DREAM CHAMBER
By DarkWave Games
Walkthrough by MaGtRo November 2013
Gameplay: This is a point and
click game.
Main menus has new game, load game, options,
credits and exit.
Options has language (English, French, German,
Spanish and Italian) and resolution selection. It also has music, effects
and voice adjustments.
The inventory bar is at top of screen.
Right side of the inventory bar are the links to
game menu (hat icon), journal (notebook icon) and wake up (pocket watch).
ESC key also accesses the main menu.
Right click examines items in inventory.
To go to sleep; click on the bed. To wake up,
click on the pocket watch right of inventory bar or the watch at center of
map.
There are 7 saved game slots. The saved game files
can be overwritten.
Distinguished male voice talks to female stranger. The Council has given authorization for the operation to start tonight.
The female stranger gives a guarantee that desired result is to be achieved. The
male voice warns - Keep an eye on Mr. Chamber.
Bedroom:
Dream state: Charlie
Chamber is in his dream state. Every night he dreams about places he's been
to recently and recalls down to the last detail - a strange form of photographic memory
Look around. See a statue-door to access Charles.
A knock is heard on the bedroom door. This wakes Charlie
up. Gregory says the car is ready.
Take the watch from the bedside table.
Car:
Talk to Gregory. It's not my fault... The truth
is, exhibitions are boring. Learn that it is because of non-alcoholic
refreshments and that the Farkan Foundation (Charlie's family's foundation)
donated a large sum for the new wing of the museum.
Learn from the journal that Charlie opened a
private investigation firm.
Museum reception:
Exhibits: Look around at
all the exhibits. Check the suit of armor. Lord Carolus I is an ancestor of
Charlie.
Prof. Archer: Talk to the
professor with the monocle. He leaves to check if everything is ready for
this evening.
Redheaded woman in white:
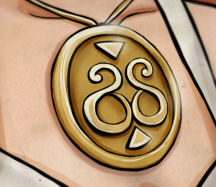
The woman in white wears a strange pendant with peculiar shape. Try to talk to her. She
asks for a drink.

Get a drink: Go to the buffet table and take a
glass.
Mix and match drinks from blue bottle (no taste), pink bottle (carbonated),
yellow bottle (sweet) and lemon. Give her the prepared drink.
She will eventually settle for a light sweet-sour
drink made from blue and yellow bottles and lemon.
Give the green drink with
lemon to the woman.
Talk to woman stranger in white.
Prof. Archer: Prof. Archer
comes in and says the museum has been robbed and the thieves have left.
Inspector Chandler Chamber:
The police inspector is Charlie's uncle.
Police station office:
Answer Uncle: Yes - Prof. Archer left the reception.
Break down Uncle's fortress wall:
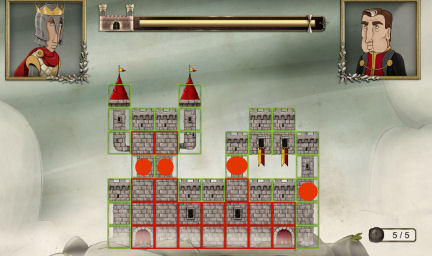
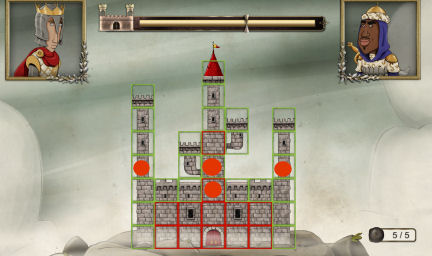
To break the opponent's defense, Charlie thinks of the sentences as an
attack. The more relevant the sentences are the closer to victory.
Green parts of the castle can be attacked but
the red blocks are outside the range.
The resistance bar is seen at top of screen.
There are 5 chances to break the wall. Select
a relevant sentence and then select the green block to be hit.
Select the 2 blocks of the skinny base at left
tower and the left block on the right tower. Fire. The higher the
number, the more force the shot is.
If there are more balls, hit the same spots
until they break.
- My curiosity is more than justified.
- That's unlikely, there was a purpose to the
question.
- No information. As you refer. Can I ask for
some opinions, at least?
- I knew you has something on your hands!
(Left tower destroyed).
- You're the one who mentioned suspects!
(Right tower destroyed).

Learn that Prof. Archer is the suspect. The
thieves had an accomplice inside the museum and the Professor was the only
one absent at the time of the theft.
Uncle leaves the office. Look around.
Check the list of suspect on the file drawer right
of the fan.
Charlie noted that the redheaded woman in white is
not there. Uncle comes back and dismisses Charlie.
Charlie's bedroom:
Charlie is frazzled after a lively evening.
Box: Check the box on the
bed.
| See a box. Move the squares on the side to the
center square and form a design. |
|
#3 - right, right.
#2 - left, left, down.
#1 - down, left, left.
#3 - up, right.
#1 - right.
#2 - up.
#4 - up, right, right.
#2 - down.
#1 - left.
#3 - left. |
 |
 |
|
The envelope states "Service Society"
and the design is the same as the woman in white medallion.
|
Guest: Gregory knocks and
says there is a guest.
It is Teleta, Charlie's girlfriend. The
Thrademakus family donated important finds to the museum. The objects tie
Teleta's family to the town. It was given by the Thrademakus' to show that
they are not as bad as their reputation.
Teleta hires Charlie to recover the stolen objects
and return them to the museum. Charlie takes the job.
A phone call
between 2 agents discuss the box on Charlie's bed. Package was delivered.
They want Charlie to reach "them". The first agent wants to clear the field.
Dream state:
Bedroom: Enter the
Charles chamber. Meet Charles, Charlie's subconscious.
Check the fireplace, portrait above it, his ego
(portrait behind Charles), newspaper and gramophone.
Talk to Charles. Charles brings the medallion and
box symbol to Charlie's attention. SS is on the medallion - Service Society.
Exit through bedroom door and be at the map: Charlie's
house at left, Chandler's office at top, Museum Hall at right and wake up at
center.
Museum Hall: Go to the
museum at right by clicking on the label at bottom of screen.
Look around. Check for any difference since the
last time.
Check the hook above the door at left. It is the
hook used to keep the skylight closed.
Exit at bottom center - red carpet.
Chandler's Office: Check the
guest list again.
Pocket watch: Wake up.
Charlie's bedroom:
Bottle: Check the
empty champagne bottle on the glass table. There is a note inside the
bottle but it is too small to read.
Napkin holder: Go to the
bar and take the metallic napkin holder from the open cabinet door. Exit the room.
Museum:
Car: Talk to Gregory
about the box. Gregory is asked to check a Society Service. Gregory asks
about this "Service Society".
Museum Hall: See that the
exhibits are covered.
Check the buffet table and take the melted ice
sculpture's trident.
Check the hook above the door. Use the trident on
the hook. The skylight opens. Climb through.
Move the crate: A heavy
box is blocking the way. Use the trident on the box. It broke.
Use the metallic napkin holder with the broken
trident to get fixed trident.
Use the fixed trident on the box. The box falls
down. Enter the store room.
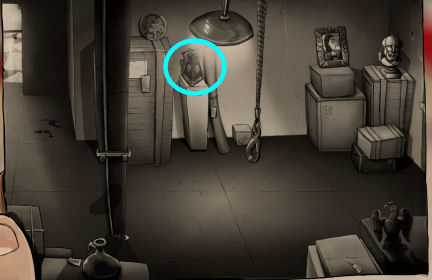
Warehouse: Check the
large crate on back wall and the hook on the ceiling.
Take the little sturdy empty box from the
floor.
Alarm-door: Check the green
door and learn that the alarm can be disengaged from inside when the bar is
raised.
Alley: Check the framed
notice about a regulation - file 257. See an apple core on the ground.
Take the suction pad-toilet plunger from
the trash bin.
Go to end of alley to check the road and then go back
inside. Enter the warehouse.
Gregory: Outside the
Chamber of Commerce, the White Widow bumps into Gregory.
Gregory finds out that the 1907 certificate of
incorporation that is necessary for the company is missing.
Professor Archer's house:
Exit the museum to be at the map. Go to Prof.
Archer's house. Talk to Professor Archer.
Break the fortress wall of Prof. Archer:
- If my memory serves me correct, you left the
party the other night. Why?
- What did you want to check? At that time...
- Let's just hope the police don't start
getting strange ideas.
- A rumor like that needs to be stopped. With
the list of the stolen objects, I'll be able to help. Rumors.
- You know you need any help you can find. I'm
offering mine.

The professor gives a picture of the museum
warehouse. It is to be given to the police.
Look around the room.

Glass case: Look at the
glass case. Charlie really wants that old lighter.
Use the suction cup - toilet plunger on the glass
case.
Take the gold lighter. Exit the house.
Distinguished male voice talks to and female stranger. They know that someone alerted Charlie about them.
Chandler's Office:
Go to Uncle's office at the police station.
Pick up the blank scrap paper on the floor.
Talk to Chandler. He's hot.
Turn on the fan by pressing the red button on the
pole.
Give him the warehouse photo. He drops the paper
he's reading.
Chandler has a bad back. Pick up the list of
stolen items with some notations. Charlie gives it to Chandler.
Exit.
Teleta's House:
Go to Teleta's house.
Teleta's personal library:
Look around.
There's a book - The Art of Escapism that is
protruding in the bookcase left of the entryway.
Learn that Teleta is into mysticism. Check the
apparatus for Lampmancy and carnivorous plant at bottom screen.
Talk to Teleta. See a voodoo doll on the desk.
Exit and go home.
Charlie's home:
Gregory: Go back home and
talk to Gregory. Learn about the missing documents of the Service Society.
Gregory recommends to contact the main Chamber of
Commerce. It might not have reached there yet.
Charlie tells Gregory to do so while he rest.
Dream state:
Go to bed to dream.
Chandler's office: Pick up the
paper from the floor.
Read the police file. The police are keeping the
receivers of stolen goods - as well as the venues of contraband products
like alcohol under surveillance.
Joseph's Club - the Proud Peacock (Charlie's
favorite hangout) is on the list. Joseph is a friend of Charlie's. Exit.
Teleta's house: Go to
Teleta's house. Read the Art of Escapism from left bookcase. It is how to
unlock padlocks, locks, traps, etc...
Museum warehouse: Go to
the Museum. Go through door to be at the warehouse.
See female footprints on the floor facing the
triangular amphora.
Alley: Exit the green
door to be at the alley.
See a T&T van. The license plate of the telephone
van is TT C2-120.
Check the rake under the van. It was used to
remove the tire tracks from the dirt road.
Charles: Go back home.
Enter Charles' yellow door.
Talk to Charles about the password to the Proud
Peacock. Charles jokes that Charlie might find the answer at the bottom of a bottle.
Hmm...
Charles recommends following the trail of the
Service Society.
Exit and wake up by using the pocket watch.
Professor Archer's house:
Talk to Prof. Archer. The amphora is Greek from
the 17th century. It was said to be cursed. Thrademakus family donated it in
1907. It was the year the professor worked at the museum.
Charlie recalls that it was the year the
Thrademakus had a commercial alliance with Charlie's father and also
the year of the big stock market crash.
Teleta's House:
Go to Teleta's house.
Bottle: Check the
Lampmancy apparatus. Place the champagne bottle on the stand.
Use the lighter from the professor on the candle. Check the words on
the wall. Pierre Perignon - it is the Proud Peacock password.
Voodoo doll: Check the
doll on the table at bottom of screen. It resembles Charlie. Click on it
several times.
Press clippings: Read the
papers at right end of the desk.
Learn that it is all about Charlie's family and
his accident when he was a boy.
Charlie learned that he stayed at the Thrademakus mansion
to convalescent
after the yacht accident that killed his parents.
Fortress battle with Teleta:
- Are you gathering information about my
childhood?
- There 's no need to.
- You should answer questions - mainly about
an amphora.
- That was the real target of thieves and
since it belonged to your family...
- I don't think so. There's something fishy
here and I want to figure it out.
Teleta gives an explanation. Kairos is an amphora
that can channel misfortune from environment and pour it out to things and
people.

Proud Peacock:
Street: Go to the Street
in the map. Check the manhole, newspaper and wheel.
Note the stylized peacock above the door. Check
the power panel left of the door.
Take the tricycle at the corner and the
blunt and rusty knife stuck on the poster.
Knock on door. After the password, Charlie is
allowed inside.
Club: Order a drink - as long as
there is no olives.
Order 2 drinks in the selection: whiskey gin and
tonic or any of your choice.
The glass breaks. The bartender glues the glass.
Take the leftover rapid action glue.
Joseph: Enter the door
behind the screen. Look around.
Check the painting, the peacock and ashtray.
Check the "Notes for the Constitution" on the
drawer left of the coat stand that has a fur stole.
Check the things on Joseph's desk.
Talk to Joseph. He still won't take off the
prohibition of olives.
Charlie asks help about his case the theft in the
museum.
Fortress battle with Joseph:
- I need something to point me in the right
direction.
- I don't need this kind of advice. I need
some information about the case.
- Did you know the police are keeping your
place under surveillance?
- Excuse me for insisting but I have a
personal interest in this case.
- I told you this is serious. I wouldn't
bother you if it wasn't.
The theft at the museum was done by a group of
professionals from out of town. The group is led by a woman with fondness
for white dress - the White Widow.
It is theft by commission. Leave the club.

T & T Company:
Look around.
Secretary: Try to talk to
the secretary. When Charlie comes near, she answers the phone.
Use the knife on the telephone cord.
Talk to the secretary now. The employee and
license plate info are confidential and kept in the archives.
Guard: Talk to the guard to get
to the elevators.
Fortress battle with guard:
Whatever answer is given; Charlie will be
defeated.
The guard recognizes Charlie after the fight.
Charlie owns the company and apologizes.
Charlie can pass.
Elevator: Charlie enters
the elevator. He cannot remember where archive is located.
He gets tired. Click on panel and he's back at the
foyer.
Sleep: Go to the couch
and rest.
Select the T&T.
Check the transparent plant. There's a framed
directory behind the plant.
Directory: Wake up.
Go to the plant and check what's hidden by the
plant. See that archive is at B1.
Go to the elevator. Press B1 button.
Archives: Check the
yellow tags. See that the second group of drawers at left are for motor
vehicles.
Look for TT C2-120. Click on the drawer at bottom
of the cabinet. The files have been moved because the drawers are broken.
Go to the front left group of drawers. Click on
the bottom drawer and Charlie finds the correct drawer.
Now to look for the files. Click anywhere and
Charlie learns that the driver of the vehicle is Mr. Hemmet Harding. Charlie
also finds the address.
Exit and leave the building.
The first and second agents say that Charlie is
getting close and thinks that the Service Society might contact the Thrademakus.
Suburbs:
Go to the suburbs. Look around and check the
outhouse-combat latrine.
Take the crate right of the outhouse and the
broken stool at right.
Enter the building: Try
to enter the building at left. Hear a barking dog.
Check the rusty fire escape ladder.
Place the crate under the ladder; then broken
stool and then tricycle.
Use the small box from the museum on the broken
leg of the stool.
Climb up.
Apartment: Charlie enters
through the window of the apartment.
Look around. Charlie hears someone coming. Charlie
hides under the bed.
Hemmet enters looking for a note. He memorizes the
note and then tears it.
Pick up scrap of paper from the floor. Look for
more papers. Charlie is not able to find the scraps of paper.
Pick up the burglary tools. Exit through the window. Go home.
Charlie's home:
Service Society: Gregory gives
the report from the Farkan Foundation about the Service Society.
It was founded in 1907 by Charlie's father.
Sleep: Go to suburbs and enter
the building.
See the scraps of papers around the room. Click on
all 9 scraps.
Wake up and go back to suburbs.

Suburbs:
Go back to Hemmet's apartment.
In inventory click the blanks crumpled paper from
station with glue from club to get adhesive scrap paper.
Pick up the scraps of papers.
- paper under the metal rods at bottom left.
- metal tub beside the table.
- pot on the table.
- right of table.
- above saw by window.
- fireplace.
- broom
- shoe left of stove.
- rug hanging on clothesline.
Click the 10 (including the first one picked up)
collected scraps on the adhesive scrap paper.
Put the pieces together to get complete note.
Click-hold-drop the pieces on to the glue.

Proud Peacock:
Street: Go to the Street
in the map. Go to Joseph at his office.
Show the complete note to Joseph. The note is
decoded as: Old Docks, St Kathrine St, 02:00 PM.
Harbor:
Hemmet: Go to the harbor.
Charlie eavesdrop between Hemmet and White Window.
The White Widow points a gun at Hemmet. She
decides to let Hemmet go and tosses the gun to the water.
Follow the White Widow:
You have to follow the White Widow without being discovered or be
too close to the White Widow.
The start is at bottom center of screen.
There are 2 bars at bottom:
Walk and Map. The map brings you out of the puzzle and can go somewhere
to rest.
Checkpoint: If you
reached the only checkpoint in the puzzle; you can go back to the harbor
and start over from that spot. The checkpoint is at top of the overhead
view - right of the inverted L shaped building with brown roof.
Walk: You can
click-hold the "walk" to move fast or do short clicks to move little bit
at a time. This depends on the situation. The short clicks are good when
between 2 circle of lights.
There are area where you can rest for a second
and no dock worker can come near - like the crates at left of center.
The White Widow is in red circle, Charlie is
in green circle and the dock workers are in large circle of yellow.
The route goes around all the area and
eventually end up at the metal building at right side of the center.
Good luck.

Warehouse: Look around
the area.
Check the lock of the wire gate. Use the burglary
tools taken from Hemmet's apartment on the gate.
Charlie says to study more on how to use them.
Exit at bottom screen.
Teleta's house:
Check the book protruding at left bookcase - The
Art of Escapism.
Warehouse: Go back to the
harbor and the warehouse.
Burglar: Use the
burglary tool on the wire gate.
There is a reset (R) button.
The aim is to hit each pin to turn the rings
on the keyhole so that the space on the rings coincides with the space
at bottom of the lock.
L-R: #3 - hit 3 times,#1 - 4
times, #4 - once and #2 - 7 times. Hey, it was easy.


Enter the open gate. Go right the side of the
building. Look around.
White Widow: Check the
window. See the White Widow holding the triangular amphora. She gives the
rest of the stolen goods to the men.
She exits with amphora and Charlie confronts her.
Fortress fight with the White Widow:
- Please explain why you were at the museum
the evening of the theft. You had no invitation.
Fire at #1.
- Try to be more clear, I'm tired of getting
partial answers.
Fire at #2.
- Who hired you, and what's so special about
that amphora?
Fire at #3.
- I know the company was started by my father,
but I don't know why. Could you help me out?
Fire at #4.
- So you're basically using an antique as
bait? That's pretty strange.
Fire at #5.

White Widow lights the fuse of a bomb. Charlie
goes left to stop the bomb. It was attached to an empty barrel. The White
Widow escaped with or without the amphora; depending on the fortress fight
result.
Charlie calls the police and the thieves were
caught and the stolen goods recovered.
The White Widow reports to the Service Society. They
have exposed the enemy. They are not to recover the other Kairos.
In another meeting the agent reports to the Director.
The news of exposure did not bother the Director. He wanted all the participants
in the game to be in position. Depending on the result of the White Widow fight;
he might have the amphora. He exchanged it at the museum prior to the theft.
This document may not be
distributed without express written permission of the author and the content may
not be altered in any way.
For Questions or Comments
on this Walkthrough,
Please write to:
MaGtRo
Copyright © 11/2013
MaGtRo
 GameBoomers
Walkthroughs and Solutions
