

Written by Angela Clayton, Maryland USA
April, 2002
With
special thanks to:
Bob
and
Bert
for their great help in creating this walkthrough...
Save
often and examine everything. Have pens (preferably pencils) and lots of
paper ready!!! Note: this guide will walk you through every aspect
of the game--not just hints. Therefore, this is a complete walkthrough.
This guide will support both PC and Mac formats.
Open
the envelope and read the will. At the bottom of the letter you'll find
the code to open the door. If the will is missing, enter this code: 0821-1996-A92C
(be sure to includes the dashes too). Click okay and open the gate. Get
the monocle and you'll fall down the stairs. The twins will take the monocle;
you'll get it back later. Examine the lobby. Go to the furnace and turn
right. Climb up the ladder on the wall, go forward and pick up the CD.
Put the CD in the empty slot above the Panty Slice poster, at the left
side of the ladder.
Turn
the wheel to release the fuel. Go to the huge red staircase. At the left
of the staircase you'll see a handle. Pull the handle down and water starts
streaming. Walk to the right 2 times. Pick up the coin beneath the staircase.
Go to the furnace. Turn the wheel and wait for the gauge to stop on 7,
then push the red button and pull the handle down and hold it for a couple
of seconds, then release. You should hear a monkey and an organ
playing. Back away from the furnace and make sure that the furnace is glowing.
Put the coin into Isadora's fortune machine and listen to what she says
(pure babble).
Climb
up the red staircase to the left of lsadora and click at the center of
the door. This is some kind of music memory puzzle. Solve the puzzle by
matching the sounds (which isn't hard, but could be time consuming). Go
through the door to the Muse Machine. Examine the machine and you'll see
that some parts are missing. Go back and click at the center of the door,
the chart of the muse machine. Write down on a piece of paper the items
that go in the Muse Machine. Go to the organ. Pull the handle in front
of the organ and a bridge appears.
Look
at the monkey. Read the music sheet and make an exact drawing of it.
It’s a good idea to save your game. Note: there are 5 buttons (organ
stops) above the keyboard, do not touch them. Play the notes from the left
to the right (with no stops) on the keyboard. The best way is to
number the keys from one to eight so that you can play them relatively
quickly without stopping since you can't play the keys and look at the
music book at the same time. Make sure you match the line to the correct
key.
Look
at the eight symbols--start numbering with the first symbol on the far
left side, then write the number on that key until you number all eight
of the symbols.Just follows the
line to each key. Later on in the game, you will be able to figure out
what symbol matches to the corresponding alphabet. This part is easy, just
follow the line to the key and number each one until you finish all eight.
Note: These are the eight keys that I had to play, but each game is different,
so you may get a different variant, but the principle is still the same.
When
done correctly, a little music is played. Go to the door with the Tiki
Gods, at the left side of the red staircase. If you played the music correct,
they laugh and let you through to the Drum room. Look for a large drum
(monkey points to a symbol, write this clue down). Go to the left to the
Acme Drum Machine. Pull the handle down and play what the Voodoo drummer
is, by pushing down one of the six red buttons.
First
practice a little before you actually start, then push the red button to
start the puzzle. Get a piece of paper, you will be listening to
6 riffs. Some of the riffs could repeated, so listen carefully. He
will play each riff and when you select the correct one, he will add another
riff, until he plays a repetitive sequence of 6. Each game is different,
but I had to play 5, 3, 5, 1, 3, 6.
When
you identify the correct sequence of 6 riffs, go towards the Voodoo
drummer and he will say something like "funky rhythm, man"…walk and you'll
get the maraca. Place the maraca into the Muse Machine. Go back to the
Drum room and left of the Acme Drum Machine on the wall you'll see a painting
with masks. You have to place the 10 masks in order so that each and every
one has something from the other ones. If you take too long to order them,
the masks start moving by themselves.
Start
with the round face with white bulging eyes, then the white eyes with fangs,
green fangs with horns, red face with horns, clown with tongue, blue face
with red tongue, red eyes with feathers, feathers with circle on head,
huge eyes and the last one you can figure out yourself, I guess. Once you
order them correctly, the masks will turn around.Make
a note of what you see (4 masks and background color under each mask)--it's
the "mask sequence." Exit the door by the Voodoo drummer. Walk to the Clown
Music machine. Click on it until you see the records with the hand. Enter
the "mask sequence" as you saw it when the masks turned around. The hand
gets a broken record and the needle goes through the record. Look down
and pull down the grill. Pick up the gear.
Go
to the right. Look at the painting and you'll see a part of a guitar. Make
a note of it (Tapestry room clue). Click on the brown door. Salty
goes inside for a fight but loses his energy. Walk to the other end of
the corridor and you'll see a flashing painting. Remember the sequence
of the flashing lights (yellow=lx, blue=2x, red=4x). Head back to Isadora.
At the right side of her steps you'll see a music poster Sounds of War
CD.
Open
it and write down the number of the song with an (*) asterisk by "Dogfight."
Go to the red staircase and look at the left underneath Thurston's painting
= 2nd clue of the guitar (Tapestry Room). Write this down. Go to
the right in front of the moving stairs. Notice you can't go upstairs-not
yet anyway. Near the railing is a ladder, climb down. Go to the left. Click
on the heart of the clown pole. Move down the lowest gear twice. Move down
the left gear twice. Now place your gear from the Clown Music machine between
the left and the right gear which is in the center.
Since
the gears have been reversed, you can go upstairs now. Go to the record
player and place the switch on the number of song "Dogfight" from the
Sound of War CD, you wrote this number down earlier. Push the button. If
Salty doesn't go nuts, you have chosen the wrong song. Go to the "microwave".
Note this is the 3rd clue = for the guitar (Tapestry room). Make a sketch
of it.
Walk
further and try to open the garage door on the left side. You will be able
to open it later. Further down on the left, you'll see a checkerboard
with moving discs. Flip the board over and write exactly each letter, color
and symbols of what you're seeing (very important clue for solving the
second organ sequence). You really have to write down everything in detail
in this game, especially the colors. Look through the telescope and study
the room; you have to enter it later. Go to the elevator and push the piece
on the top control panel back in its slot. Elevator control flashes
red and you hear pinging sound like a pinball game.
Go
to the left and move the lever to the "1" position. You can now exit to
access the 1st floor (weird, forward, turn right, forward, up the ladder,
turn left twice and then down the stairs). Now go back to the Clown
Music machine and go to the right. Enter the brown door. You are
now entering the Tapestry room. Notice there are several tapestries to
explore (facing the throne)-2 on the right and 3 on the left. As
soon as you enter, go into the first one on the right, turn the dials behind
the tapestry in such a way that all 3 eyes are focused on the throne. If
you did this correctly, all 3 eyes on the screen blink. Sit down on the
throne. Push the red button and remember VERY GOOD what you're seeing.
You'll see a symbol and a letter beneath it. You will need this soon, so
write it down. Walk back towards the door and click on the red lion tapestry
on your right side.
Enter
and you'll see a "Wheel of Fortune" (W.O.F). Extra hints!! When you sat
on the throne and you pushed the red button, you saw a little bit of the
W.O.F. Remember this. You saw two things: (1) a sign, the first letter
and (2) the letter on which it stays. Now turn the wheel until the
"new" letter is beneath the symbol which you saw from the throne. Make
a perfect drawing of this including all the symbols and letters (I placed
the letters on top and the symbols at the bottom because you have to change
the symbols into letters).
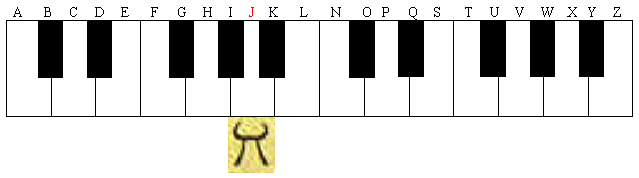
Write
all the symbols and letters on a blank keyboard as in the example below.
The example shows how the keyboard was started with the throne clue. As
you can see this alphabet is missing 2 letters. Just act if they don't
exist, for the purposes of this game you will have 24 letters Note: (this
is how your keyboard should be setup since "M" and "R" are missing). You
have to count the 24 keys as follow: 1 white, 1 black, 1 white, 1 black,
2 white, 1 black, so count every key from top to bottom and so on.
Confused?? Let's review… While looking at the W.O.F., look at the keyboard
that you used to play the 8 symbols.
You
numbered each symbol. Now look at the symbol and letter that you
wrote down earlier while on the throne, these are important clues.
Find that symbol amongst the 8 symbols on the organ sheet music.
Label that key with the letter from the throne. Notice that you changed
the Wheel of Fortune!!! This happens because you had to spin the
wheel. In my example, I just filled in the first key to illustrate
placement of the clue from the throne. The other 23 symbols need
to be written on the bottom as well. Once this is done you are ready
to work on filling in the decoder (table from the tool shed).
| J | S | T | U | W | X | Z | T |
 |
 |
 |
 |
 |
 |
 |
|
The
revised keyboard was derived from taking the throne clue and matching it
with the symbol that you just played the first organ sequence. Once
you align the information given on the throne, you just fill in the rest
of the alphabet by matching the symbol to each letter, write exactly what
you have seen on the W.O.F. This example happens to be A (left margin)
through Z (right margin), however, this is not the case in all games.
Randomly the J has been assigned to the symbol above. It all depends
on the clue that is given by the throne and where the symbol is placed
on the organ sheet music. Symbols and letters can change with each
game, so keep this in mind. Start at the center, then go to the end of
your keyboard, and go on with the beginning of your keyboard. The
letters wrap around the keyboard.
When
you finish drawing the keyboard, look down and get the mouse. Feed it to
the cat on the tapestry. Don't go in yet. Enter the tapestry with the horse.
Read the book on the table. Make a note of "How to Tune a Guitar" and save
it for later, the letters are important. In the first drawer you find a
guitar string. Leave it alone (I didn't need it, it’s a phony clue).
The guitar string that you need is located elsewhere in the Chasm. In the
second drawer, you'll find an important clue, make a complete note of this
one (you will need it later to play on the organ). In the third drawer
you'll find an alphabet. Now go to the Tapestry with the cat and enter
the room. You'll go through the door. Go to the right, 1x forward, left,
2x forward, left, 1x forward. You'll see a skull. Turn left, 1x forward,
left, lx forward to the bar.
Open
the door at the right side and take the bottle. Turn 2x left, 1 x forward,
turn right, 1x toward, turn left to the skull. With the skull behind you:
1x forward, left, 1x forward, left, 1x forward, turn right to the skeleton.
Give the bottle to the skeleton and you'll get a bone. Turn right, lx forward,
turn right, 1x forward, turn right, lx forward, turn left, go through the
door. You're back in the Tapestry room. Now go to the 2nd floor. Head for
the garage door. Enter by pulling up the middle handle. Notice the dog
behind the garage door. Give the bone to the dog. Talk to Charlie, the
robot and join the race.
Choose
the white car (it's the slowest one) and push the green start button. Now
click with your mouse cursor on the car and keep it pressed. You have to
win the race (maybe you have to try several times, it's fairly easy). After
you win the race, you may take something from the tool shed. First look
inside the car on the floor. Make a note of everything on the sheet. Now
go to the tool shed. Move the handle to the right and on the shelves you
find a toothed wheel, a sparkplug and another important hint (the decoder).
Make a note of everything. Don't forget any arrow, block or what
ever, note everything as usual. The notation sheet must be accurate
in order to decode clues needed to finish the game. Watch closely if you
have to add or to subtract to get to the second letter! If this is wrong,
nothing happens! Pay close attention to detail such as the direction
of the arrows and the number.
Since
you can only carry one item at a time, first take the sparkplug to the
Muse Machine. Go back to the tool shed, take the toothed wheel and go down
the pole into the Chasm. Now you have to go back to the skull. Face the
skeleton, go to the right, lx forward, turn right, 3x forward, turn right,
1x towards the door. In front of the door go left, lx forward, turn left,
2x forward, turn left, 1x forward. If you followed the correct route, you're
standing in front of the skull now. Save your game now. Look
down and click on the little skull. Place the toothed wheel in the empty
slot. Your goal is to align all pink dots so that all of them are showing
on the top wheel.
Before
you start, count the number of holes on each wheel. The secret is
to start with the wheel that has the lowest numbers of holes, include the
pink dots in your count. Every game differs, but with my game the
correct order was: 1, 3, 4, 2 and I counted 12 pink dots. If done correctly,
you'll hear a noise and the mouth of the skull opens. Enter skull. Now
you are in the Guitar room. Go to the guitar. She tells you that
she needs a guitar string. Go up the stairs to the skull and enter the
Chasm again. Head for the bar. Turn right, 1x forward, turn left,
1x forward to the bar.
Take
the guitar string out of the left or center door. Go to the left 2x, lx
forward, turn right, enter the skull via the opened mouth. You are back
in the Guitar room. Give the string to the guitar and now you have to tune
her. She bends down her head, so you have to read your notes "upside down."
For example, I had to play ADBEEG. Remember her head is down so you start
with the letter G and the last letter is A.You
may get another set of letters, but the idea is the same.Refer
to your notes from the "How to Tune a Guitar" book. If you do the tuning
incorrectly, she gets angry and you'll have to start over. If you do the
tuning correctly, the red light comes on. After that you have to do the
rest of letters and the red light needs to stay on. After you tuned the
guitar, you'll get the tuning fork.
Go
through the white door and you'll enter the hall with the Clown Music machine.
Take the tuning fork to the Muse Machine. Head back towards the Clown Music
machine. Turn left and go through the white door. Play the game with the
ball and the disks. You have to turn the disks until a little ball comes
out at the bottom. If something goes wrong, pull one of the peppers
to start over again. Click the ball and you'll get another very important
clue. Make an exact notation of it, colors, arrows etc. Notice after
playing with the pinball, you can easily calculate the missing letter!
Exit
the room via the white door. Enter the brown door, now you are in the Tapestry
room. Go and stand in front of the last tapestry near the throne. Choose
the three guitar parts: the one from Thurston's painting, the microwave
and behind the cat painting. Build the correct pieces of the guitar
and the tapestry will go up. Click on the small button and watch the movie.
Turn
right and open the little door. It's the vacuum tube. Alas it's taken by
the twins. But don’t worry you can get it back.
Enter
the Guitar room and go up the stairs via the skull. Go to the bar, turn
right, go 1x forward, turn left, 1x forward, turn left 2x, forward and
you're behind the bar. Turn left twice, open the Twins Time Bomb chest.
Take the vacuum tube. Go back 1x, 2x forward, turn right, 1x forward, turn
right, 1x forward to the skull. Go inside the skull back to the Guitar
room, then go to the Muse Machine. Place the vacuum tube in the Muse Machine.
Go to the organ. Save your game so you can go back if you make mistakes
or the steam goes out of the organ.
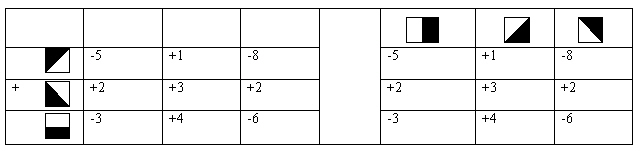
Time
for a real puzzle: Have your revised keyboard ready, letters on top of
it and the corresponding symbol at the bottom. Place all your notes around
you. Also the notes of the tool shed after the car races. Change the symbols
into letters (see W.O.F). Take the left part and try to fill these in with
your notes. Notice the blocks with the shadow. Below see an example of
the completed chart. All the columns on the right and left should
add up when you finish. The right and left sides of the chart mirror
one another. In other words, the same identical numbers. The only
difference is that you read the numbers on the left side horizontally and
the left side is read vertically.
After
you placed the last symbol of the music sheet, you are ready to work with
the decoder from the tool shed. Once you complete the decoder, you
will be able to play the second organ sequence. While playing the
organ, pay attention to the knob that has to be pulled out; is indicated
by the staff with the 5 circles (use the dark one). Verify if your calculation
is corresponding with the note of the tool shed. In the left part after
the block with the shadow, you have to indicate from the left to the right
plus or minus arrows in the 3 empty spaces, arrows pointing to the right
(+), pointing to the left (-). The upper row was filled in for me -5, +1,
-8. This corresponded with the note from the Tapestry room.
The
second row from the left to the right corresponded with the note of the
box with the moving discs (symbols changed into letters, then compared
with W.O.F. and counting the spaces between the letters!) became +2, +3,
+2. The third row on the left is calculated by adding up the first two
rows and you use the hint from of the note inside the car. In my game,
it was the letter "U." Below is how my decoder looked when it was
completed. Your numbers probably will be different, but your chart
should look similar to this example.
Decoder (Tool Shed):
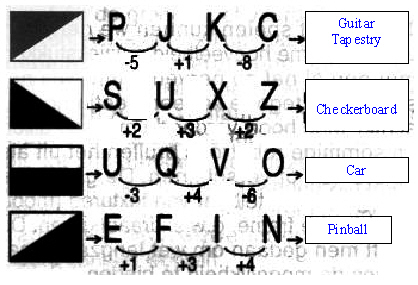
I
made 4 keyboards to prepare for playing the second organ sequence. Don’t
forget to set the organ stop first, then play the keys in order.
This is what I played, your sequence will be different, but the principle
is the same. You are numbering the keys after you decipher the 4 letters
to get the coins from Isadora. Below see how I prepared the four
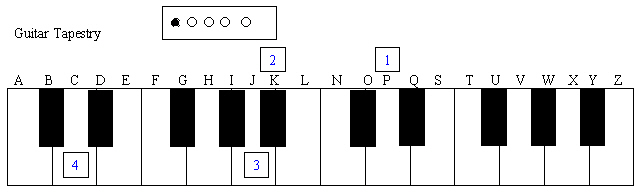
keyboards, but I only numbered the Guitar Tapestry as an illustration.
Look at the example below as a suggestion to setup each of the 4 organ
sequences. Just remember write down your keyboard, organ stop and which
notation clue you are playing. Your organ stops probably will be the same
since they don’t seem to change from game to game.
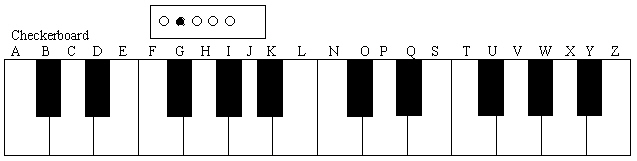
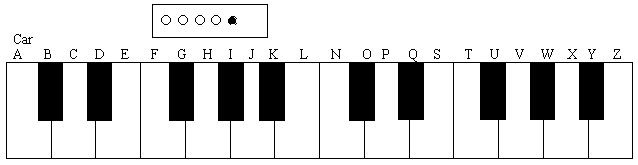
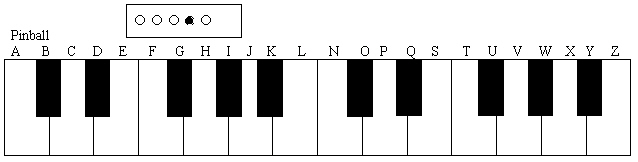
Now
play the 4 musical sequences on the organ: the guitar tapestry, the car,
the pinball game, and the checkerboard. If you played all the notes correctly,
you'll get a coin for each of the four sequences. Leave them alone until
you got all 4 coins, black, gold, red and green. They are on the hands
of the monkey above the organ. Give the coins to Isadora. For one of the
coins you'll get a key. The green key yields the key. She also
tells you some nonsense as usual.
Go
up the red staircase and go to the right up the stairs towards the door.
Use the key and enter the Attic.
At
the left, you'll see a poster of a chemist which indicates that you have
to mix colors. Go to the left and walk towards the board with blocks on
the ground. You have to go to the opposite side, but you'll be thwarted
by a creepy figure and have to start over again. You can zigzag across
the board, but I waited until the middle row was empty and then I quickly
clicked my mouse cursor which got me on the opposite side in no time. The
smoking bear allows you to get something out of his toy chest. Take the
elevator card.
Enter
the elevator and place the card in the slot. You should hear pinball sounds
and you can now access the basement. Put the handle on B (the basement).
Save your game!!! Now you have to shoot a lot of rats. You'll get a gun
and 5 bullets. Every time you hit a rat with a target, a light along the
wall goes on. However, from the opposite corridor huge rats come
towards you which you have to shoot each one with 5 bullets. Shoot the
small rats that hide in the holes with one bullet. You can reload
your gun by clicking on it. Its easier if you hold the Ctrl key down
while shooting since this turns the gun into a machine gun.
Do
this as often as possible because you have too little time to shoot, you
have to start all over again if you run out of bullets. Just take your
time and concentrate on the huge rats. When all lights are lit you can
enter the corridor and there you find a cabinet. Open it, unfold the paper
you you'll find a monocle. Go back to the elevator, enter it and go to
the Muse Machine. Put the monocle into the machine and listen.
The
Muse Machine explodes. Turn around and the bridge is also collapsed. Walk
forward and you'll join the Twins on the way down. Go to the left and click
on the front of the boat and you'll end up in a room in the jungle. Examine
everything, especially the palette. It shows that the color you are missing
is green and is connected between yellow and blue. (yellow=1, blue=2,
so green=3 and red=4).
Now
go to the jungle organ. Save your game!!! You have three attempts to play
each sequence correctly, after the third attempt the game stops and you'll
be back in Windows or Mac desktop. Take your notes and your keyboard drawing.
This is the final organ sequence of the game. There are 5 repetitive
sequences that you have to play correctly without errors. Have your decoder
and revised keyboard ready.Complete
the clues on each totem. Now you have to calculate again! The
colors on the totems are important because they indicate how many times
you will play the clue on each totem. You have to play the keys without
any pauses, otherwise it's wrong and you have to start all over. When the
Twins are talking, you cannot play any keys. As soon as the critter
stops talking, quickly start playing the sequence.The
second sequence I had to play 9 keys, 3rd-12 keys and 4th--15 keys.There
is not enough time to try to calculate what to play and then play it. You
play over and over until you get it right.Once
you get the correct sequence to play, then you have to get the timing right.Before
I played each sequence, I had the revised keyboard in one hand so I could
keep myself orientated on the position of the keys and I used my other
hand to work the mouse. I memorized what I had to play so that I could
quickly play the sequence.If the
Twins start talking, just remember where you stopped and continue to play
as soon as the totems turn around again.Have
your mouse positioned on the next key so that you can play it when the
talking stops. The Twins talking is just a distraction.Stay
focused.By the time you finish sequences
2 through 4, you can take a sigh of relief.The
last sequence is a relatively easy.You
just point to where it would be if that key would have been on the keyboard
(the letter M or R)--this is easy.If,
it's M, you would hit between the between L and N keys. If you make a mistake,
start the game over or better yet back away from the keyboard and start
again with the first sequence (this resets the puzzle).It's
better than listening to Thurston Last over and over.This
is not a problem since you writing down what to play in each sequence.You
know if the sequence is correct because you advance to the next sequence.Let's
begin...
Put
the hand on the key and keep your mouse button pressed until you hear the
sound!! First try a sequence (you must begin with the first one every time).
You'll see 3 totems. They show you symbols and letters. You have to change
the symbols into letters and on your revised keyboard you can see what
you have to play.The sequences start
off easy and become more difficult.Unless
you are a genius, write each of the clues on each totem and then figure
out the letters to play.Sequences
2 through 4 involve colored boxes.Just
match the box from the decoder, this will indicate the three numbers that
you will use to calculate the next 3 letters of the clue on a particular
totem.Then you play that clue the
number of times indicated by the color on the block.
My
first 4 symbols were yellow, so I had to play them 1 time from the left
to the right. The letters were J, S, S, N. The second series of totems
showed a symbol, a yellow letter, a yellow/black block and a red letter,
namely P, then, Z, yellow/black block, and S. After the calculation it
seemed that I had to play: P, Z, U, W, T, S, S, S, S. (The block was equal
to the one on the left guard so I had to use those letters. The S was red,
so play 4x).
The
third series was indicated with a symbol and a yellow/black block, the
next totem was empty and on the third one was a blue G and a blue/black
block. The first block was equal to the one of the first guard and was
also on the left part of my note of the tool shed, with the sum next to
it. My first letter was U, then via calculation: U, O, P, G, G, H,
K, P, G, H, K, P (the last 4 notes, two times because they were colored
blue). There also was a blue circle around the letters, which was on the
note of the pinball game.
The
fourth series showed a symbol with a blue/black block, a green B, after
that a yellow B with yellow/black block. The shading of the blocks matched
the second row of the decoder. The symbol was the letter B from the revised
keyboard. So I had to calculate from the symbol using +2 +3 +2. The color
was blue = 2x. The green B = 3x. The third totem was equal to the first
one, but yellow so: B, D, G, I, B, D, G, I, B, B, B, B, D, G, I. After
having played the music the twins are stuck in green rings. The fifth
and final sequence, now you are asked for a letter which didn't show up
in the alphabet. With my game it was the letter M and I had to point exactly
between the L and the N on the line, so that two keys are going down at
the same time. This was the last act. Now swing along with Salty
and Isadora and others. Enjoy the finale!!!
copyright © 2002 Angela Clayton