Agatha Christie: The ABC
Murders
By Artefacts Studio
Walkthrough by MaGtRo
2016
Gameplay:
This is a point and click third person game.
At start of game, make a profile.
It is one out of 3 profiles available.
The main menu has play, bonuses,
options, profiles and quit.
Bonuses have timeline,
reconstructions and trophies.
Timeline shows the sequence of
events of the case.
Reconstructions are replay of
the event based on accumulated evidence. Select the actions that
happened during the crime.
There are 50 trophies that can
be obtained during gameplay. They are acquired by acting like Poirot.
Help can be obtained when the pause
icon at top left is clicked on.
Saves are automatically done when
the game is exited. There are no manual saves.
Options have the language, volume,
video and controls. Credits are on all these frames too.
Language has voiced, language and subtitles
choice. Voice has English or French selection. Language has German, English,
Spanish, Italian or French selection. Subtitles can be ticked on or off.
Volume has controls for music,
voice, and sound.
Video options have quality
(high or low) and screen resolution.
Controls choices are for
controller or mouse.
During gameplay, open the
arrow at bottom right to see:
- the objectives-exclamation
point.
- notebook has
information about the characters seen during investigation.
- little gray cells are
questions raised during investigations and answered by selecting deductions -
evidence.
Inventory or items collected
are seen left of the arrow at bottom right of screen.
Hercule Poirot and Captain Arthur
Hastings are reading newspaper at Whitehaven Manor. The mail arrives. Poirot reads a letter
that challenges him to solve the ABC case; starting with A - Andover on
the 21st of the month. Poirot wants Inspector Japp to be informed.
See the challenger circles the A of
the ABC guide book.
Poirot and Hastings ride the train
to Andover.
Andover on 22nd of the month.
Go and meet Japp:
Chief Inspector Japp:
Go to Inspector Japp. Alice Ascher owner of the tobacco shop was killed
yesterday.
Observations:
Click the cursor on character.
Select the eyeglass icon at left to inspect the character. The the talk
balloon is at right.
Click on Inspector for a closeup. Then click on areas that answers Poirot's
observation.
Is Japp too relaxed? Click on
hat, mouth for smile and body for relaxed attitude.
Say that it is too obvious.
Inspect the crime scene:
Enter the tobacco shop. Look
around.
Newspaper and shelves at right:
Go to shelves by display window at right. Click on shelves, newspaper and floor.
Counter: Turn
items by click-hold-move of mouse.
Click on paper sack with
strawberries, turned ABC train schedule (it has no prints) and counter full
of
prints.
Murder scene:
Look at the murder scene.
Click on matches; blood under head, floor with no
other marks, Alice's head and body hidden from behind the counter.
Tobacco shelf:
Look at tobacco shelf. The tobacco shelf is messy.
Hastings mentions that tobacco
shops do not sell ABC guides. He leaves to questions the neighbors.
Cash register:
Look close at the cash register.
Rotate the cash register by click-hold-turn.
Double click on active spots
to look closer or to do an action.
Turn to left side of cash
register to see the lock-unlock lever. A -5- clue is written under
it.
Flip (click-hold) the arrow to
the unlock icon.
Turn to the right side of the
register. See another clue: 8 - -.
Look close at front of
register. Double click the open button to open the cash register.
The register is full of money.
See the third clue: - - 2. There is an orange tab under that clue.
Look close at the keys of the
register. Press-double click the clues obtained: 852.
Take the key under the
last clue in the till.
Inspect Mrs. Ascher's bedroom:
Check the door left of the
shelves. Use (click-hold-drop) the key from till on the door.
Bed: Examine the
bed.
Click on blood on pillow, bloody handkerchief and turned picture frame.
The picture of Franz and Alice Ascher's honeymoon.
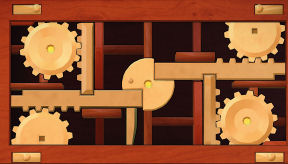
Chest: Look
close at chest under portrait. See a chest that has knob that is blocked.
There are 4 birds pictured in each corner.
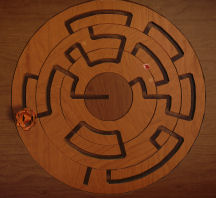
The top has an intricate maze for
a decorative flower at end of the lines.
Turn the second and third
circle to make an unblocked path to the center.
Click-hold-move the flower to
center.
Birds:
Look close at the birds on the top lid and see that they are clamped down.
Look close at the birds at
door in front of chest.
Click-hold turn the birds
until a click (not gears) is heard. The knob is unblocked.
Open the cabinet. Read the
rejection letter from the Royal Bank denying Alice's request for a loan to
buy the lease of her shop.
Examine the cough syrup with
laudanum.
Kitchenette: Go
to the left and look close at the kitchenette. Click on old stove, modest
crockery and simple tap.
Mirror: Click on
mirror to get Poirot to preen. If you see any mirror during gameplay - click
on it to get Poirot to smooth his mustache.
Puzzle box on table:
Look close at the puzzle box on the table.
Examine the puzzle box. The
aim is to slide wood slats to expose and press buttons.
Underside:
Turn the box and look close at the underside.
Slide the wood slat at right
to top part. Then slide bottom slat to right; slide left slat down and
top slat to left. Press the exposed button.
Long side:
Look close at long side with indented square.
Slide the bottom slat to the
left. Press button.
Short side:
Turn to short side at right. Look close.
Slide the middle slat to the
right. Press button.
Long side again:
Turn left to the same long side again. Look close.
Move the top slat to the left.
Press button. The box is opened. That should do it.
Move the top cover to the
left.
Examine the necklace with
bright
blue stones and the picture of a young lady. Turn the picture to see Mary
Drower, Alice's niece.
Poirot asks Hastings to find Mary
Drower.
Little
grey cells:
Is the theft the motive for the
crime? Check each statements said by the character at bottom.
Click-hold-drop the appropriate evidence-character on the circle on top.
No objects of value for
sale in this shop. The till is untouched and is full of money.
Answer: Theft is not the motive.
Was Mrs. Ascher killed on site?
Pool of blood near her head. No other marks on the floor.
Answer: She was killed on site.
How do we explain the presence of
an ABC guide on the counter? There are no fingerprints on the guide. Letter signed ABC announcing the Andover murder.
No railway guide for
sale in the tobacco shop.
Answer: It was the left by the murderer as
a signature.
Inspect the tobacco shop's
surroundings:
Go outside the store to look
around.
Nancy Bodley, Vegetable and fruit
seller: Go to Nancy Bodley selling vegetable.
Observations:
Examine the seller. Click on cigarette on hand, ashtray on stall and box
of matches.
Interrogate Nancy in a
respectful way while she is rude.
Question Mary Drower:
Japp says that the victim's niece
is at the back of shop.
Mary Drower:
Enter the shop, note that the body was removed. Enter Alice's
bedroom.
Observations:
Select eyes, handkerchief and black dress.
Talk to Alice's niece. Be nice
to her. (If you are not nice, she will cry). Ask questions that are not
threatening.
Learn that Alice is not afraid
of her husband and she gives him money - so money is not a motive.
Find Franz Ascher & Look at what Franz
dropped:
Go to store area. See Franz Ascher
brought in. He is drunk and became unconscious.
Corner of store:
Look close at the mess made by Franz when he stumbled in.
Select a box of new stockings.
Check the ledger. See that Nancy Bodley owned money and that Alice gave
money to Franz.
Find a way to sober up Franz:
Go to Nancy Bodley next door.
Look at the bottle on the ground
right of the stall. It is a bottle of vinegar.
Interrogate Nancy Bodley again:
Talk to Bodley. This time be accusing and threatening.
She brought strawberries to the
tobacco shop at 6 PM.
Take the bottle of vinegar.
It is what Alice use to wake her husband.
Grey cells:
Can we establish the time range
during which Mrs. Ascher was killed? The body was found at about 11 pm.
Mrs. Ascher was seen alive at 5:30 pm.
Alice Ascher was killed between 5:30
and 11 in the evening.
Can we reduce this time range and
why? The fruit seller did not see
anybody in the shop at 6 pm. Because of the counter, the body is not visible
from the tobacco shop's door.
Alice was killed between 5:30 and
6 pm.
Question Franz Ascher:
Go back to the tobacco shop. Use
the bottle of vinegar on Franz.
Franz Ascher:
Poirot updates Japp.
Observations:
Select black eye, split lip and ripped sleeve.
Interrogate Franz about his
alibi. Make fun about the fight. Rodrick Tanner is his alibi.
Grey cells:
What was Mrs. Ascher doing when
she was killed? A cigarette packet near the
victim's hand. Packets in a muddle on the shelf. She has one wound at the
back of her head.
Answer: She was taking a pack of cigarettes
from the shelf.
Reconstruction of events:
Select the crime's course of
events by selecting the actions that the killer may have executed.
Select: Advance,
ask for and turn around (guide).
Whitehaven Manor:
At Poirot's
apartment, mail arrives
again.
Read the newspaper on the table.
See that the murder is reported.
Turn on the fan to get some cool
air.
Go to bookcase left of dining
table. Read the ABC guide. Click on Andover.
Look at the mirror to get Poirot
arrange his mustache.
Read the letter:
Take,
turn the letter and read the next mail sent
by the murderer. The next crime will be in Bexhill-on-Sea on the 25th.
Compare the new letter with the first
one.
Click on the desk to have a closer look on the 2 letters.
Click a defect on
one letter, pull back and then click on the similar defect on the other letter. The
defects will be encircled.
-
double click the letter I on both letters.
- double click the A
on both letters.
- double click on hazy w that is not printed properly.
Both letters were written on the same typewriter.
Grey cells:
What is special about the Andover
murder? Andover ABC guide. The first
victim was called Ascher.
Answer: Andover and Alice Ascher starts
with the letter A.
What can we guess about the next
murder? Letter announcing the Bexhill
crime.
Answer: The next victim's name will start with B.
Leave Whitehaven:
Exit home to go to Inspector Japp.
Enter the taxi waiting for Poirot and Hastings.
Go to Scotland Yard:
Enter through
the gates to be in Japp's office.
Japp's investing
on his career: Look close at the medals, etc on the
wall
by the door.
Click on medal
board, Certificate of Merit and shooting trophy on table.
Check the map
behind Japp: Click on the red pins to see London and
Andover.
Check Japp's
desk or his person: Click on piles of files,
telephone off the hook and cup of cold tea.
Poirot tells
Japp the bad news. The next victim's name will start with B. Poirot
explains his deduction.
Japp's call: Japp calls about the murder of a young lady on the beach.
Bexhill
on the 26th:
Bexhill Observations:
Look at the police behind the barrier at right of street.
Click on Victorian house behind the police, modern
bungalow on the beach and seafront (edge of beach).
Talk to Japp: Go down to the beach and talk to Japp. The young
lady was killed around midnight last night.
Examine the crime scene:
Look at the body behind the cloth barrier.
Click on face, neck, open empty hand, small key
tied to wrist, ABC guide open to Bexhill, braided silk belt and feet.
Grey cells:
How was the victim killed?
She did not struggle. There was a braided silk belt. The victim has
marks on her neck.
Answer: The victim was strangled by surprise with her own
belt.
What are the common points between the Andover
murder and the one in Bexhill? The ABC guide
is open to Bexhill. Andover ABC guide.
Answer: The killer signs his crimes with an ABC guide.
Are the crimes on Andover and Bexhill the work
of the same murderer? The press does not know
that the ABC guide was found in Andover.
Answer: The 2 murders are premeditated.
Identify the victim:
Find the victim's belongings:
Look close at the key taken from the murder
victim. It has a #6 tag.
Check the modern bungalows on the beach. Note the
sequence of the numbers of the bungalows: 9, 8, 7, 9, 5. They are all
locked.
Look close at bungalow #9 between 7 and 5. Note that
there is a padlock that needs a code.
Examine or look close at the 9 on the door.
Click-hold-turn it right side up - 6. See numbers etched behind it - 715.
Look close at the padlock and enter the exposed
code - 715. Use the key taken from the victim on the keyhole. Flip up and slide the bar.
Search her belongings: Look at
the picture on the wall of Betty's first day at work at the Ginger Cat
Restaurant. The victim's name is Betty Barnard.
Examine her bag to get watch, lipstick and
photo of the victim with a man. Check her shoes.
Go to Ginger Cat:
Photo location: Climb the
steps.
Examine the round structure with a cupola at the corner. Check the
cupola on top of building and newspaper kiosk by the policemen. Click on the base of the beach wall to
show the seaside.
Go left and check the store at the corner.
Inspect Betty's workplace:
Ginger Cat Restaurant:
Enter the restaurant. Look around.
Examine the well laid table and jukebox. Be sure
to check the mirror to get more ego points.
Miss Merion, restaurant owner:
Look close at woman by the cash register.
Observations: Select
the woman's red hair, clothes showing strict appearance and the cash
register.
Poirot orders some snack.
Check Betty's schedule:
Look close at the papers on the counter.
Look close at the schedule book at right.
Click on Betty's name and her column on the 24th of July. She worked
from 11
am to 7:30 pm.
Then click on Millie's name at first column to
see that Betty was alone at 5 pm to 7:30 pm.
See who the customers are during the time Betty
is alone: Take the order bills on the basket at left and it
will be spread out.
Study the bills. Click on the 2 bills that Betty
served during the time she's alone.
Double click on bottom right (6:30 pm)
and bottom left (7:20 pm) bills. They are from a family and a single man who ordered
Whitehorse whiskey.
Miss Merion comes out and reprimands Poirot.
Interrogate the owner based on her business and not know personal life of
her personnel.
Go to Betty's house:
Exit and follow Hastings to Betty's house.
Megan Barnard: Betty's sister
lets them inside the house. She just arrived this morning.
Home: Look around and
click on piano.
Are the Barnards music lovers?
Check the piano, violin on table and worn couch.
Question Megan Barnard:
Observations: Examine
Megan.
What is she
feeling? Select: eyes, photo frame she's holding and tense
hands.
Talk to Megan. Concentrate of Betty's fiancé -
Donald Fraser. Insist on the truth.
Megan has to answer the phone and gives permission
to check Betty's bedroom.
Hastings leaves to find Donald Fraser.
Check the mirror above the fireplace.
Examine Betty's bedroom:
Climb the stairs right of exit door. Check the
mirror on the dresser.
Look around in Betty's bedroom.
Check the bed with clothes, box of stockings and
invitations. Click on menu, dance invitation and cinema ticket.
Betty as a music lover:
Check
the small table at right. Click on metronome, microphone and music
stand.
Go left and check the side table. Click on medicine and box. Get a small key.
Check the record sleeve taped on the wall between
the windows. Betty recorded a demo.
Examine the clock on the drawer:
Turn the clock to check each side.
Open side panel: Check the
right side to see that it is blocked by a small piece of wood.
Examine the spindle at top right and the leg
at bottom right. They are both movable.
Loosen the top spindle by turning it to
the right. Loosen the bottom right leg by turning it to the left.
Look at right side again. Double click to open
the panel. Take the winding key.

Open the top panel: Look
close at the small panel at top of the clock. Slide the panel down to
reveal gears.
The top left and bottom right gears are
covered by wooden panels.
Correctly position the 4 corner knobs on
sliders to remove those 2
wooden panels:
- top left and top right knobs should be
inwards facing each other (move left knob to right position and right
knob to left position).
- slide bottom right and bottom left to middle positions.
The panels are removed.
Use the winding key taken from clocks side
panel on top left, bottom right and then middle gears.
Use the winding key on the top keyhole above
the clock face. The left side panel opens.
Letters: Read the 2 letters
hidden inside the left compartment. They are notes from D and Adrian.
Listen to Betty's record:
Look for Betty's record:
Exit the bedroom. Downstairs, look close at the gramophone and the stand its
on.
Look close at the cabinet of the stand. Use the
key taken from the box left of the bed on the keyhole.
Take Betty's record with a label of 78T. Study the solfege - graph
of assigned notes.
Side panel of cabinet: Turn the
cabinet to look close at right side panel.
Double click the metal knob to open the drawer.
Turn the cabinet to look inside. Take the crank-handle.
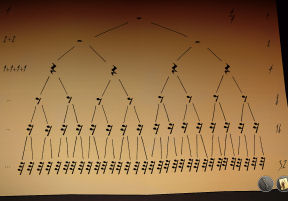
Get the code: Double click
the drawer again to open the flap inside. See a code with icons similar
to the
graph seen with the record.
Study the paper graph. Note that the starting
number at top is 4 (note icon) which splits to 2 of the next icon; which
in turns splits to 1.
So 4 becomes 2 becomes 1 becomes .5 becomes
.25. Note the icons that labels those numbers.
Looking at the code with icon at drawer; it
shows that ? + ? + ? = 1. Try .25 + .25 + .5 = 1 or
any combination that produces 1.
Click-hold-move to select the icons. Hear a click.
Identify the record to be played: See a slot at
bottom right of right side panel opens up. It has 2 letters and a number. Remember the label of
the record - 78T
Enter 78T on the
panel. This opens the small panel in front of the turntable.
Play the record:
Do this part in sequence. (I got a glitch mixing the steps up.)
There is a knob in the just opened small
panel. Flip up the knob
under the turntable. That raises the needle.
Place the record
on the turntable.
Flip down the knob on small panel to lower the
needle.
Insert the crank
on hole at right side of the turntable. Turn the crank.
Press the T
shape knob beside the turntable down.
Betty was
stopped from recording by Donald. Betty was advised by the doctor not to
strain her voice.
Continue questioning Megan:
Examine Megan again. Observation: Select
- eyes with
tears, Betty and Donald picture and no wedding ring.
Talk to Megan again. Ask if Donald was in love
with Betty. Ask for cooperation. Donald can be violent.
Hastings says that Fraser is at the restaurant.
Grey cells:
What had Betty planned to do with her evening?
Betty had probably planned to meet someone that
evening. Betty was seeing other men as well as Donald. Betty lied to Donald
about what she was planning to do the day before.
Answer: Betty lied to Donald because she has a date with
another man.
Did Betty know her assailant? Betty has
marks on her neck.
What is Megan Barnard's behaviour hiding?
Megan kept looking at the photo of Donald and Betty. Megan really liked
Donald Fraser.
Answer: Megan has a soft spot for Donald.
Did Megan Barnard have a motive for killing her
sister? Betty was seeing other men as well as Donald.
Answer: Megan was jealous of Betty.
Question Donald Fraser:
Exit the house. Poirot asks Hasting about Fraser.
Fraser has no alibi. Go to the restaurant.
Observation: Study Donald
Fraser. Select: dark circles under eyes, crumpled clothes and Whitehorse
whiskey.
Question Donald with care so that he doesn't lose
his temper. Ask about seeing Betty that afternoon. Ask about Whitehorse
whiskey. Ask for cooperation to catch the killer.
Donald relates his actions
the night of the murder.
Grey cells:
Did Donald have a motive? Betty used to go
out frequently. Donald was a violent man.
Answer: Donald has a motive - jealousy.
Does Donald have an alibi? Donald does not
have an alibi.
Donald might have been at the beach and killed
Betty? The two murders were premeditated and were carried out by the
same murderer.
Reconstruction:
Exit the restaurant.
Reconstruct the crime: Select -
Advance to #6, change (Betty) and advance. Attack is done.
Go back to London:
Follow Hastings and enter the taxi.
August 30 - Prepare to leave for Churston:
Hasting takes the mail that arrives. Specify that
it is 30th today.
Call Scotland Yard and Japp to warn him.
Learn the reason for the mail's delayed arrival:
Pick up the mail from the floor by the door.
Examine the 3 new inventory: The piece of envelope
was mailed to wrong address - Whitehorse Mansions.
Read the note written by the post office on the
other piece of envelope.
Book shelf left of dining table:
Observe the ABC guide book and Hastings hunting photos.
Newspapers: Check the 2
newspapers on side table by sofa.
Packing suitcase: Talk to
Hastings who is packing the suitcase.
Point out that order is essential. Select: bath towel, pajamas, unprotected bottles, odd socks and badly closed
toothpaste.
Compare the new letter with the other
letters from ABC:
Look at the desk to compare the letters.
Select the same discrepancies as the previous 2
letters: I, hazy w and odd A.
Grey cells:
Why does the murderer warn us so late? Letter C was sent at the right date. Piece of envelope with a wrong
address.
Answer: The mail was delayed because of an error.
Answer the telephone:
Sir Carmichael Clarke was killed during his walk.
He is a famous throat specialist.
Churston.
Examine the
crime scene:
Sir Carmichael Clarke:
Examine the body: blood splatter, ABC guide, the neck and pants.
Items on blanket: Look
close at items on blue cloth. Check the watch with a dragon coin, wallet,
signet ring with family's coat of arms and key holder.
Stone structure: Go to the
stone structure between the 2 bushes and bird. See a rabbit hole, wild
flowers and the picturesque rock.
Bush by path: Examine the
only bush left of the path.
Cleared area by bush: Examine
the trampled grass right of the bush.
Grey cells:
What was Sir Carmichael's position when he was
killed? The zone soiled with blood covers a
conical-shaped area which extends away from bush. There is a wound with a
clear outline. The body was found in front of the only bush in the
surrounding area.
Answer: Sir Carmichael had his back to the bush.
Did Sir Carmichael see his intruder?
The victim has his back to the bush. The victim only had one wound.
Trampled grass behind the bush.
Answer: Sir Carmichael died without seeing his assailant.
Japp arrives. Answer him: The murder was carefully
planned. The murder was very violent.
Question the victim's brother:
Go left and be in the drawing room.
Thora Gray: Franklin Clarke
introduces Thora Gray, Sir Carmichael's secretary.
Observation: light makeup
of face, old dragon brooch and elegant clothes.
Franklin Clarke: Talk to
Franklin. The ailing widow can't talk to Poirot today.
Be nice in interrogating Franklin. Be understanding. Ask if the villagers knew.
Inspect the lounge: Franklin
leaves when Thora calls for him. Poirot asks Hastings to watch if the
residents come back while he inspects the room.
Table:
Check the teapot, the dragon motif at center of table, the 4 plates
(turtle, dragon, crane and tiger) and the private collection catalogue
book.
Examine the
Chinese map above 2 display cases at opposite wall (south is upward).
The right
display case has a Chinese compass.
Go to the
far wall.
Book case:
Look close at the book case left of the fireplace.
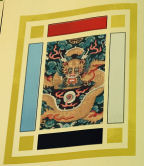
Book: Read the
book right of a colored discs puzzle. Note the colored bars surrounding
the pictured dragon.
Chinese
animals: See discs with the Chinese
animals seen on the table earlier (turtle, dragon, crane and tiger).
The next
layer has blank colored discs and below that are larger blank
colored discs.
The
central knob on the dragon emperor rotates the top layer of animals.
The
knobs at top left and bottom right rotates the middle layer of
colored blank discs.
The
knobs at top right and bottom left turns the bottom larger colored
blank
discs.
Start by placing the bottom larger blank disc in position
similar to that pictured in the book: Red on top, white at
right, black at bottom and blue at left.
Arrange the middle blank discs to match the bottom one.
Arrange the animals in their correct positions: Dragon at left,
crane at top, tiger at right and turtle at bottom.
Turn
the animals to have the dots facing the central dragon emperor.
The bottom
cabinet is unlocked. Open the cabinet. See ceremonial daggers with one
missing.
Read the
letter that states that Lady Carmichael has cancer and has only one year
to live. She is to be given morphine to ease her pain.
Thora Grey:
Hastings warns Poirot that the secretary is coming back. While checking the
collection catalogue; examine Miss Grey.
Observation:
Check a flustered Miss Grey - partially removed lipstick, bright eyes and
quick breath (click on book).
Interrogate Miss
Grey. Ask about relationship, events version and think about Franklin.
Hastings saw
Franklin kissing Miss Grey.
Reconstruction:
See the
reconstruction of the crime. Select: wait, admire (Carmichael), attack
from right and cut throat.
ABC: See Alexander
Bonaparte Cust (ABC) read the newspaper. See the ABC guide on the table.
Whitehaven Manor:
Hastings gifts
Poirot with a new pen.
Meeting of
suspects: Observe the guests.
Check
Hastings and Sir Franklin Clarke.
Check Thora
Grey and Mary Drower.
Donald
Fraser: Dark circles around eyes, shaving cut on chin and tense hand.
Megan
Barnard: Earrings, necklace and eyes looking at
Donald.
Poirot talks to
the people - be nice.
Grey cells:
Murderer profile:
Is the killer
clever? Indeed. Let us look again at this murder if you please. You will see
that the murderer carried it out to perfection. Clever.
Is the killer
sure of himself? Killed when the street was packed with people. Self
confident.
Is the killer a
seducer? The man seduced Betty before taking her to the beach. Seducer
Does the killer
like trains? A passenger time table! Likes train.
Is the killer
impulsive? The killer is methodical and prepared his crime meticulously.
Cold.
Is the killer
generous? Without the ABC, we might have suspected Mr. Ascher and Mr. Fraser.
Generous.
Mary cannot come
just like that to London. Franklin helps Mary.
Franklin wants
Poirot to come back to meet with Lady Clarke.
What do the
victims have in common? Mrs. Ascher took a cough medicine. Betty had problems
with her voice. Sir Carmichael Clarke was a famous doctor.
Answer: All victims has
throat connection.
Churston:
Franklin and
Thora are leaving Poirot alone at the mansion. Thora is leaving her employ. A
nurse will be coming to give Lady Clarke her medicine.
Go and find Lady
Clarke in her bedroom:
Lady Clarke:
Go upstairs and check on Lady Clarke.
Observation: Check her dazed eyes, clenched fists
and the painkillers on the side table.
Talk to Lady
Clarke. She wants the nurse. The telephone rings.
Go down and
answer the telephone. The nurse can't come to give the injection. Poirot
will do it. The skeleton key is at the lion trophy.
Mirror:
Check the mirror on wall above the telephone.
Find the skeleton
key:
Look close at
the lioness head on the wall at foreground.
Check the label
of the Sumatran lioness. Take the skeleton key. Read the label.
Give Lady Clarke
her injection:
Go to the
dresser and look around.
Use the skeleton
key on the locked small medicine cabinet on the dresser. Automatically,
Poirot gives the medicine.
Talk to Lady
Clarke. Remind her of her invitation. Learn that she doesn't like Miss Grey.
Lady Clarke falls asleep.
Wake up Lady
Clarke and continue questioning her:
Combs:
Go to the dresser again. Take the bronze comb at left.
Pick up the
silver comb from the floor by the bed.
Look close at
the side table left of bed. Take the gold comb from table.
Dresser:
Look close at the dresser by wall.
Check picture of
fun game in croquet, picture of radiant Lady Clarke and Lady Clarke and Sir
Carmichael picture.
Musical box:
Examine the musical box in front of the pictures.
Double click
the lid to open the box. See the workings of the music box. See that the
spring is broken.
In inventory
open the neversharp pen given by Hastings by using the hand icon at
right. Automatically take the spring.
Place the
spring on right end of the cylinder in the box.
Place the
gold I, then silver II and lastly the bronze comb III at bottom part of
the box.
Click-hold-turn the crank. When released, the music box plays.
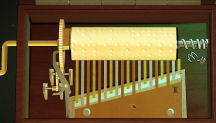
Lady Clarke
wakes up.
Question Lady
Clarke. Carmichael likes Thora. Agree with Lady Grey.
Learn about the
man Thora was talking to - man not a gentleman with plain face.
Answer the
telephone: The phone rings.
Go down and answer the telephone. It is Hastings. Hastings admires Thora.
Inspect the
mansion:
Sitting room:
Enter through door at left. Look around again.
Book
shelf: Look at book shelf again. Check the
daggers, doctor's letter and valuer's report of Sir Carmichael's
mansion.
Click on
label of book to learn that it was made by the firm Donald Fraser works
for.
Locked
cabinet right of fireplace: Use the skeleton key
to open the cabinet.
It has
Sir Carmichael's patient records.
Check
the left side files - A to D. No dust on the files. Have been
handled recently.
Check
the right side files - E to Z. Lots of dust. Have not been handled
for a while.
Check the
display at the corner.
Check the
book on the table by door. It is the Combeside private collection
purchase book.
Check the
map above the display again. Check the 2 display cases
below it. One has the compass.
Check the
table again. See items that Thora left. Read the letter. Look at the
dragon locket and the ceremonial dagger.
The locket
has a nice inscription showing that it was given by Sir Carmichael.
Foyer:
Go through door and look around at foyer.
Check
mirror, phone, Sumatran lioness trophy and small table by door.
Small
table by door: Examine the Black dragon's curse
book. Read the dedication on the book given by Lord and Lady C to
Franklin who will never grow up.
Examine the
arsenic sent to Thora.
Open
Franklin's trunk: Look close at the trunk.
Dials:
See 4 locked dials on the front.
Turn the
trunk and double click-check the labels on the left side. Lift the
handle and see the tag from China - 1927.
Look
close at the front of the trunk to see the 4 dials. Using the number
from the tag, enter 1 9 2 7 on the dials. The locks open.
Lid:
See a watch and 3 pictures on the lid.
There are numbers on the pictures that are
not hidden.
Click-hold-move Franklin's travel pictures.
Scroll to study the pictures.
The left
set has picture #7 on the last hidden picture. The middle has no
written number on the last hidden picture. The right pictures has 20
on the last hidden picture.
Turn the
watch above to 7:20. Hear a sound.
Trunk:
In far view, turn the knob on the front doors to open
the trunk.
Drawers:
Check the bottom right drawer to get Allen keys.
The upper drawers are empty. Open the
left door to see Franklin's whiskeys.
Top
drawer: See that the top lid under the
pictures are locked. Look close to see a triangle.
Look
close at the Allen wrench in inventory. Click the hand icon at
right to isolate the wrench required.
Use the
Allen wrench with triangle on the lock. The lid opens to show
another cover.
Check
the screws at top right and top left to note that it has hexagon
indents.
Isolate
the hexagon tipped wrench in inventory. Use it on the top right and
top left screws.
Great
Britain map: A map in 6 rings is exposed.
Arrange
the Great Britain map by turning the rings. One ring will affect
other rings. The center circle is permanent and used as guide.
Turn
ring 1-outermost to have the light brown part to the left side. This
affects ring 3.
Turn
ring 3 (from outermost to innermost) to have the light brown on the
left side. This affects ring 5.
Turn
ring 5 to correct position. This affects ring 4.
Turn
ring 4 to correct position. This affects ring 2.
Turn
ring 2 to correct position.
The red area
is opened. Look close and open the small lid at center. Take
Franklin's family signet ring with year 1587 on it.

Franklin's
office: Use the skeleton key to open the locked door
left of stairs. Look around.
Chinese
cabinet: Examine the Chinese cabinet right of door. See
a lock at center that has Chinese characters.
Lock
clue: There are 3 metal disks with Chinese
characters at bottom and one on top. Look close at those metal
disks.
Examine
the left character at bottom. Turn the circle to get the character
at left side position. This character right way around.
Examine
the bottom right character. Turn the circle to get the character in
second from left position. Position of the character looks right
to me.
Examine
the middle character at bottom. Turn the circle to get the character
in third from left position. This character right way around.
Examine
the only character at top. Turn the circle to get the character in
rightmost position. Position of the character looks right to me.
Arrange
the characters on the lock at center to show the clues on the
arrange characters.
The cupboard
is opened. Look at the 3 books (countryside, train and travel in China
books) and the items at bottom shelf.
Trophies:
Go to left end of room.
Look at:
rifle, tennis racket and shoes on shelf and head of animals.
Examine the
head and label of Kodiak bear from Alaskan peninsula.
Examine the
head and label of a Greater Kudu from South Africa.
Map:
Go to the map on wall. See a world map.
Open the
square at bottom right corner. Use the signet ring on the slot.
The
small squares on the frame open to show footprints of animals.
Change
the footprints on the small squares that intersect the countries
that Franklin used as hunting grounds
Lioness
of Sumatra: Change the small squares at top
right, bottom right and middle of right side squares to clawed 4
toed feline footprint.
Alaskan Kodiak bear: Change the top left, bottom
left and top at right side squares to 5 toed clawed footprint.
South
African Greater Kudu: Change the top second
from right, bottom second from right and bottom at left side to hoof
print.
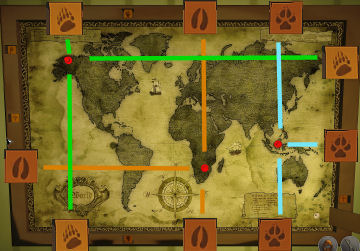
Safe:
The map slides to reveal a safe with 4 dials.
Enter the
number seen on the signet ring from top left, top right, bottom left and
bottom right: 1 5 8 7.
Check the
contents of the safe: gold sovereigns - stocks and
certificates, Eton school report that showed Franklin is a good student.
Read the 2
letters from Lady Clarke and Sir Carmichael. Lady Clarke mentions Thora
and knowing about her illness. Sir Carmichael mentions the comfort he
receives from Thora.
Inspect the
mansion's surroundings:
Exit to the
garden using the door at the sitting room.
Poirot smells
something horrible.
Flower
boxes: Go to right end of patio. See one of the flower
box is not aligned.
Look close
at flower box to see a dead rat beside brown pellets. Examine the flower
box and Poirot realigns the flower box. Click on flower box to admire
the work.
Formal
garden: Go down the steps. Inspect the fountain, the
wisteria on pergola, trimmed hedges and greenhouse.
Wheelbarrow:
Check the wheelbarrow at bottom right corner of the garden. Take the
burned documents.
Overlook:
Exit through gate and see a memorial to Sir Carmichael. Read the plaque from
Lady Clarke.
Grey cells:
Why did Thora
leave personal belongings behind at Combeside?
Thora left Sir Carmichael's gifts. Thora left a letter behind. A dagger is missing from Sir
Carmichael's case.
Answer: Thora does not
want to be accused of theft.
Is Thora a
poisoner? There's a poisoned rat at the scene of
the crime. Thora has ordered rat poison. Thora left a letter behind. Lady
Clarke has one year left to live.
Answer: Thora does not
have reason to poison Lady Clarke.
Telephone Hastings:
Place the
skeleton key back behind the plaque of the Sumatran lioness.
Use the phone at
foyer to talk to Hastings. Poirot asks Hasting to order solvent to use on
the burned document.
Talk to Donald
Fraser:
Donald Fraser is
waiting for Poirot at Whitehaven Manor.
Use the mirror to arrange the mustache.
Donald Fraser:
Look at Donald.
Observation:
unshaven, crumpled clothes and dark circles under eye.
Talk to
Donald. Reassure him. Encourage him.
Grey cells:
How should
Donald's dream be interpreted? Donald was very much
in love with Betty. Donald does not kill Megan in his dream. Donald really
likes Megan.
Answer: Donald is
starting to like Megan and feels guilty. Learn that he like trains.
Talk to Thora
Grey:
Remind her that
she did not see anyone that day? She remembers a stocking salesman. He was
hesitant and shy.
Ask her whether
she resigned of her own free will. Thora knows about Lady Clarke's
animosity.
Ask if she will
return to Churston. Poirot asks if she will accept if Sir Carmichael
proposes.
Grey cells:
Would Thora
have married Sir Carmichael if he had lived?
Sir Carmichael had offered Thora a brooch. Sir Carmichael
found Thora charming. Thora is evasive about her relationship with Sir
Carmichael.
Answer: Thora wanted to
be married and would have done so if Sir Carmichael lived.
Is there another
common point between the murders? Mrs.
Ascher's personal effects: a stocking box and an account book. Thora Grey
saw a door to door salesman. Betty's mother is upset about Betty's new stocking.
Answer: Each member has
a stocking connection.
Telephone Japp:
Use the phone.
Mr. Cust tells his landlady that he has
to travel for an engagement.
Collect the post:
Mail arrive.
Hastings is disagreeable.
Compare the new
letter:
Newspaper:
Check the newspapers on the table by sofa. Select statistic bulletin and the
Daily Blague newspaper behind it.
New mail: Pick up the
mail. Read the new mail sent by ABC killer. The next murder will be in Doncaster.
Click on
desk to compare the new mail to the old one. Click on the I, A and w.
This was sent by the same person.
Poirot calls
Japp to tell him about Doncaster.
Decipher the burned
documents:
Go to the table
by door. Talk to Hastings. Look close at table under mirror.
Put the
pieces of burned documents to form the complete letter.
There are 4
pages. Look close at one set.
The
piece on top of the screen is permanent. Connect the other pieces to that
one.
Use the solvent
ordered by Hastings
Use the
bottle of solvent on the cloth.
Take cloth
and use it over the pages.
Poirot reads the
burned paper. It is the medical record of Mrs. Ascher.
Look close at
the 4 pages on the table. Select each page and see that they are the record
of Alice Ascher, Betty Barnard, Alexander Bonaparte Cust and
Dick Dudley Dunbar, owner of Black Swan in Doncaster.
Cust suffers
from coughing blood, absences and amnesia due to mustard gas and head trauma
during the war.
Grey cells:
Where do the
burned documents come from? Mrs Ascher's name is
visible on the burned documents. Sir Carmichael's medical records have been
consulted recently. All the victims suffered from throat afflictions.
Answer: The documents
came from Carmichael's patient medical records.
Answer the
telephone:
Talk to Japp
about Alexander Bonaparte Cust. Tell him to look at Black Swan hotel in
Doncaster.
Marbury Guest
House:
Hastings has a
dental appointment.
Poirot takes the
taxi to the guest house. Look around and then enter.
Question Mrs.
Marbury:
Mrs. Marbury
the landlady: Talk to the landlady peeling potatoes. Learn
about Cust's ailment.
Ask where the stains were - collar and buttonholes.
She repaired Cust's bathing dress. After Churston, Cust started buying
newspaper.
Take the key from counter. Check the
register and Poirot noted a discrepancy. Talk to
Mrs. Marbury
Observation:
welcoming smile, smooth movements of hand peeling potatoes and relaxed
posture. Room 306 was rented while Mr. Cust was away.
Cat:
Look at the cat picture at end of counter. Select: picture, pillow and hanging cork
toy.
Search Cust's room:
Check the mirror
first.
Look down on the
floor under the sink and see blood.
Check the shelf
and take the bottle of laudanum and the bottle of sedative.
Desk: Select: ABC guide, knife, pencil scrapings, spilled
bottle and letter.
Read John
Milligan's letter about Cust's being hired to sell Silky Legs stocking. The company
sent the typewriter, stockings and a schedule of his rounds starting at
Andover. The rest was covered by spilled ink. Poirot has to prove that he
went to Bexhill.
Typewriter: Examine the typewriter. Poirot wants
to get the
ribbon.
Rotate the
cover of the left and right reel of ribbon.
Look close
at the center stretch of ribbon and metal clip. Click to remove the ribbon.
Look close
at the ribbon. Rotate it to read what was typed.
Check the
closet. Select: clothes, Bexhill's newspaper, bathing dress, other
newspapers starting at Churston.
Check the boxes
on floor. Select: ABC guides. Open the other box using Cust's knife and see stockings.
Grey cells:
Where was Cust
at the time of the Bexhill murder? Cust's room was
rented to someone else on the 25th. Bexhill's local paper dating from the
day of Betty's murder was found in Cust's room.
Answer: Cust was
probably in Bexhill on the 25th.
Talk to Japp:
Go down and talk
to Japp. Japp wants to know if Poirot thinks Cust is not guilty.
Grey cells:
Was it possible
for Cust to have killed the three victims? Cust was in Churston on the day
of Sir Clarke's murder. Cust was in Bexhill on
the day of Betty's murder. Cust was in Andover on the day of Alice's murder.
Answer: Cust was in all
the town.
Are there any
common points between Cust and the killer?
All the letters sent to Poirot come from his typewriter. He has a knife like
the one used to stab Sir Carmichael. He has ABC guides at home.
Answer: He could have
committed the crimes.
Is Cust's
behaviour suspicious? He keeps
the newspapers that talk about the murders. He lied about his destination.
He had blood on him.
Answer: Guilty.
Poirot explains
about the blood on shirt and the newspapers.
Go to Scotland
Yard:
Take the taxi to
Scotland Yard.
Alexander
Bonaparte Cust: Look at Cust.
Observation:
shaking hands, crumpled jacket and lowered eyes.
Talk to Cust.
Ask if he knows Poirot. After a while he coughs. Give him the laudanum.
After the coughing, his
shirt has blood.
Admit that
you do not believe he's capable of killing. Talk about army. He
likes to follow orders. Get him to believe he's innocent.
When Cust
gets terrible headache, give him the sedative.
Talk to Japp: Exit the room
and talk to Japp.
Grey cells:
What do we know
about Cust's health? He
suffers from hemoptysis. He has problem with his throat. He suffers from
absences.
Answer: Cust is mentally
and physically weak.
Are there any
clues that do not support Cust's guilt in the Churston murder?
Sir Carmichael was attacked from behind and the blood spurted out in the
direction of the sea. Mrs. Marbury saw Cust's shirt with stains on the
buttonholes.
Answer: The murderer's
shirt should be stained on sleeves not buttonholes.
Are there any
clues that do not support Cust's guilt? Newspaper article
started at Churston. He did not recognize Poirot.
Answer: There are
several details that show that Cust was not guilty.
Can we say
without shadow of doubt that Cust is guilty? He says that he did not write
the letters. He had no reason to kill them.
Answer: Not guilty.
Cust's profile:
Is Cust clever?
Army was the only place he didn't feel inferior. Mediocre.
Is Cust sure of
himself? He was hesitant and shy. Easy to influence.
Is Cust a
seducer? Medium size, glasses dark suit and felt hat.
Without any charm.
Does Cust like
trains? He is always unwell on trains. He does not like
trains.
Is Cust
impulsive? Gentle as a lamb afterwards. Cold.
Is Cust
generous? Cust is parsimonious. Miserly.
Go home:
Take the taxi.
Hastings reads his newspaper.
Read the 2
newspapers on the side table beside the couch.
Bring the
revolver to Hastings:
Gun case:
Go left of the couches. Look at the gun case.
Decision
time: See blank cartridges and real bullets. Decide which bullets to use
on the revolver.
Answer the phone:
Japp says that
there is no other clue found.
The suspects:
See the meeting of the characters in the case. They discuss the case.
Grey cells:
Why did the
murderer make a mistake in the address? The murderer always warned Poirot about his murders. The letter's arrival saved the murderer. The error in the
address caused the letter to be delivered late.
Answer: The mistake is
intentional.
Why did the
killer send his letters to Hercule Poirot? Poirot's address is not very well
known.
Cust profile:
What do we know
about Cust? Cust was in the war and has never
been quite the same in the head since. Cust was wounded during the war.
Answer: Cust is mentally
fragile and easy to manipulate.
How to explain
Cust's presence at the crime scenes? Alice and Betty are in Doctor Clarke's
medical records. The murderer found a way to access Doctor Clarke's medical
records.
Answer: Cust was
manipulated.
Donald Fraser's profile:
Answer Megan
Barnard. Say that just one murder is of interest to the killer.
Access to
medical records: Indicate that Donald's firm worked for
Clarke.
Is Donald
clever? He's a bright man with a promising career ahead of him.
Is Donald sure
of himself? Since Betty's death, I have doubt about myself.
Is Donald a
seducer? Women seem to like him!
Does Donald like
trains? I'll sleep on the train. I like trains.
Is Donald
impulsive? It was an awful scene...
Is Donald
generous? He would have made Betty a good husband. He's attentive and
generous.
Franklin Clarke's profile:
Is Franklin
clever? School report.
Is Franklin sure
of himself? Take Franklin: he's fallen for her sweet talking charm. He's a
lovely boy, very plucky and sure of himself.
Is Franklin a
seducer? Miss Grey is already being courted by Franklin Clarke.
Does Franklin
like trains? The Railway book.
Is Franklin
impulsive? Dear Franklin... I wish you a good start to a successful new
year!....... .... if you weren't a real cool blooded guy.
Is Franklin
generous? It is normal that people helping should be reimbursed.
The murderer:
Answer Franklin:
Say that Thora Grey bothered him.
No proof can be give; so - lie
about the fingerprints found on Cust's typewriter.
The ending
depends on the bullets used on the revolver.
See what
happened to the other characters.
This document may not be
distributed without express written permission of the author and the content may
not be altered in any way.
For Questions or Comments
on this Walkthrough,
Please write to:
MaGtRo
Copyright © 2016
MaGtRo
 GameBoomers
Walkthroughs and Solutions
GameBoomers
Walkthroughs and Solutions