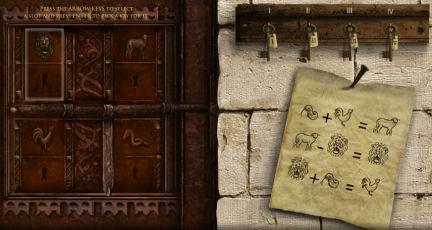
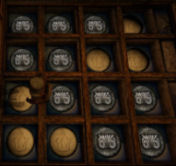
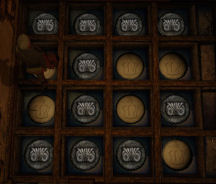
| See 4 locks: lion, sheep, rooster and snake. There are 4 keys labeled I, II, III and IV. Decode the picture clue under the keys. Use the deduced key on the lock. Lion - 2 Sheep - 4 Rooster - 3 Snake - 1 The door opens. <checkpoint> | |
Adam's Venture Episode 2: Solomon's Secret
by Vertigo Games BV
Walkthrough by MaGtRo May 2011
Gameplay: This is a third person keyboard controlled game.
The main menu has resume, new game, options and exit game.
The options menu has display and audio adjustments. The display options are for resolution, full screen, world detail and texture detail. The audio options has sliding bar to adjust master and music volume; and subtitles.
The saved games are done automatically. A sound is heard when a checkpoint save occurs. Going back to a previous game is not possible.
The items picked up are seen at top right of the screen. The item is used automatically when the appropriate action is entered.
The game guides the player on what keys are to be used in the first chapter of the game.
The keys used in the game:
ESC accesses the menu page and skips the intro.
Shift makes the character run.
Ctrl makes the character crouch.
Space bar makes the character jump.
The arrow keys direct the character to top, right, left and down.
Enter key tells the game to do the action.
Toggle to remove the key action.
After the last scene in episode 1 - The Search for the Lost Garden, Adam Venture and Evelyn Appleby are inside a plane. They are brought to the Clairvaux Corporation compound in Jerusalem. They are locked up at the control tower to explain what happened to the missing Professor Jacques Saint Omair and the search for Eden.
Escape from the Airport
Escape the cell:
Look around. Inspect the book on the floor, the cell door and then talk to Evelyn.
Wood door: Open the wood door at left. Adam wants to pick the lock.
Talk to Evelyn. Adam gets the hairpin.
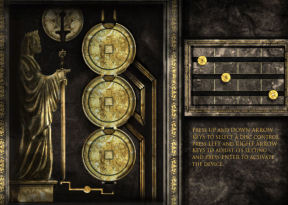
Lock puzzle 1: Open the door.
See the lock puzzle. The aim of the puzzle is to push all the bars up.
Use the left and right arrow to move the hairpin left and right. Use the up arrow to move the hairpin up.
From left to right: move up 3 4 1 2.
Adam kicks the door open.
Exit: Go down, left, left, space bar up to the ramp.
Adam destroys part of the ramp leaving Evelyn stranded in the cell. <checkpoint>
Search for cell key:
Go forward inside the control tower.
Inspect the map at far wall left of the door. See that it is the map of the Temple Mount in Jerusalem.
Go down the stairs. Go into the quarters at left. Look around.
Pick up the sparkling keys on the floor by the table at left wall.
Go back to the cell upstairs and open the cell door.
Find a way out of here:
Go forward to the map on the wall. Open the door at right to be on a balcony.
Hear-see the pilot leave to inform Clairvaux managements at the dig site.
Go left on the balcony. Face the ladder at left and automatically climb up.
Evelyn sees the way out of here. She points to a green car.
Get to the car:
Go to the opposite railing of the control tower and walk the ramp.
Go left to climb down the ladder to the ground. <checkpoint>
Go around the left side of the building and see a garden.
Garden: See a pilot open the window.
Crouch-ctrl key and go left. Go around (left, right, left) the walls at center of the garden until the wire enclosure at left.
Guard: Adam and Evelyn are hiding by some boxes. There's a guard on the left.
Pick up the sparkling apple on the other side of Evelyn. Move Adam back to left side of Evelyn.
Throw the apple. The guard leaves to check the noise.
Car: Go left where the guard was and run to the green car.
Evelyn says the car has no fuel.
Go close to the car and pickup the radio. Adam will need 6 gallons of gasoline. <checkpoint>
Get 6 gallons of gasoline:
Gallon 1: Go to the storage shed at end of the path and open the door at right.
Lock puzzle 2: See the lock puzzle. The aim of the puzzle is to push all the bars up.
Use the left and right arrow to move the hairpin left and right. Use the up arrow to move the hairpin up.
From left to right: move up 2 4 1 3.
Enter the shed. Inspect the crate by right wall. It has mining materials.
Go back to the aisle at left in front of the shelving.
Take the sparkling gallon of fuel at bottom shelf at far end of the shelving.
Gallon 2: Go left to the corner of the shelving.
Crouch-ctrl key and then go forward to lit area.
At this other storage area, jump-spacebar-up twice on the shelving at right.
Spacebar-up to hang on the overhead red pipe.
Go left until the top of the shelving on the left.
Go down on the right side of that shelving to be at the other side.
See a crate at center of the small area. Drag-enter the crate to reveal another opening on the left. Press enter to toggle off.
Crouch to go through the opening at left.
Pick up the gallon of fuel on the floor.
Gallon 3: Jump up (spacebar-up) to the shelving on the left. Jump down on the other side.
Pick up the gallon of fuel on the floor.
Gallon 4: Open the door on the left. Cross to and enter the other building.
Go to bottom of screen and left to a dark side aisle to get to another open area.
Go forward. See a gallon of fuel on the platform at right.
Drag the crate to get it close to the platform. Jump on the crate and go around the fence.
Pick up the gallon of fuel on the floor.
Gallon 5: Jump up to the overhead red pipe.
Shimmy to the left until the next area.
Drag the crate that is left of the Clairvaux insignia. See a recess at the back wall.
Crouch forward and pick up the gallon of fuel in the recess.
Gallon 6: Open the door at left. See 3 tents.
Enter the right tent and inspect the crate. It has mining materials.
Enter the middle tent and see a locked chest.
Lock puzzle 3: See the lock puzzle. The aim of the puzzle is to push all the bars up.
Use the left and right arrow to move the hairpin left and right. Use the up arrow to move the hairpin up.
From left to right: move up 4 1 3 2.
Get the alpha bonus code - messiah. After getting all 5 bonus codes, go to www.adams-venture.com and enter the codes. See the bonus.
Enter the left tent. Pick up the gallon of fuel.
Adam reads some documents on the table. He calls Evelyn.
The alarm is sounded. The guards are looking for them. <checkpoint>
Get back to the car:
Go back to the building at right. Overhear the men talking. They are going to search for the prisoners using the plane. The plane takes off.
Jump up on the box with Clairvaux insignia left of the wired fence to the overhead red pipe. Shimmy to the right.
Go to the bottom part of this room with the platform. Go to bottom of screen to the dark side aisle.
Go right and exit this building. Run to the other building at right.
Jump up to the top of the right shelving and down on the other side.
Crouch and go through the hole at right shelving.
Again - jump up to the top of the right shelving and down on the other side.
Crouch and go through the hole at the front left shelving.
Go down the aisle and exit the building.
Adam insists on driving. On the way out he backs up on an electric pole and the tanks of oil below it.
The sparks cause an explosion.
At the Temple Mount
<checkpoint> The car broke down. Adam informs Evelyn that the Clairvaux corporation is excavating at the Temple Mount; presumably to study Solomon's Palace. This must be stopped.
Walk forward through the cacti lined path and see the workers walk by. One of the workers is upset at Clairvaux Corp. Evelyn predicts a riot.
At the path on top of the wall, overhear and see a Clairvaux officer tell a worker that the corporation stopped water to the city to cool their machines. The people do not have anything to drink or cook with.
Find a way pass the guard:
Continue forward and left. See a guard posted by a barricade to the inner city.
Talk to the guard. No one is allowed to go through because of a major riot.
Talk to Evelyn. Another way is needed to be found.
Continue to the left and see a sparkling beam on the top of the building. Adam wants a rope.
Find a rope:
Go back to the area where the Clairvaux officer informed the worker about the water.
Go to the break on the wall and down to the wood planks. Adam drops down in a storage area.
Ignite torch at center of the room. Go to the right and climb down the ladder.
Open the double doors: See closed double doors at far left of room. Behind this one are 3 more double doors.
To the right are 4 levers on the floor that controls weights on the wall.
Each weight opens a double door behind the one on the left of the levers.
The object of the puzzle is to lower all 4 weights on the wall to the floor to open all 4 doors.
Use levers (from left to right): 3 2 1.
Enter through the 4 doors with man, lion, ram and bird heads on the doors.
Search for rope: Continue forward pass tombs.
Ignite the cobwebs covering the archway on the left.
Pick up the sparkling rope at right. <checkpoint> Go back outside.
Get to the walkway: Jump to the wall pass the hole on the floor to get on the walkway top of the wall.
Press-HOLD the up arrow.
Shift to run on the first marker on the floor and immediately (on the next marker) press space bar to jump to get on the other side of the hole on the floor. (Use up arrow-shift key; still holding up arrow-spacebar.)
Get to excavation site:
Go back to the beam on the top of the building left of the guard.
Inspect the beam again. Adam uses the rope and jumps over the wall. <checkpoint>
Talk to the men in the area. Go to the back part of the path and meet Evelyn.
Go left through the archway and see the plane searching for them.
The local people are upset at them and close their doors.
Continue forward and up the ladder on the wall. Evelyn goes right.
Continue forward and fall to the ground.
Lock puzzle 5: Open the chest.
Push bars: 1 4 3 2. Get the beta bonus code - choice.
Climb the ladder to get back up.
Get to the other roof gardens: Adam has to have a running start jump to the next building and then turn right and jump to the building at right.
Press-HOLD the up arrow.
Move to start of the path - shift to run and immediately press space bar to jump to get on the other building. (Up arrow-shift key; still holding up arrow-spacebar.)
Turn right and position Adam to jump right.
Move close to wall.
Press-HOLD the right arrow - shift to run and immediately press space bar to jump to get on the other building. (Right arrow-shift key; still holding right arrow-spacebar.)
Go close to wall. Jump up and shimmy to the left. Jump to get to left building.
Go forward. Inspect a water fountain on the wall. It's dry.
Climb the ladder left of the water fountain. Go forward.
The walkway falls down and separates Evelyn from Adam.
Find another way: Go down the ladder and go forward.
Evelyn drops a crate from the rooftop.
Drag the crate to bottom of screen until a break on the wood fence on the wall at left.
Jump on crate and over the wall. <checkpoint>
Go through crates blocking the passage: Be in market area. Look around.
See a scale-type system at right corner of the area. The crates-boxes block the path through the archway.
Animal locks: Go back to the left part of the area.
Look close at the door under the blooming plants.
| See 4 locks: lion, sheep, rooster and snake. There are 4 keys labeled I, II, III and IV. Decode the picture clue under the keys. Use the deduced key on the lock. Lion - 2 Sheep - 4 Rooster - 3 Snake - 1 The door opens. <checkpoint> | |
Drag out a crate. Drag the crate close to the platform. Jump up the crate to get on the platform.
Push the crate that is on top of the platform to the left counter balance-pan of the scale system.
Watch the blocking crate on the other pan rise up.
Jump off the platform.
Crouch and go through under the raised crate-pan to be on the other side of the archway.
Go forward and see water flowing through the aqueduct system on the rooftop. If you watch at the right time, you will see a yellow rubber duckie.
Go forward until the path is blocked by a wired fence.
Climb the ladder on the left wall.
Restore the city's water supply:
Go to the other side of the roof and see the excavation site gate. <checkpoint>
The water system that locks the gate also cuts off the water supply of the city.
Go down and see a big ramp close to the wall. The posts straddle the wall to hold the dam on the aqueduct.
Go to the back and left through the archway.
Use the boiler on the platform that is attached to the dam on the aqueduct at top of the wall. Something is missing on the gear setup attached to the posts.
Go back to the other side of the wall.
Walk beside the ramp. See an opening under the ramp. There are no plants on the opening.
Crouch and enter the opening. Go forward towards the wall. Pick up the gear.
Go back out and around to the machine powering the dam.
Use and see a close up of the gauge of the machinery. The gear is added to the machinery.
The aim of the puzzle is to get the red arrow to point to 20 on the gauge.
Under the gauge are buttons with + or -.
Use the left and right arrow to select a button. Press enter to push the selected button.
The red arrow points to 38. To get it to 20, press buttons: -10 enter, -10 enter, -10 enter, +5 enter, +7 enter. You did it!
Go back to the ramp. Enter through the open gate.
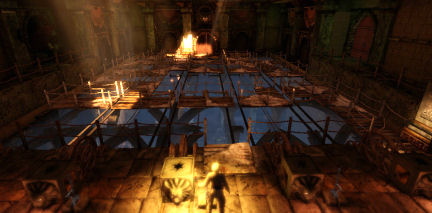
Exploring the Excavation Site
Get uniforms:
<checkpoint> Enter the tent at left.
Absence Board: Inspect the absence board on the pole at center of the tent.
Read the descriptions.
1. William is the one fired for neglecting safety protocol because he dropped his hammer and injured a worker.
2. Catherine is the one covering legal issues because she's the only other woman on the list.
3. Brian because he is not Thomas, Alan or William.
4. Alan because he is at the hospital to bring flowers for Rose.
5. Rose because she's injured and Alan brought her flowers at hospital.
6. Thomas because he is leaving today and Brian is driving him to the airport.
Evelyn and Adam are in uniforms now.
Enter the archeological compound:
Go forward and check the gate. It is locked. Note that there is a rope from the tower to the pole inside the compound.
Go back to the tower. Inspect the control panel of the tower.
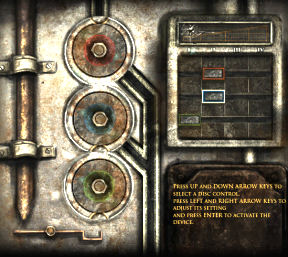
Disc puzzle 1: The object of the puzzle is to time the position of the notch at the edge of each disc to catch the dropped pellet. The pellet should then go from one disc to another to the third until it is received by the small balance at bottom.
The right pan of the balance gets lowered thus raising the left to make a connection to a metal at left.
Move the top red bar one space to the right.
Move the middle bar one space to the right.
Leave the bottom bar as is.
Press enter to see what happens.
The ladder goes down. Climb the ladder. Use the rope.
Adam and Evelyn slide down to the other side of the gate. <checkpoint>
Pretend to be a mechanic:
Go forward. Check the first tent and see mining materials.
Check the second tent and see beds and books about mining.
Fix the radio: Pass by the tent to the right and be stopped by a guard.
The guard says he did not break the radio and was waiting for Thomas to fix it.
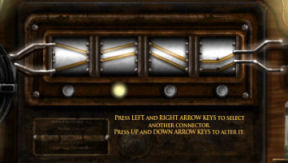
Enter the tent and inspect the radio.
The aim of the puzzle is to get complete connection of the 2 wires on the left to the 2 wires on the right.
Hear the call from the airport to the site reporting that the prisoners escaped.
Adam turns off the radio. <checkpoint>
Talk to the guard. He wants another machine fixed.
Fix the boiler releasing steam: Look close at the boiler releasing steam. Something is missing.
Go to the back left tent and pick up the button panel.
Go back to the steam spouting boiler. Use the boiler to insert the button panel.
The aim of the puzzle is to get the red arrow to point to 20 on the gauge.
Under the gauge are buttons with + or -.
The red arrow points to 33. Use the left and right arrow to select a button. Press enter to push the selected button.
Check the gauge and press buttons to deduce that the first button is +7 and the middle button is +11.
To get it to 20, press buttons: -17 enter, +23 enter, -9 enter, -17 enter, +7 (first) enter.
The steam stops. <checkpoint>
Lock puzzle 6: After doing the boiler puzzle, go close to other boiler. Go down using the ladder to the pit below.
Open another sparkling chest. Press up: 2 4 1 3.
Get the gamma bonus code - Moriah. Thanks, Becky!
Talk to the guard again. He wants Adam to fix the other machine by HQ area.
The guard lends his security badge.
Fix the boiler by the HQ area: Go right and talk to Evelyn. The pilot is reporting to the management at HQ.
Go right to the checkpoint. Talk to the guard. <checkpoint>
Enter and go left to the wood platform.
Climb down the ladder. Go to the back part of the area and see the boiler releasing steam.
Inspect the boiler.
The red arrow points to 38. Use the left and right arrow to select a button. Press enter to push the selected button.
Check the gauge and press buttons to deduce that the first button is -24, second is +7, middle is -11, fourth is +17 and the right button is -7.
To get it to 20, press buttons: middle-third (-11) enter and fifth-right button (-7) enter.
The steam stops. <checkpoint>
Eavesdrop on HQ:
Climb the ladder inside the tent. Go down the ramp to bottom of screen.
Go forward to the tent at end of the path.
Eavesdrop on the pilot reporting to James Saint Omair. Adam falls in the excavated temple.
Down the well
<checkpoint> Adam falls inside the temple. He calls to Evelyn to join him.
Solomon's family tree:
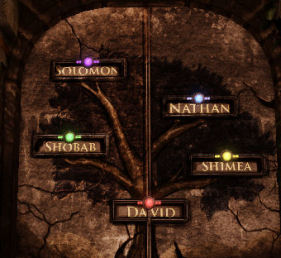
See a central stand at middle of hallway and 4 recesses with pictures and list of names.
Examine the double doors at end of hallway. See Solomon's family tree. The names listed on the recesses are the same as on the family tree.
Recesses:
Using the picture above the list in the recesses and the position of that biblical person on the tree, select the appropriate name in each of the recesses.
Back left: Select Nathan. There is a mature tree depicted here. Nathan is the next oldest to Solomon.
Front left: Select Shimea. There is a small seedling depicted. Shimea is the next youngest to David.
Front right: Select Shobab. There is a young tree depicted. Shobab is the next youngest to Nathan.
Back right: Select David. There is a seed being planted depicted here. David is the youngest in the tree.
See colored circles appear above the names on the door. Remember the colors.
Central stand: The fire stands light up.
Go to left fire stand and ignite torch. Inspect the central stand to ignite the fire.
See colors beamed to the colored circle above the names on the door.
Beam of light: The colors are produced by 2 lenses on the stand: a red lens at inner ring and another lens at middle ring.
The outer ring moves the beam to focus on another name.
The aim is to produce a beam of colored light using a combination of the 2 lenses on the stand. The color of the beam should be similar to the colored circle on the door that it is focused on.
The up and down arrow selects the wheel (inner, middle, outer).
The enter key turns the wheels.
Do Solomon only.
Turn outer wheel to focus the light on Solomon's purple circle.
Turn inner wheel to move red lens on the beam.
Turn middle wheel to move blue lens on the beam.
Purple beam is now focused on Solomon. The door opens.
Deeper in the temple:
Ignite the spider web. Adam and Evelyn take off the uniforms.
Open another closed door: Go forward until another closed door.
Jump up twice to the small ledge on top part of wall. Turn left and jump up to the next ledge.
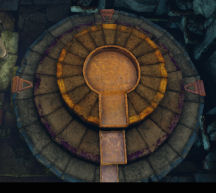
See a wall fountain with a wheel behind it on the left.
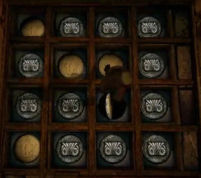
| Disc puzzle 2: See another 3 disc mechanism like the tower control panel at the dig site. The object of the puzzle to is to get the notch at the edge of each disc so that the dropped pellet goes from one disc to another to the third until it is received by the small scale at bottom. The right pan gets lowered thus raising the left to make a connection to a metal at left. Do not move the top button. Move the middle button one space to the right. Move the bottom button to far right. Press enter to see what happens. | |
Go down and enter the archway. <checkpoint>
Suspension bridges:
Go to bottom of screen and then left.
See a big chamber with no floor at center. Another door is at back of the chamber.
There are suspended bridges on the empty floor. See the chamber below.
There are 5 wheels with lion heads. 4 of the wheels have levers that adjust the positions of the bridges. The rightmost is missing a lever.
Go left in front of the levers and see a sparkling item on a bridge at left.
The aim of the puzzle is to move the bridges to find the missing lever and then move it again to make a path to the door at back of the chamber.
Levers: Use levers to find out which bridges are affected by what lever.
From left to right:
Lever 1 affects bridges at lanes 1 and 3.
Lever 2 affects bridges at lane 2.
Lever 3 affects bridges at lane 3.
Lever 4 affects bridges at lane 4.
Missing lever:
With the bridges in original positions, use lever 2 to bring bridge close to stone path.
Use lever 1 to move bridge back once.
Use lever 3 to move bridge close to stone path.
Walk the bridges and pick up the lever.
Use the lever on rightmost waterwheel.
Use the attached lever 5 and see that it affects bridges in lanes 1 and 5.
Get to back door:
With the bridges in the positions after getting the lever and lever 5 installed:
Bring lane 5 bridge close to stone path.
Use lever 4 to move bridge in lane 4 back once.
Use lever 3 to move bridge in lane 3 back twice.
Use lever 2 to move bridge in lane 2 back once.
If done correctly, see the back door open.
Go to opened back door through bridge at lane 5. <checkpoint>
Underground waterways:
Go pass an underground waterfall. The engineers are dynamiting above ground.
Go forward and see that the platform bridge is at the bottom of the crevice.
Inspect the water wheel at left.
| Disc puzzle 3: See another 3 disc mechanism. Move the top disc to fourth right frame. Move the middle disc to fourth right frame. Move the bottom disc to third frame. Press enter to see the platform bridge rises up.
| |
Use the lever on the wall. The platform bridge lowers down.
Hall of columns:
Aqueduct source: The platform bridge settles on the floor deep underground. <checkpoint>
Use the 3 layered wheel that connects to the aqueduct at bottom of screen. Something is missing.
Hall: Go left and see a huge double door.
Look around.
Lock puzzle 7: Go to front left part of the hall. See a sparkling chest. Open the chest.
Push bars: 3 2 4 1. Get the delta bonus code - Judgment.
Door icons: Look at the double doors.
See 2 pictures on either side of the double doors: a praying hand on the left and a treasure chest at right.
Use the 2 pictures to light them up. Sound is heard of a machinery activating. See a wheel moving under the grill on the floor.
The text on the door lights up. Inspect the text. God praises Solomon for praying but not asking for riches.
There are 8 columns in the hall: 4 on each side. Each column has an icon. There are 2 each of 4 icons.
There are 4 levers on the floor between the 2 sets of columns.
The aim of the puzzle is to lower to the ground the 2 praying hand icons and 2 treasure chest icons only. The other icons should stay up on the columns.
By pulling levers learn which lever affects what icons. Go back to the checkpoint to get the levers untouched.
Before the levers are touched, use levers 1 and then 2 (left to right).
The first and last icon on the left columns go down - the praying hands.
The second and last icons on the right column go down - treasure chest.
Use all 4 icons (2 praying hands and 2 treasure chests). The 4 should now be lit up.
Then use-turn off the back treasure chest icon at right columns (closest to the doors).
See the door left of the double doors slide up.
Go to the open door at far left of the back wall. Crouch in and pick up the lever.
Aqueduct source:
Go to the right side of the hall. Go right to the aqueduct setup seen earlier.
Use the aqueduct discs to attach the lever.
Aqueduct discs: The aim is to align the disk so that the outlet all points to the aqueduct at the bottom.
Use the up-down (or right-left) arrows to select the disc.
Use the enter key to activate it.
Note that the middle outlet is at top of circle and the top outlet points to the left. The bottom outlet is already pointing to the aqueduct.
The discs turn opposite each other.
Select-enter the top gold disc.
When it turns and the outlet points to the top and is aligned with the middle outlet - immediately activate the middle purple disc.
The 2 discs should align at the bottom with the bottom disc. (Gold -purple.)
Water flows. The double doors at the hall open.
Enter the double doors.
SOLOMON'S THRONE ROOM
Evelyn leaves Adam behind. <checkpoint>
Go forward and see that the path ahead is blocked. The door at right is locked. Go left and enter the enclosure.
Numbers and icons:
| See a wall with icons on the left and Roman numbers that can be moved by the wheels in front. The rosette is already numbered VI. Note the clue on the left wall. Circle x sun + sun can only be V x I + I = VI Rectangle x rectangle can only be II x II = IV Rectangle x triangle can only be II x III = VI | 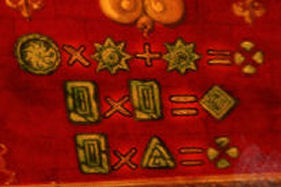 |
| Use the wheels to place the appropriate number aligned with the icons on the left. I = sun II = (as is) rectangle III = triangle IV = diamond V = circle VI = (as is) rosette The locked door at end of the hall opens.
|  |
Hallway:
Go through opened door. <checkpoint>
See a sparkling object on the ruins left of Adam.
Ignite the torch on fire stand at right of the room.
Jump up to the pedestal at right of the sparkling object.
Lock puzzle 8: Enter the room on the left. See a sparkling chest. Open the chest.
Push bars: 3 4 1 2. Get the epsilon bonus code - wisdom.
Exit the room and go to the back part of the pedestal.
Continue forward and see the corner blocked by rubble. Jump over the rubble.
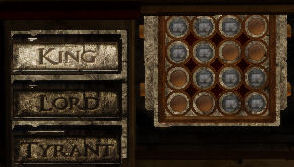
Solomon's story:
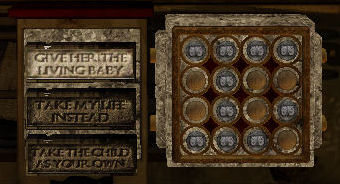
Continue forward until a chamber with pictures on the wall and grates on the floor.
Left picture: Use the left picture on the wall.
See the start of the famous Solomon story about the 2 mothers and justice. Although Adam says it's about that baby who cuts his sword in half using two kings.
Select King at bottom list. Press enter. See that the circle pattern on the right changes. Remember this 4x4 squares with circles pattern.
Go right and enter an enclosure. See 4x4 squares with owl circles.
The object of the puzzle is to reproduce the pattern seen below the first story frame.
Step or jump to a square to change the design of the square.
If done correctly, the middle picture is activated.
Middle picture: Go to the wall and use the middle picture.
Enter the correct answer at bottom - Solomon. Press enter.
Remember the 4x4 squares with circles pattern.
Go to the enclosure and reproduce this pattern.
If done correctly, the right picture is activated.
Right picture: Go to the wall and use the right picture.
Enter the correct answer at bottom - Give her the living baby. Press enter.
Remember the 4x4 squares with circles pattern.
Go to the enclosure and reproduce this pattern.
If done correctly, the grate on the floor opens.
Another locked door:
<checkpoint> Climb down using the ladders.
Door disc puzzle: Go forward and see another locked door with a disk puzzle in front of it.
Use the disc puzzle. There are 3 discs: gold, purple and red
The aim is to align the disk so that all outlets point to the pipe at right.
Use the up-down (or right-left) arrows to select the disc.
Use the enter key to activate it.
Activate the middle purple disc first.
When the middle purple and the bottom red discs are aligned, activate the top gold disc.
Immediately activate the bottom red disc. (Purple - gold - red.)
Water pours from top and opens the doors.
Enter through door, forward and use the elevator.
Throne room:
<checkpoint> Go to Evelyn. Another disc puzzle is presented.
Use the disc puzzle. Evelyn explains about the oil basins that should be filled from the oil pump powered by the discs. Then the oil basins should be lit up to reveal a secret passage.
Throne room disc puzzle:
Use the disc puzzle again. There are 5 discs in this one.
Select-enter in this order as fast as you can: purple (2), green (5), red (3), gold (1) and blue (4).
You might need to play around the timing of one of the discs.
See the pumps are powered.
Torches: Enter the throne room. Evelyn says to ignite all the basins with the torch.
See 4 stands with levers in front of them.
Ignite the torch on the brazier at left.
Use the lever on a stand and then ignite the stand.
Start on front right, front left, back left and then automatically back right.
The secret passage behind the throne opens. Adam says something sweet to Evelyn
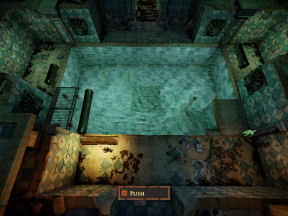
Logs in the pool:
Go down the steps until a pool. <checkpoint>
See a doorway at back of room and logs that can be used to make a bridge to the other side.
Push the log at bottom floor to the water.
Go to the log at left. Push log in to the water.
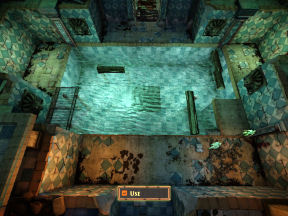
Go back to the bottom area.
Use the lever. The water from the pool is drained out.
Go down the stairs.
Push the small log at top left to the right end.
Push the bottom horizontal log to the 2 posts.
Push the long log to go right by the stairs.
Use the lever. The pool is filled with water.
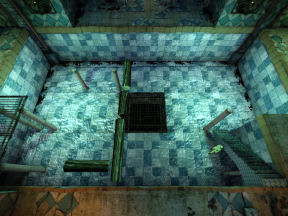
Jump on the right log in the water to get to the log on the right.
Push the log at right to the water.
Go back to the bottom area.
Use the lever to drain the pool again.
Push the 2 logs at right to go left (blocked by post and log).
Push the small log by the 2 posts down.
Jump over long log by stairs to go behind it. Push the long log by the stairs to go left and blocked by the small log.
Go back up and use the lever to fill the pool with water.
Walk the logs to the other side.
SOLOMON'S TREASURE
<checkpoint> Walk to the elevator.
Use the elevator's lever. Adam and Evelyn ride the elevator down to the center of the earth.
Walk the swinging bridge. A bridge falls into the unknown. Jump to go the next bridge.
Go forward to a rock tower at end of stone steps.
At the stone tower, use the puzzle on the wall.
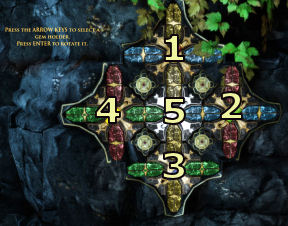
Color puzzle: The aim of the puzzle is to place gems of similar colors around a central tube-gem holder of the same color.
Use the arrow keys to select a gem holder.
Press enter key to rotate the gem holder.
Place yellow at left, red at top, green at right and blue at the bottom.
Rotate these numbers:
1 5 3 5 3 1 1 5 5 3
2 5 5 2 5 2
4 1 5 1 5 5 1
4 4 5 5 5 4 4 4 5 5
Stone walkway rose up around the tower.
Climb up to see Solomon's treasure.
Evelyn and Adam run back to the surface. The whole temple is coming down.
Run to the surface. Help Evelyn climb up.
Adam is crushed by a fallen column.
Evelyn is taken by James Saint Omair and the Clairvaux guards.
To be continued...
This document may not be distributed without express written permission of the author and the content may not be altered in any way.
For Questions or Comments on this Walkthrough,
Please write to: MaGtRoCopyright © 5/2011 MaGtRo