Adam's Venture
episode 1: The Search for the Lost Garden
Developed by Vertigo Games
Published by Iceberg Interactive
Walkthrough by PolloDiablo October 2009
Gameplay: This is a third person adventure game with action-sequences and timed puzzles. The game does not support the use of a mouse, everything is done with the keyboard only. The main menu has game (new game, load game), options, and exit the game. The game saves your progress automatically at checkpoints throughout the game and cannot be saved manually. I encountered some problems after loading a saved game where I ended up between two doors that were both closed so it is recommended to play the entire game in one go (can be done in about two hours). It is not Alt-TAB friendly. Also, you can die in this game, but you will return to the latest checkpoint.
The game has some hidden 'treasures' to collect, these are texts that do not influence the game in any way. The game does not keep track of how many you have found. I will mark these with an Optional tag so you can skip them if you are not interested.
Intro
We see and hear Adam Venture, a young explorer, explain how this whole adventure started with finding some memoirs from a knight, Charles L'Heureux. The document is full of strange symbols but Adam recognizes the names of the four rivers that mark the location of the Biblical Garden of Eden. He manages to get funding from the Clairvaux Corporation and together with his girlfriend Evelyn, their dog and professor Jacques Saint-Omair they set out to discover if the gardens are still there.
At the Gates of Eden
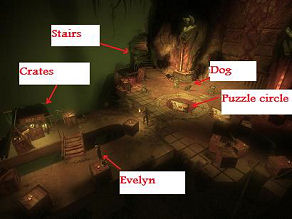
As the game starts, Adam, Evelyn, the dog and the professor have just set up a base camp near the entrance to the famous Gardens. A pop up hint will appear, telling you to use the arrow keys to walk towards Evelyn, so let's do so. At the bottom left of the screen you will see some arrows, these indicate you have reached the first checkpoint. Walk towards Evelyn until a new pop up box appears, telling you hitting [Enter] will open a conversation between Adam and Evelyn.
Oh no, Adam forgot to unload the crates of food and the plane has left because of a sand storm... Evelyn then tells you the professor needs your help with something and gives you a radio (walkie-talkie), accept it with the [Enter]-key. Use the arrow keys to walk behind Evelyn towards the circle and the gates.
Optional: You can look at the circle by walking onto it until the [Look]-hint appears (press Enter). Some pieces are missing. Press Enter again to close the screen.
Optional: Adam's dog is here, you can talk to him (press Enter when the pop up appears) and he will bark back.
Use the arrow keys to walk towards the staircase and go up. You will get another pop-up that tells you you can run by holding down the Shift-key. Go up until you reach the professor. When the Talk pop up appears, press Enter. Adam would like to just blast his way past the doors, but the professor wants to preserve them. He believes there is another way in, but the entrance is hidden behind some rocks. He asks you to find some explosives to clear these away.
Go back to base camp and find the crates under the roof. Press Enter to inspect the crate, then Enter again to pick them up.
Return to the professor (who has come down the stairs a bit and is getting impatient). Go up a bit further until you get the [Place]-hint. Press Enter and Adam will automatically run for cover. Return to the now-cleared entrance and walk into the cave. At the end, go left and Adam falls down a slope. Evelyn calls him on the radio but Adam tells her not to follow him just yet. He sees some swinging axes blocking the way. Walk towards them.
(A Checkpoint saves your progress here).
If you use the [Shift] key along with the arrow forward, you can run past them without dying. If you do get hit, you will die and return to the last checkpoint but you can try as many times as you like. You can also pause between the two axes but the camera angle makes it a little hard to judge where the second axe is in relation to Adam, so it's better to just run through both in one go.
The search begins
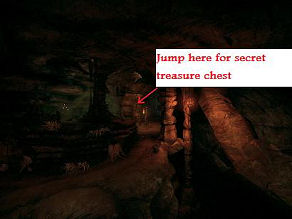
You end up in a cave. A cut scene shows you the layout of the cave.
Optional Go to the right and use [Enter] to [Pickup] a chest. It contains the first secret of the game (1/10), a text about Charles L'Heureux. Go back to the entrance of the cave.
Go to the left and follow the path until you come to a ledge. You can [Jump] with the [Space Bar]. Do so to make the message box disappear. Make your way further into the cave and you will reach an overhang. Pressing [Ctrl] will make Adam crouch. Continue towards the light. As you reach the other side, press [Ctrl] again to make Adam stand up again. Explore the new cave and walk towards the ledge. Adam can [Hang] from it by jumping towards it (use the Space Bar to jump). Now use the arrow keys to go to the right. Drop off by using the [Ctrl] key.
At this point, Evelyn gets in touch again and asks what is going on. He tells her he sees bats and hears a strange hissing noise, but she hears nothing. Must be static interference.
Walk down the ramp and towards the back of the cave. There are two openings here, but a gate is blocking one of them The other has a crate in its opening. Get close to the crate and you will get the option of grabbing it and dragging it out of the way with the arrow keys. Now you can enter it (don't forget to press [Ctrl] to crouch). Go though and you will end up in the first cave again, but now you are in its center. Walk towards the right and you will see a button on the wall. Go close to it and press [Enter]. This opens the gate in the previous cave. Go back to the left and press [Ctrl] to crouch and re-enter the tunnel. Go back to the cave and enter the tunnel that was previously closed off with the gate. There are some rats here but they are harmless. Follow the tunnel until you end up in a cave that has what looks like waterfalls made of dust or smoke.
Optional Go behind the rightmost of these 'dustfalls' to find the second secret treasure chest (2/10) and return to the cave.
On the bottom left of the screen there are some white stones forming a ledge. Go there and press the [Space Bar] twice to jump up. Go around and press the button on the right. This operates an elevator in the first cave. Go back to the ledge and return to the tunnel with the rats. Crouch to go through, re-enter the tunnel that was previously blocked with the crate and return to the first cave.
Evelyn contacts Adam again but there is more static. The professor has managed to translate some of the inscriptions and warns Adam that these caves were designed to keep humans away from the Holy Gardens for ever, but Adam is determined to go on. Walk onto the circular plate in the middle and the elevator will go down. Walk toward the back of the cave until you find your way blocked by a bush. Press [Enter] to set fire to it with your torch and continue to the next cave.
Faith Hope and Love
Cross the bridge and Adam will try to reach Evelyn. The connection is very bad and there is a lot of interference. A shadow cloud enters the cave.
(A checkpoint will automatically save your progress here)
This cave has three exits and only one of them is correct. They are marked with Faith, Hope and Love. If you choose the wrong exit, you will die. Fortunately, there is a puzzle that will tell you the correct answer. Walk to the pillar and press [Enter] to inspect it. It has three blocks, each with part of a sentence on it. The goal of the puzzle is to get them in the correct order. Select one of the blocks with the arrow keys and press [Enter] until it shows the correct bit of sentence. Select the “Check” button at the top with the arrow keys and press [Enter] to check if your solution is correct. If so, all three gates will open. If not, try again.
The solution is “So these three things remain” “Faith, Hope and Love” “But the greatest of these is Love”.
This is your clue to choose the exit marked Love. The gate closes behind you and the shadow cannot pass through. You are now in a new cave.
Optional There is a well-hidden ledge right at the entrance of this cave (to the left behind the pillar there). It does not give you the [Jump] pop up hint so you may have to try a few times. Pick up the chest for you third secret (3/10). Return to the main path.
Walk towards the gate on the left. There is a stone pillar here which you can [Use] by pressing [Enter]. This not only opens the gate but rewards you with your first Puzzle Piece. Adam calls Evelyn to tell her the good news. Continue down the path.
(A checkpoint automatically saves your progress here)
Ignite the brazier by pressing [Enter] to open the gate and enter.
A Leap of Faith
Cross the bridge and choose the middle path. Adam needs a key to open this gate. Go back and choose the rightmost path (behind the waterfall). Adam needs fire. Go back and choose the leftmost path (behind the waterfall) and continue to the puzzle pillar. In the same way as before, place the texts in the correct order and select the “Check”-button with your arrow keys to check the solution, If your solution is correct the waterfalls will disappear.
The solution is: “Everything can distract you” “Look behind the material world” “Take the leap of faith”.
Go back and re-ignite your torch at the brazier. Choose the rightmost path and ignite the brazier there. You can now continue deeper into this cave and find a key here. Go back and choose the middle path. Use the key on the gate (use [Enter]) and it will open. Walk onwards until you are on an rock overhang above a ravine.
Optional There are some white stones on the edge of this overhang. Jump down and enter the water. Go towards the back and walk along the rightmost edge of the waterfall. Follow the water and you will see some drawings of a jumping man and hands reaching out to catch him. Go left to find the fourth secret chest (4/10). Go back and climb out of the water. At the white stone ledge, use [Space Bar] twice to climb up again.
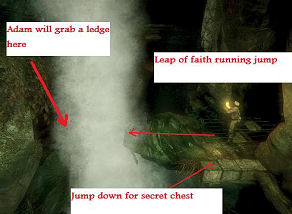
Now it's time for that leap of faith. Stand near the entrance of the cave (where the gate was that you opened with the key) and hold down [Shift] to run. Just as Adam leaves the overhanging rock, press [Space] to jump into the waterfall across the ravine. Adam will automatically grab an invisible ledge. Press [Space Bar] again and he will climb on. If you don't make it, just jump out of the water at the white stone ledge and try again. Walk down the path and Adam will see that shadow cloud again. He calls Evelyn to tell her. Continue on this path, cross a stone bridge, follow the path, cross a wooden bridge and find another stone pillar. Use this to find the second Puzzle Piece. This also lowers a ledge into place. Jump towards this ledge to grab it and use the arrows to go to the right. Drop off with the [Ctrl] when you are above the wooden bridge and follow the path to a blue cavern. There is a small cave behind a waterfall but it leads nowhere (your torch will extinguish if you do go here). Continue onwards.
(A checkpoint automatically saves your progress here)
Go to the left to find a rope ladder. Go up and light your torch if needed. Continue.
A Full Spectrum
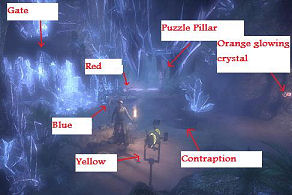
Continue onwards and you will see that the black shadow is still following Adam. Arrive in a cave with some crystals and some pillars. There is a gate on the left with a brazier behind it, some kind of apparatus in the middle and a huge stone plate covering an exit. An orange glowing crystal hangs to the right of this exit. Finally, there is another stone puzzle pillar here. If you inspect the apparatus you will find out something is missing. Go to the puzzle pillar at the back and jump into the water behind it. Walk towards the back and [Pick Up] a green crystal. You can't leave the water at the white stone ledge, so Crouch down when you see the pop up. Go towards the yellow light and end up in that small cave behind the waterfall in the blue tunnel I mentioned before. Leave this cave, go left, climb the rope ladder and re-ignite your torch. Walk back to the puzzle pillar and solve it by using the arrow keys and turning the blocks to put the sentence in the correct order. Use the arrow keys to select “Check” and if correct, the gate in front of the brazier will open.
The solution is: “I am the Light. Who follows me” “will never walk in darkness,” “but will have the light of life”.
Use your torch to ignite the brazier. Use the green crystal with the contraption in the middle of the cave. It is a prism. Now because the glowing crystal next to the stone plate is orange, it stands to reason we need orange light. Go to the yellow crystal and turn it, then do the same with the red crystal. The orange glowing crystal is now activated and the exit opens. The shadow cloud flees and Adam calls Evelyn to tell her he has discovered it is afraid of light.
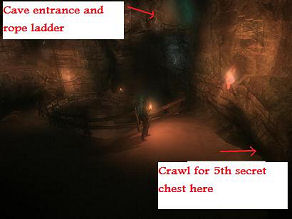
Follow the orange glow into the cave. Cross the bridge and follow the path until you find a stone pillar. Use it to find the third Puzzle Piece. It also causes a stone ledge to appear. Follow it and continue left until you find another rope ladder. Go gown it and follow the path to the left.
Optional On the right side here, there is a small opening. Use Crouch to enter it and find the fifth hidden treasure chest (5/10). Go back to the cave.
Go to the right until you find a burning torch and another rope ladder. Go down and see a metal gate to the right. Go left and find a brazier. Use it to open the metal gate. This is a timed puzzle, so use [Shift] to run to the gate. If it closes before you can enter it, light the brazier again and try again. Continue onwards.
(A checkpoint automatically saves your progress here)
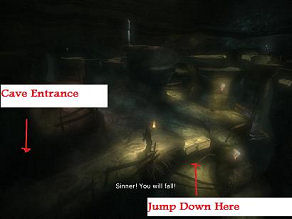
Hold on to your belief
Be very careful in the next section of the game as you can fall to your death here! The shadow is here and speaks to Adam. Adam will certainly fall! Adam isn't impressed much and continues. At the bottom right of the screen is a white stone ledge. Jump down here and go around the rock.
Keep close to the wall and jump down again at the white stone ledge.
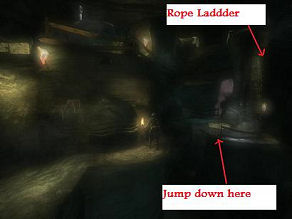
Go around to the rope ladder and climb up until a pop up box tells you you can jump off and towards the white stones at the other side of the ravine.
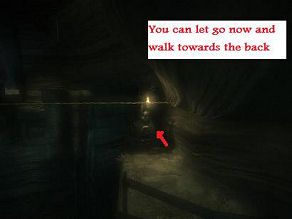
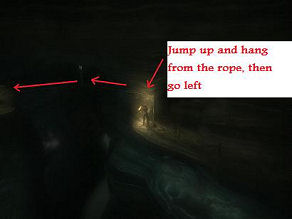
Use the [Space Bar] to do so and use it again to climb all the way up. You will need to crouch under an overhanging rock for a bit, then get back up and walk towards the gate. There is a rope above.
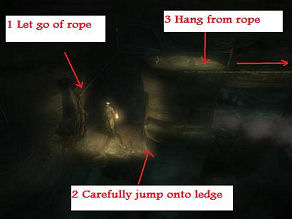
Use the [Space Bar} to jump and Adam will hang from it. Use the arrow keys to go left. Adam will automatically turn corners so just continue until you can't go any further. You can safely ignore the pillar and chest you see along the way, we will go to these later. When you reach the end of the rope, drop off with [Ctrl].
Walk towards the back but be careful not to fall off! There is another rope here, jump to it and use the arrow keys to go left.
Continue along the rope until you reach the end. Drop off with [Ctrl]
(A checkpoint automatically saves your progress here)
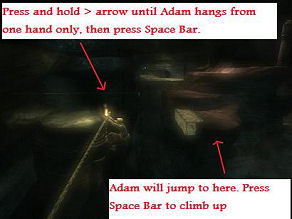
Carefully climb onto he ledge and jump to yet another rope. Use the arrow keys until you reach a round rock. There is a white stone ledge behind you. Jump towards it by pressing the right arrow key (Adam will hang from only one hand now) then [Space Bar]. Press [Space Bar] again to climb up.
There is a puzzle pillar here. Solve it in the usual way and select “Check” with the arrow keys to confirm the solution. If you are right, some large rocks will form a path for Adam to follow.
The solution is: “Faith comes by hearing” “And hearing by” “The Word of God”
Optional If you go right from the puzzle pillar, you can see a chest on another rock. Bu holding down [Shift] and jumping, Adam will grab the ledge. Use [Space Bar] to climb up. This is the sixth secret chest (6/10). It holds the same text as the fifth. Go back to the rock with the puzzle pillar you just solved.
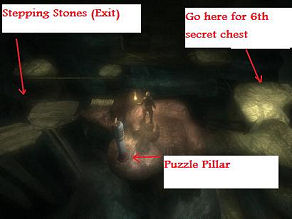
Follow the stepping stones (be careful, you can still fall off) and exit the cave.
(A checkpoint automatically saves your progress here)
Walk through the waterfall. Your torch will extinguish but some fireflies will light your way if you walk slowly. When you are near the end of the path, do a running jump by holding down [Shift] and pressing the arrow keys, then pressing the [Space Bar] when you reach the end. Press [Space Bar] again to climb up. Use the stone pillar to get the fourth Puzzle Piece and open the gate. Enter the next cave and an earthquake occurs. Evelyn felt it too and she calls Adam to tell him that. The shadow cloud shows itself again.
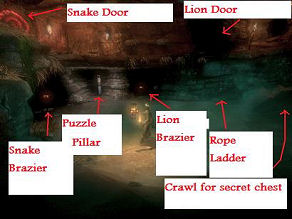
The Lion and the Snake
To your left is a door with a spiral symbol, a snake. Jump down into the water. There is a brazier here but no fire. Walk to the cave. It has a Puzzle Pillar. Solve it in the usual way and select “Check” to confirm your answer. If solved correctly, you will get a warning: “Beware of the snake!”. This is your clue not to go through that door with the spiral symbol.
The solution is: “See the Lion of Judah” “has triumphed. He is able to open” “the scroll and its seven seals”.
The brazier is burning now. Use it to light your torch and go up the rope ladder to the right. Look at the rock wall and see there is a lion's head here. Jump down into the water again.
Optional Go all the way to the right and see a small opening. Crouch down ([Ctrl]key) and go in to find a stone head and a chest with the seventh secret (7/10). Go back.
There are two extinguished braziers here. This is a timed puzzle. The left brazier temporarily opens the door with the spiral symbol (Snake Door). The right brazier temporarily opens the opening with the Lion's Head. Light the right brazier and use [Shift] to run to the rope ladder and jump up and through the Lion's door using [Ctrl] to crouch. If you don't make it in time, go back down and light the right brazier again. Crawl down the tunnel and burn away the spider's webs. A gust of wind will extinguish your torch. Go on and follow an arrow on the wall. Go down the rope ladder and drop down with the [Ctrl]key.
(A checkpoint automatically saves your progress here)
To the right is a small stream with a crate in it. Go to it and grab it. Drag it all the way to the front and then to the right until it is right next to the rock wall. Jump on with the [Space Bar] and crouch down with [Ctrl]. You can now continue beneath the overhanging ceiling. There is a rope ladder here, but continue a bit further to the right to relight your torch first. Now go up the rope ladder and follow the path to some spiderwebs blocking your way. Burn them and go through. Go to the right wall and jump up towards a white stone ledge. Press [Space Bar] again to climb up. Go right and follow the path.
Cross a wodden bridge and find another white stone ledge. Jump down and go left. Follow the cave to the back and arrive at a closed gate. Use the stone pillar to find the fifth Puzzle Piece. It also opens the gate. Enter it to reach a cave with some plants.
Follow the path until you hear something rumbling. The path back is now blocked. There is a stair here that leads down.
Optional Go left along the plants and into a passage. Go through the waterfall and onto a small ledge. Go right and find the eight secret chest. Go back through the waterfall and into the cave with the plants.
Go down the stairs and follow the path to the left. Cross a wooden bridge. A voice tries to make you give up. Ignore her. She will continue to talk to you for a while.
(A checkpoint automatically saves your progress here)
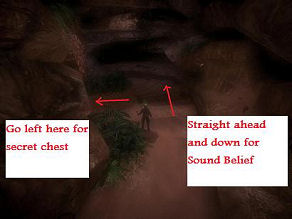
Sound Belief
There are three objects here, and three holes in the bottom through which steam escapes. There is also a Puzzle Pillar here, next to a huge stone blocking an exit. Solve the Puzzle Pillar as usual, and use the arrow keys to select “Check” to confirm your solution. It will give you the hint “Listen to the wind” and the objects will activate and start making sounds.
The solution is: “The wind blows where it will” “and you hear it's sound” (sic) “So it is with all born of the spirit”
Grab the objects and drag them onto a hole until you get the correct sound. If musical notes appear, you are doing it right. The large stone will roll away, revealing an exit.
The solution is:
Drag the object with the pipes (trumpets) to the backmost hole. The object with the wings belongs on the leftmost hole. The object with the horns on the rightmost hole.
Enter the tunnel and reach another cave. There is a brazier here that you can use to relight your torch if you need to.
(A checkpoint automatically saves your progress here)
Burn the spiderwebs on the right and find a stone pillar with the sixth Puzzle Piece. A stone bridge will appear. Cross it and go down the rope ladder.
(A checkpoint automatically saves your progress here)
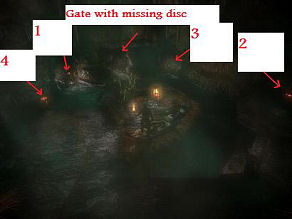
Cross the wooden bridge and find another Puzzle Pillar. A block is missing from it so we can't solve it! Walk into the dark tunnel behind the pillar and go left. Walk to the white stone ledge and climb up. Jump down at the other side. Go around the corner and see another white stone ledge. Ignore it for now and continue until you reach the bottom of the cave. Continue into the watery cave and find a small island with a burning brazier and four extinguised braziers in the water around it. There is also a gate, behind it we see the missing Puzzle Pillar block. This is a timed puzzle. Lighting one of the braziers with your torch will only make it burn temporarily. You have to light all four to open the gate. Go to each of the braziers in turn and light them to find out how long they will burn, and use that to determine the best route. Use the [Shift]key to run from one brazier to another. For me the best route was to light the second from the left first, then the rightmost, then the third from the left and finally the leftmost. But you may find another route easier, for instance 2,3,1,4. When the gate opens, pick up the missing block and return to the white stone ledge.
Climb up, crawl through the cave and find a chest.
Optional Open it to reveal the ninth hidden secret (9/10). Jump down to the left of the chest, this will take you back close to where the Puzzle Pillar is. Use the missing block with the pillar and solve it in the usual way. Select “Check” with the arrow keys to confirm your solution. If you are correct, the wooden bridge will turn on its hinge so that it leads to another cave entrance.
The solution is: “Ask and it will be given” “Seek” “and you will find”
Cross the bridge, follow the passage and go down the rope ladder. Another earthquake! Adam tries to reach Evelyn, but it is another voice he hears. The voice tells him Evelyn has fallen and Adam will never reach his goal. But he is not ready to give up!
(A checkpoint automatically saves your progress here)
Continue down the path and find another swinging axe. Use the [Shift]key to run past (start running when the axe is at its lowest point). You may need to try a couple of times as this one is a bit harder than the previous axes. You will now reach a large stone door with a stone pillar. Use it to get the seventh Puzzle Piece. The door opens. Go through.
Optional Just behind the door is a chest. Open it to get the tenth secret message (10/10).
Follow the path and you will arrive where you started, in the cave with your
base camp. Evelyn is happy to see Adam safe and sound and wants to leave as soon
as possible as the cave is on the brink of collapsing. The professor does not
agree and threatens to kill Evelyn if Adam does not use the seven puzzle pieces
to open the gates.
(A checkpoint automatically
saves your progress here)
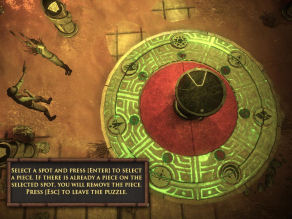
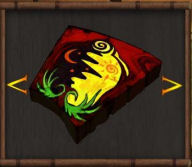
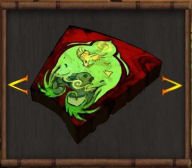
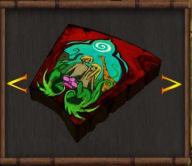
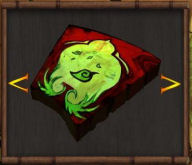
Around the circular puzzle there are seven pillars. Read the texts on them. They are texts from the Bible, the book of Genesis, and reveal how God created everything. If you don't know this text, make a note of the order in which God created things. Everything started with the creation of the Light. In the middle of the circular puzzle is a pillar. Some distance from the puzzle there are two braziers. Go to the rightmost brazier. Pressing [Enter] will make the outer circle of the puzzle turn. Do this as many times as needed to get half of the sun symbol appear at the top. Now go to the leftmost brazier and turn the inner circle of the puzzle until the sun symbol is complete. The pillar in the centre of the puzzle will rise and activate. Go to it and place the puzzle pieces you found in the correct order. Ignore the symbols on the outer circle and look at the symbols in the inner circle only.
|
|
|
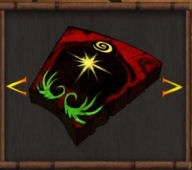
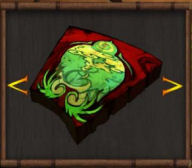
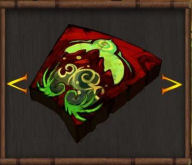
On the first day, God created Light. Place the puzzle piece that is mostly black with a single star where the Sun symbol is at the inner puzzle circle. On the second day, God separated the waters. The puzzle piece that is mostly green and has some yellow clouds at the top goes here. On the third day, God separated water and land. This puzzle piece shows a the sea and some mountains. On the fourth day, God created the sun, moon, planets and he stars. This puzzle piece has a dark half with a red moon and a light half with a red sun. On the fifth day, God created birds and sea creatures. This puzzle piece has a yellow bird and a green fish. On the sixth day, God created mammals and humans. This puzzle piece shows people in a garden. On the seventh day, God admired his creation. This puzzle piece is mostly green and has a single leaf.
|
|
|
|
|
|
|
|
|
|
If you have done everything correctly, the doors will open and the professor will run through, but the shadow cloud follows him in! Adam and Evelyn escape and make it to the plane just in time. To Be Continued...
This document was provided to GameBoomers.com and may not be distributed without express written permission of the author and GameBoomers and the content may not be altered in any way.