Adam's Venture Episode III: Revelations
by Vertigo Games BV
Walkthrough by MaGtRo March 2012
Gameplay: This is a third person keyboard controlled game.
The main menu has resume, new game, options and exit game.
The options menu has display and audio adjustments. The display options are for resolution, full screen, world detail and texture detail. The audio options have sliding bars to adjust master and music volume; and subtitles selection.
The saved games are done automatically. See a check mark at bottom left when a checkpoint save occurs. Going back to a previous game is not possible.
The items picked up are seen at top right of the screen. The item is used automatically when the appropriate action is entered.
The keys used in the game:
ESC accesses the menu page.
Shift makes the character run.
Ctrl makes the character crouch.
Space bar makes the character jump.
Enter key tells the game to do the action.
Toggle to remove the key action.
After the last scene in episode 2 - Solomon's Secret, Adam Venture and Evelyn Appleby are inside the collapsing temple. Adam is crushed by a fallen column. Evelyn is taken by a Clairvaux leader.
2 years ago in Oxford
Adam wakes up in the office of his father. Adam's father is close to proving his Genesis Theory. He wants Adam to find his new assistant.
Find the new assistant:
Open and exit through the door. Go down the hallway and turn right at open archway at right.
Go down the steps outside and right through the hallway. (Checkpoint.)
Climb the steps to the next building.
Go down the hallway and see the locked door of the old library at left.
Continue down the hallway and right to the reading room.
Adam talks to the lady. Meet Evelyn Appleby, the new assistant.
Key to unlocking the library door:
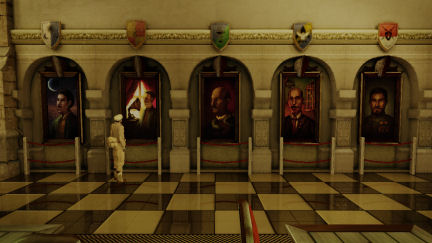
Evelyn asks for help in deciphering the clue to unlocking the library door.
Inspect the 5 large portraits on the wall.
Note that each portrait has a distinct characteristic that matches the coat of arms on top of the portrait.
Use the left and right arrow keys to select a painting. Press enter to select-highlight it.
Move the highlighted portrait to the correct position. Press enter to leave it there.
Do the next portrait.
Left to right: Man with moon under the coat of arms that has moon, Man with phonograph under the coat of arms has G-clef symbol, Man with white ruffled collar under the medical symbol, Man with birdcage under the dove coat of arms and man with medals under the sword coat of arms.
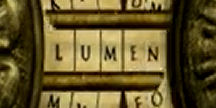
See LUMEN on the portraits. (Checkpoint.)
Unlock the library door:
Follow Evelyn up the stairs and go to the locked old library door on the left down the hallway.
Open door to see the lock.
See 2 ovals connected by bars at the center.
The oval on the left has 3 rings and the oval on the right has 2 rings.
The object of the puzzle is to enter LUMEN between the bars at the center.
Arrange the rings to form LUM on the left and EN at right.
Select a ring using the enter key. Keep on pressing the enter key until the letter needed is in position.
One possible solution:
To reset the puzzle, use the ESC key to pull back and then open the door again.
Highlight the outer ring of the left oval.
Use the enter key until the middle left oval and the outer left oval form UM somewhere around the oval and out of the bars.
Use the left arrow key to highlight the middle left oval.
Use the enter key and note that UM now rotates at same speed but the innermost turns at different speed.
Now use the enter key to turn and form LUM somewhere around the oval.
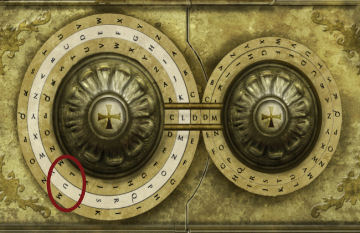
Use the left arrow key to highlight the innermost left oval.
Use enter key to see that the left oval's rings turn still forming LUM and place it between the bars. It should show LUMEW as of now.
Highlight the inner ring of the right oval. Turn it to get N to match the LUME that should be within the bars.
Find a book that "is staring at you":
Evelyn now states to look for the book that the professor states is "staring at you". (Checkpoint).
Staring at you: Look around in the library.
Go to the back part of the library.
Inspect the book case on the left wall to face it.
See that there is an "eye" at top of the book case.
Get up to the top: See that there are 3 ladders that can be moved right-left and up-down.
The ladder can be moved up at right and left side of the bottom shelf of the bookcase.
The ladder can be moved up at right side of the middle shelf of the bookcase to the top.
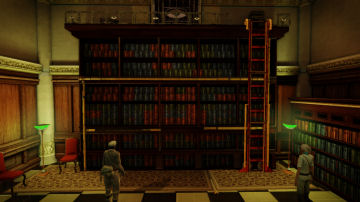
Climb up the ladder to the top.
Pick up the book on the left.
The eye panel opens up to show a secret passage.
Crouch (Ctrl key) to enter the passage. Go forward and around until the very end.
Adam falls down from the ceiling.
Go down the hall and push open the door at right.
Go back to the professor's office - the open door at left of the hallway.
The book is the History of the Enlightened Ones.
Reveal the secrets:
The book will reveal the secrets. The professor and Evelyn study the book.
Look around the room and note the coat of arms above the fireplace. There's a square hole at center.
Take the book they are reading from the desk.
Inspect the coat of arms above the fireplace. Adam inserts the book on the square hole.
The floor opens and Adam drops down to an old cellar.
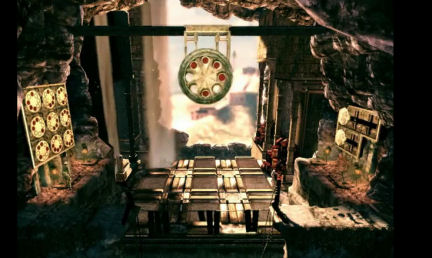
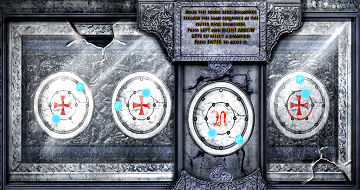
Templar disks:
S disk: Enter the tunnel at right by crouching (Ctrl key) and moving forward.
Inspect the wall and see 4 circles; 3 have the Templar cross.
Arrange the inner diamonds in the circles to be in sequence as the outer diamonds. Use the arrows to select the diamonds-circles and press enter key to move them.
Note that the sequence difference is 1 position clockwise.
Get an S disk. The locked door opens.
Exit through the door to an open area.
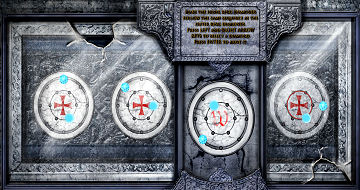
N disk: Go down the stairs. Automatically hang over the broken stairs.
Use the Ctrl key to drop down to the next stairs.
Go down the stairs and automatically hang on the broken stairs.
Drop down again by use of ctrl key. Go to the next cell. Bats! Eek!
Inspect the back wall for another set of circles.
Do the sequence again. Note that the sequence difference is 2 empty space-positions counterclockwise on outer ring and clockwise on inner ring.
Get an N disk. See the lower level cell is opened.
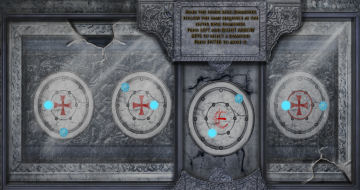
W disk: Exit the cell.
Go down the stairs. Go to the center of the clocklike lift at center of the chamber.
Pull the lever to bring the lift down.
Go to the opened room at the back. The lift tilts.
Inspect the wall with the Templar cross disks.
Arrange the circle to be in a sequence. Note that the diamonds moved sequential 1, 2, 3 positions counterclockwise.
Get a W disk.
E disk: The lift falls down. Exit the cell.
Go to the broken stairs at right and hang on the steps.
Shimmy around to the right. Drop down three times to the next level.
Drop down on the left and see the next cell. It is locked.
Go left and drop down to the next level.
Go right and run-shift and jump-space bar over the broken part of the stairs at right.
Continue down and see a key. Use to pick up the key. See a locked door at the lowest level.
Go back up (run-jump) the broken stairs.
Go to the left and jump up twice to the overhanging step one level above.
Walk close to the wall to the cell door.
Open the locked cell door.
Inspect the wall with the Templar cross.
Arrange the circle to be in a sequence. Note that the difference is sequential 2, 1, 0 empty space-position clockwise in inner ring and outer ring.
Get an E disk.
Exit the cell.
Go down to the next level and then to the next lowest level.
See that the door is now open. Go through door.
Go forward and go through the next door. (Checkpoint)
World map:
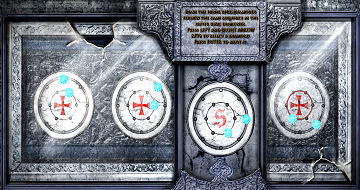
Cardinal points: See a large map of the world at center of room. Look around.
Inspect the 4 alcoves on the 4 cardinal points. Note the red on white symbols.
Inspect the control panel SW of the large map.
Press the left-right arrow keys to select a symbol.
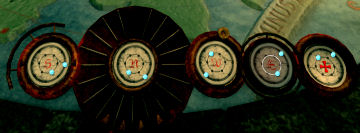
Then press enter key to select a disk. See the disks picked up underground at top left of screen. Use the arrows to scroll through the disks.
Left to right: S N W E disks.
The disk swings down and the light above turns on.
Templar secret location: Inspect the control panel again.
Similar to the Templar disks puzzle; arrange the inner ring to be in sequence.
The outer ring has 0-1-3 empty space difference clockwise. (I ignored the Templar disk at right). :(
The light above shines on a place in southern France - Luz
Luz, France - 1925
Adam and Evelyn are in route de Luz. See that a truck is blocking the bridge.
Talk to the man sitting on the bench.
Repair the truck:
The man is delivering a crate to the professor studying their town. He will take Evelyn and Adam to the professor if the truck is fixed.
Go to the hood of the truck. Inspect the truck. Adam needs a wrench.
Talk to the man about a wrench. Get a wrench. Go back to the truck.
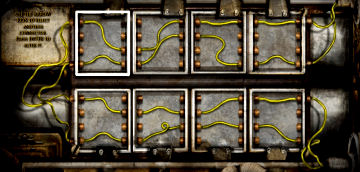
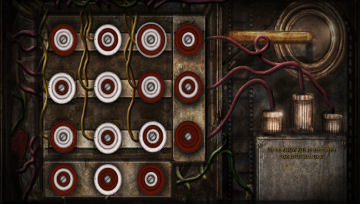
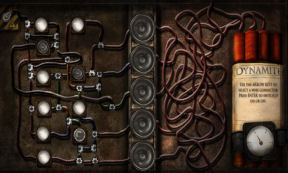
Connect the wires: See 8 boxes with wires.
Arrange the wires so that they have a continuous connection.
Climb on the repaired truck.
Professor's house:
The truck stops in front of the professor's house. (Checkpoint).
Knock-open the door bottom left of house. Talk to Professor Saint-Omair. He wants you to bring the delivered crate to the roof.
Bring crate to the roof: Go to crate.
Drag the crate to the right and back to the elevator left of the boiler.
Go right and pull lever in front of boiler. The crate rises to the second floor.
Climb the ladder up to 4th-roof level. Pull level at right corner to raise the elevator to top level.
Go down to third level and see that the crate is now at third level. Pull the lever to get crate to the right.
Go back up to roof and pull lever to lower the elevator.
Go back to third floor and pull lever to get the crate back to the elevator.
Go back to the roof and pull lever to get the crate to roof. (Checkpoint).
Talk to the professor. Evelyn takes over the conversation.
Fix the windmills:
See several windmills on the rooftop. Evelyn will fix the ones ahead.
One windmill: Jump to the rope going left. Go left until the end of the rope.
Use ctrl key to jump down. Adam slides to the next roof.
Go around the roof edge and forward to the windmill.
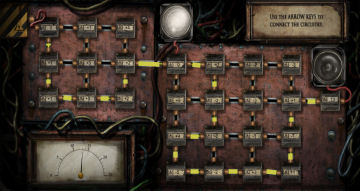
Use the windmill. Use the arrows to connect the circuitry.
See that you need a total of 9 and then 13 to complete the circuit.
You need 9 first to get the middle lamp lit. Then get 13 to light the far lamp.
Each panel has + or - numbers.
See the windmill turn and a bridge is lowered.
Second windmill: Go to the lowered bridge.
Go back and around to the left of this roof with turning windmill.
Climb the ladder. Go left and cross the bridge.
Go around the roofline of this house and climb the next ladder.
Walk to the left of this roof (squares). Go to the windmill.
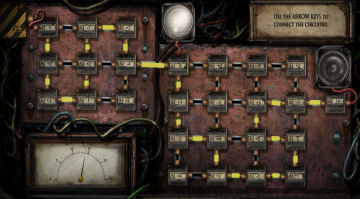
Complete the circuitry again.
The middle lamp needs 8 and the right lamp needs 14 total. (Checkpoint).
Third windmill: Go to the left roof edge. Go to the right of the crates.
Run-jump to the roof of left building. Jump up to the roof.
Jump up to shimmy on the rope and then go right.
Jump down twice. See Evelyn at far roof.
Go to roof at back center with red eaves. Shimmy to the right.
Evelyn needs help with the last windmill.
Jump down at corner of red eaves. Go forward to Evelyn.
Evelyn lowers the ladder. Climb up to Evelyn.
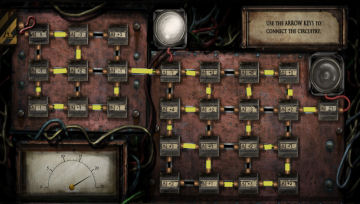
Use windmill panel.
The middle lamp needs 1 and the right lamp needs 21.
All the windmills are functioning. The professor is happy to brew his coffee.
Inside the professor's house, Evelyn talks to the professor about Luz. Luz and the church are of interest to the professor and those funding his research. (Checkpoint.)
The professor will explain his research if Adam can get the projector going.
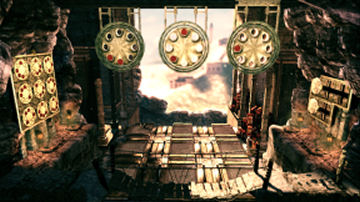
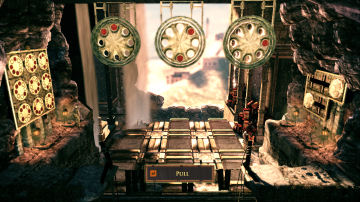
Set up the projector:
Inspect the projector at center of room.
Select a white fuse and press enter to change the way it looks.
Each fuse is made up of 3 rings.
The rings of the colored fuses rows or columns when combined must match the colored fuses at the bottom and right edges.
One solution is below:
The Clairvaux Corporation is the one funding the research of the professor. The corporation acquired the memoirs of Charles l'Heureux. The knight joined the Third Crusade with Richard the Lionheart. Charles ended up here in Luz and unlocked the Secret to Genesis. The professor is looking for the grave of this Templar Knight.
Templar Church, Luz
The professor takes them to the Templar church. (Checkpoint.)
Find the tomb of the Templar Knight:
Look around. The professor is intent on the tombstones. Note that the tombstones can be lit up when clicked on.
Evelyn is studying the 3 statues on the left. Note that the statues can be turned when used.
Clue: Go to the right of the columned structure and left of the door to the church.
See an ivy covered panel. Move the ivy and see a depiction similar to a music sheet.
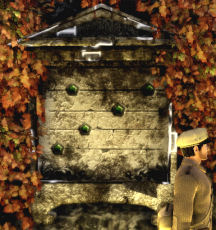
Bells: Inspect the columned structure.
See 4 bells hanging on the top of the arch.
Ring the bells to note the tones (low to high) of each one. Low to high tones (left to right): 2, 3, 1 and 4.
Pull back by use of ESC key to reset the puzzle.
Ring the bells based on the clue on the wall.
From left to right, ring bell: 2, 4, 3, 1 and 4.
The floor of the structure reveals stairs to the crypt.
Knight's crypt:
Adam finds a chest and opens it.
The professor takes the book that shows the location of Paradise. He wants to contact the corporation immediately to go on the expedition.
Evelyn reads a warning note about immortality is wrong.
Adam agreed with the professor. Adam promises Evelyn to keep her safe.
To learn more - play Episodes 1 and 2.
Solomon's Temple
Adam wakes up at the ruined Solomon's Palace. (Checkpoint.)
Find Evelyn:
Adam has to find Evelyn to keep his promise of keeping her safe.
See the hole on back wall.
Go to the wall at left. Jump up and go forward to the large opening on the wall.
Go forward and hear a loud blast. Continue to the end.
Hear Evelyn refuse to help them. The baddie brings Professor Venture to get Evelyn's cooperation.
Go forward to the opening on the wall and see them attach wires to TNT to blast the structure. Close.
Go left and climb the wall. Go left and back to the ladder. Adam climbs the ladder.
Go to far right and pull the lever of the lift. Go on top of the lift. It goes down one level.
Go left close to the wall walking on railroad track.
At the left end, walk to back close to left wall. The baddies finished attaching the wretched wires and leave.
Neutralize the explosives:
Explosives 1: Go down to the explosives and the controls. (Checkpoint.)
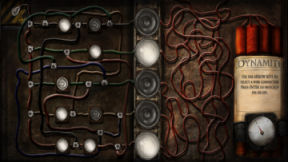
Use the control and see wire connections.
Use arrows to select a connection. Press enter key to turn on or off the connection.
Follow the wires coming out of the dynamites to the large oval lights.
Then work on finding which connectors can turn off those large oval lights. It might need combination of connectors to turn off one large oval light.
Climb the railroad car at bottom of screen. Push to start the car.
See a maze at end of the run. (Checkpoint.)
Maze 1: Go to the maze.
Go: Up, Down, R, R, U, Left to lit square. See the bridge at right light up.
Go: D, D, L, D, R, R, U, D, R, U, U, R. Cross the bridge and see another set of explosives.
Explosives 2: Neutralize the explosives using the control on top of left barrel. (Checkpoint).
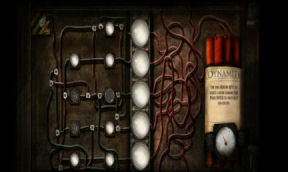
Use arrows to select a connection. Press enter key to turn on or off the connection.
Follow the wires coming out of the dynamites to the large oval lights.
Then work on finding which connectors can turn off those large oval lights. It might need combination of connectors to turn off one large oval light.
The bridge goes up. Enter the railcar at right and push.
Maze 2: See another maze at end of the track.
Enter the maze. Think ahead and open gates to planned exit route.
Go: D, R, U, D, D, R, L, U, U, U, R, D, R, U to lit square.
Go: D and R to bridge.
Explosives 3: Neutralize the explosives. Use the control on top of the drum.
Use arrows to select a connection. Press enter key to turn on or off the connection.
Follow the wires coming out of the dynamites to the large oval lights.
Then work on finding which connectors can turn off those large oval lights. It might need combination of connectors to turn off one large oval light.
Go down and right to the next railcar.
Hear a soldier talk to the baddie boss. The head of Clairvaux Corporation wants war so that he can make money selling weapons.
Ride the railcar.
Maze 3: Last maze to do. (Checkpoint.)
Enter maze. Think ahead and open gates to planned exit route.
Go: R, U, R, D, U, L, D, R, L, D, L to lit square
Go: D, R, U, R, U, R to bridge at right.
Save Prof. Venture and Evelyn:
Cross the bridge and go forward.
See that Professor Venture and Evelyn are in the elevator with the baddie. (Checkpoint.)
Go forward on the path left of the elevator.
The baddie is wiring the rest of the explosives.
Trap the baddie:
Floor: Note that the floor below is divided into 3 x 3 squares.
See that the professor and Evelyn are at top left corner.
The baddie that is wiring the explosives is located at middle right.
Hanging circles: There are 3 large hanging circles with red dots at the center.
They are affected by the levers by the left wall and the levers by the right wall.
Right panel: The panel at right shows circles that can be positioned on the different slots.
The top circle selects which large hanging circles are to be acted on. The left or far lever in front of it moves the circle to the position of the chosen hanging circle.
The bottom circle changes the way the chosen circle is shown. The right or closer lever moves the bottom circle left or right. If the circle is at bottom left; the chosen circle is flipped side to side. If the circle is at bottom right; the chosen circle is flipped up-down.
Left panel: The panel on left wall has 9 circles in a 3 x 3 arrangement.
There are 2 levers in front of the left panel.
The right or far lever executes the actions (flipping) done on the bottom panel at right wall.
The closer or left lever combines the 3 hanging circles into one and drops the cage into one of the 3 x 3 squares on the floor below.
Since the baddie is at middle right on the floor - note the circle located at middle right of the panel.
Arrange the 3 hanging circles:
The aim of the puzzle is to reproduce by arranging the 3 hanging circles at center to show the circle with red dots that is located at middle right of the panel on the left wall.
Note: Crossing the bridge will entail run-jump or shimmy on rope depending on how much damage is done on the bridge.
Study the 3 hanging circles and see what is needed to be done.
Left hanging circle: Go to right wall panel. The left hanging circle needs to be flipped up-down.
Check to see if the top circle is at leftmost position; if not move it there using the left lever.
Move the bottom circle to right side using the right lever on the floor.
Cross bridge and pull far right lever at left wall. The circle is flipped up-down.
Middle hanging circle: Go to right wall panel. The middle hanging circle needs to be flipped up-down and side to side.
Move the top circle of right panel to middle using the left lever.
Check if the bottom circle is at right side; if not use the right lever on the floor.
Cross bridge and pull far right lever at left wall. The circle is flipped up-down.
Go back to right wall panel.
Move the bottom circle to left side using the right lever on the floor.
Cross bridge and pull far right lever at left wall. The circle is flipped side to side.
Right hanging circle: Go to right wall panel. The right hanging circle needs to be flipped side to side.
Move the top circle of right panel to right side using the left lever.
Move the bottom circle to left side using the right lever on the floor.
Cross bridge and pull far right lever at left wall. The circle is flipped side to side.
Combine the 3 hanging circles: Now that the red dots are all in position, combine the circles.
Use the close-left lever on left wall.
Watch what happens.
Just the preface...
This document may not be distributed without express written permission of the author and the content may not be altered in any way.
For Questions or Comments on this Walkthrough,
Please write to: MaGtRoCopyright © 03/2012 MaGtRo