| |||||||||||||||||||||||||||
| |||||||||||||||||||||||||||
RAILWAY STATION | |||||||||||||||||||||||||||
| Knock on the door to the ticket office, then simply push the door open and enter. | |||||||||||||||||||||||||||
| Examine the telegraph machine noting the message attached to it. This puzzle is optional, and as decoding the message is a tedious and lengthy process, I suggest leaving it out. However, for sake of completeness, the solution is included. There's a book explaining Morse code on the left of the shelf above the sleeping railway man. Using the book you can translate the message, noting that to view the entire message it must be scrolled towards the left. The message must be typed exactly as shown below without any punctuation marks. Use the <NEXT> key to enter the spaces and press the <ENTER> key at the end. | |||||||||||||||||||||||||||
| |||||||||||||||||||||||||||
| Samuel's thoughts about it getting cold indicate that you need to light the stove. Take the stump lying on the floor next to stove and you find a matchbox hidden between the books on the right of the shelf in the far corner. Open the stove and put the newspaper (already in your inventory) and stump inside, then light them with the matchbox. | |||||||||||||||||||||||||||
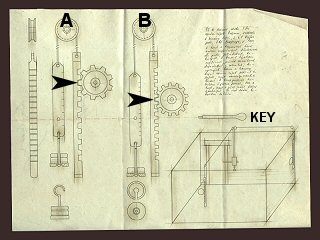
After lighting the stove go outside and explore the area. When you now return inside the railway man will have turned over. Examine him to find a small key that unlocks the cabinet next to the writing desk. In the cabinet you find medicine bottle and a letter from Paavo (the railway man's son) with a diagram of a lock system. From the letter you know the lock system is for a shed, that can only be through the door you saw outside behind the ticket office. The lock works on a system of wheels and pulleys, so you must find both wheels. You should've seen one of them on the outside wall of the ticket office. Examine the table below the three plates on the wall opposite the entrance to the ticket office to learn that it moves to the left or right. Move the table to the left, then examine the plate above it, on the left. The plate rotates, and it has nine different settings. The wheel on the outside wall also rotates, but has thirteen different settings. By studying the diagram you should be able to work out the settings for each wheel. | |||||||||||||||||||||||||||
| |||||||||||||||||||||||||||
The wheel and pulley on the left (marked A) has nine notches, while the right one (marked B) has thirteen notches. From this you know that A is the plate and B is the outside wheel. The wheel in A is positioned in the second notch and the wheel in B is positioned in the fifth notch. First turn the plate all the way to the left (top notch) then once to the right to position it in the second notch. Similarly rotate the outside wheel all the to the left, then four times to the right to position it in the fifth notch. | |||||||||||||||||||||||||||
| Finding the key to insert in the slot is more difficult. From the diagram illustration you know what it looks like. Can you think of something with a similar shape? Did you notice the bell on the post? To examine the bell you need to approach it from the side of the ticket office, and not the front. Remove the bell clapper to learn that it's actually a key! Insert the key into the slot and open the shed door. | |||||||||||||||||||||||||||
| The steam organ inside the shed is not working. Trace the pipe along the wall to find that it goes through the wall into the ticket office. Also note the valve where the pipe enters the wall. You should now realize that the large bowl on the stove is used to boil water (creating steam) and that water is supplied from the water tank. Climb up to the second tier of the water tank, then look for a lever on the wooden floor. Turn the lever to open the water supply and you hear the sound of water flowing. Go to the stove in the ticket office and pull down the lever next to the two pressure gauges at the top. The water boils, causing steam to flow through the pipe into the shed. Return to the shed and open the valve on the pipe. There's a roll of lint on the small table next to the steam organ that can be wrapped around the hole in the segment of pipe that's leaking. The steam organ should now be fully functional. | |||||||||||||||||||||||||||
| There are three signposts in the surrounding area. Examine the map on the wall in the ticket office to see that the Borgesiida (the northernmost village) is at the intersection of E28 and N68, the co-ordinates you found on the stone. | |||||||||||||||||||||||||||
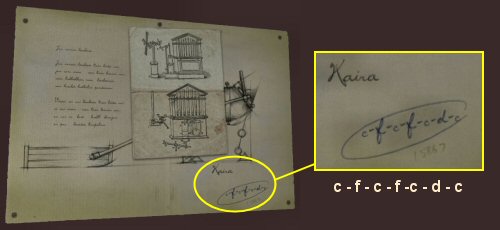
| The letter on the writing desk in the ticket office explains the whistle sounds that Kaira has been taught. Also, one of the diagrams on the wall has a handwritten notation regarding Kaira. | |||||||||||||||||||||||||||
| |||||||||||||||||||||||||||
| The letters in the notation are the musical notes used to summon Kaira. Press the corresponding pedals on the steam organ to call Kaira, who will be outside. From the letter you know that playing three notes with the widest difference between the middle sound and the other two, makes her face farther north. To do this press the C pedal, then the F pedal (furthest away) and then the C pedal again. | |||||||||||||||||||||||||||
| All that remains is for you to climb into the 'box' sled pulled by Kaira... | |||||||||||||||||||||||||||
BORGESIIDA VILLAGE | |||||||||||||||||||||||||||
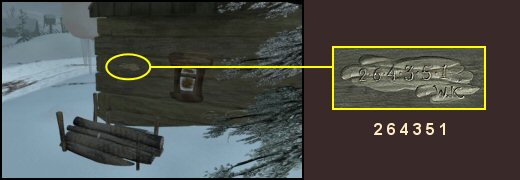
| At the point from where you enter the village there are three paths. Take the left path, towards the cabin on a mound with smoke coming out the chimney. From there go forward twice in the general direction of a split pole fence. Pan to your right, facing a cabin with a large tree and pile of logs next to it. Examine the markings on the wall, which bear the same monogram as the letter Samuel received at the museum. Make a note of the numbers as you need them later. | |||||||||||||||||||||||||||
| |||||||||||||||||||||||||||
| Note that if you don't find the cabin with the markings on the wall, the same markings can be found later in the game. | |||||||||||||||||||||||||||
| A bar (the only cabin you can enter) is alongside the split pole fence and has a circle painted on the door. To get to it from the cabin with the markings, you must first go up the mound (towards another cabin with smoke coming out the chimney) and then head back down towards the split pole fence. | |||||||||||||||||||||||||||
| The occupants inside the bar are not exactly talkative and won't respond to any of the dialog topics. You need to find a way of gaining their trust. The dog lying on the floor appears to be ill, and you just happen to have a bottle of medicine. The medicine is intended for human consumption, so it needs to be dissolved before giving it to the dog. There's no water in liquid form, but did you notice the icicles at the entrance to the bar? Break off an icicle and put it into the cup you find on the counter opposite the barkeeper. Put the cup (with the icicle) on top of the stove in the bar to melt the icicle. Combine the medicine and cup of water, then pour it into the dog's bowl. | |||||||||||||||||||||||||||
| On witnessing your kindness to the dog the girl leaves and beckons you to follow her. Go outside and find her waiting at the split pole fence. Talk to her, taking note of where she says Vainio's hut is, and how you can get there. In return she asks you to deliver an envelope to Vianio. Open the gate in the fence to get to the other side. Pick up the oilcan in the snow and climb into the sleigh. This time you get a genuine sleigh ride with a reindeer! | |||||||||||||||||||||||||||
| Note that if you don't take the oilcan there's another one to find when you need it later. | |||||||||||||||||||||||||||
LAKE AREA | |||||||||||||||||||||||||||
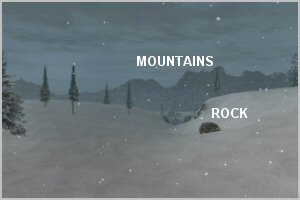
| After crossing the collapsed bridge you can initially only go in one direction. Walk forward once and you see a polar lights observation post on a snow mound. Walk up the mound to the observation post. Examine the telescope, noting there's a part is missing from the wooden block on the left. To find the missing part you first need to walk down from the mound. From now on, you often have a choice of directions in which to go. Study each direction carefully, and in particular, the far horizon. Look for the range of mountains that are not covered in snow. The mountains are visible from most locations, and by walking towards them you eventually get to the lake. | |||||||||||||||||||||||||||
| |||||||||||||||||||||||||||
| Head toward the lake until you get to the location shown in the graphic. Take note of the lake (at the foot of the mountains) and the rock. Turn to your right to see some large rocks. Go to these rocks and take the wheel lying on the ground between the two small rocks. To return to the observation post, always take the direction that does not lead to the lake, i.e. away from the mountains not covered in snow. | |||||||||||||||||||||||||||
NOTE | |||||||||||||||||||||||||||
| |||||||||||||||||||||||||||
| At the observation post attach the wheel to the telescope. Use the oilcan to oil the wheel, allowing it to be freely turned. Set the dials on the panel to the numbers you saw on the cabin wall markings (264351) and then turn the wheel. A hidden drawer opens and you get another codex scroll. | |||||||||||||||||||||||||||
| Now make your way Vainio's hut. First go to the lake, turn right and continue walking straight ahead until you reach it. Vainio tells you about the first board game when you give him the envelope from the girl. | |||||||||||||||||||||||||||
PLAYING TABLUT | |||||||||||||||||||||||||||
| There is no fixed solution to the game if you set the difficulty level to Normal. If you cannot beat Vainio, you need to set the difficulty level to Easy. This is done in Game Options in the Main Menu. | |||||||||||||||||||||||||||
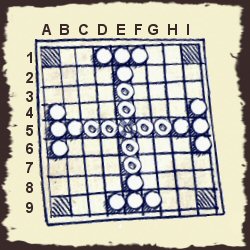
| The Tablut board is divided into a 9X9 grid of squares. The columns are identified with the letters A - I and the rows with the numbers 1 - 9. Each square is referenced by its column and row. | |||||||||||||||||||||||||||
| |||||||||||||||||||||||||||
To win in EASY difficulty level, move your pieces as follows: | |||||||||||||||||||||||||||
| |||||||||||||||||||||||||||