WALKTHROUGH AND INSTALLATION INSTRUCTIONS FOR ALIDA
By The Fellowship of the Quest
*Step-by-step instructions for installing Alida on Win XP or Win 98 are at the end of this walkthrough. (Note: these installation instructions are applicable to the North American version of Alida. The European version contains its own installation program.)
Alida Begins
You will find yourself on an orange stone balcony as the game opens. Alida is point and click and non-linear. You use the mouse to advance and, when the cursor changes to an arrow, you can turn. Once you have already been to a location in the game, you will often see the cursor turn into a rocket icon. This means that you can “rocket” to the next location without having to take each step to get there. (Check to see if this feature is enabled by putting the cursor up at the top of the screen and clicking on “Transitions” and making sure that the “Rocket Mode” is checked.) You can miss things by using the transitions this way, so be sure you have thoroughly searched an area before using it. If you don’t want to use Rocket Mode, just move the cursor a little and it will change to an arrow again.
There is a lot to explore in Alida before you have to solve any puzzles. First, I suggest exploring on your own to get yourself oriented, then return to this place on the balcony.
Okay, back on the orange stone balcony, looking out to sea.
The Orange Stone Chamber and the Puzzle Cabinets
Turn right, step forward and turn right again to go down an arched hallway of orange stone. You will enter a large orange stone chamber with giant fingers coming out of the wall. There’s a giant plectrum (used to strum a guitar) at the far end of the chamber. You’ll also find three puzzle stations, or puzzle cabinets, each in its own arched alcove. Behind the cabinets are transportation devices called T-runners, crafted by the multi-talented Juno.
Turn left into the first arched alcove. You’ll see the moon chimes puzzle (also called the moon tone puzzle), which was created by Arin (the guy you’ve come to locate). The cabinet has green/gray tubular chimes in it. Go back behind the cabinet, and there is a number: 87523. Now go back to the front of the cabinet where you are facing the round brown keys. Assume that the keys are numbered 1 through 8, starting left to right. Input the number 87523 into the keys. Black chimes descend! Note that each of the original green/gray chimes has a symbol on it, each enclosed in a triangle. These symbols in order from left to right are:
1. Line top to bottom
2. Line side-to-side
3. Inverted “V”
4. Left angled line
5. Empty circle
6. Right angled line
7. Triangle
8. Solid circle
Arin not only has created a puzzle cabinet, he also was in charge of creating an area on Alida called the Switch. Plus he has his own vault and his own cabin, of which more later.
Leave the moon chimes cabinet, go out into the orange stone central chamber and walk further to the left, past a black rectangular hall entrance, until you come to the middle arched alcove. Here you’ll see another puzzle cabinet, this one with numbers that can be set by dragging the mouse over the face of each number wheel. There is also a button to push – try pushing it down for a few seconds and watch the change that occurs. This is Luke’s cabinet. Luke also has his own vault and his own cabin, and created an area on Alida called the Peghead.
Leave the numbers cabinet, go out into the central chamber, turn left, go past another dark rectangular hall entrance, and find the final puzzle cabinet, this one with three buttons and an imager. Try pushing the buttons until you can advance each astronomical image. While the image is playing, put the mouse over the image (you don’t have to click, just move the mouse over it) – you will see flashes. You can count the flashes, which are either long or short and occur in a different pattern with each image. To accurately count the flashes, watch the light against the wood of the cabinet – this is less confusing that counting flashes by watching the image itself. This fun device is Juno’s cabinet. Juno has his own vault and his own cabin, and he has created an area on Alida called the Potentiometers.
A note from mjartisian: I’m going back and forth between several puzzles now. I like the fact that most of them can be done in any order. If I get stuck on one puzzle, I can just work on another & come back to the first.
The Orange Stone Chamber and the Black Rectangular Hallways
Go back into the orange stone central chamber (you’ll see the giant plectrum as you do so), turn right and walk down the black rectangular hall nearest the giant plectrum. At the end of this hall, turn to the left and see a closed metal door. Then turn to the right to see an extension of the hallway. Proceed further down the hallway and around the corner.
You will be in a long, triangular hallway that leads out onto a bridge. This is a good place to admire the view. At the end of the bridge is an odd door blocked by a weight with a peephole you can look in. Turn back, and go back over the bridge and down all the hallways until you are back into the orange stone chamber. Walk straight forward into the room as far as you can, then turn until you can see the giant fingers. Look for a column with a square box on it – the column is on your right near the edge of the screen. Click on the box to get closer to the column, then click on the switch inside to trigger it. You will hear a grinding and clanking noise. Well, you’ve accomplished something!
Go back down the black rectangular hallway that you have just come out of (it will be slightly to your right). Something has changed! There is now a closed metal door on the right, blocking your path to the bridge, but the metal door on the left is open. (The switch you just triggered closed one metal door and opened the other.) Proceed through the open door and down the hallway. You will come out onto a sort of dead-end extension. Look to your right to see the bridge you came down the first time. Continue onto the extension until you are in the little turret room.
Look all around. You will see some strange controls – balls with lines on them. Move these a bit just to see how they work. You will also see a viewer which shows you the view of another room with three interior metal lattices. Your job in this area is to manipulate the strange controls until you move the lattices into alignment. The clue as to how to do this is elsewhere. While you are here, though, look at the view behind the controls. You are seeing the guitar’s Peghead, and underneath it, a black sphere. That black sphere houses the room with the interior lattices that you just saw through the viewer.
Go back into the orange stone central chamber. You now need to go down the OTHER black rectangular hallway – the one between the numbers cabinet and the moon chime cabinet (it is directly in front of the giant fingers). You will come to a closed metal door. Now you need to find the switch for this black rectangular hallway.
Turn around and proceed straight into the orange stone chamber as far as you can go. (The wall curves a bit as you start out, so finding the correct directional arrow is a bit tricky.) You will be directly in front of the giant fingers. Turn to your left and go one click/step. Turn to your right and step forward. Turn to your right again and you will see another column with a switch box on it. Click on the box, then click on the lever. More grinding and clanking. Go back down the rectangular black hallway you just came out of (slightly to your left) to find – the metal door is now open.
You have entered the main vault area. There is plenty of interesting stuff to see inside the vault, but you can’t access it yet (more about this later). Go past the vault until you reach the elevator. Go up the elevator (button on the right) until you arrive on the roof. Step forward until you see a control panel for playing the strings of the guitar. In the distance is a tower which you will later learn is the jack tower. Turn the lever on the control panel and watch what happens.
A note from LadyKestrel: I’ll bet on a clear day they could hear that on the mainland!
A note from Becky: That’s why they had to have the giant guitar on an isolated island --so the neighbors wouldn’t complain.
After the motorized plectrum plays the guitar, someone will appear briefly in the circular view screen. This person is now alerted to the fact that you are on Alida.
Go back down the elevator, back through the vault area, and into the orange stone central chamber. You have accomplished everything that you can here for the moment. Leave the orange stone chamber, go down the arched hall until you are once again on the balcony looking out at sea.
The Ladder to the Place that is Purple
Okay, starting at the orange stone balcony, looking out to sea. Turn right. Proceed into a black rectangular stone hallway. Turn at the corner and proceed into it further. Keep going straight until you hit a wall. Turn left. You will see a long hallway with an opening to the sea at the end. Go down this hallway straight until you reach a darkened area with what looks like a rounded red chair. Keep going until you seem to walk right through the chair. Turn back around – on the left, on a bit of railing you will see a white button. Go back and click on this button (you will have to turn, and the cursor will signal “down” before you can properly click on it). This will turn on a white light.
Go back past the chair again in the direction of the sea. Once you have stepped just past the chair, on the railing on the left you will see a blue/purple button. This turns on a purple light, which will be important in a minute. But first, turn around to see the back of the red chair. Click the cursor signaling “down” and you will see three dials that can be moved. Move them a bit if you want to see how they work.
Now go back to the white button and turn the white light off. Walk through the chair in the direction of the sea, and click on the blue/purple button to turn a purple light on. Look back at the back of the red chair, and at the device with dials. The device with three dials on it now has arrows on it too. You want to drag the mouse around each of the dials until the arrows on the dial are approximately pointing toward the arrows across from them on the device. A light comes on, and a ladder moves into position. Go up the ladder (you have to approach it from the other side). There’s a second ladder to climb. You have now reached Arin’s vault. A surprise awaits you there. Explore the vault area until you have seen the surprise.
Exploring the Neck and Peghead of the Giant Guitar
Go back down the ladders and around behind the circular chair and go out to the railing by the sea. You will now go up onto the neck of the guitar. Proceed forward up the open stairs. Views here are spectacular – take a look around as you continue up the stairs.
You will eventually come to a ladder. Looking up, you can see the neck of the guitar directly above you. Climb the ladder all the way to the top. Turn. You can now walk along the neck of the guitar, which looks like a giant ramp. At the end of the ramp you get a good view of the Peghead. Turn to your right and click the down arrow. Take the ladder down as far as you can go. Look around at the views. You can see the Peghead above you. Walk toward it. When you can go no further, look down. You’ll see a ladder going down, but the entrance is locked. Turn and look down – you will see the sphere (the same one with the interior disconnected lattices) directly below you. That is what you will enter when you solve the turret room puzzle.
Turn to look back at the body of the guitar. Immediately to your left you will see a short post that contains a hotspot. Click on it until you see another view into the interior of the sphere. (If you can’t find the short post here, just ignore it -- it makes no difference in the game.)
You’ve seen everything there is to see in the neck/peghead location. Continue back down the ramp, ladders, stairs and hallway until you find yourself back on the orange stone balcony looking out to sea. Make sure you are facing the water, then turn left. Onto a new area of Alida!
The Ruined Houses, the Brick Arches, and the Lookout
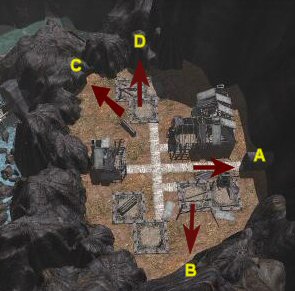
Proceed as far into the new area as you can go, turn left, and keep going until you are sitting in a cage runner (also called a cage car). Look around until you find the lever, and pull it (the lever is about midway up the cage ribs). The cage runner will take you to the plateau where the former inhabitants of Alida (before the band took possession) have left ruined houses. Exit the cage runner and go through the brick arch. When you emerge in the sunshine, try to memorize the view. You have just emerged from Arch A. Look around you to the left. You will see Arch B. If you can’t see Arch B, you’ve stepped too far into the sunlight. Backtrack a step, turn to face out into the sunlight again, THEN look left for Arch B. Go through Arch B and proceed up the circular ramp.
You are now in the Lookout area, and have an aerial view of Alida. You can see the jack tower and some rocks. If you turn around, you’ll see a fancy “N” for north. Note that the very short post in front of you is red. This will be important later. Walk counter-clockwise around the lookout area, recording the color posts as you go: red, green, yellow, white, blue, pink/purple, pink/purple, turquoise. (Yes, the turquoise DOES look almost exactly like the blue. And it’s anybody’s guess as to which post is purple and which is pink.)
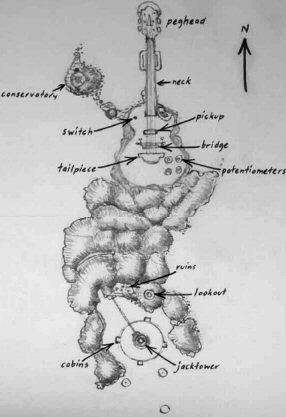
Turn around and go back around the circle until you reach a sort of balcony that juts out over the island. Look down at the ruins of the houses. Look very carefully at the foundations of the houses, which are a series of squares in different patterns. This will become important later. If you are artistically inclined, it wouldn’t hurt to draw these patterns on a sort of map (or simply use the graphic below).
Look back up, then turn to your left and look down again. You can see the base of the jack tower, a long bridge leading to a cabin (you can see the roof of the cabin if you look very carefully) and also an elevated wooden walkway that hugs a stone mountain. These are places you will soon visit – it helps to get a sense of where they are.
Go back down to the ruins. When you step out of Arch B, you will see another arch almost directly across from Arch B. This is Arch C. Proceed in the general direction of Arch C, passing the houses as you do so. As you turn left and right heading for Arch C, you will reach a point where you can see Arch C on your left and Arch D on your right. Go into Arch C.
A note from Mordack: If I could take this style of game and play it forever I’d never complain. Like an all-day sucker, I’m trying not to bite it but it’s hard not to.
The Cabins and the Circular Walkway
You will go down some stairs and out onto the bridge that you saw earlier. Proceed down the bridge until you reach a circular walkway or boardwalk. This walkway goes around the jack tower. There are four cabins on the walkway, each belonging to a band member. You are now on your own to explore for awhile. Be sure you open everything up, and click on everything, read everything. Then return here to the bridge where it intersects the circular walkway.
From the intersection of the bridge and the circular walkway: go straight as far as you can go toward the jack tower. You will see an ornate door, but it is locked at the moment. Proceed back out to the intersection of the bridge and the circular walkway. You are facing AWAY from the jack tower. Turn right. Walk to the first cabin and go in. If you haven’t opened up the planetary stand, do so now, and push the sun icon in the middle – the sun icon should stay DOWN.
On your left is a disc reminiscent of the controls in the turret room. You want to move the ball one direction at a time, and record the number that shows up when you perform each move. You need to do this for each of the three buttons. Any time the button returns to “1” (original setting) you have to start over. The settings in which the buttons do NOT show a number are blanks. The idea is to find a sequence for each button where you can go from “1” to “5” in numerical order. Blanks do NOT effect the sequence – you can roll up a blank at any point and still continue with the rest of the number sequence. Experiment until you have the entire numerical sequence, from “1” to “5”. Record the moves in the sequence as you figure it out.
Too impatient? Confused by the explanation? Okay, here’s how to get the correct sequences. (With any directional move, you should only move the ball ONE position, not more. Also, the directions you’ll read below FIRST instruct you just where to place the cursor, WITHOUT touching the ball – then the directions specify how to move the cursor, which moves the ball. The ball will only move when the cursor becomes an open hand.)
Top Button – click to activate it
Put the cursor on the left side of the ball – move the cursor to the right
Put the cursor on the left side of the ball – move the cursor to the right
Put the cursor on the left side of the ball –move the cursor to the right
Put the cursor under the ball – move the cursor up
Put the cursor under the ball – move the cursor up
Put the cursor under the ball – move the cursor up
Middle Button – click to activate it
Put the cursor under the ball – move the cursor up
Put the cursor to the right of the ball – move the cursor to the left
Put the cursor to the right of the ball – move the cursor to the left
Put the cursor to the right of the ball – move the cursor to the left
Put the cursor under the ball – move the cursor up
Bottom Button – click to activate it
Put the cursor to the left of the ball – move the cursor to the right
Put the cursor under the ball – move the cursor up
Put the cursor under the ball – move the cursor up
Put the cursor to the left of the ball – move the cursor to the right
Put the cursor under
the ball – move the cursor up
Whew! Leave this cabin. As you exit the door, go to your left and enter the next cabin. Open the planetary stand if you haven’t already and press the middle sun icon – the sun icon should stay DOWN. If you haven’t already, read Juno’s journal (yes, this is Juno’s cabin). Next, go to the device on Juno’s desk – the device is called a whabit. Click to get a close-up, then click on the button in the middle of the device. You will hear the sound of the insect. You need to associate the sound with the black silhouette picture of the insect that is on the top of the device. Now drag the handle to the right to bring up the next insect/critter. Associate the sound with the black silhouette picture. Continue this way until you have heard all the sounds and know which picture each sound is associated with. Here’s a highly individual checklist of the critters and their sounds:
Moth (cicada): low chittering vibration
Grasshopper/cricket: high-pitched vibration
Fly: low-pitched buzzing
Humpbacked toad: car engine not turning over
Cute frog: “eeeeeeeee ray ray wer eeeeeeeee ray ray”
Bee: medium-pitched buzzing
As you pull away from Juno’s desk, you can pull the string on his planet mobile if you like. Juno has an interest in astronomy, among other things. Exit Juno’s cabin and go to your left along the circular walkway to the next cabin. Enter. If you haven’t opened the planetary stand, do so and click on the middle sun icon – the sun icon should stay DOWN. Not much else here, is there? Exit the cabin and again go to your left until you reach the last cabin, Arin’s. This is where things get more interesting and informative.
Arin’s Cabin (The Backstory Place)
If you haven’t opened up the planetary stand in Arin’s cabin, do so and click on the middle sun icon – the sun icon should stay DOWN. Now go to Arin’s desk. Here you’ll find a whabit device similar to the insect/critter device in Juno’s room. This device reveals the sounds and black silhouette shapes of birds. Associate the sounds with the silhouettes. Below is a highly individual version of this:
Bird facing left on perch: jungle chuckle
Bird facing right on perch: twittering
Bird with no visible beak: “he-he-he-he (pause) he---he
Bird facing left, no perch: squawk
Bird with legs and feet – shorter body: “ree ree ha-ha-ha oh”
Bird with legs and feet – taller body: creaky sound up and down a musical scale
Look at the close-ups of the drawings on the wall above Arin’s desk. These will help orient you as to the layout of Alida. You may be interested in noting the areas where you haven’t been yet.
|
|
Click on the small bureau on Arin’s desk. Open the top drawer – nothing here of special interest. Open the second drawer – a telegram from someone named Kivas (Kivas is the band’s manager and also happens to be Arin’s twin brother). So this is what brought Arin back to Alida! Click among the other papers in the drawer. They include a picture of the moon chimes cabinet, showing the symbols on the chimes; also a picture of the Peghead showing three of the pegs that hold the strings and three of the knobs that turn the strings around the pegs; also a picture of the Switch with two devices next to it; and last a picture of one of the Potentiometers, with a cutout revealing what the interior looks like.
Open the bottom drawer. There’s a picture and a news clipping. The important clue is the drawing which contains four places on Alida, each one corresponding to a band member’s individual vault. The most important information: “All the vault doors respond to the same codes.” Somewhere in your future there will be vault door codes! And the code will be the same for each door.
Pull back and look at the round device on the desk, with buttons that resemble a cassette recorder. This contains video recordings of Arin, and operates just like a cassette player. Listen to all the recordings once to learn more about Alida.
A note from tigger: His voice... is ambroooosia!
There is a short tune in the first recording. Don’t panic – you do NOT have to reproduce this tune in any part of the game!!!
Listen again to the short videos in order to make a judgment as to the character of Arin (he really flashes that wedding ring around, doesn’t he? Uses his left hand a lot too.) Observe his clothing, facial expressions and hairstyle. In one of these recordings, Arin seems different. Listen one more time to notice which one.
A note from Becky: Where were they going to put the visiting tourists? Rebuild the huts into vacation cottages? Keep a fleet of houseboats off the cliffs?
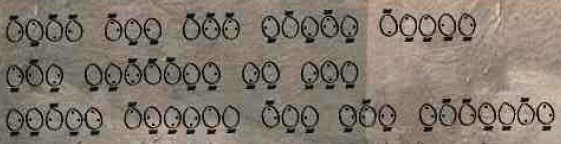
The final round of information-gathering in the cabin area: go out onto the circular walkway and listen for the sounds you heard on the circular devices (whabits) in Arin and Juno’s cabins. You need to know WHERE along the circular walkway the sounds are manifested, so that you could tell on a diagram where each sound can be heard in relation to the bridge. (It may take several seconds to hear everything at each station.)
To find the stations (places on the walkway) where you should listen, go to the circular walkway where it connects with the bridge. Listen to the sounds. From there take four steps to the right. Listen for the sounds. From there, take four steps to the right. You are now directly behind the jack tower and opposite the bridge. Listen. Take four steps to the right. Listen. Take four steps to the right – you are now back at the intersection of the circular walkway and the bridge.
A note from Rice burner: Good luck with the birds. I found it very difficult to distinguish their calls.
The easiest place to listen for the birds is to go to the back of the jack tower directly opposite the bridge (8 steps from the bridge/walkway intersection). The bird call there is quite distinctive. Now that you know what to listen for, go to the three other aforementioned stations and listen for each bird call. Now, turn the sound up and go back to those same stations and listen for any insects/critters. Record what you hear at each station.
You are now finished with the cabin area!
Proceed back out down the bridge to the area of the ruined houses.
The Pink Devices at the Ruins
Sitting on the foundation of each of the ruined houses is a pink device with a series of squares in different patterns along the middle. One device is missing a handle. To find the handle, go to the ruined house immediately in front of brick Arch B. (If you can’t remember which arch is Arch B, refer to the illustration in the section titled The Ruins, the Brick Arches, and the Lookout.) Click on the hotspot to see a close-up of the pink device. There on the ground to the right of the pink device is the handle. Click on it to pick it up. Enjoy the feel of the handle in your hand – it’s the only inventory item you’ll get to carry in the game!
Go to the device with the missing handle, which is immediately in front of brick Arch D, the only brick arch in the area that you haven’t entered yet. Click the handle into the device. Now it’s time to look at the foundations of each house. These foundations are in the same configuration as the squares in the middle of the pink devices. To solve this puzzle, merely walk around the foundation of each house until you are certain which configuration it is, and then move the pink device located on that foundation to the matching configuration. (If you have trouble seeing the configuration of the foundation, you can always go back up to the Lookout.)
Here’s a description of the house foundations:
1. Foundation immediately in front of brick arch D: (the one whose pink device was missing the handle): three squares, two in line together, the third next to the two and centered between them. Move the handle on the pink device until this same configuration shows dead center marked by the pink dot.
2. Foundation in the middle of the ruins, with what looks like a burgundy and white door panel on the ground in front -- you’ll need to click on a plank deep in the ruin in order to see the pink device: three squares in a backwards L shape. Move the handle on the pink device until this same configuration shows dead center marked by the pink dot.
3. Foundation in the middle of the ruins: one square. Move the handle on the pink device until this same configuration shows dead center marked by the pink dot.
4. Foundation immediately in front of brick Arch B: two squares in line together. If not already correct, move the handle on the pink device until this same configuration shows dead center marked by the pink dot.
5. Foundation with a stack of wood on the foundation: two squares situated diagonally. Move the handle on the pink device until this same configuration shows dead center marked by the pink dot.
It’s finally time to go to brick Arch D – the only arch you haven’t entered yet. Go through the arch. Proceed over a rough wooden bridge, through another tunnel and over another bridge until you can proceed no further. Look to your left to see a pink device. Move the handle. If you have set the other pink devices correctly, a part of the bridge will come up and you can go down the rest of the bridge to an elevated walkway high above the cabin area. Continue down the walkway, pausing occasionally to admire the view.
The Bunkers and the Vault with a Flashing Lamp
Go down a set of stairs under the ground to a grey underground bunker. Go one step into the bunker, and then look around. There are three rectangular hallways. As you turn around, you’ll see that one of them shows stairs going up. That’s where you just came from. The other two rectangular hallways show stairs leading down, and one of them has a cement balcony built over it that is accessible by ladder. You can climb the ladder if you wish. When you come back down, go down the hallway with the cement balcony over it.
This will take you to Juno’s vault. In Juno’s vault is a lamp. Get to a position where you can see the lamp clearly. The lamp is flashing in a certain pattern. There are three sequences of short and/or long flashes. There is a pause between each sequence. (The pause between sequence 1 and sequence 2 is not very long.) When the third sequence ends, after a longer pause the first sequence starts again. Write down these sequences.
The three sequences are:
Short short
Long short short short Long short short
Long short short short
Come back into the original bunker. You now want to go down the rectangular arch hallway that does NOT have stairs going up and does NOT have a cement balcony. Go down more stairs, until you reach another bunker. You can climb the ladder and look out if you wish. Approach the strange device across the room. It looks like a guitar sculpture with the Pickup portion highlighted. (This device is called a spherin.) Click to get close to it. Grasp the circular handle on the right and move it across to the left. You will see a video showing you what to do to set the Pickup – simply turn the lever on the controls to the giant guitar strings. (You’ve done this before, but you’ll need to do it again).
Go back to the original bunker. Go down the rectangular hallway where the stairway is gong up. This will take you back to the walkway above the cabins, and back to the ruins. Once at the ruins, go to brick Arch A and proceed back to the cage runner. (If the cage runner is NOT at the position in which you need it, each cage-runner-terminus has a lever that can be used to summon it.) Once inside the cage runner, pull the lever to get back to the main portion of Alida.
After you’ve arrived back at the main portion of Alida, go back down the hallway to the orange stone balcony and down the orange stone arched hallway until you get to the central chamber and the moon chime cabinet. Approach the cabinet and play a tone, any tone. This triggers the next thing that you will find in Arin’s vault.
But first – a slight (but important) detour (well, maybe not so slight!).
A note from mjartisian: My terrible sense of direction kicks in periodically and I forget where I saw some other puzzle that I have an idea about how to solve now. Other times, I remember where everything is and have no trouble finding it. It must be senility setting in.
The Turret Room and the Black Sphere with Interior Lattices
Step out from the moon chime cabinet and go down the farthest black rectangular hallway (the one closest to the giant plectrum). Continue until you are back in the turret room. You now have the code to get access to the black sphere.
Use the sequences from the disc with similar balls that you worked out in the cabin. (Below is a copy of the sequence. Again, the instructions are to first place the cursor on a spot NEXT to the ball, then move the cursor in the suggested direction, thereby moving the ball one position. You can only move the ball when the cursor changes into the open hand position. If the sequence doesn’t work, put the ball back to the dot and try again.)
NOTE: Before starting each sequence, make sure the balls are all set to the face which shows the black dot – this is where you must begin.
Top Ball
Put the cursor on the left side of the ball – move the cursor to the right
Put the cursor on the left side of the ball – move the cursor to the right
Put the cursor on the left side of the ball –move the cursor to the right
Put the cursor under the ball – move the cursor up
Put the cursor under the ball – move the cursor up
Put the cursor under the ball – move the cursor up
Middle Ball
Put the cursor under the ball – move the cursor up
Put the cursor to the right of the ball – move the cursor to the left
Put the cursor to the right of the ball – move the cursor to the left
Put the cursor to the right of the ball – move the cursor to the left
Put the cursor under the ball – move the cursor up
Bottom Ball
Put the cursor to the left of the ball – move the cursor to the right
Put the cursor under the ball – move the cursor up
Put the cursor under the ball – move the cursor up
Put the cursor to the left of the ball – move the cursor to the right
Put the cursor under
the ball – move the cursor up
If you have inputted the sequence correctly, you will see an interior metal lattice move into position after each sequence is finished. If all three lattices have moved, you are ready to enter the black sphere. You will see a short video indicating that the entrance to the ladder up on the Peghead has been unlocked. Remember, this particular location, way up on the guitar’s neck? You can now enter the previously locked entrance!
Go back out to the orange stone balcony. While facing the sea from the balcony, turn right and walk down into the black rectangular hallway, make a right at the corner, follow the hallway until the end, then make a left. You will see an opening into the sea past the circular chair with the ladder. Go past the ladder out to the sea and all the way back up the guitar’s neck to the ladder entrance that once was locked. (If you’re feeling lost, use the instructions in the section entitled Exploring the Neck and Peghead of the Giant Guitar to once again reach the Peghead and the locked ladder.)
Go through the previously-locked entrance and down a ladder -- now formed from the metal lattices -- all the way down. Turn around and look up – you will see a symbol, a triangle with a line top to bottom. Write down this symbol and where it is located (black sphere under the Peghead) and put exclamation marks next to it!
A note from mjartisian: My notes are a disaster. I have notes on my notes.
Step forward and go down another ladder all the way to the bottom. Turn around and go into Luke’s vault area. In the vault is a red guitar. On its neck is a code: 1 2 1 3 1 2 1 4. This code will eventually be entered into the numbers cabinet back in the orange stone central chamber.
Continue around the back of the vault and go down yet another ladder. Turn around and view a wire grating with a lever on the top right. Pull the lever up. You will see a weight being drawn up which, when it finally stops, is identifiable as the weight that was blocking the odd door with a peephole entrance at the end of the bridge that runs out from the black rectangular hallway off of the orange stone chamber (the bridge next to the turret room). Turn around and go back out of the vault and climb all the way out of the black sphere. Proceed back down the guitar neck and various ladders.
And on Your Way Back….
As you return into the body of the guitar, stop by the structure that resembles a rounded red chair with the ladder coming out of it. Climb the ladder into the purple vault, all the way up to the top. You will see a new code on a piece of paper taped to the vault window. This code is for the moon chime cabinet and looks like this:
Each symbol is in the interior of a triangle:
Line top to bottom
Right angled line
Empty circle
Line top to bottom plus line side-to-side
Solid circle
Line side-to-side plus inverted “V”
Left angled line
Right angled line plus empty circle
Left angled line plus empty circle
Inverted “V”
Go back down the ladders and turn your back to the water. Continue down the black rectangular hallway to the end. Turn right and go to the end. Turn left and go past the balcony and turn into the arched orange stone hallway to the orange stone central chamber. You have the code for the moon chime cabinet and the code for the numbers cabinet, but just ignore them for a moment.
The Experiment-Gone-Wrong
Instead, get as close as you can to the giant plectrum. Turn until you can see the columns and the switch boxes on them (the giant fingers will be in the background). Walk over to the nearest box and flip the switch. Go down the black rectangular hallway closest to the giant plectrum (it will be slightly to the right of the column with the switch you just flipped). Keep going around the corner and out over the bridge until you reach an odd segmented spherical structure with a symbol on top. This is the water house. Make a note of the symbol (triangle with an empty circle. Note the location where it occurs and put exclamation marks around it!
Walk down the steps and into the structure. Here you will see the experiment-gone-wrong mentioned in Juno’s journal in his cabin. It is STILL going wrong! Fortunately, the game doesn’t let you get too close, because there isn’t anyone handy to rescue you if you are drawn into the experiment’s field. Turn around. Leave the structure and take a step outside. Look carefully on the arched railing in front of you – on the right bar there is a well-camouflaged button. Click on it (it doesn’t have a hotspot). A metal plate will descend in front of you. Note the way it looks. This will be used later. Click on the button again to put the metal plate away. Then look up. To the left you will see a black square. This will be used along with the metal plate once you’ve found the correct sequences to input into the metal plate.
Puzzle Cabinet – The Numbers Puzzle
Return down the bridge and the hallways to the orange stone central chamber. Now is the time to enter the code you found on the red guitar into the numbers cabinet (this is in the middle arched alcove in the orange stone central chamber). Here’s the code again: 1 2 1 3 1 2 1 4. When you enter the final number, you’ll hear a beeping sound, and the nearest T-runner will open its protective glass shield. Time for a ride!
Take a seat in the T-runner, and grab the control switch on the upper right. You will take a ride over the guitar neck and INTO the Peghead. The Peghead is probably the most difficult puzzle in the game, so we’ll save it for last. We are here simply for a single piece of information.
A note from LadyKestrel: The peghead puzzle was my nemesis.
A Brief Visit to the Peghead
Step out of the T-runner. Turn to your right and take a step or two until you are under the metal arches. Turn left and proceed under the arches to a position in the room so that you are directly opposite the T-runner. When you can go no further, if you look to your left you’ll see an opening. Go in and walk around the windy room. From the angle next to the circular steps down, you can look into the golden design and see the letter “N”, just like the letter “N” in the golden device in the Lookout above the ruined houses. Turn and go down the circular steps.
At the bottom of the circular steps, you will see a circular control device. Ignore it for now. Above you will see a metal balcony – take the steps leading up to this balcony. Get as far onto the balcony as you can and look down. There is a symbol: a triangle with a left-angled line. Make a note of the symbol and its location and put exclamation marks around it!
Now go out of the room and up into the windy room by going up the circular stairs. Approach the wall behind the circular stairs, look to your left and go back into the central Peghead room. Turn right and then walk under the metal arches until you see the T-runner. Wrestling with the challenges here will come later. For now, get in the T-runner, grab the control mechanism and return to the orange stone central chamber. We are finally ready for the moon chime puzzle.
Puzzle Cabinet -- The Moon Chime Puzzle at Last
Return to the moon chime cabinet. Remember the symbols we saw on the wall of the vault?
If you haven’t been able to find the symbols on the wall of the vault, here’s what you must do. Play one tone – any tone – on the moon chime cabinet. Then go back to the vault (instructions on how to get there are in the section titled The Ladder to the Place that is Purple).
Here are symbols again:
Line top to bottom
Right angled line
Empty circle
Line top to bottom plus line side-to-side
Solid circle
Line side-to-side plus inverted “V”
Left angled line
Right angled line plus empty circle
Left angled line plus empty circle
Inverted “V”
Some of these symbols are the same as the symbols on the green/gray chimes. But others are the equivalent of two symbols added together (i.e., “right angled line PLUS empty circle”). The symbols that have COMBINED two symbols from the green/grey chimes belong to the black chimes. For example, the black chime referred to above is in between two green/grey chimes, one that has the right/angled line symbol, and one that has the empty circle symbol.
Look closely at each chime, and note how a curved arm comes out of each chime, ending in a circular key. The keys coming out of the green/gray chimes are brown. The keys coming out of the black chimes are black. (If you’ve played the piano, these keys are set up exactly like piano keys.) Using the above symbols in order, and figuring out which black keys are required, input the moon chime sequence by clicking on the circular keys.
If you are still confused, think of the brown circular keys as being numbered left to right, 1 to 8. Now think of the black circular keys as being arranged left to right, A to E. Input the following sequence: 1 6 5 A 8 B 4 D C 3. You will hear a beeping sound, and the nearest T-runner’s protective glass shield will be raised. Get into the T-runner and get ready for a ride to the Switch!
The Switch and the Water Tone Puzzle
Step out of the T-runner. You are now preparing to explore and conquer one of the locations that is the heart and soul of Alida. There are three areas in the giant guitar that must be set correctly before you can properly play its strings: the Switch (where you are now); the Peghead (where we stopped briefly to record the symbol) and the Potentiometers (we haven’t been there yet.) We’ll set the Switch first because it’s easiest. Well, in some ways it’s easiest.
There are three rooms in the Switch area. You can explore a bit here if you like – we’ll meet back at the T-runner when you’re finished.
From the T-runner, turn to your right and go up the stairs to a platform which supports the giant ball base of the Switch. At the top of the stairs you will notice a lever that is hanging down on your left. You will need to use this later. On the ball base, you will see a keyboard symbol that shows an octave (8 keys) as it would appear on a piano (the moon chime cabinet had a similar setup, but used circular rather than rectangular keys). The seventh key (counting only the lighter keys, not the dark ones) is darkened. This on the piano is the “B” note or tone.
Turn around and go back down the stairs. Ignore the room that has what looks like another T-runner in it. Instead, go into the room with the very large white cylinder in the middle. This is the water tone machine. On one of the walls in this room is a picture of a keyboard like the one on the Switch ball base. In front of the keyboard picture is a small stand with two triangles on top -- this controls the water tone machine. Turn around and note which key is highlighted on the picture behind you, and where the small white ball is located in the top triangle on the stand. It will be important to note where the small white ball rests after each note is played, and compare that to the highlighted key in the picture behind you. To play each note, click on the small bottom triangle on the stand in front of you.
A note from Becky: My game crashed a lot while I was using the water tone machine. To get through this section, I had to save my game after each note played. [Technical note: This problem can be addressed by downloading the Alida patch here http://www.alidagame.com/alidaPatch.html . (North American version only – the patch is already included in the European version of Alida.)]
If you don’t wish to take the notes yourself, here they are – again, here we are numbering only the lighter colored keys, NOT the dark keys):
Key 1 (counting only the lighter keys): ball is in top left corner (“C” on a piano)
Key 2: ball goes to dead center (“D” on a piano)
Key 3: ball goes to bottom corner (“E” on a piano)
Key 4: ball goes to top right corner (“F” on a piano)
Key 5: ball goes to top left NOT the corner (“G” on a piano)
Key 6: ball goes to middle left NOT the corner (“A” on a piano)
Key 7: ball goes to middle right NOT the corner (“B” on a piano)
Key 8: ball goes to top right NOT the corner (high “C” on a piano).
Remember the symbol on the ball base that showed the 7th key (“B”) highlighted? You need to set the water chime machine for the 7th key, or “B”, by getting the small white ball on the stand to go to the middle right NOT the corner. (Do this by pushing the lower triangle on the stand, until the small white ball reaches this position, checking behind you to see the keyboard picture if you want confirmation.)
When the 7th key is highlighted on the wall, go back to the middle room and go up the stairs. Now it’s time to pull that lever! You’ll hear a beeping sound, and the ball base of the Switch will rotate, revealing a staircase. Go up it. At the top of the staircase is a small window. You can see the conservatory in the distance – this was also built by Arin. And on the left in the foreground you can see part of a black metal sphere (a different one than the sphere you were in earlier).
If you turn to the left, you will see a sketch of the numbers cabinet in the orange stone chamber back in the main part of the guitar. Above that is a code.
A note from Becky: I like to think of this as the dotty eggs code.
Does the oval shape with dots remind you of anything else you’ve seen in the game? Never mind, we’ll eventually find it! Now turn around until you see the large symbol on the wall. Note the symbol – a triangular shape with a solid circle; write down where you found it and put exclamation marks around it!
You could also write down the dotty egg code, but it’s probably easier to just refer to the picture below.
The First T-flyer
Go down the stairs and then down the other stairs into the main room. Now it’s time to find the thing that looks like a T-runner, but is sitting in the middle of the third room, without access to a tunnel or track. This is a T-flyer. Even more fun than the runner version.
A note from Becky: You won’t believe what this puppy can do – I didn’t.
Get in the T-flyer and grab the mechanism on the top at the right. On the left, a graphic will appear, showing you the jack tower surrounded by the circular walkway. Note where the bridge is in relation to the rest of the graphic. Afterwards, silhouettes of birds appear on four buttons. You need to enter the bird silhouettes in their correct position according to the calls you recorded earlier.
If you get stuck, this is the solution:
Top button: Bird facing left, no perch
Bottom button: Bird with legs and feet – shorter body (may already be set)
Left button: Bird facing left on perch
Right button: Bird with legs and feet – taller body
Save your game here, in case you want to replay this ride. Remember Juno’s journal talking about how the T-flyer can go to any point in three dimensional space? Get ready! Now grab the mechanism on the top right again.
The Conservatory
Exit the T-flyer. Then go forward and up the stairs. You’ll be in the conservatory, Arin’s private sanctuary. You can explore here at your leisure. We’ll meet back at the window on this level with the lattice screen. (At the moment, this window is to your left.)
Okay, turn so that the latticed window is behind you, and proceed to the stairway downstairs to your immediate left. This is the dungeon. By the door is a dial with two notches that could be set at a certain number. If you touch the controls, then turn to your left, the tiny rectangular window will open and you will have a short conversation with Laval. If you keep failing to set the device correctly, and continually click on the window, Laval will give you hints as to how to free him.
Big Hint: The first number on the dial is “1”, not “0”. (Laval doesn’t give you this hint.)
Starting at the top with “1”, set the inner arrow at “22” and the outer arrow at “21”. The dungeon door will open.
A note from tigger: One problem I did have with this bit was that sometimes the pointer would add an extra click by itself so count carefully!!
SAVE YOUR GAME HERE.
Look in at the symbol on the floor. A triangle shape with a solid circle. Write down where you saw the symbol and surround it with exclamation marks!
Now that you’ve saved your game, if you wish to see one of the “bad” endings, go into the dungeon.
A note from tigger: Eww, why are there so many imprisoned people?? They keep making me jump!!!
A note from LadyKestrel: Yes, but they’re cute, aren’t they?
A note from tigger: Cute?? You think these guys are cute?? One just slugged me over the head and locked me up somewhere!!! Hummmph, had to go back to a savegame, which luckily wasn’t much further back!!
Once you’ve restored your game, go back up the stairs and into the conservatory. Turn to your left and proceed over to the next set of stairs going down. Take them down into a study area – Arin’s study. On the desk you will find a letter to Julia, Arin’s wife. Read both parts of the letter -- particularly the letter on the right, which gives you a huge clue.
If you set everything correctly, you can open the vault doors. Since you probably aren’t particularly interested in opening the vaults with just a flashing lamp or an old guitar (and since the locks on these vaults are disabled anyway), there are only two vaults that are important: the main vault with all the treasure, and Arin’s vault where the prisoner posted the moon chime symbols. Which will you open (or will you open both?) Something to ponder while you complete the rest of the game….
You will need to figure out the push button code -- which you will input into the green buttons on the vault doors before the sound code can work. The only way to get the sound code to work is to correctly set the Switch, Peghead, Potentiometers and Pickup. The way to discover the setting for the Switch is to go back upstairs to the conservatory and solve the model puzzle.
The Conservatory Model Puzzle
Upstairs, in the middle of the conservatory you will find a model of the guitar, with two controls. There’s a lever on the left that highlights different parts of the guitar – and you have written down a symbol for each of those parts during your travels through Alida (start looking for those exclamation marks). Plus, you know which symbol matches each key on the moon chime cabinet.
There are also two small triangles on the model, exactly like the ones you saw on the water tone machine controls. And you know how to move the small white ball so as to represent each key on the keyboard you saw in the Switch area – a keyboard that represents tones or notes exactly like the ones on the moon chime cabinet.
So what do you do with the model puzzle? You need to set it so that the small white ball is in the correct position, corresponding to the symbols you found in your travels. Here’s how you do it:
If the model doesn’t show the “experiment-gone-wrong” house (water house) highlighted, use the left lever until it IS highlighted. The symbol for the waterhouse was the empty circle. The empty circle is key “5” on the moon chime cabinet. To enter key five, click on the small triangle until the small white ball goes to the top left NOT the corner. When that is set correctly, use the left lever to advance the highlight to the metal sphere (with interior lattices). The symbol for the metal sphere is a triangle with a line top to bottom. The line top to bottom is key “1” on the moon chime cabinet. To enter key one, click on the small triangle until the small white ball goes to the top left corner. (It might already be there.)
Now advance the lever on the left so that it highlights the Switch. The symbol for the Switch is a triangle with a solid circle. The solid circle is key “8” on the moon chime cabinet. To enter key eight, click on the small triangle until the small white ball goes to the top right NOT the corner. Now advance the lever on the left until it highlights the Peghead. The Peghead symbol is a triangle with a left-angled line. The left-angled line is number “4” on the moon chime cabinet. To enter number four, click on the little triangle until the small ball is in the top right corner.
(Save your game here, as you might want to view the upcoming cutscene again later.)
Now advance the lever on the left so that it highlights the conservatory. The symbol for the conservatory is a triangle with a solid circle. The solid circle is number “8” on the moon chime cabinet. To enter number eight, click on the little triangle until the small ball goes to the top right NOT the corner.
A note from GeeGee: Yay! I did it!!! Seems I forgot a little something – i.e., both the Conservatory Dungeon and the Switch locations were at the same position on the triangle.
You will hear a beeping noise. The model starts to animate, and then something huge moves over the conservatory. (If the beeping doesn’t start, go through the settings on the model to make sure they are correct.) The lattice over the window opens. Go through the opening into the metal sphere (it now looks like a room with a metal sculpture in it). When you’re in as far as you can go, look down. You’ll see a guitar sculpture with the Switch in red. Click to get closer, then move the handle from the right to the left. You’ll see a video of the small ball in the top right corner, and then the lever by the ball base of the Switch being moved.
This is a nice payoff for a difficult, multi-step puzzle.
A note from chiefette: Thanks for the tips and the tap on the shoulder.
Final Settings for the Switch
Now you must go back to the Switch, then pull the lever to return the Switch to its original state, then set the water tone machine so the small ball is in the top right corner, and then use the lever by the Switch again to set it correctly.
Go back down the stairs to the T-flyer. This will take you back to the Switch. (You don’t need to enter the bird code this time.) As you zoom back to the Switch, note that the black metal sphere is now attached to the back of the conservatory.
Go back to the Switch and go up the stairs. Look out the window, and again see the metal sphere has moved. Go back down to the ball base of the Switch and pull the lever. Now go back to the water tone machine, and hit the lower triangle button until the small ball is in the top right corner. Then return to the Switch, go up the stairs and pull the lever. You’ll hear beeping, and the Switch will reset. You are now finished with the Switch! Congratulations! On to the Potentiometers.
Return via the T-runner (NOT the T-flyer) which brings you back to the orange stone central chamber. Walk straight forward toward the giant fingers, then turn left.
For a further plot development, go into the black rectangular hallway (the one closest to the moon chime cabinet) and through the vault area. Then turn the lever to play the giant guitar one more time. On the round video screen, you’ll receive information from one of the twin brothers.
Return to the orange stone central chamber and turn left again. Continue until you are in front of the farthest alcove with Juno’s astronomical symbols cabinet.
Puzzle Cabinet – The Astronomical Symbols
Think back to the vault with the flashing lamp. Remember the sequences of flashes you recorded? Here they are again:
Short short
Long short short short Long short short
Long short short short
The first button on the left belongs to the first sequence you recorded form the lamp in Juno’s vault. Hold the mouse over the image to count the flashes and look at the wood behind the imager to see when the light flashes (you are looking for the image with two short flashes). Once you’ve reached that image, leave it and go to the next button. This time, advance through the images until you get to one with flashes like this: Long, short short short, Long, short short. Last of all, go to the third button. Advance the images until you get to the sequence: Long, short, short, short. Hint: the flashing sequences end with a kind of flicker that looks a bit like a flash. If you can’t get the sequence right, try subtracting one flash at the end of each sequence to see if that solves the problem.
Left to right the images should be: Comet (Q-tip), nebula cloud (cloudy day), ten-point sun/star.
When the above is entered into the cabinet, you will hear a beeping sound and a T-runner will appear. Step into the T-runner and grab the control at the top right. Enjoy the ride!
Exit the T- runner. You are now in the Potentiometer area – that part near the bottom of the guitar with adjustable knobs. Explore at your leisure, and we’ll meet back at the T-runner when you’re done
First, we’ll take a look down one of the hallways in the Potentiometer area so that you have an idea of what’s going on here.
Make sure you’re in front of the T-runner, NOT the T-flyer (the runner will have its glass shield open). Step out just far enough into the room so that when you turn you don’t JUST see the T-runner behind you (three clicks from sitting in the T-runner). (This spot is important, as all descriptions in this section of the walkthrough use this spot for orientation.) Turn to your left. You will see a hallway to your immediate left (that’s what we’ll explore) and you’ll see a stand for turning on the lights. If you’ve already turned on the lights for the hallway to your left, go straight to the hallway.
(If you haven’t already turned on the lights, go to the stand, get up close to it, grab the little knob on the right and pull – then click on the button and step back. When you leave the light stand, turn and step out one click. You will see a bit of the T-flyer, and the lit hallway on your right. Enter the hallway.)
Go all the way to the end. Touch one of the bars on the elevator cage, and it opens. (It is very easy here to click the wrong way and get blipped back into the hallway, headed back into the central room. If this happens, turn around and go back into the elevator.) Step inside. Again touch one of the bars and the door will close. To your right are the elevator’s buttons. Touch the top button twice to go to the second floor. Exit the elevator and find another light stand. Turn on the light. Look up and turn to your right. You should see a metal ladder. This is the only Potentiometer that allows you to climb up the side of the interior – we’ll be doing this in a minute.
Go back into the elevator, touch the bar to close the door and hit the down button once. When the elevator arrives at the floor below, touch the bar to exit the elevator. You’ll see a planetary stand in front of you like the ones in the cabins. Click on the button to open it. Click on the planet that is farthest to the right – a grey swirling one. The walls will rotate twice.
A note from Becky: I’ve just been up the elevator shaft to the dome where the WALLS move. The place is fantastic.
Who on earth ARE these people? They can’t just be a rock band. There’s something more going on.
Turn to your right and cross the room and go up the ladder all the way to the top (it’s interesting to look across at the globe you see illuminated before you). You will see a hole in the roof. Climb through it and look out the small square window – you now have an idea of where you are on the top of the giant guitar. Climb back down the ladder and back to the planetary stand (you can climb up after clicking on each of the planets if you want, in order to see the globe illuminated, but this is the only position in which you can climb to the roof).
Click on the sun in the middle of the planetary stand. Hmmm. More flashes. Each planet has its own sequence of flashes, which is revealed when you click on the planet and then click on the sun. Record these, and associate them with the appropriate planet, as they will be important later. Return to the elevator and go down into the central room.
You are now looking for the T-flyer, which has the glass shield closed, and a white shell-like design on the wall behind it. Wonder where this one goes?
The Second T-flyer
Enter the T-flyer and grab the mechanism at the top right. On the left, an image of the circular walkway around the jack tower once again appears (apparently Juno didn’t want just anybody using the T-flyers, so each has a code/lock). You need to punch in the insects/critters you heard at each station on the circular walkway.
Frustrated? Okay, here’s the solution: all four buttons should show the moth (cicada) – yes you DID hear the cicada at every station. Tricky, right? Grab the mechanism at the top right again and hold on tight.
The Jack Tower
Exit the T-flyer. You are now INSIDE the jack tower. Behind the T-flyer and across the room is something that resembles a wooden podium. This is the next puzzle to solve. Get in front of it, and move the handle as far up as it will go. Four planets will appear on the stands around the room. Record a brief description of each of these planets (they will appear differently in each game so I can’t describe them). Behind each planet is a porthole. Turn to your left to see the porthole associated with the planet closest to you on your left. Go over to the porthole, look through it. You will see the cement circles out in the bay. Now look down. Directly in front of the cement circles is a cabin, and from the cabin’s roof comes a series of light flashes. Record the location and the sequence of flashes. (If you don’t see light flashes it’s because you neglected earlier in the game to press down the middle sun symbol in the planetary stands in all the cabins.)
Go back to the podium, facing towards the center of the room. Turn to your right to see the porthole associated with the planet stand on your right and closest to the podium. Go over and look through it. You will see the bay with an island/mountain springing out of it. Look down, and record the sequence of flashes and the location where you are seeing them.
Return to the podium. You will now attempt to walk over to the farther porthole on your left to record the information you see out of it. It is a little tricky to maneuver here because you have to go around the T-flyer. You will know you have reached the correct porthole if, after walking up to the porthole, when you turn right you see a hallway that leads to an elevator. Look through the porthole, and you will see mountains with the raised walkway that eventually leads to the bunkers and Juno’s vault. Look down and record the flashes and the location.
Return to the podium. You will now attempt to walk over to the farther porthole on your right. Again, this is tricky. You’ll know you’ve done it when you see a scene you haven’t seen before – in this case, very tall mountains and (if you look closely) the Lookout on one of them, with a small strip of the plateau holding the ruins below it. Look down, record the light flash sequence and the location.
What Does the Jack Tower Have to do with the Planetary Stands in the Cabins?
Now it’s time to take that elevator! From your current position, the elevator will be the next opening on your right. Take it down to the ground floor and open the door. You are now down among the cabins. Walk out to the circular walkway and to your left. If you look carefully through the trees, you will see the raised walkway leading to the bunkers. So the cabin in this location is the one with the following light flash sequence: short, short, Long, short, short, short. Go in the cabin and look at the planetary stand. You will notice that the planet that is currently spinning is the same one that appeared in front of the porthole when you used the control lever on the podium in the jack tower.
Exit the cabin and turn to your right. As you approach the next cabin, you will see the cement circles out in the bay. So this cabin is the one whose roof flashes short, short, short, Long, short. Go in the cabin and look at the planetary stand. Again, you will discover that the planet that is currently spinning is the same one that appeared in front of that particular porthole when you used the control lever on the podium in the jack tower.
Further exploration of the remaining two cabins will reveal the same pattern. Whichever planet on the planetary stand in the cabins is spinning, will be reflected up in the jack tower. So apparently, the puzzle demands that you set each planetary stand in each cabin to match the planet associated with the light flash sequence from that particular cabin – the light flash sequence that shows from the roof of each cabin when you look through the porthole in the jack tower.
A note from Becky: As usual, I had the puzzle only half right. I should just write down my assumptions when I start a puzzle, then midway through -- reverse them.
And how can you find a light flash sequence for every planet? That information was back at the Potentiometers. If you have recorded the light flashes from the planetary stand in the Potentiometer we explored together, you will note that one of the planets in it has the same light flash sequence as the porthole that looks out at the Lookout – short, Long. The planet in the Potentiometers that has the short, Long sequence is the large orange planet at the very top. Now your job is to return to the Potentiometers and find out which planets match the remaining light flashes from the remaining cabins.
Go back into the jack tower using the elevator, and take the T-flyer back to the main room in the Potentiometers area. Once there, walk straight across until you are in front of the T-runner in the middle of the room with your back to the T-runner in the same spot as earlier. Remember that we have already found the answer to the jack tower puzzle for the hallway on your immediate left. You don’t have to return there, so ignore it. Instead, go to the lit hallway on your left – you DON’T need to turn to see it – that is between the light stand and the T-flyer. Go up in the elevator to the second floor and turn on the light (if you haven’t already). Then go down a floor and open up the planetary stand. Click on each planet, watch the walls rotate, and then click on the sun button in the center to see and record the light flashes for each planet.
Return to the Potentiometers Area
So you are looking for a planet in each Potentiometer that has a signature light flash sequence. These three sequences (you’ve already recorded the fourth sequence in the Potentiometer you explored when you first arrived) are: 1. short, short, short, Long, short; 2. short, short, Long, short, short short; 3. Long, Long, short, short, short, short, short. Turns out the sequence that fits here is Long, Long, short, short, short, short, short – this sequence belongs to the planet farthest to the right, which is vaguely earth-looking.
Return to the T-runner in the central room. (Remember, the glass shield will be open on it.) Step out into the room. You have already recorded the necessary information for the hallways on your left. Now you need the information from the hallways on your right. If you haven’t already, you’ll need to turn on the light at the light stand on your right. Do so. Go back to the T-runner (remember the glass shield is open). Take one step into the middle of the room to the same spot as earlier. Turn to your right. We’ll explore this hallway next.
Go down the hallway, up two stories, turn on the light, then return to the planetary stand below. You are looking for the following sequence: short, short, short, Long, short, OR short, short, Long, short, short, short. This time the sequence is short, short, Long, short, short, short. The planet that matches the sequence is the one farthest to the right, with a dark swirling color.
Go back to the central chamber and the T-runner again. Take one step out into the central chamber from the T-runner to the same spot as earlier. The last hallway is on your right between the T-flyer and the light stand. Go down it, go up to the second floor to turn on the light and then down a floor to the planetary stand. You are looking for this sequence: short, short, short, Long, short. The planet that matches the sequence is the one farthest to the left, with a dark purple color.
Final Solution: Jack Tower Puzzle
You now want to get back to the jack tower and the cabins. So take the T-flyer (the glass shield is closed). Once in the jack tower, take the elevator down to the cabins. Go out to the circular walkway and take a left. The first cabin is the one with the raised walkway in the back. The planet associated with that light flash sequence is the planet with dark grayish swirls on the far right. Go into the cabin and click on this planet.
Go out of the cabin and take a right. The next cabin is the one with the bay and the circular cement bunkers behind it. The planet associated with that light flash sequence is the dark purple planet on the far left. Go into the cabin and click on this planet.
Go out of the cabin and take a right. The next cabin is the one with the bay and the island/mountain behind it. The planet associated with that light flash sequence is the planet farthest to the right that is vaguely earth-looking. Go into the cabin and click on this planet.
Go out of the cabin and take a right. The next cabin is the one with the Lookout behind it. The planet associated with that light flash sequence is the large orange planet at the very top. Go into the cabin and click on this planet.
Come out of the cabin and turn to your right. Proceed to the jack tower elevator and take it up. Go to the podium, and push the lever up as far as it can go. The planets that you selected on the planetary stands in the cabins will appear one by one. You will know the puzzle is solved correctly if the lever, on its own, goes all the way to the top and the T-flyer turns toward you and the glass shield raises up. Enter the T-flyer, grab the mechanism on the top right, and the T-flyer rises through the floor as though it is an elevator.
Juno’s Sanctuary
You have arrived at the place where the mysterious, multi-talented Juno conducts more of his experiments. Nice view of Alida, isn’t it? Click down to see views out the lower windows.
On Juno’s desk are actual photographs of planets that he has taken – with nothing recognizable as belonging to our solar system. Note the drawing of the telescope, which includes an integrated bi-sphere device. Juno has used this technology to see further than anyone else. Makes the Hubble look antiquated. There’s a telegram from Kivas just like the one to Arin. Apparently Juno returned to Alida the way Arin and Leval did. So where IS he?
There’s also a graphic showing the entrance to the original bi-sphere machine – the entrance is a circular area behind the experiment-gone-wrong. What would happen if this technology fell into the wrong hands?
Further into the room is another guitar sculpture with the Potentiometers in red. Again, click to get closer and then move the handle on the right.
You will see a series of video sequences that show a particular planet turning. This is the final way to set each planetary stand in the Potentiometer area in preparation for the final, climactic strum. I’ve included a description of the planetary stand (including one easily identifiable planet on each) plus the description of the planet that is turning (the one that should be set at the Potentiometer site).
1. Four planets, a dark orange planet at the top. (Spinning planet is the bottom one, blue/grayish and swirling.)
2. Four planets, a white swirling planet at the top. (Spinning planet is the far left one, dark orange.)
3. Five planets, most identifiable one is actually the one that’s spinning – looks like clouds in a blue sky.
4. Five planets, including the earth-like one on the far right. (Spinning planet is near the middle sun and just below it – a blue/white swirling planet.)
Final Settings for the Potentiometers
It’s time to take the T-flyer back to the floor below. Once there, return to the podium device, and pull the lever down to the bottom setting. The T-flyer will turn. Get in the T-flyer, grab the top right mechanism, and the T-flyer will return to the Potentiometers. Once there, leave the T-flyer and walk across the room to the T-runner.
Once again we’ll use the T-runner for orientation. From a position in which you are sitting in the T-runner (glass shield up) step forward three clicks into the middle of the room (when you turn you won’t see just the T-runner behind you). Turn left. Go down that hallway. Up one floor. This planetary stand is the one with four planets and the dark orange planet on top. Click on the bottom, blue/grayish swirling planet. Return to the T-runner (remember, glass shield up).
Step into the middle. Don’t turn. You’re taking the hallway to the left between the T-flyer and the light stand. Go up to the planetary stand. It’s the one with five planets and the earth-like planet on the far right. Click on the blue/white swirling planet below the sun. Return to the T-runner.
Step into the middle. Turn right. You’re going into the hallway on your immediate right. Up to the planetary stand. It’s the one with four planets, white swirling planet on top. Click on the dark orange planet on the left. Return to the T-runner.
Step into the middle. Don’t turn, but go to the hallway on your right between the T-flyer and the light stand. Five planets, one that looks like a cloudy sky. Click on the one with a cloudy sky.
No fanfare. No Halleluiah chorus, but you have finished with the Potentiometers.
A note from tigger: There was no indication I had completed whatever I had to do, hence the bafflement!!! OK, onwards and upwards!!!
Take the T-runner back to the orange stone central chamber. You now have two challenges left: the code for the buttons on the vault doors, and tuning the Peghead.
Code for the Buttons on the Vault Doors
From the orange stone chamber, take the dark rectangular hallway entrance that is closest to the giant plectrum. Go down it, across the bridge, and to the experiment-gone-wrong (water house). Do you remember the small rectangular button we accessed on the pipe? Turn your back toward the water house and then push the button. Controls will come down before you.
Now, referring to your own notes (or the picture in the section titled: The Switch and the Water Tone Puzzle), enter each dotty egg code into the controls, then look up quickly to your left and record what you see. (Note – as you will see, each symbol represents a letter of the alphabet – once you know which symbol matches which letter, you can put them in the multiple places they occur in the code message – for instance, there are 9 letter “O”s in the message.)
When completely transcribed, the message reads like this: code for all vault doors -- set numbers to two, press button for six seconds.
When you’ve finished your transcription, click on the button to send the controls out of the way so you can move again.
Remember that the dotty egg code you just transcribed showed a drawing of the numbers cabinet beneath it? Let’s go back to the orange stone central chamber and take another look at the numbers cabinet (middle cabinet). Go back over the bridge, etc. until you are in the orange stone chamber. The numbers cabinet, as you are facing into the chamber, should be on your right. Approach it. Set all the numbers on it to the number two. Then hold down the lower middle button until you see a change occur. When it does occur, record it.
Up, down, down, up, down, up, down, down. This is the sequence you use in pushing the green buttons on the vault doors.
Now we’ll enter this first set of codes into the door to Arin’s vault and the door to the main vault (the one with all the money and treasure in it). To enter the code into the main vault door, go to the black rectangular hallway in the orange stone chamber (the one farthest from the giant plectrum) until you reach the vault door. Get a close-up look at the door, and then use the code above (another way of looking at the code:
Top button, bottom button, bottom button, top button, bottom button, top button, bottom button, bottom button.
After you’ve inputted this, you should see the left green button light up. To enter this code into Arin’s vault, go out of the orange stone chamber onto the orange stone balcony, turn right, go straight until you hit the wall, turn right, go straight until you hit the wall, then left again until you get to the circular chair structure with the ladder leading up. Go all the way up the ladder into the vault and enter the same top/bottom code into the vault door. The button on the left should glow green. Later in the game, you can decide which vault doors you want to keep keyed to open (it’s very easy to disable the locks)
Return to the orange stone chamber for the final challenge: the Peghead.
A note from LadyKestrel: I was so confused with the peghead and another conundrum (not to be mentioned yet) that I thought my copy of the game should be retitled Aliduh.
The Peghead – Symbols and Flashing Lights
Go into the middle alcove in the orange stone chamber – the one with the numbers cabinet in it. Get into the T-runner and take it to the Peghead central hall. The Peghead central hall is as confusing as the Potentiometer hall was. It looks a bit like the interior of a cathedral, with arches everywhere. There are a few landmarks, however – the T-runner station, a control device in front of the central screw, and a back wall leading to the fancy “N” sculpture and the stairway down to the motor heads device. Explore a bit in order to get oriented, and we’ll meet back at the T-runner.
The control device in front of the central screw allows you to switch power from the right set of pegs to the left set of pegs. When power is on, you can adjust (tune) the pegs one at a time on that particular side. For now, hit the button to switch power over to the right side (only if it isn’t already switched to the right side). Turn right. There are three identical entrances on the right, and you’ll need to explore them all.
Go to the first entrance nearest the T-runner and down a set of stairs. You’ll see a round device (also called an arrow controller) with two symbols on it: a semi-circle and what looks like a sideways “7”. There is a pointer on the device. If you hit the button on the device, you will see screws turning and the face of the device will rotate so that a different symbol is indicated by the pointer. The round devices provide the means for turning the pegs, which tunes the strings. The symbols on the round devices represent two settings for the pegs.
Go out and up the stairs. Turn right and go into the middle entrance. Directly in front of you, before going down the stairs, is an oval opening. Go in it and go up the stairs, then look out the window. You will see a peg with a light glowing in it. Now go down the stairs, out through the oval opening and to your left until you find a set of stairs going down. Take the stairs down and you’ll find another round device, but this one has an arrow on its face. Press the button, and the arrow turns. Now go back up the stairs and into the oval opening (you will have to turn back around near the entrance to the central Peghead hall to do this). Up at the top, looking out the window, you will see a peg with a different colored light flashing. What is happening here?
Go back down the stairs and start out towards the central hall. Keep going until you see the metal arches for the first time. (Remember this position, as you will be returning to it several times.) Turn back around and note the position of the oval opening you just came out of. Now, go back down the stairs to the round device with the arrow on it and push the button again. Return up the stairs, go in the oval opening and look out the window again – yet another flashing light. Go down the stairs and go towards the central hall until you first see the metal arches. Look back, and note the position of the oval door you just came out of. Changed position, hasn’t it? Repeat this procedure one more time if you feel you haven’t quite grasped what is going on.
What’s going on is that this small portion of the Peghead -- the chamber with the oval opening leading up to the window -- is rotating. Every time you push the button on the round device with the arrow and move the arrow pointer, you are rotating the window and looking at a different peg on the Peghead. Each of these pegs (with one exception, where a bulb is broken) can flash two identifying colors – one for each setting on that particular peg, represented by the symbols on the round devices.
Where have we seen items that display a sequence of colors? Right, the color posts at the Lookout.
Now your job is to find out which color is associated with each symbol on the first round device you encountered (and the colors associated with other round devices yet to come).
Go back down to the round device with the arrow, and push the button until the arrow points straight down (6:00 position). Come back up the stairs. Go into the oval opening and look out the window. Write down the color. Go back out into the central hall, take a left and walk back to the first entrance you went in. Go back down to the round device with symbols on it and note which symbol is next to the pointer. Write this symbol down and associate it with the color you just noted. Now push the button on the round device you are standing in front of in order to switch the symbol. Note the symbol. Go back up the stairs, out into the central hall and take a right. Turn at the middle entrance (the entrance leading to the round device with an arrow). Go through the oval opening and look at the color light flashing. The color has changed! Note the color and associate it with the symbol you just wrote down.
The semi-circle symbol is associated with orange, and the sideways “7” symbol is associated with turquoise/light blue.
Next, go downstairs and hit the button on the round device with the arrow until the arrow goes back up to where it is pointing straight up (12:00). Go up the stairs and through the oval opening and note the color of the flashes. Write this color down.
Leave and go back into the Peghead central hallway. Turn right. Go into the last opening on the right, farthest from the T-runner and go down the stairs – the entrance on the right farthest from the T-runner. This round device has two symbols and a pointer on its face. These symbols look like a rolling hill and a squarish outline of a roof. Associate the color you just wrote down with the symbol next to the pointer. Push the button so that the other symbol is next to the pointer. Write down the symbol. Go up the stairs to the central hall and turn left. Go to the middle entrance with the oval opening, go up to the window and look at the color flashes. Write down the color and associate it with the symbol you just wrote down.
The rolling hill symbol is associated with yellow and the squarish outline of a roof symbol is associated with a pale pink.
Go down to the round device with the arrow. Hit the button until the arrow points to the lower left at about 8:00. (This will probably require pushing the button more than one time.) Go up through the oval entrance and look at the flashing light. Note the color. Go down the stairs and out into the central hall.
You are finished with the right side of the Peghead for the moment.
Turn left, walk forward, then turn right until you can see the control device in front of the central screw. Click on it and switch the power over to the left side of the device. Step back until you are sitting in the T-runner, just to get oriented. Now look to your left. You are going to get out and explore the entrances to your left.
Go to the left entrance closest to the T-runner. Go down the stairs to the round device. Note the symbols -- one like the outline of a simple pointy roof and one like a crooked scythe. Note the symbol next to the pointer. Associate the symbol with the color you wrote down. Hit the button so that the other symbol is next to the pointer. Go upstairs, cross the central hall and go into the middle entrance to the oval opening. Look at the window. Associate the symbol with the color.
The outline of the simple pointy roof symbol is associated with green. The crooked scythe symbol is also associated with green.
Go back into the central hall to the device in front of the central screw. Click on it to bring power to the right side of the hall. Go back to the right middle entrance, go down the stair, and push the button until the arrow is in the left middle area of the round face at approximately 9:00. (This will probably take more than one push of the button.) Go through the oval opening and up to the window. Note the color of the flashing light.
Go into the central hall to the device in front of the central screw. Click on it to switch power to the left part of the Peghead. Now go into the middle left entrance and go down the stairs to the round device. Note the symbol next to the pointer and associate it with the color you just saw. Click on the button to move the other symbol next to the pointer. Write down this symbol. Go back to the central hall. Click on the device in front of the central screw to switch power over to the right side of the Peghead. Go into the middle entrance, up to the window and note the color and associate it with the symbol you just wrote down.
The three-sides-of-a-rectangle symbol is associated with red. The outline of a fancy pointy roof symbol can’t be associated with a color – the bulb for the light is dead.
Go down the stairs to the round device with the arrow and click the button so that the arrow points to the left upper part of the round face of the device – approximately 10:00. Go back up to the window and note the color that is flashing. Go back to the central hall, click on the device in front of the central screw to switch power over to the left side of the Peghead. Now go to the left entrance that is farthest from the T-runner. Go down the stairs and note the symbol next to the pointer on the round device, and associate that symbol with the color you just wrote down. Push the button so that the other symbol is now next to the pointer. Write down the symbol. Go up the stairs, go through the central hall to the middle entrance on the right. Go up to the window, look at the flashing light and associate it with the symbol you’ve just written down.
The two peaks symbol is associated with white. The “V” symbol is associated with blue.
Now look back through your notes to the color sequence you saw on the Lookout. That sequence, starting at the point where you entered the area, and going counter-clockwise was:
Red
Green
Yellow
White
Blue
Pink/purple
Pink/purple
Turquoise.
You will be arranging symbols soon in approximately this order:
(RED) three-sides-of-a-rectangle symbol.
(GREEN) Crooked scythe symbol OR the outline of a simple pointy roof symbol.
(YELLOW) Rolling hill symbol.
(WHITE) Two peaks symbol.
(BLUE) “V” symbol.
(PINK/PURPLE) Outline of a fancy pointy roof symbol OR outline of a squarish roof symbol.
(PINK/PURPLE) Outline of a fancy pointy roof symbol OR outline of a squarish roof symbol.
(TURQUOISE) Sideways “7” symbol.
Adjusting the Two-Symboled Motor Heads
Walk out to the central hall and walk to the wall farthest from the T-runner. Walk around the wall to the room beyond it – accessible at the right corner of the wall. Remember we were here earlier to record a symbol? Walk to the windy area behind the wall, then down the steps to a complicated machine/motor with a symbol on each end of each Peghead motor head. The controls are in front of you as you come down the stairs.
Each button on the controls moves a motor head so that the symbol is changed. You can play with this for a bit, identifying symbols as you go – yes, they are somewhat similar to the symbols from the round devices in the other part of the Peghead. We need to put these in the order mentioned above. The order has to be correct on the INNER circle of the motor – the outer circle is not important.
Figure out which button operates which motor head. We are looking for a symbol by which to get oriented – one that appears only once and is simple to identify. How about two peaks? Put two peaks into the center of the circle.
Since we’re starting with two peaks, we’ll reword the color sequence because we’re starting where the white post was on the Lookout, rather than the red one. From this new starting point, going counter-clockwise, the posts go:
White
Blue
Pink/purple
Pink/purple
Turquoise
Red
Green
Yellow.
So the symbols we’ll be looking for should go counter-clockwise as follows:
1. Two peaks symbol.
2. “V” symbol.
3. Outline of a fancy pointy roof symbol OR outline of a squarish roof symbol.
4. Outline of a fancy pointy roof symbol OR outline of a squarish roof symbol.
5. Sideways “7” symbol.
6. Three-sides-of-a-rectangle symbol.
7. Crooked scythe symbol OR the outline of a simple pointy roof symbol.
8. Rolling hill symbol.
Going counter-clockwise (left) from two peaks, we’d expect to see a “V symbol. Sure enough, there is one. Put that in the center of the circle. The next two motorheads are problematic. They are pink/purple, but the pink symbol – outline of a squarish roof – isn’t among these two motor heads. There are two symbols that look like the outline of a fancy pointed roof – which matched the peg whose bulb had burned out. By process of elimination, one of these must be pink/purple. So put them both into the center of the circle.
Next we’d expect to see a sideways “7” symbol. There is none on the next motor head that is easy to distinguish. However, the one symbol (semi-circle) is CLEARLY wrong, so put the “V” shaped symbol, which at least is angular like the “7” in the center. After that, the three-sided rectangle. YES!!! There clearly is a symbol for that. After that, either the crooked scythe symbol OR the outline of a simple pointy roof symbol. One motor head DOES look like the scythe symbol. Put it in the center.
Last, the rolling hill symbol. Put that one in the center. At this point, you may want to save your game before pressing the center button, because an animation you may want to replay is about to occur.
A note from TLC: Maybe I’ll make the Guinness book listed under “longest time ever to get through a puzzle”.
A note from mjartisian: I think I might get that Guinness award, so don’t count on it.
If, at this point, you are confused by these strange symbol descriptions, here is a picture of how the motor heads should look.
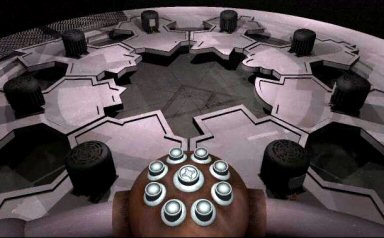
Press the center button.
Transportation Via Egg
THAT was unexpected. Go around onto the balcony to the egg-shaped thing facing you. Enter it and push the button. Going doowwwwwnnnn. Where are we?
Wander down the hall until you encounter the guitar sculpture. Again, click on it and move the curved bar on the right. You’ll see a video of a series of symbols from the round devices back in the Peghead. Write down each symbol that is next to a pointer, and the place where the arrow is pointing. These are the symbols: outline of a squarish roof, two peaks, outline of a fancy pointy roof, crooked scythe, semi-circle, arrow to lower left – 8:00.
Head back towards the egg thing. As you walk forward, check to the left with every step. You will see a set of stairs leading up. You can go look at this area, but there is nothing you actually can do or change there – Arin has disabled the transportation here by severing a control button so no one can get at it. (Maybe, someone should go down there and to look and see if Juno’s down there. Where IS Juno?) Be sure you look way up at the Peghead – nice view. Wish we could get a better look at what’s below. Haven’t we seen enough wonders in this game? No! Never enough.
Final Settings for the Peghead
Take the egg thing back to the top. It seems the egg goes up and down the huge shaft that supports the Peghead. Go up into the Peghead central hall. The control device in front of the central screw is set to the left side of the Peghead, so we’ll start there. Go to the left side entrance closest to the T-runner. Set the round device to the crooked scythe. Go to the middle entrance on the left side. Set the round device to the outline of a fancy pointy roof. Go to the entrance on the left side farthest from the T-runner. Set the round device to two peaks. Go into the central hall. Click on the control device in front of the central screw. Power is now on the right of the Peghead. Go to the right entrance closest to the T-runner. Set the round device to semi-circle. Go to the middle entrance on the right side. Set the arrow at lower left—approximately 8:00. Go to the right entrance farthest from the T-runner. Set the round device to the outline of a squarish roof. No trumpets sound for you, but nevertheless you have now, at long last, tuned the Peghead.
If you are interested, go back to the middle entrance on the right side and go upstairs and look out the window. The device is set on the broken bulb. This makes sense. If the guitar was usually kept in tune, that particular light would be flashing a lot more than the others and would be more likely to burn out.
Final Decision, Final Strum
Return to the T-runner. Take it back to the orange stone central chamber. You now have a decision to make.
Soon you will go upstairs and perform the final action – strumming the guitar that is now fully prepared. It is turned on correctly (that is, the Switch is in the correct position). Adjustments have been made to eliminate feedback (that is, the Potentiometers are set in the correct position). And the Peghead is tuned. Strumming will now create the musical key that will open the vault doors. You’ve pre-set the green buttons on both active vault doors to the “open” position, remember? One vault holds fabulous riches. The other vault holds a prisoner. Which will you open? Or will you open both?
You can experience different endings here, depending on your choices, so save your game.
If you wish to disable a vault door, merely click on the door to get a close-up and then click on one of the green buttons. The light will go to red and the door will relock. Even if you strum the guitar now, that particular vault will stay closed.
Okay, a final march down the black rectangular hallway that is across from the giant fingers. Go past the main vault. Up the elevator to the Pickup. Click to get to the controls.
A note from LadyKestrel: Hopefully, you’ll have a nice strum....
Take a deep breath. Move the lever.
Doesn’t sound much different, despite being tuned, does it? Is anything going to happen? Patience – look at the video screen for a few more seconds.
If anyone shows up to tell you a vault is open – congratulations! You’ve won the game. If no one appears on the video screen after several seconds, either the Potentiometers, the Switch, the Peghead or the green buttons on the vault door are set incorrectly and you have to go back and figure out where you went wrong.
Enjoy the alternate endings. By the way – the balcony is the orange stone one overlooking the sea – the place where you started the whole adventure in the first place.
Alida’s Questers: Arwen, Becky, chiefette, dogpenny, GeeGee, Glynn, grannygamer, Jenny, LadyKestrel, mjartisian, Mordack, norm, Rice burner, tigger, TLC
Alida Installation Procedure #1 is for WIN XP only.
Note: if your computer is set for single-click only, substitute a single click where the instructions say: "double-click."
Use this procedure if you do NOT have experience copying files to your hard
drive. I've included every possible step, and that is the reason this simple
procedure seems so long!!!
If you have WIN 98 or you may prefer using Procedure #2 if you have
experience copying files onto your hard drive.
1. Place Alida, Disk 2 in the CD ROM drive. If you have trouble finding Disk 2,
look at the open CD case (you’ll see Disk 1 on the right and Disk 3 on the
left). Now gently lift the black center spine to reveal – Disk 2!
2. If you have Autoplay enabled, you will see a window pop up with two folders:
"Alida 2 V" and "Alida Game". If you don’t have Autoplay enabled, go to “My
Computer” and double-click on the drive that says “Alida”. This brings up the
correct window.
You will also see the file: "!Quickti.exe". Ignore "Quickti.exe" for now -- you
can click on it AFTER you've installed the game IF you find you can't get the
game to run with your current version of Quicktime (I did not need to install
Quicktime to run the game, but I did need to install it in order to see the
opening video sequence).
3. Highlight the "Alida Game" folder with a single click. Look on the left of
the screen and you will see “Copy this folder”. Click once on “Copy this
folder”. A window will pop up where you pick the destination to copy the folder
to. Click once on "Local Disk C" to highlight it (Local Disk C is your hard
drive). Then click on the "Copy" button on the bottom of the pop-up window. Your
computer will copy the Alida Game folder to your hard drive.
When that is done, you should see the Alida Game folder among the other folders
on your hard drive – mine was at the very top. If you open up the Alida Game
folder on your hard drive by double-clicking on it, you should see a folder: "M"
and a file: "Alida.exe".
4. If you want to put an icon for Alida on your desktop, first close down the
open windows. Go to "Start," then "My Computer" and double-click on the "Local
Disk C" icon. You will see a folder near the top that says "Alida Game".
Double-click to open it, then right-click on the Alida.exe file within the Alida
Game. Select "Create shortcut," then drag the shortcut to your desktop. You can
now click on this icon to start your game.
5. At this stage the most important part of the game is installed.
You can play the game without installing the rest of the disks if you want to
conserve space. You will have to do some disk-swapping during the game, though,
if you don’t do a full install.
6. To do a full install: I started with Disk 1. Put Disk 1 in the CD ROM drive.
A window will pop up (if you have Autoplay enabled) that will say “Alida V 1.”
Highlight the "Alida V 1" folder with a single click. Look to the left of your
screen, and click once on “Copy this folder.” A window will pop up. You want to
copy the folder to “Alida Game”, so click once on "Alida Game" to highlight it,
and then click on the copy button.
Once Disk 1 has finished, remove it and insert Disk 2. This time, you do the
same process as Disk 1, except you want to copy “Alida V 2” (you’ve ALREADY
copied “Alida Game – so leave that one alone). When Alida V 2 finishes the
copying process, remove Disk 2 and put in Disk 3, and so on.
7. If you want to install Quicktime, put Disk 2 back in the CD ROM drive.
Double-click on the "!Quickti.exe" icon. This will bring you to a standard
installation program for Quicktime.
8. You should be ready to play now. Close all folders & click on the Alida
shortcut on your desktop. This game runs on 32 bit, either 800x600 or 640x480.
If your resolution is higher than that, the window will be smaller.
If you want the game to automatiacally play in the largest window possible, you
can right-click on the Alida.exe file on your hard drive (the one you used to
create a shortcut for your desktop), then select “Properties”, then
“Compatibility” and click on the box next to “Run in 640 X 480 screen
resolution.”
Alida Installation Procedure #2 is for WIN 98 only.
Note: if your
computer is set for single-click only, substitute a single click where the
instructions say: “double-click.”
The BELOW Installation Procedure #2 is aimed at gamers who are using Win 98.
NOTE: if your computer is set for single-clicking, not double-clicking,
substitute a single click where the instructions say: “double-click”.
1. Place Alida, Disk 2 in the CD ROM drive. If you have trouble finding
Disk 2, look at the open CD case (you'll see Disk 1 on the right and Disk 3 on
the left). Now gently lift the black center spine to reveal - Disk 2!
2. If you have Autoplay enabled, you will see a window pop up with two
folders: "Alida 2 V" and "Alida Game". If you don’t have Autoplay enabled, go to
“My Computer” and double-click on the drive that says “Alida”. This brings up
the correct window.
You will also see the file: "!Quickti.exe". Ignore "Quickti.exe" for now -- you
can click on it AFTER you've installed the game IF you find you can't get the
game to run with your current version of Quicktime (I did not need to install
Quicktime to run the game, but I did need to install it in order to see the
opening video sequence).
3. Right-click on the "Alida Game" folder. Select “Copy.” (In Win 98,
you may need to first resize or reduce the Alida window to find the “My
Computer” icon on your desktop.) If the window that opens when you click on
“My Computer” covers up the Alida window, resize or reduce the “My Computer”
window so you can see both windows.
Once the windows are resized so that neither covers up the entire screen, you
can move your two windows so both are visible by dragging them by the title bar.
(In fact, you only have to see a tiny bit of the window to use it for the next
step. The window will automatically come up when you click on it, as will the
other window, when you click on that one.)
Next click on the icon for "C local disk” so that it opens and you see the
folders. Right-click on a blank space within C and select “Paste”. (Make certain
that NONE of the current folders are highlighted -- clicking on the blank space
should make no visible changes to the current folders.) When you select “Paste”,
the computer will begin to copy the Alida Game folder to your hard drive. When
that is done, you should see the Alida Game folder among the other folders on
your hard drive – mine was at the very top. If you open up the Alida Game folder
on your hard drive by double-clicking on it, you should see a folder: "M" and a
file: "Alida.exe".
4. If you want to put an icon for Alida on your desktop, double-click on
the “Alida Game” folder on your hard drive, then right-click on the Alida.exe
file within the Alida Game. Select "Create shortcut," then drag the shortcut to
your desktop. You can now click on this icon to start your game.
OR another way to put an icon on your desktop is to right-click on the
Alida.exe file, select "send to" and get a dropdown menu which gives "desktop
(create shortcut)".
5. At this stage the most important part of the game is installed. You
can play the game without installing the rest of the disks if you want to
conserve space. You will have to do some disk-swapping during the game, though,
if you don't do a full install.
6. To do a full install: if the Alida Game folder on your hard drive is
NOT already open, double-click on the Alida Game folder to open it. Go back to
first open window that contains the Alida icons put there when you put the disk
in your CD drive. Right click on the Alida 2 V folder, choose “Copy”, then
right-click on the open Alida Game folder on your C drive and choose “Paste”.
You should then have an Alida.exe file, an ‘M’ folder and an Alida 2 V folder in
your Alida Game folder on the C drive.
Next, put Disk 1 in the CD ROM drive. A window will pop up (if you have Autoplay
enabled) that will say "Alida V 1". If the new Alida window covers up the open
Alida Game folder, resize or reduce the Alida window so that you can see them
both. Right-click on the "Alida V 1" folder. Select "Copy.” Right-click on the
open Alida Game folder on your hard drive and select "Paste". The computer will
now copy the Alida V 1 folder into the Alida Game directory.
Once Disk 1 has finished, remove it and insert Disk 3. This time, you do the
same process as Disk 1, except you want to copy "Alida V 3". When Alida V 3
finishes the copying process, remove Disk 3 and put in Disk 4, and so on.
7. If you want to install Quicktime, put Disk 2 back in the CD ROM drive.
Double-click on the "!Quickti.exe" icon. This will bring you to a standard
installation program for Quicktime.
8. You should be ready to play now. Close all folders & click on the
Alida shortcut on your desktop. This game runs on 32 bit, either 800x600 or
640x480. If your resolution is higher than that, the window will be smaller.
copyright © 2004 GameBoomers Group