ANNA
by
Dreampainters
Walkthrough by
MaGtRo July, 2012
Gameplay: This is a combination keyboard -
mouse third person with 360 degrees panning game.
Before the game starts, see the game settings:
graphics and input selection frame. The graphics frame has screen resolution
and graphics quality. The input frame has the controls.
The main menu has new game, load, options, credits,
input help and quit selections.
The options menu has mouse speed and music volume.
Selections for ambient occlusion, bloom, tone mapping, noise, anti aliasing,
subtitles and help system are also found here.
Input help has information about the game
manipulation (keyboard and mouse).
Move using the WASD keys of your keyboard.
Left mouse button shows the interface and right
mouse button moves object.
Dialogues can be skipped by the left mouse button.
Middle mouse button or I key shows inventory.
C key is to crouch.
H has online help.
F1 opens the in game menu.
The game can be
purchased as a download from Zodiac.
Save often; possible dead end might happen.
Be sure to read the .pdf
document that is in the notepad folder that is accessed when you open the Zodiac
Extras of the game. Learn the backstory of what happened to the lead character
and what brought him to D'Ayas Valley.
Anna... how could
I forget you?
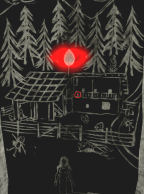
Outside the
sawmill:
Inventory has
cigarette lighter, knife, empty canteen, jotter and
mobile phone.
Main door:
Go forward using the
W key and examine the shut door.
Look up and see an
eye-shaped notch above the door.
Check the barred
window right of the door.
Stairs:
Go up the stairs and
see that the door here is inactive.
Go down and check the
small door under the stairs. The door is held together by small string.
Use the knife on the
string to remove it from the door.
Open both doors wide
open by right click-hold-move of the mouse.
Crouch down using the
C key of your keyboard. It is dark inside the small enclosure.
See a dry branch at
right wall. Use the lighter on the dry branch to get light.
Pick up the mirror
shard. (I can't put out the fire).
Yard:
Turn left and go
through the break on the cement wall.
Turn right and pick up
a dried pine cone from the ground.
Look around the
grounds and pick up pebbles.
Stream:
Go to the stream close
to the sawmill.
Examine the clear
rivulets. Use the canteen on the rivulet to get filled canteen.
Deep mud pond:
Turn right and go
forward.
See a big rock that
blocks a small area of the stream making a mud pond. The other outlet of the
mud pond is also blocked by another big rock.
Turn around from the
mud pond and go to the tree.
Pick up the branch
lying on the ground behind the tree.
Go back to the mud
pond. Use the branch on both big rocks that block the water flow of the
stream.
The water clears up.
Pick up the other mirror shard at the middle of the pool.
Open the sealed main
door:
Go back to the main
door.
Use the 2 mirror
shards on the eye-shaped notch above the door to make the sclera.
Hear a voice.
Throughout the game, voices will be heard. Listen to learn more about the
story.
Use the dried pinecone on the eye-shaped notch above the door to make an iris.
Use the lighter to
burn the pinecone.
The left side of the
door burns. It is a keyhole.
Use the filled canteen
on the burning eye above the door. This puts out the fire of the keyhole and
the door is opened.
Save game here.
Main floor of the
sawmill:
Main workroom:
Use the door and enter
the sawmill.
Turn around and
examine the door. The door is stuck behind you.
Old handkerchief:
Turn to the table left of door and see an old handkerchief with something
written on it.
Examine the note.
Obsessed by such
purity. He stretched out his arm and cut himself with the heated blade.
At last he had
fulfilled the rite.
Only when he had
seen his own blood pollute the limpid water, he realized he was drawing to the
truth.
Examine the vase on
the table and it has some flowers.
Old water saw:
Go forward to next room and see an old broken water saw at center of room.
Go to the left side of
the water saw and see decrepit boards on the floor.
Move-right click-hold-move the boards,
one at a time until you see a sharp fragment. Pick up sharp
fragment.
Stove:
Turn to and go to right corner of room. Examine the lit stove.
Open-right click-hold-move the
stove door. Examine the fire and see something in the fire.
Examine and pick up
some sawdust left of the stove.
Stockroom door:
Turn around and go forward to closed door with drawing of 5 eyes.
Turn to the left and
forward pass the old water saw. Look up and see a
ceiling hatch.
Broken table:
Go forward and examine the broken table.
Examine the stuck bone
hilt on top of the table.
Use the branch on the
bone hilt. Pick up the bone hilt.
Examine the locked
drawer at right side of the table.
Warehouse:
Turn left from the broken table and examine the warehouse-hatch on the floor close to the left wall.
It has a sturdy
padlock.
Side room:
Turn left and examine
the broken door right of the broken table.
Open-right click-hold-move the
door and enter the room.
Puddle:
There is a puddle at center of room.
Use the empty canteen
on the puddle to get filled canteen.
Hollow on the wall:
Examine the hollow on far wall. It filters a weak light inside the room.
Ritual:
Luminescence:
Turn around from the hollow on the wall and examine the luminescence on the
puddle.
There is a circle of
limpid water at end of the luminescence. This must be the limpid water
mentioned in the note. There is nothing to
walk on.
Use the saw dust on
the luminescence to expose a transparent glass bridge.
Ritual knife:
In inventory, use the bone hilt with the knife blade to get ritual knife.
Ritual:
As mentioned on the handkerchief note; walk the transparent bridge to the
circle of limpid water.
Examine the limpid
water.
In inventory heat the
ritual knife by using it with the cigarette lighter. A snake appears on the
blade.
While the knife is
still heated; use the knife on the limpid water and automatically cut oneself
to release blood on the water.
A silhouette of a man
with twin boys appears on the water. The arm doesn't hurt anymore.
Exit the room.
Stove:
Go to the stove and see 3 paintings in 3 niches on the wall.
Open the stove door
and use the filled canteen on the fire. The pipe above the stove breaks.
Pick up the key
inside the stove.
Locked drawer:
Go to the locked drawer of the broken table.
Use the key on locked
drawer.
Open the drawer and
take the wooden box and the heap of tied leaves.
Perforated box:
Examine the box and see that it resembles a darkroom.
Enter the side room
with puddle. Use the perforated box
on the hollow on the wall.
Examine the box
attached to the hole and see the twin mountains: Castor and Pollux.
Sometime in this part
of the game, you will feel strange, the rooms will change and symbols will
appear on the walls of the rooms: 3 crescent moons, 3 interlocking spirals and
trapezoids. Roots and plants will also appear on the walls.
5 eyes:
Paintings:
Go back to the paintings on the wall by the stove.
Examine the middle
niche's painting; it shows twin heads at top of the painting. The eyes of the
twins glow.
Use the middle niche's
painting and the room starts shaking and hear children screaming.
The eyes in all 3
paintings glow.
Words on wall:
Turn right and see a clue written on the wall right of the stove.
The death was
black. The hatred bronzed. The happiness golden. The solitude silvery. Yet the
sole lie was white.
Leaves:
Use the hunting knife on the tied leaves to get 5 colored leaves: gold,
silver, bronze, white and black leaves.
Place the
appropriate leaves on the correct painting as mentioned on the clue:
Look at each
painting and derive which painting matches the leaves.
Use the correct leaf
on the eye seen on the painting.
Middle niche
painting: Happiness as shown by smiling faces. Use the gold leaf on eye.
Right niche
painting: Hatred as shown by a woman scorned by the frowning faces. Use
the bronze leaf on eye.
Left niche
painting: Lie as shown by a dead woman on the bottom, sad faces and the
church on top. Use the white leaf on eye.
Go to the room with
the puddle.
Left wall niche
painting: Death as shown by a dead woman and the
shocked faces on the left. Use the black leaf on eye.
Right wall niche
painting: Go to the right wall skirting around the
puddle.
Loneliness as shown
by a lone woman and the family all dead. Use the silver leaf on eye.
If correctly done,
hear a clicking sound.
Stockroom:
Go to the stockroom
door with 5 eyes and see that it is now unlocked.
Enter and see that it
is dark here.
Lamp:
Go forward and see a large jug on the floor at left. Pickup the vegetable
oil beside it.
Turn right to the
ceiling and see a hanging lamp. Use the vegetable oil
with the lamp.
Use the cigarette
lighter on oil filled lamp to get light in the room. Look around.
Go forward on the left
side of the lamp (wall across the door).
Pick up the plant
food sack on the floor.
Go farther back and
pick up the iron bar from the floor close to the wall.
Wall painting:
Go to the far wall right of where the iron bar was taken.
Examine the painting.
See a man holding a dead baby with an eye on his body and crying heads.
Fix the stove:
Warehouse-hatch on
floor: Go back to the hatch on floor across the broken table
at main room.
Use the iron bar on
the padlock. Open the hatch.
Pickup some larch
needles.
Move the larch needles
left in the hatch and pick up the spare parts for the stove.
Stove:
Use the spare parts on the pipe above the stove.
Open the stove door.
Use the larch needles inside.
Kid:
Go to the stockroom and the painting on the wall.
Use the ritual knife
with the cigarette lighter to get heated ritual knife.
Use the heated ritual
knife with the eye on the child's body. A pulsating heart comes out of the
body. Pick up the
pulsating heart.
Go to the stove and
place the pulsating heart inside the repaired stove.
Use the cigarette
lighter on the top of the stove to light the larch needles. The room shakes.
Attic:
Go to the hatch on the
ceiling by the broken table and see that the attic ladder is down.
Use the ladder to be at the attic.
Look around:
Orient yourself in this dark place. The trapdoor you
came up from is on the floor behind you and across from the chair.
Masks: Go forward to the
wall.
Examine and pick up the 3 masks on the wall:
Face of Truth, hairy Mask of the Divine and oval Mask of the
Assassin.
See a root on the floor close to the right corner.
Wardrobe: Go forward to next room. You can pass through roots and other obstacles.
See a closed wardrobe and another root at the corner
right of the wardrobe.
Open the wardrobe by right click-hold-pull.
Examine and pick up the black mourning dress
and the black veil.
Mirror: Turn right and see a dirty mirror.
Continue to the right a bit and see another root
protruding from the wall.
Overturned chair: Go to the
corner and see an overturned chair.
Note another root on the floor that cannot be
pulled.
Trunk: Turn right and be at
a back passage. See a trunk.
Use the iron bar on the trunk to open it. Pick up the seed bag.
Continue to the right and see a root on the floor at
corner. It cannot be pulled.
Symbol of Goddess: Go to
next wall and see the symbol of the goddess. There are spirals on the right.
Turn around and examine the chair fastened to the
floor.
Continue to the right of the Goddess symbol and see
another root on the floor.
Barred door: Go to the other
corner and see a barred door.
Listen to the conversation of man and wife about
"her" and his obsession.
Pickup the 6 roots:
All the roots in the attic are stuck to the wall or
floor. They are dry.
Use the plant food on the root (the root seems
alive) and they turn green.
Then pick it up. You should have 6 roots.
-
Root on floor left of barred door.
-
Root on floor at corner left of Symbol of Goddess.
-
Root on floor right of overturned chair at corner
left of trunk.
-
Root on wall left of overturned chair and right of
the mirror.
-
Root on floor at corner right of the wardrobe.
-
Root on floor close to corner right of the wall where
the masks were attached.
Mask of the Divine: Combine
the hairy mask of the Divine with the black mourning dress.
Use the mourning dress with mask on the chair
in front of the Symbol of the Goddess.
The mask follows and looks at you wherever you go.
The Assassin:
Go downstairs through the trapdoor in front of the
chair with the mourning dress.
Mask of the Assassin: Examine
the mask and then use it. You will wear it and it cannot be taken off.
See that the room has changed. Eyes are everywhere.
The broken table has been moved.
Stove: Go to the stove and
pick up the ashes of the heart. It is thick and viscous.
Roots and niches: Check the
niches on the wall left of the stove.
They have weird images like fire (seen only when the assassin mask is worn).
Place one root on the niche. (Try using the lighter
on the root and see that it doesn't burn.)
Use ashes of the heart on the root to cover it in
death to get root with ashes.
Use the lighter to burn the root to get ablaze root.
Do the above to all 6 niches and 6 roots:
3 niches on this wall, 2 niches in room with puddle and one in the stockroom.
If possible, do the stockroom with all the hands last.
Carved silhouette: After
all 6 roots are set on fire, the mask of the assassin falls off the face.
Pick up the mask of the assassin from the
floor.
See a carved silhouette appear on the niche in the
stockroom.
Examine the visage on the wall. The shape is like
the mask of the assassin.
Use the mask of the assassin on the silhouette. It
is now mounted.
Use the black veil over the mounted mask.
Get offering for the Goddess:
Middle niche: Exit the
stockroom. See that the ablaze roots are dowsed except for the one at middle
niche.
Look at middle niche. See a wooden handcrafted basin
at bottom of the blazed root. Pickup the wooden basin.
Plant a tree: Go to the room
with the puddle.
Use the bag of seeds taken from the trunk on the
puddle. See a pond tree grow through the ceiling to the
attic.
Pond tree: Use the ladder
to attic to find where the top of tree came out on.
Go to the wardrobe area. Go to the wall left of the
wardrobe and see a deformed sapling. The end looks like a child shaped form.
Pick up all the leaves off the sapling.
Use the ritual knife with lighter to get heated
ritual knife. Use heated ritual knife on deformed sapling.
It bleeds from the wound. Use the bowl taken from
middle niche on wound to collect blood and get blood filled bowl.
Activate the Symbol of the Goddess:
Go to the symbol of the Goddess.
Mourning dress: Use the
mourning dress with mask when it is on the chair and the symbol of the Goddess
turns red.
Symbol: Examine the red
symbol of the Goddess. Something is still missing.
Use the blood filled bowl on the symbols and the
symbol glows. The Goddess is reborn.
Anna's key: Examine the symbol
and then use the symbol. Anna's key is now in inventory.
If there is no change in the room; move around, wait
(length of time depends on how fast the game was played) and look at things
until you hear a bell.
Then the room changes. Symbols will appear on the
wall. Crates are moved to different locations.
Big rocks appear. Also, see a skeleton on the floor
in front of the goddess symbol.
By this time, symbols and handprints appear on the
walls. Flames appear on the crate by trap door and around the door on the
floor.
A door will appear on the floor on the other side of
the big crate that is beside the trapdoor.
Save game here.
Choice: You can use the key on the barred door at the corner to exit the house or continue by using the key on the door on the floor.
Note: If you exit
the house (using Anna's key on the closed door) or before some
actions are triggered; you might have to start from the beginning or when you entered the sawmill to get the best possible ending.
Note 2: The appearance of the
door on the floor might be based on the Hints option chosen. If no hints are
selected, the door on the floor might appear immediately. If "key" and "time"
are selected; the appearance of the door on the floor might be delayed by the
chosen hint options. (Thanks, Chief!).
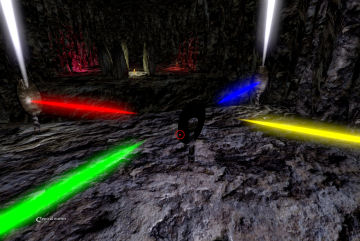
Underground:
Womb of the Goddess:
Use Anna's key on the door on the floor on the other
side of the crate beside the trapdoor.
Be underground. Look around. See 4 side mirrors and
a central one. There is a chasm that separates this side from the one with a
stone circle.
Arrange the mirrors:
Use all the 4 corner mirrors so that the light beam
is pointing towards the center and cannot be moved anymore.
Change the colors of the beams pointing to the
center:
With your back on the detached door you came through
and going left to right (1-4):
Use Mask of Divine on mirror 2 - top left. A yellow
beam is made. Pick up the mask back.
Use Face of Truth on mirror 4 - bottom right. A
yellow beam is made. Pick up the mask back.
Use Mask of Divine on mirror 3 - top right. A light
blue beam is made. Pick up the mask back.
Use Face of Truth on mirror 1 - bottom left. A light
blue beam is made. Pick up the mask back.
Use Mask of Divine on mirror 2 - top left. A red
beam is made. Pick up the mask back.
Use Face of Truth on mirror 1 - bottom left. A green
beam is made. Pick up the mask back.
Use Face of Truth on mirror 4 - bottom right. A
bright yellow beam is made. Pick up the mask back.
Use Mask of Divine on mirror 3 - top right. An
indigo blue beam is made. Pick up the mask back.
Check each corner mirror to be sure they cannot be
moved anymore.
Use Face of Truth on center mirror. See a path form
over the chasm.
Cross the chasm.
Tunnels:
Look at the circle of stone and see 5 eyes at
the center.
Go to the back wall and see the 5 drawings seen on
the niches at the sawmill. It is telling your story.
The wall behind the drawings disappeared.
Mother Earth: Go forward and see
the first candle on the ground. The tunnel splits right and left.
Go right. Go forward until the rock with 5 eyes. It
changes to a shelf full of Earth Mother statues.
Turn around from the shelves.
Dark Dome: Go forward back
to the candle on the ground.
Continue to the next candle and go right to the
tunnel beside it.
Go forward until you see the dark dome or black
cloud.
Turn around from the black cloud.
Stone face with sharp teeth: Go
forward back to the candle on the ground.
Go right and see 2 candles on the ground.
Go forward to the far left candle. See a stony visage with sharp pointed teeth. Examine
the head.
Stone eye: Turn around and
go to the other candle which is now on your left.
Enter the tunnel across this candle. Go forward until the scene with the burning oven.
Continue forward until the carved stony eye.
Examine the carved stony eye.
Examine the eye of the stone.
Use the hunting knife on the eye of the stone.
Turn around and exit back to the candle.
Stone face with sharp teeth:
From the candle, go left back to the stone face with sharp teeth.
Use the eye of the stone on the stone face with
sharp teeth. Pick up the alive eye.
Stone eye: Turn around and
go to the other candle which is now on your left.
Enter the tunnel across this candle. Go forward until the carved stony eye.
Use the alive eye on the carved stony eye. Hear a
noise; your story is told.
Turn around and exit back to the candle.
Anna: Go right until the
candle on the left.
Enter the now bright tunnel that housed the dark
dome earlier.
Watch what happens!
This document may not be distributed without express written permission of the author and the content may not be altered in any way.
For Questions or Comments on this Walkthrough,
Please write to: MaGtRo
Copyright © 07/2012 MaGtRo
 GameBoomers Walkthroughs and Solutions