ANNA'S QUEST
By Krams Design and Daedalic Entertainment
Walkthrough by MaGtRo August 2015
Gameplay: This is a point and click game.
Main Menu has resume game (Anna icon), new game (Ben teddy bear), savegames (coffee), settings (Wunderhorn), bonus (Grandpa) and exit game (door).
Settings has selections for:
Tools icon: subtitles, hotspot indicator, achievement notice, minigame skip button and open inventory by clicking.
Monitor icon: fullscreen, window size, additional animations, brightness and HD cutscenes.
Sounds icon: voices volume, music volume, effects volume, cinematic volume, global volume and mute.
Controls icon: reprogramming of mouse and keyboard keys are available.
Language (text and dialogue): English, Spanish, French, Italian, Russian and German.
Bonus has pictures, movies, achievements and credits.
Main menu is accessed by the ESC key during gameplay.
Inventory is seen by use of I key or mouse scroll button. Inventory items can be combined.
The inventory book has suitcase tab for inventory, disk for quick save, gear for settings and house for main menu.
Active spots are shown by pressing the spacebar or the mouse wheel.
Left click does the action. Right click gives a description.
Left click on dialogues skips it.
To save a game, select a frame and click the save button. There is an auto save and quick save. The saved games can be deleted or overwritten.
Load game is also in the same page as save game.
Double click leaves the scene.
Anna is called by her grandfather. Grandpa warns Anna about going to the woods. Remember that in your heart we carry our family.
Grandpa gets ill and Anna decides to leave the farm to find a cure. While walking in the woods, Anna is taken by the witch Winfriede and locked in a tower.
Chapter 1: A little Experiment
Bedroom:
Anna is locked inside the bedroom. Anna is determined to find a way to help her grandpa.
Tutorial: A tutorial follows. Go closer by clicking on door.
Sit on the red chair under a helmet attached to a machine. Her telekinetic power is stimulated.
Telekinesis: A brain icon at bottom left when clicked or the K button pressed gets Anna to use her telekinetic power. The cursor changes to the brain icon.
Use the telekinesis-brain icon on the spoon in inventory.
Take the bent spoon from inventory and click it on the camera.
The witches leave to prepare the next step.
Teddy bear: Talk to the teddy bear. Learn that the teddy bear is Ben, a boy that the witch has change.
Enhance telekinetic power:
Bed: Examine bed and pillow.
Table: Go to the table and get a crayon and yellow paint from the art stuff. Take the scissors.
Soup: Look at the soup. Anna doesn't like the soup. Use the telekinesis power on soup. (Fussy eater achievement).
Unicorn: Examine the unicorn toy. The horns are stuck fast on the toy. Use the scissors on the unicorn to get the unicorn horn.
Doll: Look at the freaky doll. Anna doesn't like the doll. Use the yellow paint and then the crayon on the doll. (Makeover achievement).
Box, toys by door, curtain: Examine the locked box with a heart, cute stuff toys by door and the curtains.
Open the machine: Examine the machine at corner and see the bottom half has a cover.
Use the scissors to open the cover at bottom half of machine. Need a more pointy stuff.
Use the unicorn horn on the cover.
Anna randomly presses a button. A blue thing-electric device falls off the helmet to the floor.
Pick up the blue thing-electric device: The device is sparking electricity.
Take the ball left of machine. In inventory, combine the scissor and ball to get half a rubber ball.
Use the half a rubber ball on the electric device on floor.
After thinking about Grandpa, Anna wears the electric device and her telekinesis power is enhanced.
The witch noticed that something happened. Remember she is watching you.
Prevent witch from watching Anna:
Talk to Ben the bear.
Use telekinesis power on camera. Oops it bursts.
See through the window that the witch comes out of her tower. She is coming.
Escape the room: Use telekinesis power on door. The door is opened.
Talk to Ben. He stands and walks out. The tutorial ends. (Escape artist achievement).
The witch: Exit and then go downstairs. See Ben covering his eyes.
The witch opens the door. Use telekinesis power on the door. The witch is locked out.
Chapter 2: The Great Escape
Find a way out:
Ben and Anna are back in the bedroom. Anna decides to look around to find a way out.
Room: Examine everything in the bedroom.
Outside room: Exit the room. Examine the rat with a key, sink with witch's hair, tap that works and witch's hat.
Hallway by door: Go downstairs and look at skeleton.
Examine the painting to see a lock. Check the pipe that is attached to the sink above clogged with the witch's hair.
Drawer: Open the left drawer and take the string. Open the right drawer and take the heart shaped key and heavy paperweight.
Cat: Examine the cat. The cat looks tired. He needs a bed.
Meet Joringel: Try to climb the stairs and be stopped by skeleton's ghost.
Talk to ghost and find out the way out. The entrance to a secret passageway is opened by a button behind the painting.
The key to the painting is taken by a rat. Winfriede was a classmate of Joringel and his wife Jorinde at the Voigt School for Witches.
Joringel's soul is trapped here.
Get the key from rat:
Drain: Check the bunched up carpet and the drain underneath. There is mold inside the drain. Get smelly mold from drain.
Combine the yellow paint with smelly mold to get cheese.
Rat: Go upstairs. Give cheese to rat with key sitting on the beam. Take the key.
Unlock the painting:
Go downstairs and use the key on painting. See a safe. There is no handle.
Anna talks to Joringel. Learn that the button to open the secret passageway is inside the safe.
There are 2 locks on the safe. One is opened with a diamond shaped key that the cat is wearing. The other lock is opened by Winfriede's voice.
Get the diamond shaped key:
Examine the cat again. Anna says the cat is tired and needs a bed. Try to take the necklace. No!
Make a cat bed: Go back upstairs to the bedroom.
Take the pillow from bed.
Click on colored item - candy #1 underneath the pillow. (Posterboy achievement is obtained when all 12 candies-colored items in game are clicked on. Candies will disappear when clicked on. Thanks to Steam achievement).
Examine pillow in inventory. It is flat and lumpy.
Left click the poor unicorn again to get stuffing. Combine flat pillow and stuffing to get fluffy pillow.
Go downstairs and give the fluffy pillow to cat. It is not inviting enough.
Go back to bedroom. Examine the curtains. It is soft and inviting.
Use the scissors on curtain to get velvet curtain. Combine fluffy pillow with velvet curtain to get velvet pillow.
Go downstairs and give velvet pillow to cat. Take the diamond.
Lock #1: Use the diamond on lock of safe behind painting. One lock turns green.
Get Winfriede's voice:
Locked box: Go back to bedroom. Use the heart shaped key on the locked box by door.
Anna takes the broken recorder from the box.
Speaker: Examine the speaker above the door. It is loose.
Use telekinesis power on speaker. Anna takes the speaker and mic.
Combine the broken recorder and speaker and mic to get a fixed recorder.
Use the fixed recorder to get Anna to record a song. (Singstar achievement).
Winfriede: Go downstairs and use the fixed recorder on door to get Winfriede's voice.
Use the fixed recorder on safe to open the last lock.
Safe: Anna takes the amulet, blueprint, book of witchcraft and portrait of a family. The woman in the portrait looks like the witch. The corner of the picture is torn off.
Anna presses the button. A stairs on the floor is revealed.
Basement:
Mirror: Talk to Mirror. Learn that the way out solution is an object already acquired - the spell book.
The mirror shows that Grandpa is getting worse. A magician in Wunderhorn village has the cure for grandpa.
Anna needs protection so that the witch will not be able to follow her after escaping. The protection spell is in page 44.
The protection spell needs: raven's feather, strand of witch's hair, blessing from the dead over a cauldron. Heat to boil together and dip an amulet charged by the moon.
Bookcase: Search bookcase at left. Examine the bottles and spell ingredients.
Read all books:
Dangerous Creatures - Learn how dragons breathe fire. They need to ingest kerosene or paraffin.
Communicating with the Other Side - To communicate with someone that passed, one needs to sleep with an object owned by the dead.
Guide to Evil Pets - Common raven nests in rooftops or rafters of houses.
Party Tricks. Anna takes the book. (Bookworm achievement).
Examine the bowls and clothes.
Parchment: Examine the parchment by stairs. It is a certificate for first place in science fair awarded to Hans Lind.
Table: Examine the book stand. Take the cork from bottle.
Drain: Take the gold ring from the foreground right of drain.
Examine the stuck drain and the cauldron.
Look at jar with hand at bottom right of screen (right of stairs). Click on candy-colored item #2.
Winfriede:
Go upstairs to ground floor. Talk to the witch behind the door.
Ask about telekinesis and the dead man. Ask about Hans Lind (after reading the parchment). (Little genius achievement).
Find a way out:
Examine the blueprint in inventory. Learn about the chimney in the bedroom. Anna thinks it is a weak spot.
Go upstairs to the bedroom.
Lens: Look at the lens on the red chair. It came from the camera when it dropped.
Break through ceiling: Look at the weak spot on the ceiling above the red chair.
Use telekinesis power on the weak spot. See a roof hole on the ceiling.
Get up to ceiling: Read the Party Trick book in inventory. Learn about pulling handkerchief out of a hat.
Take the witch's hat from wall outside bedroom.
Combine the witch's hat with the party trick book to get handkerchief chain.
Combine the handkerchief chain with heavy paperweight from safe to get weighted chain.
Use weighted chain on roof hole. See a raven on the nest by the satellite dish.
Attic: Climb up the attic. Examine everything. See the generator, dragon, mirror, rubble and crack on wall.
Take the mirror and the baby dragon from cage.
Climb up to roof. Anna looks around and finds a way down using the handkerchief chain.
Click on candy-colored item #3 on the right side of the roof.
Charge the amulet:
See the moon with passing clouds in the sky. Use the lens on the moon.
Anna lays the lens on the chimney. When the moon is not covered by clouds, use the amulet on the lens. The amulet is now charged.
Obtain raven's feather:
Talk to the raven. It is not friendly. Examine the roof patching below it.
Go down to the attic. Examine the crack on the ceiling.
Use telekinetic power on the crack on ceiling. See the raven look through the hole made in the roof.
Climb up to the roof. Use the mirror on the raven. The raven doesn't like another bird on the roof.
Go down to the attic and look through hole. Anna takes a raven's feather.
Get strand of witch's hair:
Go down and look at the sink outside the bedroom. It is clogged with witch's hair.
Go down to ground floor. Examine the pipe right of the stairs connected to the clogged sink upstairs. A part is loose.
Take the loose part of the pipe. Use the cork from basement bottle on the pipe.
Go back to the sink upstairs. Turn the tap on. Hair floated to the top. Anna takes witch's hair.
Communicate with the dead:
Joringel: Talk to Joringel the skeleton ghost. He wants a gold ring and then he will bless the cauldron.
Give him the gold ring taken from basement. Joringel is now free. He is so happy, Joringel leaves without helping Anna.
Go back down to the basement.
Drain: Examine the drain at left side of room. Use telekinesis power on drain.
Look down the drain. Examine the remains, ooze, grate and arm with handkerchief.
Handkerchief: Examine the handkerchief. It must be important.
Use telekinesis power on thumb, pointer finger and little finger (not the middle finger). The handkerchief falls on the ooze.
Combine the string from the drawer and the bent spoon.
Use spoon on string on handkerchief with a J on it.
Sleep on it: Go to bedroom. Use the handkerchief on the bed. Anna sleeps on the hanky.
Grandpa: Anna dreams of grandpa.
Try to take a book from table at foot and at side of bed for grandpa.
Click on colored item #4 on the pencil cup on table at foot of bed.
Try to take book on shelf above fireplace. Grandpa reluctantly reads the book.
Blessing of dead on cauldron.
Ghost: Ben wakes Anna up when the ghost arrives. The female ghost cannot talk and leaves.
Ghost couple: Go downstairs to the ground floor and see Jorinde.
Go down to the basement and see Jorinde. See the meeting of lost loves. (My lost nightingale achievement).
Heat the cauldron:
Place the raven's feather and witch's hair in the cauldron.
If you haven't read the book Dangerous Creatures from book shelf - do so now.
Dragons breathe fire when they eat paraffin. Combine baby dragon and crayon to get fiery dragon.
Use fiery dragon on cauldron.
Dip the charged amulet in the cauldron and automatically get shiny magical amulet.
Mirror says goodbye to Anna. Examine the shiny amulet in inventory. (Ooh, it's shiny achievement).
Time to leave:
Go to the bedroom. Ben is scared. The hole in the ceiling and the handkerchief rope are gone.
Witch enters the bedroom. She pulls her small wand from her hair and is ready to take care of Anna and Ben.
Use telekinesis power on the moving wand. Wait and see what happens. The spell backfires.
Woods:
Anna and Ben enter the woods on the way to Wunderhorn. (Through the woods achievement).
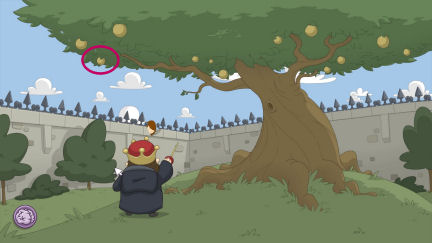
Reynard the fox: Meet Reynard. He wants the red fruit on the tree.
Use telekinesis power on the red fruit.
Use telekinesis power on middle branch. It breaks.
Use telekinesis power on top branch. The red fruit falls to bottom branch.
Use telekinesis power on bottom branch. The red fruit drops to ground.
Reynard tells them that the people of Wunderhorn are uneducated and might be surprised about a talking bear. He takes Ben and disguises him with a wig and mustache.
Hear Reynard say that Anna from the other end of the wood has telekinesis.
Chapter III: Trials of Wunderhorn
Village square:
The townspeople hid in their home when Anna and Ben enter the village. Look around. Ben leaves to check the tavern.
Roostwig and company: Talk to the rooster playing the violin by the fountain. The other musicians are a donkey, a dog and a cat.
Roostwig van Beethoriki was exiled from Bremen for squatting. They are now homeless. The cottage they reserved here was taken by rogues.
Anna says she will "level" with the rogues.
Fountain: Check the fountain behind the musicians. The main water source has been turned off.
There is a lever that pumps liquid into the fountain. Below that is a pipe that connects the fountain pipe from the tavern.
Blackey Blacksmith store: Check the blacksmith shop at left. Talk to a woman that had no time to talk.
Click on candy-colored item #5 on the hay above the horseshoe of the roof of the blacksmith shop.
Signposts: See signposts that when clicked on jumps to the listed location.
The church and antique store is at other side of square.
Wanted posters: See wanted posters around the square with pictures of Anna and Ben the bear.
Tavern:
Ben: Go right and see Ben looking through the window of the tavern. Talk to Ben.
Anna enters in the tavern. The bartender and a customer recognize Anna as the girl in the wanted poster.
Bartender: Learn that this is a magic village. Children have been missing by the old mill behind the village.
The royals are the ones that want Anna and the bear. Anna says she will help find the children and the wizard.
Gil grunts to the bartender about the alley where the wizard is seen.
Look around in the tavern. See the pipes, taps, shield, pot, coals and the sleeping man.
Find the wizard:
Go to the alley left of the church close to the entrance to the village.
Witch-Hag: See a hag pressing a brick that closes the door at left. The witch wants the spell book that Anna has.
To show the wizard magic shop, Anna gives the spell book. The witch opens the door to the shop.
Sorceress: Talk to the sorceress. She knows about grandpa. Grandpa is cursed.
To uncurse grandpa, 3 sacred objects are required:
- Amber Orb grant user exponential magical power. It is kept by the Weisse Frauen at the lake behind the woods. Do not enter the water.
- Enchanted Rose from top of Glass Mountain. A dragon grants passage to the mountain. The minister at the church knows more about the dragon.
- The Spell book from Winfriede's tower.
Wizard-Sorceress shop alley: Exit the shop.
Use telekinesis power on the sheet above the shop door. Get torn bed sheet and clothes line.
Examine the lamp post with dragon on top. Examine the church windows.
See the mill where the children disappears:
Haystack: The signpost points right to go to the mill. Go right of the antique store and see a haystack.
Click on the haystack to get a needle.
Click on haystack again to see a man drops from the sky. (Far away from home achievement).
Mill: Go right to see the mill. Look at mill, locked hatch door at basement and the door to mill. Nobody is home.
Woods: Enter the woods and learn that it is a maze. Anna says she needs help to find things there.
Tavern: Go back to the tavern and talk to the bartender. Learn about the dark woods by the mill.
The blacksmith who is gone right now and Gil the customer know the woods. Gil will not leave as long as there's beer for him.
The blacksmith is in the woods hunting for the beast of the woods. He's been gone for 2 weeks now. Gil will not help.
Try to talk to Gottfried the sad new customer. Talk to the bartender about Gottfried. Learn that Gottfried's son is missing.
Talk to Gottfried again. Hansel was taken near the mill.
Anna says that she will find Hansel for Gottfried. Learn about the witch at the mill.
Find Hansel for Gottfried:
Mill: Go back to the mill and see that the mill is lit up. The witch is in. Go inside the mill.
The witch that took the spell book is here. Kekekeke!
Look around. See the spell book is on the table at left.
Examine the stew, bird cage, furnace, lever, chair, stool and key on wall. The witch is determined that Anna sits on the stool. Try to go downstairs.
Stool: Sit on the stool. Feel the house shake. The witch pulls the lever and the stool tilts to the open hatch on floor.
Cage: Anna falls into the cage. Hansel and a skeleton are in cage with her.
Talk to Hansel. Learn about the support beam that holds the top level.
Escape the cage:
Look around. Examine the trapdoor mechanism on the ceiling.
Check the support beam, locked hatch door, hammer on wall, cage door and millstone.
Get the key to cage: Use telekinetic power on hammer to bring it inside the cage. Hansel knows about Anna and grandpa - the family that has telekinesis. Grandpa is famous for helping other people.
Use the hammer on the support beam. See the key fall on the hatch door on the floor.
Use telekinesis power on the trapdoor mechanism at the ceiling. The trapdoor mechanism breaks.
Use telekinesis power on the trapdoor mechanism at the ceiling again. The trapdoor opens and drops the key to the cage below.
Anna opens the cage with the mill keys.
Escape: Use telekinesis power on the hatch door padlock. Hansel is reunited with Gottfried.
Get the spell book:
Prepare trap: Go inside the mill basement through the hatch door.
Close the cage door.
Use the clothesline on the trapdoor mechanism. Anna places the other end of the clothesline by the top of the stairs. The trap is set.
Spring the trap: Go to the front door and enter the mill. The witch is surprised to see Anna - the sister.
Sit on the stool. The witch pulls the lever but the trapdoor didn't open.
See the frustrated witch jumps up and down on the trapdoor.
Pull the rope at top of stairs. Gotcha!
Spell book: Anna gets a buzz when she tried to pick up the spell book. It has a spell of protection on it.
Try taking the book again. (Pain in the hands achievement).
Get protection spell: Go downstairs and talk to the witch. Select dialogue that will influence the witch.
Talk until the selection appears.
- Ask about her eating children.
- I'm on your side, you know. The witch thinks no one will be as great as she is.
- *sigh* No one could ever be a great witch as you are... Exactly!
- I have dabbled in protection spells a little. Do you think I could figure it out? Kekeke!
- Do you remember the spell you used to protect the book? The witch chants... The witch finally catches on and did not finish chanting.
(Kekeke achievement).
Sorceress: Go back to the sorceress at the shop behind the church. Click on the shop door to automatically press the brick to open the door.
Ask the sorceress about the protection spells and part of the chant. Remind the book to help Anna. The sorceress recite the chant needed.
Get the spell book: Go back to the mill. Take the spell book.
See the Royal Guards talk to Ben at the tavern.
See Anna give the spell book to the sorceress.
Get Gil to guide Anna to the woods:
Go back to the tavern. See Anna and Ben talk to the royal guard.
Stop the beer selling: Remember that Gill will not leave until the beer stops.
Examine the tap and the pipes. Use telekinesis power on pipes. See the pipe tubes are switched.
Talk to bartender about Gil needing another drink. The bartender caught on Anna's trick.
Try that trick again: Use telekinesis power on pipes. Then go outside and use the fountain lever until it empties the beer in the tavern.
Anna automatically switches the pipes back. There's no more beer left.
Anna talks to Gil. Gil brings Anna to the woods. To the north are the murderous thieves and left back to village.
Get the blacksmith go back home:
Talk to the sad blacksmith. He is here hunting the beast terrorizing the village. He says he is a master huntsman and knows this woods.
Ask about beast. He doesn't want to talk about the beast. Anna is like his stubborn daughter.
Blacksmith's daughter: Go back to the village and then to blacksmith store.
Talk to Ashley the daughter. Learn that the blacksmith gets lost in the woods. He stretches the truth a bit.
He will stay in the woods until he catches the beast. The beast loves village's fruit. The blacksmith can find his way out of the woods only by being led by Ashley faking as the beast but he caught on Ashley's ruse.
Reynard: Go outside the village via the forest path at left.
Look at the bushes at left where the red fruit was dropped. Talk to Reynard the fox.
He is the beast of the woods. Ask him to help by leading the blacksmith home. Anna talked Reynard to helping the blacksmith.
Check the blacksmith shop. Talk to Ashley. See the blacksmith's shadow. (Back to the anvil achievement).
Antique store:
Enter the antique shop left of the haystack. Meet the cranky shopkeeper.
Look around. See a broken lantern left of the gramophone.
Be sure to click on the rabbit, mannequin and top hat. Much too much. (Cameodalic achievement).
Examine the magical violin. It plays the sweetest music no matter the inexperienced the player.
Click on candy-colored item #6 behind the lantern and gramophone.
Press the bell on the desk 6 times. (Ring-a-ding-ding achievement).
Give the diamond to the shopkeeper. He will not sell the violin but gives a broken lantern instead.
Get a home for Roostwig and other musicians:
Thieves' cabin: Go back to dark woods. Go north to the path with the skull sign.
Look around outside the house. Knock on the door.
Listen to the thieves inside the cabin. They are scared of a boy ghost with bright ghostly eyes.
Scare the thieves: Go to the tree stump where the blacksmith was. Examine the rock at right.
Use scissors to take stringy vines. Combine stringy vines with needle from haystack.
Use needle and thread with torn sheet from alley to get bed sheet.
Use the scissors with the bed sheet to make holes for eyes. Remember it needs ghostly eyes.
Get eyes: Go to blacksmith store and ask Ashley to fix the lantern. Get a lit lantern.
Combine the bed sheet with eyeholes with lit lantern to get fake ghost.
Go back to the thieves' cabin in the woods.
Use the fake ghost on the door of the cabin. Anna makes sounds.
When the door opens use telekinetic power on the fake ghost. The thieves run away.
Roostwig: Go back to the musicians at the fountain. Talk to Roostwig.
Anna brings them to the cabin. (Roostwig has entered the building achievement).
Get the Amber Orb from the Weisse Frauen:
Go to the intersection in the woods. Go right and be at a lake. Look around.
Old man: See a hooded old man with glasses. The old man tests Anna and comments that Anna is so unlike "her". He knows Anna's name and leaves with a dragon warning.
Weisse Frauen: The Weisse Frauen ask Anna to go to the water. Hans stops Anna before she gets into the water.
Hans: Hans talks to Anna. That's a familiar name.
The Weisse Frauen love music especially from something wooden with strings.
Hans came here looking for the Amber Orb. He lived here in this woods in a boarding school. It was a magic school. Voigt is the headmistress' name. There was a girl that was Han's best friend. She was the headmistress' daughter. He is also trapped here. He doesn't mind. He's waiting for a friend.
Roostwig: Go to the former thieves' cabin. Knock on door.
Roostwig doesn't want to perform for the last time. He gives his old violin instead.
Play music: Go back to the lake. Use the old violin of Roostwig on the Weisse Frauen. That bad! Stop. Hans stops Anna. (Kill it! Kill it achievement).
Antique shop: Go back to the square. Go to the antique store and the cheating shopkeeper.
Use telekinetic power on the toy monkey with the cymbals at top of right shelf. The shopkeeper beats the toy.
While the shopkeeper is busy, use Roostwig's old violin with the magical violin. Leave the shop.
Entrance the Weisse Frauen: Go back to the lake.
Use the magical violin with Weisse Frauen. They love the music and reward Anna with the amber orb. (So soothing achievement).
Hans talks to Anna. Anna is already helping an old friend.
Meanwhile at the tavern, a royal guard reports to the other guard in the tavern that Anna was seen in village.
Automatically Anna gives the amber orb to the sorceress.
Get information about the dragon and history:
Church: Enter the church. Examine the busy painting left of the glass windows. Examine the serene painting right of the glass windows.
Examine the serious looking man - portrait painting and the sad painting of a scared girl and the ignoring mother.
Examine the left and right glass windows.
Talk to Theodor the minister. Learn about the red dragon protection. Anyone that greets the red dragon at bell tower gets a free passage to Stone Mountain.
The entrance to bell tower is closed and he doesn't know how to open it. There are clues to open it around the church.
Ask about all 4 paintings. The busy painting shows that before magic and there was no order. The serene painting shows first witches of Wunderhorn rose to power and brought peace and order.
The man in the painting is Phillip Voigt a descendant of the witches. He summoned the red dragon to banish the dark. He built a shrine at the grove to cast the spell to call the dragon. He died there. Anna shows the family portrait from the witch's house. The child is Queen Jannike. She vanished mysteriously.
The sad painting is that of woman banishing her own daughter for an unforgivable sin. The painting was done by a mute child who witnessed the tragic scene.
Look for clues to open the door to the bell tower:
Door to bell tower: Examine the door at left. It is a heavy door with no handle.
Church organ: Examine the church organ.
Red dragon glass window: Examine the red dragon glass window. Anna examines for clues and finds a cluster of strange symbols.
Baby dragon: The baby dragon is all out of fire. Go to the tavern.
Use the baby dragon on the live coals under the pot at fireplace to get fiery dragon.
Alley: Go outside and be by the glass window. Examine the lamp post that has a dragon on top.
Use telekinetic power on the lamp post. The lamp post is bent down.
Use the fiery dragon on lamp posts. The left lamp is lit. See the glass window is lit. Anna automatically raises the lamp post.
Grove at deep woods: Go to deep woods. See the tree stump surrounded by fairy stones and flowers.
Examine the tree stump. This the grove of Phillip Voigt Theodor mentioned. There are mysterious symbols on the tree stump.
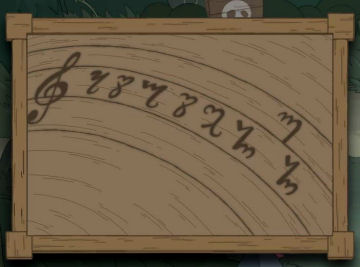
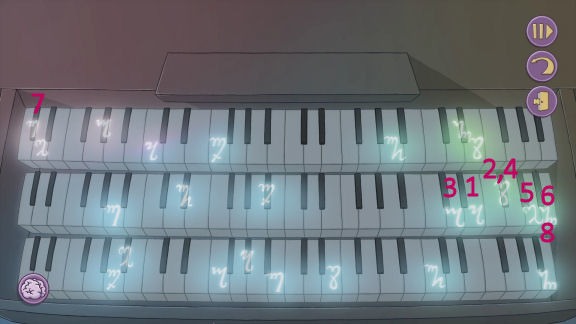
Open the bell tower door:
Church organ: Go back to the church and the organ. See the same mysterious symbols on the organ keys cast by the lit red dragon glass window.
Play - click the keys that is shown by the tree stump clue.
At top right of the closeup of the church organ keys are the skip icon, reset icon and exit icon.
Hear a sound. (Mystery solved achievement).
Bell tower door: Anna sees that the bell tower door is opened. Theodor is overwhelmed and declines to go up the tower.
Red Dragon:
Go right and look at the view of the village and Glass Mountain beyond.
Use telekinetic power on the large bell. The bell rings. The red dragon lands.
Show the baby dragon to the red dragon. It is the dragon's baby. Ooh! They fly to Glass Mountain.
Get the rose from Glass Mountain:
Knock on the door of the house. Talk to crazy Rinkrank. Rinkrank refuses everything. But he does have the rose.
Examine the locked window.
Go behind the rocks at right. Anna is hidden.
Use telekinetic power on the locked window.
While behind the rocks, talk to Rinkrank. Anna pretends to be his conscience. (Guilty conscience achievement).
Again, use telekinetic power on the closed window while behind the rocks.
When Rinkrank opens the window, use telekinetic power on window again to close it.
It slams on him and his beard is caught on the window. Anna talks to Rinkrank about her grandpa.
Anna opens the window and releases Rinkrank. He throws the rose out. (Now go away achievement).
Caught:
At the tavern, the royal guard continues to spin tales of his exploits. The other guard reports that Anna was seen with a new mustachioed companion - not the bear.
Anna gives the rose to the sorceress. The sorceress reveals herself to Anna as Winfriede. Winfriede was going to do Anna harm when the guards enter the shop and greets the sorceress as your highness. Anna is separated from Ben and brought to the dungeon.
Dream:
Ana dreams of grandpa. Grandpa needs medicine from cupboard. Check the locked cupboard.
The key is at the fireplace. Check the fireplace and see the key up on top shelf. Anna can't reach it but it falls down.
Anna opens the cupboard but the medicine is out of reach. Again the medicine goes to her hand.
Grandpa reminds Anna that near or far, in your heart, we carry our family. (Sorry Grandpa achievement).
Chapter IV: A Damsel's Deal with the Devil
Anna is locked in the dungeon and guarded by a troll. A prisoner in another cell hears Anna and recognizes her. He made Anna promise to find him so that he can explain things. He urges Anna not to give up.
Anna's cell:
Examine the hole on the base of right wall that links to cell of prisoner that wants to talk to Anna. Look around.
Examine the mattress and take a spring from mattress. Examine the grate on left wall and the cell door.
Troll guard: Talk to the guard troll. The guard is not pleased with his job. He complains about the bureaucratic red tape and no union.
Reynard: Reynard appears behind the grate. Talk to Reynard the fox. Reynard tries to bring Anna's spirit back to her usual self and offers his help.
Reynard clues to remove the guard so that Anna has free reign of the cell. He also mentions about a devil boss.
Reynard leaves and an announcement for a meeting is heard. The prison guard leaves.
Reynard leaves but says to call him if Anna needs help.
Leave the cell: Use telekinetic power on the cell door. That didn't work.
Use telekinetic power on the spring from mattress in inventory to get lockpick.
Use lockpick on cell door lock. Exit.
Food area:
Sick troll: Talk to the sick troll guarding the next door prisoner. There are whetstones at the utility closet.
Examine the water cooler and the food on the table. Take the blender, chilies and watermelon.
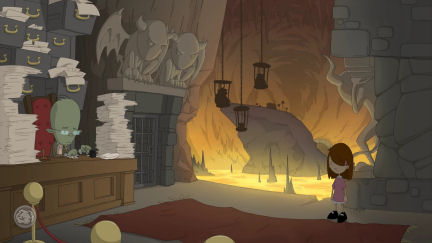
Admin troll at dungeon gates:
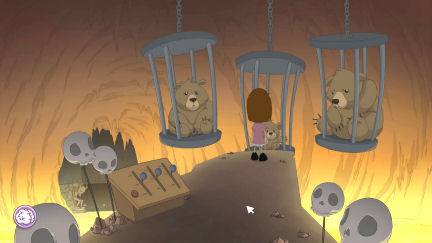
Go left to dungeon gates. See a view of the cages and lava. There are 3 bears in cages above the lava.
Nothing moves here without the consent of the head office. The head office is at northernmost part of the dungeon. The Devil is the head of this place.
Learn that Anna is here because of High Treason. Anna can take others with her when released with properly filled and processed form 31M.
Papers: Look at the paperworks on desk, inkpot and file cabinet. The file cabinet has riddles.
Gallows:
Go right to the gallows.
Wilfred: Wilfred is to have his head cut off. Look at sign in lights above.
Talk to Wilfred. He saw Winfriede in her secret room in the castle changing her looks. The room is full of plans and a cage is being built. She is the new queen to be. Queen Jannike is gone.
Learn that he is the castle gardener. Learn about the flower passibicac with sleep spores. He can draw a picture for Anna but his hands are tied up.
Anna wants to get Wilfred free and to go with her.
Talk to the executioner. No talk only chop.
Examine the trapdoor under the hanging noose stand.
Examine the guillotine. Talk to the kid troll.
Pick up the napkin and can from the trash around the kid.
Click on candy-colored item #7 beside the banana peel.
Mansion Gates:
Go to mansion gates. Look around the head office entrance.
Big troll: No visitors. Talk to the troll. He wants drink that is sumtin' sweet, sumtin' juicy and liddle thick and creamy.
Find a mixer:
Utility closet: Go back to gallows and then right to utility closet.
Short troll: Talk to the troll guard with delusion of grandeur. The human blender is behind him and his trusty steed-goat is beside him.
Try to give him the broken blender. He would not let Anna in the utility closet.
Get rid of the short troll: Place a chili on the goat's food bowl. The steed kicks the short troll.
Look around the utility closet. Take a torch from crate. Examine the storage rack.
Click on candy-colored item #8 inside the toilet paper on shelf.
Examine the human blender. Take a whetstone from box at bottom right.
Get sumtin juicy:
Gallows: Go to the gallows at left. Use the watermelon on the guillotine.
Click on guillotine. The guillotine is blunt. Use the whetstone on the guillotine.
Use the sharpened guillotine on watermelon to get melon half.
Utility closet: Try feeding the goat the watermelon, napkin and can.
Blend drink: Use the melon half on the human blender. Need a container.
Place the broken blender on the floor below the human blender.
Now use the melon half on the human blender. The juice goes into the broken blender.
Play with the guillotine and human blender several times. (Mischief maker achievement).
Get sumtin sweet:
Go to cages left of the gallows. See a family of bears: mama on the left, baby at the middle and papa bear at right cage.
Baby bear is holding tight on a honey jar. See that baby extends his arm towards a parent on the same level with him.
Cage control: See the cage control at left.
A red reset button is left of the levers.
Get baby bear to free the honey jar by extending his arms to both parents.
Get the 3 cages even at middle level. Use the control levers. One lever affects another.
Right lever to top (up twice). Papa at top and baby down.
Left lever to middle position (down once). Mama middle.
Right lever to middle position (down once). All 3 are now at middle positions.
Baby bear has arms wide. Talk to baby bear. Anna says she will take them all when she is freed.
Take the honey jar. (Honey, honey, honey achievement).
Utility closet: Try feeding the goat the honey pot. (Bwahahaha achievement obtained when various items collected in prison are fed to goat. Thanks to Steam forum.)
Blend drink: Use the honey pot on the human blender.
Get liddle thick and juicy:
Sick troll: Go to the sick troll at the food stand.
Give the sick troll the napkin for his runny nose to get snotty napkin.
Blend drink: Go to utility closet. Use the snotty napkin on the human blender.
Anna thinks that something needs to be added to the blended drink before the final taste test. Take the blender with ingredients.
Save Wilfred:
Prevent Wilfred from being axed: Go to gallows. See that the sign is to use an axe on prisoner.
Use telekinetic power on axe. The axe is stuck at ceiling.
The executioner pulls the lever - new prize is noose.
Prevent Wilfred from being hanged: Wilfred is standing on stool ready to be hanged.
Talk to executioner. Trapdoor inspection necessary.
Admin troll: Go to dungeon gate. Talk to Admin troll about the gallows inspection.
Learn that the cage troll started a strike. Learn how to be a quality inspector of gallows.
Inspect trapdoor: Go back to gallows. See that the trapdoor is opened.
Anna automatically goes down the hole. It is dark down here.
Go back up. Use torch from utility closet on any torch on wall to get lit torch.
Go inside pit. Place the lit torch on bracket on wall.
Old prisoner: Meet the old prisoner. He is thirsty.
Go to food area. Use can on water cooler to get can of water.
Go back to gallows and inside pit. Give the can of water to old prisoner.
As repayment, the old prisoner will hold the door from inside. Anna promise to take the prisoner with her when she leaves.
Wilfred: The executioner pulls the lever and the trap door does not drop.
New game. The executioner pulls the lever - prize all gone. Game Over. Player to leave game. (Game Over! achievement).
Get additional ingredient for troll drink:
Wilfred's flower: Talk to Wilfred. Now that his hands are freed, he draws the flower that has sleeping spores.
Reynard: Go back to Anna's cell. Call Reynard by clicking on the grate. Anna shows the drawing of passibicac flower.
Reynard gives the flower and then he falls asleep.
Combine the flower with the blender with drink to get tainted drink. Anna says the drink is perfect.
Taste test: Go mansion gates and big troll. Give the tainted drink to the big troll. Timber!
The Devil:
Devil: Anna knocks on the door. Meet the Devil. He is the old man by the lake.
The devil will give her freedom but first Anna must explain why she thinks she is innocent. The devil rebuts her answers.
The necessary paper for her release is ordered to be written already.
But Anna has to answer 2 riddles:
- If the better the devil you know - what do you know about the devil?
- If the devil is to make a meal of his finest what would the devil's meal be?
Mailbox: Take the mail from the mailbox. See that the notice of termination is an order for a troll to be fired from original position and transferred to janitorial position because of joining forces against the devil called "the union". The guard is the one outside Anna's cell.
Look for answers about Devil's finest meal:
Big troll: Talk to the sleeping big troll. Ask about the Devil's finest meal.
He mumbles in his sleep, he is not to say - dead dog fish from the great North Sea. Ask him second time. That's all he knows.
Wilfred: Go to the gallows. Ask Wilfred about the Devil's finest meal.
He heard the guards say... (someone else answers) an old horse's hoof.
Dungeon gates: Go to dungeon gates. Examine the file cabinet that has riddle papers above the admin troll.
Use telekinetic power on file cabinet. A paper floats down. Anna reads - rib of a whale.
Talk to other prisoner or Find clue for riddle about what do you know about devil:
Get rid of sick guard: Go to gallows.
Show the termination notice to Wilfred. Wilfred changes the name of the union guard to the sick guard by the prisoner.
Admin troll: Show the changed termination notice to the admin troll.
Other prisoner - Wizard of Wunderhorn: Go the cell of the prisoner across the food table. See that the sick troll is gone.
Slide the latch of the cell. Go inside and talk to the Wizard of Wunderhorn.
Learn about grandpa's curse and Winfriede's part in it. She draws her power from Anna.
Winfriede must be destroyed and only Queen Jannike can destroy her. If the queen can't be found, Anna has no choice but to destroy the witch herself.
Listen to the thieves' story about the "know the devil". The thief saw the hideous devil through a keyhole at midnight; gorging on unidentifiable hunk of meat.
Learn about Anna's power and her grandpa's history. Grandpa can sense things, what is in people's hearts and their memories.
Learn that Ben is close to Winfriede. A spirit is protecting Ben. The protection is summoned by powerful magic and is held day and night.
Anna gets a pep talk from the wizard.
Cell: Go back inside the cell and look around. Examine the engravings on the wall. Get meat from corner.
Get group release paper:
Admin troll: Talk to the admin troll at dungeon gate about the group release form.
The admin troll is amending it now but it will take a long time before he releases it to Anna.
Get the paper: Use telekinesis power on inkpot. He throws the messed up paper to the bear cages.
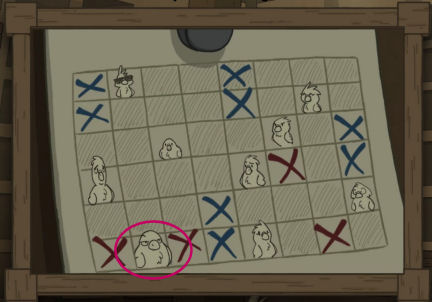
Bear cages:
Anna says the baby bear will be happy to catch that paper for her.
Go across the lava field to the bear cages.
Arrange the bear cages to have Mama at top, Papa at middle and Baby at lowest positions.
All 3 cages was left at middle positions already after the last puzzle.
(If not, redo the solution for bringing the cages to the middle position; then do the solution below).
Left lever to top position (up once). Mama up.
Right lever to middle (up once). Papa at top and baby down.
Admin troll: Go back to admin troll.
Use telekinesis power on inkpot. He throws the messed up paper to the bear cages.
See the thrown paper hit mama, then papa and lastly, the baby bear.
Get paper: Go to the cages. Automatically Anna brings baby up.
Try to take paper clutched in baby's hands. Ah no!
Give baby the honey pot and get the release paper.
Examine the release paper. All it needs is the Devil's signature and all will be released.
Answer the riddles:
See the devil's true self: Go to the mansion gates. Knock on door.
Tell the Devil - there's one thing I've learnt about you, at least... Anna gives him the meat and closes the door.
Right click the door to look through the keyhole and see the Devil eat the meat.
Anna knocks on the door and the Devil was surprised that Anna is excited seeing his true self.
Answer the second riddle: Ask about this meal riddle.
What is the meal be? A dead dogfish from the Great North Sea.
What spoon will I use? The rib of a whale...
What my wineglass to be? An old horse's hoof...
Well done! (Show me your true self achievement).
Convince the devil of Anna's innocence. Select all the dialogues and Anna has changed her explanations.
Anna will do it again to help others; not give up on grandpa and have faith in people.
Wizard, gardener, the three bears and old prisoner are released with Anna. (Close the deal achievement).
Chapter V: The Judgment of Queen Voigt
Anna and Reynard arrive outside the castle wall. The others left but Reynard stayed with her. He will stay here and not inside the castle ground.
Anna will look for the Queen Jannike.
Outside castle wall:
Examine the broken spike at top of castle wall. Use telekinesis on broken spike. Pick up broken spike.
Guards: Go left and the guards recognize Anna. They stop Anna from entering. The guard with red feather wants to see the wedding.
Posters: Go left. Look at all posters from Daedalic games and the people that worked on the games until it repeats. (No posters allowed achievement).
Broken wall: Continue to the left and see a broken wall with hay in front of it. Anna cannot climb the hay.
Use spike on the hay. Anna uses her powers to cut the rope around the hay. Climb to the broken wall.
King: See the king under a large tree. He counts the fruits of the tree. There are 12 fruits. He is so muddled. He starts counting the fruits again.
Fruit: Examine a small fruit at left side of the tree. Click on it to try to pick the fruit. (Clever reference #451 achievement).
Use telekinetic power on the small fruit then. It falls to the ground.
The king gets upset when he counted only 11 and calls the guard. As a reward for finding the 12th fruit, the guard is allowed to witness the wedding.
Enter through castle gate: Go to castle gate at right. Now there is only one guard that stops Anna.
Use telekinetic power on the spear of the guard. It twists on the gate. Enter the castle grounds.
Enter the castle:
Castle ground: Look around at river, frog and the 4 windows.
Butler: Go inside the castle and is stopped by the butler. The butler deduced (any dialog) that Anna is the flower girl.
Anna has to have a special dress, shoes and the most pristine of flowers.
Hall: Enter. Look around at the 4 angels and see doorway to the cellar, kitchen and castle entrance at bottom floor. The available entryway at top floor are to the princess' room and pigeon tower.
Check the cellar:
Cindy(rella): Enter the cellar at bottom right doorway. Talk to Cindy.
See the furnace, coal, shovel, clothes rack, fabric, Royal Army poster and sewing box.
Click on candy-colored item #9 in the dress on clothes rack at foreground.
Talk to Cindy again. Anna cannot borrow a dress. Cindy recalls her sneaking out to a ball.
After seeing the royal poster, Cindy admits to wanting to be a knight of the Royal Army. She will do that after her work is done.
For the sneaking out to a ball - She was offered a dress and shoes. Both shoes are gone. One of the shoes is here in the castle.
Great old tree in the garden has a tree spirit that gave Cindy the dress and shoes for the ball. Cindy recites the words she said to the tree.
Look at the sewing box to get yarn.
Check the kitchen:
Go to other side of hall and check the servants' room and then enter the kitchen.
Examine all the food. It made Anna hungry. Try to get the knife on table at left. Not for a child.
Examine the pot, tomatoes, grain, coals, saucepan and pan on stove.
Check the nightingale and the cage.
Talk to the cook. She run out of meat because of the wedding. The bird was given by Queen Jannike.
Check the other rooms:
Butler: Go back inside the castle and talk to the butler about Jannike's disappearance. Learn that all paintings from the wall are gone.
Try to enter through the door behind him.
Storage room: Check the storage room. See that the room has a prohibited sign on it.
Check the princess room:
Go to princess room at top floor left side. See the princess trying to fit her foot in a glass slipper.
Look around while staying by the door. The room is a mess.
Magazine: Examine and read the magazine by the door. There are coupons.
There is a coupon for a magic thimble to help sew faster. It needs a gold coin and is to be sent by pigeon post only.
Click on candy-colored item #10 in box on princess dresser in front of her mirror.
Talk to the princess.
Check the pigeon tower:
Enter the doorway at front right side top floor and be at the pigeon tower.
Take the ladder. Look at sign, mailbox and pigeon holes. Talk to pigeon with #11.
Rules: Read the note on rules and regulation. Mail should be light enough and attached with a string to the pigeons.
If the pigeon is not in designated box, they have to be led to their box. They move away from loud noises.
Ring the bell. Ha.
Meet Ernestine the Jester:
Hall: See Ernestine the jester juggle 3 balls. Talk to the jester. She gives balloons.
Know someone who needs entertaining: Select chef in kitchen.
Go to the kitchen to watch the jester juggle. Use telekinetic power on jester. The balls fall down.
Anna says to use tomatoes. The jester juggles the tomatoes again. Use telekinetic power on jester.
Talk to the jester again. Get the jester to juggle at cellar with Cindy. Follow her and then Use telekinetic power on jester.
Do these series of actions at pigeon tower and hall.
Get one glass shoe:
Do the jester act and subsequent telekinetic power usage at the princess' room.
The tomatoes land at a good place. Red faced princess turns purple. (What a mess achievement - when all the rooms in the castle have failed juggle performance with tomatoes. Thanks to Steam forum).
Look around the room now that it is empty. Check the plastic flowers.
Take the glass slipper from the floor.
Get the other glass shoe:
Swan prince: Go outside to the castle ground. The swan prince arrives on a swan-duck. He mistakes Anna as a princess and is looking for a rich bride.
He carries a glass ticket-shoe-purse to get her princess that run away from him. He is proud of his sword prowess.
Talk to the Swan Prince about the slipper and the swan that looks like a duck.
Select dialogue:
I would like to be amazed and enthralled at sword skills.
But you already won already! You got him! (He raises his arms).
They have their guard down! Now is your chance!
Then they attack you suddenly.
Oh but he... he strikes your sword hand! (See sword change hand).
Then they attack you suddenly.
But you've won already! You got him.
The prince cuts the head of the swannyduck. Pick up the glass slipper the swan prince drops.
Now Anna has a pair of shoes. (GG achievement).
Get a special dress:
Go left and be at the royal garden.
Great old tree: Examine the tree. Talk to the tree and Anna recites the words Cindy told her.
The tree spirit gives Anna an oversized dress with golden brooch.
Send for the magic thimble:
Coupon: Remember that the mail needs to be attached to a string. If you haven't gotten yarn from the sewing box at the cellar yet, do so now.
The coupon says it needs a gold coin. Go to the kitchen and use the knife on the oversized dress with golden brooch.
Combine the coupon with gold brooch-coin to get a completed thimble mail order.
Combine the thimble mail order with the yarn. Now it is ready for pigeon post.
Mail the order: Go to pigeon tower.
Place pigeon at its allotted pigeon hole:
Remember the pigeons are scared of loud noises. Use balloon on pigeon. Anna will automatically pop the balloon when placed on a slot.
Look at the rules and see a close up of the pigeons in their slots. The sole pigeon here looks like the one at second slot from left at bottom left row.
There is a skip icon, reset icon and exit icon at top right of puzzle screen.
Open the shutter at extreme right column of right wall, 4 down from top.
Open the shutter at first column right of post second row from top.
Open shutter at 4th column on left wall (left of post) bottom row.
Use the balloon to guide the pigeon to that second slot from left at bottom left row.
Place balloon left of pigeon.
Place balloon top of pigeon.
Place balloon right of pigeon.
Place balloon below pigeon.
Place balloon right of pigeon.
Place balloon at top of pigeon.
Pigeon is now at home at its proper slot. (You got mail achievement).
Attach the prepared thimble order on pigeon.
Take the gold thimble from the mailbox.
Cindy: Go to the cellar. Give the gold thimble to Cindy. Automatically the oversized dress is left with Cindy.
Winfriede's room:
Storage room: Go outside and use the ladder from pigeon tower on the window of the storage room that has a prohibited sign (top left).
Climb up and see the witch. Winfriede wants a hanging Ben to tell her about his mother.
Get rid of the owl that hoots a warning:
Get nightingale: Go to the kitchen. Since the cook complains about the meat shortage; tell the cook about the swan outside.
The cook cooks the robot bird, thus covering her view of the birdcage. Take the nightingale.
Go to the cellar. Anna sees that Cindy left to join the royal army. Anna takes the altered dress.
Use nightingale on coal to camouflage it black and get dirty nightingale.
Climb the ladder outside the storage room.
Click the dirty nightingale on Glaucus the owl. The owl still hoots warnings. Winfriede returns.
Go back to the kitchen and place the owl in the birdcage.
Explore Winfriede's lair:
Go back and climb the ladder to storage room. Anna hides when Winfriede returns.
Winfriede did not notice that Glaucus is now the dirty nightingale. Winfriede opens the cage lock and talks to Ben. She goes back to the celebration.
Talk to Ben. Ben is nervous when asked about protection spell. Look around the room.
Mirror on dresser: Check the mirror on dresser. Mirror doesn't show up here.
Family picture: Take the painting scrap on mirror. There are words in the back.
Combine the family picture with painting scrap. The writing at the back is now complete. Anna automatically returns the painting scrap on the mirror.
Check the 2 drawers of the dresser to see a piece of glass on left drawer.
Plans on wall: Check the plans on wall and see the machine used on Anna, There are notes about grandpa, Wunderhorn, etc. The king was given a potion.
Blackboard: Examine the blackboard to see a prism with a figure inside. Anna memorizes a code about little shards.
Certificate: See the certificate awarded to Hans Lind - maybe the Hans from the lake.
See all the paintings taken from the castle walls. The one left of door looks like the royal family.
Find the code of the cell door:
Painting by cell: Examine the painting covered by cloth near the cage. It is a boy - it's Ben before he became a bear. Master Bernhard, the son of the queen and king.
Anna recalls that Grandpa can read the memories from people.
Take Ben's painting from the frame.
Go to the kitchen and use the knife with the painting to get adjusted painting. The eyes are removed to make holes.
Go back to storage room. Place altered painting back on frame.
See code of cell door: Winfriede returns and Ben eggs her info to open the cell door.
Ben remembers glass things. Learn that the queen is in a glass prison and wants the protection spell against Winfriede removed from Ben.
Cage: Open the cage when the witch leaves.
Anna wants to see Ben's memories. Use telekinesis power on Ben. See Jannike in glass prison at Glass Mountain praying to the spirit that protects Ben.
Go to Glass Mountain:
Reynard: Go outside the castle wall and talk to Reynard.
Red dragon: Anna and the dragons fly to Glass Mountain.
Queen Jannike:
Rinkrank: Knock on door and talk to Rinkrank.
Queen Jannike: See Jannike imprisoned in glass.
Glass were breaking but stopped when the rose was given to Anna. Examine the glass prison.
Free Queen Jannike from glass prison:
Shards of glass: Examine and try to take the shards on the ground.
Combine the portrait message and the blackboard message to form Winfriede's message.
Use Winfriede's message on shards of glass. The shards are activated. They are dancing.
Use telekinesis power on dancing shards of glass. They combined but one piece is missing.
Get the last shard: Go back to the red dragon and fly back to castle.
Go up to the storage room. Anna updates Ben. Open the drawer.
Use telekinesis power on bouncing shard of glass. Take the shard piece from left drawer of dresser.
Fly back to Glass Mountain.
Release Queen Jannike: Combine the shard piece with the rest of the glass shards to remove the glass prison. (Shattered achievement).
Jannike is updated about Winnie and the wedding. The news made the queen decide that Winnie has won in the fight to change her Wyrd.
Talk to Jannike to learn why Winfriede is fighting the pattern of her fate. Winfriede did an unforgiveable act when she was young that made her determined to fight her fate. Winfriede is her sister. Winnie took memories of her family. Jannike wants only to protect Ben with the animal magic and refuses to stop the wedding.
Complete Anna's outfit: Take the blue flowers at right.
Leave the room. Anna automatically talks to Rinkrank to protect the queen.
Stop the wedding:
Fly back to the castle. Anna sends the red dragon back to Glass Mountain.
See a dressed Anna with a clothed Ben. Bell tolls.
See the wedding. Anna stops the wedding. Queen Jannike returns. Winfriede destroys the castle but Anna stops the falling ceiling.
Winfriede's memories:
Explore the classroom: Anna touches Winfriede to access her memories. (Memories achievement).
Winfriede as a child is scolded by her mother, the teacher at the classroom. She has to recite her work - the Wyrd.
Learn that Winnie and Hans lean more to science.
Open and take a coal from the heater at right corner.
Take the bellows right of blackboard.
Take chalk from blackboard.
Examine the alphabet around the blackboard.
Examine the spellbook in the corner. It is mother's spellbook.
Examine each drawing of the kids around the windows: Jannike, Jacob, Hans, Jorinde and Joringel.
Examine the family portrait. Try to take the shed key below it.
Get info to recite: Look at left desk to learn that it was Hans and Jorinde's desk.
Open the right desk at foreground. It is Winfriede and Wilhelm's desk. Winnie reads all the info about Wyrd and destiny.
Talk to Dorothea, the mother to recite her assignment about Wyrd and later the oath of the school.
The wanderer will be here soon to test the students.
Chapter VI: Two Sisters in a far away School
Classmates:
Hans is not in the school grounds. Talk to everyone.
Talk to defensive Joringel eating berries. He is wary of trickster Winnie.
Approach Jacob, Jannike and Wilhelm. Learn that Winnie might fail the Wanderer test.
The Amber orb guarded by the Weisse Frauen might help Winnie pass the test.
Learn that Hans left for the "usual place". Winnie cannot recall the code for the hideout.
Talk to Wilhelm. He wants a helmet in exchange for using the yoyo.
Talk to Jannike. Winnie has a secret plan to pass the test. Learn that Jannike has bear spirit guide.
Talk to Jacob about his blue flower.
Talk to Jorinde. She doesn't talk anymore. She fell in the lake and saw the Weisse Frauen. Jorinde is interested in Joringel.
Check the locked shed.
Go the usual place:
Look for code to usual place: Go inside the classroom. Check Winfriede and Wilhelm's desk.
See a note (see chart of dots) with Winnie's name on it. It says: left, right, right, middle, left, right, left.
Click on candy-colored item #11 at bottom left bookshelf.
Go to treehouse: Exit to grounds. Take path to treehouse.
Examine the treehouse built by Hans and Winnie with a beehive by the window.
Enter the code: See 3 rocks on the ground.
Click on rocks to enter the code taken from Winnie's desk: left, right, right, middle, left, right, left.
Learn about telekinesis:
Hans: The door to the tree opens. Hans mentions what he overheard in town; that there is a man with telekinesis. The man is a regular farmer but can read people's thoughts and memories. Hans researched and connected telekinesis to the third eye chakra. He thinks it is the connection between science and witchcraft. He is building a machine that can read the brain pattern.
Winnie wants to have telekinesis to prove to her mother and others that she is better than Jannike. She wants it bad.
Third eye spell: Talk to Hans. Learn about the third eye spells in the spellbook. It summons the Goddess Minerva to open the third eye.
They need the spellbook, beads and 3 candles: white, purple and blue.
To make candle they need to ask Jannike. She knows how to make candles.
Hans can do the dyes as long as the correctly colored flowers are found.
Hans has to pass the smoke appearance modules. Learn about the fog caused by dry ice placed in water.
Treehouse:
Look around the tree house. See Hans' certificate that he won at the science youth fair.
Examine the dry ice, machine, test tubes (last candy to get Posterboy achievement - Thanks to Jimmy), tools, head gear, apparatus and posters.
Book: Take the green book right of table. Read the book in inventory to learn that cornflower is a symbol of love and learn how to calm bees.
Check the baby dragon. Look out the window to be close to the beehive.
Learn to make candles:
Go to school grounds. Talk to Jannike about candle making.
Need wax or paraffin and wick. Change color with dyes.
Get beeswax: Go back to treehouse.
Use the bellows from school on dry ice to get gas filled bellows.
Look out the window. Use the gas filled bellows on the beehive.
Go back inside and take the beehive outside. (Beekeeper achievement).
Give the beehive to Hans. He takes the beeswax and give the beehive husk back.
Get wick: Go back to school yard. Talk to Wilhelm about helmet.
Give him the beehive husk as helmet and get the yoyo.
Get colors for the dye:
White: If you haven't yet, get a chalk from the school's blackboard.
Blue: Note that Jacob is wearing a blue cornflower on his lapel. Talk to Jacob about the reason for the flower (learned from Hans' book).
Learn that Jannike didn't notice his love notes.
Go inside the school. Open Jannike's desk close to the heater.
Look around the desk to get a crumpled love letter written in napkin.
Go to Jacob and tell him about the crumpled letter.
Jacob gives the cornflower - blue flowers.
Give the crumpled letter to Jannike. LOL.
Purple: Talk to Joringel about someone glancing at him. He doesn't know to tell the ladylove how he feels.
Give him one blue flower. Winnie leaves. Go back to schoolyard.
Take the berries from lunchbox.
Candle ingredients: Give yoyo, chalk, berries and blue flower to Hans.
All that is needed is the spellbook.
Get key to shed:
Baby dragon: Try to pick up baby dragon. He's hungry.
If you haven't yet, get coal from the heater in schoolhouse.
Give the coal to baby dragon. Pick baby dragon up.
Go to schoolhouse and open the heater. Use baby dragon on heater so that he can belch fire.
Winnie opens the window by the shed key.
Winnie returns baby dragon to treehouse.
Trial test: Talk to Hans to do a trial test with Mrs. Voigt. Winnie can help through the window.
Take the shed key.
Get Hans to pass smoke appearance test and take the spellbook:
Dry ice: Go to schoolground. Use the shed key on shed. Take gloves.
Go back to tree house. Use gloves on dry ice.
Talk to Hans again to do the smoke appearance test.
Test: Hans stands before Mrs. Voigt to do the test.
Use dry ice on teapot on teacher's desk. Smoke comes out.
Hans takes the spellbook. Hans did not explain about science.
Winnie gets very upset about Hans not pushing science to Mrs. Voigt.
Incantation:
Winfriede and Hans do the incantation to Minerva.
Minerva foretells that Winnie will bring suffering and pain. Her future is set. Her third is closed and cannot be opened. It is too late for Winnie but she can be saved by taking the hand of the third eye girl. Winnie thinks that the third eye girl is Jannike.
Minerva leaves Glaucus the owl.
Winfriede decides to get the Amber Orb to pass the test. Hans is upset because if something happens to Winfriede, he'll be alone again.
Amber orb:
Talk to Jorinde at the schoolyard about the amber orb.
Lake: The wanderer-old man-devil talks to Hans (who is in the lake). See Hans' jacket.
Winnie jumps in the lake and sees Hans swimming towards her carrying the orb for Winnie. The Weisse Frauen chases Hans and takes him.
The wanderer explains the fate - the will of the Norns of Jannike and Winfriede. It was a moral test and Winnie failed.
Mrs. Voigt rejects Winnie. Winfriede rejects Anna's hand. (Turn the last page achievement).
This document may not be distributed without express written permission of the author and the content may not be altered in any way.
For Questions or Comments on this Walkthrough,
Please write to: MaGtRoCopyright © 8/2015 MaGtRo