ATLANTIS
from DreamCatcherEurope FAQs (with permission)
CD1
Arrival at the palace
You must go to the Queen\'s Companions\' quarters.
Show your Companion\'s badge to the two guards in order to access the palace.
Up the stairs into the palace courtyard. Climb the stairway to your left.
Enter the Companions\' room.
Talk to Agatha.
Lascoyt and Meljanz arrive to announce Queen Rhea\'s disappearance and to relay
the order that only the Consort\'s guards may conduct the investigation.
Meljanz orders you to give him wine. Refuse to serve him.
Accept the mission that Agatha proposes.
Quit the palace and town.
In the countryside, go along to where you can turn right and find Actyon the
fisherman, near his boat.
Show him your Companion\'s badge. He will then give you information.
Actyon will also give you an ear-ring.
Return to the town.
The guards at the palace entrance will take you to see the Consort Creon.
The Throne Room with Creon
Creon asks you if you have found anything during
your investigation. Answer no.
Return to the Companions\' quarters.
Talk to Agatha. She will encourage you to find out about the ear-ring\'s
origins.
Leaving the Companions\' room, talk to Garcelos.
Go and talk to Lascoyt in a corner of the palace courtyard. He will give you a
figurine of a lamb. He will also explain how to access a secret passage which
will allow you to get to the Scarlet Cockerel without being seen by the guards.
Wait until Lascoyt has had time to engage the guard in conversation, then slip
through the door into the palace.
Move towards the door on the left in order to avoid being seen by the guard in
the gallery beyond.
When you hear the guard\'s footsteps, move forward and up the stairs to your
left.
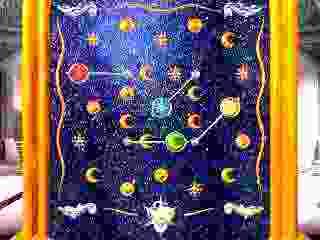
The planet enigma, the Lion room
At the top of the stairs, turn right twice and you
will come across the planet enigma.
You must turn the sun, the moon and the triangle which represents Atlantis (on
Earth).
Turn the right-hand lever to move the moon and the Earth.
When an arrow appears on the crescent moon, turn the sun with the left-hand
lever until the three astral bodies light up.
Or: click 34 or 35 times on the upper part of the left lever and 34 or 35 times
on the right lever.
The lion\'s mouth opens.
Use the lamb figurine in the lion\'s mouth.
A secret passage opens. It leads to the corridor where the Rat Catcher lives.
Place the ear-ring in the the lock of the door facing the passage. You will
access a small room with a window.
Jump through the window in order to leave the palace and enter the town.
The town
You are in an alley. Climb the steps on the right.
Walk past the orchard. Turn right twice and climb the outside stairs of the
house.
Up on the balcony, turn left.
Take the flowerpot which is on the balustrade and drop it onto the man who\'s
walking up and down the alley below.
Go down and take the knife which is lying beside the now unconscious man.
Enter the Scarlet Cockerel.
The Scarlet Cockerel inn
Talk to Lascoyt.
When Meljanz enters, talk to him as well.
The only way out of this trap is to climb the stairs. Lascoyt will follow you.
Use the knife on the rope which is attached to the hanging candelabra.
Jump in the direction of Meljanz, in order to effect your escape from the inn.
Leaving the inn, you are called to by Agatha.
Join Agatha in the small garden where the ladder is.
Talk to her. She will suggest you spy on Creon to find out where the queen is.
She arranges a rendez-vous in the orchard.
Use the ladder to get onto the top of the wall.
Go right.
Use the ladder on the window facing you.
In the Rat Catcher\'s corridor, get the claw
(lever).
Go back to the door . Upwards and to the left, you will see a nook. Use the claw
in the nook.
Take the rat figurine and use it on the cavity in the wall featuring a cat
illustration.
Enter the secret doorway and visit the Rat Catcher.
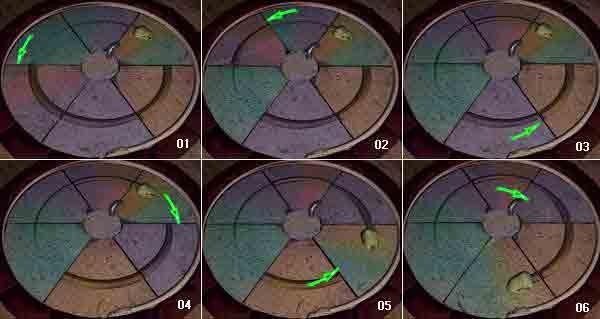
Cyclops puzzle
The idea of this game is to find the queen.
Move your figurine about the board and avoid being captured by the ogres.
Having won the Cyclops game, you will arrive in the
Dolphin room.
Go to the other end of the room and click on the star on the wall.
Take the statue\'s trident.
Use the trident on the trapdoor visible in the ceiling. You will climb up and
find yourself inside a whale.
Listen to the conversation between Creon and Gimbas, the head priest.
Go back down into the Dolphin room. Close the trapdoor and put the trident back
in its place.
From the Dolphin room, go into the long gallery.
Wait until the guard has passed and gone up to the Lion room.
Go to the Library.
The Library
Keep moving forward and get as close as you can to
the guards, then go right and left.
Push the shelves in order to knock out the guard.
Jump out the window.
You land in the orchard, where Agatha is waiting.
Talk to Agatha. When arrested, kill the guard with your knife.
Take Agatha\'s bracelet.
Go back to the garden where the ladder is.
Using the ladder on the bench once again, get back into the Lion room via the
secret passage.
Position yourself halfway down the stairs and wait until you hear the second
echo of the guard\'s footsteps.
Go forward, turn right and go through the door facing you.
Once you are in the palace courtyard, go forward once, then turn right.
CD 2
Go through the door on the right. You arrive at the
service elevator.
Enter the service elevator and click on the handle block in order to activate
the elevator.
Cross the aerial bridge in order to reach the hangar.
To the left, there is a flyer with a seahorse symbol. That is Hector\'s flyer.
Climb aboard Hector\'s flyer.
Go towards the seat, then turn round. You will fall asleep.
You will be awoken by a threatening Hector.
Talk to Hector and show him Agatha\'s bracelet.
Hector will agree to fly you to Carbonek.
CARBONEK
In the forest, go to just before the little bridge, turn left and go along the path towards the cave.
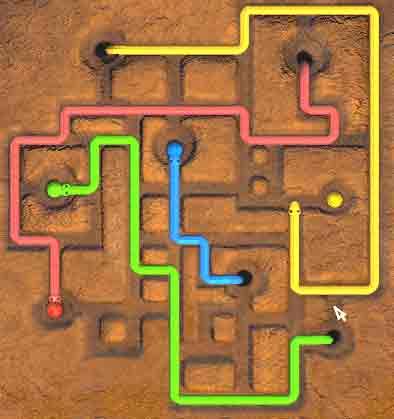
The Snake puzzle: The idea is to position the two
snakes\' heads beside each other, taking careto assemble correctly the snake\'s
body.
From the head, take the second piece on the left and move it down.
Move the middle top piece to the left.
Move the middle bottom piece to the right.
Move the head piece down.
Move the bottom middle piece to the right.
The underground complex
Talk to the cook-priestess and show her your
Companion\'s badge.
Open the coffer (chest).
Take the priestess\'s habit in order to effect a disguise.
Take the jar of beer from the table.
Offer the guard at the door a drink. He will let you out of the kitchen.
Move along the corridors, offering all the guards who stop you a drink.
Go to the cell where the queen is being held prisoner. Get the log.
By moving, you will be able to spy on a conversation between Gimbas the priest
and the Commander.
Offer beer to the guard at the queen\'s door and knock him out with the log.
Drag the guard into the cell.
Click on the guard to take his uniform and disguise yourself as a guard.
Talk to the queen and give her the pristess\'habit, so that she can disguise
herself.
Tell her to take off her mask.
Return with the queen to the kitchen, avoiding the guards.
Talk to the guard at the kitchen door (choose second icon), then exit the
complex via the chimney.
Upon exiting the cave, turn left, pass the small
bridge. Keep going straight til you find Hector.
Talk with Hector, then provoke the guards at the flyer in order to make them
chase you.
After provoking the guards, turn around and go straight ahead, crossing the rivr.
When you reach the guard, turn right. Go ahead and head for the rocks.
Find the path to the old woman\'s cave (a rocky impasse).
Wait for the old woman to invite you to open your eyes. Then move forward.
The old woman\'s cave
Talk to her.
Hen puzzle: Position the cog-wheels so that when you activate the right-hand lever, the hen lays four eggs.
Snake puzzle: Follow the old woman\'s instructions.
Return to the forest and look for the bow placed at
the foot of a tree on the cliff.
Go to nearby a ford where you will see a stone upon which a boar is engraved.
Dip the bow in the river to activate it.
Beside the place where you dipped the now-activated bow, a boar will appear.
Kill it with your bow and arrows.
When the boar is lying down, take the ring from its snout.
When the boar has diappeared, use the leather pouch on the blood-soaked earth.
Bring the ring and the pouch of earth to the old woman.
You will then sleep and have an owl dream. You will see the dialogue between
Gimabs the priest and the metal head.
The old woman will wake you up and will tell you of a hidden treasure in the
palace of Atlantis, to be found near the Tree of the First.
A priestess-pilot will fly you back to the fisherman Actyon\'s cabin on the
island of Atlantis.
CD 1
Return to the palace
Spend the night at Actyon\'s.
Return to town in the morning.
Go to the garden where the ladder is situated and use it to enter the palace.
Use the claw (lever) again on the nook, to get the rat figurine and access the
Rat Catcher.
The \" Save the Rat \" game: The aim is for the rat, which you control, to ring
the bell at the bottom of the game board.
Launch the rat: first left button - second left button - third left button -
fourth left button - third right button (wait until the piece under the moving
belt is in the right direction).
When the rat is on the belt: first right button - fifth left button.
When you\'ve saved the rat, the Rat Catcher gives
you a glass marble.
You fall into a passage. Turn around and use the marble on the little hole in
the wall.
Note the combination indicated on the sliding stone.
Go to the end of the corridor.
You enter the Guard Room.
Take the vase on your left and toss it at the guard.
Slide between Meljanz\'s legs.
Take the door on your right.
You enter the Throne room.
Turn round and take the lance standing against the door.
Use the lance on the door, in order to block it.
Go behind the throne and click on the throne puzzle.
Throne puzzle: Starting from the initial positions
of the pieces, move the red piece three times, the blue piece four times, the
yellow piece seven times and the green piece six times.
Alternative solution: position all the coloured pieces at top middle. Then move
the red piece six times, the blue piece five times, the yellow piece once and
the green pice twice.
When you have done the puzzle, the throne pivots
and reveals a secret passage.
Go down the secret passage.
Metamorphosis puzzle
Beneath the throne, take the left-hand passage and
climb the stairs.
You arrive in the Metamorphosis room.
Metamorphosis puzzle: Fill the empty spaces with
the given pieces.
Start with the parallelogram.
When the form is completed, turn round. A statue has risen from the floor.
Take the new piece from the statue.
Continue with the remaining forms, using each new piece (granted by each new
statue) to complete each form.
The final statue is of a lizard.
Click on the lizard\'s tongue.
Climb the stairs and go right twice.
You are in the Tower of the Moon.
Go straight ahead until you find a three-pronged fork in a nook.
Return to the stairwell and climb to the Tree of the First.
Go round the tree and use the fork on the ground.
Take the crystal ball.
When you get back down to the Metamorphosis room, the crystal ball will
activate. The old woman will speak of a place symbolized by a white bear.
Return via the passage to the point where a
direction leads to the throne.
Take the left-hand passage.
Use the fork on the apple-tree puzzle.
When you have reconstituted the apple tree, a secret access to the exterior
opens up.
Leave town, and go to Actyon\'s place. Tell him you need a flyer to get to the
white bear place.
He will tell you of his daughter Anna who is a pilot. Actyon doesn\'t know where
the women pilots live now.
Actyon gives you the crystal that belonged to his wife, Anna\'s mother.
Return to the town.
Use the three-pronged gardening fork again to activate the Throne puzzle
situated outside the palace.
When you have solved the Throne puzzle, a passage opens, allowing you to access
the secret underground passages.
The rosette puzzle
Go the turnoff beneath the throne and go along the
passage leading to the rosette puzzle.
Do the rosette puzzle and go through the secret opening.
You are now in the Gallery leading to the Library.
Go to the Lion room.
Do the planet enigma and place the lamb figurine in the lion\'s mouth.
Use the ear-ring once again and jump down into the alley.
Walk alongside the gardens and talk to the woman near the steps. She will tell
you where to find the house of the women pilots.
Go to the house, situated just to the right of the
steps leading down to the pond.
Enter the house and talk to Lona.
You lead her to believe that the Consort has sent you to fetch Anna.
Lona calls for Anna.
Leave the house with Anna.
Anna kicks you in the shin and runs off.
You must find her.
She has been caught by Meljanz and his friends and is being held in a room in
the Scarlet Cockerel inn.
Enter the inn.
Talk to Servage about Creon and the queen. Persuade him to keep an eye on the
untrustworthy Garcelos.
Go upstairs and into the corridor from which four rooms are accessible.
Listen to the converstaion coming from inside the end room.
Hide in one of the other rooms before Lascoyt comes out of the room where he and
Meljanz are holding Anna.
Go back into the corridor once Lascoyt has gone back into his room.
Enter the end room with Servage.
Talk to Anna about Creon.
Talk to Servage about Creon and Meljanz.
Talk again twice to Servage about Meljanz. You persuade him that by cooperating,
he will be promoted to captain of the palace guard.
Servage, persuaded, keeps Meljanz in check.
Leave with Anna.
Go with Anna to the garden where the ladder is.
Show her your Companion\'s badge.
Give her the crystal Actyon gave you. She agrees to accompany you.
Use the ladder on the bench and enter the palace via the Rat Catcher\'s corridor
and the Lion room.
After the Lion room, go downstairs, being caraful to avoid the guard.
Turn right, then go staight ahead and go through the door to the palace
courtyard.
Go straight ahead, the turn right to get to the service-elevator.
Enter the service elevator with Anna.
Activate the handle block to travel up to the next level.
A guard blocks access to the aerial bridge.
Inspect the room without Anna.
Take the sack.
Persuade Anna to get into the sack. When she asks if that\'s really what you
want her to do, answer YES.
Talk to the guard. You make him believe that the queen is in the bag and that
you are going to drop her into the sea.
Go to the hangar.
Climb aboard the flyer.
Turn towards the front of the flyer: Anna will climb out of the sack.
You will take off for the far north where the white bears live.
CD3
The Far North: SPITZBERGEN
You land on a beach.
Go to the igloo village.
Talk to the chief.
Show him your Companion\'s badge. He takes you to the cult igloo.
Listen to the chief explaining the history of his people as illustrated on the
painted hides.
When Anna points out the final hide-painting, showing a number of igloos and
humans one of whom is below ground, the chief gets angry.
A villager knocks you out.
You wake up, alone, in an igloo prison.
Use the knife to cut the rope in the wooden frame.
Use the rope on the pole lying on the floor.
Position the pole and rope on the ceiling.
You climb onto the igloo\'s roof.
Jump down to the ground.
Go round the village to avoid the guards.
Go to the cult igloo which is lit up.
Take the three pieces of wood on the floor.
Leave the cult igloo and find the igloo represented, in the painting, with a
human below it. It\'s the third on the right as you enter the village.
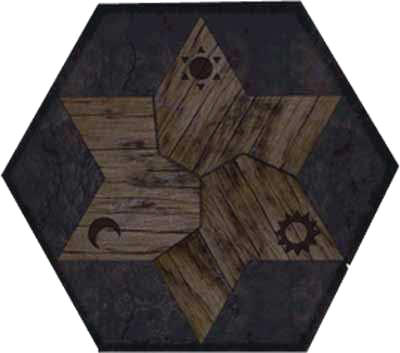
Inside this igloo, there are three symbols on the
ground: sun, moon, star.
Position the three pieces in such a way as to form a star.
An opening appears. Go down.
The Hexagonal room
Once underground, turn right.
Observe the ceremony. The villagers are about to sacrifice Anna.
Go back the way you came.
Go straight ahead to the other entrance to the Hexagonal room.
Turn round to the left and close the door.
Take the golden mask from the statue of the star god.
Talk to the villagers in the corridor. They believe you are their star god.
Use the knife on Anna to free her.
Talk to Anna about her mother\'s crystal: it could serve to activate the
statue\'s eye.
Anna looks into the statue\'s eye and sees a six-pointed star.
Stand before the coloured glass picture of the star and click on it. You will
learn part of the story of the Atlanteans. The next pictures to study are:
Child, Man, Woman, Sun.
When you are at the Moon picture, Anna sees a strange statue in the eye. This
statue represents a place.
A golden statuette appears on the sacrificial altar. Take it.
Leave the Hexagonal room with Anna. The villagers
are still in awe of you.
Return to the beach where the flyer is parked.
The Consort\'s barge arrives, accompanied by a smaller flyer. The Consort
attacks the village. Anna can\'t resist the urge to fly up and attack the barge.
Her flyer (which is also yours) crashes onto the barge\'s deck.
The smaller enemy flyer comes down and lands behind the mountain.
Go left towards the bear cave.
Place yourself in front of th bear and go left.
Go round the rocky spur and to to the cave entrance.
Enter the cave. You will go through to the other side of the mountain.
Talk to the enemy pilot, Jomar.
You both take off in his flyer towards Para Nua, symbolized by the small golden
statuette found in the Hexagonal room.
PARA NUA
When the flyer has crashed, talk to Jomar, then to
the king, Hona Ly.
Go to the basket containing the crabs.
Do the crab races, with the red-coloured crab.
Go to the statue that\'s lying on the ground and talk about it with Hona Ly (use
the inventory bar to talk with him).
Talk to the newly-arrived Hector. Use the rope on the statue.
Climb aboard the flyer.
Go see Hona Ly\'s daughter in the catamaran and ask for her help.
When the statue is at last erect, agree to Hona Ly taking Hector as hostage.
Go back down to the catamaran.
Hona Ly\'s daughter will take you to Muria, the island where the real Standing
God lives.
MURIA

The statuette puzzle: Place the various objects
thus (from left to right):
statues: blue, red, yellow, green.
animals: bird, boar, fish, crab.
astral bodies: Earth, constellation, moon, sun.
Enter the tunnel.
Go to the end of one of the aerial walkways in order to get killed by the vision
of Creon.
Show the crystal ball to the spinning woman.
Go to the end of one of the aerial walkways in order to get killed once more by
the vision of Creon.
You will then find yourself in the spinning woman\'s cooking pot. She will
expedite you to the Cube.
Inside the Cube room, talk to the Cube. It explains
everything.
When you have acquired the gray ball, click on the green flagstone which will
take you to the balcony.
Find the other green flagstone on the balcony.
In the Tower room; go into the adjacent room and take the lantern.
Come back to the tower and place the lantern and the gray ball on the tower.
Enter the cavity created by the gray ball.
Take the crystal power. The room lights up.
Climb aboard the flyer to return to Atlantis.
CD 4
Combat on Creon\'s barge
Talk to Actyon in his cabin.
Return to the flyer.
Jump aboard Creon\'s barge.
Free Anna with the knife.
When Meljanz faces you, duck to the right.
Go back with Anna to your flyer.
Once inside the place, go to see the Rat Catcher.
Go to the Library and take the eye from the whale skeleton (upper level of the
Library).
Go to the Dolphin room.
Place the eye from the whale in the dolphin\'s eye-socket.
The Minotaur\'s labyrinth
In the labyrinth, avoid entering the places where
the Minotaur appears.
In the Skull room where Creon awaits, use your freshly-acquired crystal power on
the cannon\'s crystal.
Follow Creon through the hole in the wall.
Use your crystal power on the metal head. It falls, breaks and releases the
beast within.
Return to the Skull room.
Take the crystal ball (it fell to the floor during the cannon episode) and place
it in the beast\'s mouth.