Open the door and enter Grifit's cottage... |
| |

|
| |
| On top of the book on the podium is a note from Grifit. The note instructs you to prepare the journey ship (inside a hidden tunnel) for travel and reminds you about activating the navigational map. Your Journal at the bottom of the screen glows - indicating new entries. |
| |
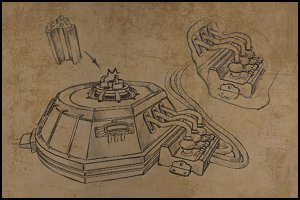
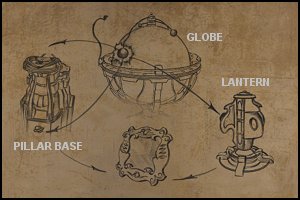
| The diagrams on the first five pages of the Journal are clues to the puzzles in the Ademika Valley. |
| |
Begin by collecting all the inventory items to be found in this room:
1) Charger (not charged) - on the bookstand
2) Lighter - from the base of the scale on the desk to the right of the fire
3) Thermometer - next to the scale
4) Three Coloured Gems (red, blue and green) inside the small chest on the same desk as the scale
5) Three Stencils (with symbols) also inside the small chest
6) Generator - also inside the small chest |
| |
| |
| |
CHARGER PUZZLE |
|
| |
| The first page of the Journal illustrates how to re-charge the Charger. There are four strange devices on the table to the left of the fire. The one on the extreme right is drawn in the diagram. The diagram shows where the Charger must be inserted and the three steel rods are also shown separately. |
| |
| Power needs to be routed to the charging device before inserting the Charger. Hold the Lighter under the burner (on the extreme left edge of the desk) to fire it up. Move to the device on the right of the burner and click the copper and black knob once to get the crown-like bit spinning. Click the knob again and note that power is now flowing through the pipe on the right. Pan to the next device on the right and insert the Thermometer into the slot on the right. Set the slider control to the third (i.e. second last) position, noting that the mercury in the Thermometer rises. The only way to determine that this is the correct setting is by 'trial and error' or by reading 'the first five minutes of play' in the manual. Pan to the charging device on the right, insert the Charger and click the steel rods. The Charger should spark as it absorbs power. Take the Charger (now fully charged) out of the charging device. |
| |
| |
| |
SOLAR SYSTEM GLOBE |
The large globe in the room has four surrounding planets attached to it by metal rods. When you examine the globe only three of the planets can be seen:
1) Blue - Large
2) Red - Medium
3) Yellow - SmallThe fourth planet, Green with a Saturn-like ring round it, is on the opposite side of the globe. It is visible if you look very carefully at the globe from the other side of the room. |
| |
Switch on the lamp to the left and then click the top of the globe. The planets complete a full orbit round the globe. Each planet shimmers and changes colour during its orbit. Make a note of the colour changes of each planet.
1) Blue (large) changes to Red
2) Red (medium) changes to Yellow
3) Yellow (small) changes to Green
4) Green (with the ring) changes to Blue |
| |
| The globe is depicted on the fourth page of your Journal. The significance of the planets and the colours they changed to is important later. |
| |
| |
| |
DOME DEVICE |
| Enter the room with the spiral staircase. On the wall to the right is a control panel with five buttons on it. Initially all the buttons are in the 'down' position. When a button is pressed, that button and the next two buttons (moving clockwise) change positions, i.e. if a button is 'down' it changes to 'up' and visa versa. To get all the buttons in the 'up' position, press each button once moving clockwise. When all the buttons are in the 'up' position the dome device rises from the centre of the floor. |
| |
| Click the small silver dome at the top of the device to open it. When you insert the Generator into the vice grip the side panel opens and a section of the wall recedes - revealing a circular door in a small tunnel. |
| |
| The side panel has slots for the three Gems and Stencils, but you don't yet know the positions they are to be inserted in. The solution to the correct positions is in the grounds outside and the diagram on the fifth page of the Journal provides a vital clue as to where. |
| |
| For the moment go into the small tunnel with the circular door, turn around and retrieve the lever lying on the ground in the bottom left corner. |
| |
| |
| |
NAVIGATIONAL MAP ACTIVATOR |
| The device at the top of the spiral staircase is the navigational map activator. It's not possible to operate this device until later and besides, you don't as yet have a map to activate. |
| |
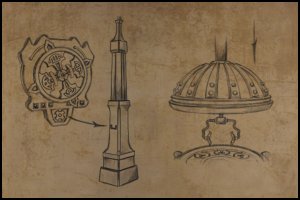
| There are three round dials on the walls - one is halfway up the staircase and two at the top. Make a note of the symbols on the dials as you need to recognize them elsewhere. The diagrams on the second page of the Journal provide a clue as to where. |
| |
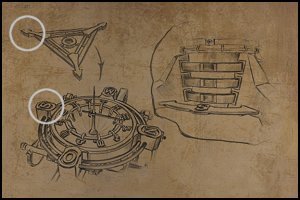
| Look closely at the base of the actual device. The three bands around the base and compass directions on the floor are depicted on the third page of the Journal. |
| |
| |
| |
SOLAR SYSTEM PUZZLE |
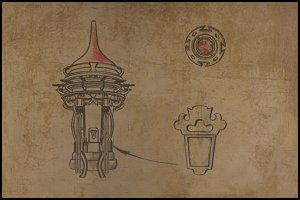
| Exit the cottage, turn to the right and then continue straight to an area with four pillars that converge in the middle. On a stone platform in the centre of the pillars are four lantern-type objects. If you examine the bases of the pillars and the lantern objects you should recognize them as two of the objects depicted on the fourth page of the Journal. |
| |
|
| |
| A stone planet is carved into the very bottom of each pillar base. As indicated by an arrow in the diagram these planets corresponds with those on the globe inside the cottage. |
| |
Inside the metal dome on each pillar is a control with three different coloured settings. Set each control so that the colour facing you matches the colour of the planet on that particular pillar base. Again, this is indicated by an arrow on the diagram. The correct settings are:
Near right pillar (large planet) - Blue
Far right pillar (Saturn-like planet) - Green
Near left pillar (small planet) - Yellow
Far left pillar (medium planet) - Red |
| |
The third arrow links the lanterns with the shimmering of the planets, i.e. the colours that they changed to during their orbit around the globe. Accordingly, each lantern must be rotated so that the colour to which the planet changed faces directly at the pillar opposite it. Note that when doing this the colour facing the pillar will not be visible. The correct settings are:
Near right lantern - Red faces the pillar
Far right lantern - Blue faces the pillar
Near left lantern - Green faces the pillar
Far left lantern - Yellow faces the pillar |
| |
| If the controls and lanterns are all set correctly, the device will activate and you get a Navigational Map from the opening in the centre. |
| |
| |
| |
BELL STRUCTURE |
| From the Solar System Puzzle take the path leading back to the cottage. Halfway along the path there are a series of bridges (to the right) leading into the valley. After crossing the third bridge turn to your right and go to the structure with a large bell. There are also three upright wooden posts with etched markings. |
| |
|
| |
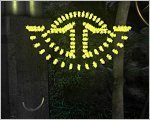
| From the diagram on the second page of your Journal you know that the markings etched on the posts are associated with the gold emblems at the bottom of each round dial on the walls in the cottage. |
| |
| Click the blue urn in front of each wooden post to release a flow of energy crystals. The crystals briefly form a symbol before evaporating |
| |
|
| |
| Do you recognize the symbols? They're similar to the ones on the round dials. Make a note of the symbols and the etched marking above which each one appeared. |
| |
| |
| |
COLOURED CONE STRUCTURES |
| Continue into the valley across the long winding bridge. You eventually get to an open area with a number of structures and devices. Stone steps lead up to three structures, each having a different coloured cone on top. In the centre is a device with a large glowing crystal ball. Another device, to your right, has three protruding metal poles. |
| |
| From the fifth page of the Journal you know the red Gem and one of the Stencils are associated with the structure that has a red cone on top. |
| |
|
| |
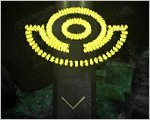
| The blue screen sealing the front of each structure is raised by pressing the button set in a red claw-like metal clamp on the left. Each structure houses a rotating mechanism. The symbols depicted on the plaques on the mechanism are identical to those on the Stencils you found in the cottage. Clicking a plaque rotates the mechanism, bringing a different plaque into view. When the correct plaque is in view you see a jolt of energy flowing through the corresponding metal pole on the device to the right. |
| |
| Do this at all three structures, noting the symbol depicted on the correct plaque for each structure. |
| |
BLUE
(LEFT STRUCTURE) | RED
(MIDDLE STRUCTURE) | GREEN
(RIGHT STRUCTURE) |  |  |  |
|
| |
| |
| |
ZODIAC PUZZLE |
| Before leaving this area, examine the device with a large glowing crystal ball. The Zodiac Triangle inside the device is locked into place on a spindle. Click the release catch on top to open the spindle and remove the Zodiac Triangle. Note that this can only be done after all the correct plaques have been activated in the cone-topped structures. |
| |
| Return to the main path to the cottage. Just before the cottage, stone steps lead down to the right. There are two structures at the bottom of the steps - to the right is a structure with three spikes protruding out the top, and the one on the left (in darkness) houses some sort of compass device. |
| |
| At the structure on the right (with the three spikes) insert the lever in the slot surrounded by metal rings. Turn the lever to activate the device, which in turn lights up the opposite structure. Remove the lever and go to the other structure. |
| |
| Again begin by inserting, and turning, the lever into the slot in front of the compass device. |
| |
|
| |
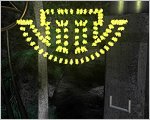
| Put the Zodiac Triangle onto the spindle in the centre of the compass device. The three bands around the base of the navigational map activator in the cottage are briefly seen during the cut scene. Note that the diagram on the third page of the Journal indicates that one arm of the Zodiac Triangle must be lined up with the 'South' emblem on the compass device. After putting the Zodiac Triangle onto the spindle, turn it until one of the arms faces south. Make a note of the three symbols at each point of the Triangle. |
| |
|
| |
| |
| |
ACTIVATING THE NAVIGATIONAL MAP |
| The first step is to set all the round dials on the walls correctly. Each gold emblem (below the dial) has a different design on its edge. The designs are identical to the carved markings on the wooden posts at the bell structure. Set each dial so that the bottom symbol (directly above the gold emblem) corresponds with the crystal energy symbol formed at the wooden post with the same marking as the gold emblem. When the dials are all set correctly, a map clamp is lowered from the ceiling. |
| |
| The next step is to place the Navigational Map in the map clamp. |
| |
| The device needs power, so insert the Charger into the receptacle on the base of the device. |
| |
| The final step is to adjust the three green bands on the actual device. Zoom in on the bands above the 'S' on the floor. Each of the symbols (at the points of the Zodiac Triangle) only appear once on the bands. |
| |
The bands are rotated, either to the left or right, as follows:
1) Clicking the top band - rotates the top and middle bands
2) Clicking the middle band - rotates the middle and bottom bands
3) Clicking the bottom band - rotates the bottom and top bands |
| |
| Click the right side of the top band until one of the symbols appears on it. Next, click the left side of the middle band once and the remaining two symbols appear (simultaneously) on the middle and bottom bands. Note that this sequence only works if followed exactly. If you didn't follow it exactly, exit the close up view and then re-enter. The bands will have reset to their default positions. |
| |
| Retrieve the Navigational Map which should now be activated. |
| |

|
| |
| |
| |
OPENING THE CIRCULAR DOOR |
| Return down the stairs to the dome device and open the side panel. Insert the Coloured Gems in the round slots in the same order as the cone-topped structures. Blue on the left, red in the centre and green on the right. Next, insert the Stencils in the slots so that the symbols correspond with the correct symbols on the plaques at the cone-topped structures. Lastly, press any of the tiny buttons on the side - the circular door in the tunnel should now be unlocked. |
| |
|
| |
| |
| |
JOURNEY SHIP |
| Open the circular door and go down the tunnel to the journey ship. You meet Belik in the tunnel, who tells you about the uprising. He gives you the Sacred Rings and says you must recover the Tetrahedrons. |
| |
| Insert the Navigation Map in the clamp on the ship and pull the lever on the side to travel to Dragast. |