* Click on the screen to bypass to opening videos of Alice finding the white rabbit then following it down into the rabbit hole (or watch them).
* Click on the door to stop falling (after 1000 miles is shown/announced).
* Click on the map then place it in your pantry (inventory).
* Click on the blue door at the far, left-hand side of the room (in the room of doors).
* Click on the Jerusalem artichoke beside the rock then place it into your pantry (inventory).
* Solve the logic puzzle the dodo asks help with by placing the red pebbles (on the ground) into the puzzle board.
Note: To solve this puzzle, 8 lines of 3 pebbles must be made. To do this, you simply place the stones in a configuration as seen below.
* Take the syllogism (paper) from the ground then place it into your
pantry (inventory).
* Click on the mouse to speak with him.
* Take the sheep sorrel (leaf) from the ground (far, left-hand side of the
screen) then place it into your pantry (inventory).
* Click on the mouse's belly then move your cursor to the end of the mouse's
tail (while not moving the cursor off of his tail).
Note: The mouse's tail will become shaded as your move the cursor
down the length of his tail.
* Listen to the mouse's story then click on the circle in the upper,
right-hand corner of the screen twice (to go back two screens to the room of
doors).
* Click on the potion on the table.
* Click on the arrow beneath the table (to move right).
Note: A box is there, but currants are needed. We will get those
later in the game.
* Click on the box to learn where the currants are located.
* Click on the loaf of bread to grow tall again.
* Click on the small door to learn that you need a purple mushroom to shrink
to fit through it.
Note: We don't have a purple mushroom just yet, so let's go find one.
* Click on the large, green door in the middle of the room of doors.
* Click on the red door.
WHITE RABBIT's HOUSE
* Click twice on the chest of drawers to reveal a gold coin.
* Take the gold coin then place it in your pantry (inventory).
* Click on the painting on the wall.
* Click on the red potion on the chest of drawers.
* Click on the flames (rapidly) to extinguish them (until they are all
gone).
* Click on the arrow at the far, right-hand side of the screen.
* Click on the letter with the beetles (beside the chest of drawers).
* Move the yellow beetles until a blue beetle is shown.
* Take the blue beetle then place it in your pantry (inventory).
Note: If you are curious, and don't want to be bothered with moving
the yellow beetles, the letter reads...
| "The rabbit is a gourmet gardener who cultivates his cornucopia with consideration. He cares for his carrots, marvels at his marigolds, lavishes love on his lettuce, and polishes his pumpkin properly. He knows his onions and tenderly tends to his vegetable friends, for he wants no one leading him up the garden path." |
* Click on the circle in the upper, right-hand corner of the screen.
* Click on the arrow on the far, right-hand side of the screen.
* Click on the bottom drawer on the chest of drawers.
WHITE RABBIT's GARDEN
* Take the carrot from the small planter pot then place it into your pantry
(inventory).
* Take the pumpkin from the large planter pot then place it into your pantry
(inventory).
* Take the marigold petal from the large planter pot then place it into your
pantry (inventory).
Note: Now would be a great time to save your game because a test of
skill is about to begin.
* Click on the arrow at the far, left-hand side of the screen.
Note: Time for the mushroom game. This will take a bit of skill to
complete. Purple, green and orange mushrooms need to be joined. The first
round just has 1 mushroom. Round 2 will have 2 mushrooms, simultaneously.
Round 3 will have 3 mushrooms to join, simultaneously. Click on the cap so
it never hits the ground. When a stem shows up, join it to the cap when it
falls to the ground. The first round is easy. Rounds 2 and 3 require that
you click on the falling caps after you successfully join one mushroom. For
round 3, take the next stem (after joining the first mushroom) of the cap
that will reach the ground first.
* Click on the caterpillar for the information about finding the next, two
stages of his life.
* Click on the orange mushroom to grow to the treetops.
Note: Puzzle time. The object of this puzzle is to move the eggs into
their proper nest. The nest in the middle can be used freely to place the
eggs. For ease of description, I will label the nests by the colors in them
(not the egg colors). Top, left nest is purple. Moving down
(counterclockwise), there is the red nest. Next, moving right, is the green
nest. Moving right, there is the blue nest. Finally, moving up, the gold
nest.
* Move the purple egg (from the red nest) to the empty nest.
* Move the green egg (from the purple nest) to the red nest.
* Move the blue egg (from the gold nest) to the purple nest.
* Move the purple egg (from the empty nest) to the gold nest.
* Move the green egg (from the red nest) to the empty nest.
* Move the blue egg (from the purple nest) to the red nest.
* Move the purple egg (from the gold nest) to the purple nest.
Note: First egg successfully placed.
* Move the red egg (from the blue nest) to the gold nest.
* Move the gold egg (from the green nest) to the blue nest.
* Move the blue egg (from the red nest) to the green nest.
* Move the green egg (from the empty nest) to the red nest.
* Move the red egg (from the gold nest) to the empty nest.
* Move the gold egg (from the blue nest) to the gold nest.
Note: Second egg successfully placed.
* Move the blue egg (from the green nest) to the blue nest.
Note: Third egg successfully placed.
* Move the green egg (from the red nest) to the green nest.
Note: Fourth egg successfully placed.
* Move the red egg (from the empty nest) to the red nest.
Note: Fifth, and final egg successfully placed.
* Click on the butterfly then place it into your pantry (inventory).
* Click on the down arrow at the bottom, left-hand corner of the screen.
* Click on the green mushroom.
Note: To complete this game, move Alice to the left with your mouse.
Avoid the ants by clicking your mouse to jump over them.
* Move your way over to the gray mushroom at the far, left-hand side of the
screen.
* Walk over and get an orange mushroom piece (as it falls) when one becomes
available.
* Jump up onto the gray mushroom just above Alice.
* Click to jump across the 4, moving flowers to get to the gray mushroom on
the far, right-hand side of the screen.
* Take the blue cocoon then place it in your pantry (inventory).
* Click on the up arrow at the upper, right-hand corner of the screen.
* Take the blue cocoon from your pantry (inventory) then give it to the
caterpillar.
* Take the butterfly from your pantry (inventory) then give it to the
caterpillar.
* Take the butterfly (now flying around) then place it back into your pantry
(inventory).
* Take the purple mushroom then place it into your pantry (inventory).
* Click on the circle at the upper, right-hand corner of the screen twice to
return to the white rabbit's house.
WHITE RABBIT's HOUSE
* Click on the arrow at the far, right-hand side of the screen.
* Click on the red potion on top of the chest of drawers.
* Click on the red door.
* Click on the circle at the top, left-hand corner of the screen to return
to the room of doors.
* Click on the blue door to the right of the green door in the middle of the
room.
KITCHEN
Note: Watch the animation with the cook and the dutchess. After, it
is time to solve another puzzle involving pairing the dutchess' proverbs for
her correctly. The 4 characters, excluding the dutchess, each say one half
of the proverb (correctly or incorrectly). It is your job to match the
proper proverbs to pass this puzzle. Due to the game not having any
subtitles for the hearing impaired, I will list out all of the characters'
sayings. If you are hearing impaired, just click on
the character I put a 1 beside first then the character with a 2; don't
click on the characters without numbers. After, the dutchess will
say something. Then you can move on to the next proverb. There are 16
proverbs in all. Only 3 proverbs are needed to pass this puzzle. I will
include all 16 in this walkthrough. Also, if you
are hearing impaired, do not leave this puzzle then come back; else, the
order of the proverbs will get messed up and there is nothing that I can do
to help you through this puzzle. The red soldier is the 4 of
diamonds. The black soldier is the ace of clubs. Finally, if you decide to
go through all 16 proverbs,they will begin again from the first one if you
did not get your third correct on number 16.
| Proverb 01: Cat: "...is another man's poison." - 2 Cook: "One man's feet..." Soldier (Red): "...is another man's fish." Soldier (Black): "One man's meat..." - 1 Proverb 02: Cat: "The early bird catches..." - 1 Cook: "The early worm catches..." Soldier (Red): "...the worm." - 2 Soldier (Black): "...the bird." Proverb 03: Cat: "...out of mind." - 2 Cook: "...out of tune." Soldier (Red): "Out of sight..." - 1 Soldier (Black): "Out of luck..." Proverb 04: Cat: "Never book a judge..." Cook: "...by its cover." - 2 Soldier (Red): "...by its wig." Soldier (Black): "Never judge a book..." - 1 Proverb 05: Cat: "Curiosity killed..." - 1 Cook: "...the bat." Soldier (Red): "Curiosity caught..." Soldier (Black): "...the cat." - 2 Proverb 06: Cat: "...louder than words." - 2 Cook: "Words speak..." Soldier (Red): "Actions speak..." - 1 Soldier (Black): "...when spoken to." Proverb 07: Cat: "All goats roam..." Cook: "All roads lead..." - 1 Soldier (Red): "...the streets." Soldier (Black): "...to Rome." - 2 Proverb 08: Cat: "Anyone can have..." Cook: "...a silver cloud." Soldier (Red): "Every cloud has..." - 1 Soldier (Black): "...a silver lining." - 2 Proverb 09: Cat: "...about nothing." - 2 Cook: "...about anything." Soldier (Red): "Much ado..." - 1 Soldier (Black): "Nothing to do..." Proverb 10: Cat: "...and speak afterwards." - 2 Cook: "Think backwards..." Soldier (Red): "...and eat afterwards." Soldier (Black): "Think first..." - 1 Proverb 11: Cat: "Birds of a feather..." - 1 Cook: "...flock together." - 2 Soldier (Red): "...fly upside down." Soldier (Black): "Snails of a scale..." Proverb 12: Cat: "The fence is always wider..." Cook: "The grass is always greener..." - 1 Soldier (Red): "...after the rain." Soldier (Black): "...on the otherside of the fence." - 2 Proverb 13: Cat: "...in the day." Cook: "...in the dark." - 2 Soldier (Red): "All cats play..." -1 Soldier (Black): "All cats are gray..." Proverb 14: Cat: "There's no use crying..." - 1 Cook: "There's no use flying..." Soldier (Red): "...over sour milk." Soldier (Black): "...over spilled milk." - 2 Proverb 15: Cat: "A bird in the hand..." - 1 Cook: "...is worth two in the sky." Soldier (Red): "...is worth two in the bush." - 2 Soldier (Black): "A bird in the bush..." Proverb 16: Cat: "...is not gold." - 2 Cook: "All that flitters..." Soldier (Red): "...does not unfold." Soldier (Black): "All that glitters..." - 1 |
* Take the invitation to the croquet tournament then place it in your
pantry (inventory).
* Click on the bread beside the cat.
* Take the currants (beside the potion) then place them into your pantry
(inventory).
* Click on the arrow at the far, right-hand side of the screen.
* Take the sugar cube then place it in your pantry (inventory).
* Click on the arrow at the far, left-hand side of the screen.
* Click on the potion to drink it.
* Click on the red door in the background.
Note: Time for the soup puzzle. You will see a recipe checklist at
the bottom, left-hand corner of the screen. There are 3 tabs at the top of
the recipe book. The first shown is blue beetle soup. You can click on the
other tabs to reveal recipes for merry marigold soup, & nails and nettle
soup. We have the option to make the blue beetle soup, or merry marigold
soup. The ingredients for nails and netle soup (snail, clove, chicken egg
and a nettle leaf) are nowhere to be found in the game. Perhaps the recipe
is included to get the player to go lurking everywhere again just to find
the ingredients. Later in the game, we will work our way through a snail
maze. Even later in the game, a chicken egg will be shown in a puzzle, but
neither it nor a snail can be collected, and placed into our pantries
(inventories).
Note: Soup puzzle layout... There are 3 green machines in the puzzle.
The green machine on the left side of the screen performs two functions. At
the top of the machine (left side of the screen) is a lever. In the
default/down position, it will cut an ingredient. In the up position, it
will beat an ingredient. On the right-hand side of the screen, there are 2
green machines. The smaller one, although it looks like a meat grinder, is
the chopper. The larger one (closest to the wall on the right) is the
grinder. Basically, we need to take ingredients from out pantry (inventory),
place them onto the shelf at the top, right-hand side of the screen, then
deliver the ingredient to the appropriate place with the pincer at the top.
If an ingredient needs to be ground or chopped, it will have to be taken
from a moving bowl by the second, lower pincer. Once the ingredients are
prepared, we can send them to the cooking pot, and make the appropriate
soup.
Note: Each recipe calls for one ingredient to be chopped, one
ingredient to be ground, one ingredient for be beaten and one to be cut.
Order doesn't matter, but for this walkthrough, I will describe from top to
bottom in the recipe book (chop, grind, beat then cut). Finally, it doesn't
matter which recipe you choose to prepare. I will discuss why after the
puzzle solution.
* Take the ingredient, from your pantry (inventory), needed to be chopped
(pumpkin from the merry marigold soup, or the blue beetle for the blue
beetle soup).
* Place the ingredient to be chopped on the top, right-hand shelf.
* Click on the pincer to grab the ingredient to be chopped.
* Click on the pincer (holding the ingredient) when it moves over one of the
moving bowls, so that the ingredient falls into it.
* Click on the 2nd pincer when the ingredient moves immediately beneath it.
* Click on the 2nd pincer when it moves over the small, green machine (not
the large one next to the wall).
Note: You will see a red check mark be placed beside the ingredient
(in the recipe book) if you have completed the task correctly.
* Take the ingredient to be ground (Jerusalem artichoke for the merry
marigod soup, or the gold coin for the blue beetle soup) then place it on
the top shelf.
* Click on the pincer to grab the ingredient.
* Click on the pincer to drop the ingredient into an empty, moving bowl.
* Click on the 2nd pincer when the ingredient moves immediately beneath it.
* Click on the 2nd pincer when it moves over the green machine closest to
the wall at the right side of the room to grind the ingredient.
* Take the ingredient to be beaten (marigold petal for the merry marigold
soup, or use the butter already on the top shelf for the blue beetle soup)
then place it on the op shelf if it isn't there already.
Note: To beat an ingredient, the green machine at the left side of
the room will need to be used.
* Click on the lever on the green machine at the left side of the room until
it moves to the up position.
* Click on the pincer to grab the ingredient.
* Click on the pincer when it moves over the green machine at the left side
of the room.
* Click on the lever again to move it to the down position.
* Take the ingredient to be cut (sheep sorrel branch/leaf for the merry
marigold soup, or the carrot for the blue beetle soup) then place it on the
top shelf.
* Click on the pincer to grab the ingredient.
* Click on the pincer when it moves over the green machine at the left side
of the room.
* Click on the salt shaker (located in the middle of the moving bowls) to
catch some salt into an empty bowl.
* Click on the pepper shaker (located in the middle of the moving bowls) to
catch some pepper into an empty bowl.
* Click on each of the six bowls, one at a time, as they pass over the soup
pot at the bottom of the screen.
* Take the Queen of Hearts' strawberry tart recipe book from the drawer then
place into your pantry (inventory).
Note: Coincidentally, I have made both the merry marigold and blue
beetle soups. Whichever you choose to prepare, you will be given the
strawberry tart recipe book if you complete either successfully. So,
choosing which recipe to prepare doesn't matter.
* Click on the arrow at the far, left-hand side of the screen.
* Click on the painting above the cat on the table (in the kitchen).
RIVER
Note: The object of this puzzle is to move the cat, the mouse and the
sugar cube to the otherside of the river. The mouse & sugar, or the mouse &
cat can't be left on either side of the river together, alone.
* Click on the mouse to get him into the boat.
* Click on the boat to move it across the river.
* Click on the mouse to get him to leave the boat.
* Click on the boat to move it back across the river.
* Take the sugar cube then place it into the boat.
* Click on the boat to move it across the river.
* Take the sugar cube then place it beside the mouse.
* Click on the mouse to get him back into the boat.
* Click on the boat to move it back across the river.
* Click on the mouse to get him to leave the boat.
* Click on the cat to get him into the boat.
* Click on the boat to move it across the river.
* Click on the cat to get him to leave the boat.
* Click on the boat to move it back across the river.
* Click on the mouse to get him back into the boat.
* Click on the boat to move it across the river.
* Click on the mouse to get him to leave the boat.
MAD HATTER's TEA PARTY
Note: Time to solve two of the Mad Hatter's riddles. The first riddle
is: "Why is a raven like a writing table?" To answer this, move your mouse
over the six tea cups (and the tea pot) on the table to hear the replies.
Beginning with the tea cup to the left of the butter, then moving clockwise,
the replies are (for the hearing impaired, or for those who missed them):
Tea Cup #1: "Enough is enough with these riddles."
Tea Cup #2: "Ravens? Never heard of them"
Tea Cup #3: "Because one grows only on the nose."
Tea Cup #4: "Because ravens ride in writing desks of course."
Tea Cup #5: "Because they have both quills as black as ink."
Tea Cup #6: "Because Edgar Allen Poe wrote about one or the other."
Tea Pot: "Writing desks fly high in the sky."
* Click on the tea cup closest to the Mad Hatter's hand on the table
("Because they have both quills as black as ink").
Note: The 2nd riddle is: "Imagine, Alice, dreaming of apples on a
wall, and dreaming off too *giggle* If I counted all, how many would
appear?" The replies (for the hearing impaired, or for those who missed
them), beginning with the tea cup to the left of the butter then moving
clockwise are:
Tea Cup #1: "If you dream of 20, that would make 5."
Tea Cup #2: "Let's not mix apples and oranges."
Tea Cup #3: "If you dream of 20, that would make 10."
Tea Cup #4: "If you dream of 10, that would make 20."
Tea Cup #5: "If you dream of 5, that would make 5."
Tea Cup #6: "If you dream of 10, that would make 10."
Tea Pot: "The tea pot is a fruitcake."
* Click on the tea cup to the right of the butter ("If you dream of 10, that
would make 10").
Note: Alice, when asked by the Mad Hatter, states that today is May
4th, her birthday. The Mad Hatter's watch is broken, so we need to fix it.
There are 7 pieces of the watch on the hooks (in the watch puzzle). The
object here is to place them in the watch in the correct order. The correct
order is: 2-1-5-4-6-3-7. To see where the pieces need to be placed, view the
screenshot below.

* Click on the bread beside the butter on the table.
* Click on the small door in the background.
ROOM OF DOORS
* Click on the red potion on the table to drink it.
* Click on the arrow at the far, right-hand side of the screen.
* Click on the brown box to open it.
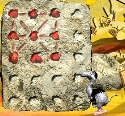
Note: Cookie game. The object is to move the currants (from your
pantry/inventory) around on the cookie to get a currant in each of the 6
indentations. You move the cookie by moving your mouse over the edges of the
cookie.
* Take the currants from your pantry (inventory) then place them on the
cookie.
Note: The longer you let a currant roll in a straight line, the
faster it will roll (and become uncontrollable). To make it easy on
yourself, try to move the currants in a curving or an S motion.
* Click on Alice to hear her say she sees something the white rabbit dropped
on the floor.
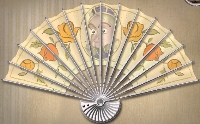
* Click on the fan on the ground (the item the white rabbit dropped).
Note: Fan puzzle. The object here is to place the pieces of the fan
into their correct order. Below is a picture of how the fan should look.
Note: Snail maze. The object here is to get the dodo bird and
mouse dry. Move Alice by moving your cursor.
* Move Alice through the large opening of the snail shell at the top of the
screen.
* Move Alice through the connecting path to the snail shell on the right of
the screen.
* Move Alice to the center, blue dot in the snail shell on the right of the
screen.
* Move Alice out of the spiral then down to the snail shell at the bottom of
the screen.
* Move Alice to the blue dot in the center of the snail shell.
* Move Alice out into the area between all 4 snail shells (yellow area).
* Move Alice into the large opening of the snail shell at the bottom of the
screen.
* Take the sugar-coated almonds (purple) then place them into your pantry
(inventory).
* Move Alice up to the snail shell at the top of the screen.
* Move Alice to the blue dot in the middle of the snail shell.
* Move Alice into the snail shell at the left of the screen.
* Move Alice ot the blue dot in the middle of the snail shell to dry them
off.
* Take the sugar-coated almonds from your pantry (inventory) then give them
to the dodo bird.
* Take the purple mushroom from your pantry (inventory) then click on Alice
to eat it.
ROSE GARDEN
Note: You will see two sets of stairs. The stairs on the right lead
to the end of the game, but we aren't ready to go there just yet.
* Click on the door at the top of the stairs at the left side of the screen.
* Take the strawberry at the bottom of the screen (on the grass) then place
it into your pantry (inventory).
Note: Rose puzzle. The object here is to make all of the roses red.
There are 6 rose bushes in the background, and 3 rose bushes in the
foreground. For ease of description, I will number the rose bushes. In the
background, the rose bush at the far left will be #1. The next rose bush, to
the immediate right, will be #2. Going farther right, there is rose bush #3
then #4 then #5, and #6 at the far right side of the screen. In the
foreground, on the left side of the screen, is rose bush #7. Rose bush #8
will be the middle bush in the foreground. Rose bush #9 will be the bush on
the right side of the screen in the foreground.
* Click the rose bushes in the following order: 1, 7, 2, 1, 4, 3, 5 then 6.
* Take your invitation to the croquet tournament (white paper with the red
ribbon) from your pantry (inventory) then give it to the Queen of Hearts.
* Take the flamingo (touching a soldier will force the flamingo free where
you will need to re-capture it).
Note: The queen, after you successfully got the hedge-hog ball under
a soldier, will run over to the standing soldier and get them to lay down
again. Standing guards, in the mean time, will shoot the ball for you if the
ball makes its way to them (this can help or hurt you). The worst thing to
watch out for is the circle at the top, right-hand corner of the screen. If
you accidentally click on that circle, you will go back to the rose bushes
then have to come back and try the croquet game all over again. The croquet
game can be tricky, or you may get lucky and receive excellent help from the
soldiers who pass the ball at other soldiers. Your goal is to get all of the
soldiers standing at once. The flamingo is your croquet mallet, so if you
lose the flamingo, re-capture it every time. This is all the help I can
offer, so good luck!
* Take the blank card then place it into your pantry (inventory).
* Click on the door at the top of the stairs on the right side of the
screen.
CASTLE
Note: Bridge game. The object is to bump the falling soldiers from
side to side (with your cursor) to get them to lie across the ropes and to
form a bridge. Red and black soldiers must alternate when forming the
bridge. Also, 8 soldiers are needed to complete the bridge for Alice to
cross. When playing this game, don't get soldiers of the same color side by
side, or they both will leave. This game takes a little patience, and there
isn't really a strategy to follow. Just stick to it, and you should get by
just fine. Good luck!
CASTLE COURTROOM
Note: Gardner, white rabbit and the Queen of Hearts are each after a
specific item. The gardener wants the rose. The white rabbit wants the
trumpet. The Queen of Hearts wants her crown. When one of those 3 objects
appear, click on it and a glass dome will form over it. The glass dome will
prevent anyone from taking it. When the respective character comes to the
item, click on the glass dome to allow them to collect the item. Immediately
create a dome over the next item in their path, so they don't trade again.
Do this until all three characters have their respective, proper items.
TRIAL
Note: We need to provide evidence to end the game.
Question: What are the Queen of Hearts' tarts made of?
Note: You will see 5 ingredients at the bottom of the screen. Go to
your pantry (inventory) then take the Queen of Hearts' strawberry tart
recipe book and click on Alice to reveal the ingredients. The ingredients
are: butter, sugar, flour, sugar-coated almonds and strawberries.
* Click on the butter then click on the two mounds of powder (one is flour
and one is confectioner's sugar).
* Take the sugar-coated almonds from your pantry (inventory) then place them
on the plate beside the picture of the sugar-coated almonds.
* Take the strawberry from your pantry (inventory) then place it on the
plate beside the picture of the strawberry.
* Take the Queen of Hearts' strawberry tart recipe book from your pantry
(inventory) then place it on the slab on the table as evidence.
* Take the blank card from your pantry (inventory) then place it on the slab
on the table as evidence.
* Take the syllogism from your pantry (inventory) then place it on the slab
in the table as final evidence.
* Watch the closing video.
THE END