ANKH: Heart of Osiris
by
Deck 13 Interactive
Walkthrough by MaGtRo May 2007 version
1.1
Gameplay: Ankh 2 is a point
and click third person game. The game is played without CD in the drive. The
main menu has New game, Load, Settings, Credits, Quit game and later after
playing, Continue game and Save game. The settings menu has brightness, screen
resolution, shadows, full screen effects, general level of details, music volume, sound volume,
Speech Volume, subtitles and Inventory hideable.
The cursor over an
object shows an action stated at the bottom of the screen that can be done. Left click of the mouse moves Assil.
Right click of the mouse is for doing the action shown at the bottom of the
screen. Select an item from inventory at top of screen and right click to
perform the action stated. A 'My to do list' is accessed by pressing tab
keys. Another press of the tab key will close the list. ESC key accesses the menu. There are
unlimited saves and they can be overwritten or deleted in the save page.
Pressing the space bar skips the intro. Double click
makes Assil run and double click on exit changes the screen scene faster.
See the 2 assassins, Tarok and Blackeye
talk to Osiris. They stole the Ankh from Assil. Osiris plans to reawaken his
servant to prepare his arrival to the world of the living. Assil arrives to take
the Ankh back. Here starts the story of Ankh: Heart of Osiris.
Chapter 1: Chasing the Scoundrels
Palace Gates:
Scruffy looking Assil wakes up outside the palace gates. Read the love letter in
inventory. So that is why Thara left Assil; the Pharaoh's daughter is after
Assil.
Look around. Read the note on the rope. Someone wants
a missing 'favorite sock'. You can go to talk to the palace guard later. Check
the clothesline, wheelbarrow, box and hole. Go right to the Bazaar.
Plaza:
Go to the shop at right. Talk completely to Take Tut Cashum, the clairvoyant and
find out that Assil is the Guardian of the Ankh. Assils's life and all other
Egyptian's depends on getting back the ankh.
Find
out who stole the Ankh
Talk to Volcano, the
fire eater completely. The shady characters went down the stone steps. Talk to
the Arabian ambassador.
Bazaar - Go down the stones steps
on the left. Talk to the wine merchant at the bar midway down the steps. The
thieves went to the new bar down the road. Go down the steps. At the bazaar, go
pass the tailor, the parrot and go outside the bazaar gate-arch.
At the Bazaar gates,
check the lantern that has glowworms. Pick up the camel muck.
Bar - In front of the Wild
Mummy, talk to Bulbul the bouncer. He was the former guard (Camella Loca dancer)
that was positioned at the backdoor of the palace in Ankh 1. He would only allow
VIPs that are clean shaven to enter the bar.
Get
rid of the beard
Go back to the bazaar
and talk to the tailor turned barber. He needs hot wax to get Assil clean
shaven. Pick up the sock that is hanging on the rack right of the barber.
Parrot - Go back down the bazaar
and stop at the shop with the parrot. Use the doorbell and talk to Fatima. When
she asks what you want to buy, pick up the parrot. Borrow the parrot (birdcage)
to show it how to talk.
Go left of Bulbul and
the bar to go to the upper city. Look at the trash can in front of Assil's
father's home. Use the trashcan and whoops! Follow the trashcan down road. Pick
up the Russian Nophrotete doll from the opened trashcan. Look at-right click it
in inventory to get opened Russian Nophrotete doll.
Go back to the left-upper city and follow the road
until the gate to the Nile shore. The gate is not accessible right now.
Box - Go to the Dinar's
abandoned shop. Take a look at the wobbly table and at the 3 hungry cats. See a
small box on the rafter of the shop.
Use the birdcage on the hook. Watch. The
bird lost its feather. You're in trouble now.
Pick up the damaged
birdcage and the small box. Use the small box to get wax and
seal.
Go up the road to the
Plaza. Use the wax inside the Russian Nophrotete doll. Use it with Volcano and get
molten wax.
Go back to tailor and
use the molten wax on him. Aaaaaah!
Go back to the Wild Mummy bar and enter.
Win
the favor of the guest
Talk to Fatima at the
bar. She wants her parrot back. Give her the damage birdcage. Gulp! Now, she's
mad and would not talk to Assil. She can help to find out where the thieves went.
Talk to
her again, this time select the in-crowd dialogue. The customers are ho-hum
about Assil so his status is quite low at the moment.
Pick up the date
juice from the bar. Go to the fireplace at right of room and pick up the
tools - pincer and besom-brush.
Badawi:
Talk completely to Badawi sitting beside the jukebox. He extols Luxor and gives
a flyer to the Sand-Beetle Cabaret in Luxor. He says it's stuffy in here.
Open the window - Go outside and look at
the window right of the camel. Use the pincer with the window to break it.
<whistle>.
Go back
inside the bar and see that Badawi now has a green smiley above him.
Comedian:
Talk to the comedian wearing a mask. He wants another job {to step into the
limelight in front of a discerning crowd), after being fired by the pharaoh.
Get a job for the comedian - Use
the flyer given by Badawi with the comedian. This invitation has no official stamp
on it.
In inventory, use the seal with the date juice taken from the bar to get
seal with date juice. Use the wet seal with the flyer. Use the flyer with the
comedian. Now he has a green smiley above his head.
Caravan drivers:
Go to the back of the bar up the steps pass the juke box. Talk to the men. They
are bored and want a bit of distraction with something only found here.
Get a local distraction - Go outside and back to
the plaza where Volcano and the Arabian ambassador are located. Talk to the
Ambassador completely. Thara has disappeared. Try to pick up the hookah he is
smoking. Nonono!
Use the camel muck with the hookah. The ambassador leaves to get new
tobacco. Pick up the hookah.
Go back to the bar and
the camel drivers. Give the hookah to any of the alert men. They now have yellow
grinning smileys above their heads.
Drinks - Assil gets coins as tip from the
caravan drivers. Fatima brings beer. The smileys turn green.
Pick up the beer coaster from the
beer container and the smileys turns yellow. Place the coaster back on top of
the beer.
Note:
The music enjoyment and the cocktail for the person that is sad seen below can be done
for either slave driver or Badawi.
Slave driver:
Talk to the slave driver. He is depressed because of his state of affairs.
Jukebox - Go to
the broken window at right and pick up glass shard from the floor. Go to
the juke box and use the coins with the jukebox. The needle is broken. Use the
glass shard with the record player above the jukebox.
Now the slave driver gets a yellow grinning smiley
above his head.
Betting slip - Go to Take Tut Cashum,
the clairvoyant at his shop at the Plaza. Look at the sign above his betting shop. After all the dialogue, get a
betting slip.
Go back to the bar and
give the betting slip to the slave driver. Now, he has a green smiley above his
head.
Comedian:
Talk to the comedian again. His green smiley turned to yellow. He doesn't like
the smoke filled room and his table shakes.
Wobbly table - Go to the caravan drivers and take
the beer coaster. Go back to the comedian and use the coaster with the
table leg. His smiley is green again.
Badawi:
Talk to him again now that his green smiley is yellow. He doesn't like the music
and wants a drink.
Go back to the wine
merchant at the Bazaar stone steps.
Wine merchant (this
step can be done anytime during the bar sequence) - Talk to wine merchant
about cocktails.
He sets out 2 ingredients, a colored bottle and the name of
the cocktail on the sign.
Code wheel - This is the game's security protection. Use the
code wheel
that came with the game.
The code wheel consists of three wheels that turn,
the outer one has names of the first ingredient, the middle one has names of
second ingredients and
the inner one has the name of the drink as well as the colored glasses.
When you rotate these rings correctly it shows how much ingredients to put in.
Adjust the wheel to show the first ingredient (left
bottle on the bar) on the
outer wheel.
Place the
second ingredient (second bottle on the bar) on the middle disc and turn it to place it under the first
ingredient.
Align the glass of the specified by the color
seen on the bar under the two ingredients.
Now that 3 items are set on the wheel, look at the
name of the cocktail on the sign on the bar. Then look for the name of the
cocktail on the inner wheel. See the amounts of the ingredients needed for the
cocktail are in the slots.
These are the answers to the wine merchant's
questions. Talk to the wine merchant to answer his questions. (Thanks, Kay!)
Pick up the
cocktail.
Go back to the bar and
give the cocktail to Badawi.
Get Fatima distracted - Fatima does not like
BYOB in her bar. Go outside to
Fatima's shop at the bazaar. Use the doorbell to call Fatima out of the bar. Go
back to the bar while Fatima is outside and give the cocktail to Badawi. He
gets a green grinning smiley above his head.
Fatima:
Talk to Fatima again about the in-crowd. Assil gets vote of confidence from the
customers.
Talk to Fatima again and she says that the thieves talked about the
old graveyard. She gives the empty cocktail glass they used.
Talk to her again to find out where the old graveyard
is located. She says it is at the dark alley and you might not see the entrance
because of lack of light.
Light source - Go back out to the
bazaar gate where the camel and the lantern are located. Use the pincer with the
lantern. Use the empty glass with the glowworms to get glowing cocktail glass.
Graveyard - Go to the alley in front of the
palace gate. It is dark here. To get light, use the glowing glass in inventory.
Assil hangs the light source on his neck. Hehehehe.
Place the sock with the clothesline. That will make
someone happy. Click on the door (entrance) to the grave yard.
At the graveyard, see the continuation
of the start of the game. Assil was conked on the head and the ankh is again in
the hand of Osiris. Did you think that was all...?
Osiris wants one more
thing - his heart.
Chapter 2: Intruders
Thara with her trio of
rebellious men (Schmuel, Shalom and Ephraim) decide to steal the pharaoh's
trophy. Dinar, the awakened servant of Osiris tells them where the trophy can be
found in the palace. For the revolution!
Find
the trophy and steal it
The group slides down
ropes on the wall of the palace. After the dialogue, pick up the withered
potted plant in a white pot. In inventory, use the withered plant to get
pot and dry spray. Look at the vine on the wall. Pick up a tendril
from the vine.
Look at the fracture on the balcony wall. Use the
tendril-vine
with the fracture. Talk to anyone of the men to hold the tendril. Climb down the
tendril.
Go right until the tree.
Pick up an unripe fruit. Go to the end of the ledge and hear the
pharaoh's daughter talk about Assil.
Scare the pharaoh's daughter away from the balcony
Go farther to the corner
of the ledge. See the gutter with a bat inside. Pick up the bat and it flies to
the roof of the balcony.
Look at the bat guano under the gutter. Use the dry
spray with the torch above the guard to get burning spray. Use burning
spray with the bat guano. Phew! That takes care of the pharaoh's daughter.
Get
past the guards and into the tower
Go back to the tendril.
The trio up there is busy discussing an earthshaking topic. To catch their
attention, use the unripe fruit on any of them. Climb up.
Go to the lit balcony
and Schmuel gives a banana skin. Pick up the Master Ra cleaning agent
from the floor by the right window. Look at the forged statue of Assil and the
princess.
Guard - Go to the elephant head
gutter at corner of the balcony. Look at the elephant head and Thara finds out
that the guard guarding the lower entrance below thinks he's hearing voices again. Try all the dialogues for
fun.
SAVE GAME HERE for dialogue replays. But for the game,
use the conscience (confess) dialogue. Then select 'the let this... other guard win the stone
and paper game'. Later replay the game that allows the short guard to win.
Go to the champagne
bottles by the door to the pharaoh's daughter's bedroom. Take a champagne
bottle. For Thara's pleasure, use the champagne bottle on the head of the
forged statue.
Bat - Take another
champagne bottle. Go back and look at the left window. See that there's a
flap-trap door at the top close to the bat. This time use the champagne bottle
on the trap door. See the bat enter the bedroom.
If you talked to the guard through the elephant head
about his conscience, the bigger guard loses the stone-paper game. He climbs up
and saves the princess from the bat. An interlude occurs. That takes care of the
guard by the entrance below.
If the short guard takes care of the princess, no
interlude is done and the door below is still blocked.
Go down the steps and into the tower now that the tall
guard is not by the door.
Open the door to the kitchen
Olga the cook - Go forward and check the kitchen door to find out it
is locked. Go forward and check curtain #1, #2 and #3.
Inside curtain #3, you won... Olga the former burger flipper now palace
chef. Olga is asleep with a bunch
of keys on her waist.
Pick up the Sacred Ten Don'ts of Cooking by the
wall and the spit roaster with the floor rug.
Hungry Guard - Exit the room and go right to the throne room. Go
forward and talk to the guard standing in front of the throne.
Talk to the
guard. He says to cook him couscous to verify that you're the new kitchen
helper.
Pick up the fishbone left of the throne and the metallic ring
above the throne.
Go back to Olga in room #3. Use the metallic ring with
the bunch of keys to get the bunch of keys.
Cook something for the guard so that he opens
the elevator door
Use the kitchen keys with the locked kitchen door.
Enter and look around. The brave rebellious trio joins Thara.
On the top level of the stairs go right and see a
refrigerator door guarded by a vile polar cat. Try to open the fridge door and
see the vile cat react.
Go down to the main kitchen floor and look around.
There's a closed elevator door at end of stairs on the left.
Ten Cooking Commandment
Don't cook dirty food!
Don't use a wet base!
Don't let the juicy food dry out!
Don't use rotten meat!
Don't forget to mourn in humbleness!
Don't overdo it with the cucumber!
Don't neglect health!
Don't forget the spiciness!
Don't stir your neighbor's pot!
Don't forget the fine taste!
To make the couscous for the guard, follow the Ten
Cooking Commandment in the correct order seen on the tablets.
Check the Ten Cooking Commandment in inventory to see
how you are progressing in the preparation of the couscous.
Don't cook dirty food! Go to
the stove. Pull the lever to empty the cooking pot if a mistake is made. Use the Master Ra cleaning agent
in the pot. Now the pot is clean. Do not pull the lever.
Don't use a wet base! Go to the
right side of the kitchen and see a sack of saw dust. Pick up saw dust
and use it with the cooking pot. Now it is dry. Do not use the lever.
Don't let the juicy food dry out!
Go to the sink by left wall. Use pot (vase) from inventory with water to get pot full of water.
Use pot (vase) full of water with cooking pot.
Don't use rotten meat! Go to
center table and check the smells funny ham, smells funny salted meat and
chicken. The chicken looks like a chicken. Pick up chicken meat and use
it in cooking pot.
Don't forget to mourn in humbleness!
Look at the onion from the side table by right wall. Pick up onion and
use it in the cooking pot.
Don't overdo it with the cucumber!
Pick up the cucumber. Use the cucumber with the vegetable cutter at
corner of the island. Pick up slices of cucumber and use it with cooking
pot.
Don't neglect health! Look at
and pick up the cod liver oil from the pushcart beside the island. Use it
with the cooking pot.
Don't forget the spiciness!
Go to the right side of the stove. Pick up the red hot peppers and the
spoon hanging on the bar. Use red hot peppers with cooking pot.
Don't stir your neighbor's pot!
Use the spoon to stir the cooking pot.
Don't forget the fine taste!
It is time to look for a gourmet ingredient.
Chase away the vile polar cat
Go to the right wall and pick up the small bowl.
Use the bowl with the left amphora with oil to get small bowl with oil.
Go to the lever and crane left of the center island. Look at and use the lever.
It is stuck. Use the bowl with oil with the lever. Use lever and see a sack with
raspberries hanging from the hook. The ants are having a feast. Pick up sack
with raspberries.
Use the sack with raspberries with the hook hanging
right of the stove and left of the amphora. See the army of ants climb down and
take more loot. Use the fish bone on the bag of raspberries. Watch as the ants
do their thing and the nature of the cat.
Go to the deli fridge at top level and open it. Look
at all the gourmet foods in there. Pick up the lark's tongue.
Don't forget the fine taste!
Use the lark's tongue with the cooking pot.
Pick up the plate from the side of the water
sink by left wall. Use plate with the cooking pot to get 'smells wonderful'
tasty couscous dish.
If an error is made in the cooking, you get a smelly
couscous dish. Redo the whole cooking procedure.
Open the dumbwaiter (elevator) door
Go back to the guard at the throne room. Use the tasty
couscous dish on the guard. He goes to the elevator door in the kitchen and
opens it with his high technical expertise.
Power the elevator - Enter the elevator and use
the lever. It doesn't work.
Go to the water sink and use the lever to divert the
water to the pipe that goes to the elevator. Now it is powered.
Go back to the elevator and use the lever. Down we go.
Trophy - Look around the storage cellar. Go to the large box on
the left. Look at large box and see it is from the Arabian ambassador.
Use the
spit roaster with the loose board in front of the crate. Take the heavy
object wrapped in large cloths that rolled out.
Use the heavy object in
inventory to get 4 large cloths and the trophy. Go back to the
elevator and use lever to go up.
Flee
See the pharaoh sleepwalking at top of the stairs. He
mumbles about couscous. Use the banana skin on him. Thud!
The cowardly trio runs the wrong way. Thara follows
and sees them caught by the guards at the throne room.
Go to the right side of the hall behind the right
columns. See 3 levers that open the trap doors in front of the throne. Use the
middle lever to take care of the guards.

Run back towards the kitchen, out to the balcony stairs and
up on the balcony to join the intrepid macho men. Use a large cloth with each of
the heroes and see each of them parachute down from the balcony.
Back at the cellar, Dinar arrives with the assassins.
From now on, I am the pharaoh. The assassins will take care of the
pharaoh - make him 'cross the river Jordan'.
Chapter 3: Into the Palace (Once again)
Escape from tomb
Enter the tomb - Assil wakes up at the bottom of a grave. Look around
and see a mummy and a mailbox. Open the mailbox and pick up the parrot
feather. Use the feather on the mummy's feet. Hihihi! Talk to the mummy
about the Ankh's guardian. He opens the tomb's door.
Hmm... It's a smuggler's storage area. Look around and
see Fatima's bird in his birdcage.
Use lid to open the crate left of door and
pick up mighty Seth's statue.
Pick up the empty crate and the
revealed yellow camel's immobilizer.
Look at and pick up the 3 notes on the left
wall.
Check the Black Forest woodpecker clock on the left wall.
Use lid to open
the crate at left foreground and pick up a coconut.
Pick up the broken
bottle and playing cards from the sarcophagus lid.
Bring down the parrot - Place the empty crate on the table under the birdcage.
Use the broken bottle on the rope of the birdcage. Ooops.
Revive the parrot - The parrot is in a sorry state. Use the coconut on the
clock to get half of a coconut. Use the half of a coconut (milk) on the parrot
to revive him. Use the playing cards on the birdcage to open it. Pick up the
parrot.
Call for help - Use any message-note with the parrot to get parrot with message.
Go outside and use parrot with message with the
mailbox.
A rope ladder is dropped down. Climb up. Well, if it
isn't the ferryman. Assil and the ferryman had a reunion.
Look at Osiris' sealed
crypt. Go left to side alley to exit the graveyard.
Get pass the night watchman
Go right to the bazaar and talk to Take Tut Cashum at
his betting shop. He says to talk to the pharaoh.
Talk to Volcano. Go back to the alley and forward to
talk to the night watchman in front of the palace gate. Hmm...
Go to the bar and talk to Fatima. Check the paper on
the comedian's chair. Talk to the caravan drivers. Listen to what they say.
Go outside to the Bazaar gate. Use the camel
immobilizer on the camel. Go back inside and talk to the caravan drivers again.
This time, they give money to pay the fine.
Go back to the night watch in front of the palace gate.
Use the fine on guard. Select the coffee fund dialogue. Enter the palace.
Watch pharaoh Dinar holding the Ankh talk to the
pharaoh's daughter. Later, Assil gets banished to the desert.
Chapter 4: Lies and Intrigues
Escape from quarry (alive)
Watch the 2 inept assassins leave the pharaoh in
the desert after crossing the Nile (Jordan) River.
The slave driver finds pharaoh and gets a slave.
You are now the pharaoh in the quarry.
Use the lid of the box right of the steps and pick up a tin of figs. Pick
up fork of a branch from the trap left of the stairs of the supervisor's tent.
Go up the stairs and talk to Assil's father, the quarry overseer.
Go
to the right screen and see a broken winch of the assembly line. Look around.
Go back and talk to the slave driver, mean guy with a branding iron.
Look and then pick up the
posters of the
pharaoh and the wanted poster with picture of a scoundrel, El Caravano.
Go right and up the hill until the tool shed. It is locked.
Get pass Cringer -
Climb the steps and meet the slave boss' second in command, Cringer. He would not let you
pass.
Use the tin of figs on Cringer. He gives in return, piece of bread with
honey
and sandwich paper.
In inventory, use the piece of bread with honey on a poster.
Use that poster with honey on the other poster to get a wanted poster with
the pharaoh's picture. Show the wanted poster to Cringer. The pharaoh is now El Caravano.
Go left and read the No Dancing sign on the cliff wall. Pick up a fire
stone - sharp edged stone under the sign.
Go left and up on the ladder to enter plateau. Go right and talk to Al Caponep, the
slave boss completely. Learn about his escape plan. He wants the pharaoh to prove himself first by playing a
prank on the quarry supervisor.
Win the favor of the gangster boss; Pull one over the stupid
overseer
Go left and down pass the scaffolding. Go left to the shower stall. Pick up the
towel from right stall. Pick up the soap that fell on the floor.
Go to the left and pick up the comb from the shelf.
Get the overseer out of the way - Go right and forward under the sign. In inventory use the comb and the sandwich
to make a comb with sandwich paper, a musical instrument. Use the
comb with sandwich paper in inventory. The
slaves on the scaffolding dances. The overseer gets upset and climbs to the
plateau to shout. He then goes to the well and takes a drink. Hmmm... There is
not enough time to run down to the supervisor's tent before he arrives to do
anything.
Stall the overseer - Go to the shower area and check the wheel and the well. Use soap on well and an
indignant voice shouts. It sounds like a God. The world shakes and a crack on
the plateau happens. Take note that the crack has green lines on the cliff wall. Of
course, there is now soapy water.
Repeat the use of the comb with sandwich paper under the No Dancing sign.
Now when the overseer drinks soapy water, he chokes. Immediately, go down to his
tent and topple the design the pharaoh never liked - Eiffel pyramid. Look at the
suspicious painting on the wall. Leave the tent, go up towards the broken shed and see the overseer cry because
his best design is destroyed.
Get rid of the boss' flunky
Talk to the slave boss at the plateau again. This time, he wants you to remove
Cringer, his right hand man so that you can rise in the slave hierarchy.
Roger - Go to the entrance to the airy heights back of the slave boss. Talk to Roger,
the slave that Assil freed. He is chiseling the image of the new pharaoh, Dinar.
Talk to him completely. Then select the dialogues that
states that he should chisel on the left side and that the face is chubby. Convince Roger of your knowledge by being a
pharaoh double or doing a pharaoh interview.
He will then chisel the left side which makes the stone
block uneven to one side.
Go to the right and look at the mooring rope that holds the stone. Use the sharp
edged fire stone to cut the rope. This drops the large stone block over the tool
shed.
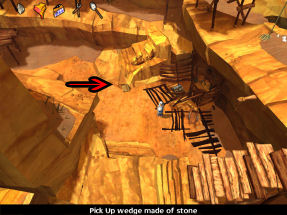
Go back down to the plateau and down to the tool shed. Pick up the shovel and the
pliers. Pick up also the wedge made of stone leaning on the rock left
of the destroyed shed.
Go to the overseer tent.
While he's still bawling, use
the pliers on the suspicious painting to reveal a hidden compartment. Pick up the
deed of ownership. Check the deed in inventory to find out that it is the ownership paper
of the slave Cringer.
Go to the slave driver
and make his day. Use the deed of ownership on him and voila! He has a new slave
that he legally owns. There goes the Cringer.
Tell
Al Caponep about items
Talk to the slave boss. He now wants several items: 2
cloths, 1 hammer and 1 chisel to use for his escape plan.
Go to Roger at the airy
heights behind the slave boss. Talk to him and continuously, ask what will cheer
him up until he gives an answer. A tasty freshly prepared meal will make him
happy.
Egg - Go to the right pass the
rope knot on the wall and
forward until the end. See a bird nest up on the ledge. Use the small fork of a
branch (taken from trap) on the nest and
get an egg.
In inventory, use the egg on the shovel to make a make
shift frying pan. Now to cook it.
Go to the desert - Go to the lower assembly
line where a broken winch is located. Use the wedge made of stone taken left of
the broken tool shed on the broken winch. This stops the assembly line stone
blocks.
Now, we can go to the other side. Go right through the
passageway and out to
the desert.
Cook the egg - Go forward until you see
a scrawny looking bush. Pick up the wrapped present in front of the bush.
It's the 'burning bush' of Moses fame. Talk to the bush and select dialogues
that make him mad. Eventually, the bush will be so mad it will burn.
Use the shovel with egg on
burning bush. Now you have a freshly prepared shovel with fried egg.
Go back to the right and
on the way see dotted lines from here to the cliff wall. This is the crack that
appeared when the godly voice of the well spoke. Click on the predetermined
breaking point (line) and get a comment about the ribbon mark as 'open here'.
Go back to Roger at the
very top of the cliff. Use the shovel with fried egg on Roger. He gives the
magnet, chisel and hammer.
Go back to the slave
boss and give all the items he asked: the towel taken from the shower stall and the
chisel and hammer from Roger.
Find
hints about door to the temple
Talk to slave boss
completely and find out the stupid escape plan.
Dinar, the fake pharaoh arrives.
He announces that he wants a search for a secret temple with a secret object. A new plan to search for the
temple to be used as an escape way is underway.
If you have not done so
- go back to the desert where the burning bush is located. Face the quarry and
see the dotted line that points to the ribbon mark of the secret temple. Talk to
slave boss about the dotted line that shows that the entrance to the temple is
behind the rock face.
Find
items that Al Caponep can combine the rope with
Talk to the slave boss
again and talk about how to find the entrance. It was decided to use the rope
and tie it to something to break this rock face. Er... the pharaoh doesn't know
how to tie a knot. The slave boss agreed to tie the knot after the pharaoh
finds where to tie the rope.
Go to the scaffolding on
the left and click on the rolled-up rope to drop it to the floor.
Go down to the ledge at
the lower level scaffolding. Look at the wobbly wedge made of wood sticking out
left of the stairs. Look at the assembly line right of the steps.
Tell
Al-Caponep about the hints
Talk to slave boss again
and tell him about the blocks of stone on the conveyor belt. He agrees to use
the assembly line blocks to open the cracks. Al Caponep ties the rope on a stone
block on the assembly line.
Find
entrance to secret temple
Go down to the lower assembly line close to the
passageway to the desert and remove the
wedge that was used on the broken winch.
See the rock face falls down to reveal the temple
entrance.
Talk to the slave boss
again. He decides to stay in the quarry. Enter the temple on the right.
Turn
on the light
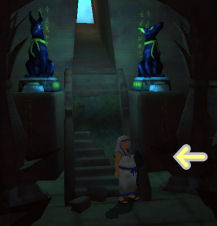
Go forward and see that it is too dark. Go back to
just below the steps and move the cursor to the right below the
steps to see a torch.
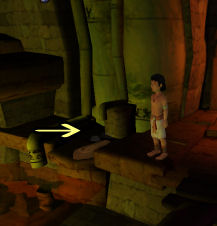
Pick up the fire stone on the steps. In inventory combine
the fire stone to the sharp edge stone to make a fire stones. Use the 2
stones on the
torch. Now we can see where we're going.
Open
the big stone door
Go forward to the far end
and see a big stone door that is close at the end of the cavern. Go back to the
steps and read the
historical text: 'When all the planets are in a row, then it is the great
birthday of the sacred Seth. His door will open and you will render homage to
him'.
Align the planets - Check the planet model
that shows various dates.
Go to the left, see the stranded Bermuda Triangle
patrol boat and a petrified diver holding a harpoon at the ceiling. Use the
magnet to pick up the harpoon stuck on the ceiling.
Look at the priest staff held by the statue and use the harpoon on it.
The pharaoh automatically clicks on the harpoon. See that it bounces off the
planet model.
Go to the right side of
the planet model and use the small box.
Look at rough stones that turns and the
pharaoh will say that it could be a grindstone. Use the harpoon on the grinding
stones to get a harpoon with sharp back part.
Use sharpened harpoon on
the priest staff again. This time when the pharaoh clicks on it, the harpoon
sticks on the planet model. The planets are now aligned. The stone door opens.
The
path is blocked! What can we do?
Go forward to see the mighty Seth and his 2 guardians. The
mighty Seth wakes up and talks to the pharaoh. The Battle of the Gods is at
hand. The fate will be decided when the stars form the constellation of the
camel.
Go to far right and see
that the way is blocked by heap of trash.
Army of Scorpion - Go back to Seth, up the
stairs and pick up the sacred urn.
Seth is upset at the pharaoh and let loose his 'army'
of scorpion. The army of one and it is 5 legged yet is on the other side of the
water flow from the cracked well.
Pick up the burial cloth in front of
Seth.
In
inventory use the sacred urn to get the beating heart of Osiris and the empty
urn.
Use the empty urn on the scorpion. Pick up the captured scorpion to
learn that it has no lid.
Go to the garbage
heap on the right and pick up the cardboard lid of a Call a Couscous box. Use the couscous lid
on the urn with the scorpion. Pick up the sealed urn.
Weasel - Talk to the well at the ceiling. Talk twice to the slave boss. He sends down a
provision of
peanuts.
Go left of the altar area and pick up the root
sticking down the floor. This made a hole on the floor.
Look at the tunnel underground and see a weasel stuck
in a hole on the left. Use peanut on the hole and the weasel digs to the right
hole.
The next hole is filled
with water from the well. Use the burial cloth on the leaky spot of the well to stop the
flow of water.
Go right and take the loose stone on the floor to
reveal another hole on the floor. Use another peanut on the exposed hole to get
the weasel to this hole.
Use the sealed urn on the hole to join with the
weasel. Watch the fight-chase.
There you go, an environmental cleanup. Exit to the
right.
Oasis - At the Banana
cultivation area, the pharaoh sees the
deadliest weapon against him - bananas. He rests after his ordeal.
Assil, Thara
and the intrepid Trio arrive and see the pharaoh taking a much needed shower.
The group talks about the threat to the world of the living if Osiris takes over. They
decide to work together.
Take
along the right equipment
As Assil, talk to the
pharaoh and he will give items to Assil. Assil's inventory now has the statue
of Seth, heart of Osiris and the stone table wrapped present. Use the
present in
inventory to get the 11th Commandment. Thou shalt not take all this
stuff too seriously.
Talk to Thara to get the trophy
to be used to carry the heart of Osiris. It needs to be packed well.
Talk to Thara again about relationship and get nowhere.
Safely
transport the heart of Osiris
Pick up the pillow
from the bed and the scoop from the cauldron outside the tent.
Go to the pool and see the
sharp edged shell. Since Assil doesn't like water, use the scoop to get the
sharp edged shell.
Use the shell on the pillow to get cloth rag. Use
cloth rag on trophy to get cushioned trophy.
Use cushioned trophy on the
heart of Osiris to get trophy with heart of Osiris. That's it!
Exit the oasis and be
back at Cairo.
Chapter 5: The Big Game
The merry troop is on their way to Take Tut Cashum to
give him the heart of Osiris. They are met
by Dinar. He takes the trophy with the heart of Osiris.
The Arabian ambassador takes the trophy and will
present it to the winner of the big game.
Let the Big Game decide. The troop decides to help
Moses' team, the Nile Crocodiles to win against the Cairo's Pharaohs.
At the arena, Dinar has
somehow prevented Moses from playing. Assil is lowered to the catacombs.

The Soccer game must be won
Pick up the hanging
rope and the message bottle from the water. In inventory, use the
message bottle to get message in a bottle and an empty bottle. Check
the message in a bottle to see the different room underground. We are presently at
stairs at lower left.
Combine the rope with
the statue of Seth to get a grappling hook. Use the grappling hook with
the grating on the left. Enter the floodgate.
Note that you can change characters by clicking on the
pictures at bottom right of screen.
Sewage room - Use door to enter the sewage
room.
This is the next room in the message-map. Go right and see the mudfall from the drain. In the map, there's a room a path behind this
mudfall. The
other drain in the map connects to a crocodile. Go left and cross the bridge. Look at the
pipe on the left - it s a drain from above. Go through the door to the room of
doors.
Room of Doors -
Note that there are 3 doors but 4 entryways. Read the sign above the entryway
back to
the sewage room. The left goes to the prison, the middle one goes to the
bridge and the right goes to the wheel-weight room.
Bridge room - Use
the middle door (right of sign) and see that the bridge goes to a duct cover. Look in
the map and see this to be the right drain of the 2 shown at the sewage room
drawing. Exit.
Prison room - Use the
door on the left and then click on any 'use' place to open the door to the
prison.
Check the first room and pick up the shackles from the
hanging skeleton.
Talk to the prisoner at the next cell.
Talk to the prisoner behind the door with high
security lock. It is Gemotep, the fruit vendor that helped Assil to escape in
Ankh 1. He needs a fine tool to escape.
Go to the far end and see a giant gearwheel next to
another prison cell. Exit the prison.
Wheel-weight room - Use
the door on the right. Look at the map and we are now at the room at the bottom.
This room is connected to the cellar on the far left side.
See a big weight beside the entryway. On top holding one of the ropes is a spring that is out of reach. To the
right of the entryway is a bell missing its clapper.
Open
the soccer goal all the way
Gate control - Go left and see a lever held by a chain and a big
wheel attached to the gearwheel in the far end of the prison room. Use the lever
and see it moved a bit only. The Nile Crocodile soccer goal is raised a bit.
Hmmm....
See a cutscene that
shows the Cairo Pharaoh's goalie defending the opponents (Nile Crocodiles) goal.
The goalie is the guard
that saved the princess from the bat. The princess waves to her lover. See the dignitaries at the VIP area.
VIP area - Change to Thara by
clicking on her picture at bottom right of screen.
See that the Arabian
ambassador, Dinar and the princess are here. The trophy, mocha coffee machine and mocha cup
are on the tables.
Talk to the princess
about having a crush on the goalie until the princess gets Dinar to raise the
goal gate.
See a guard remove the chain from the lever. The guard
talks to a prisoner to continue biking to raise the gate. The prisoner is tired.
The guard looks for a whip to give incentive to the prisoner.
Invigorate the prisoner - As Thara, pick up the mocha cup
and use it with the mocha machine to get cup with mocha coffee. Go to the floor
drain behind the chairs. Use the cup with mocha coffee on the drain-gully. Try to leave the
VIP area and will be called back by the ambassador. She can leave only during
halftime.
As
Assil, go back to the sewage room (door under the sign at the room of doors) and look at mocha coffee stain under the pipe
left of the bridge. Hmm... Use the empty bottle on the mocha stain under the pipe.
Change back to Thara.
Use the cup again on the mocha machine. Use the cup with mocha on the
gully-drain again.
Back as Assil, pick up
the bottle with mocha coffee.
Go back to the prison. Talk to the prisoner at right
cell close to the wheel. He is still tired. Use the bottle with mocha with the
prisoner. The prisoner gains energy and starts biking. And off I go!
Wheel-weight room - Go back to the
wheel-weight room (right door at the room of doors). The guard is still looking for a whip at the cellar.
Use the
lever and the gate is raised. The weights are lowered.
Soccer game must be won
Pick up the spring
on the weight rope on the right and uh oh! The weight falls and the gate slams down broken.
Only Moses can save the game now.
Prison - Go to
the prison (left door at room of doors) and give the spring to the Gemotep, the escape artist
behind the door with big lock. He opens the
cell door with the big lock.
You can answer Gemotep to go to the cellar or give him the
map.
If you give him the map, he gives a spoon in return.
If you send him to the guard, he gets caught and an
automatic half time is called.
Find
Moses before it is too late
Wheel-weight room
- Use the spoon (if you have it by giving the map to Gemotep) on the bell with no clapper right of the door. That signals
game half
time and the changing of the guard.
Or if Gemotep got caught, an automatic
halftime is called.
The guard at the cellar leaves.
Palace kitchen storeroom-cellar - Go to the
left entryway and end up at the cellar of the kitchen. The elevator lever is not
powered right now.
See the polar cat on box at right wall. Pick up the polar cat and it drops inside a sack.
Pick up cat in a sack.
Change to Thara. It's
now halftime and she can leave the VIP area. Go to the kitchen.
Kitchen - Hear Olga scream that she hate cats.
Thara, the kitchen hand is told to wash the dishes.
Pick up the washrag and use on dirty dish. See that they are now clean dishes.
Use the lever left of the water sink so that it powers
the elevator.
As Assil, use the lever
of the elevator and rise to the kitchen level. Use the cat in a sack on the
yellow hook hanging
at center of the elevator.

As Thara, use the
lever of the crane at the center of the room. Watch Olga versus the cat.
Use
the elevator door and see Assil. Use the lever and Assil and Thara go down to
the cellar.
Prison - Move both of them to
be at the room with doors.
As Assil, go to the
prison and enter the former cell of Gemotep.
Find another way - Look at the break on the wall that Gemotep
started. In inventory use the shackle with the 11th Commandment tablet. It makes
a great wrecking ball.
Use the shackle with the 11th commandment on the hook
hanging in front of the hole on the wall. Use it again and see it break the
wall.
Enter the cell where
Assil was imprisoned in Ankh 1. Use the door to the canal.
Canal - Go forward ot the left screen. Enter
the abandoned catacombs.
The crocodile dreams of Assil,
a dentist getting ready to do maybe a root canal. It wakes up and finally sees
Assil. It skedaddle out of here. Take a look at the picture of Mrs. Crocodile and the denture.
Go to the top of the screen, then left
and click on the water where the croc is located. Go forward using a creative stepping stone.
Machine room - Go left to the bridge on the
other side of the drain cover seen earlier.
Use the door to walk the bridge and
get the door to move to the other side. The door closes the sewer drain on the left. Aha!
The
secret entrance below is revealed. Try to move Assil and he states that if he does
so, the door will close.
As Thara at the room with
doors, use the door under the sign and enter the sewage room. Go forward
until you see the revealed secret entrance.
Enter and exit out -
oh my, at the Nile Crocodiles locker room. Look around and talk to Moses, the
Croc's soccer striker. He's a gecko (ginkgo) at the moment.
Get Moses to play
Substitute booth-Trainer's bench
- Exit the locker room to go to the tower at top of screen and enter the room left of the guard.
Talk to the Croc's coach completely as a reporter from Cairo Times. The trainer was
forbidden by the pharaoh (Dinar)
to use Moses as a substitute Ask about Moses and find out that if Moses is
given anything round, he will kick it. Aha!
Grandstand - Exit to go to the tower and climb the stairs. Talk to the 3 revolutionaries.
Look at the steel drum behind the guys; that is a musical instrument that
brings sunshine even a rainy day.
Go up the stairs and
see 2 statues flanking the stairs. Take a look at the one on the right with
its hands up in the air.
Fruit stand -
Talk to Bakish, the former desert merchant turned fruit merchant. Try to buy
the melon cost 1 silver. The melon is round (think Moses).
Look at the stand and the poorly attached big melon
floating above the stand.
Exit the grandstand
and when Thara enters the building-tower (trigger), a cutscene is seen. The Arabian ambassador
facing that huge melon balloon decides that he wants fruits. Bakish leaves his
stand and fruits on a tray are delivered to the VIP stand.
Bring Thara back to
the stand but Bakish returns too fast.
Prepare a miracle - As Assil, leave the bridge, pass the abandoned
catacombs and to the canal. Climb the ladder to go to the tower. Climb to the top and be stopped by the guard. An admission ticket
is needed.

Go back down the stairs and ladder. Continue on to the
right, old cell, prison, room of doors, right weight-wheel room, cellar, up the
elevator and get
to the kitchen. Exit and go to the throne room. Look at the plate
holder behind the throne.

Go right to the VIP box behind the throne. Pick up the
fruits off the fruit tray. The Arabian ambassador asks for new fruits.
As Thara you should be
by the fruit stand now. See Bakish leaves to deliver new fruits. Pick up the
green
melon from the stand.
Croc's locker room
- Go down the stairs and enter the entryway on the left. Use melon with Moses
and as the trainers states, he becomes soccer alert. Moses kicks the melon.
Substitute booth-Trainer's bench
- Moses rushes to the trainer's bench and argues with the coach to put him in
the game. The fans see Moses.
Get Thara to talk to the coach to convince him
to let Moses play. Finally, the coach relents and drops the plank to let Moses
down to the field.
Eliminate the treacherous assassins
The assassins block the way of Moses. The fans
seeing the soccer superhero go wild. The revolutionaries say that only help
from above can win the game.
See divine help arrive: beams of light from above
reflect from the steel drum of the 3 revolutionaries to the throne room.
Divine help helpers - As Assil, take the fruit bowl.
Go to the throne room and use the fruit bowl on the plate hook on the back of
throne. The beam is reflected back to the other side of the arena.

Go down to the VIP box. Take a look at where the beam
of light from the plate bounces to at the other side of the grandstand - the
statue with his hands up the air.
As Thara, go to the
grandstand. Go down the steps and talk to the tailor. Select the dialogues
that convince him that he doesn't need the glasses. When he takes it off, he
sees clearly now. He gives the glasses to Thara.
Go up to the fruit stand.
SAVE GAME HERE for dialogue replays. Use the glasses
on the statue at right with hands upheld. Watch the beam burns the weak wood
holding the tent and the giant melon. The melon falls down, rolls and takes
the 2 assassins with it.
Moses is ready to
play. Watch!
The trophy is awarded to the winner but Dinar has
other plans for it.
At the Temple of Osiris, the ending at the VIP box
depends on the dialogue chosen.
This
document may not be distributed without express written permission of the author
and the content may not be altered in any way.
For
Questions or Comments on this Walkthrough,
Please write to:
MaGtRo
Copyright © 5/2007
MaGtRo
 GameBoomers
Walkthroughs and Solutions
GameBoomers
Walkthroughs and Solutions