| |||||
| |||||
OUTSIDE THE FACILITY | |||||
| Search the jeep to find a jack handle that can be used to break the padlock on the gate. | |||||
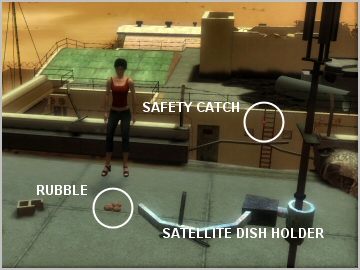
| There's a fire escape ladder on the wall of the main building to the left, but you cannot reach it. Note the red safety catch holding it in place. | |||||
| A section of the barbed wire (above the green waste container) is missing. Move both brown crates out the way to get to a safety brake on the right of the container. After releasing the brake, push the green container to the side. Now move either one of the brown crates to below the missing section of barbed wire. By standing on the crate you can climb up onto the first level. From there climb onto the green metal platform, grab the ledge above and make your way around to another green metal platform. Continue along the green metal platforms to where you can climb onto the roof. | |||||
| Note that the fire escape ladder is visible from certain areas. Rotate the broken satellite dish holder until the concave section faces toward the fire escape ladder. | |||||
| |||||
| Pick up some rubble, then while holding it, use the satellite dish holder as a 'catapult' to shoot at the safety catch and release the ladder. | |||||
| Go back down and climb up the ladder onto the roof of the main building. There are two large holes in the roof. Push the box into the first hole, then move the pipe across the hole and climb through it. After crossing the first hole, kick the rubble lying in front of the second hole into the hole and then climb down into the admin office. | |||||
LOADING BAY AREA | |||||
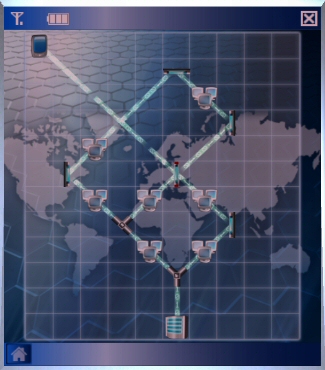
| The door leading to the loading bay has a code lock on it. Use your PDA to hack into the secretary's computer. Note that the fixed mirror in this network puzzle is also a double mirror. | |||||
| |||||
| After downloading the files, read them to learn that the secretary was advised to 'reverse the dates' for the codes she uses. Look at the secretary's wedding photo on the desk nearest the door, noting the date on it. After doing this the 'Wedding Date Reversed' option will be activated when you try the code lock. | |||||
| Make your way along the metal walkway, then grab the top of the metal shelves below and swing to the left until you can drop down onto the crates on the floor. Look around to see a key card lying on the edge of the left hopper in the ground. Try picking up the key card and you fall into the hopper... | |||||
| ...exit the room and go to the kitchen. Take the meat hook hanging on the wall. Also, move the table and climb on it to reach the stick of gum on the top shelf. | |||||
| After entering the men's locker room the door locks behind you. Take the can of engine oil from the fifth locker from the left. Hack into the admin PC with the PDA to deactivate all the electronic locks. Again note that the fixed mirror is a double mirror. | |||||
| |||||
| Go through the door at the far end of the corridor and down the stairs to the next level. There's only one room that you can enter. | |||||
| Note that if you haven't got the hook, piece of gum and engine oil you should do so before entering the room. This saves you having to come back to fetch them later when they are needed. | |||||
| After entering the room, someone shuts the door behind you. Try opening it to trigger the cut scene with 'Fingers' and Maynard. | |||||
CENTRIFUGE AREA | |||||
| Talk to Maynard to find out all about him and Anna Maria. Climb through the hole in the ceiling to get to a large hall with a roller system for moving the hoppers about. | |||||
| The control panel on the wall next to the hole operates the overhead block and tackle. When you try using it you learn that the chain (to the right of the control panel) is rusted. Pour some engine oil on the chain to fix the problem. You are now able to use the controls to move the block and tackle over the hole and then lower it through the hole. Attach the block and tackle to the bullhorns on top of the safe with the hook, then again use the control panel to lift the safe onto the roller system. | |||||
| The control panel at the opposite end of the hall is used to operate the roller system. Try the control panel, only to find that it doesn't work. The loose wires in the front of the control panel can be joined with the piece of gum, but the control panel still won't work. Talk to Maynard about the control panel and he fixes it the good old fashioned way! | |||||
| |||||
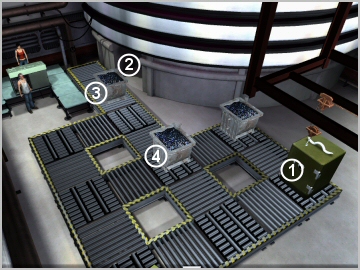
| You need to move the safe, marked (1) in the diagram, to the centrifuge entrance, marked (2) in the diagram. To do this, the hoppers marked (3) and (4) in the diagram, must be moved out the way. | |||||
| The complete sequence of moves is: | |||||
| |||||
| Get Maynard to help you push the safe into the centrifuge. | |||||
| All you have to do during the rather dramatic cut scene is to push the button on the control panel. | |||||
| After the explosion, enter the centrifuge to pick up Maynard's keys and the plastic folder lying on the floor. With the goons on high alert, the only way out is to unlock the heavy blast door with Maynard's keys. Go up the stairwell to the next level. | |||||
LOADING BAY AREA | |||||
| Open the door on this level and closely watch what happens. Take note where Nico stands to avoid being seen and that the guard kicks the door to secure it against the door catch. Pour some engine oil onto the door catch and turn off the lights at the switch on the wall. | |||||
| |||||
| Now go through the door and then into the elevator room. After entering the elevator room, lock the door with Maynard's keys to prevent the other goons from coming in. Someone left the elevator key in place, so turn the key and make your escape... | |||||