 |
Move the numbered tiles. 1 2 4 6 11 12 9 10 7 1 4 2 3 6 8 4 3 6 2 1 4 7 9 10 12 4 2 1 5 |
 |
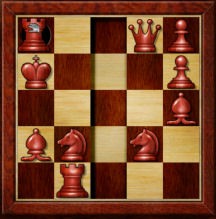
BROKEN SWORD: SHADOW OF THE TEMPLARS - THE DIRECTORS CUT
by Revolution Software
Walkthrough by MaGtRo April 2011
Gameplay: This is a third person point and click game.
The main menu has continue, restore game, new game, options and quit.
The options menu has restore game, save game, audio, screen resolution, credits, purchase music and language (flag) icon.
The audio options are volume adjustments for sound effects, music and speech.
The screen resolution selections are for full screen, original and augmented.
The language (flag icon) has subtitle language, subtitles, speech and speech audio language selections.
At the bottom of the gameplay screen, 4 icons are seen:
Wrench icon accesses the gameplay menu to save game, options and quit.
Bag icon has inventory items.
Diary icon has the gameplay synopsis of what has been done.
Question mark has puzzle hints. There are several hint stages until a spoiler is stated.
Active spots are shown by flashing blue circles when the cursor gets close to them.
Exit arrows are seen at edge of screen when all necessary actions have been done in that room.
The left mouse button does the action while right mouse button examines the item.
Items can be combined by click-hold-drop of one item over another.
Dialogues can be skipped by left click.
Use the blue back arrow at bottom of screen to back out of close up or dialogue.
To walk, guide the character by clicking where you want the character to go.
At the map, move the cursor over a flashing ball and see the name of that location at top of the page.
PARIS
Palais Royale
Nicole Collard is sent by her editor to interview Pierre Carchon, one of the most powerful men and is a known womanizer. On the way to Carchon's apartment, Nico is stopped by a mime. Mme. Imelda Carchon, the ice queen lets Nico in.
Carchon knew Nico's father. While talking to the Carchons, a sound of vase smashing is heard. Carchon goes to investigate. A gunshot is heard. Nico runs to check and sees the mime over the body of Carchon. The mime punches Nico.
Upon waking, Mme Carchon leaves the room to call the police.
Carchon's study:
Examine the murder site: Look around.
Look close at the curtain and Nico slides the curtain to show a circular cut on the glass door.
Use the door handle to open the door. Nico walks to the ledge and checks the area.
Inside, check the bust and the bookcase.
Examine Carchon's body: Look close at Carchon's body.
Pick up Nico's hairclip left of Carchon's head.
Click on Carchon's eyes and Nico closes his eyes. Click it again to open the eyes.
Click on Carchon's coat to see the wound. Click on the wound and note that Carchon has been shot.
Take the boat ticket stamped Bateaux de la Conciergerie. Exit the room.
Hallway:
Table: Look close at the table. Take the lace cloth and see a small hole on the table. Examine the cloth in inventory and see that it has an unusual symbol.
Click-hold-drop the hairclip on the hole when the yellow light flashes. The secret compartment opens.
Examine-right click the key in inventory. Take the safe key.
Easel: Check the easel on the left of the table. Examine the painting done by Imelda. Take the tube of paint.
Imelda was on the phone. Talk to Imelda completely. Select any choice; the result will be the same.
After convincing Imelda that Nico should investigate the crime; Imelda gives the drawing room key.
Drawing room:
Go right to the locked door right of the study. Use the drawing room key on the door lock. Look around the room.
Safe: Check the painting above the fireplace. Click on the button left of the painting and hear a click.
Click the painting again to see a safe. Use the key taken from the table at the hallway on the keyhole.
Check the stone cylinder and learn that it is a printer's block covered with symbols. Nico needs to see what the symbols are.
Desk: Check the desk at right side of the room.
Check and take the elephant on the desk. It is a carved elephant made by Nico's father - Thierry Collard. So Carchon really knows Nico's father well.
Make a print of the stone cylinder:
Examine the blotting paper and the paper tray on the desk.
Do either one of these actions:
Use the paint tube on the paper tray at right. Use the stone cylinder on the paper tray with paint to get stone cylinder with paint.
Combine paint tube and lace cloth in inventory. Use the paint covered cloth with the stone cylinder to get stone cylinder with paint.
Use stone cylinder with paint on the blotting paper. Take the coded message from the blotter pad.
See that the message has Sub Judice, lines and SDSSDSS etched on ornate background.
Nico deduced the connection between the message and the ticket. Sub Judice refers to a case under the jurisdiction of a court. The ticket goes to Île de la Cité where the ancient law courts are located.
Nico has seen this kind of' crime before. She has coined the name Costume killer.
Hallway:
Exit the room and go to Imelda. Talk to Imelda.
Île de la Cité
Quayside:
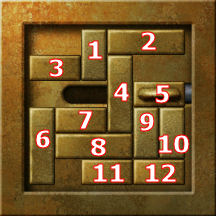
Check the boat and the 2 grilled gates. Go to the right side and see the other staircase and another grilled gate.
Examine the plaque on the left side of the grilled gate. Note that it is similar to the lace cloth in Carchon's apartment.
Look close at the grilled gate. See slider locks on the sides of the gate.
Click hold on a bar and move it either horizontally or vertically.
The solution shown below shows which bar to move. Move the bar as far as it goes.
Left lock: Move the lock to the left side by getting the bars out of the way.
| |
Move the numbered tiles. 1 2 4 6 11 12 9 10 7 1 4 2 3 6 8 4 3 6 2 1 4 7 9 10 12 4 2 1 5 |
|
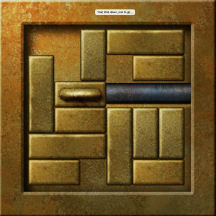
Right lock: Move the lock to the right side by getting the bars out of the way.
 |
Move the numbered tiles. 8 4 1 2 3 5 9 2 3 1 4 9 11 12 7 9 10 12 9 5 11 3 10 4 10 3 6 |
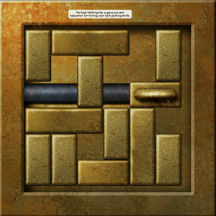 |
The gate falls down.
Grotto:
Enter the grotto. Click and examine the fallen gate. It serves as a bridge.
Check the broken skiff propped on the grill wall. Click to push it.
Take the shell case on the ground exposed by the fallen skiff.
Open the door: Check the door and see that it is locked.
Look close at the panel right of door. See that there's a hole at center and the Latin words for left (Sinister) and right (Dexter)).
Using the clue seen on the print of the stone cylinder; click on the left or right buttons.
Insert the stone cylinder on the hole.
Click S D S S D S S or click on buttons: left, right, left, left, right, left and left.
The door opens.
Take the stone cylinder back from the hole.
Antechamber:
Look around. See a cross at the middle wall and a small panel left of the open exit door.
Hold the cross up: Check the cross and click to lift it up. The exit door closes and the panel left of door opens.
Release the cross and the door opens and panel closes.
Lift the cross up again and use the shell case on the cross. That holds the cross up.
Small panel: Examine the now opened panel.
There's a hole at center. Use the stone cylinder on the hole.
Hear a sound like a mechanism trying to open but is stuck.
Left closed door: Check the left closed door and see that it is stuck. Nico checks the bottom of the door. She needs something thin.
Take the shell case from the cross. The cross is held up by something.
Take the stone cylinder from the panel and the cross drops and the door opens.
Examine the threshold-step by the open door and read the inscription.
Place the shell case on the threshold-step.
Raise the cross and it crushes the shell case.
Release the cross and pick up the flattened shell case.
Raise the cross again and use the flattened shell case on the cross. That holds it up.
Place the stone cylinder on the panel left of door to hold the cross up.
Take the flattened shell case from the cross.
Use the flattened shell case on the left jammed door.
Hidden chamber:
Enter the dark chamber.
Go back close to the antechamber and see a flashing panel on the wall.
Click to turn on the circuit breaker. Get light.
Look around and click on the flags - Fascist regalia. Ah.
Check the desks and see them covered in dust.
Desk: Look close at the desk at left that is clean of dust.
See a folder about Nico. It has pictures and information about her.
Check the coffee cup. Someone was here recently.
Check the newspaper. They are all about her articles on the Costume killer. Learn that Nico reported that those killed were known do-gooders. Nico found out that they are the opposite. The killer of the murders in Italy and Japan killer wore a costume.
Drawer: Open the right drawer and automatically get a coded message.
Take the drawer and it pulls out completely.
Check the space left by the drawer and get a cut picture of Carchon. It was taken in Africa when Carchon led an army to quell a rebellion. The natives where all killed.
Coded message: Examine the coded message in inventory.
It is a substitution cipher puzzle. Using the frequency and location of the symbols on the message, replace the symbols with alphabets.
Click on a symbol from bottom of the page and click on the matching red letter of the alphabet.
The coded message will show the change from symbol to alphabet.
If an error is done, the left single arrow will erase the last entered symbol.
The double arrows at right will erase all the entry.
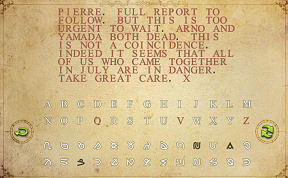
So Nico is not the only one that made a connection between the Costume killer and the murders.
Nico's apartment:
Nico is in her apartment. Nico gets a call from Ronnie, her editor and learn that the article about the murders that will bring her fame was spiked.
Nico gets another call; this time from a mysterious man named Plantard wanting to meet her tomorrow at Cafe de la Chandelle Verte.
George in Paris Cafe
George Stobbart is at a sidewalk cafe in Paris. He fell in love with the city. A man with a briefcase enters the cafe following the waitress. A clown appears behind balloons. The clown enters the cafe. He replaces the briefcase with his accordion and runs out. The accordion explodes and destroys the cafe.
Cafe de la Chandelle Verte:
Enter the cafe and look around.
Look at and examine the dead old man. Check the mirror on the left.
Waitress: Check and talk to the waitress at left. She wants brandy. Don't give her any yet.
Learn about Plantard, clown and the briefcase.
Exit the cafe. Take the newspaper at the base of the lamp post.
Read the newspaper and click on Salah Eh Dinn 1345. Click on other news in the paper.
Police: Go down the street towards the worker and be stopped by a policeman.
Back at the café, George is questioned by Inspector Rosso while Officer Moue looks around.
Answer all the questions truthfully.
Inspector Rosso believes that George is telling the truth; gives his calling card and lets him go. Hear that Rosso is interested in psychic detection.
Talk to Inspector Moue outside.
See Nico taking pictures of the destruction. Talk to Nico about the characters and the newspaper. Learn that she was to meet Plantard here and about the costume killer.
Nico gives her phone number and tells George to call if he has news.
Alley:
Go to the archway at right side of the screen. That is where the clown ran to.
Look around to see if there is any sign of the clown.
Check the manhole cover. George cannot lift it. Exit the alley.
Workman: Go to the workman down the street. Talk to him completely. Learn about Plantard.
George gives him the newspaper. Flobbage reads the newspaper. Learn that Salah Eh Dinn is a good race horse. The workman leaves to bet on the horse and gives George permission to check his toolbox.
Open the box inside the tent and get a T-shaped tool.
The box by the dirt pile is a phone. Use it if you want to call Nico.
Sewer:
Go back to the archway across the cafe.
Use the T-shaped tool on the manhole cover. George lifts the cover.
Go down the sewer. Look around.
Take the red clown nose on the floor. Examine it in inventory. Learn that inside is written La Risée du Monde, Paris.
Go further up on the path. Pick up the soggy tissue from the floor.
Take the scrap of material stuck on the grill fence right of the ladder.
Climb the ladder and be in a courtyard.
Courtyard:
Talk to the porter completely. Learn that he met an intruder earlier. He is not cooperative.
See the inventory on the screen. Click on Rosso's calling card and George shows it on the porter. He becomes helpful.
Learn about the clown, waitress and briefcase.
Show the porter the scrap of material from inventory. He gave the coat to a Romanian seamstress to fix the torn sleeve. Learn that the tailor's label inside the coat he found is Todryk and he remembers the phone number as 74 98 08 59.
Automatically exit the courtyard.
Street:
Use the phone beside the dirt pile of the workman.
Select Todryk. The tailor is not cooperative.
Select Nico. George tells Nico he found some information. Nico invites him to her apartment at 36 Rue Jarry.
Nico in Search of Clues.
Rue Jarry:
Nico says that she needs to search for clues. Look around the apartment.
Check the shelf left of the window. See a picture of Nico's father.
Check the answering machine on top shelf.
Check the stereo. You can change the music.
Open the chest at the foot of the bed at right. See the box with a carved elephant on the lid. It was made by Nico's father and is a match with the elephant taken from Carchon's desk. There is no key to open the chest given by her father.
Exit the apartment.
Talk to Fleur, the flower lady. Learn that Nico's cousin was in her apartment yesterday. So that was how Plantard knew about the article. Nico's apartment is bugged.
Exit to the left and see the map.
Cafe de la Chandelle Verte:
Click on the cafe in the map. Go left until the cafe.
Talk to the carpenter who is the brother of Flobbage, the street workman. Learn that the street workman won big in a horse race.
When the carpenter poses for his picture, enter the cafe. Look around.
Look close at the mirror at left. Click on the image of the item lodge between the pipes.
Pull back and look behind the table. Take the item between the pipes. It is Plantard's belt pouch. On the pouch is the cross of Carchon's organization.
Open the packet to get a metallic artefact and coded message.
Examine the metallic artefact to see that it is etched with a sword over the scale of lady justice.
Examine the coded message in inventory.
Coded message #2: Examine the coded message in inventory.
It is a substitution cipher puzzle. Using the frequency and location of the symbols on the message, replace the symbols with alphabets.
Click on a symbol from bottom of the page and click on the matching red letter of the alphabet.
The coded message will show the change from symbol to alphabet.
If an error is done, the left single arrow will erase the last entered symbol.
The double arrows at right will erase all the entry.
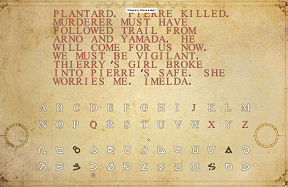
So Imelda is in on it also.
Exit the cafe. Go up the road towards the workman's area and then go right to exit the area.
Quayside at Ile de la Cité:
Automatically be at the quayside. Enter the grotto at right.
Enter the antechamber and open the door at left.
Raise the cross and prop it with the shell case.
Insert the stone carving on the hole of the panel left of the closed door.
Enter the hidden chamber.
Hidden Chamber:
Examine the Lady Justice painting on the wall above the first dusty desk at right.
See a hole right of the painting.
Examine the key taken from Plantard's packet and see the etching - Lady Justice.
Use the key on the hole right of the Lady Justice painting.
The safe opens. Take the pieces of photograph from top shelf.
Pieces of picture:
Nico places the pieces on the dusty desk.
Put together the photograph by click-hold-drop a piece to fit another appropriate piece of the picture. Oh no! It can't be.
It is the other half of the torn picture taken from the desk on the other side of the room.
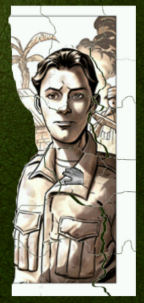
After completing the picture of Thierry Collard in Africa, Nico takes the pieces again.
Nico returns to her apartment.
George in Search of Clues.
Rue Jarry:
Talk to Fleur, the flower lady. Learn about Nico. Learn that Nico cries at night; someone watches her and how to open the building door. Learn about flowers and fortune telling.
Enter Nico's apartment building.
Talk to Nico. George updates her with what he found out. Talk about Nico and the clown. Learn about the murders of Arno and Yamada.
Show her all the items found in inventory. She also noted the address inside the clown nose.
The sodden tissue has greasepaint on it. Show her the material.
Nico gives a photo of the killer taken when he came out of the courtyard. The killer has a horseshoe shaped (or crescent moon) scar on the temple and wears pants made of the same material taken at the sewer.
Back out using the blue arrow to leave the apartment.
Go left on the street to access the map.
La Risée de Monde:
Select the costume shop - La Risée de Monde.
Talk to the shopkeeper. Ask about Plantard and the clown.
Show him the nose.
Show him the soggy tissue and verify that it has theatrical greasepaint.
Show him the killer's picture and he identifies him as Khan. He bought greasepaint this morning. Khan rented Bozo the clown and Seamus pixie costumes.
When done, the shopkeeper asks to shake hands. LOL. He gives a shock buzzer.
Cafe de la Chandelle Verte:
Jump to the cafe.
At the workman's area, use the phone by the dirt pile to call Todryk again.
After telling him Kahn's name, learn that he delivered the suit to Hotel Ubu at the second room on the right side of second floor.
Hotel Ubu:
Jump to the new location - Hotel Ubu.
Talk to the 2 gangsters guarding the entrance to the hotel.
Enter the hotel and look around.
Lady Piermont: Talk to the Lady playing the piano.
Learn that she is a widow. She finally found the man that she has been waiting for all her life but he was only toying with her affection. The man's name is Moerlin.
Show her the picture of the killer and learn that that is the man that spurned her.
She is eager to assist George in stitching Moerlin up. Moerlin is not at the hotel right now.
Moerlin gave the clerk documents to place in the safe.
Nobel Prize winner: Talk to the man reading the newspaper.
Show him the picture of Khan. Learn that he knows Moerlin.
Moerlin's room: Go upstairs and check the middle room. It is room 22. Check room 21. Both doors are locked.
Desk clerk: Go downstairs. Talk to the desk clerk about everything.
Show him Khan's picture.
Try to pick up the key on wall at end of the front desk.
Talk to the clerk again about the key and Khan. It is for room 21 and the room is empty.
The clerk is afraid to help.
Get the key: Talk to Lady Piermont about room 21 key. After learning that it is the room next to Moerlin's, Lady Piermont is eager to help.
Watch Lady Piermont at her arrogance.
Take room 21 key.
Room 21: Go upstairs and use room 21 key on the first door at right.
You can search the room if you want. Exit through the window and walk the ledge to the next window at right.
Room 22: Enter the room. Search the drawer at right, bed and automatically the briefcase. The briefcase is empty.
Check the closet. Exit the room and see Moerlin coming back to the room. Automatically George hides in the closet.
Watch Moerlin change pants.
Pants: Look close at the pants. Examine both pockets. They are empty.
See a side seam sewn up with a special stitch and strong thread.
Turn the pants over by clicking on the top of the open zippers.
Check the left back pocket to get a matchbook and automatically pull a thread with a metal tag out.
Click on the metal tag seen at left side of the waist band. This pulls the thread and unravels the stitch on the side seam on the front side of the pocket.
Turn the pants over by clicking on the middle top of the waistband.
Check the unstitched side pocket to get a pass card. It reads: Thomas Moerlin, Gruber Electronics.
Check the matchbook in inventory. It is from Club Alamut.
Back out and exit the room. Go downstairs.
Get the stolen documents: Talk to the desk clerk.
Show the clerk the pass card. He still would not let George to what is in the safe.
Enlist Lady Piermont again. Show her the pass card twice.
Watch Lady Piermont at her best. George is given an old manuscript.
Exit the hotel: Try to exit the hotel and George says that the gangster might be waiting for the manuscript.
Go upstairs to room 21. Exit through the window.
Use the manuscript on the ground below.
Climb back in and exit the room. Go downstairs and exit the hotel. See George searched by the goons.
Enter the alley at left. Pick up the manuscript from the ground.
Rue Jarry:
Automatically be at Nico's apartment. Talk to Nico about the clown and Nico.
Show Nico the manuscript. The official seal of the Knights Templar has 2 men on one horse.
Watch the history of the Knights Templar.
Look at the manuscript. Click on the center seal of the men on a horse.
Click on the man and a bull at top left. There's a gem on a tripod between them.
Click on the man weaving with a ship on the background at top right of the manuscript.
Click on the knight with a crystal ball and some Latin words at bottom left. The words are "Through my teachings, you will be enlightened".
Click on a woman with a mirror at bottom right. The mirror's reflection shows 3 hideous faces.
Nico recommends seeing Lobineau at Crune Museum.
Musee Crune:
Jump to Crune Museum. Enter the museum at right.
Talk to the security guard and learn that Lobineau is not here. Look around.
Examine the tripod at center of the floor. It is the tripod seen on the manuscript between the bull and man. There is no jewel though. It was found at Lochmarne in Ireland.
Check the window mechanism and the guard wants the window closed.
Check the wobbly totem pole and the sarcophagus.
Exit the museum.
Rue Jarry:
Go to Nico's apartment. Tell Nico about the tripod.
Learn about Professor Nigel Peagram. Nico wrote an article about Peagram. Learn that Peagram resigned his position at the University to concentrate on his dig.
Learn that the costume killer's victims were here in July.
Pull back to exit the apartment. At the street, go left to see the map.
Click on the airport red arrow at top right to go to Ireland. Click on Ireland flag.
LOCHMARNE, IRELAND
George drives pass the castle where the archeological dig is done. George gets off the bus in front of the pub.
Mac Devitt's Bar:
Liam MaGuire: Talk to Liam MaGuire, the boy leaning beside the door of the pub.
After some blarney; learn about the castle and ghost. Peagram is not here. Show Khan's picture to Liam.
Check the panel on the lower wall and the grilled trapdoor left of the pub door.
Enter the pub.
Sean Fitzpatrick: Talk to the nervous young man sitting on the table drinking alone.
See a box on the table, He denies working at the dig. Ask about Peagram.
Old man: Go to the old man at top right. Talk to the old man. Learn about the ghost (MaGuire) and the blue wire. Show him Khan's picture and learn that he cannot see without his glasses.
When he turns his head or drinks, take the blue wire he is playing with.
Mike Leary: Go to the bar. Take the green towel at right end of the bar.
Talk to owner-bartender completely. Show him Khan's picture.
Pat Doyle: Talk to Pat Doyle the man sitting on the bar closest to George. Buy Doyle a drink to lubricate his brain box. Learn that Fitzpatrick was at the dig last week. Show him Khan's picture.
O'Brien: Talk to O'Brien at the corner. Learn about Templars, tripod, Peagram, the gem and Leary. Show him Khan's picture.
Sean Fitzpatrick: Talk to him again after verifying that he worked at the dig site. Learn about Peagram, the package and Jacques Marquet.
Frightened, Fitzpatrick takes the box on the table and runs out the bar. Hear a crash. MaGuire comes in and says that Fitzpatrick was run over.
Liam MaGuire: Exit the bar and talk to MaGuire. MaGuire relates how a red Ferrari runs down Fitzpatrick. See that the jewel flies off and drops through the trapdoor on the sidewalk. The driver dressed as a pixie picks up Fitzpatrick and takes off.
Talk to him again about the pixie and Fitzpatrick.
Panel: Look at the panel on the wall left of the door. The cover is off now. George pushes the switch and breaks it.
Check the trap door and learn that it is locked from the inside.
Get to the bar cellar:
Enter the bar and talk to Leary the bartender. George orders a beer.
The beer pump is broken. Ah - the pump is controlled by the switch George snapped off outside.
Glass washer: See the glass washer shaking at the back of the bar. Ooops - it stopped also. George volunteers to repair it. Leary says George is not an electrician.
Show Leary, the electronics pass card taken from Khan's pocket. Leary allows George to fix the glass washer.
If you haven't yet, take the blue wire from the old man at right. Use the blue wire on the electrical plug on the wall right of the glass washer and left of Leary's hand. The glass washer works.
Trap door: Go down to the cellar and see that it is dark.
Use the lever that unlocks the trap door outside. Hear grating of metal.
Go outside and pull on the trapdoor. Now there is light at the cellar.
Khan: Khan arrives and asks about witnesses to the accident and a small box.
Jewel: Go back down to the bar cellar. Automatically get a flashlight and the blue gem.
Faucet: Use the faucet. Use the towel from the bar on the running water to get water soaked towel. Turn off the faucet.
Get to dig site:
Exit the bar. Go right by the fence right of MaGuire.
Look around at the castle gate. See a stack of hay on a trailer by the castle wall.
Hay man: Talk to the hay man completely. George volunteers to watch that no one climbs the haystack.
Castle wall: Climb the haystack to top. See a crack on the wall.
Use the metal T bar in the crack. Climb up over the wall.
Goat: Go to the ladder on the ground and get butted by the goat.
Go to the left and move the part of a plough to bar the goat. Down goes George again. The goat's rope gets entangled on the plough.
Go down the ladder to the dig site.
Dig site:
Look around. Take plaster of Paris from the sack on the table.
Check the door, the 5 holed panel of the left of door and the statue on the floor.
Statue: Look close at the statue. Move the statue and it overbalanced to the sand.
Lift the statue upright and see 5 holes on the sand made by the back of the statue.
Use plaster of Paris on the pattern in the sand.
If you haven't used the bar towel on the faucet at the cellar - do so now.
Use the water soaked towel on the plaster of Paris on the sand.
Take the plaster cast.
Door: Use the plaster cast on the panel left of door.
The door opens. Enter the secret chamber.
See a panel with Montfaucon and a hanged man.
Paris again
Nico in Paris
Nico's apartment:
Message machine: Check the blinking message machine at top shelf left of the window.
Hear the editor, George about the gem and Imelda. Imelda is to meet Moerlin tonight. Uh Oh!
Palais Royale:
Check the intercom and door of Carchon's apartment.
Enter the apartment: Look and click on the broken window of the apartment.
Look at the sculpture in front of the apartment.
Click on both bases of the wires holding the sculpture. Nico unhooks the wires.
Push the sculpture and it leans on the wall. Climb up.
Check the plastic sheet of the broken window. Use the bullet case on the plastic sheet.
Click on window to enter the study.
Imelda: Exit the study and enter the drawing room at right. See Imelda.
Moerlin was dressed as a cavalier. She knows Thierry.
Look close at Imelda. Open the locket and take a tiny key.
Nico's apartment:
Bug: Open the chest at foot of bed and Nico sees the bug. She disposes the bug.
Thierry's box: Look again at Nico's father's box.
Use the tiny key taken from Imelda on the keyhole.
See the picture of Imelda. It is the middle piece of the torn photograph. She is between Carchon and Thierry in Africa.
Read Imelda's letter to Thierry. Learn that Thierry is a government spy.
The next morning, George updates Nico. George wants to know more about Montfaucon and the picture of a hanged man. Nico advises him to check the Crune museum and Rosso.
George in search of Montfaucon.
Poste de Police:
Leave Nico's apartment and click on the Poste de Police in the map.
Talk to Sergeant Moue completely. Learn that Marquet is known to the police as the Mole of Montmarte and is presently at the hospital. Show him Khan's picture.
Exit the police station.
Hagenmeyer Hospital:
Select hospital from the map. Enter the hospital.
Talk to Dr. Hagenmeyer standing by the door.
Receptionist: Talk to the receptionist. Learn that Marquet is here.
Tell her that you are not related to Marquet.
Show her Khan's pass card. Learn that Marquet has been asking for Moerlin.
After checking the computer, the receptionist says that Marquet was moved to J-2, Nurse Grendel's ward. Learn about Nurse Grendel.
Mr. Shiny: Go to the left hallway.
Talk to Sam, the janitor.
Go left on the left hallway. Nurse Grendel tells you that you are not allowed here.
Exit the ward. Try to open the red door left of the janitor.
Pull the plug of Mr. Shiny off the wall. The janitor goes around and plugs Mr. Shiny back on.
When able, open the red door left of Mr. Shiny. Automatically George takes the white coat and wears it.
Nurse Grendel: Go back to the ward at left. Talk to Nurse Grendel.
Nurse Grendel gives a blood pressure cuff and tells you to take the BP of the patient Eric Sopmarch.
Learn about Marquet and his room.
Talk to the first patient Mr. Sopmarch. Try to take his BP and he is not satisfied.
Exit the ward to go back to the hallway.
Benoir: Go right of the janitor to get back to the lobby.
Talk to Dr. Hagenmeyer. He tells George to take care of Benoir his nephew, a recent medical school graduate.
Talk to Benoir.
Go back to the ward at left hallway and left again by the janitor Sam.
At the ward, go right at foreground pass the first patient Eric Sopmarch. The patient stops George because he has not finished taking his pressure.
Give the blood pressure cuff to Benoir. Tell him to take Eric Sopmarch's blood pressure. If you like take Nurse Grendel's BP first. :)
Marquet: While Benoir is doing that, go right at foreground. Talk to the guard in front of Marquet's room.
Enter the room and see a very sick Marquet.
Talk to Marquet and George tells him about having the jewel. The Hashshashin was stopping him from reforging a sword. Marquet wants you to bring the jewel to the Grand Master. Learn that Flap and Guido are going to steal the tripod and are working for him. Klausner is in Syria on a wild goose chase.
A doctor orders George out of the room.
Benoir returns the blood pressure cuff. Hear a cardiac arrest sound from the room.
The guard shoots the door open. They find the window open and Marquet dead.
Nico's apartment:
Automatically be at Nico's. Talk to Nico about Marquet.
Crune Museum:
Talk to the man leaning on the case under the window.
Learn from Andre Lobineau about Montfaucon and Peagram. They had a meeting in July. Andre will study the manuscript at Nico's place. Learn about the Templars. George warns him about the tripod. The Hashshashin is the source of the word assassins. Learn the location of Montfaucon.
Show him Khan's picture and the matchbook. Alamut is where the assassins are located.
Hide in the museum:
When the guard is looking away and is standing far away; open the window mechanism left of the window.
The guard will close the window. Immediately go to the sarcophagus and George will open it and enter.
See the 2 thugs try to steal the tripod.
Click on the wobbly totem to stop the thieves. The top hits George unconscious. A costumed person drops from the skylight and kicks the thugs.
Nico's apartment:
Talk to Nico about what happened last night. It was Nico that saved the tripod.
Learn about Andre's excitement about the manuscript.
Montfaucon:
Travel to Montfaucon and be in front of a cafe.
Gain entrance to hanging site: Talk to the policeman sitting at the sidewalk cafe.
Talk to the juggler performing by a manhole. George tries his hand juggling and drops the balls.
Check the manhole. We have to get rid of the policeman and juggler to get to the manhole.
Show the red nose to the policeman. The policeman gives a tip in juggling as a clown.
Click the red nose on the juggler. George asks to juggle and performs wearing the clown nose. George is a hit.
The clown leaves. George picks up the red ball left behind. The policeman leaves also.
Use the T-shaped bar on the manhole cover. Enter the manhole.
Underground canal: Look around and see a boat with a crane and 3 doors.
Go around the corner left of the doors. See a locked door with a skull and a painting of a hanged man.
Go back to the right and check the 3 doors. The left door states this is where the gallows used to stand. The middle has the word Templiers.
The right one is flaking. Use the T-shaped bar on the door at right and sees a mechanism inside the wall.
Use the lever on the mechanism through the hole George made. The door is jammed.
Use the crane on the boat and George unravels the chain.
Take the hook at end of chain. George automatically places it on the jammed door and winds the chain. The door is now completely destroyed. Enter.
Meeting: Look around.
Check the light coming through the cave wall at middle far end of the cavern.
Listen and watch the meeting of neo-Templars. They are out to take over the world.
See the Nobel Prize winner seen at Hotel Ubu reports about the Broken Sword. They want to reforge the Sword of Baphomet. They are looking for the sword. One of the leaders is the doctor that killed Marquet.
One of the components is the Lens that Klausner has located. He is in Syria.
Meeting area: Go down the stairs after the neo-Templars leave on a boat.
Look close at the circular pedestal and the stand that the world leaders stood on.
Click on the Latin words: I shall not die completely. The brighter from the darkness.
Place the tripod on the stand. It fits.
Place the blue gem on top of the tripod. It lit letters M A R I B.
Nico's apartment:
George updates Nico. Marib is a village in Syria.
The gem is left with Nico and the tripod will be returned to Andre Lobineau at the museum.
Marib Syria
Bazaar in Marib:
Click on the red arrow of the airport on the map. Click on the Syrian flag at right.
Nejo: Talk to the boy watching his stand.
Pearl Henderson: Talk to the woman tourist from Akron, Ohio at the other shop. She's looking for something ancient to take home as souvenir.
Duane Henderson: Talk to Pearl's husband, Duane. While talking to Duane, George realizes that the knight in the manuscript is not holding a crystal ball but a lens.
Arto the Kebob seller: Try to talk to the kebob seller. Note that he bastes his kebob once in a while.
Carpet seller: Climb the stairs right of the kebob seller. Check the carpets.
The big one at center looks familiar. Click the matchbook on the carpet seller. He takes the matchbook and opens the hidden entrance.
Bar Alamut:
Ultar: George talks to Ultar, the taxi driver guide.
Show Khan's picture to Ultar. Learn that the assassin was asking for George and Klausner.
Learn about Bull's Head where Klausner went a week ago.
Talk to him completely. Say yes to going to Bull's head.
He wants 50 bucks to bring him to Bull's Head.
Toilet: Check the locked door at right. Click on the sign on the door. Check the spittoon left of the door.
Talk to the bartender. Learn from the taxi driver that the bartender does not have a tongue.
Talk to Ultar about sign. Learn that the toilet door sign states that the door will be opened when the new toilet brush is returned.
Get the toilet brush: Exit the bar and go down to the bazaar.
Talk to Arto the kebob seller. George notes that his baster is the toilet brush.
Talk to Nejo the boy and ask for his help. Give him the red ball.
Nejo tells George to tell Arto the Kebab seller some Syrian words.
Go to Arto and tell him the words Nejo mentioned.
Arto chases George. Go back down to the bazaar and talk to Nejo.
He gives the toilet brush.
Return the toilet brush: Go back up the stairs and through the carpet.
Give the toilet brush to the bartender. He gives the toilet door key.
Talk to Ultar and learn what the Syrian words mean.
Toilet: Use the toilet key on the toilet door.
Check the mirror and the toilet towel dispenser. Use the toilet key to open towel case. Take the toilet towel.
Check the toilet chain above the commode. The toilet chain is removed from the tank.
Get a ride to Bull's Head.
Get old artefact: Go back to bazaar and back to Nejo. See that he is throwing the ball on the door.
Pet the cat and it will jump to top shelf.
Ring the bell beside Nejo. The door opens and Nejo's father steps out.
The open door diverts Nejo's ball and hits the top shelf scaring the cat. The cat jumps off and pushes the statue off the shelf.
Pick up the statue from the ground. It is broken. Show the statue to Nejo.
In inventory combine the soggy tissue with greasepaint with the broken statue. Now it looks like it's made of marble.
Get money: Show the altered statue to Pearl. Talk to Pearl completely.
Show the statue to Duane. Duane buys the altered statue for 50 bucks.
Talk to Duane completely. Show him Khan's picture. Duane takes George's picture. That's strange.
Get taxi: Go back to Club Alamut.
Give the 50 bucks to Ultar and select yes.
George leaves the toilet keys on the bar.
Talk to Ultar by his army truck. The fan belt is broken.
If you haven't taken the toilet towel yet, do so now.
Give the toilet towel to Ultar. He places half of the towel on truck and returns the other half to George.
Bull's Head:
A binocular follows George through his travel to and trek up Bull's head.
Hole in the ground: Check the hole on the ground at edge of the mountain. See a crack on the rim of the hole.
Take the branch off the tree.
In inventory combine the branch with the towel. Use the rolled towel on branch on the crack of the hole's rim.
Go down the hole.
Hole on the wall: Examine the hole on back wall. Click on the hole twice. The entrance opens.
Templar hideout: Enter and see Klausner's body. The door closes.
Klausner: Look close at Klausner's body. Check the bottle, whip, body and then jacket.
Take the lens from the jacket's pocket.
Stone map: Look close at the stone map at left shelf. George memorizes the Latin words.
Statue: Look at the statue at right shelf. Right click the statue to note the 3 heads.
Khan: Hear the door opening. It is Khan.
Outside, talk to Khan and answer him truthfully. He translates the words of the stone map. It is a clue where the Sword of the Baphomet is located.
When the time comes, shake hands with the hand shock buzzer. Watch George escape.
These explain the left top part of the old manuscript.
Crune Museum:
Talk to Lobineau about the manuscript. The knight is Spanish and the crest is of the Vasconcellos family.
SPAIN
Villa de Vasconcellos:
Click on the red arrow of the airport on the map. Click on the Spanish flag at left.
George looks at the seal above the arch.
Lopez the gardener: Talk to the gardener. Say no to lottery. He refuses to let George in the house.
Get to see Countess Vasconcellos: Go left to the side of the house. See that the garden hose goes into a window of the house.
Use the pressure cuff on the garden hose. George moves to the right. Lopez warns George that he will set the dogs on him if he enters the house.
Lopez enters the house. Follow Lopez.
Click on the suit of armor and see that it is big enough to hide him.
Go to the hallway right of the armor to let Lopez thinks that George is with the dogs.
Immediately hide behind the armor after the dogs bark.
As soon as Lopez is down the hallway to check on the dogs, climb the stairs.
Countess de Vasconcellos: Talk to the Countess completely.
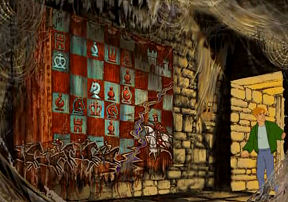
She shows the old chess set that is from the time of the Templars. One piece is missing.
George noted that the bases of the chess pieces are irregular.
Lopez arrives to warn the Countess.
Mausoleum: The Countess brings George to the mausoleum, the structure dates also to the time of the Templars.
Inside look around and click on tomb at right. There are 5 Vasconcellos Knights Templar. Ask about the knights. There are 6 but one is missing.
Check the altar and George removes the bible. The bible is over a checker board. Talk to the Lady again.
After convincing the Lady about the relation of the chessboard and the chess pieces, the Lady orders Lopez to get the chess set.
Talk to the Lady to learn about the curse and the history of Don Carlos the missing Knights Templar.
Chess set: After getting the chess set from Lopez, George places them on the altar chessboard. They fit.
Black chess pieces: See the black pieces on the side of the chessboard.
Click on the base of a chess piece and see 4 colors.
Click on a chessboard square and see 4 colors.
The aim of the puzzle is to place the pieces on the correct squares on the chessboard by matching the color under the chess pieces and the squares of the chessboard.
White chess pieces: 3 white chess pieces are now on the side of the chess board: the bishop, knight and the queen.
The aim of the puzzle is to place the pieces in position to hold off the black pieces and to checkmate the black king.
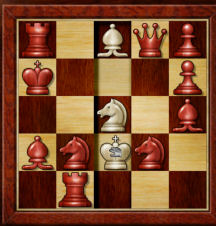
When the chess puzzle is correctly done, a secret panel on the wall opens.
The Lady takes the Vasconcellos communion chalice out.
These explain the top right part of the manuscript.
Nico's apartment:
George updates Nico. Show Nico the Vasconcellos communion chalice.
George has promised the Lady to find the missing Don Carlos, the 6th Knights Templar.
PARIS 3
Montfaucon:
Talk to the policeman who is supposed to be undercover watching for Sewer Jacques (George). :D
Read the plaque on the side of the steps.
Climb the steps to enter the Church.
Priest: Talk to the priest. Show him the tarnished chalice and he will polish it.
Knights' tomb: Look at the knight tombs on the wall and floor.
Glass Windows: Check and click on all 3 windows.
Statue: Click and study the statue beside the priest.
Click on staff with a disk and scroll.
Use the lens on the scroll. It fits.
Click on scroll and George reads the Latin verse on it. We saw this verse before.
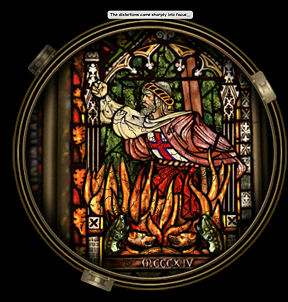
Glass window: Click the lens-scroll to look through the lens.
See a distorted part of the glass window.
Click-hold-move the tabs to different positions to focus-align the glass window parts.
Use the lifted hand and Roman numeral date at bottom as your guide.
It is a burning knight with 1314 as date on the bottom.
Priest: Talk to the priest again and he gives back the shiny clean chalice.
Learn that the chalice has an etched coat of arms similar to that seen on the tomb of the Knight by the wall closest to the window.
Talk to the priest to verify that the Latin verse means what is seen on the old manuscript.
Don Carlos de Vasconcellos: Go to the tomb on the wall by the window.
George verifies that the Pegasus on the coat of arms is the same.
Bible references: See the close up of the plaque on Don Carlos' tomb.
There are bible references (book, chapter and verse) inserted in the plaque.
The aim of the puzzle is to find them.
Click-hold-move the cursor over the verses to highlight it.
When all are found George will say so. George also notes the numerals surrounding the verses.

Exit the church and go to map left of the policeman at the cafe.
These explain the bottom left part of the manuscript.
Crune Museum:
Talk to Lobineau. Ask him about the 3 headed statue seen in Syria. Learn about Baphomet.
There is one Baphomet figure found here in Paris. The location is now in the map.
Site de Baphomet:
Jump to the new site left of the map.
Painter: Talk to the painter smoking a cigarette.
He remarks that the visitors to the site are well dressed. Show him the picture of Khan. He was here asking questions also.
Entrance to dig: Enter the building. Look around.
Check-right click the thermostat and see that it is way high.
There's a lock door behind the guard and a phone right of the guard. There is a locked bathroom across the guard.
Guard: Talk to guard and find out that he raised the thermostat to keep warm. He has gloves if his hands get cold.
Talk to the guard completely.
Get the door key:
Ask the guard to use the toilet. He gives the keys.
Use the key on the toilet door. Enter and look around.
Make a copy of the key: Take the soap on the sink. See a close up of the soap.
Use the keys with the soap and get an imprint.
Use the plaster of Paris with the imprint.
Click on the faucet handle on the background. George wets the plaster.
Click on the hand dryer on the background. George dries the plaster.
Now there is a plaster key in inventory. George mentions that it does not look like the real thing.
Exit and return the key to the guard.
Paint the copy of the key: Go outside. Click the key on the paint can beside the painter. He is not cooperative.
Go back inside and use the phone right of the guard. Automatically call Nico. George asks her to keep the painter on the phone for a while.
Go outside and tell the painter about the phone call.
Use the plaster key on the paint can to get it painted metallic.
Return the keys: Go back inside.
The painter does not want to talk to the woman on the phone anymore.
Ask the guard for the keys again. Go back to the toilet.
Combine the plaster key with the key ring. George says it doesn't feel like a real key.
Exit the toilet and lower the thermostat. See the guard wear his gloves.
Return the key.
Distract the guard:
Use the phone again and ask Nico to call back and ask for the painter.
The guard answers the ringing phone. He goes out and talks to the painter. A lively discussion ensues.
Enter the building. Use the key on the locked door.
Baphomet: See the dig site. Climb down to the floor.
Click on Baphomet's head. Then click on Baphomet's base. George noted that the pattern doesn't make sense.
Place the shiny Vasconcellos chalice on the start of the pattern by the base of Baphomet.
See a close up of a church with a square tower reflected on the shiny chalice. Exit.
These explain the bottom right part of the old manuscript.
Nico's apartment:
Talk to Nico. Show her the shiny chalice. George decides to go back to Countess de Vasconcellos in Spain.
SPAIN 2
Lost children:
Lopez: Talk to a now friendly Lopez completely. Learn that the Countess laughs more.
Show the chalice to Lopez. The idea of where the lost children is discussed.
Countess: Enter the house and climb the stairs.
Talk to the Countess. George shows the chalice. George brings up the matter of the lost children; finding Don Carlos' tomb and the bible references.
Bible references: Go down to the garden.
Go to the mausoleum by clicking right of the big tree with orange blooms. Take the bible.
Go back to the Countess at the house. Give the bible to the Countess.
The references relate to: hiding place, well is deep, bring light into hidden things and save me from the lion's mouth.
Bring light into hidden things:
Go back to the mausoleum. Look around.
Check the candle on the chandelier. It has never been lit.
Use the soggy tissue with greasepaint on the long pole leaning by the altar.
Automatically George lights it on the candle on the altar and lights the candle on the chandelier.
The open window snuffs the flame of the candle.
Click on the open window and George closes the window using the long pole.
Use the soggy tissue on the pole again. The chandelier candle is lit again and shortly after melts to reveal a complex shaped key.
Well is deep:
Dowsing: Talk to Lopez at the garden. Ask about the old well that should be around the courtyard.
Talk to Lopez several times while he's thinking. Learn about dowsing.
Lopez points to a hazel tree. Check the hazel tree left of the large tree with orange blooms. It has no Y shaped branch.
Go to the left side of the house where the garden hose enters the window. Check the small tree beside the window. George gets a Y shaped branch.
Show the branch to Lopez. He tells how to use the divining rod. Watch George dowse.
George finds a tin can. Lopez throws the tin can and it falls in the old well.
Save me from the lion's mouth:
George goes down. See the lion's head.
Check the lion and George says the fangs are separate pieces.
Sound is heard. The lion breaks in pieces to nearly hit George.
Hiding place:
Click on the dark area exposed by the lion.
Climb back up and ask Lopez for a flashlight.
Go back inside the house and take the mirror above the faucet in the small room left of the stairs.
Go back down the well. Use the mirror on the well's wall. :)
George sees a socket at center of the door.
Use the complex shaped key found in the candle on the dark door.
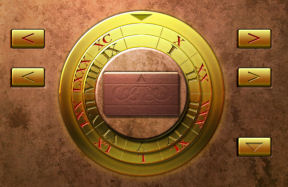
Dial: See a dial with Roman Numerals on 2 wheels.
There are 4 arrows at the side.
The top left and right arrow turns the outer wheel and the bottom left and right arrows turn the inner wheel.
There is an arrow at top of the dial where the selections are positioned.
The down button at bottom right enters the selection.
Above the wheel see the numerals entered.
When all the selections have been entered, press the central button inside the wheels to submit ALL the selections.
The numerals to be entered are the ones found surrounding the bible references on the tomb plaque of Don Carlos.
Enter these numerals in this order:
1. XIV: Outer wheel - X; inner wheel - IV. Press the down button at bottom right.
2. XXVII: Outer wheel - XX; inner wheel - VII. Press the down button at bottom right.
3. VI: Outer wheel - blank; inner wheel - VI. Press the down button at bottom right.
4. LXXXI (numeral taken from diary): Outer wheel - LXXX; inner wheel - I. Press the down button at bottom right.
5. III: Outer wheel - blank; inner wheel - III. Press the down button at bottom right.
6. I: Outer wheel - blank; inner wheel - I. Press the down button at bottom right.
7. XVII: Outer wheel - X; inner wheel - VII. Press the down button at bottom right.
8. XII: Outer wheel - X; inner wheel - II. Press the down button at bottom right.
9. XXV: Outer wheel - XX; inner wheel - V. Press the down button at bottom right.
Press the button inside the wheels.
Secret chamber:
Enter and see the children. One child is holding the missing chess piece.
George looks at a checker board on the wall.
George returns the missing chess piece.
Andre is in Nico's apartment. They discussed the clues.
Bannockburn England
Train:
Nico and George are on the train to Stirling, England. Across them is an old woman.
Talk to the old woman. Show the woman all the items in inventory.
Try to exit through the door.
The porter asks for the ticket.
Exit the compartment.
Go left to the next car. See Guido out for a smoke and blocking the rest of the train.
Go back to the right to Nico's compartment and see that they are not there.
Go left and enter the next compartment. Talk to the man in striped shirt about Guido and Nico.
Open the window and exit to the top of the train.
Go to the right and down the metal rungs of the baggage car.
Watch the fight between the old woman-Khan and one of the neo-Templars.
Pull the train stop cord at top left of the door behind George to stop the train.
Khan is mortally wounded by Eklund the fake doctor-train porter. Learn about the sword of Baphomet. The sword is energy from the earth.
Untie Nico. Exit through the left door.
St. Ninian Church, Stirling:
Nico and George walk towards the ruins of St. Ninian. The bag left by Khan is filled with C-4.
The church was an old army dump in the English civil war.
Open the door: Look around. Check the door and the inscription.
Check the rubbish pile several times to get clay pipe, old metal coin, small cog and spindle and plastic pen top.
Check the mechanism left of the statue. The handle comes off. Take another cog and spindle from the mechanism.
Look close at the statue left of the door.
The demon has his mouth opened. Place the handle in the demon's mouth.
Place one cog-spindle in one eye socket and the other cog-spindle in the other eye socket.
Automatically, George turns the handle and the door opens.
Cellar: See powder kegs on one side of the room. The torches are lit.
Go to the door. Hear chants coming from the doorway.
Cavern: Enter the cavern and see the neo-Templars chanting.
See Baphomet statue framed by 2 blue pillars. See Inspector Rosso.
Eklund catches Nico and George. Listen to the Grand Master.
The Grand Master asks George to join them.
Watch what happens to Rosso and Eklund.
Nico and George try to escape but stopped by Guido.
Take the lit torch and throw it on the powder kegs at foreground.
Nico uses Khan's bag.
The Eiffel Tower
This document may not be distributed without express written permission of the author and the content may not be altered in any way.
For Questions or Comments on this Walkthrough,
Please write to: MaGtRoCopyright © 4/2011 MaGtRo