BARROW HILL: Curse of the Ancient Circle
by Shadow Tor Studios & Matt Clark
Walkthrough by MaGtRo April, 2006
(updated 10-16)
Gameplay: Barrow Hill is a point and click adventure game.
The main menu has new game, load, save (during gameplay), options, credits, quit and resume (during gameplay) selections. The options menu has inventory descriptions, help and resume game after saving selections. The main menu can be accessed at top left of screen during gameplay. There are 10 saved game slots which can be overwritten. The refresh selection is for updating the saved game list when a saved game file is added manually to the game folder.
The inventory items are seen when the cursor is moved at top or bottom of screen. The inventory items at bottom of screen are used at specific places. The items at top right of the screen can be used anywhere-anytime during gameplay. The items placed at top middle of the screen are items that are made. Moving the cursor over an inventory shows the name of the item. Plants can be collected only when the basket is obtained.
The cursor changes to show what action can be done. If an item can be interacted with using an inventory item, the cursor changes to a hand with a tool.
NOTE: This game is non-linear. You can check things anytime or anywhere until a trigger opens up another area of progress. This walkthrough is just one sequence of gameplay. There are also random events that can be done anytime during game; examples are phone calls to Emma and dialogues with Ben. The meeting with the Sentry rock can also occur randomly - so watch out!
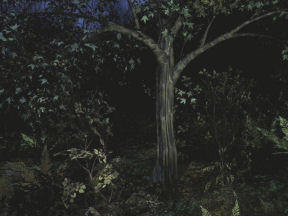
A car drives from modern civilization to the ancient woodlands of Cornwall. The radio is tuned to Emma Harry of Barrow Hill Radio. It is the 12 hours of darkness of Autumn Equinox. Suddenly, the car stalls.
What happened?
West of Gas Station
Turn around and see that a film barrier between the 2 standing stones does not allow passage back. You are kept in. Turn around to walk forward up the road. At right of car, check the white mushrooms.
Go forward pass the narrow road sign and see a structure at right. Enter right, right again to look at the faded etched stone slab beside the structure. We cannot read it. Try to enter the structure. It is dark in there. Turn around and go back to the main road.
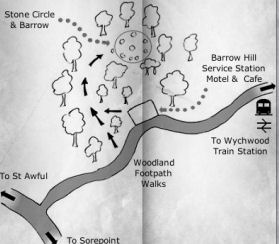
To the left are steps to enter the woodlands. We'll check it later. The other path to the right is another entrance to the structure on the right.
Go forward until 2 red reflectors are seen left on the road. Turn left and see a tree. Go forward and see some red berries behind the tree. Go back to main road and continue forward to the Service Station.
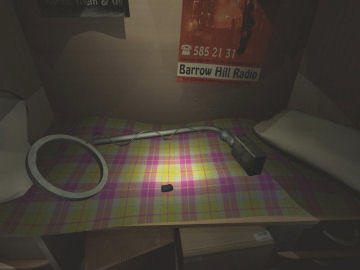
Motel: See a red mail box left of the motel. Take and read Elsie's postcard to Marianne. Go forward and see the service station. To the left is the Motel. Check and see that there are 3 locked rooms. At one end is a fruit juice vending machine.
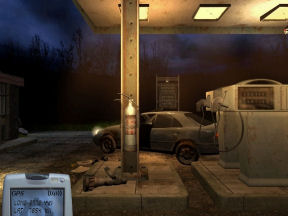
Forecourt - Gas pumps: Look close at the idling car with lights on in front of the gas pumps.
On the ground by the passenger side of the car is an Omega 3 Regeneration Hair Tonic - Marine Enhanced. Beside it is a lump of something.
Go around the front of the car and see items on the ground - shoes, papers, toys, crayons and another lump of something. Pick up a and click again on the blue crayon to place it in inventory.
Look close at the lump of something on the right. Take the Cornish Fungi Kingdom book. Turn around and see inside the empty cafe through the windows.
Rest rooms: Turn left and go forward to the rest rooms left of the Barrow Hill Motors. Enter the Ladies and look around - mirror, sink, dryer and fan. Sit on the toilet if you want to. See the poster for Stop deeding the seagulls and Antiques at Adventure Land by the door.
Enter the Gents and look around. Take the matches on the toilet cover. Exit.
Service station building: Enter the service station building. Look around and examine everything.
Office: Hear a voice coming from the office on the left. Knock on the office door. Talk to Ben, the attendant. He's very scared. What was it? Searching, standing there. Stay away from the Barrows! Listen to his ramblings as you look around. Note: Visit Ben every now and then and he randomly give clues.
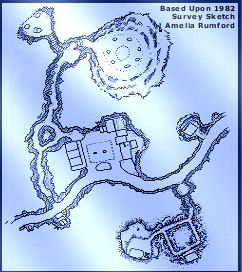
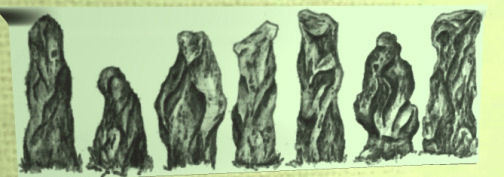
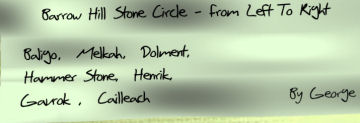
Hall: Look close at the tack board at other end of the hall. Below the colored picture of the standing stones of the barrow is a black & white picture of the standing stones. Click on it to turn the paper to the other side. Barrow Hill Stone Circle (from left to right) - Baligo, Melkah, Dolment, Hammer stone, Henrik, Gavrok, Cailleach. George the manager of the Service Station drew the picture.
Read about the Barrow Hill Circle on the left and about Megalithic Cornish sites at right side of the tack board.
Postcards and leaflets - Turn left and look at the different postcards. St. Anneka's well is the structure we saw on the way here.
Read the Myth & Legends leaflet by Elsie Prestidge to learn about Mogred, Ballen and the demon.
Read the Pagan & Wiccan Magic to learn about fairies & sprites, crystals, elements, different seasons and the mystical mushroom - Dryad Slumber. Take note of the colors to bring life to spells: red and orange for fire, yellow and brown for earth, green for water and blue for air. Combine colors for maximum effect. During Autumn Equinox, the Celtic Gods walk among us, observing and receiving gifts from the land.
Turn around and look close at the window counter. There's an Altar stone jigsaw puzzle laid out. Put it together if you wish.
Cafe: Enter the cafe and look around at all the tables. There's a salt shaker on one table. Read the 'Arthurian Legends' in a magazine at far table and M(aggie)'s letter to Ben.
Check the menu board. Go behind the counter and take a bite out of a tart or perk a coffee, if you please. The tack board has cards for Bab's cabs - 0503 265636 and Edward Briss' pasties - 0503 444222.
Check the cash register and read the note under the cash register by G(eorge) to Ben who is hiding in the office. Take note of the lock code for room #2 of the motel. The code is random. The * and # keys resets the lock. The cash register is locked. Turn left and enter the kitchen.
Kitchen: The kitchen is dark and the light switch left of door does not work.
Lantern - Turn left from light switch left of door and look close at the yellow lantern. There's an empty match box beside it.
Move the lever on top to pump the lantern and then pick up the lantern. Move the dish. See an action cursor at the nozzle of the dish. Click on matches at lower left of the inventory bar. Take a match and strike it on matchbox. Move the flame to the nozzle of the dish to light the lantern. Click on lit lantern to place it in inventory.
Fuse box - Turn around from lantern table and look close at fuse box. Open the fuse box and note that #4 is the kitchen lights.
Flip the red button at the bottom to turn off the power. Click on the fourth panel to pull it out. Click to open the panel and see that there's no connection. Click on wires inserted at top left. Click again to extend wires and click once more to wrap wire on the connection of the 4th panel. Close panel and flip the button below the panel. There's light now.
Look around the kitchen. There's a padlocked door on the left of the fuse box. Go forward to the stove. The ranges can be turned on. Turn right and see across the sink is an area with knife chopping board and mortar pestle. Below right, on the floor is a waste can.
Radio - Above the sink is a radio. Turn on the radio, use the right knob and listen to different settings - Music or Bingo, toothpaste, Celtic Corner and other commercials at 7.5. Hear that the shampoo - Omega Regeneration is marine enriched. Horoscopes are heard at 12.24. Tune to 15.3 BHR to hear Emma Harry. Clues can be garnered from the radio. The phone number of Emma Harry- BHR 585... Because of static, the rest of the numbers cannot be heard completely.
Click on the Venetian blinds to see the telecommunication tower outside.
Corner - Turn right and go to the corner cabinet. Open the top cabinet and take the basket. Below the cabinet is a box of Sandstone egg cups. Open the box and take the egg cups. Go around, check things and note a blender beside the light switch by the door.
Office: Exit the kitchen and listen to Ben rambling in the office. Talk to Ben again. (Dialogue can be random). Hear about 'it's tracking you' and about the 'others just coming'. They've been awoken. Talk to Ben again. It happened after the power surge with Conrad running out in his jeep. The rocks, the rocks are alive.
Exit the building and go across the forecourt to the motel.
Where are the people?
Motel: Enter the motel through the steps right of the motel and by the picnic table (looks familiar). All the rooms are locked.
Pete Aston's motel room 2 - At room 2, enter the code seen on the note under the Cafe's cash register.
Enter the assistant archeologist's room. Check everything in the room.
Look close on the desk at the foot of the bed. You can turn on the radio and tune in on Emma Harry at 15.3, BHR. A call by Ben to Emma can be a random occurrence and if it is heard.
Open the green tool box and take the trowel. Read the letter at the box behind the tool box. Open the right drawer and take the mobile phone with low battery. Read the letter in the drawer.
Journal - Look at bed and read Pete Aston's journal. First pit is around Melkah. Test pit 2 is around Gavrok. Baligo stone is where pit 3 is located. Dolment stone is by pit 4. Pit 5 is by Hammer Stone. Cailleach stone is by trench 6. Henrick is close to pit 7. A pot is recovered beside each stone. There's a sentry stone at the outlying Menhir. Learn about the protesters, Conrad's PDA and GPS. Room 1 is the archeologist's storeroom. Learn about St. Anneka's well.
Look close at the side table. Place the cell phone on the charger. Hey, that is a sound of a speeding transport. Who was that? If you exit, you will not see anyone. Go back to room 2 and check around some more. Take the recharged mobile phone. Read the letter and note that Conrad Morse lost his hip flask of whiskey while digging.
Look close at the map on the wall. Note the layout of the service station building. There's a backyard and a clearing beside the Barrow Hills Motors. There's an area below the road east of the service station and further down the road is another structure. Above the motel is the way to the archeological site and the standing stones. There are 4 stones on the path and 7 standing stones at the circle. There's also another set of stones at top left. Exit the room.
Woodland: Go to the picnic table right of the motel. Enter the woodland on the path right of the picnic table and lamp post. Turn on the lantern to see well. Go forward until a 'Stop the Dig' sign. Look around on the ground and see leaflet and signs. Look closer and see several lumps, some with signs, leaflet, glasses and a shoe. So that's what happened to the protesters.
Go closer to the sign and turn right. Go forward twice and see a hiking sign.
Stone Row: Go right, forward and see 4 stones left side of the path and lamps on the right. This is a random occurrence in the game - After the lights go off one after the other, the sentry standing stone appears and blocks the path. Don't touch it or you will be another lump as the others. Go somewhere else and not come back until later in the game.
Go back to the station, by climbing the stairs, turn right by the dig site-soil heaps and pass the 4 small stones on the right. After the lit path (2 clicks forward) and when the lantern light comes on, take a left. If you continue forward from the time the lantern gets lit, you will end up at the main road. If you take a left here or on the main road and go forward, you will end up at the service station.
Behind Service Station: Go to the playground area at right of the service station building. Check the swing, nice! This area can be accessed through the emergency door beside the far table inside the cafe or from outside beside the gas pumps.
Move the fence rail and go through to the back. Go around the back and look through the kitchen window. Turn around and look up at the radio tower. Go forward. Look close at the trash cans. Eeeeeek! Turn around and read the newspaper hanging on the trash bin with ashtray on top. Go left and look through the window. See Ben inside the office. Go back and go to the telecommunication tower.
Telecommunication tower - The gate is padlocked. Enter through the hole at bottom of the gate. Go forward and look at-open the panel on the tower. The box states - this base station operates between 830 and 865 MHz. Open the box. See that it is running on 717 MHz.
The aim is to get the readout to be between 830 and 865 MHz.
Each button has a specific frequency. Pressing other buttons either raises or lowers the frequency.
917
667
722
317
767
517
1017
267
1117
712
- 50
- 400
- 200
- 450
1117
- 5
These are the MHz of the buttons as shown by the readout above the squares.
Learn which buttons affects the other buttons.
When a button is pressed on the left column (ex. 1117 - Note that the buttons (when pressed individually) on right column decreases the value of the one on the left column . This is shown by the readout above the squares.
After knowing those values, press the buttons that will get the desired frequency.
There are multiple solutions to this puzzle.
Pressing the red squares shown above results in 862 MHz.
Press the big red button at bottom right and the tower is set.
Now that the tower is set, check the mobile phone and see if you can get through to Bab's Cabs - 0503 265636 and Edward Briss' pasties - 0503 444222. Enter the number desired. Press the phone icon. Well, the phone works. Exit the tower and the back area of the service station. Go back to the Office.
Ben at the office: (Can be random.) Talk to Ben through the grill. He talks about what happened to the people at the car in the forecourt and Conrad in his jeep.
He gives the code to motel room. Take note of the number because it is a random number. If you missed this number, you can find it later in the office.
East of service station: Go to the main road and go to the left. Click on the lantern in inventory to light your way. Check the phone booth. Use the phone and hear a growling unintelligible voice. Place the receiver back and exit the booth.
Continue down the road until the exclamation point sign. Turn right to the gate with the scarecrow. See a three wheeler. This must be the entrance to the area seen at the bottom right of the map at Pete's room. Exit to go back to the main road. Continue down the curvy road.
Conrad Morse's jeep: See Conrad's crashed jeep. It must be him heard while in Pete's motel room. The number plate is 4X68578. Go forward between the 2 standing stones. Like the stones where the car stalled and at the Altar Stone area, the film barrier prevented exit from the area.
Radio - Look inside the jeep and take the radio. Press the button to turn the radio on. Hear music at 18.5. Press the down button to change the stations. Listen to Emma at 15.3 and hear a clear phone number for the radio station - 585-2131. She is bothered by someone tramping around close to her and she has no outside lights. (Dialogue can be random). Now that the number of the radio station is known, use the cell phone and see if we can call Emma Harry at 585 2131. There's no signal here.
Items - Look down on the ground and see Conrad's items are strewn all over. Read the newspaper and the Ancient Stones of Cornwall by Brian Clark. Read Conrad's notes. Look at the lump, what is left of Conrad, to see his driver's license.
PDA - Pick up his PDA. Click on it to place it in inventory. Look at the PDA at top right of the screen. See 4 remote camera stationed at the dig sites. Click on each picture to see them close up.
Click on 'survey map' at bottom left of the PDA. The jeep is at the end of the road at right of the map. There's a structure to the left of the road. Click on 'back to menu' and then click on notes. Read Conrad's thoughts. His room at the motel is #3 and the code that is seen is a random code.
Owl barn: Turn left while facing the back of the jeep and enter the woods. See a dilapidated barn. Go forward to the right side and try to open the door. Go back, turn right to the other side and try that double doors. They are locked or blocked.
Enter the barn - Turn left towards the drum and turn right to see an upright drum on the left wall of the barn. Turn left and take the crate. Turn right and click on the drum to place the crate on top of it. Move cursor to go up.
Look right, left and down. This must be the protesters' hideout. It's so worn down - it's unsafe. See placards - 'Stop the Dig'. Go forward towards the table. Yikes and Ouch too! Turn on the lantern. Look around the ground floor of the barn. In front is a padlocked door.
Gas torch - Turn right and see the double doors are blocked by a large beam. Turn right from double doors and look close at blue cart. Look inside the box and take gas torch. Turn right and look down right of the crates and drum or left of the gas tank. Pick up rubber tube. Look close at the gas tank. Attach the rubber tube on the hole. Then attach the gas torch. Turn the gas tank knob to release gas. Use the match from inventory. Click a match to light it and then light the end of the gas torch. The padlocked is cut opened.
Top level of barn - Before exiting, climb the ladder to see more of upstairs.
On the table, check the camera in the pan. Click to turn it around. Click on the slider button on top to turn it on. Use the arrow buttons to scroll through the pictures. Check the 'Stop the Dig' leaflet. Study the map and see the 2 paths leading to the Stone Circle and Barrow. One of the paths is above the station (motel) and one coming from the road.
Turn left and check the items on the window. Read the notes of Trevor Spencer, organizer of the protesters. I could swear I saw the sentry stone move, as dusk was falling. Look through the binocular and move the cursor to extreme left of the screen to see the standing stones in front of the moon. The compass is acting weird. Check the other window and pick up some acorns left by Trevor's squirrel. It will go into the basket.
It is time to get out of here. Go down and exit through the door. Turn right and go forward to the road.
Stone sentry: Randomly, you might meet the stone sentry on the road by the phone booth or at the woodland. Do not touch it or you will end up like the others - just turn away. If you do touch it, there's always another chance.
Emma Harry: Go back until the phone booth and see that the mobile phone has signal. Now that the number of the radio station is known, use the cell phone and call Emma Harry at 585 2131. Watch as she hears banging and Wincey, the dog barks. See her follow the dog outside the mobile home and the arrival of a standing stone.
Swamp: Turn around and go to the area left of the scarecrow. Enter the area and see the lump that was once Wincey the dog. Go forward and now we can enter through the back ramp. Go down the steps to the swamp.
Go forward, turn at first right and forward until the end of the boardwalk; towards the lights of the radio tower and the mobile home.
Barrow Hill Radio: Look around outside and then enter the mobile home. The door is pulled open.
No one is around. Wincey's bed - awww! Look at the self-assembly metal detector box. Batteries not included. The metal detector parts are on the bed. We need batteries.
Computer - Go to the computer. Password? Using your computer's keyboard, enter Wincey with an upper case W and then click ok.
Click on internet browser, then favorites. Check all the favorites. Barrow Hill Radio is Emma's homepage. Mountain Cake shows that Emma has a sweet tooth. At e-bidding, click to read about a failed bid on Malt Whiskey. Whiskey is made from Barley. The Weather Man link is where Emma gets her weather report. Check the Common and Scientific Names. It's a good resource. Go back to the main page and read her Blog. She found an artifact while at the dig.
Tapes and mushrooms - Turn around and click on the different tapes on the player console. Listen to all especially the top middle one - that sounds like the one from the phone?
Look close at the pots of mushrooms. Take some from the bottom pots. Using the Fungus guide at top right of screen - the one of the left is the Liberty cap and the one on the right is Destroying Angel. Check also that Dryad Slumber mentioned on the Witches leaflet at the office has a red cap and cream stem.
You can read the Metal Detecting Beginners Guide on the table.
Church ruins: Exit and go back to the swamp. Turn at first right and left towards the ruined Church. Look around the ruins.
Monument - Go across the boardwalk to the monument. Look at the Celtic cross and the base. Go behind the monument and look at the base. It is a sitting man with stag horns - the Ancient Man.
Use the trowel to remove the back. Read the red book. The priest of the chapel wrote about the suspicions of the Glastonbury Abbey. He writes of a ritual. Take the metal artifact. See a picture of St Anneka's well.
Exit the swamp and go back to the main road. Let's check Conrad's room at the motel.
Why is this happening?
Conrad Morse's room 3 at the motel: Enter the number taken from Conrad's PDA on the door lock of room 3. Look around at the scribbling and drawings of a very disturbed man. Look and read the papers strewn in front of the shower and the one tucked at the toilet seat.
Seal - Read the paper under the pillow on the bed. He talks about a shattered seal taken from the barrow. 'With the artifact removed from the barrow, he will be free once more'. He scattered 2 pieces of the broken seal. One is at the service station that can be located using the GPS reading of 2778.446 by 7854.445 (the only one that works).
Look at the papers on the floor by the bed and on the bed. Look close at the torn pieces of paper in the trash can left of the shoes on the floor. Put them together to make: 'My briefcase combination code is now reset. I've used a solution that can be found on my jeep's number plate.'
Tape recorder - Turn around and open her right drawer of the desk. Take the recorder and press the blue button to turn it on. Listen to Conrad talk. Press the + and - to listen to different recordings. In #2, he talks about the artifacts - pieces of the seals. One piece is in the swamp buried. In #3, he talks about the other piece of the artifact is close by. In #4, he talks about the stones asking for offerings brought to them. In #5, sentinel stone awakes and begins to hunt because he took the broken seal. What have I done? What have I done?
Briefcase - Look on top of the desk. Look close at the briefcase. The combination as shown by torn paper in the trash can state that it is based on the jeep's number plate. The number plate is 4x68578. That multiplication equals 274312. Enter 274312 on the briefcase.
Scientific report of the digs - Read everything in the briefcase. The Barrow Hill Excavation Report states: Trench 1 has oil residue in the pot. Trench 2 has fruit seeds, mainly Blackberry, Gooseberry and Pear - note that there's 2 parts more of the blackberry that the other fruit seeds. Trench 3 has bones from Melanogrammus Aeglefinus and Gadidae species. Trench 4 has seeds and spores; the report will be in a separate document. Trench 5 has seeds of Hordeum Vulgare known as Barley. Trench 6 has sodium chloride. Trench 7 has clean pure conditions (moisture). Open the envelope to see the report on Trench 4 - seeds of Quercus tree, red berries and a fungus. Look at the pictures in the brown envelope. Exit the room.
Where did Conrad hide the 2 pieces of the broken seal?
Motel room #1: Using the number given by Ben on the lock. Enter and look around. Go to the bedroom area and turn around to face the door. Take the GPS on the wall by the partition of the 2 rooms. Take the GPS from upper right of the screen. Press 'activate' and it will be seen at lower left corner of the screen. Exit and look for one of the places that the GPS works.
Forecourt: The artifact should be around here since Conrad stated that it is close by. Go towards the Gents rest room and then turn around to face the fire extinguisher on the post left of the pumps. Look at the GPS reading. Right on! Look close at the fire extinguisher and take one artifact (piece of the broken seal). Deactivate the GPS.
Ben at the Service Station Office: Listen to Ben. Broken glass... Oh No! Oh No! Look through the blinds. It got Ben. Go to the back of the service station through either the emergency door in the cafe or outside.
Behind Service Station: Enter through the fence. Go to the office at far end. The window wall is broken.
Office: Enter through the hole in the wall. Ben is now a lump on the carpet. Look at the monitor of the surveillance cameras around the station. Press the playback button on each of the 4 recorders. See Ben come out of the kitchen, out of the cafe and go towards the office to hide. The last tape showed what happened to the people that were in the car. The sentry stone touched them and they became lumps.
File cabinet - Turn around and look through the file cabinet. If you missed what Ben said earlier, the top drawer of the file cabinet has the code to motel room 1. The whiskey bottle at second drawer showed that the ingredients are Golden Barley and pure water. The bottom drawer has a note by George concerning the fruit machine at the yard.
Desk - Turn around and check the desk. Ben's cigarette is still smoking in the ashtray. Take blank papers from the right drawer. Take batteries from the left drawer. Look at the Product Guide of Fruity Goodness Natural Fruit Juice on top of tray. These are the drinks in the vending machine left of the motel rooms. The different flavors are Blackberry, Apple, Pear and Gooseberry. You can play the scratch card to see if you won 2 million. You can also play with the golf ball, if you want. Listen to Maggie calling sick on the phone recorder.
Unlock the door, pull back and click on the office door to go to the hall. Conrad stated that the other broken piece of the seal is somewhere in the swamp. Exit to the road and take a left. Go forward to the scarecrow and go right. Go forward to the swamp.
Barrow Hill Radio: Go to the mobile home and enter.
Computer - Look close at Emma's computer. Enter Wincey as password. Select Internet, Favorites and then common-scientific-names.co.uk. Learn that Salt is sodium chloride, Cods are family Gadidae, Haddock is Melanogrammus aeglefinus and Oaks are Quercus species.
Read her Blog again. The artifact she took must be part of the seal. That is why she is being chased by the stone sentry. Exit the computer by clicking on the bottom of the computer. Try to call her at 585 2131. She does not answer.
Assemble the metal detector - Review the picture of the metal detector on the box. Look close at the parts on the bed.
Click-hold-drop the parts to fit them together. Hear a click when the part is in place.
Place the wire on the rod.
Place the rubber handle on the right end of the rod.
Place the readout box on the rubber handle.
Place the metal ring on the left end of the rod.
Place the black rubber at left end of the rod.
Pick up the metal detector. Open the battery panel. Insert batteries taken from Office drawer. Close panel.
Exit the radio station.
Church ruin: Take the metal detector from top right of screen. Turn it on and the readout will be placed at bottom right of screen. Go to boardwalk and right towards the ruin. Enter the ruins. Go forward until the wall and see that the metal detector's reading went to the right. Look close at the ground. Move the rocks away and then use the trowel. Take the second broken piece of the seal-artifact and read the note. Turn off the metal detector.
What offering and to which one?
The note stated that offerings should be made but we have forgotten. In his absence, we made offerings to show ourselves of the gifts passed down to us over generations. Conrad also mentioned the offerings on #4 of his recorder - the stones are asking to have offerings brought to them.
|
Names of stones from left to right taken from picture on station tack board |
Baligo |
Melkah |
Dolment |
Hammer stone |
Henrik |
Gavrok |
Cailleach |
|
Trench # based on Pete's journal |
#3 |
#1 |
#4 |
#5 |
#7 |
#2 |
#6 |
|
Substance found in trench based on report in Conrad's briefcase |
Melanogrammus Aeglefinus and Gadidae species |
Oil |
Quercus tree, red berries and a fungus |
Hordeum Vulgare known as Barley |
clean pure conditions (moisture) |
Blackberry, Gooseberry & Pear |
sodium chloride |
|
Offering needed (some deduced from Emma's computer) |
Fish |
Oil |
Acorn, red berries, mushroom |
Barley (whiskey) |
Water |
Blackberry, Gooseberry & Pear |
Salt |
Look for offerings: 2 types of mushrooms have been taken from the radio station - Liberty cap and Destroying Angel. Go back to the main road, turn left and walk towards the station.
Turn right at red phone booth and go forward behind the phone booth. See some mushrooms. Look close and use the Fungus guide to identify it. Pick some False Death Cap and they will be placed in the basket seen at bottom right of the screen. Continue on the main road pass the service station and towards the west side. We saw berries and mushroom on this road earlier.
West side: 3 clicks forward pass the mailbox, turn right and see the tree we saw earlier. Go forward and pick some red berries.
Go pass St. Anneka's well to the stalled car. Turn left and pick up Shaggy Ink Cap mushrooms. Turn around and go back. Take the stairs left of the main road close to St. Anneka's well.
Woodland: Climb the steps and turn on the lantern. Go forward twice and look to the right. Take Dryad Slumber mushrooms with red caps. This is the mushroom mentioned at the Wiccan leaflet at the station. Turn left and go forward the hiking trail.
Go forward 3 times and see a plant stop forward progress. Turn left to go deeper in the trail to the 4 stones left of the lit path.
(Random event). The phone rings. Answer it and hear a frightened Emma.
Tent: If the stone Sentry is not here, continue on and see the dig site with tent. Look around the tent and read the newspaper. Exit the tent and turn right. See that there's a soil heap to the right with the strainer frame. The trail path continues forward and one to the left.
Soil heaps: Remember that Pete mentioned that Conrad lost his whiskey hip flask at the dig site. Go outside the tent. Look close on the soil heap left of the hanging strainer frame.
Use metal detector and see that there's something metallic in the soil heap. Use the trowel and get the hip flask. Then click on egg cup in inventory. When a correct offering is taken, see the glyph of the appropriate stone and hear - The Ancient Man has awoken. Balance must be restored. Take the cup with whiskey - whiskey (barley) offering. Turn off the metal detector.
Stone Circle: Go forward and see the 7 standing stones at the barrow. Eerie place. Turn right and read the Barrow Hill Stone Circle post. The Sentry stone is not here. Remember Conrad's journal.
Look around and go back to the tent area - stone heaps.
Altar Stone: Take the path at right across from the tent. Go forward down the steps between the rocks.
Midway the steps going down, turn right and pick up Parasol mushrooms.
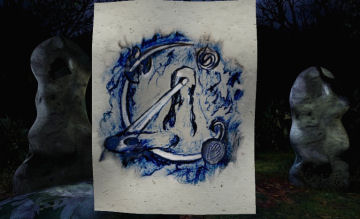
Read papers written by Conrad Morse on the ground Look at the altar table and the 2 standing stones. Between the 2 stones is that film barrier. We cannot go further. The right stone has a hand shape on it. The left standing stone has a hole on top with the moon as background. The altar stone has a central hollow
Go back to the Service station by climbing steps, right at soil heaps, forward pass the 4 stones and the lantern is lit, take a left and forward to the station.
Cafe: Go to the table right of the back door of the cafe. Move the menu away and click on the back salt shaker. Click on an egg cup in inventory. Get the salt offering. See the glyph of the stone and hear -The Ancient Man has awoken. Balance must be restored.
Go to the cash register. Use the trowel on the cash register and get some pound coins.
Kitchen: Go to the stove and turn right. Click the basket with the acorn, berries and mushrooms on the chopping board.
Take berries and place on mortar at top right, add acorn to the mortar and since it is the one mentioned on the Wiccan leaflet, add the red capped Dryad Slumber mushroom. Click to use the pestle and it will automatically ground the items. If a mistake is done, click on trash can to empty the mortar.
Click an egg cup on the mortar and there will be a flash of light to show that it is correctly done. See the glyph of the stone and hear - The Ancient Man has awoken. Balance must be restored. Take the plant mixture offering.
Office: Go to the office. Turn right from desk and exit to go to the yard.
Yard: Turn right, forward and look around at the things kept here. Turn around and see a red mini casino. I think this is what George asked Ben to take care off quietly. Insert a pound coin on the slot and pull the lever. You might need to pull the lever several times to get 50 pence coins.
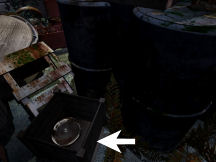
Go to the adjacent aisle of 'things'. Go forward, turn right and look down at a halogen headlamp. Take the lens from halogen lamp. Turn around and see a ladder.
 |
 |
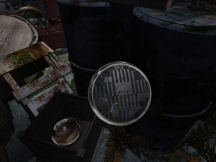 |
| Hot Spot at bottom of screen | Headlamp | Lens taken |
Pick up the ladder and while seeing the ladder on the screen, turn left to face the building. Click to lean the ladder on the roof. Climb up to the roof. Turn left, climb the metal ladder and look close at skylight hinge. Click on hinge and enter the Garage.
Garage: Enter the garage office on the right of the ladder to go down. Look around. Click on oil can. Then click on egg cup in inventory, click on lever of the oil can. When a correct offering is made, see the glyph of the stone and hear -The Ancient Man has awoken. Balance must be restored. Take the cup with oil - oil offering.
Exit the garage office and go down the ladder. Look around the cobwebby garage. Exit through the door at the end of the garage by sliding the rod and clicking on the door knob. Exit the yard and go through the office to go to the motel.
Motel vending machine: Use 50 pence coins on the slot of the vending machine and press buttons above Blackberry. Do the same for Gooseberry & Pear drinks.
Car at forecourt: Go to the car running in front of the gas pumps. Look at the lump at passenger side of the car. Take the Omega 3 Regeneration hair tonic from the ground. Remember the radio advertisement and also read the label of the bottle - it is marine enhanced - fish!!! Click on an egg cup in inventory. Click on bottle cap to get fish offering. See the glyph of the stone and hear - The Ancient Man has awoken. Balance must be restored.
Kitchen: Go back to the kitchen and turn as soon as you enter. Go forward and turn right to a blender. Look close and remove the lid. Remember the report in Conrad's briefcase, there's twice more of the blackberry than the other fruits. Place FIRST the Blackberry drink on the open blender. Repeat addition of blackberry to blender to get 1000 ml. Then add one click (500 mls) of Pear drink on open blender. And then add one click (500 mls.) of Gooseberry to make 2000 mls. Click an egg cup on the open blender. See the glyph of the stone and hear - The Ancient Man has awoken. Balance must be restored. Take fruit (juice) offering.
Walk around and get a call (random event) from Emma. She can't leave the Barrow. It came for me. Why me?
St. Anneka's well: Time to visit that ancient place and look for clean water. Go to main road and walk down to the west side curvy road.
Stone slab - Turn left to the other entrance to St. Anneka's well. Use lantern to have a better look at the stone slab. Use paper on slab and then click on crayon to get a legend tracing. Praise to St. Anneka, who descended from the skies; to ground our wandering spirit and lift our souls. Praise to St. Anneka.
Tin can - Use lantern and enter the well entrance. Turn left as soon as you enter the well. Open the tin can on the shelf and look inside. Read the comments by Elsie Prestidge and visitors to the well. Take note of the ritual of the water blessing. It made the water so pure and was placed onto the Henrik stone. This confirms the scientific report in Conrad's briefcase that we need pure water.
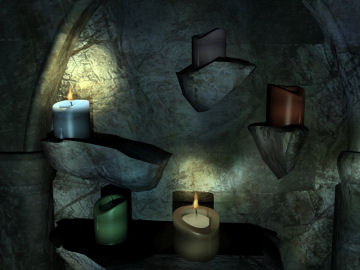
Enter the grotto and see the different candles on the wall. If you want, you can throw some coins in the water. Turn left and enter the alcove. See ancient drawings on the wall. Exit and go to the right alcove.
Hole on wall - See a hole on the wall at the right alcove. Turn right and see a stone with a glyph. Remember we have taken a metal artifact at the monument's secret hiding place together with a note mentioning St. Anneka. Insert the metal artifact on hole. Click on metal artifact to turn it. Hear a sound.
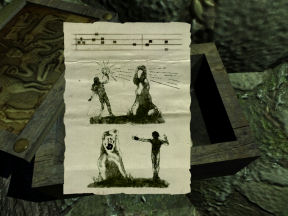
Ancient Man Box - Turn right and the stone with glyph is removed to reveal a box. The box has the same horned man - Ancient Man seen at the monument across the Church ruin. See a music sheet with a song for St. Anneka and hear music in the background: Oh, Anneka, Anneka from the bluest heights descend to our brown earthy soil. Bring your blessing of sacred water so that we may grow again. This must be the water blessing prayer.
Study the other picture of a man holding a disk through the hole of a standing stone and a man holding his hand out to a standing stone with a hand print. We saw those stones before at the altar stone area. Read the thoughts of the priest that hid here. Learn the reason the chapel is in ruins. The priest hid the old things on the monument and also here. The seven offerings must be made to the stones. Exit the alcove and let's start the water blessing.
Water blessing - Look close and face the candles. Take matches from inventory. Based on the music sheet in the box, light first the blue candle and then light the brown candle. Hear heavenly music. Click an egg cup on the water and there will be a flash of light to show that it is correct. See the glyph of the stone and hear - The Ancient Man has awoken. Balance must be restored. Take the blessed water offering.
Balance must be restored
It is time to do what we have to do. Go to the woodlands via exiting from here at St Anneka's well, cross the road and climb the steps. Use the lantern. Go forward and turn left at the fork (plant blocking path) of the path. Go forward until the 4 small stones on the left side.
Stone row: On the first stone, use paper on stone and then click on crayon to get a tracing. Do this step to all 4 stones using the same paper. See a drawing of a beam of light passing through the hole on the standing stone and landing at the center of the altar stone.
Stone Circle: Go forward pass the soil heaps to the 7 stones circle. Let us give the offerings to each of the standing stones. Go close to each stone and click the correct offering on the stone. If correct, the words are said and rainbow light comes out of the stone. If wrong, a lightning will strike and you have to make a new offering.
|
Names of stones from left to right |
Baligo |
Melkah |
Dolment |
Hammer stone |
Henrik |
Gavrok |
Cailleach |
|
Offering to be given |
Fish |
Oil |
Plant |
Barley (whiskey) |
Blessed water |
Fruit Juice |
Salt |
Look at the center of the barrow and see a dig site. Use trowel on the ground of the dig site and see an etched plate. This must be where the seal fragments lie. But we have only 2 and the seal is broken. Now what?
Soil heap: Go back to the path. The phone will ring. Answer the phone and talk to Emma. I can't get away. I can't get off this hill. I have something I stole. You might need it. It's after me. It's hunting me. I have to keep moving. Can I trust you? I will leave it for you.
Go towards the soil heap and see the third piece of the seal on the ground. Take the artifact and read the letter. Do not place the broken pieces of the seal in the barrow dig site or else the stones' rainbow light will go out and the game ends.
Go forward and turn right towards the altar stone.
Altar stone:
 |
 |
Seal - Remember the pictures in the box at St. Anneka's well and the tracings of the 4 stones at the Stone Row. We need to reform the seal.
Place the 3 artifacts on the center hollow of the Altar Stone.
Face the stone with the hole on top. Look close on the hole and place the lens taken from the yard on the hole.
Go to the other standing stone and place your hand on the handprint.
Oh that is wonderful! The seal is complete again. Take the restored artifact.
Stone Circle: Go back to the Stone Circle and the dig site at the center. Use trowel on the ground of the dig. The disk crumbles and you fall down the hole.
Barrow Chamber: The Barrow chamber is a circular chamber with side alcoves where the offerings given are seen. Look at the side alcoves and click the cup to see the offerings.
One of the side alcoves is a step to get back up to the top. If you exited the chamber through the steps, go back down through the hole on the dig site of the barrow.
Look close at the central table and then look close at the seal etching at the center. Place the restored artifact on top of it.
Balance has been restored.
If we don't heal the wounds, It will come again.
This document may not be distributed without express written permission of the author and the content may not be altered in any way.
For
Questions or Comments on this Walkthrough,
Please write to:
MaGtRo
Copyright © 4/2006 MaGtRo