BARROW HILL: The Dark Path
By
Shadow Tor Studios & Matt Clark
Walkthrough by
MaGtRo October, 2016
Gameplay:
Barrow Hill is a first person point and click adventure game.
Before the game starts; see a game setting
selection frame. The display frame has device, colors and antialiasing
choices. Run in window; maintain aspect ratio and use desktop resolution
can also be selected. The sound frame has a choice of the sound device.
The main menu has new game, load, options and quit selections.
Options has a selection for subtitles,
inventory description and
audio descriptions. Change the x to check mark if chosen.
In game screen, move the cursor to the top
to see the menu link at top left. Resume and save game selections
are added to the menu.
Bring the cursor to the bottom of screen to
show the inventory.
Right click an item to get a closeup of the
item.
NOTE: This game
is non-linear. This walkthrough is just one sequence of gameplay.
Eerily similar to the start of the event 10 years ago,
a car drives to the ancient
woodlands of Cornwall. The radio is tuned to Emma Harry of Barrow Hill Radio. It is Autumn Equinox.
Emma mentions the lives lost, her experience and the disturbance of ancient
powers at this time of the year 10 years ago. A woman draws a symbol on the
floor and starts an invocation. Emma and the family of those lost want, need
answers.
Keep looking. Keep searching.
Barrow Hill Service Station:
The car stops in
front of the service station that was the location of the event 10 years ago. It has
changed tremendously. The station is fenced with rusty wire mesh. Look around.
The radio is still
on in the car. The channel can be changed using the arrows. Some clues can
be obtained listening to the advertisements.
Shrine:
Mia Kendell:
Go towards the shrine.
The phone rings. Answer the cellphone in
inventory by clicking on the green phone icon. It is Mia Kendell. She is
running away from something. You're a journalist. Emma gave her your number.
Shrine:
Look at the pictures on the shrine. Look at right side of the table. Take
the box of matches.
Look close at Ben
Kendell's missing poster. Poor Ben met the Sentry stone in the office 10
years ago.
The center one with
missing text is that of the family in the car that met the Sentry stone 10
years ago at the station's pump. To the left, Jonathan was last seen at St. Awful and Sorepoint
road.
To the right is a
child's drawing of a brother with q306 written on it. Mia must have drawn
this when she was child missing her brother Ben. Aw...
Look close at the
votive candles at left side of table. Light the red candle using the matches
in inventory. Take the lit red candle.
Cafe:
Go to the back door of the old cafeteria and look through the circular
glass. See tables and candles.
Find out what Mia is involved in.
Back side of station:
Go right of the
rusty swing set. Go through the broken fence pointed at by the "free hugs"
sign arrow. With a lit candle, look around.
Turn left and see
the locked electric box.
Mia:
Continue to the right behind the broken window of the old kitchen.
The cellphone rings. Answer it and listen to Mia again. She wants to know
what happened to Ben.
Continue forward by
the tires. At right, see a path between 2 trees - very dark there.
Turn back around to
the rear of the office. See a fence with a yellow arrow and tires.
Go forward to jump
down to the fenced in back side of the station. Uh oh. Lost the candle.
See a locked door
with danger sign. This is the garage.
Office:
Turn diagonal left and forward to the door of the office. Push-click to open
the door. Enter and look around.
Poor Ben met his
demise here. Take the electric utility key from table.
Box of mugs:
Back up and turn left from garage door. Look close at box behind the rusty
bicycle.
Remove the mugs from
top to bottom. Take the slingshot.
Mia:
Back up and turn around. The cellphone rings again. Answer Mia's call.
Gus, Olly and Mia are hunted. She drew a pentagram
and followed the Dark Path but it didn't work. She wants you to guide her
out of the wood. She could see the old tractor. It's close. It's coming for me.
Wood area behind
station:
Go forward past the
fence.
Cairn: See a pile of
stone. Remove the stones from top to bottom. Take
simcard#1 labeled Barrow farm.
Gus sign:
Turn left and see a fire in a drum at end of path. 3 bicycles are parked at right.
Turn left and see
graffiti made by Gus on the wall of the garage.
Gus' graffiti has
his name with a geometric shape above it. A green arrow points up. Look up
and see a weather vane on the roof.
Barrow Hill
Quoit:
Read the Barrow Hill
Quoit stand right of the graffiti. The Quoit is a chambered tomb built 6000
years ago.
Turn right and look
close at the Quoit by clicking on top of it. See a hole on the rock.
Cellphone:
Mia:
Go forward to the Quoit. See a light flash inside and hear a scream.
Emma:
Enter the Quoit through the hole at the base of the rock. Hear a cellphone
ring. Go forward and pick up the purple cellphone.
It's the DJ, Emma.
She scolds Mia thinking she was the one who answered the phone.
Mia's cellphone:
Pick up Mia's purple cellphone. After this, your cellphone is gone.
Right click
Mia's cellphone in inventory. See the time and weather at top of the
screen.
The phone is
middle left but can't be used. Middle right are messages.
Check the
messages sent by Gus and Olly. Mia tells the boys to bring the
objects, wishes and then meet here at 6 PM.
Read Emma's
message. Mia insists on knowing what happened to Ben.
Read Bobby
Rob's message about not being able to open Ben's case and the
missing CCTV footage.
Click home icon.
Bottom left are music tracks. Listen if you want.
At bottom right
(top) is the video. There's no transmission.
There's a
compass at bottom right (top).
Notes made by
Mia is at bottom right (bottom). Read all 4 pages.
She needs 5
metals to charge the pentacle.
Emma was her
old babysitter.
List of 2006
victims: Ben, Emmet family, Conrad Morse, Winsey,
3 protesters...
Gus is
hesitant to help and Olly will do anything for Mia. Mia believes the
Dark Path is the way.
Check the map at
bottom right.
The Barrow
farm has a red marker, the Quoit has a green marker and the radio
station has a purple marker.
Click on a
marker to see a closeup and then click again to get a description.
Click the power
button to exit the cellphone.
Pedestal:
Look around. Go
forward to the pedestal at back. See geometric symbols on the walls. See a
round hole on the wall.
Pebbles:
Look close at the
stones arrangement inside a ring of evergreen branches. Take the pebbles
at center. A ring of pebbles are left.
Mia's clothes:
At right is an empty shopping bag from Bygones, Old Vicarage
Place, St. Awful.
There is a purple
hoodie with a Sorepoint insignia, socks and a pair of shoes beside it.
Check Mia's size 5
shoe right of the hoodie twice. Take simcard#2.
Check the sales
ticket on the hoodie and learn that Mia bought an Edwardian night dress.
Looks like Mia changed clothes.
Pull back and pick
up Mia's Sorepoint Academy ID card. Mia likes her things purple colored.
Pull back and click
on right wall to see a dirty poster.
Dark Path items:
Pull back and look
close at the box with Dark Path leaflets and clipboard at right.
Tablet:
Pick up the tablet with Sorepoint wallpaper.
Watch the YouVid video at school and the wishing
stones. See cairn with offerings (?star
made of wood) and Mia asking for help from the stones.
Click on orange
marker at left side of the tablet screen to see the Dark Path leaflet.
Follow the teaching of James Tregowen, www.thedarkpath.co.uk.
Clipboard:
Pull back and read the Dark Path Hit list on the clipboard. It is a list of
people and places the kids will leave leaflets to.
Book: Read
the Cornwall - Ancient Antiquities book at right. Learn about the Quoit. It
is locally known as the Witches prison.
Backpack:
Open the front pocket of backpack to get Mia's hairclip with some of
her hair.
Move the cap on top
of the backpack to get the hand wipes.
Dirty poster:
Pull back and go back to the dirty poster on the wall right of the pedestal
area.
Use the hand wipes on
the dirty poster. Read Ben's missing poster.
Sitting area:
Go to the laptop
area at left side of the chamber. See tires used as seats.
Book:
Look close at the book by the wall lit by a torch. Read the Dark Path
book written in 1965 by James Tregowen.
Summon the
dead pentacle: The book opens on how to
summon the dead.
Create a
pentagram using a natural substance like salt, flour or chalk.
Mark each point
the symbol representing the elements, metals or specific deity. Do not
leave the circle until the ceremony is complete.
The offerings
are placed in specific order around the pentacle: gold, copper, tin,
lead and iron.
Next page is
torn. Binding pentacle: At right page, learn the colors needed to do
binding pentacle.
Wishing
Stones: Click on the witches tab at top of book. Read
about wishes and the wishing stones.
Learn that
wishes are made on stone cairns. Read the rhyme for wishing. The
reversing the wishes rhyme is torn off.
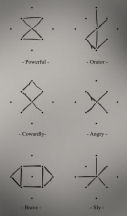
Wood
effigies: Click on the geometric shape tab at
right.
Read about the
shapes and uses of the wood effigies. A successful wood effigy is a
shade of the individual and can be used to harm them.
Note the
different characteristics and shapes of the wood effigies at right page.
Remember Gus' graffiti; the shape above his name means brave.
The symbols in
the chamber means powerful.
Take the
torch/flashlight.
Laptop:
Look close at laptop. It needs a password.
Password:
Read the postit. The password for the video feed is the event that
started it all. It has 4 digits.
What started
this? 4 digits... Remember Mia's drawing at the shrine; it has a 4
digit code - q306 and text "when my brother went away".
Using your
computer's keyboard type in q306. Click on submit button.
Note that the
symbols for the hooded characters on the wallpaper are for: cowardly,
powerful and brave.
Web:
Click on world icon to see the recently visited and recommended sites.
BHR
Barrow Hill Radio: Click on radio web page.
Under games,
you can play a HOG titled Strange Mystery of the Haunted Winnebago
CE.
Spooky button opens the forum. Read the
posts. Note Elsie Prestige the White Witch's post about the girl, boy and other.
Click on
Home button at top right of screen.
The Dark
Path: Click on the Dark Path website. Read
about the missing, mystery, pictures, conspiracy and members only.
See the list
of the missing and how or where they disappeared.
At Ben's
page, note that Mia is the head of the revived Dark Path. Click on
Home button at top right of screen.
New Pics
show the kids went inside the fenced in area of the station.
Cornish
Messenger: Read the newspaper. Click on Home
button at top right of screen.
Purine Balance: See ad for Purine
Balance.
Sensation: Move and then drop sachet into
the cup and see what each blend does.
Power:
Click on each sachet to see the ingredients that each blend
contains.
Emails:
Go back to desktop. Select email icon. Read e-mails.
Incoming
mails: The White Witch Elsie writes to Mia
about Baibin, the combined feminine crone, maiden and mother.
Read Emma's
mail asking Mia not to go out. Check the 2 incoming pictures
attached at Emma's mail at left.
Sent
email: Mia's mail is just in case something
happened to them. Find Gus' simcards to learn everything.
Trash:
Olly writes about Mia doing a summoning spell at the old farmhouse. Gus Bevan
writes that he will be late.
Saved:
The White Witch informs Mia the exact time the true equinox will
occur. She warns Mia not to deviate from the Dark Path. Elsie says
that a woman stole ancient treasures from the barrows and Baibin is
angry.
Go back to
desktop.
School projects: Click on the books icon at bottom right.
The project is Film Studies. They do short films.
Click on
Edit Project.
Capture
film: Click on top icon. Select film clips from the
2 simcards already collected at bottom. Then click on play icon at
bottom left.
See the
leaflet being distributed and Mia's obsession with the powerful
symbol.
There are
slots for 6 more films. Go back to desktop.
Pictures: Click on the picture icon at top
left of the desktop. See pictures of Olly Tindle, Gus Bevan
and Mia Kendell.
Mia looks close at a rock with spiral patterns. Olly and Gus stand in front
of the wishing stone area.
Note the last picture at bottom right of a spirit woman.
The video icon doesn't have transmission connection. Click on "sleep" button
to close the laptop.
Hole on the wall:
Pull back. Look
close at the hole on wall above the laptop area.
Olly:
The cellphone rings. Answer Mia's cellphone and hear Olly.
The beautiful
woman is after Olly, Gus and Emma the DJ. They made wishes. He is locked in
the motel at the service station. He lost his glasses by the picnic area
close to the motel. He asks for you to contact Sad Barry to get the CCTV
working and guide him out of the motel. The security camera is watched by
Goshawk Security.
See the security
camera pan around the area. See the Groshawk Security sign with the phone
number - 5557869 on the rock shelf.
Find Olly.
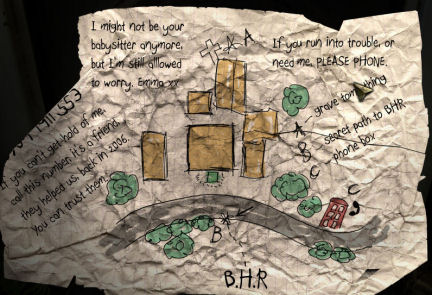
Get map:
Exit the Quoit.
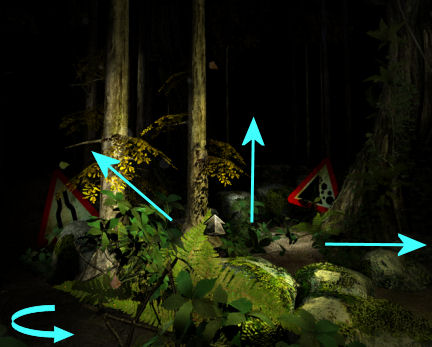
Crossroad:
From the Quoit,
turn left and go forward, use the torch on the dark path. Go forward on
the path once more.
See a 4 way
crossroad with road signs.
Emma calls and talks about the event 10 years
ago.
Left path goes
back to the Quoit.
At diagonal
left is a road narrows sign. It goes to a 3 way crossroad to access
the picnic
area, Druid Pool and Wishing stones.
Ahead with a
rockslide road sign is the path to oak tree stump used to make effigies.
At right is
the path that goes to tractor and another crossroad (back of service
station, tower and red phone booth).
Go to red phone
booth:
Turn right at
the 4 way crossroad.
Go forward once
before the wood steps and turn left to see the path to the tractor. See
orange cable on the ground.
Continue down
the wood steps and go forward again.
See the 3 way
crossroad. Ahead is the fence with the tower, diagonal left to the red
phone booth and diagonal right to back of service station (dark path
seen earlier).
Go diagonal left
to the red phone booth.
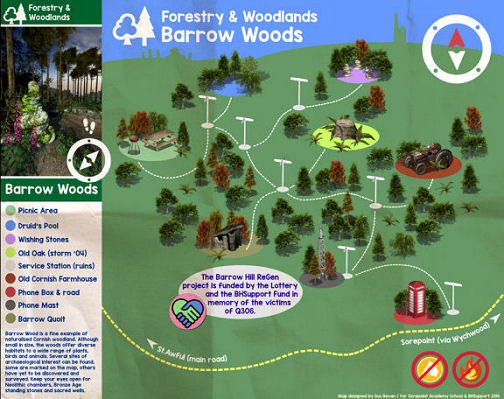
Forestry and
Woodlands stand: Look close at the green stand. Read the
text that mentions the Druid pool, Quoit and the Barrow Farms.
Open the cabinet at left to get a Barrow Woods map.
Study the map and
note the places. Note that the event 10 years ago is called q306.
Phone booth and road
sign:
Check the phone booth
and the bus stop sign by road. This is the St. Awful and Sorepoint road.
Bring power to the
service station:
Go back to the
station by going forward on the road. See the car. Go through the hole on
the fence by the swing set.
Turn left and look
close at the electric box. Use the electric utility key taken from the
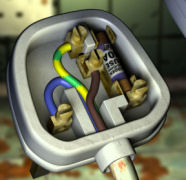
office on the keyhole.
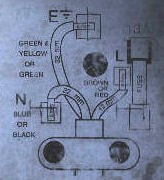
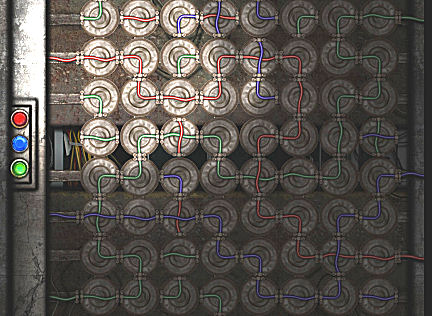
See red, green
and blue wires. The aim of the puzzle is to connect same colored
wires to similar colored outlets on both sides.
Click each plug
to turn it. Power is back on.
Contact Goshawk
Security:
Olly wants us to
contact the security company.
Go to the office via
forward twice behind the station and left to go over the fence with the
yellow arrow again. The lights are on.
Go diagonal left to
the office door. Click to enter.
Error message:
See that the screen is on. It shows an error message - No
signal/access.
Spymaster
1988 codes: Check the orange edged paper under the
monitor.
See BH 2673 site
address code written on top.
The error code
for "No signal/access" is 475.
Pick up the phone
receiver to automatically connect to Sad Barry at Goshawk Security.
He wants the
site address. Using the number pad at bottom right, click BH 2673 or 24
2673. He doesn't want to come here at the station.
He wants the
error code. Enter 475.
Barry can see
the monitor on his side so he diverted the feed through another venue.
Guide Olly out of the
motel:
CCTV:
Look close at the monitor at the motel - cam#5 at top center. See Olly
rambling. Use the arrow cursor
to point at bottom left to get Olly to exit the motel.
At cam #4, click at
bottom left to exit the rear of the motel.
At far view of
cam#4, Olly states it is Mia that is chasing him. Click at bottom left exit.
At cam#7 pumps, see
the spirit-Mia appear at the main station. Guide Olly through the break in the
fence into the main station.
See the spirit block
the way to the back area. Click at bottom
left, to get Olly to move around the car.
At cam# 3 woods,
Olly is now behind the fence of the garage area. He mentions Baibin. Get him
to go through the hole in the wall of the men's toilet.
At cam#2 private,
get Olly to exit through the toilet door at right.
At cam#1 garage, get
Olly to go through the garage's double door. Mia appears intermittently. When Mia turns
around click on the garage door. Olly enters the garage.
Olly's fate:
Pull back and hear
Olly say he's out now. Then hear that Mia catches him. Olly tells Mia that he's got a
present for her. He cries.
Go outside and see a
magicked Olly surrounded by plants and purple mushrooms, His body is
covered with designs.
Examine the symbol
on his forehead - coward.
Take Olly's
school ID from his left hand.
Gus sees Olly
through the fence and he says he will call the police.
Who is causing this
occurrence and why.
Open the garage door:
Office:
Go back to the office. Listen to Maggie's message on the answering machine.
It was left
there 10 years ago. She is still sick and left the garage key on the boss'
armchair.
Click on the armchair
left of the monitor. Get the garage key.
Check the open
drawer of the desk. Click-hold-move the papers to the side. Take the box of
lead pencils.
Check the garage:
Garage:
Go to the garage door with the danger sign. Use the key to open and enter
garage.
Radio:
The radio is on. Lady Tregowen of Barrow Moor calls in at Emma's
broadcast. She talks about Baibin and Baibin's world (place of the dead). Bernard her dog
barks in the background, runs away and the call was cut off. Emma taunts Baibin on the air.
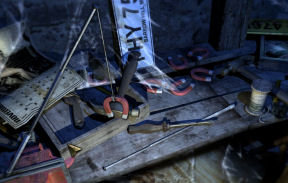
Look around the
garage. Look right and take the crowbar propped on the wall.
Wiring chart:
Turn right to the wall left of the door. See several plans tacked on the
wall.
Click-drop the plans
to the side to see a UK plug wiring chart. Remember this chart.
Worktable:
Look close at work table left of car. Take the screwdriver.
Open the car boot:
Car:
Check the car boot and see that it is locked.
Power:
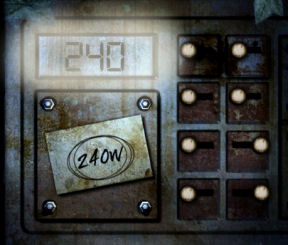
Check the lift panel right of the POWER sign. It has no power. <grin>
Go to the area in
front of the car and see that there is power as shown by the green light
(and radio). There's a panel hidden beside it.
Remove the ivy
covering the hidden panel. Use the screwdriver on the screws of the cabinet
door.
See that the
correct wattage is 240w but it is reading now as 710.
Bring the
setting to 240 by adjusting the knobs at right.
Move knobs on the left column to the left.
Move top 2 right knobs to the left.
Move bottom 2 right knobs to the right.
Raise the car:
Go back to the panel right of the car boot.
Use the top
button right of the arrows to raise the car.
Look close at the
grill revealed under the car. See car keys.
Get car keys:
Look close at
worktable again. See an antenna held by the vise at left.
Click on the thread
spool to get a length of thread. Attach the top tip to end of the antenna
on the vise.
Take a magnet and
attach it to the end of the thread. Take the fishing magnet.
Look close at the
exposed grill. Fish with the fishing magnet and catch the car boot keys
with ADH initialed keyholder.
Search the car boot:
Lower the car using
the down button on the panel.
Use the car boot key
on the lock. Examine the contents of the car boot.
Journal:
Read Agatha Dunn-Harker's journal completely. She is an archeologist
with an eye for profit and prestige. She got interested in Barrow Hill
and the different ancient sites therein. She was warned about disturbing
Baibin and to stop digging.
She located
Barrow Farm with its entrance made of upright stone and lintel. The farm
was built on top of a burial mound.
ADH Agatha dug a
skeleton of a female. Aggy was nearly choked by the skeleton. She left
the dig.
Read the paper
tucked in the journal to learn the 4 grave goods she took from the
skeleton. Remember this list and description.
Chart:
Open the rolled up paper above the journal to see the locations of the
grave goods taken from the skeleton. Remember this.
Ant of
Cornwall book: Read the book borrowed by Agatha
from the Royal Society Survey. Learn about Barrow Hill and Baibin.
Note
the rhyme at bottom of right page. To wake Baibin will be death. (Agatha
woke Baibin and stole from her.)
Celtica, Age of
Mystery: Read the green book written by Arwen Tregowen.
Hmm... Read about Baibin.
Look at pictures
of Agatha. Take the archeology trowel right of the pictures.
Doors:
Go to the double
door of the garage. Move the galvanized sheet at right. Look through the
hole.
Use the fishing
magnet to get the red oil can. Exit the garage.
Do what Gus asked.
Find Gus:
Search for Gus:
Outside the garage, turn left and go forward once. Go
forward once towards the Quoit and turn right to enter the woods.
Go forward twice to
the crossroad and turn right for the path to the main road. Go forward.
Gus: Get a phone call
from Gus. Mia is possessed because of what she did at the old farm. Gus has
eyes in the buildings. Follow the orange cable. Find the transmitter and fix
it. He will leave instructions at the phone booth where he is now. Mia is
coming. Gus also asks to collect all his simcards to learn what happened.
Phone booth:
From where you are now, go forward once to the metal fence. Go diagonal left
and forward to the red phone booth.
Open the booth and
take the transmitter setting note.
Search for more
simcards and information:
Go back to the rear
of the service station. From the road at phone booth - road - fence hole by
swing set and forward once at back of building.
Kitchen:
Turn left and see a door with the Dark Path - powerful symbol.
Use the crowbar from
the garage on the door. Enter the kitchen. Look around.
Radio:
Hear another caller to Emma's show. The farmer talks about the lady of
the leaves. Grave robber took things from her back in the 60s. She's
here. She's beautiful. The call was terminated.
Note:
Look at the note at the chopping block held by a knife. It is from the
White Witch (WW). The lady watches from the trees when the sun and
moon doth meet save their souls the souls of three.
Microwave:
Check the microwave at left corner by sink. It is broken. There is no
plug at the end of the wire.
Freezer:
Hear a sort of knocking. Go to the freezer at right. Open freezer. Ugh!
Flies!!! Flies everywhere.
Get rid
of flies: Go to the corner by the stove right of
door. Look close at switch on wall and flip it.
It turns an
insect repellent UV lantern on. The flies are zapped. Don't turn it off
or the flies come back.
Go back to the
freezer and open it now. Take simcard#3.
Cafeteria:
Turn around and go forward. Turn left and through the door to cafeteria. Look
around.
Cash register:
Open the till of the register. Take the fuse.
Table with
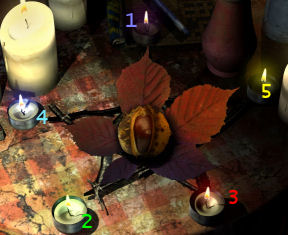
chestnut: Go to the table with candles. Se an unripe
chestnut and pentagram with candles.
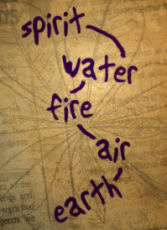
Read the
note Mia left on the magazine: From top to bottom:
spirit-water-fire-air-earth.
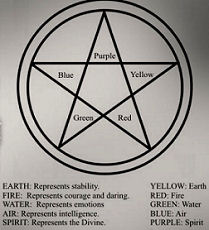
Read the
Dark Path book in inventory. Click on pentagram tab. Study the colors
and connected element at right.
The drawing
shows where those colors-elements are placed in the pentagram
The object
of the puzzle is to light the candles in the order stated by Mia's
note:
Each candle
emits different colors.
Use the
match. Then in correct sequence: Light the top-purple first;
bottom left-green; bottom right-red; top left-blue and top
right-yellow.
The leaves
turn brown and the chestnut opens. It is autumn.
Click on
chestnut twice. Take simcard#4.
Door:
Look through the circular glass of door. See Mia outside -
searching.
Table by
door: Look close and check the menu on the table
by the door. Take
simcard#5.
Gas station
hallway: Exit the cafeteria through the glass double
doors.
Turn left to the
door. Note a bell on the ceiling.
Cart:
Look close at cart. Take simcard#6 from the top shelf of
the cart.
Shrine:
Turn around and see another makeshift shrine.
Look through
the cards and poster on wall.
Pagan
prayer wheel: Take the pagan prayer wheel
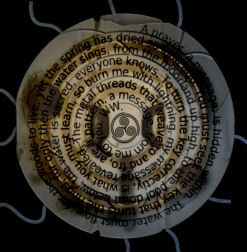
from the left table. Read it in inventory using the turn arrow.
Right click to pick in inventory.
A prayer,
a message is hidden within. The water must flow from the woods to
live, yet the spring has dried so long ago. You must seek the key
that turns the rings, for only then the water sings, from the
moorland up high, to the pool down below, the water is sacred,
everyone knows. To turn the key correctly, is what you must learn so
burn me with lightning, my message revealed. The metal threads that
weave to and fro are a pattern, a message from me to you. WW.
Right
table: Check the right table. Take the rune
stones.
Learn hidden
message of prayer wheel:
To turn the key
correctly, is what you must learn so burn me with lightning, my message
revealed. The metal threads that weave to and fro are a pattern, a message
from me to you.
What burns metal to
produce lightning? Aha!
Kitchen:
Go back to the kitchen. Turn around to door.
Look close at cart
left of door and under the switch. Remove the mixer and take the plug hidden
at the back.
Fix the
microwave: Go to the broken microwave at corner.
Microwaves do not like metals in them - sparks are produced.
Look close at
the cord. Attach the plug to the end of the cord.
See the opened
plug. Place the correct wire to the correct slot. The chart at the
garage wall shows the correct way.
Click a wire and
then click the slot to place it on.
Place the blue
at bottom left. Place the yellow-green wire at top. Place the brown
under the top slot.
Place the fuse
found from the cash register on slot at right.
Pull back and it
will be plugged automatically. Hear a beep; the microwave is working.
Place the pagan
prayer wheel inside the microwave, close door and click top button at right
panel.
Take the burned
prayer wheel. See patterns and shapes of the toasted metal wires that run
through the burned prayer wheel.
Search the Woods
and complete Gus' tasks.
It is time to search
the woods. Exit the kitchen, turn around. Go back to the back of the
station, right to go out the broken fence by swing set and to the road. Go
left to the red phone booth.
This is where we will
start. Note that each points have a marker to mark the important locations.
Study the map.
Transmitter tower:
From red phone booth
and Forestry info stand, go forward twice. Turn left and see the metal
fence.
Click on tower to
look up.
Look close at the
box at base of tower. It has Gus etched on it.
Use screwdriver from
garage on the 4 screws of the box. Take Gus' MP3 player. It has
distress signal track.
Tractor:
Back up from tower
and turn right. Go forward to the wood steps twice.
See the hiking
picnic sign at left. Turn right and see a path to the tractor. The orange
cable runs through here.
Tractor:
Look close at tractor. Take the iron horseshoe from the side of the tractor.
Blocked path to farm
house: Turn right from tractor and see that branches move
to block the path. The orange cable run through there.
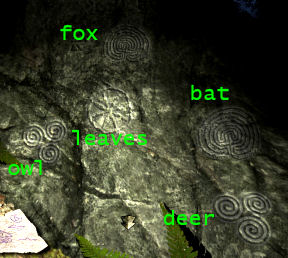
Spiral etched
rock: Turn right again and see a rock with runes and spiral
maze etched on the face of the rock.
We saw this on
Mia's laptop. A photo showed her studying the etchings.
Pick up the
paper on the ground. It has runes similar to those on top part of the
rock and a central drawing similar to the pedestal with hole on the wall
seen at the Quoit.
Study the
etching on the rock. Look close. The runes B Y H
light up.
Click on each
spiral. Starting from left to right, hear music with distinct sound at
end: owl hoot; leaves in the wind, fox bark, bat wings and deer call.
Find Gus' Transmitter
and fix it:
Follow the orange
cable. Go back down the steps at right from the spiral stone. See the picnic
marker.
The cable goes to
the rocks left of the sign. Look close at rock. It's Gus' transmitter.
Study the
transmitter setting paper Gus left at the phone booth. Set the
transmitter as instructed.
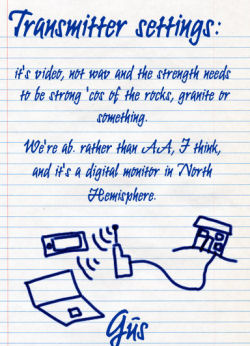 |
Turn the
transmitter on. Set it to video.
Turn the str
(strength) knob to the highest setting; at 5.
Turn the
right knob to point to AB.
Flip
switches: to REC, Monitor, Digi(tal) and N. Hem(isphere).
Signal Live! |
 |
Explore the rest of
the woods:
Turn right and
forward to see a discarded orange drink container. This is the 4 way
crossroad.
4 way crossroad:
Turn left from drink container is the path back to the Quoit.
Turn right and
see the 3 other paths. Right is where we came from (tractor, tower and
red phone booth).
The rock slide
road sign goes the tree trunk.
The road narrow
sign goes to picnic area, wishing stone and Druid's pool.
Tree stump of old oak:
Go forward to the
rock slide path. Look close at stump. See that it is covered with moss. We
will work on this later.
Go back to the
crossroad.
Wishing stones:
At the crossroad,
take the road narrow sign path. Go forward once and be at another crossroad.
Ahead goes to the
wishing stones.
The curve road sign
at diagonal left goes to the picnic area and Druid's pool.
Owl tree:
Go forward at path ahead. See a broken trunk with a red hand. The right tree has an
owl nest hole at top. There are pentagon shaped wood effigies.
Look close at hole.
Take simcard#7. One more card to go.
Turn right and go
forward to the wishing stones.
Emma: Get a call from
Emma. She wants you to find the 3 kids.
Wishing stones:
Study the 3 wishing stones - cairns. See that each cairn has a wish.
Right has Gus'
letter from the hospital about his sick mum.
Middle stone has
Olly's letter about his crush on Mia.
The left one has
wish for Emma.
Picnic area:
Go back; forward 3
times to get back to the crossroad. Take the left road narrows sign path again.
This time take the
left path with the road curve sign.
Go forward once and
see a rock slide sign at left and a danger (exclamation point) road sign at
right.
Emma: Get a call from
Emma. She feels that something ancient is woken and it feels like what
happened 10 years ago.
The danger road sign
goes to the Druid's pool.
Take the path ahead
with the rock slide sign to be at the picnic area.
Olly's glasses:
Remember Olly said that he lost his glasses here. Look at the BBQ
to see Olly's glasses.
Try to open it
and see that it is stuck. Use oil taken from outside the garage on the
grill.
The grill is
lifted. Take Olly's glasses.
Picnic table:
Look right and close at moss covered picnic table.
Use archeological
trowel on moss to see Olly's wish - MK 4 OT.
Newspaper:
Exit the area; go forward towards the wood steps, turn left and click on trash barrel left
of the picnic area sign.
Read the September
2007 newspaper that tells about the service station closing.
Druid's pool:
Continue up the
steps. See a break in the wire of the fence at left.
Go through break of
the fence to be in a pool loaded with junk. Ugh!
Sign:
Turn right and see the graffiti covered sign.
Use the hand
wipes from Mia's backpack to clean the sign.
Read the text.
Precious items were thrown in the reflective pond during ancient times.
Look close at
the depiction on top. See a cup rising from the waters.
Restore the Druid's
pool:
Pool:
Turn left to the pond. Click the junk to remove them from the pond.
Small cairn:
Turn left and see 2 shelves above a dry canal.
Look close at lower shelf that has stacked
rocks.
Take the rocks
from top to bottom. Take the crystal pendant.
Read the note
from the White Witch. The water will flow once the spring key is found
and used. The spring key
is lost when thieves tried to take it. The crystal pendant will find it.
Use the
crystal pendant: Take the pendant from inventory
and see it swing on the screen.
Click on
suspected places on the ground and hear a squeak when it is the correct
place.
Click on the wet
area on the ground right of the purple flower. Get the spring key.
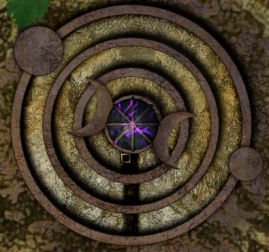
Use the Spring key:
Pull back and click on top shelf.
See 3 rings with
4 moons and space on each ring. It looks familiar.
Study the burned
pagan prayer wheel from White Witch taken from the service station.
The aim of the
puzzle is to move the rings to form the same configuration as the burned
prayer wheel.
Pull back to
reset the puzzle.
Insert the
spring key on the central hole.
Turn the
middle light colored ring 2 times to move the large moon position.
Turn the
inner light colored ring from center 4 times to move the small moon and
get the spaces aligned.
Water flows and
the pool is again reflective.
Follow through the
spiral etched stone clue:
Go back to main
path. Turn left and forward 4 times to get to Quoit-station. Enter the
Quoit.
Pedestal:
Remember the drawing left by Mia at the Spiral etched stone; it has the
runes, hole in the wall and circular item below the hole.
Place the rune
stones on the pedestal with red candles, ring of branches and stones.
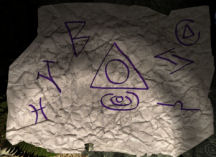
Place the
runes stones that light up when the spiral stone was clicked on
inside the circle. Use rune stones BYH.
See the owl,
bat, fox, deer and leaves appear inside the circle on the wall.
Remember this.
Go back to the
spiral stone by the tractor. Exit the Quoit.
Spiral etched stone: Turn left,
forward twice, right, forward and left to the tractor.
Turn around to
the spiral stone.
Click
sequentially on the different etchings that represent the things that
appeared on the Quoit pedestal after the correct runes are placed.
Click on
bottom left (owl), top right (bat), top middle (fox), bottom right
(deer) and bottom middle (leaves).
Ah, the
branches that blocked the path recede and open the way to the farm house.
Barrow Hill farm house:
Go through the now
open path. See the farm house with the 2 upright stones and lintel as stated
in Agatha's journal.
Door:
Go to the door and see Dark Path leaflets littered on the ground.
Check the door and
see the do not enter sign.
Check the pile of
stone - small cairn by door. Take off the pile of stones from top to bottom and place them
at right side of floor.
Get simcard#8
(the last one).
Mia:
Hear Mia chanting inside the house. Pull back and follow the orange cable to
the open window at right.
See Mia-Baibin block
entrance. You're transported to the wishing stone area.
Check if the last simcard taken from the stone is
missing. If so, go back to
farmhouse and unstack the pile of stone by door again.
Watch Gus' video:
From wishing stone area, turn around. Go
forward 4 times to be back behind the station. Enter the Quoit.
Now we have all of
Gus' simcards and the last of the task he asked us to do.
Look close at Mia's
laptop.
Make a movie:
Click on the books icon at bottom right. Click on Edit Project.
Click on capture
clips to download the rest of Gus' simcards.
Arrange the
clips in order of deducted occurrence. Click the arrow to play the
clips.
From left to
right: Click-hold-drop a thumbnail to the
square where you want it to be placed.
1. Burn a
leaflet.
2. Bike
scene with Gus and Olly.
3. Spray can
use on wall.
4. Insert a
leaflet in mail slot.
5. Knock on
door.
6. Mia draws
pentagram on floor.
7. Mia
showing book.
8. Mia is
possessed.

Click on middle
icon make movie and if correctly arranged get a lost scene. The last
blank square has a new thumbnail - Mia's eyes.
Click play
button to watch the movie. Click on sleep button to exit.
We have done all
what Gus wanted us to do. Exit the Quoit.
Gus' fate:
The phone rings.
Answer Gus' call. He says Mia is possessed. Baibin will be coming for anyone
who says her name. Baibin wants what was taken. Mia-Baibin catches Gus.
Go to the red phone
booth. Outside Quoit, turn left, forward twice, right, forward twice
diagonal left and go to phone box.
See Gus surrounded
by leaves. Take Gus' school ID card. Check the sign on his forehead -
brave.
Find out how to
save the kids.
Farm house:
Go to the farm
house. From the phone booth and stand; go forward until the step. Turn right
while at the steps, go forward to the tractor and then farm house.
Enter through the
window. Mia is gone.
Check the camera Gus
used to record Mia.
Use the matches in
inventory to light the candles at right wall.
First room:
Look close at the pentagram. Read the Dark Path book at right.
Pentagram tab:
See Mia's notes. Remember 5 metals are needed.
Witch tab:
Read the torn part of the Wishing Stone page. It states how to reverse a
wish.
An effigy of
each wishmaker is needed.
A personal
item.
Learn also
that an ID of each person is needed.
Effigy making:
Review how to make an effigy.
Room at left:
Go to adjacent room left of the video camera stand.
Fireplace:
Check the picture of the farmhouse 1854 above the fireplace.
Look in the
fireplace. Move the burned coals. Take the pieces of paper.
Attach the
pieces to the fixed piece at top left. Take the map to Barrow
Hill Station.
Find Emma:
Study the map to BHR.
Go to the car in front of the station. Go to main path, go left, forward
until the road-phone booth.
At the car, hear
Emma on the radio. Mia is there and catches Emma at the station.
Go to BHR:
Exit car. Go forward at road and then turn right. See a path through the
brush just across the shrine.
Go forward. Take
the plank just crossed and place it on the open space. Go forward until
the motorhome-radio station.
Emma's fate:
Enter and see Emma
magicked like the boys.
Look close and see
there's no symbol on her forehead. Emma has leaves in her mouth. Hmm...
Take the Wincey
pendant from her neck.
Exit the motorhome.
Go to the chair at the pier. See a newspaper with Emma's picture at top
right. Her mouth is covered by "silence".
Click on picture to
get Emma's photo.
Reverse the wishes
to save the magicked ones.
Recall the procedure
on how to reverse wishes made as seen from the Dark Path book at the
farmhouse.
Make effigies:
Go back to the
station. Go to the oak tree stump via path at phone booth. Go forward
until the 4 way crossroad close to Quoit. It is marked by that discarded
orange drink container.
Old oak stump:
Turn right and go forward to the rockslide road sign.
Look close at moss
covered stump. Use the archeological trowel to remove the moss.
Effigies:
Review the shapes in the Dark Path book we need to make for the magicked ones
.
Gus needs brave
shape. Olly needs coward shape.
Emma is silenced
and her mouth is covered. Use the orator shape for Emma.
Make one for Mia
just in case - powerful - the Dark Path sign.
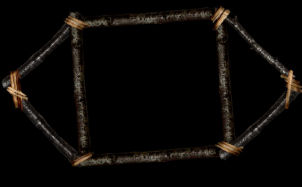
To make an
effigy, click on the required lines to make the shapes.
Make
brave, coward, orator and powerful.
 |
 |
 |
 |
| brave |
coward |
orator |
powerful |
Wishing stone:
Go to the wishing
stone. From the stump, turn around and forward once. Turn right twice.
Go through the road
narrow sign path. Go forward at the next crossroad to be at the wishing
stone area.
Identify each
cairn-stack of stones. Add a personal item, ID and the effigy for each
one.
If correctly
done, see light shine over the items.
Right cairn
is Gus'. Click on the flat stone to make space. Place his ID card
and MP3 player on the shelf and the brave effigy on the side of the
stacked stones above it.
Middle
cairn is Olly's. Click on the flat stone to make space. Place his
ID card and glasses on the shelf and the coward effigy on the side
of the stacked stones above it.
Left cairn
is Emma's. Click on the flat stone to make space. Place her photo from
the newspaper and Wincey's pendant on the shelf and the orator
effigy on the side of the stacked stones above it.
Turn around and
exit.
Get a call.
Answer Emma. She is freed. Emma wants you to free Mia. Emma will look
for Gus and Olly.
Go forward and
get another call. Answer Gus. Gus asks that you free Mia also. Precious
items were stolen from the angry spirit that possessed Mia. Replace the stolen
things with something similar.
Go forward twice
and get the third call. Answer Olly. Olly thanks you.
The three
magicked are now released.
Locate items needed to
free Mia.
Find items needed to
replace the treasures stolen from Baibin:
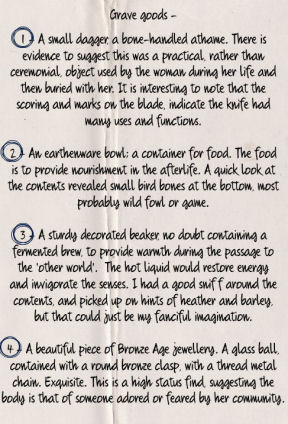
Recall the 4 items
taken from her grave by Agatha: a small dagger, bowl with wild fowl or game,
beaker that has brew that invigorate and restore energy and glass ball
jewelry.
Glass ball:
Go forward to the back of the station. Enter through the fenced in area.
Turn twice to
see where Olly was magicked. He's gone.
There's a Celtic
Corner shopping bag. This is his present for Mia. Take
the glass ball pendant.
Small dagger:
Go back out and through the woods.
Go to the phone
booth via right at crossroad and forward from then on.
Pick up the
multi-tool left by Gus at the phone booth.
Search Emma's motorhome:
Emma's radio
station: Go to Emma's place at the swamp. Take the path across the shrine by
the road. Go forward to the motorhome.
Enter the motorhome
and see that Emma is out looking for the boys.
Computer:
Look around for needed items. Check her computer. It has the same links as
in Mia's laptop.
Purine balance:
Review the Purine balance link.
See at the
sensation link that the green-purple sachet invigorates while the
gold-brown sachet restores.
See that in the
power link; the gold-brown sachet has barley as an ingredient
while the green-purple sachet has heather.
Beaker that has
invigorate and restore energy brew: Go to the kitchenette.
Move the top
shelf items to reveal the red I heart BHR mug.
Place the mug on
the coffee ringed counter top.
Open the Purine
balance box at left. Take green-purple sachet and empty into the mug.
Take a gold-brown sachet and empty it on the same mug.
Pour water from
kettle on mug.
If correctly
done, the liquid shine for a moment and turns purple. Take the
invigorate and restore drink.
Container with wild
fowl or game: Remember the ads made on the radio, as well
as seen in newspaper about the Moshi Noshi noodle food.
Go to the multi
tape player right of Emma's chair. See a picture of Emma and Matt.
Move the photo
aside. Take the Moshi Noshi Uncooked Duck Noodles.
Go back to the
stove. Place the duck noodles on the counter. Pour hot water from the
kettle on the cup.
Get Moshi
Noshi Duck Noodles.
Magazine:
Go left towards the rear of the motorhome. Read the Freaky Times magazine to
learn more about Baibin.
Castaway fishing
rod: Go to the closet at rear of motorhome. Take the
castaway fishing rod.
Locate items as offering
to tempt Baibin:
Review the pentagram
tab of the Dark Path book. The metals needed are: gold, copper, tin, lead
and iron.
Tin:
Exit the motorhome. Go to the trash cans at rear of the motorhome.
Get a discarded open
tin can.
Go back to the
gas station across the way.
Iron:
If you haven't taken it yet, the iron is a horseshoe located at side of the
old tractor.
Lead:
If you haven't taken it yet, the box of lead pencils are in the drawer at
the gas station's office.
Copper:
Go to the Quoit via woods or back of the station.
Outside of the
structure, look close at Gus' graffiti on the wall. Click on the green
arrow to look up at the old weather vane.
If you have
pebbles and slingshot, use the slingshot on the weathervane.
Hit it 3-4 times
to get it to fall to ground. Take the copper weathervane.

Gold:
Go to the now clean Druid's pool.
Use the castaway
fishing rod to fish for the cup illustrated on the sign.
Automatically get the gold cup after
the several failed attempts.
Appease Baibin.
Give offering to Baibin:
Go to the farmhouse.
Answer the phone and
talk to Emma. Emma says to give Baibin offerings and whatever she wants to save
Mia.
Enter the house
through the window at right.
Look close at
pentagram.
Review the metal
positions in the Dark Path book at right.
The book at
right as noted by Mia has the power order: air (blue), fire (red),
spirit (purple), water (green) and earth (yellow).
Deduce the
locations for the metals based on the color of the diagram.
Note that the
drawn pentagram is upside down compared to the book.
Place the
metals in order: gold, copper, tin, lead and iron.
Gold cup at
right point.
Tin can at
top left.
Iron
horseshoe at bottom point.
Copper
weathervane at top right.
Lead pencils
at left point.
|
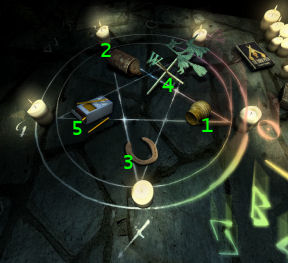 |
Baibin's skeleton: The floor cracks.
Move the tiles to expose the soil.
Use the
archeological trowel at several places of the exposed soil to reveal the
skeleton.
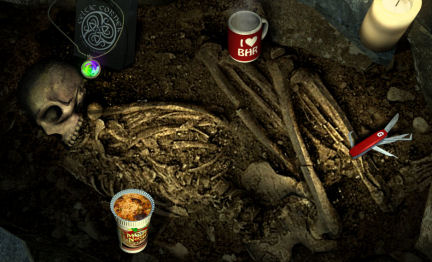
Return the treasures
stolen from Baibin:
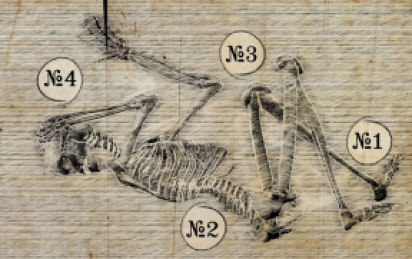
See Baibin's
skeleton.
Recall the location
of the stolen grave goods from the drawing made by Agatha.
Place the items
taken in order:
1. Place
multitool at foot of the skeleton.
2. Place the
duck soup at back of skeleton.
3. Place the
invigorate-restore red mug by her knees.
4. Place the
crystal ball by her skull.
Save Mia:
Mia appears. Help
me! Help me!
Use the powerful
effigy on Mia.
She collapses. Look
close at Mia. Pick her up.
Go through the
window.
The sun is shining. The birds are singing. Autumn Equinox is
over.
This document may not be
distributed without express written permission of the author and the content may
not be altered in any way.
For Questions or Comments on
this Walkthrough,
Please write to:
MaGtRo
Copyright © 10/2016
MaGtRo
 GameBoomers
Walkthroughs and Solutions
GameBoomers
Walkthroughs and Solutions