TIPS - Hints and shortcuts.
GET AN ITEM
- An item is added to your inventory.USE AN ITEM
- Left-Click an item in your inventory and Click again to use the item on the area.Click NEW GAME to begin.
A car passes through the darkening Cornish landscape. Meanwhile, elsewhere, a witchy hand draws weird symbols on an old slate floor.
"The Autumn Equinox is with us once again, a powerful night in the Pagan Calendar. It’s been 10 years since ‘the event’ at Barrow Hill...
Many people lost their lives that night. I saw ‘Things’, things that shouldn’t exist in our modern world - an ancient power, disturbed after thousands of years." - DJ Emma Harry
As DJ Emma Harry continues her nightly intro, we step out of the car, into the night.
Previously on Barrow Hill - This is the Barrow Hill Service Station, 2016. We have returned to the scene of the crime, ten years on. Last time, we 'restored the balance', and stopped the power inside the ancient stone circle, but not before several people lost their lives. We saw it happen! Why have we returned?
Check your Inventory, at the bottom on the view.
You have a Phone. Travelling light?
Look at the Roadside Shrine.
Your phone is ringing! Someone wants to talk to you.
Click the phone, found in your inventory. Click the green answer button.
Receive a phone call -
Is that you? The journalist? I'm Mia, Mia Kendell.
Emma Harry gave me your number. She says you can help!
Mia Kendell? The surname is familiar, and she sounds like she's in trouble.
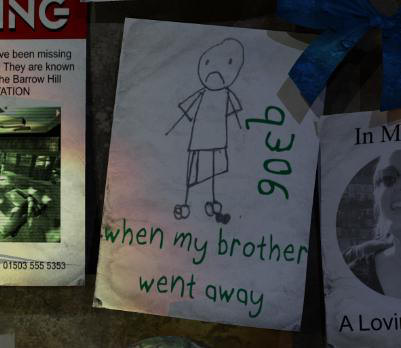
Look at the notices, memorials and mementoes.
Notice:
People disappeared, and the kids drawing with Q306 written on top.'When my brother went away'
There's an unlit candle, the big red one.
Click right side of Shrine, to find the matches.
GET:
MatchesTIP:
All Inventory items can be 'right-clicked' for a larger view, very helpful when seeking extra clues.USE:
Matches on CandleClick candle.
GET:
Lit CandleLeave The Roadside Shrine.
TIP:
Click down the lane, to reach the Phone Box.Turn LEFT, click to enter the edge of the woods.
It's dark in there!
Click the Forestry Sign.
Click the leaflet dispenser.
GET:
Map of Barrow Woods.Return to the car.
Return to the Roadside Shrine.
Proceed through the Children's Playground (climbing frame and broken swing)
"Free Hugs"
Not a chance!Climb through the hole in the fence. Trespassing! Naughty, naughty.
You are behind the utility buildings of the ruined Service Station.
Notice:
Electrical Box.Continue past the broken window.
" My brother, he disappeared, a few years back. People say he's probably dead, but…I want to know what happened to Ben!"
Ben? He is…was… Mia's brother? Hmmm.
Proceed to a fence and pile of old tyres.
There is a dark path, between the trees, leading further into the woods. But, you need a decent light to proceed. Typical!
Climb over the fence – Whoops we have dropped the candle!
Look about the Yard.
There are bulkhead lamps, but no power.
Receive another phone call from Mia.
" I created a Pentangle, made the offerings, it should have worked!
I have to know! The Dark Path, it was supposed to help."
You created a what?! Whatever it is, it doesn't sound very sensible, not on Barrow Hill and definitely NOT on the Equinox.
In The Yard, find box of loose junk on floor. Rummage through box.
Get:
SlingshotNotice:
Locked door, to garage, which needs an item.Go to other yard door and continue in to the Office.
Previously on Barrow Hill - This is where Ben Kendall met his fate, 10 years ago. Something smashed through the window (and wall!!) and fried poor Ben, as he begged for his life. But, does everyone know what really happened?
Look at the desk.
Get:
Utility KeyExit the Office, proceed forward, towards the woods, via a gap in the fence.
Click the stone cairn pile. Dissemble stone pile to find Sim Sard beneath. Curious.
GET:
SIMcard #1Look about, see the Barrow Hill Quoit (pronounced 'Koyt').
Read the sign for info. It's ancient, a 6000 year old tomb. Cool.
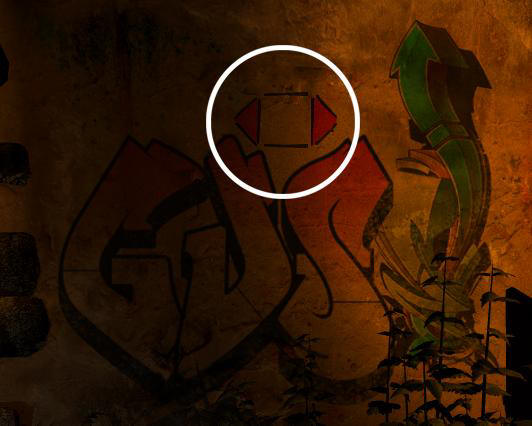
Look at graffiti. Gus?
There is also a symbol, a basic geometric shape:
And an arrow…
Look up. See Witchy Weather Vane, green with age. It needs something.
Three bikes are leant up against the old monument. Look closer.
A flash of green? Some sort of spores? A muffled scream?
There is a small opening, in the stones, enough to squeeze through.
Enter the Quoit. It is deserted. What happened to Mia?
A phone rings and it's certainly not ours, Danse Macabre as a ring tone?!
Step forward to the Altar, find phone on floor. Answer it.
It's DJ Emma Harry, but she was expecting Mia to answer. She's alarmed!
"I know you're still seeking answers for your brother, I've told you I'm still investigating"
Get:
Mia’s Phone
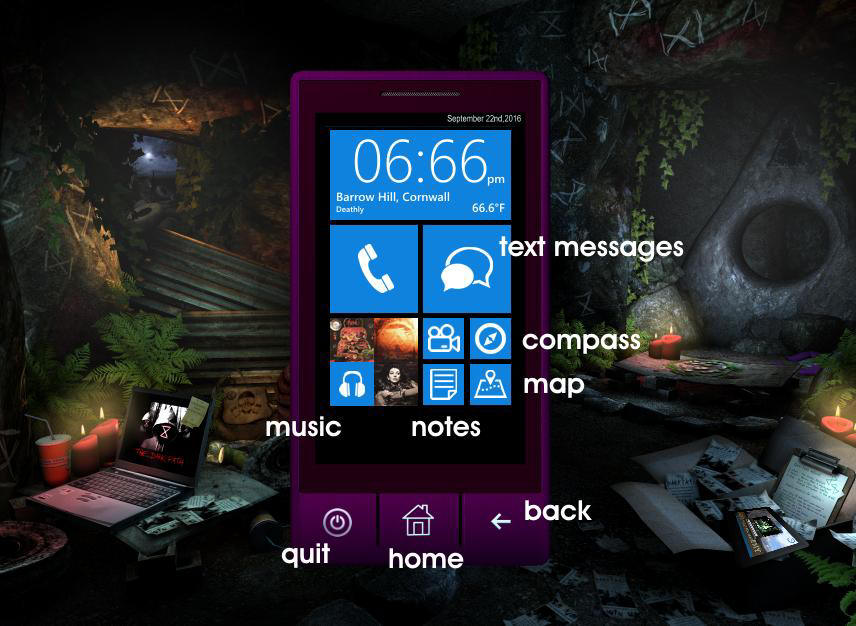
Mia's Phone -
Click Mia's Phone, to bring up the screen.
There are loads of clues and back story hidden within Mia's harmless looking phone, even if it is a rather vile shade of purple. Mia seems to like purple, perhaps that's a clue?
Read phone notes – Page 1-4 - It seems Mia had a plan.
Read her old text messages, revealing more about Mia's friends, Gus and Olly.
Try the Video Link (no signal, for now)
Look at interactive map – see 3 saved map pins – click pins for more info on each location –
Notice:
The Quoit , Barrow Farm and BHR radio station are all tagged.Click the compass icon to activate an onscreen compass. Useful.
You can listen to Mia's music collection - The Dark Path sounds a bit weird.
Explore the rest of the Quoit –
Get:
Mia Kendell's ID Card.Look at Spiral Altar, in front of the triangular stone.
Get:
PebblesLook at the pile of clothes, hidden in a stony booth, to the right on the holed triangular stone.
It looks like someone changed into something more suitable, for black magic!
Click receipt to read.
Click the sweater - 'Sorepoint Academy'. They're just kids!
Click the nearest shoe.
Get:
Sim Card #2Elsewhere, in the Quoit -
Check the leaflets concerning 'The Dark Path', some sort of chav goth gang?
Read the book 'Cornwall - Ancient Antiquities' for further information regarding the Quoit.
Click the Digital Tablet, by the leaflets to watch a video. Creepy.
Click to zip pocket on the green backpack.
Get:
Mia Kendell's HairclipClick the hat -
Click to pull out the hand wipes.
Get:
Hand Wipes.Go to the Laptop Area, glimpsed when you entered the Quoit.
Look at the area behind the laptop, tyres have been arranged as seats. This is a den!
Get:
TorchRead Dark Path Book.
TIP:
The Dark Path - A strange book, from 1965. Three chapters of the book have been specially selected, and will help solve the pagan puzzles later in the game. Don’t worry about absorbing all the info now, as it becomes more obvious later.Look through the window-like hole in the wall of The Quoit.
See security camera outside – notice sign in the ferns – Read 'Goshawk Security'.
A phone call -
Olly Tindle -
He is trapped in the motel, next to the Service Station. He has dropped his glasses and needs our help. He mentions 'Sad Barry' and something about "getting the CCTV working".
What on earth is going on?
Look at the laptop.
The Laptop is locked. Blast!
TIP:
Read sticky note clue – "The Event" – 4 letters/numerals.Look for clues, if you haven't worked it out.
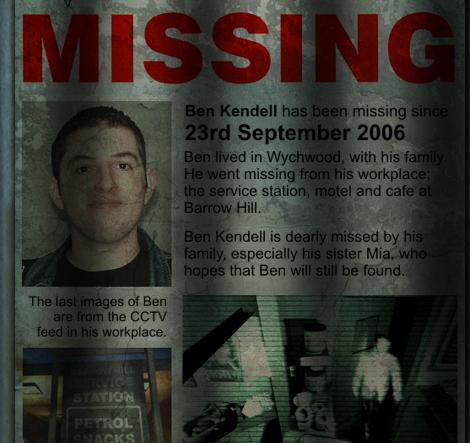
Click to look at the metal sheet to the right of the Altar area, there's an old poster.
Use:
Hand WipesReveal an old missing poster - Ben Kendell - Mia's brother, and a date, September, 2006, 'missed by his sister'.
TIP:
Mia's brother disappeared during an 'event', 10 years ago, which is known as Q306.Go back to the Laptop.
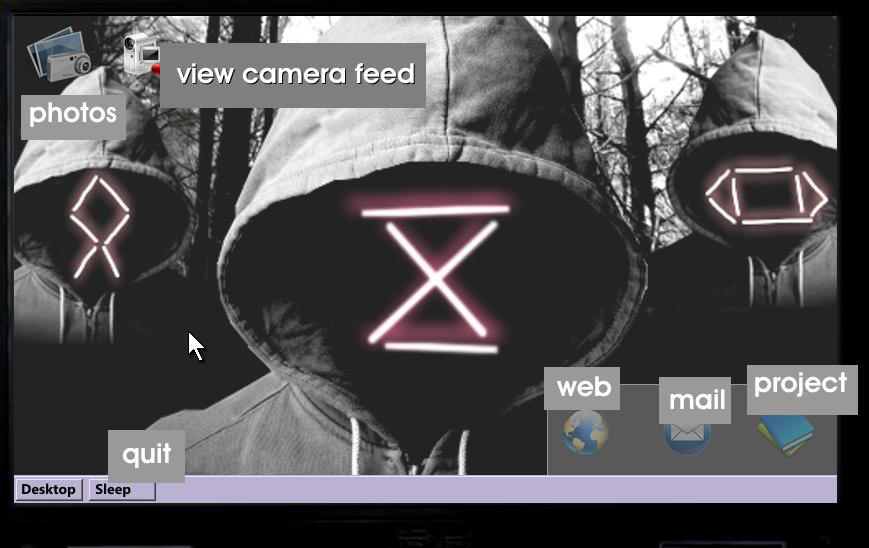
Mia Kendell’s Laptop
Type, using your keyboard, the code: Q306 and click the 'SUBMIT' button.
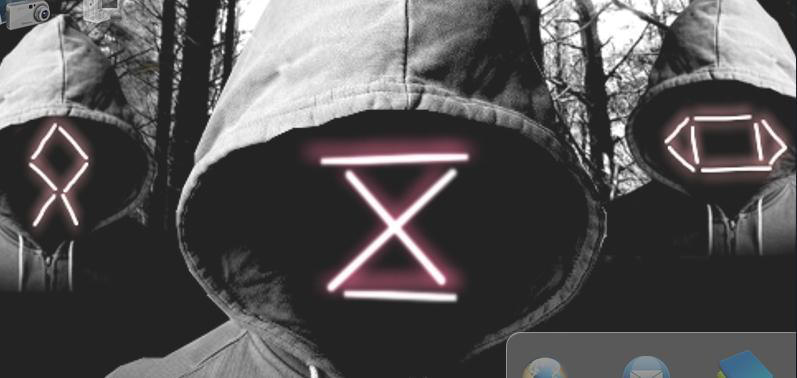
The desktop:
ICON - Photos (top left) The photos tell the story of today, with Mia, Gus and Olly at college, and later, their explorations of the Barrow Woods.
TIP:
Check the 'deleted' photo, it shows a shadowy figure of a girl, in a dark building.TIP:
Mia is looking at a rock face, with spiral patterns.TIP:
Olly and Gus can be seen by strange rock formations, to the right, in the woods.
ICON - Video link – Click it. The red light and 'dud' sound mean it is not working, yet.
ICON - Web browser – local cached files only, so no checking your facebook. Instead, check out the 'Spooky' section of the BHR message board about tonight’s Equinox Events. Click Next on the forum, or previous, to read the other entries.
"The time approaches, the hour is near" - White Witch
Other websites include -
Purine Balance product site: click 'sensations' to interact with the site, drag and drop flavours into the cup to Learn the ‘power’ they provide.
TIP:
Note the powers of each Purine, 'sedate', 'invigorate' etc etc.Cornish Messenger: read the short news stories, 'strange graffiti'.
The Dark Path: A cultish looking website devoted to Q306, and its victims. Click the buttons to explore the web pages, and learn more.
TIP:
Check the 'New Site Pics 2016', it reveals the three teens have been trespassing, and another mention of 'Goshawk Security'. What security?!Read Mia's emails (I know! It's a bit rude, but she is in trouble):
New emails -Emma Harry is worried, and also read the strange message from WhiteWicca, about a "divine" being called Baibin. What a crank!
Saved emails - More info about the equinox and WhiteWicca, "you will see your brother again".
"…a woman, the worst the thieves, came to Barrow Hill in 1965… Baibin will not rest until her treasures are returned…"
TIP:
Read trashed emails, by clicking TRASH, they are very revealing.Sent Emails - Mia has a 'Heather moment', and leaves a 'just in case' email to the world. She also mentions the SIMcards you have been finding.
From Mia's Desktop, click the books icon -
ICON - Video Software
-----------------------------------------------------------------------------------------------------------------------------------
PUZZLE -
Click 'Edit Project'
TIP:
You need to collect all 8 SIMcards to finish Mia's video project. Gus has hidden the cards, just in case he disappeared, like the other victims, 10 years ago. He is likely to have hidden them across the hill, in various audacious locations. Keep 'em peeled.You currently have 2 cards, if you're following this walkthrough, but if you've jumped in, from the ether, here's a complete list -
#1 - under the cairn stone pile, near The Quoit
#2 - in Mia's shoe, inside The Quoit
#3 - in the hole, in the tree on junction to Wishing Stones
#4 - inside the freezer, in the kitchen, after zapping the flies
#5 - in ruined café, by solving 'autumn nut puzzle'
#6 - in ruined service station, on the trolley
#7 - inside the menu, café table, by double doors
#8 - by the door, to Barrow Farm, found later in the game
-----------------------------------------------------------------------------------------------------------------------------------
Exit the Quoit.
We have a torch and know a lot more about what has led up to tonight's shenanigans, but have yet to enter the Barrow Woods. Torch in hand, let's go!
Click to enter the woods, beside the bikes, we can follow the teens route.
USE: Torch on the darkness.
Explore!
There are defined areas, based on the map, which can be viewed at any time in inventory, or by clicking the icon in the bottom left.
TIP:
If you don’t have the map, follow this route to the Phone Box and the Forestry Sign, immediately after entering the wood, with the torch up.R, F, F, F, L
Locations to discover in the Barrow Woods:
Tree Stump Altar - Covered in moss. Return later to make Wood Effigies.
Get a phone call.
"…you are the only one who really knows what happened, you restored the balance, made the offerings…"
Owl Tree -
Click the hole. Click to take the hidden stash.
GET:
SimCard #3To the right, of the Owl Tree, you can see piles of stones.
The Wishing Stones -
A phone call.
"The Dark Path, they hide out in the Barrow Woods"
Click on each pile of stones, to find the current 'wishes'. There are three in all.
TIP:
Try to determine who's wish is who's. Gus, Olly and Emma Harry.Picnic Area -
Look at the BBQ. Olly's glasses? The grill is stuck.
Look the picnic table. More moss. Come back later with an Oil Can.
Click the newspaper in the litter bin, and learn more about the old Service Station and the 'cult'.
Druids Pool -
It's been sealed off at some point? Why?
Not much of a pool!
Look at the sign.
USE:
Hand WipesThe pool is an ancient druid site, where precious items were 'sacrificed' to gods and deities. It looks vile at the present, but perhaps we can do something about that.
TIP: Click the sign illustration for a closer look. What a nice cup!
Turn to look at the stone steps, with small stone cairns.
There are two steps.
Click First step.
Click again, to look closer. There's something under the stones.
GET:
Crystal PendantRead the note.
"…a crystalline guide…"
Click second step.
A nice obvious puzzle, waiting to happen. But, you need the key, mentioned in the note.
Click back to the steps view, and bring out your magical purple pendant.
USE:
Pendant on the mud.Move the pendant, over the scene, until it hums.
TIP:
Try the really wet looking bit.GET:
Spring KeyLook back at Step 2 -
USE:
Spring KeyIt moves! But, we don’t know what to set the rings to.
Old Cornish Farmhouse -
A rusting tractor announces you have found Barrow Farm.
Look closer. Pick up the horseshoe. For luck?
GET:
HorseshoeLook around.
There's a girl… Mia? A barrier of branches blocks your path. It's like they're alive! Well, MORE alive!
Notice:
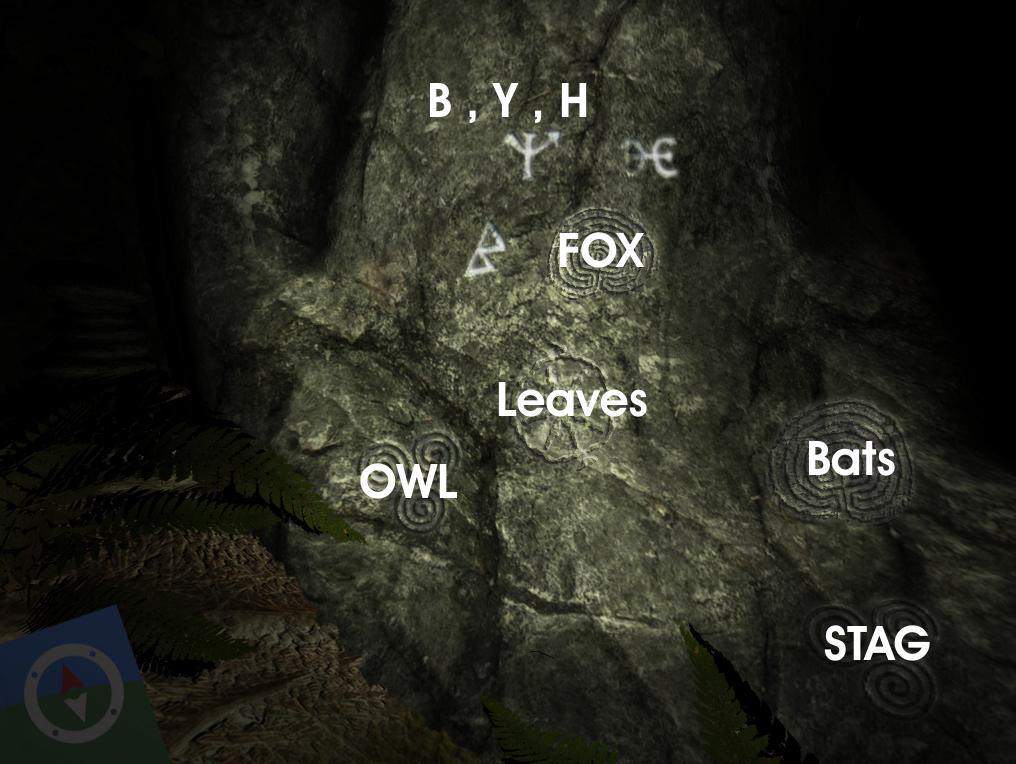
The orange cable leading up the slope.Turn again, to examine the rock face. You've seen this location before, in Mia's photographs.
Some of the symbols are 'Celtic Mazes'.
Click the symbols. They glow. Listen out for animal sounds, from the woods below.
Notice:
Three distinct symbols, to the top. They are smaller and can be read as 'B', 'Y', 'H'.There is an order here, discovered elsewhere. Move on.
Phone Mast -
Enter the metal compound. There is a sealed box on the mast. It needs an item.
From this location you can see the back of the Service Station, and the Phone Box Area.
Go back to the car, by passing the Phone Box.
The radio is still on, so now is a good time to check the airwaves.
Click the dial, right, to hear an emergency message from Gus Bevan.
"find the SimCards…it'll show you what happened"
Other stations are available.
TIP:
There are clues to later inventory items hidden in the adverts.Return to power box behind the Service Station.
TIP:
Through playground, through white fence, turn left.USE:
Utility KeyYikes! The Cornish do like a good puzzle!
Click the power nodes to make the connections.
Connect blue to blue, red to red, green to green. They will light up when done.
Power has returned to the Barrow Hill Service Station.
Go back to the yard, by jumping over the fence.
TIP:
You can access the yard from the woods, also.The lights are on.
Return to office.
Click the answer machine.
"…work keys…office…check down the side of the office chair…"
Click chair.
GET:
Garage KeyGo to yard – look at locked garage door.
USE:
Wipes on widow, optional.USE:
Garage Key on doorGo in to the garage.
A radio is still tuned!
"It's Baibin's world, a place of the dead. She was the last to be buried on Barrow Hill"
Look around the garage.
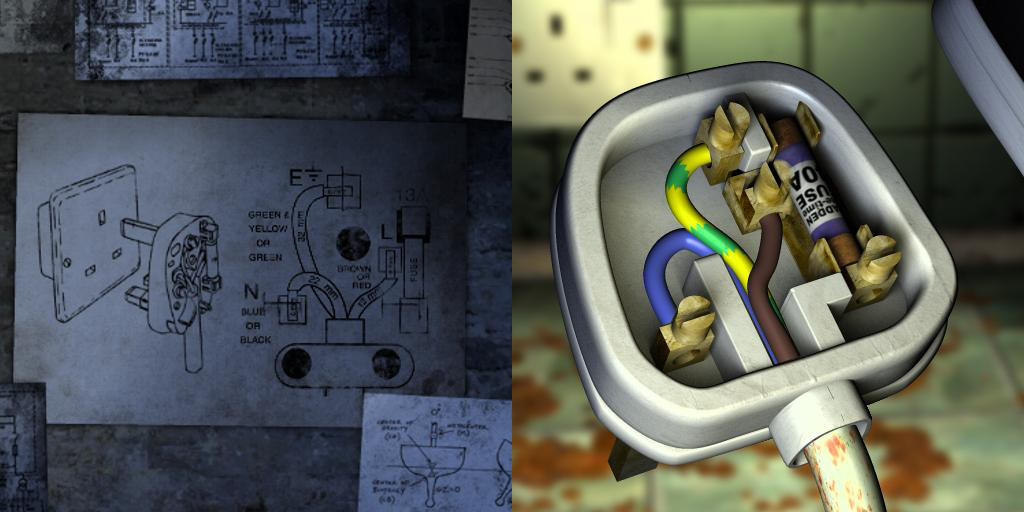
Notice:
Instructions on how to wire a UK plug, fascinating!GET:
CrowbarOn the workbench –
GET:
ScrewdriverClick the string, click the string on the old car aerial, click the magnet, click the magnet on the bottom of the string, click to take.
GET:
Fishing MagnetLook at double doors.
Click the metal sheet and look outside.
USE:
Fishing MagnetGrab the oilcan.
GET:
Oil CanLook at the power relay box on the garage wall, behind the ivy. Move the ivy, it seems to grow everywhere, like a green invasion.
USE:
Screwdriver to open fuse boxFuse Box Power relay:
Click the switches to set the required current.
240v
Some switches add power, others deduct.
Look at the Lift Buttons, across the car, in the garage.
Use controls to raise the car.
There is a service grill, under the car. Take a look. There are keys down there!
USE:
Fishing MagnetGET:
Car Boot KeyNow, lower the car using the green lift controls.
USE:
Car Boot Key on car boot/trunk.Inside car boot, examine the belongings.
See photos – Archaeologist outside an old farm, and Celtic Mazes.
Read the Celtic Mythology book. Who or what is Baibin?
Read Agatha’s Dunn Harker's Journal, it reveals a back story to 'Barrow Farm'. Agatha, an archaeologist, excavated (what she believed may be) the burial site of a Celtic Deity known as Baibin. She also took the four grave goods from the site. Uh oh.
Also, make sure you read the note, tucked in the diary! Make note of the goods, and the number.
Read grave plot scroll – Note the positions of the grave goods.
TIP: Note what was found at each position in the grave.
GET:
Archaeology Trowel.Exit garage.
You have a crow bar. Earlier, there was a scuffed door with the Dark Path symbol, which might allow access to the interior of the Service Station. Or, you could approach some of the puzzles by now…
TIP:
The trowel can deal with moss and dirtTIP:
You are still looking for SIMcards.…but for now…
Go back through the Barrow Woods, aiming to return to the Service Station front.
You are likely to get a call from Olly Tindle, Gus Bevan or Emma Harry while wandering the woods. They all want your help!
Emma Harry -
She is really worried about her friend. So worried she'd rather stay home and talk about the spooky equinox while you crash around in these bloody woods!
So, let's help these teens!
Gus and Olly are nearby. Olly at the motel, Gus was near the mast. They can't be far. As for Mia, she seems a little self possessed to care. She's a little frightening too.
Back to the Service Station front.
Go to the door, with the Dark Path symbol.
TIP:
Car, playground, white fence, grey door.USE:
CrowbarEnter the kitchen.
Another radio, another phone in.
"one name, the oldest name, should never be said, it's her that walks the woods, the lady of leaves, that grave-robber, she took 'em"
Something is making a din, at the back of the kitchen.
Proceed to the back, click the freezer lid. Flies! Loads of them.
Go to the oven/cooker. There's a switch, to the top right, click the switch. The flies are gone.
Go back to the freezer.
GET: SIMcard #4
Read the note.
'Sun and moon meet?' The Equinox.
'The souls of three'. Gus, Olly and Mia?
Leave the kitchen, through the open door, into the old café.
Read the note.
'when her treasures are made anew' Ah ha! We going to make Baibin some new grave goods, to replace those stolen by Agatha Dunn-Harker back in 1965. Cool. Easy enough.
Click the cash register.
GET:
FuseProceed into the café.
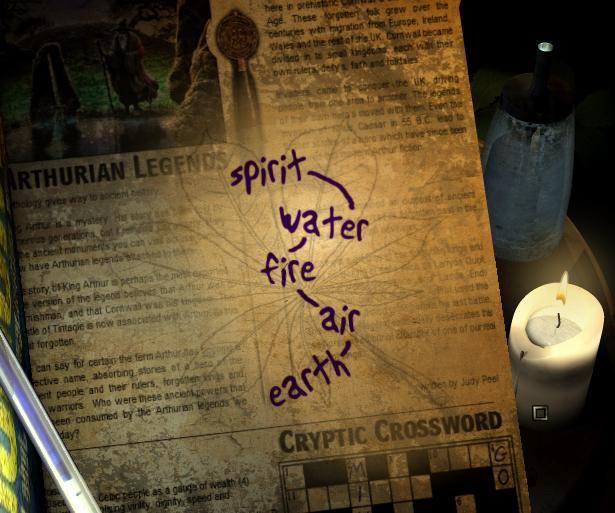
Click the altar with the stick pentagram. There are five night-lights arranged on the points of the pentagram, each a different colour. It looks like Mia has been playing with fire to impress her friends, perhaps based on the rambling nonsense we read in that book - The Dark Path
The horse chesnut (or conker, to you and me) is still green. The autumn fall is about to happen, as leaves start to turn from green to red, brown and yellow. The Fall.
Read The Dark Path book. The Chapter called 'Binding Pentacle'. There is a colour to each point of the pentagram.
Click to look at the magazine, on the table. Someone, Mia, has scribbled a note.
'Spirit, Water, Fire, Air, Earth'
Reference The Dark Path book, and work out the order to light the candles.
TIP:
Purple, green, red, blue, yellow.The Chestnut has turned to autumn. Neat trick Mia!
Click the nut. Click again.
GET:
SIMcard #5Look around the café. Click the table, near the double doors.
Click the menu.
GET:
SIMcard #6Go through the double doors.
There is a trolley, with old plates and cups. There's also a stash, hidden by Gus.
GET:
SIMcard #7Look around. There is a weird shrine, like the Roadside Shrine, but different. The cards are wishes and prayers, rather than missing posters. So, the people around here REALLY believe in this stuff.
Click to read some of the cards, and look at the poster, from 2006, now defaced.
GET:
Pagan Prayer WheelRight-click the Pagan Prayer Wheel, and click-hold, to rotate it. There is a message in the spiral pattern.
"…the water must flow, for the woods to live, seek the key…"
"burn me with lightning, my message revealed"
Lightning? It's a dry night, but that microwave might help replace the weather. The Prayer Wheel is an old practise, where threads of metal were woven into patterns, song and prayer said during the weaving. Then, the mesh was sealed between paper, and prayers were written on the surface. The prayer was then destroyed, to seal the wish.
Click the round table, there are more wishes and messages.
GET:
Rune StonesPass back through the kitchen.
Click the food mixer, next to the door.
Click the jug. Yay!
GET: Plug
Go to the back of the kitchen, and look at the microwave. Inactive.
Click electrical lead next to the microwave.
USE:
PlugUSE:
FuseA plug wiring puzzle, how thrilling!
Click the wires, and click again to place them. The clue was in the garage, on the wall, but for now.
Green - top
Brown - right
Blue - left
Plug in the microwave.
Click the microwave.
Looks like it might be leaking a few rads!
USE:
Pagan Prayer WheelClose the door. Press the keypad.
The microwave doesn't like the metal content, burning of the paper, without damaging the precious clue.
GET:
Pagan Prayer Wheel (burnt)Click and hold the Pagan Prayer Wheel to get a clue to solving the Druid's Pool puzzle.
TIP:
Don't try to read the message without turning it, as it'll make you dizzy.Leave the Service Station.
Jump over the fence, into the yard.
Olly mentioned CCTV. Something about 'Sad Barry'. Go to the office.
Look at the old screen.
Click the note, beneath the screen. Error codes.
BH2673
Click the phone.
You are through to Barry, from Goshawk Security.
Enter your site address: BH2673
Error code: 475
The CCTV is working. Click the small versions of the views, to see a full screen version.
We are looking for Olly Tindle, but feel free to browse.
TIP:
Click the motel interior, top middle, last. You can then preview the other views, before Olly takes over.Olly has lost his glasses, so he needs you to guide him to safety. He seems mortally afraid of Mia. Why? What could she possibly do?
Guide Olly by clicking the direction you want him to go.
"Is she possessed? Yeah, that could be it!"
If Olly goes to the Service Station forecourt he has an encounter with his friend. There's definitely something wrong with her!
So, instead, guide Olly back, and send him left, into the woods.
"DO the summoning spell properly…"
"I said her bleddy name!"
Guide Olly through the old toilets.
Mia is haunting the forecourt. Wait for her to be facing away from Olly to make a move.
Guide Olly the garage front, there is a hole in the double doors.
Leave the office. Olly is safe!
OMG! Olly is… what is he?!
Not dead, but somehow entrapped in magic bindweed and…spores? Bugs?
Immediately, Gus turns up. He's scared, and runs off. He said he would call the police.
Look close at Olly.
GET:
Oliver Tindle's ID CardTwo ID cards, so far. Mia and Olly. Gus is the only one left. We'd better find him.
Enter the woods.
The phone, Gus is calling you.
Gus tells us that he is hiding. We should look for his hidden SIMcards and edit the clips, via Mia's laptop.
"I've got eyes inside the building"
"follow the orange cable"
"find the SIMcards"
He tells us to follow the Orange Cable, to his transmitter. It will give us eyes inside the building. He leaves instructions, in the red phone box, for setting up the transmitter.
Go to the Phone Mast.
Look at metal box on Mast.
USE:
ScrewdriverGET:
Gus Bevan's MP3 PlayerGo to the phone box.
Look inside.
GET:
Transmitter Settings NoteEnter the Barrow Woods. Go to the Old Farmhouse (Barrow Farm), and find the orange cable. Follow it
back to a patch of rocks and ferns next to the HIKING sign. Click to look closer. Click the bind weed. That stuff gets everywhere! Supernatural?The transmitter looks complicated, but Gus left us some clues.
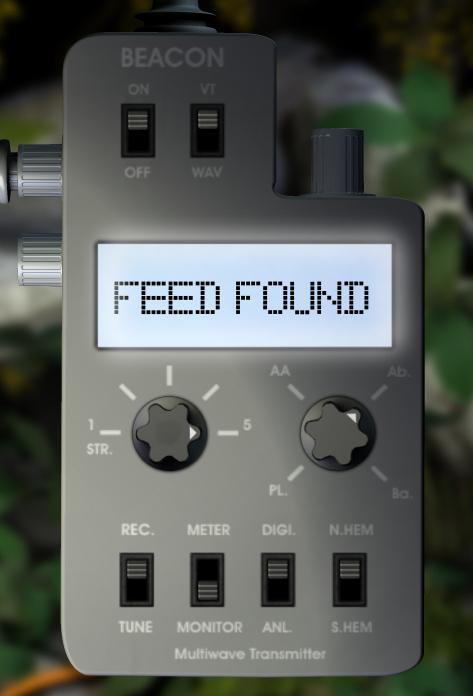
Set the dials as follows -
ON, VT,
Strength 5
Ab.
REC
MONITOR
DIGITAL
N.Hem
Your clicks result in -
FEED FOUND – SIGNAL LIVE
Leave the transmitter. Click your phone. Click the video camera icon.
We have eyes inside the farm.
TIP:
The scene changes with each view, there are several videos of Mia doing her thing.TIP:
You can also view the footage on Mia's laptop.So, Mia is hiding up at the old Barrow Farm. The twigs block your way. The orange cable passes that rock, with the Celtic Mazes, that fascinated Mia so much on her visit. There were three symbols on the carved wall that looked like letters. The dropped sketch suggests we use them in front of the altar, in the old Quoit (the triangle stone, with the hole in the middle is clearly marked).
Go to the Quoit.
Look at the Altar, in front of the triangle stone.
USE:
Rune StonesTIP:
There are lots of combinations, of three. Most combinations work to get different visions.C,<>,H = a face
Y,C,B = alien? ... baby? ... alien baby?
Y,C,H = a woman, I hope
C,<>,bent bar = Celtic Turtle
<>,bent bar,H = tribal face
Y,H,bent bar = bird
B,<>,bent bar = hunting scene
Y,B,bent bar = I have no words. I don't know how to describe that.
Put a rune in, any, and take it out = sad triangle man
TIP:
Use C,<>,H and get a pic of developer, Matt ClarkTo solve this puzzle, use the stones with the symbols seen at the rock face, with the spiral patterns.
Solution: BYH
There is an order, the animals are a clue.
TIP:
Owl, Bat, Fox, Stag, LeavesWhich is what we should do. Return to the rock face, with the Celtic Mazes.
Click each symbol, hear an animal.
Top - Fox
Middle - Leaves
Left - Owl
Right - Bats
Bottom Right - Stag
Solution is: Left, Right, Top, Bottom Right, Middle.
The twig barrier has been lifted! Take that Mia, or Baibin, we're coming up to Barrow Farm.
Go forward. Red candles light the way, never a good sign.
Look at the sign - Barrow Hill Farm
Go forward.
You can hear Mia, busy doing her magic in the old farm. It's all a bit freaky.
Look at the front door of the old farm.
Click the cairn pile to dismantle, and take the final SIMcard!
GET:
SIMCard #8Come away from the door, click right, to look at a window.
The orange cable leads the way, click forward.
Climbling through the window, you get a nasty surprise.
Back at the Wishing Stones. It seems that Mia/Baibin doesn't want us to interfere in her plans. So be it, we shall find out what happened. We have the final SIM.
Go to Mia's Laptop, in the Quoit.
The video feed ICON, on the desktop is now active. Mia/Baibin is working up to something, a final show before the big act.
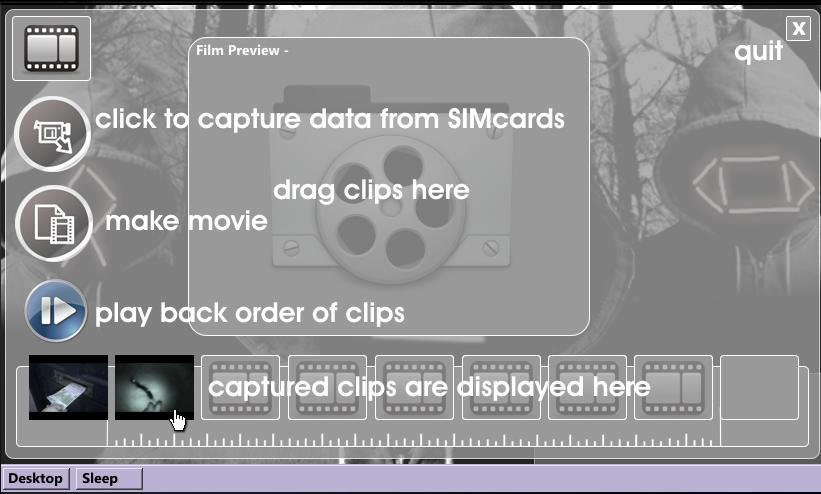
Quit the video, and click the BOOKS ICON, bottom right. It's Mia's Project. (Certainly is!)
Click EDIT PROJECT.
Capture Clips.
There are 8 clips in all. The aim is to piece together the events leading up to the Equinox. Most are obvious, as they take place at Barrow Farm, but the earlier ones are tricky.
The order is:
Someone alone, burns a leaflet. (Someone not sure about all the weirdness).
Gus asks Olly is he's serious about Mia. (They look at the weirdness, book and leaflets)
Gus sprays a wall with the Dark Path symbol. His bag has many leaflets still in it.
Posting the last leaflet. (Gus sounds fed up)
Knocking on the door.
Chalk drawings.
Showing Gus and Olly the book.
Possession.
Once placed in the right order, click MAKE MOVIE.
An unused clip is revealed. It shows the Mia/Baibin possession, she is talking a strange language.
Gus was right, we did need to see the clips! Let's find him.
Leave the Quoit. It's the man of the moment, Gus.
"…there was something there, in the farmhouse…"
"She wants what was taken"
Quick! Get to the Phone Box.
Gus has been trapped in the Bindweed. Silenced, for now. He said her name, and she came for him.
GET:
Gus Bevan ID CardNotice:
The symbol on Gus' head.We'll just leave Gus for now, he's not going anywhere.
Let's deal with Mia! She's tried once, and failed, so we're in with a shot. Go to the farmhouse.
Enter through the window.
Mia is gone…ish.
Look at the Video Camera. This is the camera that captured the footage.
Look around the farmhouse.
There are two rooms. Either can be explored.
This room, with the pentacle on the floor. It is the same as the one from the video.
Look at the candles, to the right, to look closer.
Light them.
A glowing pentacle, humming with energy. There is power here, that's for sure.
Look at the circle, the pentacle on the floor.
Look at Mia's copy of the Dark Path book. She has added notes.
'power order for the metal offerings'
Notice:
Mia's copy of the Dark Path has the missing Wishing Stones page, about reversing the wish. She wanted to keep that part secret.TIP:
You need to find examples of the metals described.TIP:
The metals are spread across the area, some need a puzzle solved to get them.The room with an old fireplace has a picture on the wall. Barrow Farm back in its heyday.
Look at the fireplace.
Click the ashes to remove them.
Click the paper.
Click and hold to move the scraps about.
It will make a map, a basic emergency route to Barrow Hill Radio.
GET:
Map to Barrow Hill RadioFollow the map.
Go to the Service Station front, go to the car.
A radio sequence, Emma has an uninvited guest. She said her name, three times, earlier tonight, like a taunt. You could say she brought this on herself, but let's hope you're not too late.
To the back of the car is a rough track, barely a path. This must be the secret route described by Emma on her map.
Proceed down the path.
Cross the plank. Turn. Pick up the plank, then turn, place it across the gap. Emma Harry's ingenious drawbridge, not!
Pass through the lower swamps of Barrow Hill, to find BHR. It's awfully quiet.
Go inside BHR.
Emma has been silenced.
Look around the room.
GET:
Castaway Fishing RodLook close at Emma to take her pendant.
GET: Wincey Pendant
Go outside, go to the water's edge, on the small jetty.
Look at the trashy mag, click the corner to take a picture of Emma.
GET:
Emma Harry PhotoLook in the bin, by the Winnebago.
GET:
Tin CanLeave the swamp, and return to the Service Station.
You MUST break the wishes. It's the one thing they all have in common. Mia's magic could not trap you forever, so you stand more of a chance. Break the wishes. Reverse the magic.
Read the Dark Path, and learn how to make shapes using twigs. They are called Wood Effigies, some sort of offering for the fairies. There are various shapes, you need to work out which could represent the three trapped by the bindweeds: Gus, Olly and Emma.
Gus has a symbol on his head, and is also found on Mia's desktop portrait and the graffiti by the Quoit.
Olly has a symbol on his head, and he's a bit of a coward, he said so twice, on the phone. He's also on Mia's desktop.
Emma is an 'orator' (someone who commands an audience with their voice), she's a DJ. Check the book for the symbol.
Mia is powerful, as we can see. Check the book for her symbol. It is the Dark Path symbol too.
Make wood effigies of each symbol.
The wood effigies can be made on the old oak altar, deep in the Barrow Woods.
Go to the altar.
USE:
Archaeological Trowel on the mossMake the shapes.
GET: Four Wood Effigies, the last is for Mia.
Orator Wood Effigy
Cowardly Wood Effigy
Brave Wood Effigy
Powerful Wood Effigy
You have some personal items for some characters already, but here is a complete list, and their locations:
Emma personal item - Wincey Pendant - round Emma's throat, BHR
Gus personal item - MP3 Player - inside metal box, by the Mast
Olly personal item - his glasses - inside the BBQ
USE:
Oil CanGET:
Oliver Tindle's GlassesGo to The Wishing Stones.
There are three stacks, each representing Gus, Olly and Emma.
Place the offerings for each.
Love Letter Stack - coward, glasses, Olly ID Card
Hospital Stack - brave, mp3 player, Gus ID Card
BHR Stack - orator, Wincey Pendant, Emma pic from mag
TIP:
You don't have to do all three at the same time. If you've got parts for one, do it.Leave the Wishing Stones.
Emma Harry is on the phone.
"I was trapped"
"Swallowed by leaves"
"something feeding off her sadness"
Gus phones.
"If you can save Mia, please try!"
"Precious things were stolen from her"
"Maybe you could replace them with something similar"
Try to save Mia. Go to Barrow Farm.
Emma phones.
"Whatever that thing wants, give it to her!"
"Was something stolen? What can we offer?"
Enter through the window, look at the pentacle.
USE:
the five metal offerings------------------------- Metal Offerings -------------------------
Iron - Horseshoe made of iron. Clue to metal, Celtic Corner radio advert.
Found - On the tractor, by the bottom of Barrow Farm.
GET:
Horseshoe-------------------------
Gold - The cup, thrown into the offerings pool, The Druid Pool.
Spring Puzzle, by the Druid's Pool.
Consult the Pagan Prayer Wheel for the solution.
There are 3 dials, each moves or moves another in turn.
TIP:
Coming away from the puzzle resets it.USE:
Spring Key* is you haven't already, insert in the centre. (*found using the pink crystal diviner).Solution: Middle 4 times, second ring twice.
With the moons aligned, the water flows.
The pool is clear, click to remove the rubbish. A shopping trolley?! Where is the nearest shop? St.Awful? That must have been quite a hike.
USE:
Castaway Fishing RodMove the rod and click, you may be lucky!
If you don't, you'll automatically get the cup after 5 goes.
GET:
Gold CupYou can carry on fishing if you like.
-------------------------
Copper - The green weathervane, by the Quoit. It's green, verdigris. It has to be copper. Additional clue, the Antiques Adventure Land advert.
Go to the Quoit, look at the graffiti, there's an arrow, look up.
USE:
Sling shotAim at the weathervane, take some good shots when the target is close or over.
Pick up the weathervane, after it tumbles into the nettles. Ouch!
GET:
Weathervane-------------------------
Tin - Tin can, Emma's bin by BHR
GET:
Tin Can-------------------------
Lead - In the drawer in the Office. Click and drag to move the leaflets out of the way.
GET:
Lead Pencils------------------------- End of Metal Offerings -------------------------
Consult the Dark Path book on where to place the Metal Offerings, and the correct order.
TIP: Each metal has an element, the order is written in Mia's copy of The Dark Path. Cross reference the lists. There are only five, each has a colour, an element and a symbol.
The metals should be placed as:
Right: Gold Cup
Top Left: Tin
Bottom: Iron Horseshoe
Top Right: Copper Weathervane
Left: Lead Pencils
Something is happening! The ground has changed, the earth exposed. Click the slabs to move them out of the way.
TIP: All
of them.USE:
Archaeology Trowel several times, dusting off the earth.This is the grave site of Baibin, the wrongly monikered 'mythical deity'. She lived. She lived here, in the old Barrows of the hill. Agatha Dunn-Harker dug her up, in 1965, and took the grave goods, and her arms, apparently. What a horrid thing to do. It's no wonder that Baibin is out looking for her things. The best we can do is find modern equivalents of the old items, and hope she doesn't notice her arms.
TIP:
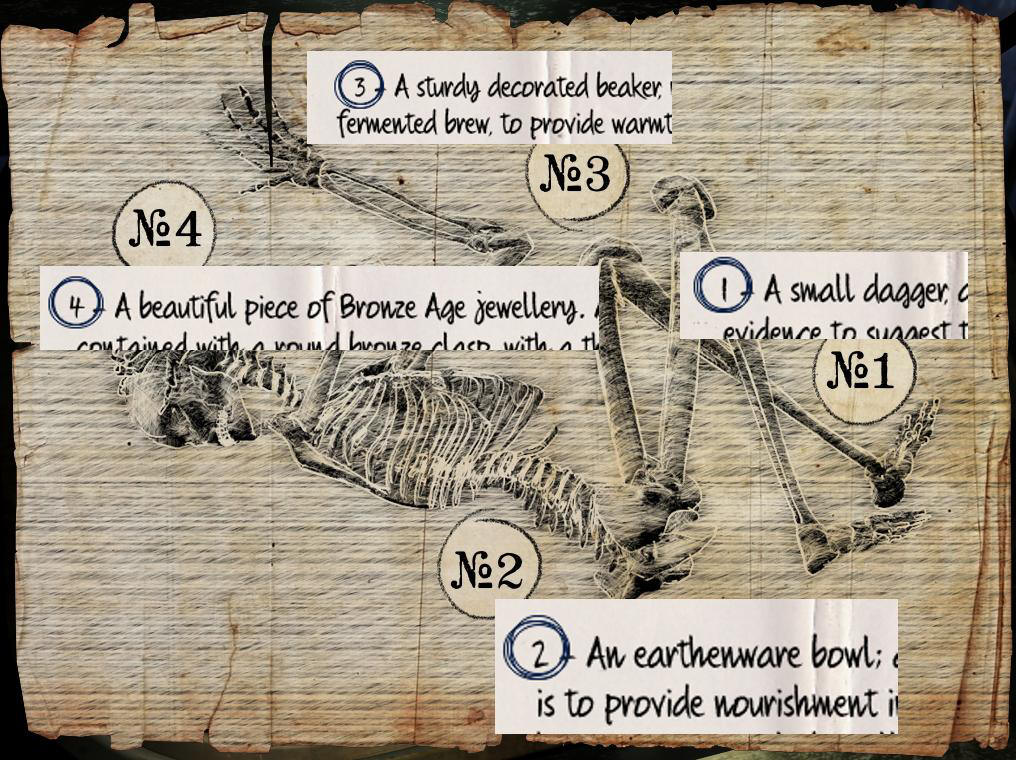
Consulting Agatha's Journal would be good, if you haven't already. Or refresh your mind. There were 4 grave goods, from specific places around the body, neatly labelled 1 to 4.You need new grave goods.
--------------------------------------- Grave Goods ----------------------------------------------
1 - Dagger - actually Baibin's Athamé - Gus' Survival Multi-tool.
Go to the phone box.
Go check on Gus.
He has left behind his handy multi-tool.
GET:
Survival Multi-tool-------------------------
2 - Food Offering - Wild fowl or game
Go to BHR.
Enter the Winnebago.
Emma has gone, looking for Mia, Gus and Olly.
On the floor of the Winnebago is Freaky Times magazine. Click to read more on ‘The Witch of Barrow Hill’ – Baibin sees, Baibin knows.
Look at Emma's DJ area.
Look at the DAT dates.
Move the photo of Emma and Mr.Organic, ooooh!
There's an unopened packet of Moshi Noshi. Clue, front of Scorn magazine, or Emma on the radio moaning about her diet "Wild Fowl or just foul".
GET:
Uncooked Duck Noodles.Look at the kettle area.
USE:
Uncooked Duck Noodles.GET:
Duck Noodles-------------------------
3 - The drink offering, a restorative brew to invigorate the afterlife.
Move items around, above the kettle area, to find the BHR Mug.
GET:
Barrow Hill Radio MugUSE:
Barrow Hill Radio Mug on the kettle area.Open the Purine Balance packet, to get a selection of infusions.
TIP:
The website, on both laptops has clues to the 'effects' of each sachet. Click 'sensations'. There are also clues in the ingredients list, under 'Power'. Purine has also managed to restore Bob's hair, during the Purine Balance advert.TIP:
Agatha writes about the drinks offering in her journal.Brown/Cream = restoration
Purple/Green = invigoration
Click the kettle to add water. A lovely purple brew, oh Baibin will be pleased.
GET:
Invigorate and restore drinkLeave BHR.
-------------------------
4 - Jewellery, something decorative and meaningful, it must be precious in some way.
Return to the Yard, to check on Olly.
Olly has left us a lovely gift. Click to pick it up.
GET:
PendantOh, it's a gift for Mia! Take it.
----------------------------------------- End Grave Goods -----------------------------------
Go back to Barrow Farm. It is time to give Baibin what she is seeking, the stolen goods, buried with her for a reason.
Enter the farm through the window. One last time.
TIP:
If you have the grave goods, this is end of the road, the night is drawing to a close.Place the items, correctly, around the body.
USE:
Survival Multi-tool, by the feetUSE:
Duck Noodles, by the spineUSE:
Invigorate and restore drink, by the kneeUSE:
Pendant, by the headHope she likes them!
A conflicted Baibin/Mia appears. She is desperate.
"help me"
USE:
Power Wood Effigy on Mia.Mia is free. Just a girl in a thrift store frock. A case of supernatural misadventure.
Baibin has gone, returned to the earth, happy with her offerings.
The night has turned to day; the ferns dry and turn autumnal before your eyes. It's a pleasant autumn morning, in the heart of Cornwall. A black bird sings. The night is over; the green has retreated and died for another year. It's over.
Look at Mia. Is she dead?
Click Mia and carry her body to the window.
Click the window to leave.
Emma Harry wraps up the nights events, in her usual style.
She might have a point about grave robbing.
The END.