CHINA |
| |
| This part of the road leads to China. You are 'transported' into the body of Doctor Wei. First try leaving through the gate to discover it's blocked by a shadow. This activates the shadow dialog topic with Master Lo and Master Wu. Talk to Master Lo (first room on the left) to learn about what's happening. Then talk to Master Wu (the old man outside). Ask Wu about finding Grand Master Tan Yun and he tells you to meet him in the Turtle Chamber (last room on the right). |
| |
| |
TURTLE CHAMBER |
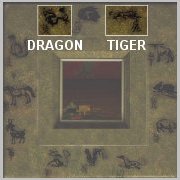
| Master Wu (the Master of Directions) tells you to 'establish the directions' and then travel to the 'House of the Tiger'. Note the four coloured drawings on the rim of the stone pot. Click the one closest to you to view the drawings or click any other drawing to rotate the rim. Also note the diagram set out on the floor. The diagram is a 4X4 grid and you move around from corner to corner (or 'crossroads' as Wu calls them). |
| |
| Place the turtle in the stone pot and ask Wu about it. He says the turtle 'swims towards the mountain, the plain at his tail, the pagoda to his right and the river to his left'. Study the drawings on the rim carefully. The red drawing is the only one that doesn't have a pagoda, the yellow drawing the only one that doesn't have a river and the green drawing doesn't have a mountain. |
| |
| Rotate the rim so the turtle and coloured drawings fit Wu's directions. Only one position shows the turtle facing a mountain, a pagoda on his right and a river on his left. The other three positions each have either a mountain, a pagoda or a river missing. From this you know the red drawing is the mountain, the yellow is the pagoda, the white is the river and per force the green drawing must be the plain. |
| |
| Face in the same direction as the turtle and hold up the engraved medallion. The symbols on the medallion correspond to positions on the floor grid. Take note of the tiger and dragon positions. |
| |
 |
| |
| Talk to Wu, using the 'square' dialog topic. Follow his directions to the 'House of the Tiger' by moving to the relevant crossroad (or corner) on the floor grid. The final direction is from the House of the Tiger to the House of the Dragon, which is why the positions of both these symbols must be noted. |
| |
| Click the turtle icon below to view the graphic solution. |
| |
 |
| |
| |
| |
DRAGON ROOM |
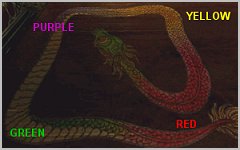
| Enter the Dragon Room through the door created when the Turtle Path is successfully followed. Open the treasure chest (and the others inside of it) to get the wand. Use the wand to burn the incense on each of the four corner pillars on the floor map. The pillars must be lit in the same sequence as the colours on the corners of the serpent painted on the floor, beginning with the tail - red, green, purple then yellow. |
| |
 |
| |
| If you return to the Turtle Chamber through the door between the rooms the door seals itself shut. It can be re-opened by clicking the hotspot on the wall in the Turtle Chamber. Move your mouse slowly across the wall when looking for the hotspot as it's not easy to find. |
| |
 |
| |
| |
| |
BRIDGE PUZZLE |
| After lighting the pillars in the correct sequence you'll be miniaturized. The dragon sea area can now be entered. To return to your full height, exit the floor area toward the candles in the same direction as the dragon door. Miniaturizing is automatic whenever you now enter the dragon sea. |
| |
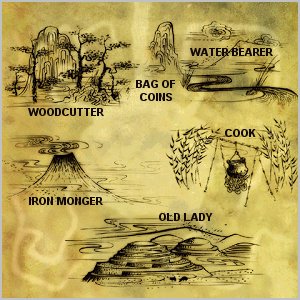
| Note the wooden post with five hooks to the left of the raised bridge. Pick up the five figurines and bag of coins lying on the ground next to the post. The figurines are a woodcutter, iron monger, water bearer, cook and old lady respectively. The drawings on the floor area depict a few trees in front of a mountain, a volcano, a river, a cooking pot, the plains and a lone mountain. |
| |
| Return to full size and place each of the figurines on the drawing associated with it's profession. To see a diagram of the area, click the hotspot in the corner while holding the bag of coins. |
| |
 |
| |
| You know that a figurine is placed on the correct drawing if it cannot be picked up again. Lastly, the bag of coins is placed on the only remaining (unoccupied) drawing, i.e. the lone mountain. |
| |
 |
| |
| When all the figurines and the bag of coins are correctly placed, re-enter the dragon sea. Take the coins out the bag and buy a metal disk from each of the characters (figurines). The metal discs must be hung in a specific sequence on the hooks on the wooden post next to the bridge. The symbol on each disc, cryptic clues given by the characters and the dragon on the other side of the wall through which you entered are all indications that a basic knowledge of Feng Shui is needed to work out the sequence. Two sequences are necessary - the first only partially lowers the bridge and the second one drops it to ground level. |
| |
| Click the Feng Shui icon below for a detailed solution. |
| |
 |
| |
| |
| |
DRAGON PUZZLES |
| After lowering and crossing the bridge you arrive at a pagoda with two golden doors. These doors can be opened by pointing the arrow in the middle towards either the hunter or the fox. Click the hunter to point the arrow at him - pointing the arrow at the fox will have grave consequences later! |
| |
| Inside the dragon is the first of two really weak and meaningless puzzles. Along the bottom of the cloud and dragon board there are five single clouds that must to be raised. This is done by alternately clicking certain clouds in the left and right cloud formations above. I didn't see any logic nor consistent sequence in doing this, and sometimes the dragon has to be clicked before the clouds. Fortunately it only requires a minimal amount of trial and error. When the fifth cloud is raised take the pearl that was underneath it. |
| |
| Enter the 'cockpit' area of the dragon and insert the pearl into the slot on the wall beside the curtain. |
| |
| |
| |
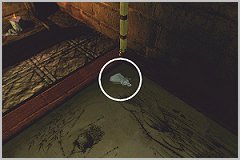
HELL MAZE |
| The dragon brings you to another pagoda. Try entering through the red door - after the third attempt Tan Yun appears in a puff of smoke. Tan Yun wants the mushroom of immortality and opens a second red door around the side of the pagoda. |
| |
| Enter Hell Maze through this second door. The bull at the entrance gives you a form that must be stamped correctly. The maze itself is not overly difficult to map, but there are a few twists to it. Begin by finding the Chinese girl (she's holding a stick with a fox's head - a clue to what she was previously). In gratitude for saving her life (pointing the arrow on the golden doors at the hunter and not the fox) she gives you a fan. The three stamps on the fan are the ones you need for the form. The stamps are randomly generated and different for each game. Note that if you pointed the arrow on the golden doors towards the fox the Chinese girl won't help. As punishment for cruelty to animals, you have to go back to the golden doors and change the direction of the arrow. |
| |
| Each of the other six animals in the maze has a different stamp to put on the form. However, three of the animals (the goat, horse and rabbit) are upside down and can only be accessed by walking on the ceiling. Climb the stairs at the far end of the maze to switch between the floor and ceiling. The bull, dog, pig and mouse are accessed when on the floor. The Chinese girl will only be seen on the floor and she disappears after giving you the fan. |
| |
| The spirits flying about have no relevance - just ignore them. |
| |
| There are six different stamps - a complete horse, complete tiger, complete dragon, horse's head, tiger's head and dragon's head. The animals will always put the same stamp on the form. |
| |
COMPLETE HORSE - Rabbit (ceiling)
COMPLETE TIGER - Goat (ceiling)
COMPLETE DRAGON - Pig
HORSE HEAD - Mouse
TIGER HEAD - Horse (ceiling)
DRAGON HEAD - Dog |
| |
| Give the correctly stamped form to the bull at the entrance and get the mushroom of immortality. Click the maze icon below to view the maps and graphic solution. |
| |
 |
| |
| |
| |
COMPLETING THE ROAD |
| Give the mushroom of immortality to Tan Yun to get a lantern containing a serpent needed to exorcise the shadow blocking the gate. Return to the Adobe to complete this part of the road. To get the dragon to fly again, remove the pearl from the slot and immediately replace it. |
| |
| |
| |
CRYSTAL JOURNEY |
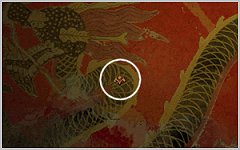
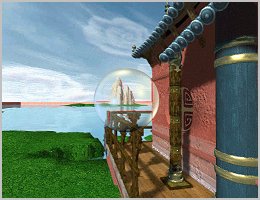
| At the very beginning you're given the crystal and told that it contains a number of journeys. The lines on the crystal are a partial outline of a specific scene in whatever place you are. When the correct scene is viewed through the crystal, the lines will turn red. To get an exact match the screen resolution should be set to 800X600. Click the crystal when the lines are red and take a short trip into space. This also adds a journey to the crystal. Click the Earth to return. |
| |
| The matching scene is left of the golden doors. Facing left the matching outline is part of the pagoda and part of the mountains in the distance. |
| |
 |
| |
| The large hanging gong in the courtyard is the way back to the ship. Pick up the padded mallet next to the gong, move to the front of the gong and strike it with the mallet. |
| |
| |
| |
|