Black Circle: Carol Reed Mystery 6
by MDNA Games
Walkthrough by MaGtRo December 2009
Gameplay: This is a first person point and
click game. Before the game starts, see a display and sound selection frame. The
display frame has device, colors and run in window choices. The sound has a
choice of sound device.
The tutorial on how to play the game can be selected
at start of the game.
There is a very good hint system in the game. The hints can guide the gamer without the need of a
walkthrough.
The game is non-linear. This walkthrough is just one
sequence of gameplay.
It is the rainiest summer in 26 years. Now the sun
has appeared.
Carol's home: Look around the
kitchen.
Exit the kitchen and go to the hallway.
The phone rings. Take the mobile phone lying on the
old fashioned phone. Press the button to answer the phone.
Talk to Oscar, the neighbor from the apartment
below. He wants Carol to come and talk to him.
Visit Oscar:
Turn around
and exit the apartment. Go down the stairs and knock on the blue double doors.
Talk to Oscar
completely. Learn that he found a dead man in a ramshackle building during his
walk to the jetty. Oscar is a retired doctor blind in one eye. The man had a
non-working mobile phone with him. Oscar left to call the police. The man
disappeared when the police arrived. The police didn't believe him.
Visit Stina:
Select Stina's Bakery on the map. Have a nice chat with Stina about doll
houses.
Check out the
allotment: Select the allotment on the map.
Go forward, left
and right in Carol's allotment.
Shed:
Turn right by the fence and enter the shed.
Turn right inside
and take the file from the shelf.
Exit the shed and
the allotment.
Explore the
railway bridge area: Select the Railway Bridge on the map.
Look around. Go
over the bridge. Turn left at base of bridge.
Shack:
Go forward until the red shack. Face the building and look around.
Look close at the
ground where the man should have sat.
Take the piece of
paper with a picture of a bicycle and an address - 27 Cotton Road.
Turn the paper
over and get a phone number 011-23 80 70.
Phone number:
Right click the mobile phone in inventory to get a close up.
Click on the phone
number and it gets automatically dialed. No one is answering the phone.
Click on the
operator icon at top left and learn that the phone number is not listed.
Jetty:
Turn left from the shack and continue to take a stroll in the woods.
Go forward to the
water. At the jetty, look around.
Turn to the left
to look down at the water. Take the cigarette case.
Examine the
cigarette case and see that 'Milly' and a heart are etched on the top of the
empty cigarette case.
Turn around, walk
back to the bridge and exit.
Visit 27 Cotton
Road: Select 27 Cotton Road on the map.
Enter the building
and talk to the man. He mistakes Carol as the cleaning lady.
He wants Carol to
bring her stuff and then come back.
Home:
Select Home on the map.
Go forward to the
living room and look around.
Check the picture
on the armoire. Check the pink envelope. It has a note by Jonas and invitation to an
Adventure Game Convention in Stockholm.
Go back to the hallway and left to the WC. Enter the
WC and turn left. Take mop and
bucket.
Exit the apartment
and go back to 27 Cotton Road, the bike shop.
Do some sleuthing
at 27 Cotton Road:
Bike Shop:
The man leaves.
Face the hallway
to the offices. Go forward and enter the first door at right. Take the blue
pencil from the table. Exit the room. Feel free to look around.
Enter the kitchen
at end of the hallway. Turn left and go right to the lounge.
Go to the desk
with computer by the window at end of the room.
Check the trash
can under the desk.
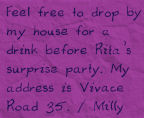
Put together the
pieces of paper.
Left click to
move the pieces and right click to rotate them.
When the paper
is in correct place, it changes color to purple.
Learn the
address of Milly - Vivace Road 35.
Exit the bike
shop. Check the painting left of the door. Exit the building
by going down the stairs.
Visit Milly's
apartment: Select Milly's apartment on the map.
Talk to Milly.
Learn that she's a part time secretary at the bike shop.
The cigarette case
was a gift to a former boyfriend. Edvin Vergerus has been imprisoned for drug
related crimes. She points Edvin's parents apartment in the map.
Visit Edvin
Vergerus' parent: Select Edvin parents apartment on the
map.
Talk to Edvin's
father. Learn that Edvin did not come home last night and was arrested a week
ago.
Explore Edvin's
parents apartment:
Computer room:
Go forward to the kitchen, right to the laundry room and right to the computer
room.
Check the paper on
the bed. See Edvin's semicircle building sketch and a letter asking for the
spare key of the apartment he was evicted from.
Turn around and check the note pad on the shelf.
Read Edvin's To Do list.
Get notes from
old apartment.
Search the
foundry.
Find out more
about the message to Abel from Joss.
Guest room:
Go back to the laundry room at left. Turn right and go through the door to the
guest room.
Look around and see nice quilts
and paintings.
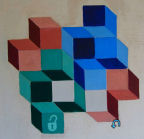
Cube decorated
box: Check the closets by other door to the hallway.
Inside the leftmost closet is a cube decorated box on the middle shelf.
The color of some squares on the lid changes when clicked on.
Exit through the
door at left and be at the hallway. The door opposite the guest room is
locked.
Living room:
Go forward at the hallway, go left and look around in the living room.
The balcony door
needs a key.
Exit the apartment
through the alcove at end of the hallway at left. It has a brightly colored
quilt that looks like stained glass hanging on the wall. The exit door is at
right.
Search for
Edvin's old apartment: Let's follow Edvin's to do list.
Select Milly's apartment on the
map.
Talk to Milly. She mentions Edvin's probation officer
is Ben Dorner. He is also the owner of the bike
shop. Milly gave the probation officer's phone number.
She mentions that
Edvin hides things behind pictures, especially women's pictures.
Edvin's parole
officer:
Contact parole officer: Use the mobile phone and click on
Ben Dorner's name. Talk to Ben. He is at the Riverside Cafe.
Talk to
probation officer: Select Riverside Cafe on the
map.
Talk to Ben Dorner. He gives Ben's old
apartment address.
Edvin's old
apartment:
Edvin's parents
apartment: Based on what Milly stated, go to the guest
room.
Go forward through
the hallway until the end. Enter the door at left.
Check the
paintings of women on the wall. Look behind the one with big bluish hat at the
middle.
Take Edvin's
old apartment key. Place the painting back on the wall.
Exit the
apartment.
Enter Edvin's
old apartment: Select Edvin's old apartment on the
map.
Enter through door and check the nameplate on first
door at left. Use the key from the painting on the
door lock.
Search the
apartment:
Kitchen:
Turn left to the kitchen. Check the cabinet under the sink.
Look through the
magazines and see a court summons about his trespassing at the Berling Foundry
(that is in Edvin's to do list).
Empty living
room: Go across the hallway and exit to outside. Check the
shed. Go back inside the apartment.
Empty bedroom:
Enter the door on the left. Take the stepladder.
Utility room:
Exit at right and then go left.
See a metal box at
top of shelf. Place the stepladder on the floor.
Climb the stepladder and look close at the metal box. It is closed by a screw.
Bathroom:
Go to hallway and turn right. Go to end of the hallway and enter the bathroom
at end of the hall.
Take the roll of
toilet paper.
Go down the
hallway, right and then left to leave the apartment.
Do research on
the Berling Foundry:
Stina's Bakery:
Go to Stina and talk to her about the Berling Foundry. She refers you to
the library.
Library:
Turn right and see 2 monitors. Go close to the right one. Click on the mouse.
Berling Foundry:
Read about the Berling Foundry.
It was founded by
Otto Berling and later run by his son, Hugo Berling.
Abel Kant was
murdered there. The murder is linked to the Madonna cult headed by Hugo
Berling.
Madonna Cult:
Click on the Madonna Cult link.
Learn about the
dangerous rite of passage of the cult.
The members were
baptized at the water tunnel at Hammer Hill.
Abel Kant's hands were cut off during an overtime shift.
Abel's brother was
killed the day after in his home.
There are 3
members of the cult alive at that time: Max Vogler, Emil Vogler and an unknown
third person.
Water Tunnel at
Hammer Hill: Click on the Water Tunnel at Hammer Hill
link. Learn where it is
located.
Discovering the
Berling Foundry: Select Berling Foundry on the
map.
Go through the
hole on the wire gate.
Go forward 3 times
and turn right. See a ladder sticking out inside the building. We cannot enter
through there yet.
Continue forward
to the end of the road.
Turn right and go
forward. Turn right and see a broken wall with metal door.
Continue to the
left. Turn right and see a metal double door full of graffiti.
Enter through the
metal double door.
Go forward to end
of the hall and look left. See a yellow room on the left and a room on the
right with red metal rafters.
Red rafter
room: Enter the red rafter room on the right.
Look left and see
fuse boxes. The big one on the right has a broken wire.
Continue to back
part of room and see a bag of cement on the bench.
Upper floor:
Turn right, forward and enter the room on the left, pass one room and to
another.
Turn left and
climb the stairs (not ladder) to the upper floor.
Turn left, forward
and left again to a parts room. Take the hook from one pigeon hole on
the shelving at right. Go back out, right and right down the stairs.
Go right at bottom
of stairs and forward to hallway. Turn right pass the
cement bag to the yellow room.
Yellow room:
Turn right and see a dark room (no light). Turn around and
exit out of this room.
Columned hall:
Go forward twice and turn left. See a barred office.
Office:
Enter the office with blue walls and broken glass windows by its right side.
See a paper tacked
on the board. Read the paper written by Max Vogler, Head of the Train Depot. Max is one of the
surviving cult members.
Turn right and see
a first aid cabinet. Exit the office.
Oven:
Turn right and forward to the room with an open window.
See a metal
shed-oven in that room. Look inside the large oven and take screwdriver.
Ladder:
Turn to the right and see the ladder we saw outside. Exit the building up that
ladder. We can now use this ladder to enter the foundry.
Exit the foundry
area.
Uncovering
Edvin's secrets: Go to Edvin's old apartment.
Turn right,
forward and right to step ladder. Climb the ladder
and use the screwdriver on the panel.
The edge is not
thin enough. Click the file on the screwdriver. Use the sharp
edged screwdriver on the screw.
Read the paper
behind the cord. What's in the dark room? Is this the dark room at the
foundry? Search Milly's apartment more thoroughly?
Jonas:
Exit the apartment
Get a call from Jonas. Meet him at Leonardo Diner. He asks for the
invitation to the Adventure Game Convention.
Home:
Enter the living room and take the pink envelope on the armoire to get the
blue invitation.
Jonas:
Go back to Leonardo Diner. Give the invitation.
Train Repair
Depot: Go to the Train Repair Depot where Max Vogler
once worked.
Go forward to the
building that Edvin drew.
Turn left at the end,
forward, left and right. See the janitor.
Talk to the
janitor. Harrump! He lost his mobile phone at the Tower Remains and he has
Max' number in it.
Tower Remains:
Go left, forward, right and forward to the Tower.
Look through the
grilled wall and see the mobile phone.
Turn around and
get a call from Edvin's father. They left the apartment opened for Carol to check.
Revisit Edvin's
parent apartment:
Read the note on
the table.
Living room: Enter the
living room.
Open the cupboard on the wall right of the balcony
door.
Take the balcony
door key. Want a glass of wine?
Balcony:
Use the balcony key on the balcony door lock. Look around the
balcony.
Cubes painting:
Be sure to look close-click on the cubes painting.
Take note of the
cube's wall colors and location of the padlock.
Guest room:
Go back to the guest room.
Cube decorated
box: Open the left closet. Take the cube decorated box.
Now that you
looked close on the cube painting at the balcony, click the sides of the cubes to make it
similar to the painting. Then click on the green wall with the padlock.
Take the
magnetic stripe card. Read the letter from Joss to Abel - the
brothers that were murdered. Both are related to the Madonna cult.
They hid the
'stuff' in the foundry and there's a map behind the first aid cabinet.
Master bedroom:
Exit the guest room to the hallway. Enter the room opposite the guest room
door.
Look around. Take
the sewing thread beside the sewing machine. Exit the
apartment.
Train Repair
Depot: Go back to Train repair depot.
Recover the
janitor's phone: Walk to the Tower.
In inventory,
combine the thread and hook from the foundry.
Use the sewing
thread with hook on the mobile phone to get the janitor's mobile phone.
Go back to the
train depot. Talk to the janitor to give him the janitor's mobile phone.
The janitor lost
his notebook at the Silo. It has the code to unlock his phone.
Investigate
Milly's Apartment: Go to Milly's Apartment.
See the note on
the door. Milly is gone but the apartment is open.
Bedroom:
Enter the bedroom at left.
Look at what is peeking under the bed. The painting
is weird.
Open the box. Take
the sharp knife.
Find the
janitor's notebook:
Berling Foundry:
Before going to the Silo, go to the foundry.
Go forward around
the back of the building. Enter through the double doors at the end of the
path.
Go forward to end of hallway.
Turn left and enter the red rafters room.
Use the sharp
knife on cement bag on the bench at back of room. Take cement.
Exit the building
and the foundry area.
The Silos:
Go forward to the grey silos at the back.
Turn left by the
green door. Go forward and turn around to the ladder.
Rectangular
silo: Climb up. Turn right and climb up again. But the
rungs are slippery.
Use cement on the
rungs of the ladder. Climb up to top.
See
a notebook on the hatch cover straight ahead. Use the sewing thread with hook
on the notebook.
The notebook was knocked off the hatch. It fell
somewhere.
Climb down to
ground level.
Recover the
notebook: Turn left at ground level.
Turn right between
the silos. Go forward towards the light at far silos.
At the exit sign,
turn left and take the stepladder.
Turn left again
and go forward to the end.
See a broken
ladder. Place the step ladder right of the broken ladder.
Climb up. Turn
right, climb up the next ladder and turn right on the ramp.
Take the
notebook on the ramp floor. Go down to ground
level.
Train depot:
Find the janitor and talk to him. He finds Emil
Vogler's address.
Visit Emil
Vogler: Go to Emil Vogler's house.
Wow! Talk to
Emil. Learn about the shrine close to the mine owned by Hugo Bering.
Get a newspaper
article about crushing mill used for rites of passage. She gave
directions to the mine.
Gather more
information:
Stina's Bakery:
Talk to Stina. Read the newspaper
article about Edvin's mutilated body.
Oscar's
apartment: Talk to Oscar. Learn where they found
the body - by the Opera House.
Where the body
was found: Go to where they found the body.
Go forward until
the river. Turn left at riverbank.
Take the gloves
left by police.
Find and
explore the mine:
Shrine:
Go to the shrine.
Go forward twice,
turn right and go forward to the building.
Turn left and pick
up the chisel from the fire pit. Look around as you
will.
Foundry:
Go to the Berling foundry.
Enter the foundry
through the open window with ladder.
Go to the office
outside this room.
Look right to the
band aid thing that is mentioned by Joss. Use chisel to
remove the cabinet.
Take and read the
letter. Learn that merchandise is on the floor of Abel's cubicle. Abel
also got an impression of Ben Dorner's house key.
Study the map of
the dressing plant and mine. Exit the foundry
area.
The mine:
See 2 paths as you arrive at the mine - one on the left and one to the right.
Take the right
path. Just before the overhang-tunnel, turn left and pick up a brick.
Go forward until
the end (behind a big boulder at center of screen). Turn left and see a mine
entrance. Take the crowbar from the floor.
Go back out and
turn right. Forward once and turn right. Another tunnel is seen.
Enter this tunnel
which is the one on the left path at start of this area.
Midway inside the
tunnel or 3 clicks in, turn right and see a door with 3 keyholes.
Turn left and
forward to exit.
Check the Train
Repair Depot again: Go to the depot.
Go to door close
to where we found the janitor. Use the magnetic
strip card on the slot left of door.
Enter the office.
Look close at left side of the blue file folders. Take the insulating tape.
Look close at
machine at right. Take Ben's letter on the shelf above the machine.
Read that he feeds
Edvin's habit and uses him as courier. His office is beside the Restaurang
China and the code to enter is 1024.
Exit the building.
Electrical box
of the foundry: Go to the foundry.
Find the
electrical box: Enter through the far metal double doors
behind the building.
Go forward to the
end of hallway. Turn left and enter the red rafters room.
Fix the
electrical box: Turn left inside the room and look close
at the electrical box at right.
Use the gloves
from the riverbank on the loose wire. It is placed in position.
Use the insulating
tape on the wire. Pull the lever up.
Go even further
in the foundry:
Turn right,
forward to cement bag and left to the yellow room.
Turn right and see
that the dark room is now lit. Enter that room.
Abel's cubicle:
Turn left and go forward until the end.
Turn left and
enter the cubicle.
Look close at the
metal plates on the floor. Use the crowbar taken from the mine on the metal
plates.
Take the
cocaine and the key impression.
Exit the area by turning around, go right, forward twice, right at yellow room and right at
hallway off the yellow room to outside the building.
Leave the drugs
with the police: Go to police station. Click on police
station to leave the drugs.
Ben Dorner's
office: Go to Dorner's office.
Keypad:
Look close at keypad left of door. Enter 1024.
Elevator:
Enter, turn left and enter the elevator. See that the elevator is under
maintenance.
Check the floor
buttons and see Braille under each number of the floor buttons. Exit the elevator.
Go to Dorner's
office: Climb the stairs. Turn left at top of
stairs.
Go forward and
left. Go through the open double doors.
Turn left, forward
and enter the office at left.
Search Dorner's
office: Turn left and take the post-it on the book.
Look close at
post-it and see some indentations on the paper.
Use the blue
pencil from bike shop on paper. It looks like Braille.

Elevator:
Go back out the office area and down to elevator.
Look close at the
floor buttons and identify the Braille numbers on the post-it: 40 70 60.
Go back to the
office area. Turn right as soon as you enter the office area.
Another office:
Enter the door at right.
Check the trash
can. Take the note from Veronica. Ben is on vacation.
Safe:
Exit this office. See a door. Enter through this door and see a safe.
Enter the code
seen on the post it: left to 40, right to 70 and left to 60.
Take and read the
blue folder. Find out Ben Dorner's address -13 Rovner Drive.
Exit the office.
Turn around, forward through double doors; turn right before lounge area and
down the stairs.
Dorner's house:
Water tunnel:
Go to water tunnel. Go forward and read the info about Hammer Hills.
Turn right while
facing the info stand. Go forward twice and look right.
See trash pile.
Take superglue from the trash.
Continue forward and see
the water tunnel. Go back to the
exit.
Gain entrance
to Ben Dorner's house: Go to Dorner's house.
In inventory
combine the key impression and glue. Take the key made of glue.
Click on the
handle of the door and Carol makes a comment about hoping he hasn't changed
his lock in 15 years.
Use the key made
of glue on the lock. Enter the house.
Snoop
around Dorner's house:
Go
forward and look left at linens on table. Take cellar and cinema keys.
Turn
around and climb the stairs.
Enter
the computer room and look at diamonds and dots drawing on middle file tray.
Go
downstairs. Go forward to kitchen.
Read the
note on the counter. Ben lost his mobile phone while at the cellar.
Go
through to other room and outside to patio.
Cellar: Continue to the backyard. Go right and see the
cinema building. You can check it later if you want.
Turn
right and see the stairs to the cellar. Go down and use the cellar key on
lock.
Look
around. Go forward and left to next room.
Find
Ben's mobile phone: Using your mobile phone, call the
number found on the back of the paper by the jetty.
Follow
the ringing sound. Turn left to the sink and look down to the plastic tub.
Look
close and pick up the mobile phone.
Press
the button to listen to Edvin's last voice message. He's in bad shape
after taking speedball.
Pick up
the button.
Find
secrets in Dorner's cellar: Go back to next room.
Go
towards the exit door. Turn right and enter another room.
Open the
blue cabinet on the wall right of the door.
Gold
box: Take the gold box on top shelf. Place the
button on the hole.
Using
the numbers on the diamond-dots drawing; press top, bottom, second from top
and middle right buttons.
Read the
letter of Hugo Bering to Ben Dorner. Ben killed Abel Kant.
Read the
3 obligatory stages of the 'rite of passage'.
1. The
concrete labyrinth. See the map on the left.
2. The
water tunnel.
3.
Entrance to the inner rooms of the mine.
Take 3
colored keys: red, green and blue keys.
Exit
Dorner's house by going through the house and out the front door.
Find
out more about the cult trials:
The
concrete labyrinth: Go to the shrine.
Go
forward twice and right to the shrine. Turn
left and forward to the end.
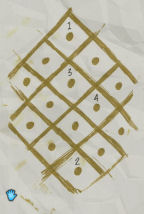
Turn
left and walk the concrete labyrinth. Check
the X mark in the map. Go there.
Go
forward, left, forward, right, forward, left, forward, right.
Look
down. Use chisel on the moss covered metal beam.
Look
close and see that the plate is unreadable. Use toilet paper on the plate.
The key
to the keys is at the turn of the tunnel.
Pull
back and click the exit text at bottom right. Exit
this place.
The
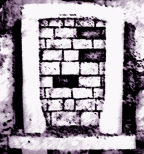
water tunnel: Go to the water tunnel.
Go pass
the red marker stand. Go left and forward to the water tunnel.
Go down
to the water and enter the water tunnel.
Go
forward until the end. Look up at the ceiling. See red
3, blue 1 and green 2.
Turn
around and exit this area.
Mine:
Go to the mine. Take the left path.
Walk
midway the tunnel and then turn left. See the door with 3 keyholes.
Use the
keys taken from the gold box.
Insert
blue key at middle keyhole first. Hear a click. Right click to release key.
Insert
green key at bottom keyhole second. Hear a click. Right click to release key.
Insert
red key at top keyhole last. Hear a click. Right click to release key.
Explore the inner sanctum of the mine:
Go down
the stairs. Look around.
Look
left and see the painting seen under the bed in Milly's apartment.
Turn
around and click on the bricks of the altar. Carol makes a comment.
Use the
brick taken from the other path in the mine on each of the bricks. There's
nothing there.
Go back
to Milly's apartment.
Milly's apartment: Talk to Milly.
Learn that the painting seen in the mine is one of 2 paintings Ben Dorner commissioned.
The
other is the brick altar with 3 bricks gone.
Milly is
Abel Kant's daughter.
Altar:
Go back to the mine and down to the inner sanctum.
Using
the brick, hit the 3 darkened bricks on the altar as shown by the sketch.
Chalice: Look in the chalice. Move the contents of the
chalice.
Talk to
Ben Dorner. Use
cement on Ben. Go behind Ben and automatically be out of the mine.
13
year old murder case near solution
This document may not be
distributed without express written permission of the author and the content
may not be altered in any way.
For Questions or Comments
on this Walkthrough,
Please write to:
MaGtRo
Copyright © 12/2009
MaGtRo
 GameBoomers
Walkthroughs and Solutions
GameBoomers
Walkthroughs and Solutions