BROKEN AGE
By Double Fine
Walkthrough by MaGtRo March 2014
(Act1), August 2015 (Act 2)
Gameplay: This is a third
person point and click game.
Main Menu has continue, new game, load game and
options selections.
Options have selections for controls (key
remapping, interaction style and cursor settings), volume adjustments (for
music, voice and effects) and subtitles (on and languages).
Choice of fullscreen, letterbox mode and dropbox
saves
are also seen. Credits are at bottom right.
The default game keys are left mouse button for
interact, ESC key for pause, right mouse button for inventory and space bar
for skip cutscene.
Interaction style can be drag or click.
ESC key during gameplay will also show the in game
menu at top of the page.
In game menu has resume game, subtitles, volume,
controls, manual save and save and exit.
To change character, open inventory using the
right mouse button or move the cursor to bottom right. Select or click on
the character icon at bottom right of the frame.
Space bar skips cutscenes.
Inventory is opened by an arrow at bottom right of
screen.
In Win7 the saved game folder is in
C:\Users\computer name\Documents \BrokenAge\saves folder.
There are 7 manual saved game slots and one autosave slot. Saves can be overwritten.
To start a new game, click on any frame in the
load page.
ACT ONE
You can start the game playing either Vella or
Shay.
VELLA
SUGAR BUNTING.
Go home:
Select Vella on the left. Wake Vella up by
clicking anywhere.
Hear Vella's sister call her. Go down to talk to
sister.
Follow her home by clicking on the house with the
smoking chimney.
Enter the dark house. Walk to the right to be in
the surprise party prepared for Vella. Mother lost the special ceremonial
knife.
Maiden's Feast party:
Talk to father, sister Rocky and Levina Clench by the
cake.
Learn from Levina about the Maiden's Feast and Mog Chothra. Learn that Mog Chothra has already eaten
a girl in Meriloft.
Levina thinks it's an honor to be chosen and does
not want to hear about killing Mog Chothra.
Talk to Grandpa Brommel Beastender. He wants to
fight Mog Chothra. They were once a town of warriors.
Talk to mother who is looking for the knife.
Find the knife:
Take the purple towel at bottom of
screen. Take a cupcake.
Give the cupcake to Grandpa Beastender. If drag
gameplay is selected; open inventory at bottom left. Click-hold-drag the
cupcake to Grandpa.
Split it with you? Grandpa uses the missing
knife and throws it on the table. Take the knife from the table.
Give the knife to mother.
Sacrificial maidens:
See the 5 sacrificial maidens facing the water.
Vella is at the center wearing her Up for Grabs pink cake outfit.
Talk to the other maidens. From left to right:
talk to green Delish girl with flower, yellow Fun Size girl
with drumstick, purple Drink Me girl with water bottle and red Hot
Stuff girl with lit candles.
See a bird that hovers above Fun Size wanting her
drumstick.
After talking to the other girls that wants to be
the meal of the day, Levina toots her horn to call Mog Chothra.

Escape being a sacrifice:
Mog Chotra rises from the water and eats red
Hot Stuff girl with lit candles.
Ask purple Drink Me girl for a drink from
her water bottle. She wants Vella's corset in trade. Vella gives the
corset but purple girl returns it because it is too big for her. She
gets her water bottle back.
The green Delish girl is now eaten by Mog
Chothra.
Ask purple Drink Me girl again for her
water bottle. Vella gets the water bottle but purple girl is now
eaten.
Ask yellow Fun Size girl to a trade for a
bite of her drumstick. Whaddya got? How about something bubbly to wash
it down?
Yellow Fun Size girl with drumstick sprays
herself with the water bottle. Wanna trade something for a bite of that
drumstick?
Need a towel? Vella gives her the towel.
Yellow Fun Size girl throws the drumstick
to Vella. The drumstick gets stuck in Vella's cake skirt.
Yellow Fun Size girl gets eaten.
The hovering bird tries to get the drumstick
from Vella's skirt.
Use the corset on the bird to catch it.
Vella is stuck in the cake stand. Use the knife on
bottom of her skirt to
cut herself free from the cake skirt.
Vella flies away, kicks free of Mog Chothra and
escapes being eaten.
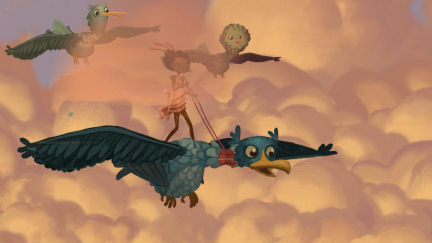
MERILOFT.
Vella climbs on top of the bird and flies up in
the clouds. They are met by other birds. See a town in the clouds.
Vella falls and loses the knife.
Jessie the blue bird lands and sees the golden egg in her nest.
Vella drops in Jessie's nest.
Get cloud shoes:
Jessie the blue bird throws Vella out of her nest.
Walt'r and Ch't: Talk to
Walt'r and Ch't. Learn that they are preeners; those that takes care of the
nests.
Learn that the next sacrifice is in Shellmound.
Meriloft had their sacrifice yesterday.
Learn that Jessie the blue oligull lost one of
her eggs. Gus took Jessie's eggs. Brother Lightbeard is the guru.
They float in the clouds because of area/buoyancy -
pounds per square inch.
Get the knife:
Car'l at Cloud Shoes: Go
right to the hut. Talk to Car'l. Surprised, Car'l drops her knife through
the clouds.
Walt'r and Ch't are her husband and son. Learn how
they got here. M'ggie is her daughter.
Learn that cloud shoes keeps them from sinking
through the clouds. Choose Area.
M'ggie: Go down from hut.
Take the path to the right screen.
Be sure to stay on the path. If you fall off you
get rescued by purple Whoops a birdie and brought back where you fell off.
Talk to the girl in feathers cleaning eggs. She is
C'rol and Walt'r's daughter.
Borrow her ladder. Learn about the
feathrvator and the golden eggs (egg substitutes).
Knife: See the knife on
the big nest at top right of the screen See a golden egg at a far nest in
the middle.
Go right to the nest with the knife.
Use the borrowed ladder on the nest. Take mom's
ceremonial knife.
Car'l: Go down and go
left back to the left screen.
Go to to Car'l at Cloud shoes. Give the knife to
Car'l.
Car'l gives big cloud shoes. They are too
big.
Maiden Feast sacrifice:
Go down from Car'l and take the ladder going down at center of the clouds.
Talk to the rejected maiden feast sacrifice
sitting on a swing.
Get cloud shoes that fits. Talk to her
completely.
Click the bird cloud shoes on Vella. Now she's
wearing cloud shoes.
Climb back up to the clouds above.
Recover Jessie's egg:
Jessie: Go to Jessie's nest. Use
the ladder on her nest. Climb up. Click twice on Jessie.
Small tree: Go to the path
behind Jessie. Read the sign to the small tree.
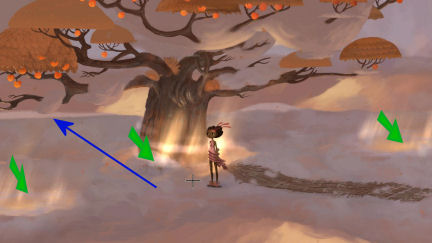
Get a fruit: Continue to
the left. See a large
tree laden with fruit.
Go left of the tree trunk and see a low lying
branch.
Click on branch to get Vella shake a fruit off the
branch. The fruit drops through the cloud.
Go down the hole (green arrow - light passing through) in the
clouds and be brought back by Vera the purple bird.
Walk close to the tree
trunk to fall down into the lower level.
Hear someone screaming. Go left of the tree trunk
and see a nest. Take the fallen fruit from nest.
Gus: Go right and see Gus
screaming and hanging from a branch. See Jessie's blue egg on branch at right.
Talk to Gus. Try to go pass Gus and he grabs
Vella. Vella falls again and is returned to the clouds above Gus.
Get Jessie's egg: Go to
the hole in the cloud with light shining through right of the screen.
Vella falls on top of Gus. Both of them fall off
and are caught by Vera the purple bird.
Vella is returned to the tree. Go down the tree by
walking close to the tree trunk.
Walk the right branch and take Jessie's blue
egg.
Enter the hole in the trunk to get back to the
main cloud level.
Return the egg to Jessie: Take
the wooden path and go right to Jessie.
Give the blue egg to Jessie and get a hug. Take the golden egg.
Get another golden egg:
Go down to the center platform. Take the path to
the right and go to the right screen where M'ggie is located.
Take the path going to the center back. See a nest
with a gold egg.
Use the ladder on the nest. The bird in the nest
removes the hook of the ladder.
In inventory click-hold-drop the ladder on the
large cloud shoes to combine them.
Use the ladder with cloud shoes on the nest. Climb
up. The bird removes the hook again but ladder floats.
Take the second golden egg.
See the guru Harm'ny Lightbeard.
Go back to M'ggie and then left to go to the main
cloud area.
Take the left wooden path. Read the sign - way to
Harm'ny and his beard.
Go left and see 3 empty bowls of Enlightenment.
Talk to F'ther (Feather). He's Harm'ny
Lightbeard's heavy. One can only see Harm'ny if one places an offering on
one of the bowls.
Place a golden egg in a bowl. The gate opens up to
allow access to the ladder. Climb up.
Harm'ny: See Lightbeard
snoring in his cushion cup.
Talk to the guru. Ask for help kill Mog Chothra.
Lightbeard is so shocked that an egg fell from his stash.
Vella asks for the golden egg. Lightbeard pushes
it off and the egg drops on F'ther.
Leave Meriloft:
Vella climbs down. Pick up the third golden egg.
Place the other 2 golden egg in the bowls.
Climb the ladder and Vella wonders what would
happen if the weight is too much for the platform. Vella shakes the ladder.
The ladder falls down to earth.
SHELLMOUND.
Vella drops in a house and walks to the balcony of
the house.
Meriloft: Go left back to the room and Vella climbs up the
ladder to see the destroyed platform at Meriloft. Hear Lightbeard calling
F'ther to fix the ladder. If you missed getting something from Meriloft; you
can always come back.
Go back down to the house in Shellmound. See the
ladder that went through the roof.
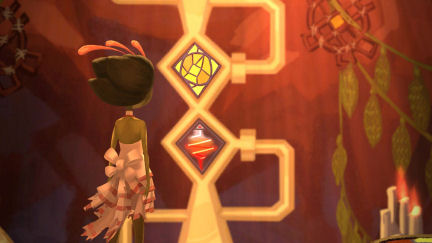
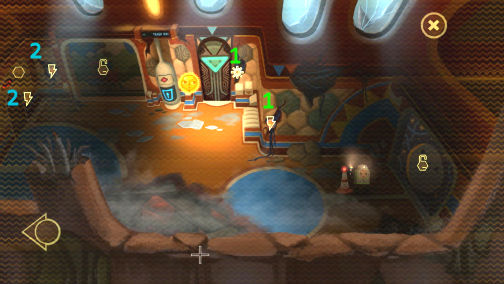
Stained glass window:
Check the stained glass window and get a piece of glass.
Curtis the woodworker: Go down
and talk to Curtis. Learn that the trees have been talking to him. The trees do not
want to be cut down.
Curtis allows Vella to take his axe. Get the axe
from right wall.
Check the fireplace, the ripped painting above
fireplace and Kokopelli artwork.
Talk to Curtis about his art. After the strange
talk, take the Kokopelli art.
Warning: Exit the room at
right. Curtis warns Vella to not go east of the main road. There's a snake
there so go at the other direction.
Road: Check the mailbox.
Go to bottom of screen to be at main road. Go left.
Snake: Go left until the
snake and French horn. The snake squeezes Vella.
Click on the French horn
and Vella blows on it. The snake wraps itself on the horn.
Tree: Go right until a tree.
See a tree that is trying to talk. Click on tree twice to learn it doesn't
have a mouth.
Use axe on tree to give it a mouth. Learn about
the spruce that Curtis changed to a stool.
The tree has sap at corner of his mouth. He would
not give up his sap.
Offering arena of Shellmound:
Continue to the right and cross the bridge to the
city. It looks like Mog Chothra has not been here yet.
Seagulls: Pick up the driftwood at the shore close to
the seagulls that are eating fish guts.
Check the fishing poles. All the hooks have been
stolen.
Maiden Feast Marshal Dune:
Talk to the man at top of stairs.
Vella doesn't smell right. She needs to get a
fragrance recipe.
The Marshal is trying to build the offering arena
but the waves are washing the sand structures away.
About the bucket hat - looks good on you! Very
fancy. He gives the bucket to Vella.
Talk to him again and ask about the construction.
The sands are falling apart.
Maidens: Go right and
check the ribbon by the arena area at middle of screen.
Check the perfume bottle beside the left maiden.
It is her grandmother's recipe of musk, pheromones and animal sweat.
Talk to the sacrificial maidens. Learn about the
Beast Hooker perfume that is irresistible to Mog.
Dead Eye pyramid:
Blind guards: Climb the stairs
right of the sacrificial maidens.
Look at the beach and see the whole Maiden's Feast
area from up here. Check the pyramid that has an unusual top.
Talk to the 2 guards. Dead Eye Dawn at right run
out of holy tear gas on her weapon. The Dead Eye God sees no one. Learn that they are
blind.
Vella can enter if she solves the Riddle of Yorn.
Learn about Dead Eye God. The God brought miracle
objects. Learn about the Battle of Vulgentoll; the final battle between
humans and Mogs.
Ask about bringing them something - like more tear
gas. Dead Eye Dawn gives Vella her weapon.
Solve the construction problem of the offering arena:
Get stool: Go back to the left
and enter Curtis' house.
Give Curtis the deadwood taken from Shellmound
shoreline. Get a stool made by Curtis.
Get sap: Remember that the
talking tree was upset about the spruce made into stool by Curtis.
Exit house and go back to talking tree at right.
Use the Marshal's bucket on the limb of the tree.
Show the stool made by Curtis to the tree. The
tree
throws up sap. Get a bucket full of sap.
Sand solution: Go right to
Shellmound.
Give the bucket of sap to Feast Marshal. It will
get the sand to stick together and construction will progress.
Get perfume:
Go down to the seagulls eating fish guts at bottom
left.
Use the tear gas weapon on the liquid fish guts.
Vella fills the weapon.
Use the tear gas weapon on the sacrificial maidens.
The seagulls attack the maidens with the fish guts smell.
Take the perfume bottle.
Enter the Dead Eye pyramid:
Climb the stairs at right to the 2 guards of the
pyramid. Talk to them again about the Riddle of Yorn.
Give the peach fruit taken from the tree at
Meriloft to the guards. If you ate it, go back to Meriloft using the ladder
in Curtis' house and get another one.
Enter the pyramid.
Awaken the Dead Eye God:
Turn on the chamber: Look
around. See a recurring symbols on the stands and hanging objects.
Check the symbol on the stand at right. It is
recessed like a socket. The symbol looks familiar.
Use the Kokopelli art from Curtis on the stand. It
fits.
Space traveler: A man
comes out of the Dead Eye cryochamber. He sees the stand that rose from the
floor. Alex fiddles with the circuit control router to get back to Loruna.
Learn that Sugar Bunting where Vella came from was
called Steel Bunting before he went to sleep. The other towns are afraid of
Steel Bunting.
Talk to Alex the space traveler. His ship crashed here 300
years ago. He's been in cryogenic suspension because he got tired of the
natives.
The ship does not have any weapons but he will try
to help kill Mog Chothra. His home planet of Loruna is dying. His mission -
Mission Dandelion is to look for any help for his planet.
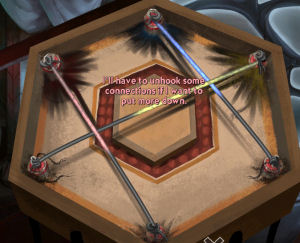
Mess with the coils: Go to the tubes
at center. Vella takes the top drive coil. Click on bottom
amplifying quartz and Vella breaks the glass.
Place the coil at top. The space traveler said to
put them in correct place or else it will overheat. Place the stained glass
at bottom. The space traveler said that it is correctly placed.
Make a death ray: Take the
drive coil and the stained glass off again.
This time - place the coil at bottom and the
stained glass from Curtis' house at top.
Vella and the traveler come out of the pyramid and the guards
faint.
The traveler gives Vella a remote to
trigger the death ray when Mog Chothra is in position.
Join the Sacrificial Maidens:
Go down the stairs.
Use the perfume on Vella.
Talk to the Feast Marshal. Vella is now a
sacrifice.
Mog Chothra:
Marshal Dune blows his pitch pipe - Showtime. The 2 maidens sing to call the monster.
Disable Mog Chothra: The
monster's tentacles grabs Vella.
Go a bit inland. Take the remote from inventory and see a
triangle target. Place the triangle on one of the tentacles and fire.
Remove 3 tentacles.
Kill Mog: Get caught by
the monster and realize that the mouth is closed so the death ray will not
enter the monster.
Use the ladder on Mog's mouth. Vella extends the
ladder to get more opening.
Fire the death ray inside Mog's mouth.
The monster is dead. Vella loses consciousness on
the beach.
SHAY
Space ship:
Shay is awakened by Dad the night computer. Day computer -
Mom arrives and tries to wake up Shay.
Click anywhere to wake up. Shay is given his bath
and transferred to the dining table.
Choose your breakfast. Take the spoon and
scoop up breakfast. The spoon talks.
Flashing red light alerts that there is an
emergency.
Emergencies: At the
control center, computer says there are 4 emergencies to be taken care of.
- Avalanche victims on Galarctica.
- Runaway train in System 7.
- Defend the vessel Friendship Circle from attack.
- Foreign body on the hull of the ship.
Select the emergency that Shay should address.
Help the avalanche victim on Galarctica:
See 2 victims stuck in an ice cream avalanche. See
a mountain of ice cream at the back of the avalanche.
Use the spoon to eat the ice cream and free the
victims.
Shay eats lunch.
Save the runaway train in System 7:
See that the mountain has closed its mouth and
the train will crash in Spike Canyon.
Click on the mountain to wake up the bridgeman.
The tongue comes out to make a path for the train.
The train safely goes to the station and stops.
Shay has his dinner.
Defend the Friendship Circle:
Shay goes to the teleporter and arrive at the
vessel.
Talk to one of crew. They were attacked - a Hug
attack.
Shay goes to bed to sleep.
Next day: Have breakfast and
choose the next emergency to face.
Investigate the foreign body on hull of ship:
Better suit up and investigate that foreign body.
Shay exits in his space outfit. Go right and see a
mass with swaying ribbonlike plant on it.
The ribbon thing wraps itself on Shay. Shay pulls
it out and see a boxed present.
Shay eats lunch.
Fake train wreck:
Go to System 7 again for the runaway train.
While on top of the hill, click on the mountain so
that the tongue-bridge is withdrawn.
The train crashes in Spike Canyon. The passengers
and Shay drop down the canyon. At the bottom are spikes. The spikes cushion their fall.
Meet a talking wolf. He tells Shay that when he tires
of child's play to go and see him. He gives Shay a screwdriver.
He also warns not tell anyone about this.
Good night:
The computer mom has regimented Shay's schedule
and he has no time for himself except for the made for kiddie emergencies.
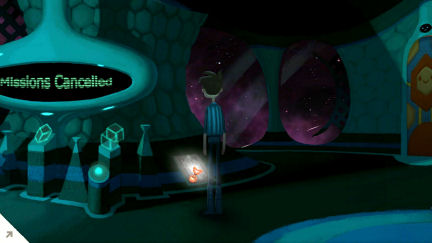
Mom cancels all mission so that Shay can rest.
Fake Shay:
Click anywhere to stand up.
Open the present in inventory to see a Grabbin
Gary robot.
Air vent: Go right to
the console that shows Mission Cancelled.
Check the humidifier with the yellow oxygen tank.
Take the oxygen tank.
Go right and to the door with a smiley face. Mom
catches Shay and puts him back to bed.
Wake up again and go right of the console with
Mission Cancelled.
See a air vent at right base of the console.
Use the screwdriver taken from wolf on the air
vent.
Take the inflatable raft inside the vent.
Make a fake Shay: Combine the
inflatable raft and the oxygen tank to get a blow up doll that looks like
Shay.
Use the blow up doll on the bed.
Meet Marek:
Enter the open air vent. See Computer - Mom check
on Shay.
Shay enters a room he hasn't seen before. He sees
the wolf.
Talk to Marek. Marek says that Shay is done with
children's games. There is war raging in the galaxy.
Marek shows the prisoners at Talon Nebula. They
are to be executed. Shay says they have to save them.
The ship is programmed to keep Shay safe. The
rescues will place Shay at risk.
Shay is given the Talon Nebula chart. He has to
program the navigation panel.
Marek gives an ear piece so that they be in
communication.
Talon Nebula:
Go to Talon Nebula: Enter the
ventilation shaft at left. Exit at Navigation room.
Talk to Space Weaver. Give Space Weaver the star
chart. They arrive at Talon Nebula.
Go back to Marek by entering the ventilation shaft
at right wall.
They are late. The captors left the victims
unguarded.
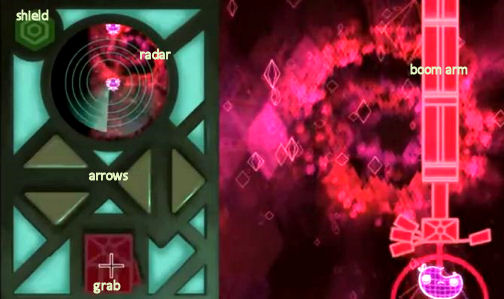
Learn how to use the boom arm:
Marek shows the controls to Shay.
Press the green button to lower the shields so
that the boom arm can be extended.
Watch the red boom arm at right frame until it is
positioned above the subject, then press the red button to use the grapple
and rescue the victim.
The boom arm will place the victim in the
auxiliary cargo hold. They have to be quarantined.
Rescue the victims: See
victims on the radar at left frame. Move the ship close to the victim.
Use the right arrow and top arrow on left frame to
be in position over the next victim.
Press red button when the boom arm is over the
victim. Shay got another victim.
Marek sees the hostile forces have returned. They
have to retreat and leave the one remaining victim.
Shay gets upset because he has to choose which one
lives or dies.
Danger System 5:
Another mission: Another
emergency is seen on the console. Another rescue is needed at Danger System
5.
Shay has to control his emotions to proceed to
another rescue.
Shay asks for the star chart.
Star Weaver: Enter the
ventilation shaft at left wall and give the new star chart to Star Weaver.
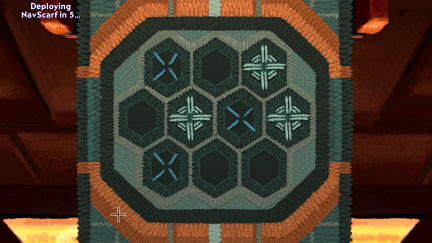
Go down the ladder and see that Space weaver
weaves the destination pattern into his NavScarf.
Go back up and enter the ventilation shaft at
right wall.
Rescue 1:
Go back to Marek's control room.
Use the green button to lower shield.
Press the red button when the boom arm is over the
victim.
Rescue 2: Use the arrows
on left frame to position over another victim.
Press the top and left arrow to move to the next
victim.
Press the red button to grab it when the boom arm
is in position.
Rescue 3: Press the top
arrow twice to be by the next victim.
Press the red button to grab it when the boom arm
is in position.
Rescue 4: Press the right
arrow once and the down arrow twice.
Press the red button to grab it when the boom arm
is in position.
Marek wants to stop but Shay wants to save another
one.
Rescue 5: Press top arrow
twice.
Press the red button to grab it when the boom arm
is in position.
Something is wrong with this one. Release the
victim.
Attacked: The ship came
under attack. Now the ship is on high alert.
The controls are now overridden by Mom - computer.
Shay rushed to get back to bed before Mom finds
out that he's not there.
Mom checks on Shay, her brave boy.
Stand up and see what is written on the console.
Program the ship for manual control:
Go back to Marek via the air vent right of the
console.
Check the windows and see that there are security
cameras everywhere. Marek says it is for Shay's protection.
Talk to Marek. A new emergency is called by Prima
Doom.
Control of cargo boom arms:
They have to do a manual override of the controls. Marek hacked the location
and Shay can go there without alerting the Overmother.
Take down shields: Place
the omicron inhibitor given by Marek over the fusion orb and they
will turn it on-off when time is right.
Get to Prima Doom: A
star chart is given by Marek.
Marek: Learn that Marek
is a recent stowaway. He sensed that Shay is now ready. Marek is in disguise
as a wolf so he can blend with other stuffed animals of Shay. Marek is a
rescuer of creatures in need.
Look around the ship:
Marek's bedroom: Go left
through the door. Check the bed and see that there are wolf hairs.
Check the rescued victims in quarantine.
There is a ventilation shaft on the floor at left
that will end up in Shay's trophy room but best to go back up to Marek's
control room for now.
Marek's control room:
Exit through the ventilation shaft at right to be in Shay's bedroom.
Shay's bedroom: Exit through the
smiley door at right.
Door with hexagon:
At the hallway, try to enter the next door with hexagon and see that mom
is making a surprise for Shay.
Kitchen-Galley: Enter the
kitchen through the door with spoon. Check the sign, table and mom's face.
Take the knife on the table at bottom left.
Exit.
Main computer room: Enter the door right of kitchen.
Learn
about the sacrifice girl story.
Go up to the bridge. Talk to mom. Learn that they
are looking for a new world because their home planet Loruna is doomed.
Ah...
Learn that Dad does all the maintenance during the
day.
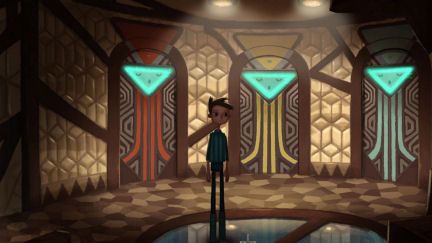
Emergency world scenarios:
Enter the blue door at right of back wall. See 3 doors with drawings.
Ice Cream avalanche world:
Enter the ice cream world. Talk to the knitted companions.
Take the whipped cream gun at right. Exit
through the painted door at left.
Click on mom's face again.
Friendship Circle world:
Enter the door with stars.
See one of the knitted companion in pain. Fix her back
and get a hook.
See fake controls in the room. Exit through door
upstairs.
Train ride room: Enter the
door at right and then through the door with train drawing.
Shay is banned from the train for life. Exit.
Do manual control of cargo boom arms:
Airlock: Go through the
door at right (not the teleporter door with inverted triangle). It has a
smiley planet on the double door.
Read the warning airlock ahead sign. Go through
the hallway.
In space: Shay comes out
wearing the spacesuit tethered by air tube.
Use the oxygen tank on Shay's helmet for air.
Use the whipped cream gun on Shay's space suit for
propulsion.
Use the knife to cut off the air tube and be free.
Cargo boom control: Go up. The
ship tube tries to catch Shay.
Go up again pass the radio tower of the ship and
then up again to see the huge cargo boom.
Go left to be close to the cargo boom arms manual
control.
Use the knife to open the glass cover of the
panel. The knife floats free in space.
Use the present - Grabbin Gary robot on the panel.
Shay has the remote.
Go back to the ship by going above and right pass the radio
tower and then down.
Get a helmet that fits:
Go back to mother's main control room by going
left past the fake emergency scenario rooms and as far as you can go.
Teleporter nexus: Enter the
green inverted triangle room on back wall. See 3 teleporter doors with inverted
triangles.
The left red teleporter goes to the toy
- junk room.
The yellow middle teleporter goes to the fusion
orb containment facility.
The right blue teleporter goes to the starboard
passageway that leads to the air lock.
Fusion Orb containment facility:
Enter the yellow middle teleporter. Shay's head shrunk.
Go left and get suited to protect from omicron
radiation. There's no helmet.
Go back to the right to have the suit remove.
Exit through the teleporter.
Shay's head returns to normal size. It is because Shay
returned through the same teleporter.
Hall of heroes - junk room:
Enter the left red teleporter door. Shay's head shrunk again.
This is the room that is adjacent to Marek's room
that can be accessed via the ventilation shaft at bottom of right wall.
Look around at Shay's toys. Take small hazard
suit. It separates into suit and helmet. It keeps out omicron
radiation.
Make head smaller to fit the helmet:
Try the diamond shaped helmet on (click it on Shay) and see that it doesn't
fit even though the head shrunk.
Going through a teleporter and not using it to
return makes the head smaller.
Exit through the ventilation shaft at right wall
to be in Marek's bedroom and right to Marek's control room.
Shay reports to
Marek. Exit at right to ventilation shaft to be at Shay's bedroom.
At Shay's bedroom, exit right and walk the passage
to the right to enter the main control room.
Enter through the green door to be at the
teleporter room again.
Enter the right blue teleporter and exit. Try the
helmet again and see that it still does not fit.
Go left and walk the hallway to the end and be at
the main control room again.
Enter through the green door again.
Take down shields:
The 2 side
teleporter doors would not let Shay go through again. Their inverted
triangle light are now off.
Go through the middle yellow door. Shay's head shrunk for the third time.
Use the diamond shape helmet on Shay now. It is a
little snug.
Go left to wear the suit. Enter the glass door. Go
down to bottom screen.
Place the omicron inhibitor on the orb - fusion
sphere floating in the contained room.
Exit the room, remove the suit and exit through
the teleporter. Shay's head returns to normal size.
Exit to the left to be at the main control room.
Get to Prima Doom:
Enter the red door under the central platform and
be at Space Weaver domain.
Stand right of Space Weaver. Talk to Space Weaver.
Ask it to bring you to Cozy Cluster. SW weaves the
pattern to Cozy Cluster. It is the closest pattern to Prima Doom.
Go down the ladder immediately.
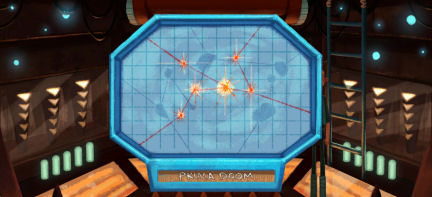
Look at the Prima Doom star map given by Marek.
Use the hook taken from the hugging companion and
copy
the pattern on the panel. If you run out of time, talk to Space Weaver again
to start the puzzle.
Click on blank space at top left, second from
right middle and left bottom to copy Prima Doom chart.
Arrive at Prima Doom. Space Weaver realizes the
error and wants to correct the problem. He has run out of thread and suffers a
meltdown.
Do the mission:
Go back to Marek using the shaft at right. Marek
brings him to the control.
Rescue 1: Open the shield
by pressing the green button.
Grab the victim using the red button.
Rescue 2: Press up arrow
twice. Get the second victim.
Marek says they are attacking us and they will
pull out. Shay refuses and tries for the third victim.
Rescue 3: Go right 2-3
times. Pick up the third victim.
The third rescued victim looks strange.
Save the ship:
Marek tries to take Shay to a safe place but a
falling ceiling drops on Marek.
Shay runs to save the ship. Shay runs past mom who
says that dad is taking care of things.
Shay goes to the airlock and is out of the ship.
Shay faces the monster and is hit. He loses consciousness.
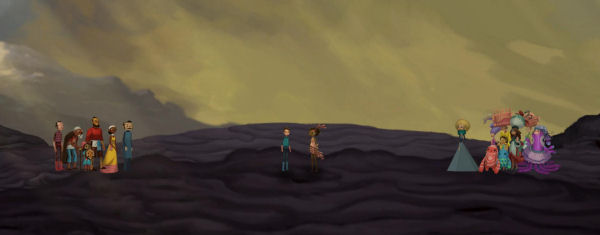
Mog Chothra:
Watch the blending of the 2 stories.
Vella examines the fallen Mog Chothra. Shay comes out
of Mog Chothra.
Vella tries to punch Shay but falls inside
the spaceship-Mog Chothra instead.
The door closes. Shay is now in Vella's world and
Vella is locked inside Mog Chothra.
ACT TWO
You can start the game playing either Vella or
Shay.
SHAY
SHELLMOUND:
Shay's parents:
Father is in a pile of sand. He tries to talk to a
shocked Shay. Mother is still inside the spaceship.
Shay finally realizes that his parents are real
and not computer generated. Father also realizes that they are not in space.
Explore Shellmound:
Go left and look around.
Hexipal buddy: Pick up the
hexipal that does maintenance in the ship from the sand at left by the
stairs.
Maiden Feast Marshal Dune:
Talk to the man at top of stairs. He's choking. See schematics on the wall behind the Marshal.
Carol: Talk to Carol who
is trying to
make a hook for her fishing rod. She needs a hook.
She has a spool of wire. Get an inkling that the girls eaten by Mog Chothra are the ones that Shay rescued with Marek's
console.
Stinky mess: Look at the stinky
mess at bottom of screen.
Deadeye God - spaceship:
Climb the stairs and enter the spaceship.
Alex: Talk to Alex. They
are both from dying Loruna and wants to go back there.
Learn more about Vella. Alex' ship is all about
music while Shay's ship is about knitting.
Shay has Marek the wolf while Alex had a talking
cello also named Marek.
Looters got parts of the ship and Shay will look
for them.
Father: Father comes in
and says that Mog Chothra flew away. Father's name is Ray Volta.
He will make a hull patching compound to fix the
holes in Alex' spaceship.
To get Alex' ship running, they need:
- electronic genius.
- patch the hull.
- superconductive gyroscopic hypercam unit.
- heavy duty antigravity unit.
Alex thinks the guards looted the ship because
they are wearing radiation resistant blast curtain.
Alex draws a schematic of the gyroscopic hypercam
unit.
The electronic genius has to be able to enter
small spaces and fix things in the spaceship.
Exit and Shay thinks he remembers this place in a
dream.
Help the choking Marshal Dune:
Go down to the beach and left across the bridge.
Tree: Talk to the tree. Learn
that Vella made him sick and his sap has sticky properties.
Examine the ground with a hardened "sick" from the
tree.
Snake: Go left and hear someone
at left. Go left and see the sign and horn.
Read the sign. The snake constricts Shay. But
being hugged by his knitted huggies gave Shay the tolerance to being
squeezed.
The boa constrictor gets tired squeezing-hugging
Shay that it falls to the ground. Pick up the snake-Mr. Huggy.
Marshal Dune: Go back to
the right until the beach.
Use the exhausted snake on Marshal Dune. Mr. Huggy
squeezes out a pitch pipe stuck in Marshal Dune's throat.
Get a superconductive gyroscopic hypercam unit:
Marshal Dune: Talk to
Marshal Dune. Mog Chothra might have gone to his home beyond the
gates of Plague Dam.
Loruna is a lost city pass the Plague Dam.
Build a superconductive gyroscopic hypercam unit
sand model: Marshal Dune can build anything as long as it is
made of sand.
Click on the plans on the wall. Give the
gyroscopic schematic to Marshal Dune. I think sand is the perfect
material for making spaceship parts.
Get a superconductive gyroscopic hypercam unit
made of sand.
Get the sand superconductive gyroscopic hypercam
unit stick together: Go to the talking tree. Go left of the tree to be at the house with
mailbox.
Mail box: Check the
mailbox of Curtis' house. Shay takes a missing flier of Vella Tartine
from the mailbox.
Go right on main path to be at the talking tree
place. Remember how the tree reacted with Vella.
Place the sand superconductive gyroscopic hypercam
unit on the "sick" throw up of the tree.
Use Vella's flier on tree. Ha! The sap hardened
the sand superconductive gyroscopic hypercam unit. Pick it up.
Curtis: Go left and enter the
house with a ladder through the roof. Talk to Curtis.
See that Curtis doesn't do wood anymore. He is now
into metalworking. He orders his mold from a catalog.
Use the sap hardened sand superconductive
gyroscopic hypercam unit on Curtis.
Curtis likes the candle holder. Get the
superconductive gyroscopic hypercam unit.
MERILOFT:
Get the heavy duty antigravity unit:
Go upstairs to the room at left. Shay climbs the
ladder to Meriloft.
F'ther and Lightbeard-Harm'ny:
Talk to F'ther. See that Lightbeard wants to get off his nest. F'ther has combined the
ladders to get him down.
Learn about Vella. Harmony hates anything that's
not light.
Click on the ladder by Lightbeard. The ladder goes
down and Shay climbs on the ladder.
(This part is very glitchy for me. To get through,
I have to get Lightbeard-Harmony or F'ther highlighted first by placing the
crochet hook over them; then right click to start a dialogue. I can get the
proper triggers to proceed from then on).
Click on Lightbeard to talk to him completely.
He's naturally bouyant.
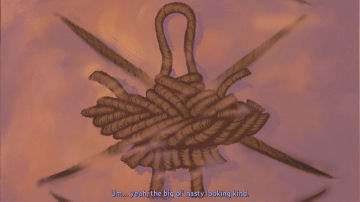
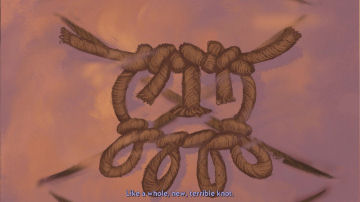
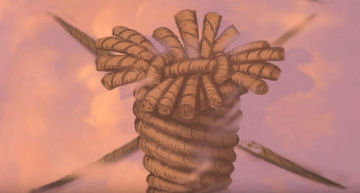
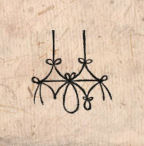
Knots: Click on
F'ther to start a dialogue (see note above to start dialogue).
Can you untie that bow on Harm'ny's cloud?
Because it's in the way of us saving him? I'd better go find a knot
expert for advice.
Remember the description of the knots or take
picture of them.
Carol: Go down the ladder to be
at Curtis' house. Go right until the beach.
Talk to Carol completely. Ask her about the knots.
Select the description that closely resembles the
knot seen by F'ther. These are what I saw in my replays:
|
 |
|
 |
|
 |
|
A little bit like you
strangely enough |
|
A face that's really
a cow's udder |
|
A lazy pole vaulter |
|
 |
 |
|
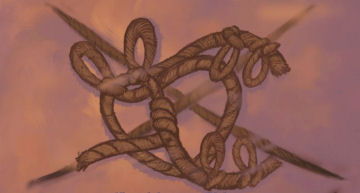
A bucket of fingers |
Alligator wrestling a pretzel |
Pencil: Carol needs something to
draw with for the untying diagram.
Go up to the spaceship and Alex. Give Alex the
superconductive gyroscopic hypercam unit.
Ask him for his pencil.
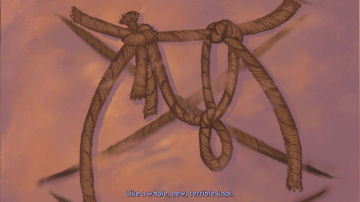
Untie the knot: Give the pencil
to Carol down by the pool. Get an untying diagram.
Go back up to Meriloft and F'ther. Climb the
ladder to lower Harm'ny's cloud.
Use the diagram on F'ther. Give that knot
another try.
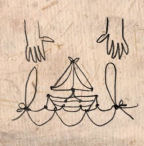
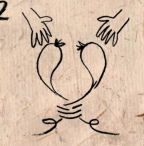
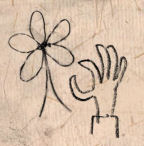
See the diagram. Use the dialogue that best describes the steps. Follow the steps 1 - 2 - 3.
If correct, F'ther will give a positive answer.
|
 |
|
 |
|
 |
|
 |
|
Make the boat go
under the bridge |
|
Pull apart the
fighting snakes |
|
Poke the clown in
the eye |
|
She loves me, she
loves me not |
|
 |
|
 |
|
 |
|
 |
|
Unravel the sweater |
|
Tug on the piggy's
tail |
|
Pull off the fly's
wings |
|
Tickle the foot |
The diagram might not match if the description
of the knot given to Carol is the wrong one.
If wrong get a new diagram. Automatically be with
Carol.
Harmony is heavy: Ah, Lightbeard is exposed. A singing fish falls of
the pile of stuff Harm'ny has hoarded.
F'ther gives the heavy duty antigravity unit to
Shay and delivers it to the spaceship.
Get the correct pH of the caulking compound:
Go back down to talk to Father by the pool. Talk
to him completely about Operation Dandelion and who Marek may be.
The pH of compound should be 7 before the final
ingredient can be added.
Remember that the space spoon gives a chemical,
nutrient content and ingredient breakdown of
all the food that it shoves in Shay's mouth.
Use the space spoon on the concoction. It has a pH
of 6.
Explore Meriloft: Go back to Meriloft via the stairs at Curtis' roof.
See that F'ther and Harm'ny's cloud is gone. Go right to center of town. Look around.
Jessie the blue bird: Go to
Jessie the blue bird's nest. See that the egg is cracking but is having
difficulty getting out. Jessie scares Shay off the nest.
Tree: Click on the signpost
behind Jessie. Go left of the signpost to be at the tree.
Darkeye guards: See the 2 guards
talking to the tree.
Gus and fruit: Go to the light
passing through cloud-hole
close to the trunk of the tree. Drop down to the lower level.
Go left and see Gus drinking fruit juice. Talk to
him completely.
Get the tapper he uses to get fruit juice.
Get a fruit from the pile.
Get shell: Go through the hole
in the trunk and then back to Jessie's nest at right.
Use the tapper on the cracked egg to help it
hatch. Cute! Get eggshells that falls on the floor.
Get pH 7: Go back to Father at
the beach.
Use the eggshell on concoction to raise the pH.
Test the pH using the spoon.
Use the fruit on concoction to lower the pH. Test
the pH using the spoon.
Do this until the pH is 7.
Father shows Alex the caulking material. Father
enters the main part of the ship to patch the hull.
Get radiation suit:
Go back to Meriloft via Curtis' roof. Go to the
tree behind Jessie's nest.
Guards: Talk to the 2
guards-druids chanting at the tree.
Shay will look for a stick to fight them for the
robes. They are worshipping the tree because of the fruit. They are seeking
answers.
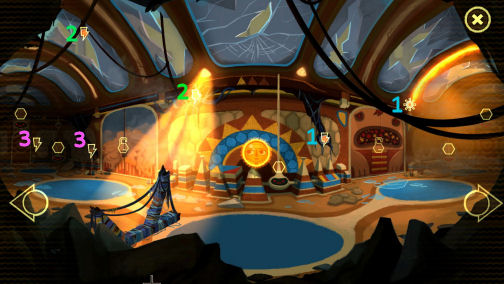
Men at Cloud Shoes: Go
right to the center of town. Talk to
Husker Tartine, father of Vella and Walt'r, husband of Carol. Learn about Vella.
Girls selling cupcakes: Go down
the hut and go right to next screen.
Talk to Rocky, Vella's sister and M'ggie, Carol's
daughter. They are selling cupcakes for printing, distribution, etc... to
raise awareness about missing Vella and Maiden Feast system lies.
Grandpa and Ch't: Go to Grandpa
Brommel Beastender at clouds at back. See him teach Ch't, Carol's son how to fight.
Talk to Granpa. Ch't gives money to Shay. He's
been keeping the money that his dad gives for Harm'ny.
Grandpa frosted the cupcakes using his stick-cane. He
has enough frosting for one more cupcake. He can't help frosting a plain
cupcake.
Get the cane: Buy a cupcake
using the money given by Ch't.
Go back to the 2 husbands at Cloud Shoes. Talk to
them about the cupcakes.
Walt'r eats only the frosting of the cupcakes.
Give the cupcake to the 2 men. Husker will not eat something with his
daughter's face. Walt'r eats the frosting off the cupcake. Now the cupcake needs
frosting.
Go back to Grandpa and give him the cupcake.
Grandpa frosts the cupcake. Get the cane.
Get the robes: Go back to the
druids-guards by the tree. Use the cane on the guards-druids. Shay loses.
They only pretended to be blind. They both
fall through the cloud leaving the robes behind. The fly away on the bird. Get the
robes.
Morelia and Twyla: Go back to
center of town. Go down the ladder at right. See Harm'ny in a cage.
Talk to Morelia, Vella's mother and Twyla, the
rejected Maiden
Feast girl. Well, at least your costume is cool.
Ask to make a costume. Twyla needs a pattern and
material.
Talk to Harm'ny-Lightbeard several times. He
doesn't want to be released. The cage is for his protection.
Get a radiation suit: Give the
baby radiation suit and the radiation proof curtains-robes to Twyla.
Get a feathered radiation suit.
Find an electronic genius:
Get the fish: Go back down to
the talking tree. See the fish caught in the tree's branch. It's too high.
Talk to the tree. Hey, want to hear a joke?
This is a random puzzle. My game has these:
What's the smallest full-grown tree you ever heard of? I've seen one no
bigger than my hand. A Palm Tree.
Pick up the singing fish.
Get wire from Carol: Go to Carol
by the pool. Show the fish to Carol.
Then use the crochet hook on Carol.
But please promise to leave some fish in the ocean for future generations.
Get the wire.
Hexipal buddy: Look close at the hexipal buddy picked up from the sand. We need a pattern on how to place the
wire.
Destination chart:
Alex: Go back to Alex at the
spaceship. If you haven't yet , give him the superconductive gyroscopic hypercam
unit and feathery radiation suit.
Give Alex the pitch pipe and he whistles the last destination
port visited by the ship:
middle, middle, high, low and middle tone.
The ship is shaking because the heavy duty
antigravity unit is warming up.
VELLA
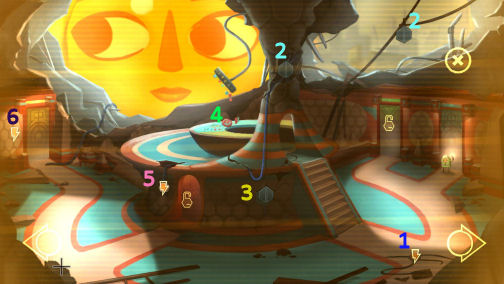
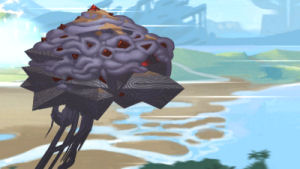
INSIDE MOG CHOTHRA.
Do starfield repair:
Change to Vella by clicking on Vella's icon at
right side of inventory bar.
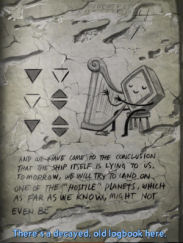
Knife: Hear a voice that
is targeting something. Move and see a knife drops from above. Talk to the
knife and then pick the knife up.
Learn about Commander and Mom.
Outer breach: Look at the hole
on the starfield wall. Go right.
Damage reports: Hear an
announcement about outer breach on wall. The ship tries starfield repair.
The starfield is obstructed by foreign body.
Take the space helmet from the crack on the
wall. The ship seals the starfield wall.
Do air transport system repair:
The announcement states that it is unable to
repressurize air transport and set antigravity field. Air transport system
is incomplete.
Look at the 2 machines with ripped tubes on floor.
Each machine has 3 holes.
Air tube:
See 2 ripped areas on air tube hanging from
hatch at right. One rip is at bottom and one at top. Climb the tube to see the hatch at top. It is closed.
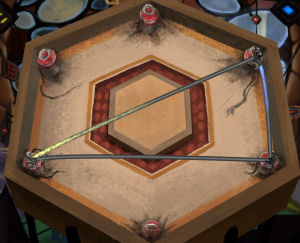
Get a short tube and use it on machine:
Go down and use Dutch the knife at bottom
ripped area of tube to get a short tube.
We need to have the middle panel close to the
tubing to pop out.
Use the short cut tube on the 2 machines. This
might be a random puzzle.
In my game; place (click-hold-drop) one end of
the tube on the bottom and middle tubing of the left machine.
(On
replay, the short tube was bottom and middle of the right machine).
The panel by the hatch and tubing at right
pops out close to the hanging tube. It can be used for support.
Get a longer tube
and use it on machine:
Climb the tube to the top ripped area of the
tubing.
Use Dutch the knife on the top part of the
tube to get long tube. Vella falls on the popped out panel by the
tube.
Use the long tube on the 2 machines.
In my game, one end goes on the top of the
left machine and middle of right machine.
(On replay, the long tube
works on the top tubing of both machines).
Air transport is repressurized and antigravity is
initiated. The ship is now functioning. Vella floats in the air.
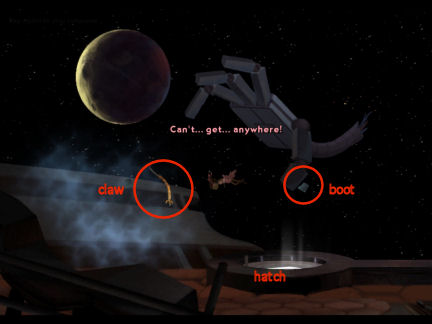
Get to opened hatch-airlock door:
Vella is not capable of moving. The hatch at
bottom
is now open.
See a yellow claw on the left, 2 blue boots (one
at left and one at right) and a giant hand above.
Get the yellow claw tube:
Take the space helmet from inventory. Wait for the yellow claw to be close
and facing Vella. Click the helmet on claw to get claw.
Get the boot: The blue boot
right of Vella is closer. Use the yellow claw on the boot under the hand at
right.
Wait for the hand to close when Vella is facing
the boot and then click the claw on the boot.
Place the cursor with claw on top of the boot,
wait for correct time and then release.
Go to the opened hatch: The claw
will not release the boot. Use the claw-boot on the giant hand to move Vella
above the hatch.
Vella
recognizes the hand as one of the tentacles.
The hand floats above the open hatch. Drop
to-click on the open hatch. Vella is inside the airlock area of the
spaceship.
Find out who is behind sweetie pie:
Explore the ship: Read the
airlock warning sign on the wall. Go to the hallway at left.
The ship is moving. Vella brought Mog Chothra back
to life. Talk to the hexipal swinging a warning light.
Examine the trash chute left of the asleep
teleport door. The train door doesn't open.
Go left through the playroom hallway. The
playrooms are closed and the intercom stands are sending out electricity.
Exposed wires, broken glass and debris are all over.
Go left and move the blockage.
Control room: Exit
through door at left to be at the destroyed control room. See the screen
wall is broken and the ship is flying over water.
Check the console and Vella notes it is as
fake. The door to the Space Weaver at base of the podium is locked.
Enter through door at left and be at the living
quarters hallway.
Mom's quarters: See the intercom
wire at Mom's quarters (last door at left and beside Shay's bedroom) is
exposed and sparking.
Talk through door. Talk to Mom. Mog Chothra's
brain? Can you open this door? This is Engineering department. It's me
Shay. If you don't believe I'm Shay, I'm leaving!
Vella doesn't sound like Shay. Mom wants to be
sure.
Find out what is going on:
Shay's bedroom: Enter the door
at left.
Look around.
Check the sad monitor and the fake Shay on the bed.
Marek: Go through the vent on
the control panel to be in Marek's lair.
Go left and see Marek underneath fallen debris.
Talk to Marek.
Learn about "the last one". Marek says he
was sent to save Shay from Mom, the brain of the ship.
His mission is to get control of this ship. He
explains about Shay's rescuing maidens from the plague. Shay has instinct better than technology.
Shay was interested in the last one-Vella. The
maidens are locked up.
Marek wants to get to the central control room.
Marek opens the door to his quarters.
Explore rooms:
Marek's bedroom: Enter the door at
left. Look around. The prisoners' door is locked. Check the bed.
Trophy room: Enter the vent at
left. Look around. Read all the papers and examine the picture.
Medical report: After Shay's 5th year, he has
grown 2 inches taller and 3 shoe sizes. Splargh therapy seems to be
working.
Shoe Fairy letter: Shay got red
striped shoes and green with skulls shoes. Shay wants red shoes with skulls for next
year.
Award for Shay Volta Best Actor "Purple Boots
- The Musical".
Second place in shoe tying contest. Painting
of a red boot.
Shay first boot, Age 5. It is dotted.
Jar of teeth of Volta, S. Age: 6. Deciduous
incisors 8,9.
Drawing made by Shay at age 8 of fireman
wearing red coat, red hat and blue boots.
Picture of Shay missing his front tooth;
hugging a snake and wearing shoes marked 7 with skulls.
Change head size:
Teleporter by Trophy room: Talk
to Melanie, the red teleporter.
Enter the teleporter. Vella's head gets bigger
and her voice changed.
Nexus: Check Nadine, the yellow
middle teleporter. It has been quiet.
Go left to exit the nexus and be at the fake
control room.
Go to the other side of blue teleporter:
Enter the blue door to be at starboard hallway at left. Go right pass the
locked playrooms. Go through another door and forward.
Enter the blue teleporter to go back to nexus. Vella's head gets bigger.
Convince Mom that Vella is Shay:
Go left to the fake control room and then to the
door at left to go back to living quarters.
Mom: Talk through door of Mom's
room. It's me Shay. Mom needs more proof.
All answers to Mom's question can be deduced
from the items at the trophy room.
What was the name of your favorite stuff
animal as child? Mister... Huggy (from Shay's encounter with the
boa constrictor).
Of all my pet names for you, which one was
your favorite? Please, can we not do this?
Mom made his space boots until 9th birthday.
She never repeats the same color or design. What is color, size and
pattern of his first space boots?
(Based on the items at the trophy room: the
shoe fairy letter states red and green boots; while the fireman was
wearing blue boots. The purple boot was a musical.)
So the color is purple.
(Based on the items at the trophy room: his
first boot was at 5 years of age. He grew 3 sizes after 5 years of age.
His picture with Mr. Huggy is size 7 boots.)
So the size of his first
boot is size 4.
((Based on the items at the trophy room: Shay
had polka dotted first boot).
So the pattern is polka dot.
The door opens. Mom sees Vella. The ship lurches
and both are thrown inside the control room.
LORUNA
Learn what is happening:
Mom interrogates Vella. Marekai-Marek-wolf removes
his mask. He intends to finish Operation Dandelion.
They arrive in Loruna behind the plague Dam. The
spaceship is to be sterilized upon arrival.
Mom: Take Lorraine the knife.
Talk to Hope-Mom to update her about the monster and maidens. The maiden kidnapping sounds like what
Thrush would come out with.
Marekai: Press the red
button bottom left of the monitor to talk to Marekai. They are going to the
Red Hangar for processing. The maidens are in safe room.
The dam was built to separate them from the
genetic inferiors at the badlands (like Vella and other humans).
They need the girls for "unnamable". Shay was
raised to be weak but sensitive enough to select the right genetic material.
Find a way out of here:
Click on the orange thing on the ceiling. It is
the central control sphere that Mom used to look at everything in the ship.
Use the arrows to move about. Get out of the
sphere view by clicking on the X at top right.
Remember the hexigal with the warning lantern
close to the airlock. Hexigal can fix the electrical malfunctions on her
path.
Go right to control room; right to playroom
hallway and right to starboard hallway to get to hexigal.
On the way, click on hexagons to cheer up the
smileys. See 4 at playroom hallway and 1 at starboard hallway.
Open locked rooms on the way by clicking on
the padlock icons.
Lead hexigal to Hope-Mom's door:
See hexigal at right.
Hexigal fixes any electrical problem shown by lightning bolt icons.
She goes only to areas that is dark. So lights
shown by sun icons have to be turned off.
Room off the airlock by starboard hallway:
1. Click on the sun icon by teleporter and the
lightning bolt closest to Hexigal.
2. When able, immediately click on the 2 lightning
bolts by the door to get Hexigal to next hallway.
Playrooms hallway: Go left
arrow.
1. Click on sun icon by hexigal to darken room. Immediately click on lightning bolt right of Vella.
When hexigal is working on right of Vella
lightning bolt:
2. Immediately, click on the lightning bolt on
ceiling at left and then the lightning bolt above and left of Vella.
3. When able, click on lightning bolts by the door
at left. Hexigal goes to fake control room.
Fake control room: Go left
arrow.
1. Click on lightning bolt on floor at right.
2. 2 closed panels open to show lightning bolts.
Immediately click on cable and post lightning bolts.
3. Click on another lightning bolt that appears at
base of podium.
4. Another lightning bolt appears on the table at
podium. Immediately click it.
5. While Hexigal is working on the one on the
table, click on the lightning bolt left of space weaver door.
6. Then click the bolt by the door at left. Hexigal
enters the living quarters.
Living quarters hallway: Go left to living
quarters.
- Click on the lightning bolt under the broken
window. Hexigal is sucked out to the outside of ship.
Save Hexigal:
Enter the galley-kitchen. See Hexigal hanging
outside the broken window. Exit the galley.
Shay's bedroom: Use the left
arrow and enter Shay's bedroom.
Click on the claw to remove the debris on top of
the fake Shay and the plastic body. Fake shay is given the programmed bath
and taken away. Go right.
Click the hexagon on the monitor. Ooops.
Galley: Go back to galley. See
that fake Shay is on the breakfast table as programmed ready to be fed.
Click on the hexagon below the monitor until it
shows Taco Pill Tuesday.
Click on claw to give fake Shay his pill. The claw
swings and Hexigal grabs it to be inside the galley.
Open the galley door by clicking on lightning bolt by
door.
Open Mom's door:
Go left arrow. Fix lightning bolt under window and
the panel by Hope's door.
Red hangar: Mog is now at
Red Hangar and is to be sterilized. See the Mog Factory.
Hope: Talk to Hope-Mom.
Vella and Hope made a pact to stick together.
The plan is: Build a bomb, get the bomb off ship
and drive the ship out of here.
Build a bomb:
Get Vella's head back to normal:
Go to the nexus behind the green door in the fake control room.
Enter and exit twice on either the left red or the
blue right teleporter. Vella's head is back to normal.
Find a
bomb: Enter Nadine the middle yellow teleporter to
the fusion orb containment facility.
Go left and see the suit machine drops and breaks.
Enter the containment room and then go to bottom of screen.
See and try to take the orb. It's hot.
Keep the bomb cold: Go
back to the teleporter and to the nexus.
Ice Cream avalanche room: Go to the ice
cream room via the fake control room and then blue door or the blue teleporter
and then go left.
Talk to the yarn playmates on top of the ice cream
mountain. They are trying to cryofreeze themselves. The ice cream has
chemicals that keeps things cold for a while.
See a whipped cream gun.
Climb the avalanche to try to reach the ice cream
with the yarn playmates. Vella slides down.
Use Carol's feather cloud shoes on Vella. Climb up
and reach the playmates.
Use the helmet on the ice cream to get a helmet
full of ice cream.
Go down and the whipped cream takes the cloud
shoes.
Get the bomb: Go back to the fusion orb
containment facility via the yellow middle teleporter.
Enter the containment room.
Use the helmet full of ice cream on the orb at the
containment room to get the orb in the helmet with ice cream.
Go back to the nexus.
Get the bomb off the ship:
Trash chute: Exit through
the blue teleporter. See a trash chute left of the teleporter. It is closed.
Hmm...
Blockage: Go
left and then pass through the blockage. Put the blockage back to
cover-block the hallway.
Mom's room-control room: Go to
the real control room - where Mom Hope is.
Use the orange central control sphere at the
ceiling.
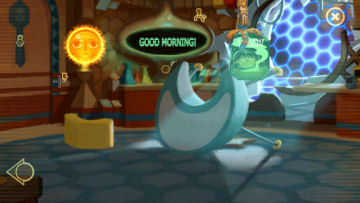
Galley: Move the arrows to enter
the galley-kitchen.
Press the hexagon below the monitor to show "Good
Morning" that was used to give Shay his breakfast.
The claw drops down with a cereal box and spills
cereal on the floor. See a cleaning robot take the spilled cereal.
Lower the cereal: Press the
hexagon again. When the cereal box is down midway - immediately click the
pause button left of the claw. It stops the claw.
Exit the control sphere by clicking on the X at
top right.
Go to the galley and try to take the cereal box.
The spilled cereals are cleaned again by the bot. Save game here.
Follow the cleaningbot:
Be sure that you already placed the blockage
at the middle of the playrooms hallway.
Follow the cleaning robot as fast as you can.
Use the double arrows (double click) at exits.
The path to take is: galley - hallway - door -
fake control room - left green door - nexus - right blue teleporter -
starboard hallway.
Click on cleaning bot by the trash chute. The bot leaves. Pick up the dropped cereals.
Use the helmet with orb packed in ice cream in
the open trash chute. The bomb is now in a large trash bin below the ship.
If the bot is ahead of you - repeat the
process.
Fix space weaver:
Go to the base of the fake control room. Talk to
space weaver.
He needs a star chart, yarn and spindle.
See that the hatch at right to Marek's lair is blocked.
Find the maidens and a hook:
Marekai's lair: Go to
Shay's bedroom and then down the hatch.
Listen to Marekai talk to the leader of Thrush.
Vella is significant to Shay.
The other maidens are to be incinerated after the
repair the ship. They do not want to answer to others why they lost a collector-Shay.
Mom is to be "unpurified" because she has been in
contact with unpurified primitives.
Marekai's bedroom: Exit the
lair. Go to the nexus via the green door at the fake control room.
Enter Melanie the red teleporter to be at the
trophy room. Enter the hatch at right to be in the bedroom.
Examine the broken panel right of the locked door.
The door is clear now. Talk to the maidens. They
are hungry.
Feed the maidens: Use the
cereal on the door. The dropped cereals are being hooked under the door.
Use the cereal on the door again. Click to take
the hook.
Get a star chart:
Save game here. While in Marek's bedroom, click on
the wires and it sounds an alarm.
Marek-Marekai enters the room while Vella hides.
Marek fixes the wires.
Immediately, exit to trophy room - red teleporter
- nexus - fake control room - living quarters hallway - Shay's bedroom.
Go down the hatch of the control panel. Go left.
If Marek is still not here, go to the computer at
extreme left and
press the green button. It will lock Marek' bedroom door for a bit.
Take the star chart on the stool at left.
Exit the room through the hatch at right screen.
Marekai breaks out of his bedroom and destroys the
button.
Get yarn:
If you haven't taken Lorraine the fork from
the control desk at Hope's room - do so now.
Toy train room: Go to the
playrooms hallway behind the blue door at fake control room.
Enter the train room left of the teleporter and
trash chute.
Talk to the crying yarn playmates and the train
conductor. They are crying because Shay the young hero is not here.
Get Shay: Go to the galley and
take the blow up Shay from the table.
Go to the ice cream avalanche playroom. Use the
plastic Shay on the whipped cream gun to get a blown up Shay. The whipped cream is made by Father
and can fix flat tires with it.
Train room: Go back to the train
room. Use blown up hero on crying playmates.
See the train ride the rails. Yeah, let's do
the wave. Uh oh! One of the playmates gets stuck on a branch and
unravels.
Vella gets the bunched up yarn. Blown up
Shay burst. Vella is banned for life also.
SHAY and VELLA
AS VELLA:
Make destination chart:
If you have played Shay's part
already and have not done this part, get Shay to give the pitch pipe to
Alex - do so now. Change to Shay at inventory bar. Get the last destination
pattern.
Yarn: As Vella, go to space
weaver's room. Give him the bunched up yarn. He doesn't want the yarn that
way.
In inventory combine the fork and the yarn to get
yarn and spindle. Use the spindle on space weaver.
Alter the star chart: Give the star chart to space weaver.
Immediately go down and use the hook from the
maiden on the woven
star chart to make the pattern of the last destination port whistled by Alex: middle, middle, high, low
and middle.
Use hook to fill in the second middle and high
triangles.

Lift off aborted:
The space weaver tries to get the ship going but
Mom blocked the engine.
Mom: Go to Hope at the real
control room. Talk to Hope to learn that Marekai is doing a navcheck right
now (as seen on screen). When he finishes; he will go outside the ship to
finish repairing the ship.
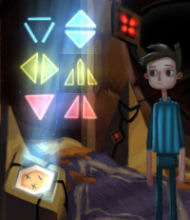
Volta Family picture: Look close at
the family picture on the console shelf.
Note the geometric-triangular patterns on the board
behind the Volta Family. This clue is random and changes
during the game - best to copy it down.
AS SHAY:
Find an electronic genius:
Show Alex the hexipal.
Study the hexipal:
Combine the wire to hexipal. See a closeup of the unwired hexipal.
There are 6 red contact points.
Click on a contact point and then another
point to join them with a wire.
3 colored wires can be placed before the wire
runs out.
They are placed in order: blue first, yellow
second and lastly the red. The machine reads the shapes in that order.
Learn which contact point make what geometric
shape:
Place wires on hexipal by joining 2 contact
points.
Number the contact points in your notes 1 on
top, going clockwise to 6.
Always wire the hexipal: blue first, yellow
second and lastly the red.
Read the hexipal on the diamond
reading-charging stand left of the exit door of the spaceship.
Do this wire reading until all contact points
are read.
Note down the shapes made by those contact
points and their positions (1-6 clockwise) - you will use those
positions for other patterns in the game.
Note also that the first end-click of the wire
is placed based on the left column shapes. The other end is the shape on
the right.
Find the correct pattern:
Recall
the pattern seen on the Volta family portrait on Hope's console. Note
the pattern is random.
Reproduce that portrait pattern on the hexipal
with the blue on top, yellow middle and red at bottom.
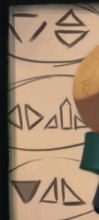
Wire the hexipal:
Knowing now which contact point shapes are for blue, place the first
wire on the contact point for the left blue geometric shape and then
the other end on the contact point for the right blue geometric
shape.
Do the second wiring for yellow and then
the last for the red.
If correct, Shay will say that he has good feeling about this pattern.
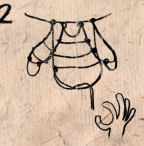
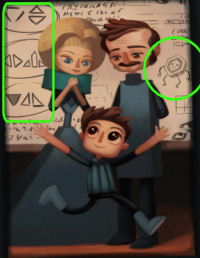
This puzzle is random. In my game:
Waking hexipal pattern:
Top left blue shape (inverted triangle) is contact point 2 that goes
to contact point 5 (vertical arrows).
Yellow is contact point 4 (horizontal arrows) that connects to contact
point 1 (cutup triangle).
Red (inverted triangle) is contact point 3 that connects to contact point 6
(split triangle).
Hexipal is alive. Give hexipal to Alex.
Hexipal goes around and fixes things that are broken.
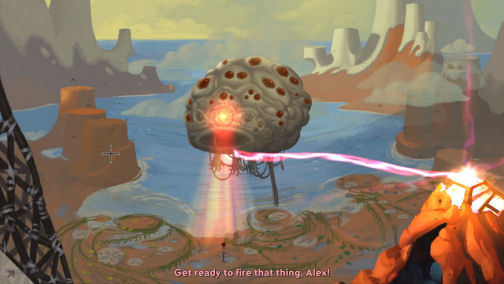
Liftoff of the spaceships:
Father returns and says that he didn't patch
everything. Alex starts the lift off.
The Tartine family arrives and demands answers
about what happened to Vella.
Clarence the Deadeye God has woken.
Marekai leaves the ship and is by the trash bin. Mog
Chothra sails away. The red Orb is alive and flashing. Marekai jumps away.
The bomb-orb explodes.
Clarence-Airship Maloruna arrives at the base and asks to enter.
Gate opens. Clarence meets Mog Chothra.
The walkway is too short to get to Mog Chothra. The base starts firing at Mog Chothra.
Click on either spaceship to select the character you
want to play.
AS SHAY:
Talk to the Tartine family. See the hexipal
dancing with Rocky, Vella's sister.
Try to enter through the door at right. Alex stops
Shay.
Use the Grabbing Gary remote. Mom resets the
manual to centralized controls and Gary's arms stops hugging.
AS VELLA:
Vella recognizes Alex' ship. Space Weaver does not
want to change destination program and refuses Hope's orders.
Hexigal and death ray:
Exit the control room.
Find wires for hexigal: See
hexigal under debris. Her wires are gone.
Go to Shay's bedroom and down the hatch to
Marekai's lair. Take the wires on Marekai's computer.
Head of Thrush: Talk to
Marekai's boss, the head of Thrush. Learn why they want Vella and their plan
for their future Lorunian and Shay. See (Xe)Levina Clench.
Fix hexigal:
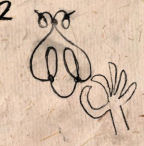
Note the pattern burned on hexigal. There are
remnants of colors on the contact points. The burned marks are
consistent with the order the wires are added.
|
The Warning pattern (based on my game's
positions):
Blue wire - 1 to point 3.
Yellow wire - 2 to point 5.
Red wire - 6 to point 4.
Arrange the wire and Hexigal is back to her
warning ways. |
 |
Fake control room: Go to fake
control room and climb the podium. Use the death ray remote while at the
podium.
Alex realizes that Vella set off the death
ray. Clarence overheats. Alex goes down to shut down the manual of the death
ray.
AS SHAY:
Explore the inner part of Clarence:
Now that Alex left the door open, go down and look
around. Talk to Ray, Shay's father.
Old book: Read the old
book at foreground. It shows the hexipal harp pattern.
Real old quadripals: Enter the
left entryway. Be stopped by the old hostile quadripals. They block the way
to the death ray control panels.
Harp: Exit and go right.
See old musical instruments. A harp is at center of room.
Check the panel on wall beside the large drum and see that the large
drum mallet is gone.
Take the radio at foreground.
Entice and distract the old quadripals:
Take hexipal: Go back
upstairs and try to take the dancing hexipal.
Use the radio on hexipal and he repairs the radio.
Give the fixed radio to Alex who is still trying
to contact Loruna.
Entice the quadripals: Go
downstairs. Use hexipal on the quadripals at left hallway. They are in awe and worship
the 6 tone hexipal.
Go to center room. The quadripals follow.
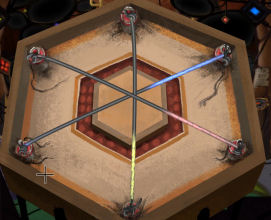
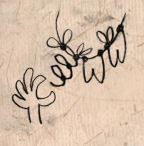
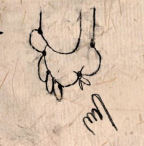
Rewire hexipal to harp pattern:
Review the harp wire pattern from the old
book. Rewire hexipal from the original dancing pattern (blue is 5-1,
yellow is 5-4 and red is 5-6).
|
 |
The harp pattern (based on my game's
positions):
Blue wire - 3 to point 2.
Yellow wire - 2 to point 5.
Red wire - 3 to point 5.
|
 |
Harp room: Go to right
room. The quadripals follow.
Use the harp wired hexipal on the harp. Hexipal
plays the harp and the quadripals dance.
Deathray panel:
Go to left room now that the quadripals are gone.
Take the drum mallet from pillar.
Go around the pillar and pull the handle to turn
on the power for the manual control of the pyramid-death ray on top of the ship. Alex will turn
this off if Vella plays with her remote again.
AS VELLA:
Distract Space Weaver and Hope:
Remember that Hope changes the controls to central
rather than manual; preventing Shay from using Grabbin' Gary.
Go down to Space Weaver's room. Go down the ladder
and stand in front of the woven scarf.
Touch it and Space Weaver says do not touch
because he-it is sensitive.
Program hexigal to harp pattern.
The harp pattern (see Shay's pattern above):
Blue wire - 3 to point 2.
Yellow wire - 2 to point 5.
Red wire - 3 to point 5.
Place harp programmed hexigal in front of the
woven material.
Hexigal tickles Space Weaver. Space Weaver calls Hope for help.
Immediately go up and exit. Meet Hope at the
exit.
Reset control:
Immediately go to Hope's room- control room. Press the red button to get
MANUAL on the monitor.
If Hope gets back here, redo the tickling and the
run to the control room.
Death ray: Go to the
podium of the fake control room as fast you can. Save game here.
AS SHAY:
Distract Alex:
Remember that Alex turns off the death ray
whenever Vella uses it.
Go to the Harp room at right. (Be sure that death
ray is powered up.)
Take hexipal and stand in front of the drum.
Combine hexipal and the drum mallet.
Rewire hexipal to Warning pattern.
Place warning with mallet hexipal in front of the
large drum.
The Warning pattern (using Vella's pattern):
Blue wire - 1 to point 3.
Yellow wire - 2 to point 5.
Red wire - 6 to point 4.
Save game here. Hexipal makes a
ruckus. Alex comes down and tries to stop hexipal.
Immediately, exit - climb upstairs - use Grabbin
Gary (now that Vella has the ship on manual).
Mog embraces Clarence.
If Alex comes back here - redo from save game
again or earlier.
AS VELLA:
Hopefully Hope is still distracted with Space
Weaver and that Shay has the death ray turned on.
Use the death ray remote while standing on the
podium of the fake control room.
Watch what happens to Mog and Clarence. Shay is in
a bind. Vella is caught by Marekai. Vella makes Grandpa proud. Hope and Ray
get the fright of their lives. Grabbin' Gary is a real professional.
Watch the credits to see illustrations of what
happened to the characters in the game.
This document may not be
distributed without express written permission of the author and the content
may not be altered in any way.
For Questions or
Comments on this Walkthrough,
Please write to:
MaGtRo
Copyright © 8/2015
MaGtRo
 GameBoomers
Walkthroughs and Solutions
GameBoomers
Walkthroughs and Solutions