COMER
Walkthrough
written by Mr.
Bill
Game produced by Shine Studio (1998)
COMER
Walkthrough
written by Mr.
Bill
Game produced by Shine Studio (1998)
Many years from now
scientists find a site of human remains
……dated as early as
the Jurassic period
……before the extinction
of the dinosaurs
Many years from then, they find another……
Introduction
This is an unusual and deeply philosophical game. In some respects very reminiscent of Myst, even with snatches of Myst music, it nevertheless stands on its own as a work of art in its own right, with beautiful original graphics and music (both original music and classical adaptations) to be enjoyed throughout the game. The music CD is also available from Shine Studio.
PLEASE NOTE: the hypothesis of the story is imaginative and very unusual, and creates much food for thought. Because it is so unusual, we have included observations about the unfolding story throughout. At the end of this walkthrough we have also included a final commentary about the ending by Kyle Choi, author of COMER, as well as a brief commentary of our own. But please play the game before you read it, so you don't spoil it for yourself.
So the intent of this thorough,
step by step and in depth walkthrough is to not only help you solve the
puzzles to complete the game, but also to help you enjoy, understand and
appreciate the fascinating story involved. My hope also is that this style
of walkthrough may help the novice and, possibly, the intermediate adventure
gamer, to learn how to go about discovering and solving all that needs
to be done without losing sight of the story itself (the most important
part of any adventure game) and have fun along the way (the second most
important thing about any adventure game).
Note About Loading A Previously Saved Game And Saving:
You will NOT have to start each time from the first CD. To start a saved game on another CD other than the first CD, click on the word COMER in the menu at the top of the introductory screen (do NOT click on the introductory screen). Then click on the word OPEN, and then either click once on the saved game you wish to open and then on OK, or double click on the saved game you want to open. The saved game will always take you to the beginning of that area but, don't worry, everything that you have already completed in that area has been saved.
How to Approach the Game:
Explore everywhere and look
at everything. There is much beauty to see and hear in every location.
And it may only be after you have explored an area thoroughly that you
know what to do next. Don't be in a hurry to finish the game. After all,
you'll miss it when it's over. Only use this walkthrough if you are hopelessly
stuck, or in order to make sure you haven't missed something in a given
area. Otherwise you will miss the adventure and the sense of accomplishment
of discovering things on your own. You may want to read through it completely
however, after you have finished the game, to clarify any elements of the
story which were not clear to you!
The Adventure Begins:
You
are the 28th Comer. It is only in our own age when scientists finally find
a site of the earliest human remains which proves that we did live among
the dinosaurs. Later another site is found: the cradle of a new higher
being. You must find a way to terminate the experiment and save humanity,
thus completing the mission which the 27 forecomers before you were unable
to accomplish.
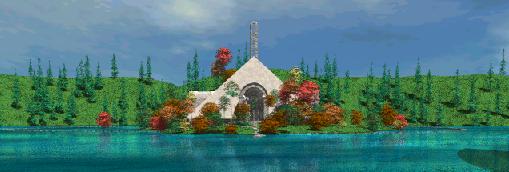
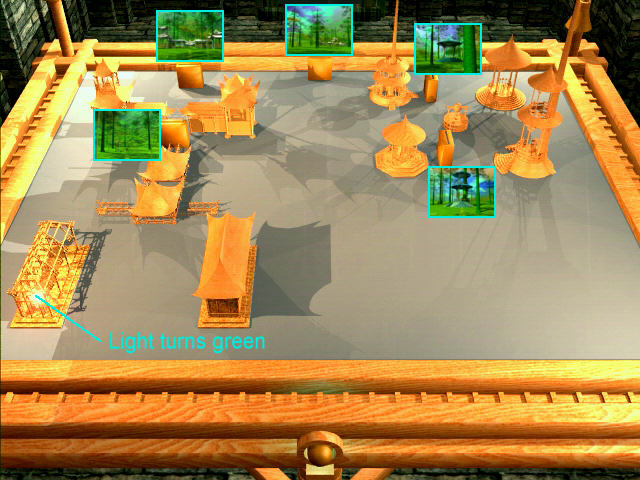
Solar House & Elevator:
You find yourself high up on something facing what looks like a phone and something that looks like an island way off in the distance. Move one step forward toward the phone. Pick up the receiver. Make a note of the numbers on the receiver: 21283778 (these numbers are this phone's number). Just for the fun of it, try punching in the numbers on this phone (a backwards message?). Notice the up arrow above the phone. Click on it and see what appears to be an island in the distance.
Turn once to the right and notice the house below. Beautiful, isn't it? Looks like a solar house. Turn twice more to the right and notice the sign. Move forward 2 steps toward it and notice that it says "MYST ART". Move the letters "T" and "S", one at a time, from the word "MYST" over to the word "ART". You first move the letter "T" by clicking on it and while holding down the left mouse button, drag it to the right. Then you do the same with the letter "S". When both have been moved it should read "MY START" and turn blue-green. Now go one move past (or under) the sign and turn twice to the right and look for the down arrow at the bottom of the screen. Click on it.
You arrive at a ground level archway through which you see trees in beautiful fall color. But before going through it, notice that you still have a down arrow and click on it. Notice the water and the same island that you saw earlier off in the distance. But you can't go toward it yet, so go back up to ground level.
Go through the archway and follow the path to the house that you saw from the top of the elevator. Click on the doors. After they open move forward once to enter the house: it's a solar house, reminiscent of one built by the famous architect Frank Lloyd Wright in Arizona. Now turn twice to your left (not diagonally left) and notice another phone. Move forward twice to the phone. Lift the receiver and notice this phone's number: 19640210. Try calling the other phone up on the top of the elevator (21283778). Nothing, huh? Before you leave the phone click on the # key and the $ key. Looks like a couple of discs that could hold recorded messages. Why are there two of them here? We heard a very strange message (backwards I think) at the top of the elevator. You don't suppose we would get a different message if we called this number from up there, do you? Let's try it.
Turn to your left once to back away from the phone. Then turn to your left twice, then move forward once and turn right once, then leave through the front door and walk the path back to the elevator. Go up to the top of the elevator, then move forward once to the phone, lift the receiver and dial the number of the phone (19640210) we saw on the receiver in the house. Hey another message!
The message is:
Congratulations for having been chosen as the 28th of all the Comers to this land. This is not just a physical journey, but one of imagination and of mind. So explore, be challenged, and enjoy!
Well how about that, you are the 28th Comer. I wonder what that means? Hmmm. Well, we better go back to the house. Turn three times to the right, then move forward 3 times and turn twice to the right. Click on the down arrow at the bottom of the screen. Again when we reach ground level move forward out of the elevator and follow the path to the house.
Click on the doors, move forward once and you'll see a strange round metal-looking thing (like a satellite dish). Click on the diagonal arrow (pointing upward and to the right), then move forward toward it 2 times. Now click on it and the music stops. Click on it again and you will see it show a clock that reads 10:30:03 (Hmmm). Click on it again and you will see a round calendar (Hmmm, is this time of year, December, a clue?). Click on it a third time and: Well, if the first one measures hours and the second one measures months, how long a period of time does the third one measure? I'm not sure yet, but didn't I see this pattern on a clock-like tower outside just behind this thing? Click outside the round object and you will step back from it. Notice the clock-like thing outside. Well it is the same, but the pattern is green.
Now turn to your left once. Notice the bench under some brick arches. Move forward twice to the bench. You are now sitting on part of it. Look up and click on the ceiling. A video of someone arriving to this location, but it seems to be winter here. Click on the ceiling again. A lighthouse and a new land of 5 strange buildings on sand dunes near the water. Click on the ceiling for a third time. Appears to be a very beautiful and very green world. Now click on the ceiling for the fourth and last time. What a beautiful volcanic island with a lovely crater lake on it! I wonder where these other three places are?
Now click on the down arrow and then turn to your right twice. Move forward once and then turn to your left. You now can see a hallway with blue lighting and a walkway down the center. Move forward twice and pause to listen to the music. Does it remind you of anything? Move forward three more times and notice the water and the reflections in the water. Move forward three more times and notice that the music has stopped and the birds are singing. Notice the circle on the floor in this outdoor patio-like area. Move forward once and you will see a down arrow at the bottom of the screen (don't click on it yet). Instead move forward twice and notice the island way off in the distance again. Turn to your right once and you will see a cliff on the left and several beautiful trees in their fall colors. Turn back to the left twice and again you will see the cliff on the right and more beautiful trees.
Ok, lets turn one more time to your left and then move forward two times back into the patio area's circle on the floor. Can't see a down arrow? Turn either to the right or to the left twice and you will again see the down arrow. Click on it now.
Another elevator. It's dark in here but those lights along the sides are certainly beautiful, aren't they? Notice the diagonal arrow on the right (it will take you back up again if you click on it). Let's move forward 6 times towards the door. You now see a doorknob on the right and something white on the left. Click on the white area on the left. We'll I'll be: it's a light switch. Turn to your left once and look at the room with the lights on. Ok, let's turn to your left one more time and turn the door knob. Wonder what's in this white room?
Move forward once and turn left. Four pictures depicting the four seasons. A seedling on the left depicts SPRING, next a flower for SUMMER, then a fallen leaf for FALL and finally on the right a snowflake for WINTER. Now turn right twice. Here we see a globe on the left, a white screen with an image again of that island off in the distance straight ahead (it must be important: it's everywhere) and a piano under a painting on the right. Move forward once and turn right. Click on the painting. It's a picture of this house in the fall (like it is outside right now). Click on the down arrow and you get a view of the piano. Click on the piano. What a lovely tune! It reminds me of falling and dancing leaves in the breeze.
Turn right (or left) twice and then move forward once by clicking directly on the globe. Notice that you now have a hand cursor on the globe and that North America is receiving a fair amount of light (the sun's energy). Place the hand cursor at the lower left-hand side of the globe, depress the left mouse button and drag the now closed hand cursor to the upper right-hand side of the globe and then release the left mouse button. Hey, the globe rotates so that North America is now getting less light than before (less of the sun's energy). Turn right twice. Wow, the painting has changed! Click on the painting. Looks like this house in the winter season, doesn't it? Click on the down arrow in order to look at the piano. Click on the piano again. This music sounds like a brisk and happy wintry day. Interesting! By turning the globe we have changed the season in the painting and the music. Turn right, move forward once and then turn left. Move forward towards the door and then turn the door knob. Move forward 5 times and then click on the diagonal cursor on the right pointing upwards.
Listen to that wind up here on the surface! What happened to the birds? Move forward twice and turn to your right. Look at all the snow, and the leaves are gone from the trees! No wonder I was so cold: it's winter up here now! Turn twice to the left. You don't suppose that, by turning the globe, we changed the seasons? Why would we do that?
Let's go back into the house. Turn left and move forward 3 times. That hallway looks different! Move forward one more time. The music is different and there are pictures on the walls! What's happened to the water? It looks like ice now: could it be? Turn left. Is this the start of a story: maybe your story? Turn to the right, move forward once and then click on the diagonal arrow on the lower right of the screen. I think that IS ice! It didn't take long to freeze all that water, did it? Now click anywhere on the screen to return to looking down the hallway, then turn left again. A volcano and a village below the volcano. Turn right, move forward once and again turn left. A monster spewing out fire onto the people and their village. Turn to the right, move forward once and turn left again. Could this be a sacrifice to the monster? Turn to the right, move forward once and turn left again. Looks like a stranger is going to rescue the maiden from the horrible fire-spewing monster. Turn to the right, move forward once and turn left again. This stranger appears to have a head resembling the sun and is slaying the monster. Turn right twice. Darkness seems to have overtaken the village now. Turn to the right, move forward once and turn left again. The villagers seem upset with the faceless stranger. Turn to the right, move forward once and turn left again. The stranger has to defend himself and the maiden from the angry villagers. Turn to the right, move forward once and turn left again. The stranger and the maiden ride off into the volcano to escape the violence. Turn to the right, move forward once and turn left again. Time passes as different peoples come and go. Turn to the right, move forward once and turn left again. Could this depict the stranger whose faceless head resembled the sun and the pretty young maiden? Why is the maiden so sad?
Now turn left, move forward 7 times and then turn right once. Move forward twice. Do we want to go out there? It is a little warmer in here! Why did we change the season? Hey, wait a minute, wasn't that water when we went down in the elevator earlier? You don't suppose? Let's go look! Move forward once and follow the path (if the snow hasn't covered part of it) back to the elevator. The snow wasn't too bad. Now that we are back in the elevator, click on the down arrow. Look at that! The water's frozen! Now maybe we can walk to the island from here (brrrrr). Move forward once.
Sand Dunes & Native Huts (Brown Hills):
Insert Disk 2
Where did this lighthouse come from? But wait, I don't see a light in it, do you? What is it? Maybe it's an observation tower. This is really a magical world! The ice is gone and it feels warm again. Notice a hand cursor on the small tower on the left of the pier. Click the hand on the right side of the small tower and, while holding down the left mouse button, drag the closed hand cursor to the left side of the small tower. It turns and so does the big one! There doesn't appear to be a ladder on the other side of the large tower. Oh well, lets go check out the big tower. Move forward three times. Be careful, those boards on this pier seem to be very far apart from one another! Now click on the up arrow at the top of the screen and you will be looking up the ladder. Move forward and you will climb the ladder into the observation tower.
Hey, there is a pier leading to land on the other side of this tower! Move forward once. There are buildings over there! Click on the down arrow at the bottom of the screen. Oops, just as I thought, no ladder over here. Well, we do know that this tower turns, but how from up here? We could turn the small tower again, but I can't reach it from here…my arms aren't that long! But this seems to be a magical land, so click on the up arrow at the top of the screen and then turn right (or left) once and move forward. Click anywhere on the water where you have a forward arrow and, like magic, the tower rotates so that the ladder is now on the other side facing the land. Click on the down arrow at the bottom of the screen and you will now be looking down the ladder. Move forward and you climb down to the bottom of the ladder and are facing the interesting looking buildings on the beach.
Move forward three times and you are standing on the beach facing one of the buildings. Move forward again 3 more times and you find yourself facing a round stone with the pattern of three again that we saw in the house. Looks like a sun symbol at the top and a fish on the lower left, but I'm not sure yet what that symbol is on the lower right. Now click on the diagonal arrow in the upper right-hand corner of the screen. Then move forward to climb up the ladder onto the deck of this hut. Turn left, then move forward once, turn right, again move forward once and then turn right again. You should be facing a doorway with a strange box-like device inside the hut.
Move forward once through the door, then click on the down arrow at the bottom of the screen. That looks like a plunger that you can push down. I hope it isn't connected to a box of dynamite somewhere. Oh well, here goes. Click on the handle and, while holding down the left mouse button, move the closed hand cursor downward and then let go of the left mouse button. You should see the handle go down and the color of the small ring around the shaft of the handle turn from orange to blue-green (it should stay blue-green). So far so good: nothing exploded. Now click on the up arrow at the top of the screen and you will be looking at that box-like device again. Move forward once and turn to your left. There's that fish symbol again on a button on the side of the device. Wonder what this thing is? Lets find out: click on the fish-like symbol which will push in the button. Hey, this thing is a holographic video projector! Doesn't that person look like Einstein? Listen carefully, it's a little hard to understand.
His message is:
I am the 27th Comer. Having witnessed what is happening here and what was interpreted by our romantic forecomers, I am obliged to present the other side of the story.
Concerning the creation of life: Many of us noticed that the dinosaur was never mentioned in all the holy works, including the Bible. Some may think it is not important, since the focus of those works is about human creation. Others explain that those works are merely based on human witnesses, written with no knowledge of dinosaurs. Here is another possibility: the dinosaur was purposely not mentioned.
Now back to the story, or should I use a better term: the experiment. The romantic presentation reveals 3 characters, which I would give names from the modern point-of-view. First, the dragon in the top of the volcano: that's the dinosaur. Second, the villagers: humans. And the third, the one with the face of light: What is that?
Dinosaurs never spit fire: this is nothing more than a volcanic eruption. Or, you can interpret it as the dinosaur became ruthless and jeopardized the experiment of the newer species: humans. So it was decided to exterminate the dinosaur, in order to make way for humans.
That's fascinating! I never thought of that possibility before. Does that have something to do with why you are here now? We have to learn more.
OK, now let's first turn right and then move forward once by clicking just to the left or above the projector (not on the projector). Move forward again through the door of the hut to the outside balcony. Turn right and then move forward twice in order to climb down from the hut and back onto the dunes. Click on the diagonal arrow located on the right of the screen that is pointing to the upper right. Looks like there are some larger huts up there. I guess we have quite a bit of climbing to do, don't you think? Click on the diagonal arrow on the right that now is pointing downward. Ah, there's another hut that we can reach. Let's go! Move forward 3 times and then click on the diagonal arrow on the left that is pointing upward and then turn to the right. This is where Comer 21 stayed. Let's go up and see if we can figure out who Comer 21 was. Move forward and then click on the up arrow.
Well, we're on Comer 21's deck. Turn left and then click on the diagonal arrow that is pointing up and to the right (found on a cabinet that has six raised panels on the front of it). Can you do anything with the raised panels? Try clicking on them. Hey, each has different symbols on it! How many symbols are there on one panel? Six different symbols on each one, and each panel has the same symbols (hmmm). OK, let's move forward twice and look at the bamboo cross over there. Maybe we can click on that orange spot. It turns blue-green when you click on it but it won't stay blue-green, so I guess we have more to do here. Turn left twice and then move forward once. Now turn left again.
That looks like a desk. I wonder what's in the drawers? How many raised panels were on that cabinet …6 wasn't it? 3 on the right and 3 on the left? Hmmm. 6 desk drawers: 3 on the left and 3 on the right. Do you think it's a coincidence? Guess we should see what's in those drawers. Click on the diagonal arrow (pointing downward and to the left) that can be found on the left side of the desk. To open the top drawer, click on the open hand found on the drawer's handle (this closes the hand) and, while keeping the left mouse button down, pull (drag) the drawer handle towards yourself, then the drawer opens when you let go of the left mouse button. This drawer has a drawing of two hands. To close the drawer just click on the drawer's handle. OK, open the second drawer the same way you did the first one. It's a gondola (boat) in Venice maybe? Hey, look at the symbol in the front of the boat! We saw one like that on the raised panels of the cabinet. Close the second drawer. Open the third drawer down: it's a drawing of a man. Close the drawer. The drawings in these drawers look very familiar. Let's see what is in the 3 drawers on the right side. To back away from these drawers click anywhere except on the drawer handles.
Now click on the diagonal arrow pointing downward and to the right that is found on the right side of the desk. Open the top drawer (4th). A letter! You can read the letter if you want, but I don't know if we should. It could be personal. Oh, OK! Just click on it to read it! To put it back in the drawer just click on it again. OK, close the 4th drawer and open the middle drawer (5th one). It's a drawing of a path going through a group of trees. Close this drawer and open the bottom drawer (6th). It looks like some kind of monster, but wait! Look at the little creature above the monster. It's that same fish-like symbol we've seen outside the first hut, on the holographic projector and on the raised panels. Let's go back to the cabinet and see if we can open it. Don't you think we have to match the symbols on the raised panels by position to the drawings in the 6 drawers? Let's give it a try. Again, to back away from these drawers click anywhere except on the drawer handles.
Move your cursor now to the top of the screen and turn right once, and then move forward once. Now turn right twice so that you are facing toward the cabinet. Find and click on the diagonal arrow that points upward and to the left that is located on the cabinet with the raised panels. OK, what goes on the top panel on the left? Right! That top left drawer of the desk showed a drawing of hands so we choose the hand. Second panel down on the left? That strange music-like symbol on the front of the gondola. Third panel down on the left? Sure! Man. Now the top panel on the right? Yes! A hand writing: like the letter that we found in the top right drawer. The middle panel on the right? Yes! Trees. And, finally, the bottom panel on the right? The fish-like symbol. Would you look at that: the cabinet has opened to reveal a painting, but of who? What is that large round reddish thing over the painting? When you click on it we see Leonardo da Vinci's painting of the Mona Lisa. Apparently da Vinci was the 21st Comer? Now I know why those drawings in the drawers looked so familiar. Wow! As a Comer it looks like you're in the company of geniuses (the real adventurers of the human race) with Einstein and now da Vinci! What were those flashing blue streaks that I saw at the cross when you pushed that reddish button? Say, did the color change on that cross from orange to blue-green? Let's go take a look at it. Move forward twice. Yes, it changed from orange to blue-green, like the color of the ring at the base of the plunger we pushed down near the holographic projector. The color change must mean we have completed our task here.
I guess it is time to find our next challenge: so turn to the left twice, then move forward twice and turn to the right. Move forward twice and we're off the deck of da Vinci's hut. Now let's click on the diagonal arrow on the left (pointing downward and to the left), then click on the diagonal arrow on the right (pointing upward and to the right), then move forward twice and you find yourself standing in front of another hut. Move forward once to climb up onto the deck of the hut, and then move forward one more time and turn left. You are now looking into a room with a ladder. Looks like we will have to climb it and see what new adventure is in store for us up above. Move forward once and turn to the right, then find the up arrow on the ladder and click on it so that you are now looking up the ladder. Move forward to climb the ladder and then turn to the left. Isn't that a portrait of the famous Egyptian Queen Nefertiti? Was she one of the Comers? OK, turn back to the right and then click the down arrow at the bottom of the screen. Turn left, then go forward and turn right.
Hmmm. Looks like the type of fountain that is called a dragon washer. Wonder what we have to do with it? Move forward once and notice an orange light and a hand on a switch in the middle of the pot of the dragon washer. Click on the hand on the switch and we see the fluid in the pot bubble a little, but nothing happens (light is still orange). Notice a diagonal arrow (on the right above the pot) pointing downward and to the right: click on it. Notice the round greenish knob that can be turned. A pair of arrows show up on it when the cursor is placed over it. Also notice that you have two different pairs of arrows (one pair clockwise and one pair counterclockwise) depending on whether you have the cursor on the right side or left side of the greenish knob. Notice that there are six divisions on this half circle to the right of the green knob. Choose the counterclockwise arrows and click on them 3 or 4 times. Hey! Some of the divisions light up! Hmmm. Now choose the clockwise arrows and click on them 3 or 4 times. Yeah, this decreases the number of lighted divisions on the half circle. Try leaving it at 5 lighted divisions. Now, to return to the central switch and light click on the diagonal arrow (pointing downward and to the left) that can be found in the LOWER LEFT-HAND CORNER of the screen.
This time click on the diagonal arrow (above the washer on the left side) that is pointing downward and to the left. Again you will have two different pairs of arrows (clockwise and counterclockwise), one on either side of the greenish knob. Choose the clockwise pair of arrows and click on them 3 or 4 times. Notice we are increasing the number of lighted divisions on the half circle that is now to the left of the greenish knob. This time choose the counterclockwise pair of arrows and click on them 3 or 4 times. Now we see that we are decreasing the number of lighted divisions. This side of the washer works the in same way except in the opposite directions. Let's leave this one at only one lighted division. OK, to once again return to the central switch click on the diagonal arrow (pointing downward and to the right) that is found this time in the LOWER RIGHT-HAND CORNER of the screen. Now, with the hand, click on the switch. Darn! We have some fluid moving up higher but nothing happened. We need to see if there are some clues around here somewhere for this washer, otherwise we are going to have to try many, many different combinations. Man, that could take a while!
Turn right once, move forward once, and then click on the down arrow found on the bottom of the screen. We haven't seen this ladder before. I wonder where it goes? Move forward to climb down the ladder, then turn left, move forward once and then turn left twice. Well look at that! Looks like it could be a sign or something. Maybe it will tell us which Comer Nefertiti was. Click on the diagonal arrow (pointing downward and to the right) found on the round thing (with the sort of crescent moon-shaped thing underneath).
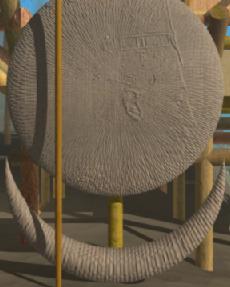
Hmmm. That's a portrait of Nefertiti again in the large round stone, but facing to the right this time. What is the crescent moon-shaped thing below it? Hey! Are you thinking what I'm thinking? That pole is dividing the crescent moon by what appears to be about one third on the left and two thirds on the right. Isn't that crescent shape approaching a half circle? Those shapes on the dragon washer were approximately half circles, weren't they? You don't suppose? If we could rotate the crescent moon shape (with the pole over it) up to the left, it would show that the pole is about two thirds up on the crescent shape. The dragon washer's two half circles had 6 divisions. I bet we light up 4 divisions (two thirds of the 6 divisions) on the left side of the washer since the pole is two thirds up the crescent. If we rotate the crescent moon-shaped object up and to the right (again with the pole) we see that the pole is about one third up the crescent shape. That should mean that on the right side of the dragon washer we light up 2 divisions (one third of 6). You know something? We have 2 portraits of Nefertiti, one facing to the right here and one facing to the left upstairs. I bet that 4 and 2 combination that we just talked about works the other way around too, what do you think? Anyway, I think we've got the answer! Let's go try it.
Ok, click on the diagonal arrow (pointing upward and to the left) found on the left side of the screen, then turn right and then move forward once to climb the ladder and once again be on the deck of Nefertiti's hut. Now move forward once and then turn right to once again face the washer. Click on the diagonal arrow (pointing downward and to the right) found above and on the right side of the washer. Choose either the clockwise or counterclockwise arrows to light up the 2 bottom divisions of the half circle (one third). To return to the central switch and the orange light click on the diagonal arrow (pointing downward and to the left) that can be found in the LOWER LEFT-HAND CORNER of the screen. This time click on the diagonal arrow (above the washer on the left side) that is pointing downward and to the left. This time, using either the clockwise or counterclockwise arrows, set it so that the four lower divisions of the half circle are lighted (two thirds). OK, to once again return to the central switch click on the diagonal arrow (pointing downward and to the right) that is found this time in the LOWER RIGHT-HAND CORNER of the screen. Now, with the hand, click on the switch. Yes! We got the fluid to reach the points at the top and conducted what appeared to be electricity across the points. This caused the little light beside the switch to change from orange to blue-green, so again we must have finished our task here. I wonder what we are getting for accomplishing these tasks?
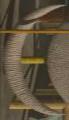
NOTE: If still confused look at the four pictures below.
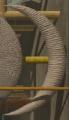
Picture
1. Crescent moon and pole rotated up and to the left (pole two thirds up).
Picture
2. Dragon washer set correctly on the left side (two thirds up).
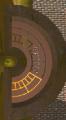
Picture
3. Crescent moon and pole rotated up and to the right (pole one third up).
Picture
4. Dragon washer set correctly on the right side (one third up).
OK! Turn right, then move forward once, click on the downward arrow and then move forward once to get down off of Nefertiti's deck. Move forward twice. Holy Smoke! Is that a bridge? Let me guess: we have to cross it, right? Do you have any idea where it goes? Oh, alright, let's go. Move forward three times. Hang on! Wow! What is that ahead? Move forward two more times.
Look at that airship! Hope we get to fly it, don't you? I wonder where it would take us? Maybe that island we have seen so many times earlier! OK! Let's click on the diagonal arrow that is pointing upward and to the left (found around the airship). What was that noise? I thought I saw something moving upward toward the airship. There is a rope bridge going to the airship. Can we go over the bridge to it? Try clicking forward. I didn't think so. Wonder what we have to do to get to it? Click on the Down arrow found at the bottom of the screen. The drawing is in the shape of the airship and the person seems to be pointing at the 7 small diagrams above him. What are they? Try clicking on each of the 7 diagrams and see what happens. Don't you recognize 3 of them? The second one reminds me of the cross at da Vinci's hut, the third one is the dragon washer and the fifth one is the plunger that we pushed down in Einstein's hut. Hey, there are 7 diagrams and 7 sections of the rope bridge to the airship! We've only done 3 of the 7 so far and only 3 sections of the bridge are filled in! Don't recognize the other 4 diagrams, but I would bet we have 4 more tasks to accomplish before the bridge completely fills in and we can use the airship.
OK, turn right. Another bridge to a third platform. Move forward twice. It looks like a portal window or something like that, but we have more to do at the dunes so let's go back to them first. Turn left once, then move forward twice, then turn left again, and finally move forward three times. Now we are back at the dunes. Move forward three times, then turn left once and move forward twice, and notice the sign to the left. Click on the diagonal arrow pointing upward and to the left (found on the sign). The sign says this is the hut of Comer 15. OK, now click on the diagonal arrow pointing upward and to the right (found on the right side of the screen near the ladder). We now find ourselves standing right in front of the ladder to the fourth hut. Click on the up arrow found at the top of the screen in order to climb the ladder.
Move forward twice, then click on the lamp seen on the left side of the screen. Notice the letter on the table under the flame of the lamp. Let's read the letter! (I know I was afraid to before, but I have more courage now working with you.) Click on the diagonal arrow (pointing downward and to the left) which is found on the letter. A letter signed by Sinbad? Sinbad, the sailor? Sinbad of the One Thousand And One Arabian Nights? Wow! Maybe he was more than just a myth. He speaks of the one with light: a sultan whom he would worship. I wonder who this ONE WITH LIGHT is? To put down the letter just click anywhere on the screen. Alright, let's turn right. Hey, look at the three numbers on the post to the left: 0, 1, 2. Click on the diagonal arrow (pointing downward and to the left) that is found over the three numbers. I bet we need to push the 1, then the 0 twice and then the 1 again for One Thousand And One Arabian Nights. Try it. Oh NO! Good thing I didn't bet with you: I kinda like my shirt.
We need to look around some more. Move forward once by clicking anywhere on the forward arrow except on the numbers themselves. Now turn left twice. I see a book on the table over on the right. Let's take a look at it by clicking forward on the right side of the pole where the book is. One Thousand And Two Nights? Where did the extra night come from? Must have been quite a night to warrant a book about it. Say! Do you suppose….? Turn left once and then click on the diagonal arrow (pointing downward and to the right) found over the numbers. Now let's try 1, 0 twice, and then 2. Wow a periscope! Why a periscope in a hut? Oh yeah, he was a sailor. Didn't think they had submarines back then though. I guess we now have to open the periscope. Notice the open hand cursor on the handles of the periscope. Click on the hand cursor to close it and then drag the closed hand outward from the pole of the periscope, then let go of the left mouse button. Well, it opened but I don't think our task is finished yet because I see an orange colored light on the bottom inside of the periscope. What happens if you click on the orange light or the gold button? Hey! We've got a blue-green light at the top inside the periscope! I think we've completed another task! OK, let's leave and find the fifth and last hut here that I thought I saw high up on the dunes. Click anywhere on the forward arrow except on the periscope or its handles (notice the light stays blue-green and the periscope closes and we have moved forward once). Now move forward two more times, then click on the down arrow found at the bottom of the screen and then click forward once to climb down off the deck of Sinbad's hut. I think that hut straight ahead is where we want to go now.
Move forward four times so that you are now standing in front of the fifth hut. Move forward one more time and you are under the hut. Turn left once (so that you are facing the ladder) then click on the up arrow found at the top of the screen (so that you are now looking up the ladder). Move forward twice to climb the ladder. Now click on the diagonal arrow, on the left side of the screen (that is pointing downward and to the left) and then turn left once. Oh boy! 24 chimes. I bet we have to play part of the music we have been hearing, but which part? I was never any good at these….I hope you are (just kidding)! Notice the down arrow! Click on it and we see a model of a small hut and a switch on the pole below it. Move forward once to get a closer look. Notice once again an orange-colored ring around the base of the switch. I bet if we get the chimes right the color around the switch will change to blue-green again. Let's click the hand on the switch and drag it downwards to see what happens. Well! The color changes to blue-green around the switch while the roof raises off the little model hut, but the color goes back to orange when the roof comes back down on the tiny model hut.
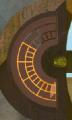
OK! We've got to work with the tune on the chimes. To back away from the little model hut, click anywhere on the screen except on the switch itself, then click on the up arrow at the top of the screen, which will take us back to the chimes. Let's number the chimes starting with the left side of the bottom row of chimes. Thus they are, from left to right, numbers 1 through 12 on the bottom row and, on the top row, again from left to right, numbers 13 through 24. After many hours of trying you finally decide that the first six tones that occur after the repetitious introduction are 5, 17, 13, 5, 13, 10.
If the description above is not clear to you, look at the picture below. The numbers on the picture are the order in which you strike the chimes.
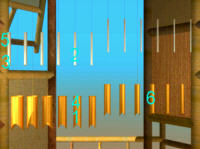
Picture
courtesy of Shine Studio
You know you've hit them correctly because then we are automatically taken down to the little model hut, the roof goes up and then closes, and this time the color around the base of the switch stays blue-green.
OK, to back away from the little hut click anywhere on the scene except on the switch. Now turn to the right twice, then click twice on the down arrow found at the bottom of the screen, then turn to the left once and finally move forward four times. Turn left and move forward one time back to the rope bridge. Move forward three times. Hang on again! Wow! I'm getting a little used to it, but I still don't like heights. Let's go look at the airship and those drawings again. Move forward two more times.
OK! Let's click on the diagonal arrow again that is pointing upward and to the left (found around the airship). I'd still like to know what is making all that noise? Oh, I see! It makes that noise as the sections of the bridge fill in. We have done 2 more tasks (5 in all so far) and, if I listen, I can hear 5 sections of the bridge filling in. So it looks like we still have 2 more tasks to do somewhere before we can fly this airship. At least I hope we get to fly it. Click on the down arrow found at the bottom of the screen. Try clicking on each of the 7 diagrams again and see what others we have finished. Now we can recognize 5 of them. The first one is the little model of the hut where we played the chimes, the second is the cross at da Vinci's hut, the third one is the dragon washer at Nefertiti's, the fourth is the periscope at Sinbad's hut and the fifth one is the plunger that we pushed down in Einstein's hut. I don't recognize the last 2 diagrams. Where are these tasks that we must do? Ah Ha!! Maybe we have to enter that green portal-like thing on the other platform. Let's go!
OK, turn right. Move forward twice. Well, are you ready? I'm not sure I am, but let's go. Click on the green circle. Whoa! What is happening? Wow! Isn't this a beautiful place? Beautiful music too!
The Green Mossy Valley Of Pavilions:
Insert Disc 3
Look at all those oriental-looking pavilions! Everything is so green! Turn right. There's that design of three again with smaller symbols on each of the three areas. I'm not sure what the other disc is. Can we get closer? Click on the design of three. There's that fish-like symbol again. We saw it on the projector in Einstein's hut and on a drawing in da Vinci's desk: it was with a larger beast, wasn't it? Einstein talked about dinosaurs and that drawing of the beast with the fish-like symbol could be a dinosaur. The fish-like symbol must represent the dinosaur which Einstein said was eliminated in order to make way for humans. Humans must be represented by the man symbol on the lower right. Could the sun-like symbol at the top represent some other type of beings? Maybe those we saw depicted with a face of light? Let's take a look at the round thing beneath this design. Click on the down arrow found at the bottom of the screen. That is a water droplet symbol at the top center. The reading is 100. This must be the humidity here (100 percent). No wonder everything is so green and moss covered here.
Let's see what else is here. In order to back away from here, click on the forward arrow at the bottom of the screen either to the right or to the left of the device that measures humidity. Now turn right once and click on the diagonal arrow (pointing upward and to the right) which is found on the right side of the screen. Great, two paths to choose between. Let's choose the right path. (Better than choosing the wrong path, wouldn't you say? Sorry! Sometimes I just can't help myself.)
To choose the right path click on the forward arrow. Move forward one more time and then click on the diagonal arrow (pointing upward and to the right) which is found on the right side of the screen (but not all the way over to the right side).
That looks like a huge bell in a pavilion. Move forward three times. That is a diagram or part of one on that bell, isn't it? At the lower left there is a symbol for waves. Could it stand for water? To the right of the waves is an arrow, but in front of the arrow we see something in the way. It is like a bar that goes up near the top of the bell. There appears to be something at the top of the bar but it's hard to make out. I think I'll make a drawing of all this for us to use later. Let's move around the bell and see if there is more to this diagram. Turn to the right and then click once on the diagonal arrow (pointing upward and to the left) found near the left side of the screen. Now turn to your left to look at the bell again. We can see that the one pathway at the bottom on the left leads to a large pathway going upward which in turn has five different smaller pathways leading from it. Each of the five smaller pathways has the wave symbol in front of it. Notice that there is something over the top of the pathway that goes upward. Are these pathways canals, or maybe pipes? Could the thing at the top hanging over the opening of the upward pathway be a stopper? If you dropped it down to the bottom, would it stop the flow of water into the five smaller pathways? We need to see more of this diagram. Again turn to the right and then click once on the diagonal arrow (pointing upward and to the left) found near the left side of the screen. Now turn to your left to look at the bell again. The five smaller pathways all lead to a rod that blocks it. Say, doesn't that look like a handle on the thing that is at the top of each rod? Hey, they're valve controls, I bet, that can be turned to open or close the valves. It's hard to see, but notice an arrow on the bell pointing to the right after the second pathway. There is something to the right of the arrow, but I can't quite make it out. Let's see the next section of the bell. Turn to the right and then click once on the diagonal arrow (pointing upward and to the left) found near the left side of the screen. Now turn to your left to look at the bell again. That thing looks like a ring attached to a chain. Didn't we see that symbol up by the airship? You know, on one of the small diagrams? Wonder where this ring is? Alright, I know you've been wanting to hit the bell, go ahead! Click the open hand on the pole and, holding the left mouse button down, drag it back to the left, then let go of the mouse button. Hey, it rotates and you can see the whole diagram! But it rotated too fast, and I couldn't have drawn it that way.
OK, here is the drawing that I made for you of the diagram on the bell. Pretty good, don't you think?
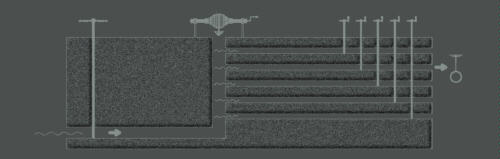
Picture
courtesy of Shine Studio
OK! Now we have to find the valve controls, the thing with the stopper, and the ring. It looks like we need to open the big valve on the left so water can go upward to the five smaller pathways. We want the stopper to be at the top, and then we need to open the second smaller valve in order for water to flow through the second pathway to the ring on a chain. Why do we want to do this? I guess it has to do with filling in that bridge to the airship. Let's turn right and then move forward five times straight toward the very large tree surrounded by the pavilion. Turn to your right, then click on the diagonal arrow (pointing upward and to the left) found on the left side of the screen and then click on the diagonal arrow (pointing upward and to the right) found on the right side of the screen. Move forward three times and then turn left. Move forward one more time. Alright! These are the valve controls! The big one in front must be that first one that lets water reach the upward pathway. So turn it to the left (counterclockwise) to open it by clicking on the open hand on one of the handles and drag it counterclockwise, then let go of the left mouse button. Nothing happened did it? Maybe it is already open. Try turning it clockwise. By golly, it WAS already open and now we have closed it. OK, turn it counterclockwise again and then leave it open. I bet all of the smaller valves are already open too. Turn each of the smaller valve controls clockwise to close them (that is, move the closed hand to the left, then let go). Then open only the second valve from the left by turning it counterclockwise (move the closed hand to the right). OK, we should be done here. Turn left twice and then move forward twice toward that large tree surrounded by the pavilion. Now turn left and move forward twice. That stopper is already all the way up. I think that is where we want it, because we want water to flow up the large pathway to the smaller pathways. Turn right twice and move forward twice, then turn left and move forward once. Click on the diagonal arrow (pointing upward and to the left) found to the left of the tree. Then click again on the diagonal arrow (pointing upward and to the left) found near the green bridge. Move forward three times toward the bell. Then turn right once and then click on the diagonal arrow twice (pointing upward and to the left and found next to the bell). Now you should be looking at a tree that has what looks like a chair next to it. The pole that strikes the bell is in the upper left-hand corner of the screen.
Move forward toward the tree with the chair 6 times. You should now be sitting in the chair. Isn't this music lovely? Why don't we just sit here for a while. Aren't you tired? OK, OK! Turn to your right once and then notice an up arrow at the top of the screen. Click on it. How about that, an elevator chair taking us up into the tree! Cool! Notice another up arrow at the top of the screen after you reach the top. Click on it. Hey, this is the brass ring on the chain that we saw on the bell and on the diagram up by the airship! Notice the orange colored ring around the base of the chain. I guess you reach up and pull on it by clicking on the open hand found on the ring (to close the hand) and then drag the closed hand downward and let go of the left mouse button. OK! The orange ring around the base of the chain changed to blue-green and stayed blue-green. Another task finished. Hopefully we only have one more to go and then maybe we can fly the airship.
OK, click on the down arrow twice to go back down the tree. Move 5 times toward the bell, then turn right, then move forward once toward the tree surrounded by the pavilion, and then click on the diagonal arrow (pointing downward and to the left) found in the lower left-hand corner of the screen near a path. Move forward twice.
Wonder what we have to do here? Ready? Move forward twice and then turn left. That looks like the bird of peace (a dove with an olive branch). It has a blue light. Does that mean it is OK? Can't seem to do anything here, can you? Well, let's turn to the right twice. That looks interesting: it's another bird, but it doesn't look like a bird of peace. Move forward twice. What happens if you click on the feathers of the arrow? Oh No! Looked like the feathers went along the bow to form a branch with leaves (like the olive branch), but the arrow went through the bird, and that is not peaceful! Maybe we have to change this bird to a bird of peace? Hmmm. How do we do that and why do we want to? Turn left once, then move forward twice and then turn right and move forward twice. Look, a door to a building that is partly underground. Move forward one more time. Can you open the door by clicking on it? Nope! But it has the same light and color around it that the bird of peace has. So I'll bet that matching those two birds is how we unlock this door (or open it). OK, let's go back and see if we can make the one bird peaceful like the other one. Turn left, then move forward twice, then turn left again and move forward twice again. Here we are back again at the not-so-peaceful bird.
Try clicking on the right end of the bow and, while holding down the left mouse button, drag it up to the beak of the bird, then let go. Wow, it rotated into that position! Tricky! No hand cursor this time to give away the solution. That is tricky! Well what else must we do to get a bird of peace here (make it look just like the other one)? Click on the feathers. Alright! We have the branch with leaves and have removed the arrow. Still not quite right though, is it? Turn left and look at the other one. Notice that the olive branch is tilted out (not straight up and down) and bent differently. Turn back to the right. Now try dragging the bottom of the branch outward a little to the left and see what happens. Hey, it bent the branch so that it is shaped like the other one! Cool! But, why doesn't something happen? It looks right! Maybe something did happen. Turn left, then move forward twice. Look at the bird ahead! It is now brilliantly lit with a radiating sun behind it, and with no blue ring around it. Then turn left twice and look back at the bird we just finished. It sure looks the same (not lit up as brilliantly, but otherwise the same).
Let's check the door again. Turn left once. Alright! The door appears to be open. Move forward 3 times. It is open! There seems to be a very large table in there. Let's enter the room by moving forward once. Look, the table has models of all the structures found here in this green world. We could have used this earlier to help us find where the valves and other things were located, couldn't we? Oh well! We succeeded anyway. This must be our last task before we get to use the airship. I sure hope so. Don't get me wrong, it's beautiful here and I love the music, but I'm just anxious to find out where the airship will take us. So, we'd better get started!
Let's look at the other end of the table that has this miniature layout of the Valley of Pavilions. Click on the diagonal arrow (pointing upward and to the right) found on the right side of the table. Then move forward twice, turn left twice and move forward once. Now we're looking down on the scale model of the valley. Notice the 5 rectangular boxes with a slot in the top of each one. Does something go in these slots? Also notice 2 buildings on the left close to us. I don't think we have visited these yet, have we? Now to back away from this table click on the dark wall above and behind the table. Turn right and notice the picture of the copper chair that took us high up into the tree. Turn right again, then move forward once and notice that this picture is of the bridge and the other structure which contains the humidity measuring device and the design of three: the sun-like symbol (one of light?), man and fish symbols. Turn right and notice the stairs. We'll have to find out where they go later. Now turn left twice and notice another set of stairs. Again we'll check that area later.
Turn left one more time, move forward once and then turn left again. Another picture, this time of where we are now as seen from just beyond the Birds of Peace. How many pictures are in this room? Turn to the right again and notice two more pictures, one on either side of the stairs where we entered this chamber. 5 pictures and 5 little boxes with slots. Hmmm.
I don't know about you but I want to know what is outside those two stairways we just saw. Maybe it will help in here. Turn right twice, then move forward once and then turn left once. Move forward twice to go up the stairs and outside. We seem to be in some kind of enclosed garden area. Then turn right once, then move forward three times, then turn left and look at the interesting art work, then turn right once, then move forward once and then turn left again to look at more art work.
Wow, this is Leonardo da Vinci's painting of THE LAST SUPPER (Jesus with His Disciples), but with a difference! Notice that here Jesus has a head of light, just like the man in the paintings in the hall of the Solar House. Does this imply that Christ was really a being of light (light being) that humanity drove away (destroyed) with violence? And was He the same One (man of light) that Sinbad talked about worshiping? Turn right once and move forward once again. What is this painting? Another One that radiates light, but this time the head looks disembodied, more like a ball of light with the suggestion of a face in it. One thing is for sure: the man with a head that radiates light is a recurring theme in a lot of humanity's famous art, especially our religious art (we call it a halo).
Turn left once to note the artwork, then turn right twice, then move forward once and then turn left once. There is another structure over there that looks like one that we saw on the table of miniatures inside. Move forward twice, then click on the diagonal arrow (pointing upward and to the left) found on the left side of the screen. Move forward once and notice what looks like a huge switch. I bet we have to throw that switch. But wait a minute! What is that on the floor? Click on the down arrow found on the bottom of the screen. It's a book! Click on it. Hey, it's about Sinbad's missing 1002nd Night that no one has heard of before. And why is this tale missing from the l00l Nights? Can we open it? Yes! By clicking on the book itself it opens. (NOTE: Click on the right-hand page to read the next page, click on the left-hand page in order to go back to a previous page and either click on the cover opposite the last page or somewhere outside the book itself to put the book down and back away from it.) OK! Let's read it! What does it say?
The myth that Einstein had started unraveling becomes clearer now. And in many ways it is a very familiar story to us, because it is repeated in different ways in all the myths, legends, and religious literature of all cultures in the world.
It seems that many faithful people followed the "man of light" and the beautiful maiden when they escaped into the volcano and, after they went up "into the mount", it no longer spewed fire. The man of light who had saved the villagers from the fire-spewing monster (which was symbolic of the dinosaur according to Einstein) began to be worshipped by humanity, instead of worshipping their human leaders. To win back control, the human chief (tempted by the clown or jester…what we call the devil?), goes to the volcano to get the maiden. He finds no fire-spewing volcano, but instead a peaceful lake, and he also finds that there are others there that have wings, and can fly (are these light beings what humanity calls angels?). But when he tried to marry the girl there was a catastrophic "earthquake" which forever barred humanity from the "mount".
Is this "mount", this lake on top of a volcano, where the light beings are, just a symbol or does it really exist and, if so, where? Could that be the volcanic island that we saw from the Solar House? Is it possible to get to it? Is that where the airship will take us? Will we find light beings there and, if so, why are they there? All the paintings and drawings we've seen seem to suggest that they are a more evolved species. And why would humanity want to destroy the light beings or drive them away? Do we think they are a threat somehow to us, like the dinosaur was? Why?
Let's check that switch. Maybe that's our last task before being able to go. Click on an area outside the book to put it down and back away from it. Now click on the up arrow found at the top of the screen. Click on the open hand found on the handle of the switch and drag it downward, then let go of the switch (left mouse button). We can pull the lever, but it doesn't stay down and the orange doesn't turn blue-green. We must need to do something inside with those pictures and the slotted boxes on the table first.
Turn right twice, then move forward 4 times, then turn right once and then move forward again (must click to the right of the tree and on the stairs of the building in order to get past the tree). Move forward one more time to go down the stairs. Now we know where the stairs to the right led to. Both of these stairways take us into the courtyard or enclosed garden where we found The Last Supper painting and the huge switch.
Now that we are back in the sunken room let's go look at a picture more closely. Turn left, then move forward once and then turn left again. Notice that round thing on the bottom of the picture that has a somewhat orange-red ring around it. Can you click on it? Hey! We got a card from the picture. Does anything happen if you click on the picture?
Wow! I think we were just teleported to the real area outside, to the place where that picture was taken. And we no longer have the card we got. Do you suppose that each of those pictures gives us a card and that we are to place each card into the correct slotted box that is in the same position from where the picture was taken? I bet every picture will teleport us out to that position if we wanted to. However, if we do that we would have to keep finding our way back to the table. Let's go back to the table and see if we can do it without all that running around. Move forward 7 times so that we are once again standing in front of the table in the sunken room.
Turn to the right and study the picture carefully. Take its card by clicking on the round thing at the bottom of the picture. It looks as though we can take only one card at a time since we are carrying it with us. We don't have an inventory area to carry them in. OK, click on the diagonal arrow (points upward and to the left) which is found to the left of the picture. Then move forward twice (you will see the card in your hand when going forward), then turn left twice and then move forward once so that we are looking down on the table. Let's number the slotted boxes. How about starting on the back row (from left to right) as box 1, box 2 and box 3 and the two in front (closest to us) starting with the one on the left as box 4 and the one on the right as box 5. I believe this card goes into box 2. Go ahead and click the card on box 2 (middle one in the back row). Notice the round button on our end of the table. What happens if you push it? Oh No! the card left. I hope it will be available at the picture again. I guess if we make mistakes we have to push the button and then we can start all over.
Let's go get that same card again. Click on the dark wall above the table in order to back away from the table. Turn left once, then click on the diagonal arrow (pointing upward and to the right) found on the left side of the screen and then move forward twice. Turn left and push the knob (round thing) under the picture again. Good! The card went back to the picture. Click on the diagonal arrow (pointing upward and to the left) found to the left of the picture, then move forward twice, then turn left twice and move forward once. OK, this card goes into box 2, right?
Let's get the other card found at the other end of the table and then we can do the three back here. Again to back away from the table click on the dark wall over the table. Click on the diagonal arrow (pointing upward and to the right) found on the right side of the screen, then move forward once and then turn right. That is the pavilion with the valve controls. Click on the knob below the picture to get its card. Click on the diagonal arrow on the right side of the picture, then move forward twice, then turn right twice and move forward once. Where does this card go? Yeah, it looks like it goes in box 3. Click the card on box 3.
OK, let's get the card behind us. Back away from the table (click on dark wall above table). Turn right twice and move forward once. This picture is of the bridge and humidity measuring device. Click on the knob to get its card. Now turn right twice, then move forward twice. This card may go into box 4. What do you think? Click the card on box 4. Alright, let's back away from the table again (click on dark wall above table).
Turn to the right. This is the pavilion with the chair and the tree. Push the knob to get its card, then turn left and move forward once. This card obviously goes into box 5. Click the card on box 5. Let's back away from the table again (click on dark wall above table), then turn left once. This picture is looking down the path toward the pavilions where we are now. Click on the knob below the picture to get its card, then turn right and move forward once. Obviously, this card has to go into box 1, so click the card on box 1. Did you notice that the light flickered and seemed to get brighter in the structure on the left nearest us when we did that? Does that mean that something changed in that structure outside? Let's go see.
PLEASE NOTE: If you had difficulty with the above instructions concerning the correct placement of the cards into the boxes with slots, then take a look at the picture that follows. But please note that the picture over the middle box of the back row is a reverse image of the picture on the wall (sorry about this error, but I will try to get a corrected copy from Shine Studio).
Picture
courtesy of Shine Studio
Alright, let's back away from the table again for the last time (click on dark wall above table). Notice how bright that light in the little building is now! Turn left twice, then move forward once and then turn right once. Move forward twice to go up the stairs and outside. Then turn left once and then move forward 5 times. OK! Let's try that switch again. Click on the open hand found on the handle of the switch and drag it downward, then let go of the switch (left mouse button). Alright! It stays down this time and the orange lines turned blue-green. Turn right twice, then move forward 4 times, then turn right once and then move forward again (must click to the right of the tree and on the stairs of the building in order to get past the tree). Move forward one more time to go down the stairs.
I think we have finished all of our tasks here in this beautiful and mysterious green world, so let's head back to the airship now. Turn left once, then move forward once, then click on the diagonal arrow (pointing upward and to the right) found on the right side of the screen. Move forward 3 times to go outside. Now move forward 4 times to cross the bridge. Click on the diagonal arrow (pointing upward and to the right). Take the path to the left by clicking on the diagonal arrow (pointing upward and to the left) found on the left side of the screen. Move forward 2 times and you should see the portal. OK, let's go do some flying. Click on the portal.
The Airship
Insert Disc 2
Move forward twice, then turn right, then click on the diagonal arrow (pointing upward and to the left) found near the airship. OK! The rope bridge is complete now all the way to the airship (we can hear the loud sound 7 times - one for each task completed, each of which gives us a completed section of the rope bridge). Click on the down arrow found at the bottom of the screen. Click on the sixth small drawing (from the left) and notice that it is the switch we threw in the courtyard. Now click on the seventh small drawing (far right) and notice that this is the chain with a ring on it that we pulled high up in the tree. We have all 7 tasks completed, so let's go flying! Click on the up arrow found at the top of the screen and then move forward 3 times. We now find ourselves sitting in the airship facing forward, with 2 controls in front of us (one on the left and one on the right). Turn to the right and notice the rear of the ship and it's propellers. Turn back to the left so we are again facing the front of the airship. I hope this airship is safe and that you know how to fly it. Do you? Alright! Then let's go!
Click on the open hand on the control lever on your right, then drag it to the left and then let go (release mouse button). Listen to that engine. I wouldn't exactly say it's purring, but it did start. Turn to the right again. Cool! The props are turning, so let's go. Turn to the left again and then click on the handle of the control on your left by clicking on the open hand and dragging it to the right, then let go (release mouse button). Here we go!
The Volcanic Island & Beautiful Crater Lake
Insert Disc 4
Well it looks like we've finally made it. We're actually on the "mount" that Sinbad said humanity couldn't get to any longer. This is where the light beings are supposed to be, isn't it? I'm a little nervous, aren't you? Apparently we were forever barred from here because of our violence…because we were a threat to them. But we must have thought that they were a far greater threat to us, to our species, according to the old legend recorded by Sinbad. I wonder what they look like. Like that picture in the hallway paintings, or was that just a symbolical representation? But then da Vinci had Christ represented as one, and he looked human, at least during the time people knew Him as a man. Are they such an evolved species that they can take on different forms and, if so, what is their form normally when they're not interacting with humans? How can we recognize them?
Look at that beautiful lake and those trees! I don't think I've ever seen water with such a clear blue-green color before. What's that sound? It sounds like something (or several things) moaning, or talking in a strange way. Click on the lake. What was THAT sound? And WHAT were those lights that flew up to the trees behind the building? Click on the lake again. Well, we obviously can't get to the building that way, and I didn't see any more lights this time. But I still hear that moaning noise.
Turn right once. There's our airship. Turn left twice. Aha, a boat! We can use that to cross the lake and get to the building. But wait a minute. What are those Roman-looking columns across the lake? Maybe we can walk around the lake and see. Let's go! Turn left again, and then go forward 8 times (always making sure to click forward directly on the path). Watch your step! Those trees sure are beautiful, and they look so soft-to-the-touch. Aw, wouldn't you know it? Something had to block our way, right? OK, what do we do here? We'd better SAVE HERE in case we mess up and have to start over. Let's try matching the color of the rectangle to the color of the stone it's on . Number the rectangles from top to bottom (1 to 5). Click on #1 twice, #2 twice, #3 four times, #4 twice, and leave 5 alone (it looks correct already). That did it. The column disappears into the ground and we can go forward.
Go forward once. What is that behind that column? We can't go forward anymore, so turn left, go forward once, turn right, go forward once and then turn right again. A small pyramid in the middle of Romanesque columns? What's that inscribed on it? Let's get a closer look. Go forward once, then click on the picture. An angel with trees on its wings? What on earth could that symbolize? I know that Sinbad's story said that the human chief found winged beings here, but what do trees have to do with them? There doesn't seem to be anything else that we can do here now, so let's try that building across the lake. Let's go back and get that boat.
OK, click anywhere but on the pyramid to back out, then turn right twice, go forward once, turn left once, go forward once, turn left again, go forward once to the steps, and turn right. Go forward 9 times (again, always making sure to click forward directly on the path), then turn left. There's our boat! Click on it to get into it, click forward 3 times to cross the lake, then click on the diagonal arrow (pointing upward and to the right) located on the path. Go forward twice. The path forks! Maybe we'd better take a look outside before we go in since we don't know what to expect here? Click on the diagonal arrow pointing toward the left path, then click forward directly on the path to follow it (You can stop here and there to look around by turning to the left or the right. Notice the brilliant colors of the trees. Quite a contrast with that blue-green crater lake color!) OK, we've found out that the path just leads around the building and we haven't seen anything else puzzling or threatening so far, and we're back where we took the left path, so now let's go inside.
Move forward 3 times. It looks like some kind of stone mound in the floor with some stone knobs around it. Move forward once more to stand on the mound, then turn in a circle to look around by turning to the right 4 times. Look at the strange windows or doors (more like slits with bars, actually). And such a strange way that they're opened in places and not in other places. There seem to be 8 bars in each window, with some of them open (they're all open in the one we came in through) and some of them closed. Notice the down arrow and click on it. A Greek work with a knob above it, but nothing happens when you click on it. Turn right 4 times (a different Greek word in each position with a different knob, but nothing happens when we click on them). Such a strange combination of Roman, Egyptian and Greek elements at this place! Don't you wonder how old it is and who (or what) designed it and what it's for?
There must be something hidden here and some way to get further in. Click on the up arrow. Let's go back outside and see if we can discover how. Turn right twice, then forward twice to go back through the door, then turn left to turn around and look back inside. Oh, what's that button on the right side of the doorway? Must have missed that before because all we could think about was getting inside! Click on it. Hey, the mound rolled over and disappeared, leaving a circle in the floor, and 4 pillars raised: those knobs must have been the tops of the pillars. Let's go back inside. Go forward twice.
The pillars have little indentations in them. Let's try clicking on them. Hey, a light comes on when you click on them! And goes off when you click again. And there's a larger indentation at the top of the pillar, but nothing happens when you click on it. Let's look at all the pillars and see if they are the same. Turn right once and examine the next pillar. It looks the same. Turn right again. Hey, this one by the front door has a button in the top indentation, but nothing happens when we push (click) on it. Turn right again. This one looks the same as the other 3. Turn left to return to facing the one in front of the door you came in, the one with the button on top.
Those lights have to be a code of some kind, but what? There has to be a clue around here somewhere. Maybe the Greek words, but I don't read Greek, do you? It's all Greek to me! (Sorry about that.) Wait a minute! There are 8 lights on each column and it seems to me that we saw 8 bars in each of the windows or doors. You don't suppose? Sure, that's got to be it! Let's try it.
Let's number the bars in each window/door from top to bottom (1 to 8) and note which bars are open. Open has to mean Light, right? The one behind this pillar is the one we came in, so all the bars were open on it, right? OK, let's turn on all the lights on this pillar. Let's see about the one on our right hand side. Turn right once, then click to the right side of the pillar to view the one on our right hand side. Bars 2, 4, 5, and 8 are open on this one. Turn right twice, forward once, and right twice again to return to the pillar and, again numbering from the top, click on lights 2, 4, 5 and 8. OK, let's check on the pillar to the left of the door pillar. Click left twice, then forward to the right of the pillar. Bars 1, 3, 4, 6 and 8 are open on this one. Turn left twice, forward once, and left twice to return to the pillar. Click on lights 1,3,4,6 and 8. So far, so good! Only one to go. Turn left once, then move forward once to view the window. Bars 1, 4 and 6 are open on this one. Turn right twice, go forward once and right twice to return to the pillar. OK, turn on lights 1, 4, and 6. Nothing happened!! Did we miscount? I don't think so. Oh, I know! I bet we need to push that button on the top of that pillar in front of the door we came in. Turn right twice. Click on button at the top of the pillar. That did it!
We've found our way in. We're going down in an elevator. We've stopped at another level. It appears, with the down arrow at the bottom of the screen, that we can go down another level, but let's check those doors in front of us first. Move forward twice. Sure is a strange looking door. And it has 3 symbols on it that I can recognize more easily now: the sun (or light) at the top, a man figure on the bottom left, and a dinosaur figure on the bottom right. But I can't tell what's inside there, can you? Will the door open? No, it's locked! Turn left once and move forward once. There's a door ahead of us. Can we get to it? Move forward once. We must have passed the door. Turn right. Darn, we can't get to that door! Turn left, then move forward once, and then click on the diagonal arrow (pointing upward and to the right) found on the right side of the screen. More doors. Can we open these? Again they are locked. I can't really see in there very well either. We've got to find a way to open these doors.
Let's go down to the next level, maybe we can find something there to help us. Turn left twice, then move forward twice and then click on the down arrow found on the bottom of the screen. Look, there's an archway straight ahead with a blue light coming from inside. Let's check it out. Move forward twice. Sounds like we are entering into a cathedral or church of some kind. Move forward twice, then turn right and then move forward twice to what looks like another projector. Look, that button on the top has the light symbol on it and it appears to be lit up more than the other two. Hard to make out the other two, but the left one resembles a silhouette of an angel and the one on the right has something like a torch in the middle. Can't make out what is on either side of the torch though. What happens if we push the darker buttons? Try it! The images turn a blue-green, but don't stay that way. Do you suppose that when we complete our task here that they will stay blue-green? What is our task? Why are we here? Enough worrying, thinking, or whatever: lets' push the button with the sun-like symbol on it. Go ahead and click on it. Another holographic projection from Einstein! He must have made it this far too, and left a message for the next Comer and that's you... you're the 28th Comer! I don't think any of the other Forecomers even made it this far! Let's hear what Einstein has to say. We'll have to listen carefully because he's a little hard to understand!
This is the 27th Comer again. Let me continue my interpretation of the findings, which may position us a step closer to the realm of life.
The evil side of human nature could be more destructive than volcanic eruptions and probably is the reason why the 2nd experiment is now coming to an end. Another plan was drafted, the volcano was calmed, the place was chosen, and the new experiment is underway.
Now I understand why the dinosaur was never mentioned in all the holy works: we humans face the same destiny of replacement. Here I SAW the new beings and heard their groans. They are in the form of light…a pure energy state…no flesh!
Didn't Sinbad warn us with his story? Didn't da Vinci give us a hint in his art? Didn't we already know much of this from our own religions and prophecies?
But our hope still lives. I am doing my best to intervene in the process and persuade the new beings to go away. The important fact that I have learned is that they rest in trees (i.e., reside in; live in). They are in those trees on the island and around the shore. They are everywhere!
OH NO!!! Our worst fears are true! Humans are to be eliminated because we are too violent, just like the dinosaur was eliminated before us to make way for humans. We are to be replaced with a new, more evolved, non-violent species. A species that is already here and has been here for a long time being prepared to replace us! Evidently, according to the old stories and legends, these light beings (what we usually call angels of light?) tried to help us at first…tried to change our violent nature and lift us to a higher, more evolved state of consciousness (remember the old legend depicted pictorially in the Solar House hallway?). And we attacked, destroyed or drove off every one of them, every time! Was that why the maiden was shown crying?
And, worse, Einstein says that now the experiment is drawing to a close….that it's almost time for the replacement of the dominant species….for the extinction of humanity! Oh No!
No wonder we didn't know about them and couldn't recognize them: they are usually invisible, pure energy! And they live in trees (maybe like our spirit lives in a body of flesh)! They're everywhere!!! We are so used to trees that we pay absolutely no attention to them (although I have heard stories about people who swear that, when they sit under a tree and meditate, the tree talks to them). That's what must have been the lights that we saw when we first arrived at the lake…they're light beings! And that must be the sound of their voices (groans) that we hear.
The 27th Comer obviously didn't finish what he was trying to do because they're still here! We've got to figure out how to make them leave now!
Maybe he had a way set up, or at least partially set up, already. Or maybe he didn't have time to finish it, but left us a clue about what to do. Let's go see what we can find!
Turn left once, and then move forward 3 times. That looks like another doorway (actually more like a tunnel) directly across from us. Let's go see what's in there. Move forward 9 times. That looks like a ship's navigational wheel. Wonder what it controls?
NOTE: For those of you who would like a shortcut for this section, skip the following very long paragraph and read the shortcut which follows. But make sure you read through the following long paragraph for observations about the story and look at all the pictures so that you see the clues that you will need later.
Let's turn the wheel and see what happens. Click and drag the closed hand on the wheel only once to the right, then let go. Hey, look! That large pillar in front of us turned! That must have opened or turned something up above. Let's go up and see what changed, if anything. Turn right, then go forward 7 times to the small round platform of the elevator and then click on the up button once. That door still appears to be closed. Let's check the other one. Turn left twice. No, it still looks closed too. It must have been something else. Turn left twice and click on the up arrow to take us back to ground level, then turn right 4 times. No, I don't see anything different in here, do you? The only place I can think of that we haven't checked is out by that little pyramid that we couldn't do anything with before. Let's go check that. Go forward 6 times, then turn right. Click on the boat to get in it, then go forward 3 times to cross the lake, and click on the diagonal arrow (pointing upward and to the left) to get out of the boat. Now go forward 9 times, always clicking directly on the path. It sure makes me feel weird, and very nervous, to walk through these trees and hear those voices (groans) now that I know what's in them. You too? And I know that they're watching our every step. I just hope that they don't know what we're planning to do! Turn left once, go forward once, turn right once, go forward once, and turn right again. Aha! Something is different about that pyramid! That must have been what we turned. Let's get a closer look. Move forward once, then click on the pyramid. It looks like an angel lighting something with a lamp….I'm not sure, but that looks like some kind of rocket that the angel is lighting. Is that a clue about something we have to do? Wait a minute. This pyramid has 4 sides, and we've only seen 2 of them so far. I think we're going to have to turn that pillar downstairs 2 more times to see what's on all 4 sides, so we know what to do. Click anywhere but on the pyramid to back away, then turn right twice. Go forward once, turn left once, go forward once, turn left again, then go forward once to the step. Turn right, move forward 9 times on the path, then turn left. Click on the boat to get in it, go forward 3 times to cross the lake, then click on the diagonal arrow (pointing upward and to the right) to get out of the boat. Go forward 6 times to the elevator, turn right twice, then click on the button at the top of the pillar to go down. At the first level, click on the down arrow to continue going down in the elevator. Turn right twice and go forward 7 times. Click and drag the closed hand on the wheel to the right only once, then let go. OK, let's go see what the 3rd side of that pyramid has on it. Turn right, then go forward 7 times to the elevator and then click on the up button twice to go back up to ground level. Go forward 6 times, then turn right. Click on the boat to get in it, then go forward 3 times to cross the lake, and click on the diagonal arrow (pointing upward and to the left) to get out of the boat. Now go forward 9 times, always clicking directly on the path. Turn left once, go forward once, turn right once, go forward once, and turn right again. Go forward once and then click on the pyramid for a close up view. I was right! This picture IS different. But what does it mean? One angel painting another angel's wings? I'm sure it's a clue, and that it has to be symbolic of some action that we take, but I'm not sure what yet. I'm getting awfully tired of all this running back and forth but I guess we still need to see the 4th side. Maybe that will help make what we have to do clearer. Click anywhere but on the pyramid to back away, then turn right twice. Go forward once, turn left once, go forward once, turn left again, then go forward once to the step. Turn right, move forward 9 times on the path, then turn left. Click on the boat to get in it, go forward 3 times to cross the lake, then click on the diagonal arrow (pointing upward and to the right) to get out of the boat. Go forward 6 times to the elevator, turn right twice, then click on the button at the top of the pillar to go down. At the first level, click on the down arrow to continue going down in the elevator. Turn right twice and go forward 7 times. Click and drag the closed hand on the wheel to the right only once, then let go.
Shortcut for the paragraph above: Click the closed hand on the wheel and drag to the right exactly 3 times. The following screenshots show the first 3 sides of the pyramid.
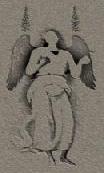
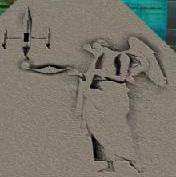
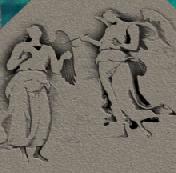
Side
1: Angel with trees above wings.
Side
2: Angel lighting rocket with lamp.
Side
3: Angel painting wings on wingless angel
OK, let's go see what the 4th side of that pyramid has on it. Turn right, then go forward 7 times to the elevator and then click on the up button twice to go back up to ground level. Go forward 6 times, then turn right. Click on the boat to get in it, then go forward 3 times to cross the lake, and click on the diagonal arrow (pointing upward and to the left) to get out of the boat. Now go forward 9 times, always clicking directly on the path. Turn left once, go forward once, turn right once, go forward once, and turn right again. Go forward once and then click on the pyramid for a close up view. Hey, that looks like one of the doors that we saw earlier on the first level underground. Does anything happen if we click on it? Let's see. Click on the drawing of the doors. It looks like they opened?
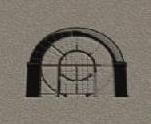
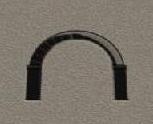
Left
Picture: Doors closed. Right Picture: Doors open
You don't suppose that opened the doors down below, do you? Let's go find out. Click anywhere except on the pyramid to back away, then turn right twice. Go forward once, turn left once, go forward once, turn left again, then go forward once to the step. Turn right, move forward 9 times on the path, then turn left. Click on the boat to get in it, go forward 3 times to cross the lake, then click on the diagonal arrow (pointing upward and to the right) to get out of the boat. Go forward 6 times to the elevator, turn right twice, then click on the button at the top of the pillar to go down one level. Look at that, I was right! That door is open!
Go forward 4 times. It looks like a some kind of holy painting, kind of like an angel without wings. Does anything happen if we click on it? No. Turn right once. What's this? An angel artist? Click on the paints. Hey, we took its' paints! What are we supposed to do with these? Wait a minute. Didn't we see this angel on that small pyramid painting another angel's wings? Do you suppose we are to paint wings on that one we just looked at that has no wings? Let's try it! Turn left once, then click the paints on the shoulders of the wingless angel. Look, it has wings now! You were right! Those diagrams on the pyramid WERE clues (evidently about some way that was prepared to get rid of those beings)! OK, lets put these paints back where we found them and see what else we can find. Turn right and then click the paints on the angel painting. Then turn left twice. Another angel with a burning lamp. Click on the lamp. OK, we have the lamp and we know what we have to do with it (the diagram on the small pyramid showed it lighting some kind of rocket), but where? I don't see one here.
Turn left once. It looks like that other door is open too. Go forward 9 times. There's the rocket! Click the lamp on the opening in the rocket. OK, it's lit, but nothing happened. I don't see anything else here, but there has to be a switch to throw or a button to push or something, somewhere! Wait a minute! I remember now. There were those 2 other buttons on that projector on the lower level. I couldn't understand the diagrams on them at the time but, now that I think about it, one had an angel on it and the other a diagram of this rocket!!! Einstein must have set this all up and then, for some reason, either chose not to do it or didn't have time to do it, but he left all the information for the next Comer. Let's go put this lamp back and then go try those buttons. We'd better hurry. We don't want those beings to catch on to what we're trying to do!
Click anywhere to back up, then turn right and go forward 8 times, then turn left and click the lamp on the angel. OK, the lamp is back where we found it. Turn left, go forward 4 times to the elevator, turn left twice, then click on the down arrow to descend to the lowest level. Go forward 4 times, turn right, then go forward twice. Look at that! We were right! Both of those buttons are now blue-green, so everything must be ready to go! I'm very nervous, are you? But we've GOT to get rid of those beings before they are used to replace humanity, don't we? Yes! OK, here goes! Click on the sun (light) symbol at the top.
We did it! Look at that! I think they're all leaving!
The Ending
Now go back up in the elevator to ground level and walk outside. Notice how barren and desolate it looks with no trees anywhere, and how sad and lonely it feels without even the sound of wind in the trees which we are so accustomed to. Yes, we have successfully driven the more advanced species (the beings of light) from the world and have saved the human species from extinction or replacement. But at what price?
What have we done? The trees are all gone here and the light beings with them. Are they gone everywhere, or just here? We have saved humans, but will man become less violent and survive, or will he become increasingly more violent without the light beings' influence? And if the trees and light beings are gone everywhere, how CAN humans survive? How dependent were we and our world on them?
WHAT HAVE WE DONE?
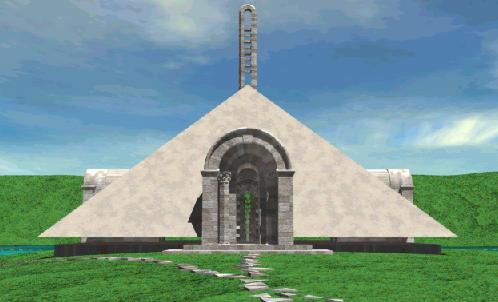
********************************************************************
Commentary on the Ending by Kyle Choi, author of Comer:
The credits were deliberately not shown at the end. They were always available from a pull down menu at the top of the screen, but I didn't want them to interfere with the mood of the ending.
I would consider the ending a success if, when you return to the surface, it arouses a mood of loss in you. Notice that sad and soft music accompanies the loss of the trees, the loss of the light-beings, and the loss (i.e., the ending) of the game. You will have also noticed that all kinds of trees were everywhere in all 4 of the sites in Comer. So obviously we love trees too. In other words, I wanted the ending to be a solitary place, where people could interpret and express what they have experienced by themselves.
Actually we completed making the game with a feeling of sadness and loss, and perhaps that is embedded in the ending of Comer.
********************************************************************
Commentary by Mr. Bill:
We dearly love trees. After all, we own a Plant Nursery. But it is interesting to speculate that if the human species is too violent and harmful to the earth, and so is to be replaced with a species that already exists here (as the story hypothesized), what better choice could be made than trees? (On the other hand, it gives a whole new slant to Arbor Day, doesn't it?)
It felt very strange to
have a game with no real ending, with no credits, with everything deserted,
no trees, no wind in the trees, very sad music, just you alone on a volcanic
island in the middle of nowhere. But that's exactly
how it would be if the story were real, isn't it?
Visit Mr. Bill's Adventureland for help with other games!
For comments, corrections or suggestions for this walkthrough, send email to mrbill@acd.net
This walkthrough may NOT be distributed without the written permission of Mr. Bill.
Copyright
© September, 1999 Mr. Bill's Adventureland
http://www.mrbillsadventureland.com
All
rights reserved.
Portions Copyright © 1998 Shine Studio
Last updated January 6, 2000