CSI: Deadly Intent
by telltales games
Walkthrough by MaGtRo November 2009
Gameplay: This is a first
person point and click game. The Main Menu has new game, continue, options,
credits and quit.
A new case becomes available when a previous one is
completed. At this point, the new game selection can be used to replay the old
case or start the next case. The options menu has the audio-video selections,
tutorial mode, subtitle settings and hint level.
During gameplay, the main menu is accessed by opening
the PDA, select options and choose main menu. The selections on the PDA are
evidence, case file, locations and options.
It is strongly recommended to read the manual that is
in the installed game folder. Learn how to investigate crime scenes and collect
evidence.
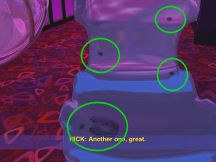
Case 1: Broken Hearted
A bride lying on the bed has a piece of glass on her
neck. Capt. James Brass
leaves the crime scene.
Crime Scene - Aurelia's Fantasy Suites:
Talk to Nick Stokes completely.
Get a CD of
the 911 call. Check the hot tub in the corner.
Body: Look close at
body. Use swab on her body or pool of blood to get the victim's blood.
Carpet: Look close at the
light part of the carpet right of the bed.
Use the LCV (fluids) bottle on carpet. A swab is
used on the blood from carpet.
Bar: Pan right and look close on
the floor at left end of the bar to see white powder.
Use bottle to collect evidence.
Bed: See a vibrator
controller left side of the bed.
Dresser: Look close
on the floor left side of the dresser and right of the bathroom door.
Take the piece of glass that matches the one on
the bride's neck.
Sofa: Pan left and look
close at the right cushion of the sofa.
Automatically the cushion is turned over. Use swab
to collect sofa blood evidence.
Bathroom: Enter the
bathroom.
Right sink: Look close at
right sink. Use luminol on sink and get sink evidence.
Check-open the right cabinet under the right
sink.
You can check the cupid shower head if you want.
Nothing there.
Interrogate the witness:
Pan right and talk to the witness completely.
His name is Charles Steer. He looked in the room at
check out time - around 11.
A Mexican man checked in the room. Ask who
cleaned the carpet.
Morgue: Open the PDA.
Select locations and then morgue.
Talk to Doc Al Robbins at the morgue completely.
The victim is inebriated and took cocaine. The
murder was at 3AM.
The COD is a heart shaped item. The second shard
from victim's neck is given.
The fingerprints ten card is given.
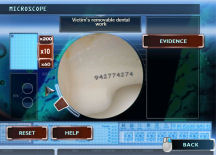
Examine the victim's mouth. Get the victim's removable dental work that
has a number.
Aurelia's Fantasy Suites:
Go back to the crime scene.
Look close at the vibrator controller left of the
bed. Flip the switch.
Pick up the piece of broken glass that
dropped from the bed.
Lab: The lab is separated
with the Data lab (info processing) on the left and Materials lab on the right.
Materials lab: Enter the
Materials Lab on the right.
Analyzer: Look close at the
machine at left.
Chemical Analysis:
White powder: Select
Chemical analysis, evidence and white powder from crime scene.
Click on search button at top right. See the
comparison of the working and reference spectrums.
Click to select the spectrums on the right that match the spectrum of the evidence.
Click (top to bottom 1-8): 1, 4
and 7. Click confirm match. It is carpet cleaner.
DNA analysis: Select DNA analysis
and then click on evidence on left side of the screen.
Select the sample to be tested.
Victim's DNA: See the
victim's DNA on left. Click 'search button at right.
The victim is not in the system.
Select another sample from Evidence.
Blood from couch cushion:
See the DNA from couch on left screen.
Click Evidence at right and select Victim's
blood for comparison.
No match. Pull back. It might be the
perpetrator's blood.
Blood found in sink:
See the DNA from sink on left screen.
Click Evidence at right and select Victim's
blood for comparison.
Select the top right strand of the sink's blood
and overlay it on the first column of the victim's blood.
Match all the strands. Move the sample strands
up down on the column on the right to match it.
Click on Confirm Match after all the 4 strands
are overlaid on the right side. Match found.
Blood from carpet: See
the DNA from carpet on left screen.
Click Evidence at right and select Victim's
blood for comparison.
Pull back and Nick says that it might be left by previous guest.
Comparison machine: Pan
right to right wall and look close at machine.
Microscope:
Select microscope and then the victim's removable dental work.
Click-hold the sample at the center until you
see the number ID of the dental work.
Select the correct zoom at top left - x10.
Use the slider (click-hold-move) on the left of
the circle until it is in focus.
Assembly table: Click to
look close at the table at center of room. It is used to assemble pieces of evidence.
See the glass pieces-shards taken from crime scene.
Match the 3 pieces we have so far. Rotate the
pieces.
Data Lab: Exit the
materials lab and go across the hallway to the data lab.
Audio-video analysis:
Look close at the monitor on left wall.
Select audio. Click on evidence and select the 911
call. Listen to Charles Steer's call to 911 by pressing the arrow at right.
Database: Look close at
the computer setup by the glass wall on the right.
Select Medical database, evidence and the ID
number from victim's bridgework. Click search.
The victim is Lynn Bowder, married to a soldier deployed overseas.
Captain Brass: Listen to
the info about Lynn. She works at Pleasure City as a dancer.
Pleasure City:
Enter the lounge.
Kathy Burd:
Talk to the bartender completely. She has bruises on her arm.
Lynn was dancing for a Mexican guy. They left at
midnight.
Chair by pole stage: Look
close at the middle chair facing the stage.
Use the fingerprint brush on the chair. Move the
brush to get prints.
Automatically the prints are lifted off using the
tapes.
Do these 4 times to get all the prints.
Get a call from Capt. Brass that someone tried to use Lynn's ATM
card.
Data lab: Go back to Data
lab.
Fingerprint database: Look close
at the computer setup by the glass wall on the right.
Select fingerprints, then evidence. Select a print
from the lap dance chair prints collected.
Compare it to Lynn's ten card.
Click-hold drop the sample on one of the quadrants
of Lynn's print.
If they are the same, click on Confirm Match button.
The print from upper left of lap dance chair matches
Lynn's print.
Search for the negative prints:
The rest of the prints that are negative should be searched using the Prepare
Search button at right.
Select 5 distinct characteristics on the print. A
red circle will happen. Then click on search to see if there is a match.
Place a search result print on right frame. See if
they match.
If a match is found, click on Confirm Match
button.
Upper right print from lap dance chair matches to
a transsexual's print - the middle one of the search result.
Fingerprint from lower right of chair matches an
82 yo stripper - middle one of search result.
Finger and palm print from seat of chair matches
Airam Dominguez.
Captain Brass: Go to Brass'
office.
Talk to Brass completely: about party, card and
Dominguez.
Get the Lynn's ATM card. Ask to bring
Dominguez in for questioning. Use prints from seat of lap dance chair as
evidence. A BOLO is put out on Dominguez.
Get a picture of Dominguez to show witnesses.
Data lab:
ATM card: Look close at the
ATM card.
Use the fingerprint brush on the card. Get an ATM
print.
Use the fingerprint database in the computer at Data
lab.
Do a comparison of the ATM print with Lynn's print.
No match.
Prepare a search of the ATM print.
Find 5 characteristic points on the ATM print;
then search.
Get 4 possible matches. Check if there is a match.
The bottom print on the right matches - it is
Charles Steer at the motel.
Crime Scene - Aurelia's Fantasy Suites:
Talk to Charles Steer at the crime scene. His story
changed about the credit card. He says he's clean of cocaine.
He recognizes Dominguez.
Get a call that Dominguez is picked up trying to get
a ride.
Interrogation room:
Talk to Dominguez completely.
Automatically, get DNA sample from Dominguez
and clothes.
Stop the interrogation by selecting the PDA.
Data lab:
Talk to Raymond Langston.
Do his print analysis from a cannoli form.
Do prepare search. Look for 5 unique characteristics
of the print. Do a search.
Match it with the top left quadrant and then
confirm match.
Materials lab: Look close
at the chemical analysis machine.
DNA: Select DNA.
Blood from cushion:
Select blood from couch cushion. Do a match with Dominguez' DNA.
Move the strands until they match a column of the
DNA sample.
Confirm match on the blood on the cushion. It's a
match.
Blood from carpet: Select blood
from carpet.
Do a match with Dominguez' DNA. No match.
Shirt: Select Dominguez'
shirt in evidence.
Turn the shirt to get a side view.
Take the shard from the right side of the
collar-shoulder area.
Shard: Go to the assembly
table at center of room.
Match the new shard with the bottom tip of the rest of the shards.
Interrogation room:
Continue the Dominguez interrogation. Ask him about being at fantasy suites.
Select the evidence that showed that he is there by
clicking on the exclamation point button.
Select blood from couch as evidence. Learn that there were 2 women with him that night.
Pleasure City: Go to Pleasure
City.
Enter and look close at bar. Take the napkin that has mucus of Kathy Burd.
Materials lab:
Napkin with Kathy's mucus: Look close at evidence in the PDA. Select the napkin
with Kathy's mucus.
Use a swab to get a DNA sample.
Use the DNA analysis machine.
Do a comparison of the blood from carpet and mucus
from Kathy's napkin. They match.
Captain Brass: Go to Brass'
office.
Talk to Brass about search warrant for Kathy's
apartment.
Show the Kathy Burd blood from the crime scene
carpet evidence. Click Present button.
Kathy Burd's apartment:
Enter the apartment. See that Charlie's in the
apartment also.
Charlie runs out and leaves a shoeprint in the mud.
Talk to Kathy completely. Look around the apartment.
Check the bed, side table and table with paints.
Enter the closet right of bathroom. Pick up the
glass shard close to the hanging clothes.
Enter the bathroom. Look around. Check the shower.
Use Luminol on the drain to get blood sample.
Exit the room and look down at the shoeprint in the
mud.
Use casting material to get a cast of the
shoeprint.
Materials lab:
Assembly table: Add the
glass shard from Kathy's apartment to the other glass shards.
Analysis machine: Do a DNA
analysis of the blood from Kathy's shower.
Do a comparison with Lynn's blood. Confirm match.
It's a match.
Captain Brass: Go to Brass'
office.
Talk to Brass about arrest warrant for Kathy.
Show the Kathy Burd blood from the crime scene
carpet evidence. Click Present button.
Present victim's blood from Kathy's apartment. Click
present button.
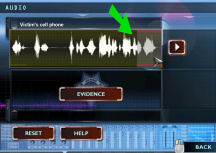
Interrogation room:
Interrogate Kathy completely. Get Kathy's
fingerprints.
Ask if she saw Lynn after she was killed. Refute
that statement using the glass shard evidence.
Kathy blames Charlie. Get the cell phone as
proof that Charlie threatens her.
Stop the interrogation and go to lab.
Data lab: Look close at
Audio-video analysis monitor.
Select Audio, evidence and Kathy Burd's phone. Click
on right arrow to hear the playback of Charlie's message.
Do a comparison by clicking Evidence. Compare with
the 911 call by Charlie.
Click on the left most sound wave and then click on
compare. Match found.
Captain Brass: Go to Brass'
office.
Talk to Brass about warrant for Charles Steer.
Show the Kathy's cell phone as evidence. Click
Present button.
Interrogation room:
Interrogate Charlie.
Ask to see his shoes and get a DNA sample.
Stop the interrogation and go to the lab.
Materials lab:
Shoes: Look close at the
shoes in evidence. Use swab to collect white powder from his shoes.
Turn the shoe and take the glass shard from
under the shoe.
Analysis machine: Do a
chemical analysis of the powder in Charlie's shoe.
Compare it with the carpet cleaner found in the
crime scene. Match found.
Assembly table: Add the
glass shard from Kathy's apartment to the other glass shards.
Get a complete heart ashtray.
Data lab:
Ashtray: Look at the
ashtray in evidence. Turn the ashtray to see the back side.
Click at top right part of the ashtray. Use
fingerprint brush on top left of ashtray to get an ashtray print.
Go to fingerprint database. Compare print from
murder weapon (ashtray) and Kathy Burd's ten card. Confirm match.
Interrogation room:
Interrogate Charlie again about cleaning the crime
scene.
Click on exclamation button and select the powder
from Charlie's shoes. Click present.
Continue the interrogation until he says that Kathy
used the ashtray.
Stop the interrogation.
Talk to Brass about talk to Kathy Burd.
Interrogate Kathy Burd completely.
Show the print from the murder weapon as proof.
Case 2: Coulda Been a Contender
A Supreme Force Fighting League referee, Rick Shimada
is found murdered inside the ring. He made a controversial call in the
championship fight between Hank Hackett and Tito Tiger Malone.
Arena: Talk to Greg Sanders.
Victim: Check the
microphone that was used to strangle the victim.
Move to the cord of the mike and take a hair.
Look close at the victim's head. Collect a blood
sample from the pool of blood under the neck.
Tina Allens: Talk to
Tina at right side outside of the ring. She found the victim a
little after 11.
Learn about props. Horace Willingham the owner of
the league has key to the prop room.
Locker room: Talk to Hank
Hackett. Learn about the disqualification.
Morgue: Talk to Doc Robbins.
The victim was unconscious prior to being strangled.
There are 6 injuries on side of head and back. The
victim was killed at around 11.
Look close at side of head. Take a swab of the white
pasty substance on the wounds.
Pull back. Look close and take the microphone
cord above the autopsy table.
Materials lab:
Hair from microphone cord: Look close at
analysis machine.
Do a DNA comparison of the hair found on the
microphone cord with Shimada's blood sample.
No match. It might the killer's.
Paste sample: Back up
and then select chemical.
Select the paste sample taken from Shimada's body.
Click on search. Select from top to bottom (1-8):
1 and 6.
Confirm Match. Match found. It is a slate paste used
to clean a katana.
Capt. James Brass:
Automatically, talk to Brass.
Horace Willingham's Office:
Talk completely to Willingham in his office.
Get the prop room key.
Look close at the key taken from evidence. Turn it
over to see the back.
Use the fingerprint brush on the key and get
Willingham's print.
Arena: Go the ring.
Go to the right and check the table. Take Tina's lipstick.
Look close at Tina's lipstick in evidence.
Use swab to collect Tina's DNA from the
lipstick
Use the fingerprint brush on the base of the
lipstick to get Tina's prints.
Prop room: Pan left to the
stairs at left side of the arena.
Look close at lock on door. Automatically open the
door using the key given by Willingham.
Climb up to the video control panel area.
Control panel: Look close
at base at left side of the control panel table.
Take the VCR connected to the security camera.
Prop closet: Turn to the
door on left wall. Enter the prop room.
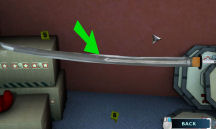
Katana: Look close at the katana leaning on the carton box. The katana came apart.
Check the handle on top of box and then in
evidence. There should be a piece of wood.
Check the blade on the floor and then in
evidence. The blade is dull.
Use swab on the blade to get oily residue.
Turn the blade to one of the blunt edge. Use luminol
on middle part of blade
and get blood sample.
Data Lab:
Look close at the audio-video analyzer monitor.
Select video playback and then the Octagon
surveillance footage.
See Hank and Shimada in the ring.
Material's lab:
Oily residue: Do a
chemical analysis on the oily residue taken from the katana.
Click search. Select from top to bottom (1-8):
3, 5 and 8. Click Confirm Match. It is a metal cleaner.
Blood from Katana blade:
Do a DNA analysis on the blood from katana blade.
Do a comparison with Shimada's blood. Click on
Confirm Match. It's a match.
Capt. James Brass: Talk to
Brass.
Ask to bring Hank for questioning. Use the Shimada's
blood on the katana sword as evidence.
Interrogation room:
Talk to Hank. Ask about talking to Shimada after the
fight.
Use the VCR as evidence that he is lying; then click
Present button.
Get his cell phone.
Arena: Use Hackett's cell
phone from evidence in arena. It confirms that there's no signal.
Capt. James Brass: Talk to Brass
about the cell phone records.
Interrogation room: Hackett is
released.
Materials lab:
Hair on mic cord: Do a DNA
comparison on hair found on mic cord and Tina Allens' DNA from lipstick.
No match.
Greg talks to Catherine and Nick. Learn that Hackett is dead.
Locker room:
Hackett: Check the syringe
on Hackett's shoulder.
Pan to the right and check the vial on the right
cubicle. Take the vial.
Look close at the vial in evidence. Turn the vial
upside down and rotate it.
Use the fingerprint brush on the vial to get
prints.
Morgue:
Talk to Doc Robbins. Hackett was killed by injection
of the metal cleaner.
Syringe: Check the
syringe on the metal tray above the autopsy table.
Look close at syringe in evidence. Take the hair
on the syringe.
Materials lab:
Vial: Do a chemical
analysis on vial found in Hackett's locker.
Click search. Select from top to bottom (1-8):
2 and 7. Click Confirm Match. It is steroid.
Syringe in Hackett's arm:
Do a chemical analysis on syringe in Hackett's arm.
Click search. Select from top to bottom (1-8):
3, 5 and 8. Click Confirm Match. It is metal cleaner.
Comparison: Select metal
cleaner found in katana blade and as evidence, select syringe in Hackett's
arm.
Click Confirm Match.
Hair from syringe: Do a
DNA
analysis on the hair from syringe.
Compare it to hair found in mic. Click Confirm
Match. It's a match.
Do another analysis and compare it to Tina's DNA.
No match.
Data Lab:
Do a fingerprint analysis on the print found on
Hank's vial.
Compare it to Willingham's print at bottom left
quadrant. Click Confirm
Match. It's a match.
Capt. James Brass:
Talk to Brass about search warrant for Willingham's
office.
Use fingerprint found on Hackett's vial. Click
Present button.
Horace Willingham's Office:
Open the bottom cabinet at right side of the trophy
case. Take the plastic jug with metal cleaner.
Look close at the top of the leather desk. Check the
roll of money at left side of desk.
Materials lab:
Riley Adam's: She asks to
have a chemical analysis done on a sludge sample.
Select the sludge sample from evidence.
Click search. Select from top to bottom (1-8):
1, 4, 6 and 7. Click Confirm Match.
Metal cleaner from Willingham's office:
Do a chemical analysis on the metal cleaner from Willingham's office.
Click search. Select from top to bottom (1-8):
3, 5 and 8. Click Confirm Match. It is metal cleaner.
Comparison: Select metal
cleaner found in Willingham's office and as evidence, select syringe in
Hackett's arm. Click Confirm Match.
Capt. James Brass:
Talk to Brass about arrest warrant for Willingham.
Use the metal cleaner found in Willingham's office
as evidence. Click on Present button.
Interrogation room: Talk to
Willingham. He confesses to both murders.
Lab: Greg does hair analysis
and confirms that the hairs from both murder weapons are not Willingham's.
Briefcase: Look close at
briefcase in evidence.
Check the document in the folder. A loan for a
women's league was turned down. Tina co-signed the request. She's a co-owner.
Check the betting slip left in the briefcase. It's a
bet for Hackett to lose made by Tina.
Capt. James Brass:
Talk to Brass about arrest warrant for Tina Allens.
Use the bet receipt against Hackett as evidence.
Click on Present button.
Interrogation room: Talk to Tina.
Stop interrogation by pulling back before asking
about knowing Hackett will lose.
Brass has Tina's personal effect.
Tina's purse: Look at Tina's purse
in evidence.
Look inside and check the tube cream. A
warrant for her medical records is needed.
Look inside and take the key.
Material's lab:
Comparison microscope: Use
the microscope.
Select Horace Willingham's prop room key.
Click on Evidence at right and then select key found
in Tina's purse.
Select x10 and then move the slider at bottom left
until the keys are in focus.
Move the keys to show the stem of both keys. It's a
match.
Chemical analysis: Select
prescription drug found in Tina's purse.
Click search. Select from top to bottom (1-8):
1, 4 and 7. Click Confirm Match. It is an immunosuppressant.
Interrogation room: Talk to Tina
about the prednisolone.
Morgue: Ask Doc Robbins about
the prednisolone.
Capt. James Brass:
Ask about warrant for Tina Allen's records.
Select prednisolone in Tina's purse as evidence.
Click on Present button.
Data lab:
Look up Tina's medical record in the computer. Use
medical database.
Select the prednisolone in Tina's purse as evidence.
Click search.
Find out that it is used for her hair transplant and
she is using another person's hair for transplant.
Interrogation room:
Talk to Tina about warrant for a hair sample.
Get Tina's transplanted hair sample.
Material's lab:
Tina's transplanted hair sample:
Do a DNA comparison of Tina's transplanted hair sample.
Make a comparison with hair found on mic cord. Click
Confirm Match. It's a match.
Make a comparison with hair from syringe found on
Hackett's body. Click Confirm Match. It's a match.
Interrogation room:
Ask Capt. Brass to interrogate Willingham again.
Question Willingham completely.
Ask Capt. Brass to interrogate Tina again.
Refute the betting on Hackett to lose using the bribe
money evidence.
Refute prop closet locked with Tina's prop room key
evidence.
She says she never came near Shimada or Hackett. Use Tina's hair on mic cord.
Use Tina's hair on syringe found on Hackett's body.
Get her confession.
Case 3: Last Gasp
A woman soaking in a hot tub is given a drink.
Twilight Palms Rehab Center:
Capt. Brass and Dr. Ray Langston view the body of Clarinda Jackson. Clarinda was
famous for her TV show Roomers. She now hosts a live version in a casino in
Vegas.
Spa: Look at the body in
the hot tub. Pick up a ring with a tribal pattern at right end of the
hot tub.
Pull back and check a D'Oranger cap on the
steps left side of the hot tub. Turn the cap around and use the fingerprint
brush to get a print.
Pan left close to Dr. Langston. Pick up a broken
D'Oranger bottle. Look close at the broken bottle in evidence. Use a swab
to get a liquid sample left inside the bottle.
Pan right to the lamp post right of the hot tub.
Pick up the plant.
Steve Tampson's room: Talk
to Tampson.
Morgue: Talk to Doc Robbins.
The TOD is 10-11 PM. The COD as drowning and was
held underwater.
Get Clarinda's prints and DNA. The victim was legally drunk
and had roofie in her system.
There is semen collected.
Look close at the bruising on her left shoulder.
Langston says that the hand that did the bruising must be wearing a ring. A
picture of the bruise is taken.
Materials Lab:
Comparison microscope: Go
to the microscope on the far wall.
Do a comparison of the ring found in spa and
photograph of the bruise on Clarinda's shoulder.
Using 10x magnification, move the slider until the
ring is in focus. Move the photograph until the mark on the shoulder is seen.
They match. The killer was wearing the ring.
Liquid in broken bottle: Do a
chemical analysis on the liquid in broken bottle.
Click search. Select from top to bottom (1-8):
1, 5, 6 and 7. Click Confirm Match. It is the drink with roofie.
DNA retrieved from victim's vaginal vault:
Do a DNA search. Get 4 possible matches.
Do a comparison of the DNA. The last-bottom sample
is a match. It is Steve Tampson.
Move back and go out.
Plant: Dr. Langston
identified the plant to be Devils backbone or Mother of Thousands.
Capt. James Brass:
Ask to bring Steve Tampson for questioning.
Use the DNA retrieved from victim's vault as
evidence. Click on Present button.
Interrogation room:
Question Tampson. Tampson gives his medical number.
Data room: Do a medical database
search in the computer. Use Tampson's medical number as evidence.
Morgue: Ask Doc Robbins about
Clarinda's medical record.
Interrogation room:
Talk to Tampson
again. He's free to go but continue to question him.
He mentions Jack Shell.
Capt. James Brass:
Go somewhere and get a
call from Brass about Clarinda's husband.
Go to Brass' office and ask about Goldwasser.
Interrogation room: Talk to Ernie
Goldwasser.
Goldwasser gives Clarinda's purse. Look inside
Clarinda's purse in evidence.
Get a cell phone. Langston says that a call was made
by Goldwasser to Clarinda.
Data lab:
Cell phone: Look close at the cell
phone in evidence.
Turn it around and get a thread that might
have been used to wipe it clean.
Look close at the monitor of the video-audio
analyzer.
Do an audio analysis of the cell phone as evidence.
Click on the arrow at right to hear a playback.
Click the last part of the soundtrack and hear a
bell. Langston says he heard that bell before.
Interrogation room: Continue to
interrogate Goldwasser.
Refute Goldwasser' statement about wife's affair. Use cell
phone as evidence. Click Present button.
Goldwasser mentions a church bell that rings up the
hill. That is the bell Langston remembers.
Goldwasser mentions Jack Shell. Get a copy of the
e-mail about cancellation of a show at the casino.
Jack Shell's dressing room:
Talk to Jack completely.
See a print at right side of the door frame.
Use fingerprint brush and get Jack Shell's print.
Data room:
Print on cap of broken bottle:
Do a fingerprint comparison of print on cap of broken
bottle and Jack Shell's print. Confirm match. It's a match.
Capt. James Brass:
Ask for a search warrant for Jack Shell's dressing
room.
Use the print found on cap of broken bottle as
evidence. Click Present button.
Jack Shell's dressing room:
Enter the dressing room.
Pan to the right and take the paper on the couch. Read
the document in evidence. It is a violation of substance abuse memo sent to
Clarinda.
Look close at and take the Mother of Thousands plant
at base of the standing lamp left of couch.
Materials Lab:
Skin flake from bowling ball: Lt. Briggs
wants a DNA test done on her case.
Use skin flake from bowling ball. Do a search.
Match the DNA from sample to the third sample at
right. Confirm match.
Assembly table: Look close at
assembly table.
Join the small plant to the top edge of the main
plant.

Capt. James Brass:
Ask Brass to have arrest warrant for Jack Shell.
Use the plant found in Shell's dressing room as
evidence.
Interrogation room:
Shell: Interrogate Jack
Shell.
Use the memo about the rehab found in Shell's room as
evidence to refute his statement about not knowing she has a problem.
Shell talks about what happened last night.
Someone interrupted Shell before he can wipe the
bottle - someone that sneezed on his
sweater.
About the Mickey, Goldwasser gave the bottle of
D'Oranger.
Goldwasser: Question
Goldwasser.
Jack Shell's dressing room:
Take the sweater at left end of the rack.
Use a swab on the mucus on the sweater.
Materials Lab:
Mucus on the sweater: Do a DNA
comparison on the mucus on the sweater.
Compare it to Steve's DNA retrieved from vaginal
vault. Confirm match.
Capt. James Brass:
Ask Brass to have search warrant for Steve
Tampson's room.
Use the mucus sample from Shell's sweater as
evidence.
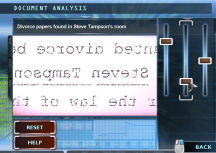
Steve Tampson's room:
Take the towel on the bench at corner of room.
Take the divorce paper on the dresser behind
Langston.
Materials Lab:
Microscope comparison: Go to
microscope at far wall.
Use thread found on victim's phone as first evidence.
Click on right evidence and select towel from Tampson's room.
Use 10 x. Move the slider at bottom left circle to
bring in focus the towel. Then move the thread circle to show the thread. Match
found.
Document analysis: Use the divorce
paper as evidence.
Move the 3 slider until the letters are in focus.
Interrogation room:
Ask Brass to talk to Goldwasser.
Interrogate Goldwasser about divorce paper. Get a copy
of cast photo of roomers.
Materials Lab:
Microscope comparison:
Compare the cast photo from Roomers and the ring found
in spa. Use x10 magnification. They match.
Capt. James Brass:
Ask Brass to bring Steve Tampson in.
Use the cast photo as evidence.
Interrogation room:
Question Tampson about the ring.
Refute the touch her phone with thread found in
victim's phone.
Continue the interrogation about 'lil coward'.
Refute the 'lil coward' with victim's cell phone.
Case 4: Extinguished
See a fire breather practicing. The Great Andrew is
dead. Riley Adams takes pictures.
Levesque's practice space:
Generator: Examine the
generator.
Use luminol on the edge of the generator above the
word generator. Get a blood sample.
Get paste at top right above the switch.
Click to open the cap of the generator. Use the swab
to get liquid sample on generator wick.
The generator is brought to the lab.
Other evidence: Look around
the room.
Take the plastic bottle right of Riley. Look
close at plastic jug in evidence. Turn it around and use swab on the mouth of
the jug.
Look at the grill on the wall on right side.
Vicente Manoto: Talk to the
owner of the building standing at right.
Garage Lab: See the
generator enclosed inside a plastic tent. The generator is turned on until it
runs out of fuel. Flip the switch on front side.
Materials Lab:
Paste found on generator: Do
chemical analysis on paste found on generator. Do a search.
Click search. Select from top to bottom (1-8):
2, 4, 5 and 8. Click Confirm Match. It is a caulk.
Liquid sample from generator wick:
Do chemical analysis on Liquid sample from generator wick. Do a search.
Click search. Select from top to bottom (1-8):
3, 5, 6 and 8. Click Confirm Match. It is a gasoline.
Unknown chemical from jug:
Do chemical analysis on unknown chemical from jug. Do a search.
Click search. Select from top to bottom (1-8):
3, 6 and 8. Click Confirm Match. It is paraffin.
Blood sample from generator:
Do a DNA analysis on blood sample from generator.
Do a search. Match the strands to the second from
top sample at right. Confirm match. It is from Lyle Fitzer.
Levesque home: Talk to Mrs.
Ardell Levesque.
Capt. James Brass:
Ask Brass to bring Lyle Fitzer in for
questioning.
Use Lyle's blood sample on generator as evidence.
Click Present button.
Interrogation room:
Question Lyle.
Morgue: Get a call from Doc
Robbins.
Talk to Doc Robbins. He would have died soon with
cancer. No treatment in last 6 mos.
Get a gelatin capsule-pill found in his
stomach.
He's been dead for 4-5 hours. Get fingerprints
and DNA sample.
Look close at his left wrist. Take white paste
from his left wrist.
Look close at his face and take swab of the
makeup over the lesions on his chin.
Materials Lab:
Pill taken from victim's esophagus:
Look at pill in evidence.
Use swab on pill-capsule to get fluid.
Use container-swab on spilled powder of
capsule.
Fluid: Do chemical analysis
on fluid found on victim's esophagus. Do a search.
Click search. Select from top to bottom (1-8):
2, 4 and 6. Click Confirm Match. It is amniotic fluid.
Powder from pill: Do
chemical analysis on powder from pill. Do a search.
Click search. Select from top to bottom (1-8):
1, 7 and 8. Click Confirm Match. It is a sugar.
Stain-Paste found on Levesque's wrist:
Do chemical analysis on paste found on victim's wrist. Do a search.
Click search. Select from top to bottom (1-8):
2, 4, 5 and 8. Click Confirm Match. It is a caulk.
Makeup: Do chemical
analysis on makeup found on victim's chin. Do a search.
Click search. Select from top to bottom (1-8):
2 and 5. Click Confirm Match. It is a makeup.
DNA analysis: Compare amniotic
fluid from pill and Lyle's blood sample from generator.
See that parts of Lyle's blood match Confirm match.
The mitochondrial part of Lyle's blood matches the amniotic fluid.
Microscope: Look close at
the pill from victim's esophagus.
Use x60. Move the capsule to the left until the edge
of the blue part of the capsule is seen.
Focus the capsule using the slider until a number is
seen - 125.
Data lab: Go to computer.
Check the medical database. Use the pill as
evidence. Click search. It is methotrexate, used in cancer treatment.
Morgue: Talk to Doc
Robbins about methotrexate.
Garage lab:
CO experiment: Click on
generator and Ryan says it almost done.
Check the CO level by panning right. Read the meter
on the plastic wall - 1600 parts million. Levesque has 3200 parts per million. Not enough to kill Levesque.
Levesque's practice space:
Talk to Dr. Manoto about grill on wall and boiler room.
Boiler room:
Gasoline can: Take
gasoline can right of the grill. Look close at gasoline can in evidence.
Turn can to other side and take fingerprint at
base of can.
Use swab on the mouth of gasoline can to get
gasoline.
Boiler: Look close at boiler
at corner.
Grill: Open the vent right of
the boiler room. See the furnace pipe on the floor.
Look close at caulk on the furnace pipe. Get a
sample.
Use the magnetic brush-powder (middle black
fingerprint collector) on the print on the caulk.
Try to take the caulk. Uh oh.
Materials Lab:
Gasoline found in boiler room:
Do chemical analysis.
Compare gasoline found in boiler room to liquid sample
on generator wick. Confirm match. They match.
White paste on furnace pipe:
Compare white paste on furnace pipe with caulk found on generator. Confirm
match. They match.
Data lab: Go to computer.
Print on gas can: Compare
print on gas can with Levesque print. No match.
Prepare a search by picking up 5 characteristic
areas. Click search.
Place the print at top right quadrant of the search
result print. Confirm match. They match. It is Dr. Manoto.
Print found in paste on furnace pipe:
Compare print on gas can with Levesque print. No match.
Prepare a search by picking up 5 characteristic
areas. Click search.
Place the print at top right quadrant of the search
result print. Confirm match. They match. It is Dr. Manoto.
Capt. Brass talks to Riley about Manoto. Get a
citation- warning letter to fix pipe.
Capt. James Brass:
Ask Brass for search warrant at Levesque home.
Use the fluid in pill as evidence.
Levesque home: Talk to Mrs.
Ardell Levesque.
Go around the corner from where Riley is standing.
Enter the first door on the right.
Look down on the floor right of the bed.
Use luminol on the stain closest to bed. Get sample
of blood.
Pick up the pill-capsule right of stain. Use
swab to get fluid on pill found in Levesque home.
Pan right and use swab on dark fluid right of
capsule.
Pull back and take the bottle of methotrexate
behind the lamp on the side table.
Materials Lab:
Fluid found in Levesque home:
Make a chemical comparison of the fluid from Levesque home with the fluid on
pill in victim's esophagus. Confirm match. It's a match. It's amniotic fluid.
Bottle of methotrexate: Make a chemical
comparison of the bottle of methotrexate with the sugar from pill in victim's
esophagus. Confirm match. It's a match. All the pills contain sugar.
DNA analysis:
Fluid found in Levesque home: Make
a DNA comparison on the fluid found in Levesque home with fluid found in
victim's esophagus. Confirm match. It's a match.
Blood sample found at Levesque home:
Make a DNA comparison on the Blood sample found at Levesque home with the
amniotic fluid found at Levesque home.
Microscope: Do a comparison
of the pill found in Levesque home with the methotrexate pill in victim's
esophagus.
Use x60 and place the blue edge of the pill on the
left side of the circle. Look for the numbers.
Adjust the focus of the number using the slider at
bottom left.
Capt. James Brass:
Talk to Brass and
found out about the prescription and the association with Dr. Manoto.
Ask to bring Dr. Manoto for questioning.
Use the print on furnace pipe as evidence
Interrogation room:
Talk to Dr. Manoto.
Use the building citation as evidence to refute that
the pipes are in good working order. Click Present button.
Use Manoto's print in caulk on furnace pipe to
refute that he didn't touch the pipes. Click Present button.
Use the prints on gasoline can in boiler room to
refute tamper with generator. Click Present button.
Use bottle of methotrexate pills with sugar to
refute Jeremy Proxmire question. Click Present button.
She gave the prescription pad to Ardell.
Capt. James Brass:
Ask to bring Ardell for questioning.
Use the bottle of pills filled with sugar as evidence.
Interrogation room:
Talk to Ardell.
Use fluid found on pill in victim's esophagus to
refute 'not aware of any pills'.
Ask if he was violent to him and hitting Lyle.
Riley talks to Catherine and Nick. Get a call
from Brass about Ardell's purse.
Capt. James Brass: Talk to Brass.
Get Ardell's purse.
Data Lab:
Ardell's purse: Look close at
Ardell's purse in evidence.
Take the Ciclopirox tube prescribed by Manoto
for Lyle.
Take the keycard from the purse. Use the fingerprint
brush on the keycard to get a print.
Computer: Use the medical
database to check antifungal cream. Click search and verified that it is
antifungal cream.
Keycard print: Check
the fingerprint obtained from the keycard.
Prepare search. Overlay the evidence print over the
top left quadrant of the searched print. Confirm match. It is Lyle's.
Capt. Brass says that the gas is now turned off at the
boiler room.
Materials Lab:
Chemical Analysis: Do a
chemical analysis of the antifungal cream. Click search.
Click search. Select from top to bottom (1-8):
1, 4, 6 and 8. Click Confirm Match. It is ciclopirox - antifungal cream.
Boiler room:
Go to the vent and try to remove the caulk on the
rusted pipe. Nick comes and takes the pipe off.
Make a casting of the hole in the pipe to see a
chisel mark on the edge of the pipe hole.
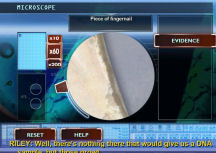
Look close at the broken pipe and automatically take
the fingernail.
Materials Lab:
Microscope:
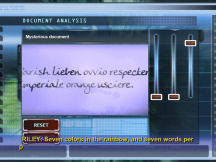
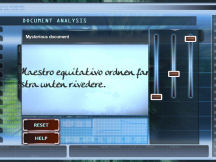
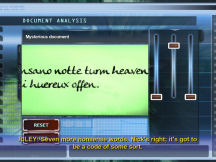
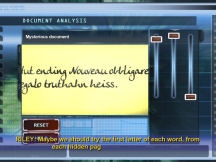
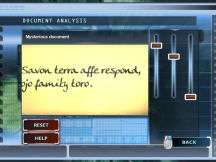
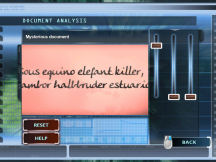
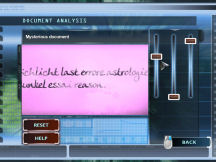
Mysterious document: Nick
asks help to check a 19th century parchment.
Select Document analysis. Select mysterious document
as evidence.
Move the 3 sliders to get focused text. There are 7
layers of text in this parchment.
Fingernail: Use the
fingernail as evidence.
Use x60 and then move to the edge of the fingernail.
Use the slider at bottom left to focus the nail. The fingernail has fungus.
Riley talks to Capt. Brass about Lyle.
Capt. James Brass:
Ask for search warrant to Lyle's room.
Use the fingerprint with fungal infection as evidence.
Levesque home:
Go around the corner and to room at end of the hall.
Take the Swiss army knife from desk under the
bunk bed.
Pan left to the end of the table under the wolf
poster. Take the chisel.
Materials Lab:
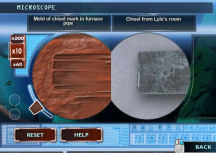
Microscope:
Use the chisel as evidence and compare it to the mold
of chisel in furnace pipe.
Use x10 magnification. Move the chisel and mold to
center of circle. Match found.
Swiss army knife: Look close at
knife. Pull out the brown toothpick at end of the knife.
Look close at toothpick in evidence. Use container to
collect white powder on end-tip of the toothpick.
Chemical analysis:
White powder on toothpick: Do
a chemical analysis on the white powder at end of the toothpick.
Click search. Select from top to bottom (1-8):
5 and 8. Click Confirm Match. It is methotrexate.
Capt. James Brass:
Ask to arrest Lyle Fitzer.
Use methotrexate in toothpick as evidence.
Interrogation room:
Talk to Lyle about toothpick and then leak.
Use chisel to refute his statement about leak. Click
Present button.
Case 5: Crime Scene Impersonator
A female impersonator is singing on stage. Next she is
seen lying dead on stage. Capt. Jim Brass brings Catherine Willows up to date.
The victim might be Mr. Floyd Collister also known as Marcelle.
Marcelle's Club:
Pan left to the pictures of Marcelle.
Check the box of Classic Cork at left end of bar. Use
Ninhydrin to collect fingerprint.
Go to stage and pan right. Look close at bottle of
Classic Cork on floor below the stage.
Swab the liquid beside the body on stage
Gary Beaumont: Talk to the
witness sitting at the bar.
Learn about Miss Apprehension is Wallace Biegenawski.
Dressing room: Enter the room
right of stage. Look around.
Look close at shelving right of the mirror. Take
Marcelle's pill box.
Look close at desk. Take the blue folder with an
angry note from Wally.
Materials Lab:
Classic Cork bottle: Do
a chemical analysis of the Classic Cork bottle. Click search.
Select from top to bottom (1-8):
3, 5 and 7. Click Confirm Match. It is Classic Cork.
Liquid found near victim:
Do a chemical analysis of the liquid found near the victim. Click search.
Select from top to bottom (1-8):
3, 5 and 7. Click Confirm Match. It is Classic Cork.
Box of pill found in dressing room:
Do a chemical analysis of the pills. Click search.
Select from top to bottom (1-8):
2 and 6. Click Confirm Match. It is hydramazine, Marcelle's heart medication.
Data Lab:
Print from case of Classic Cork:
Do a fingerprint search on the fingerprint from the whiskey box.
Prepare search by finding 5 characteristic areas. No
match.
Morgue:
Talk to Doc Robbins. Get a set of fingerprints
and DNA sample of the victim.
Get also DNA sample from victim's nail.
A serial case called Barbur Street Boozer in 1975
was recalled.
No Hydramazine was found in the body.
Marcelle's Club:
Automatically be at the club. Floyd is asked to ID the victim.
Morgue: The victim is Wally
Biegenowski - Miss Apprehension.
Biegenowski's apartment:
Riley is with Catherine as backup
Open the door and see Floyd Collister-Marcelle.
Riley and Marcelle left to get her meds.
Look around in the closet. Take the cigarette
butt from the ashtray on top of the washer.
Check the living room and kitchen. See a laptop on
the desk.
Cigarette butt: Use swab on
cigarette butt to collect Floyd Collister's DNA.
Interrogation room:
Get a call from Riley that Marcelle is ready to be
interrogated.
Automatically be in interrogation room. Talk to
Marcelle.
When Marcelle says that Wally and I are very close -
refute the statement with angry note as evidence. Click Present button.
Get Wally's password to his computer.
Biegenowski's apartment:
Take the laptop.
Data Lab:
Wally's laptop: Use Wally's laptop
on the video analysis machine.
Do a Video playback on Webcam images from computer.
Materials Lab:
DNA from under victim's nails:
Compare the DNA from under victim's nails with Floyd Collister's DNA.
They do not match.
Interrogation room: Talk to
Marcelle.
Get a call from Brass about the old files of the
Barbur Street Boozer.
Materials Lab:
Talk to Ray Langston. Learn about the Barbur Street
Boozer cases.
Marcelle and Wally were the last 2 suspects. Get
fingerprints from Wally and Marcelle. Also get a sample of the liquor used
by the Barbur Street Boozer.
Liquor used by the Barbur Street Booze:
Do a comparison between the liquor used by the Barbur Street Booze and the
Classic Cork whiskey. Confirm match. They match.
Capt. James Brass:
Automatically be in Brass' office. Inform about the
1975 murders. Juarice Briggs is the last detective to handle the murders.
Interrogation room:
Talk to Lt. Juarice Briggs. She gives her note.
Learn about a suspect - Gary Beaumont protected the
honor of a male prostitute in 1975.
Catherine talks to Langston about Gary Beaumont.
Interrogation room: Ask Brass
to interrogate Marcelle-Floyd.
Talk to Marcelle about Floyd. Learn that Floyd lives
in the alley behind the club.
Alley behind Marcelle's:
Talk to Gary. Get the bottle of Classic Cork
Gary is drinking.
Look at the sleeping bag in the lean-to. Check the
love letter to Wally from Gary.
Pull back and pan left. Check the trash bin. Take the
bottles of Classic Corks (enough to kill Wally).
Take also the apron.
Materials Lab:
Microscope:
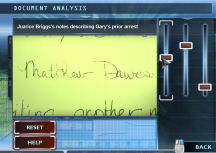
Brigg's notes about Gary's prior arrest:
Do a document analysis on Brigg's notes about Gary's prior arrest.
Move the 3 levers at right until the name under Lon
Muskie changes to Matthew Dawes.
Read Brigg's case file under suspect.
DNA Analysis:
Apron from dumpster: Turn the
apron around and use swab to get blood from the apron.
Do DNA comparison on blood from apron with victim
Biegenowski. Confirm match. They match.
Data Lab:
Classic Cork bottle taken from Gary:
Use the fingerprint brush to get Gary's prints.
Print from case of Classic Cork:
Do a fingerprint comparison on the fingerprint from the whiskey box with
Gary's fingerprint from whiskey bottle. Confirm match. They match.
Capt. James Brass:
Ask Brass for arrest warrant on Gary Beaumont.
Use Gary's print from case of Classic Cork whiskey.
Click Present button.
Interrogation room:
Talk to Gary. Get a DNA sample from Gary.
About reason to be mad at Wally, use the love letter
about unrequited love.
Talk about Lon Muskie and learn that Briggs released
Lon Muskie.
Find out that it was Matthew Dawes that Gary beat
up.
Capt. James Brass:
Ask Brass for search warrant for Det. Briggs' home.
Use Briggs' note as evidence. Click Present button.
Briggs' trailer:
Enter the trailer. See that it is a shrine to the
Barbur St Boozer case.
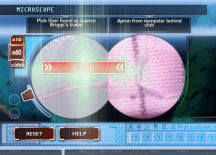
Look close at the pillow in the bed. Take the pink
fiber.
Materials Lab:
Microscope:
Pink fiber: Do a comparison
of the pink fiber and the apron taken from dumpster.
Use x60 magnification. Move the slider to bring the
fibers in focus.
Move the apron down (edge seen) and then right until
a snag is seen. They match.
Capt. James Brass:
Ask Brass for arrest warrant for Det. Briggs.
Use apron fiber as evidence. Click Present button.
Interrogation room:
Talk to Lt. Briggs. Get a DNA sample from Briggs.
Materials Lab:
DNA from under victim's nails:
Do a comparison between DNA from under victim's nails with Briggs DNA. Confirm
match. They match.
Interrogation room:
Talk to Lt. Briggs.
Refute Briggs' statement that she did not see the
victim before with the DNA from under the victim's nails.
She suspects that Floyd Collister is the Barbur St
Boozer.
Briggs mentions that there's hair from the '75 case.
Briggs is arrested.
Materials Lab: Capt. Briggs gives
the hair samples from the Barbur St Boozer killings.
DNA analysis:
Hair from scenes of Barbur St Boozer killings:
Do a comparison between the hair from scenes of Barbur St Boozer killings and
Floyd Collister's DNA. Confirm match. They match.
Capt. James Brass:
Ask Brass for arrest warrant for Floyd Collister.
Use hair from scenes of Barbur St Boozer killings as
evidence. Click Present button.
Interrogation room:
Talk to Floyd Collister aka Marcelle.
Floyd Collister aka Marcelle is under arrest.
This document may not be
distributed without express written permission of the author and the content
may not be altered in any way.
For Questions or Comments
on this Walkthrough,
Please write to:
MaGtRo
Copyright © 11/2009
MaGtRo
 GameBoomers
Walkthroughs and Solutions
GameBoomers
Walkthroughs and Solutions