Bosch's Damnation: Carol Reed Mystery 10
By MDNA Games
Walkthrough by MaGtRo March 2014
Gameplay: This is a first person point and click game.
Before the game starts, see the game settings: display and sound selection frame. The display frame has device, colors and run in window choices. The sound frame has a choice of sound device.
The main menu has resume, new game, load, save, options and quit selections.
The options menu has speech, music, effects and subtitles adjustments.
The tutorial on how to play the game can be selected at start of the game.
There is a very good hint system in the game. The hints can guide the gamer without the need of a walkthrough.
The game is non-linear. This walkthrough is just one sequence of gameplay.
The main menu is accessed by right mouse click or the ESC key.
The space bar shows all the active spots in the screen.
In Win7, the saved game folder is located at C:\Users\computer name\Saved Games\Carol Reed - Bosch's Damnation folder.
Carol's home:
It is wintertime.
Kitchen: Examine the nice gingerbread houses on the window sill.
Turn around and take the cell - telephone from the chair right of the entryway.
Turn left before the entryway and examine the cute tin can.
Text message: Exit to the hallway and get a text message.
George Pamper, a cleaner for the Stierngranat family wants to talk to Carol about something that has been bothering him. He lives at Erring's Road 30. New location is added on the map.
Living Room: You can look around and see the bulbs in the tray on the dining room table and a Christmas lantern that hangs on the window.
The office-den is at left.
Bedroom: You can check the bedroom through the double doors at right side. Another Christmas lantern hangs on the window.
Exit to the hallway and exit the main door to get the map.
George the Cleaner:
Talk to George in his home. The Stierngranat family went on a 10 day skiing trip to Norway 5 weeks ago. They have not returned yet.
Erik the father, Veronica, the wife, 19 years old daughter Carin, 2 other children and Martin, Carin's boyfriend went on the trip.
CHECK THE HOUSE.
The Stierngranat House:
Check the foyer.
Living room: Go forward. Check the living room and bar.
Other rooms: Check the sitting room and adjacent morning room with shades drawn at left.
Bedroom: Continue to the next room pass the hallway and see that it is a bedroom.
Check the box on the fireplace mantel. Take the key from box.
Locked door: Exit and see a locked door.
Another bedroom: Turn left and then right. Go forward and then turn right. Enter the next bedroom. Look around.
Linen closet: Turn right in hallway and then left to the closet door. Open the door. Look around.
There is something on the top shelf but it's too high for Carol. Exit the room.
Laundry - utility room: Turn around to the opposite door. It is locked. Use the key taken from the box on the fireplace mantel.
Look around. Open the cabinet at right. Take the needlenose pliers. Check the light bulb.
Upstairs: Go back to the foyer and climb upstairs.
Landing: Turn left and examine the decorative pot on the shelf. There's something in there.
Use the needlenose pliers on pot to get the hidden key.
Formal dining room: Go forward to a room with dining table. Check the child's room at right.
Nursery: Go to next room and see a crib. Turn right and see a bed and portable children's wardrobe.
Check inside the wardrobe and take the mini flashlight.
Other rooms: Look around at family room and master bedroom.
Kitchen: Go right before the master bedroom and be in the kitchen off the family room.
Telephone: Go forward to the pantry area. Check the telephone on the counter. The line is dead.
Attic locked door: Go forward and exit through entryway by the landing.
Turn right just after exiting and see a door with a lock that has 4 slits.
Open the attic door with 4 slits:
Lower floor locked door: Go downstairs and turn right at foyer.
Turn right to locked door just before the hallway.
Use the key taken from the pot at landing upstairs on the lock.
Use the mini flashlight from the portable wardrobe on the dark closet.
Wallet: Take the wallet on top shelf. Take the paper in the pocket.
The paper has the GameBoomers PW and 4 lines. Yay!!!!
Attic door with 4 slits: Go back upstairs to the landing turn left to see the steps to the attic door.
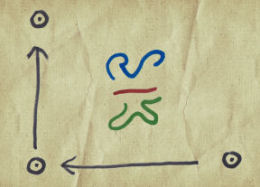
Look close at lock with slits. Press the button with slits in the sequence shown on the GameBoomers password paper.
Attic: Look around at the attic. Turn right and take the ladder.
Turn right and go to the storage room at far back.
Storage room: Turn left and examine the open box on top of the pile.
Take the paper with colored symbols.
Check linen room:
Exit the attic and then go downstairs. Go forward to living room.
Turn right on the hallway before the living room. Go forward to the side exit door.
Enter the linen room across the utility room. Use the ladder taken from the attic. Climb up.
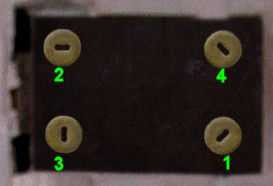
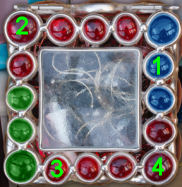
Open the tin box: Take the tin box.
See that it has 4 buttons at each corner and the symbols seen on the paper in the attic.
Use the top right corner button to change the colors of the symbols similar to the clue paper: blue, red and green.
Then press the buttons similar to that of the clue papers.
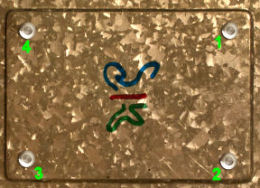
Gift wrapped package: Take the gift wrapped package inside the box.
Open the package. See a painting of a vase full of flowers.
Turn the painting to read that it is a birthday gift for Martin from Carin.
Click on writing for Carol to say that the present was never given.
INVESTIGATE MARTIN.
Check with George:
Exit the house and go to George. Talk to George.
Find out that Martin rents a room at George's house.
Martin's Room: Look around. Turn right and check the letter on the side table. He won a prize for choosing colors for the Blood Falls competition.
Check and unzip the pocket bag inside the side table It's empty.
Box: Go to the other side of the bed and check the box under the bed. It has a color coded lock.
Blood Falls:
Stina: Exit the room. Go and talk to Stina. Learn where Blood Falls is located.
Blood Falls: Go to Blood Falls at Industrial Park (Carol Reed 5).
Go forward until the end and then turn left.
Go through the wired gate. Go forward until the end of walkway. Go down and check the snow covered crate on the landing.
Take the USB flash memory stick.
Carol's house: Go home and go to the living room with Christmas lanterns on the window.
Use the flash drive on the laptop left of window. Learn that the colors of the falls are seen at night.
Blood Falls: Go back to Blood Falls.
Go forward until end and down to the walkway across Blood falls.
See the colors of Blood Falls. Take a picture by positioning the camera on the cell phone and then click.
Go back to the exit.
Sleep: Carol is tired. Go home and sleep in the bedroom.
Martin's box: Go back to Martin's room. Take the box under the left side of bed.
Press the color of the Blood Falls: black, blue, red and yellow.
Read the game contract from Lame Samba Games and Triangle Games owned by Martin Jensen.

Summer arrives:
Get a text message from George that the family has decided to stay abroad and will try to sell the house. George was paid.
Carol's allotment: It is now summer and Carol has been busy.
Carol is in her allotment. Look around.
Check the hammock by the shed. Take the key.
Check the door lock of the shed. Use the key on shed lock. It needs lubrication. Exit the allotment.
Stina's store: Stina shows the morning paper. Martin Jensen was found murdered in Stierngranat Barn. He's been dead since winter.
Talk to Stina.
Martin Jensen's murder scene:
Stierngranat Barn: Go to the Barn. Enter and look around.
Pick up fingerprint powder beside the turned over table. Close the lid.
Go left and forward there's an upper level to the barn. It's too high.
Enter through door at left. Take the ladder at next stall at left.
Go back to the other part of the barn. Use the ladder on the wall and climb up to the upper part of the barn.
Go forward and see something under the wood plank. It's too far away.
Go down and exit the barn.
Other barn: Turn left and left around this barn to the back. Carol wants to check Martin's room again.
See another barn. Look around in this barn. Turn right and take the rake. Go back to the main barn.
Clock wallet: Climb up to the upper part of barn. Use the rake on the object under the wood plank ahead.
It falls down below. Go down and search for it at other side of barn.
Go forward from door and turn right. Take the clock wallet. Flip up the clock and see a Malte Stierngranat Museum in Stjarneborg calling card. Get new location.
Exit the area.
Learn about Martin:
George the Cleaner: Talk to George. The Stierngranats have sold their house.
See the letter from Monica to Martin.
Martin's room: Turn left and check the closet. See Monica's new address.
Monica: Monica is Martin's foster mother.
Martin worked in all the Stierngranat Museums and is doing a computer game about Malte Stierngranat.
CHECK STIERNGRANAT MUSEUMS & OTHER PROPERTIES:
Malte Stierngranat Museum:
Look around. Turn left and see a room that is being redecorated.
Malte Stierngranat: Enter the ground floor museum. Look around and learn about Malte Stierngranat. Learn about his pyramid mausoleum.
Go to the stairs beside the exit door. See a padlocked door right of stairs.
Go upstairs. Turn left and look around this room.
Sten Johansson: Read the brochure about Sten Stierngranat. He changed his last name to Johansson. He is an artist and is buried in a sarcophagus outside Malte's pyramid. See his picture at back of brochure.
Malte's pyramid: Turn to the entryway. Read the book right of door. Learn about the pyramid. Get new location. Exit.
Church Museum:
Enter the museum: Go forward and right.
Look close at Codeboomer keypad left of door.
See that 4 keys are dirty. Press those 4 numbers in sequence based on the dirt of the keys. Press 6910.
Church: Go forward and left of the spire with vane structure. Look around inside the church.
Psalms: Go toward the altar by right aisle. See the numbers of Malte's favorite Psalms.
Bosch's painting: Go back to front of the church and check the Hieronymus Bosch painting and label on the wall.
Reception counter: Go back out to the spire with vane. See the back side of the reception counter.
Check the shelves. See a card that states - new code for School Museum.
Check the die. Turn the die to see that some of the dots are in red. Take picture of the die's six faces.
Room: Enter the room beside the reception counter and then turn left.
Study the picture above the entryway to get the Stierngranat's School Museum. Get new location. Exit.
School Museum:
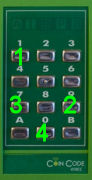
Enter the museum: Check the keypad of the door at left.
Review the die clue seen at Church museum. Die 6 has one red dot, die 3 has 2 red dots, die 4 has 3 red dots and die 5 has 4 red dots.
Press 6345.

Trash basket: By the reception desk, turn to next room, go forward pass the stairs and into a small kitchenette at right.
Check the trash basket under the table. It is a postcard from Martin to Carin.
He mentions a painting and a studio.
Hallway: Go back to the reception desk by exit door.
Look around. Go forward at hallway and see a locked door at right.
Classroom: Facing the exit door, enter the classroom at right.
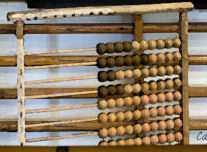
Turn left and see an abacus with a matrix of numbers above it. Exit.
Carin's studio:
Find where Carin's studio is: Go to George. Talk to George about the studio and Carin. New location is seen.
Studio: Go forward and then left. Open the door to Carin's studio.
Look around. Take the hole punch from the shelf by the door.
Box: Go forward. Turn left and look close at the box above the single shelf at right.
The lid of the box shows the matrix of numbers above the abacus in the School Museum.
Martin's note: Turn to the opposite wall. Examine the shelf with the papers.
Read Martin's note and brochure about the Sonic Forge - Sound Factory. Get new location.
Check the picture of the pyramid on the shelf above the computer. Exit
Sonic Forge:
Look around. Go forward and check the pallet before the enclosed room at left. Take the oil.
Enter the enclosed room at left. Check the table at left to get Martin's digital sound recorder.
Exit the room and go left, forward, left, forward and see a stuck door with broken glass at left. Exit.
Malte Stierngranat Museum:
Enter and turn left. The renovated room is now open. Go inside and look around.
Turn right and read the brochure on the bench-chest.
Learn about Johansson Peak. Get new location. Exit.
INVESTIGATE STEN JOHANSSON.
Johansson Peak:
Learn about the staircase on the Information message board. Climb up.
Information message board: Go forward twice and while at the curve of the road, look around.
See art works on the ground, the back of the Hollywood style Johansson sign and hot areas.
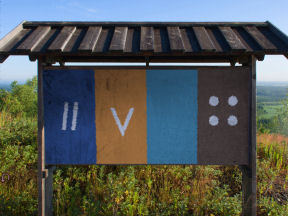
Look close at an Information message board with symbols and colored columns.
Artworks: Look around at the artworks. Continue down the road.
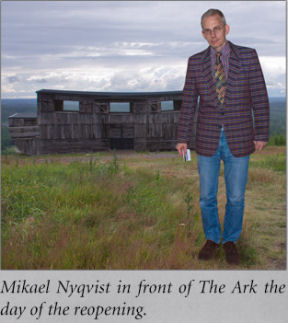
Mikael Nyquist: On the road going downhill, see 2 statues at left. One of the statues is lying down.
On the ground is a brochure. Read the brochure to read about the Ark controversy and megalomaniac Mikael. He's now admitted to a psychiatric ward.
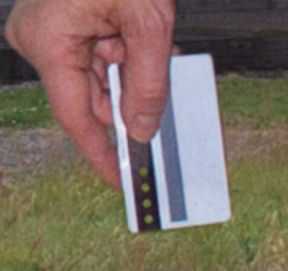
The Ark: Across the road from the ark is a bench. Pick up the personal magnetic card with 3 punches on the magnetic strip.
Look close at the keypad of the Ark. It doesn't work.
Go back to Mikael's brochure by the 2 statues. Zoom in and study his picture. He's holding a key card that has personal digital ID. This card has 4 punches on the magnetic strip.
Use the hole punch from Carin's studio on the magnetic card.
Keypad: Use the 4 holed magnetic card on the keypad. Green light turns on.
Look at the keypad. Based on the colored columns with symbols seen on the Information message board down the road, press 2504.
Door opens. Look around. Read the Forest of Fontainebleau poster to learn that the Bosch painting is now in 2 parts: Church Museum and Saint Maria Church. Exit.
You can exit the area the way you came here or the back way - go forward to main road, go left, forward to tower, right to the small dirt path. See the wire church; turn left to the stairs going down. Exit.
Santa Maria Church:
Enter the church and look around. Read the pamphlet from table at left.
Learn more about the Bosch painting that Malte is fond of. A smaller reproduction of half of the painting is here. Sten Johansson painted the altarpiece.
Get a text message from Jonas. He wants to meet at the Dome Cafe. Get a new location.
Enter the church. Go forward 3 times and go left. Study the Bosch painting at right. Check the altarpiece done by Johansson.
Sten Johansson: Enter the sanctuary left of altar and read about the altarpiece.
Click on the picture of Sten's car at the Car Graveyard. Exit.
Car Graveyard:
Dome Cafe: Talk to Jonas. Learn where the car graveyard is located. Get new location.
Car Graveyard: Look around at the junk yard.
The rest of the road is muddy and Carol does not want to go forward. There is a barn at right. Go back and exit.
Allotment: Go back to Carol's allotment. Check the key left on the lock of the shed.
Use the oil taken from Sonic Forge on the key.
Take the rubber boots on right bench. Exit.
Car graveyard: Go forward again. Click the rubber boots on the muddy path.
Go forward once and check Sten's car at left. Check the junk cars at both sides of the road.
First barn: Go forward twice pass the fallen tree on the road and check the barn at right.
Enter and take the crowbar at right.
Second barn: Go back to main road and continue at right.
Turn left at end of the road and see a rusty van. Take the hammer from van.
Turn around and check the second barn at right.
Enter the right door. Check the worktable at right. Look inside the zipped bag at middle. Get a knife.
Check the wallet at right and see Sten's calling card.
Check the left door of the barn and get a bicycle tire. Exit.
FIND OUT WHAT MARTIN IS HIDING.
Sonic Forge:
Stuck door: Go back to the stuck door. Go left pass the enclosed room ahead.
Go forward and left to the stuck door. Use the crowbar on the door.
Items: Look around. Turn left after entering. Get audio cable from the box on the floor.
Enter the office. Check the items on the 3 file cabinets. Learn about Emhart Zurich and get his address from bottom drawer of left file cabinet. Get new location. Exit.
Emhart Zurich: Talk to Zurich. Learn about Martin Jensen and about his father's cabin he lent to Martin. Get new location.
Radiot's cabin:
Gardener: Talk to the gardener. Love his beard. Before he'll let you do research, he wants you look for his To-do list he lost in his sister's place. He can't find the key to the guest house.
Sister's house: Look around. Go to the living room and the window.
Turn around and check the drawer of the Tiki table. Take the key.
Exit through the kitchen door to the backyard.
See the guest house at left. It is locked.
Go forward to the shed. Use the key from drawer on the padlock.
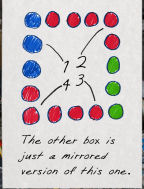
Take the colourful note tucked in the pile at right side. It has red, green and blue circles.
Find the key to the guest house: Go back to the house. Go upstairs by going to the front door and turning around.
Turn right twice and enter the bedroom.
Check the side table by the door. Take the box with colorful gems.
Using the clue taken from the shed, press the buttons marked in the note except for doing it mirror image.
Take the key to the guest house.
Find the list: Go down and out the kitchen door.
Turn left and use the key from box on the guest house lock.
Check the trash can to get the To-do list. Exit the backyard and house.
Cabin: Go back to Radiot's cabin. Give the list to the gardener.
Go to the living room and the table under the window at right.
Check the Christmas postcard from Mom to Carin.
Carin's drawing: See Carin's drawing of the matrix of numbers above the abacus seen in the School Museum.
Turn right and take the key from the fireplace mantel.
Radio room: Go to the front door. Turn left before exiting.
Check the door handle to know that it is locked. Use the key from fireplace on the lock.
Go upstairs. Turn right and read the letter from distributor to Triangle Games, the name of Martin's new games company. There is a logo beside it.
The radio room is at left side of the attic. Exit.
Martin's clue:
Martin news: Go home and enter the bedroom.
Check the tablet on bedside table. Turn the power button at left side on.
Read about the investigation on Martin's murder. He was killed with several blows to the head.
Face the bed and sleep.
Martin's digital recorder: Go to the living room and the laptop on the table left of windows.
In inventory, combine the cable from Sonic Forge with Martin's digital recorder.
Use the audio recorder with cable on laptop.
Hear Martin mention a strange space behind his wardrobe.
Go to exit door. Turn right and open closet. Take flashlight from behind the recycle bottles on the left. Exit.
Martin's room: Check the closet at left. Move the clothes and see a hatch.
Turn the left clip. Turn the right and it is stuck. Use the hammer from the van at the car graveyard on the clip.
Click on dark hatch. Use the flashlight on the dark hatch. Turn left and climb the ladder.
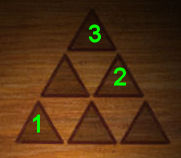
Open Martin's box: Take the box with triangles on it.
Remember the logo of Martin's new game company - Triangle Games. It has 3 colored triangle.
Press the triangles to know what color they are.
Then press the colors of Martin's Triangle Games: red, blue and green.
Take the key. Exit.
OPEN THE PYRAMID:
Malte Stierngranat Museum: Go to the museum. Use the key on the padlock right of the stairs.
Read the poster that mentions the relationship of Malte and Sten. Sten mentioned that the key to the pyramid is kept under his rear. Exit.
Car graveyard: Go forward 4 times and turn left to see Sten's car.
Use the knife from the second barn to open the car seat. Take key. Exit.
Open the padlock of the Pyramid: Go forward twice and turn left. Go forward to the pyramid.
Look around. See Sten's tomb at left.
Use the key from Sten's car at graveyard on the padlock of the pyramid.
See 5 red buttons on the door. Exit.
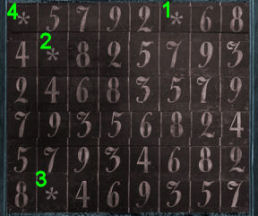
Open Carin's box: Go to Carin's studio. Check the box on the shelf at left wall.
Go back to school museum and take a picture of the matrix of numbers above the abacus in second room at left.
Go back to Carin's studio.
Check the numbers on the lid of the box and note that there are 4 asterisks.
Compare those numbers with the one from the School Museum to know what numbers the asterisks are supposed to be: 3, 4, 6, 2.
Check the abacus on Carin's drawing (top to bottom): 4, 6, 2, 3.
Press the lid that corresponds to 4 6 2 3.
See a box that says to open on your 18th birthday.
 |
 |
 |
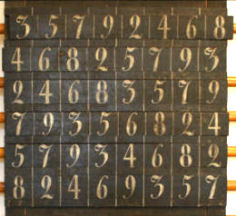
Code clue: Read Malte's letter to granddaughter Carin.
Learn about partial family tree engraved on golden plaques. Malte carved the names of relatives that he wants added to the family tree when they die.
The clue to the code can be found on the Bosch paintings. Read the article about Malte.
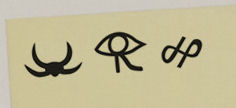
Questions of the code clue:
How many poor souls do we see inside the human tree?
How many spears pierce the human ears?
How many ladders can we see in these paintings totally?
The Prince of Hell is at his seat. How many does he poop and eat?
How many playing cards have hearts in the painting's lower part?
The rest of the letter is not here.
Answer the code clue:
Go to the Church museum and Santa Maria Church to check the paintings.
There are 5 souls in the human tree seen at lower half of painting at Church Museum.
There is 1 spear in the 2 human ears seen at lower half of painting at Church Museum.
There are 4 ladders total at lower half of painting at Church Museum. There are 1 at bottom and 3 on the top part of the painting.
The Prince of Hell ate 1 and released 2 souls in the painting at Santa Maria Church - total of 3.
There are 2 hearts on banners in the lower half of painting at Church Museum.
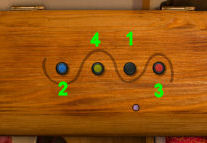
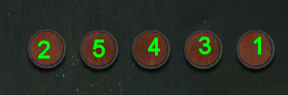
The code is 5 1 4 3 2.
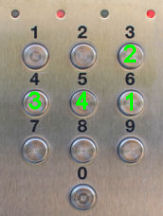
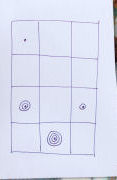
Use the code on the pyramid's red buttons: Go to the pyramid. Look close at the 5 red buttons.
Using the code 51432; press the buttons that are stated in their corresponding positions. See picture below.
SECRETS OF THE PYRAMID.
Explore the pyramid:
Look around. Turn left and read the vandalization of Stierngranat monuments. Learn about Malte's train wagon in Norrkoping. Get new location.
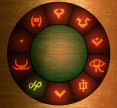
Go to the altar. See Stierngranat coat of arms - 3 stars over a hand grenade. The stars are colored blue, green and red.
Study the plaques on the family tree. The plaques are held by screws. Exit.
Malte's train wagon:
Enter the train car: Try to climb up. Carol says too high.
Use the bicycle tire on the train's lower base. Climb up. Look around.
Conductor's area: Explore the conductor's area at left end of the car.
Take the screwdriver from the counter at right.
Go through door at left to be at exit door. Check the pigeon holes at right.
Read the letter from bottom left hole informing Malte that no private trains are allowed on the Swedish railroads at start of 1986.
Check the clock wallet at top right hole. Open the wallet to see colored stars. Take the stars note. It looks like a clue for the coat of arms at the pyramid. Exit.
Plaques at the pyramid:
Go to the pyramid and use the screwdriver on the plaques left of the coat of arms.
Unscrew the right side of the second from bottom plaque. Turn to the back and see that Malte etched his son's Erik's name on it.
The bottom left is blank. The bottom right has Martin Jensen's name on it. Well, what about that!
Get a text from George Pamper.
LOCATE STIERNGRANAT FAMILY.
Skiing house:
George: Talk to George. Learn about the family skiing house. Get a new location.
Skiing house: Explore the inside of the house. Check the kitchen, utility room, sauna, bedrooms and living room.
Examine the sofa in the living room. Read the note that states the family rented a house until the end of the month. New location is obtained.
Check the fireplace and bedrooms at right. The left door is locked. Exit.
Rented house:
Front area: Go forward and ring the doorbell at left. No one is home. Look around at the things on the porch.
Take the note with grid from the table.
Enter the shed at right. Take the crowfoot from the bag hanging at left.
Back area: Exit, left to side alley and go around to the back of the house.
Enter the back porch: See the keypad lock. Use the note with grid clue taken from table by front door to get the code of the door lock. Press 1 9 7 0.
Enter the rented house: Be in a screened porch. Take the ladder right of the door.
Check the note of the landlord on the table mentioning a loose plank left of the door.
Check the plank left of the locked door. Carol can't reach it.
Pull back. Use the ladder on the plank. Climb up.
Use the crowfoot on the plank. Take the key.
Pull back. Use the key on the locked door.
Explore the rented house: Be in Carin's bedroom. Check the vanity bag on the bed. Unzip it and see a locked diary.
Turn around from bed and check the tablet on the shelf. It has a grid with alphabets lock.
Exit to living room. Turn left.
Enter the bedroom at left beside the door to Carin's bedroom. Open the side table to see a picture of a cat. Turn the picture over to see its name Gork 1998-2012.
Go around the dining table. Enter the bedroom with the crib and see a suitcase.
Go down the hall. Enter the bathroom across from the front door. Turn left and check the case on the shelf. Take the gold hairpin from case.
Go back to Carin's bedroom right of the hutch at dining room.
Open the diary: Unzip the vanity bag on Carin's bed.
Use the hairpin on the diary. Read the diary. Get a note from diary that has symbols on it.
Turn on the tablet: Turn around and take the tablet on the shelf.
Press the power button. Enter the name of the companion cat that passed away - Gork.
Read Carin's notes. She left her suitcase at the skiing house. The key is in the stove.
Skiing house:
Suitcase: Check the fireplace-stove right of the living room. Get the key.
Use the key on the locked door at left.
Check Carin's suitcase on the floor. Click on arrows to make the symbols seen on the note from diary green. Press the center button after each symbol is lit green.
Red diary: Use the hairpin to open the red diary.
Read the rest of Malte's letter to Carin. Learn what happened when Carin confronted Martin. Exit.
Erik: Erik stops Carol from leaving.
Erik gives Carol a piece of paper that dropped from Martin's pocket. It's a psalm board miniature.
Use the fingerprint powder on Erik.
Exit the house. Carol calls the police automatically.
MALTE'S TREASURE:
Church Museum: Go to the psalm board at Church museum and take a picture of it.
Stierngranat's coat of arms: Go to Pyramid mausoleum.
 |
 |
 |
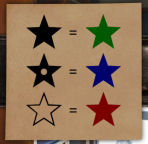
Compare the psalm board miniature from Martin's pocket, the psalm board from the Church museum and the colored stars code take from the train, deduce the code to the code of arms.
See that the black star = green star = 3.
The star with hole = blue star = 2.
Press the green star 3 times and the blue star 2 times.
The secret compartment opens. See the painting that Malte hid.
Carol returns the painting and keeps Malte's secret.
This document may not be distributed without express written permission of the author and the content may not be altered in any way.
For Questions or Comments on this Walkthrough,
Please write to: MaGtRoCopyright © 03/2014 MaGtRo