Cold Case Summer: Carol Reed Mystery 9
By MDNA Games
Walkthrough by MaGtRo March 2013
Gameplay: This is a first person point and
click game.
Before the game starts, see the game settings: display
and sound selection frame. The display frame has device, colors and run in
window choices. The sound frame has a choice of sound device.
The main menu has continue, new game, load, save,
options and quit selections.
The options menu has speech, music, effects and
subtitles adjustments.
The tutorial on how to play the game can be
selected at start of the game.
There is a very good hint system in the game. The
hints can guide the gamer without the need of a walkthrough.
The game is non-linear. This walkthrough is just
one sequence of gameplay.
The main menu is accessed by the ESC key.
The space bar shows all the active spots in the
screen.
Swedish Prime Minister Olof Palme was shot in the
back on February 28, 1986. The case is still unsolved.
A tutorial screen is seen. You can do the tutorial
or skip it.
Carol Reed reminisces while beautiful sights in
Sweden are seen.
New case:
Look around in the bedroom. Check Len the clown
doll on the
bed. Exit through the door
with ribbons.
Look around in the living room.
Tablet: Check the tablet
on the dining room table. Press the button.
Read a message from Stina. Carol left her cell
phone at the store. A new location in the map occurs.
Office: Enter the room at right
and look close at computer. Take the mini flashlight left of the
monitor.
WC: Exit the room and the
living room. Check the bathroom and see that the
bathroom is gutted.
Look left from the gutted plumbing. Pick up the
pencil from floor.
Kitchen: Exit the
bathroom and go left 2xs to the kitchen. Look around in the kitchen.
Take the scissors form the kitchen dining table.
Stina's store: Exit the
apartment and see the map. Jump to Stina's store.
Talk to Stina. Stina wants asparagus peas from the
allotment (new site in the map). Take the cell phone.
Allotment:
Jump to the allotment in the map.
Go forward once and then turn left. Go forward 2xs
and turn left. Pick some asparagus peas.
Exit the garden and the turn left to the shed.
Shed: Go forward to the
blue shed. Move the stone on the stand and take the keys
to the allotment.
Turn right and use the keys on the padlock of the
shed. Look around the room. Open the drawer at right.
Phone call: Exit the shed
and the cell phone rings. Press the green phone button to answer the phone.
Talk to mysterious man that wants to meet her at
the Graffiti Heap (new location).
Mr. X-Harri Mickelsen:
Exit the allotment and jump to Graffiti Heap.
Graffiti Heap: Go
forward, right, forward twice, left and forward to graffiti wall.
Turn left and see 2 trash bins. Go left of the
trash bins to the red building.
Go close to the red building and talk to X. He
doesn't want to show himself. X says that he can give Carol the case that
will make her famous.
Carol refuses the case. Exit the area.
Carol's apartment:
Automatically be in the basement of her apartment.
Enter the door ahead. Go forward and look right.
Take the expensive soap in blue bottle. Enter the shower to clean up.
Automatically be in the bedroom. Go to bed.
Cell phone: Be awakened by the cell phone
ringing. Look left and answer the phone.
It is Samuel Rinkman of the Norrköping Police. He
asks about Harri Mickelsen. He was found strangled at the Flat Iron
River close to the Wire Lookout (new location).
Exit the bedroom and go to the living room.
Tablet: Use the tablet on
the table. Learn about Harri Mickelsen. Click on the text and Carol will say
she knows someone in the prostitution business (new location).
Click on the links Olof Palme and Christer
Pettersson. Learn that Christer was sentenced for killing Palme. Exit the apartment.
Investigate Harri Mickelsen:
Wire Lookout: Climb the
Wire Lookout and look around.
Exit the
Lookout and go behind the lookout.
Go left to and down to the landing. Take the wire brush from the steps at right. Exit the area.
Graffiti Heap: Jump to
Graffiti Heap. Go to the red building where Carol talked to mysterious X -
Harri.
Go to the area that Harri hid. Pick up the note
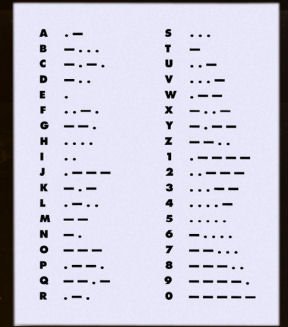
Harri dropped on the ground. Check it in inventory and see that it is in
Morse code.
Amber: Jump to Amber's
apartment. Talk to Amber. She doesn't know where Harri lives but tells that
he worked at the Pamplestone Pumping Station (new location).
Pamplestone: Enter the
building and look around.
Go forward and check the small table left of the
door. See that it is full of tools. There is a hammer here. Remember that it
is here.
Turn left and see a locked door.
Furnace
room: Go forward to the next room. Go right at back of
room and check the large furnace at right. The
left door of the furnace can't be moved.
Go right and forward to the other side of the
room.
Look left to the coal on the floor. Pick up the
copper wire wrapped around a piece of wood. Use the scissors from Carol's
home to cut a piece
of copper wire.
Workroom: Enter the room
at right. Look close at worktable at left.
Pick up the pictures. Turn it around to
read the note from Rita. The building in the picture has ceiling paintings. Exit the building.
Stina's store: Give
Stina the asparagus peas. Stina says the buildings might be one of the
Aurora monuments (new location).
An Aurora monument: Jump
to the new location. Go forward, right and enter the structure.
Exit to the other side and read the poster stand at
right. Learn about the Aurora Temple with ceiling painting (new location).
The Aurora Temple: Enter
the temple. Look up at the cherubs depicted in the ceiling.
Pick up the lens beside the basin at center. Turn
it to get a phone number.
Use the cell phone to call that number. Click on
the number to call Rita.
Talk to Rita. Learn where Harri lives (new
location). Exit the area.
Check Harri's apartment:
Enter the apartment: Jump
to Harri's apartment. Enter the building.
Read the name plate and then try the door knob. It
is locked.
Exit the building. Turn right and go forward.
Right again to be at the back of the building.
Go forward and turn right to the first fence gate.
Go through the gate and go forward to the back
door. Check the door and see that it is also locked.
Go down and turn right to the hedge. Check the
window at right. Enter through window.
Office: Look around the
office. Turn left and see games.
Turn left and check the keyboard. See and examine
a cardboard cutout of an exterior picture. The address is cut off.
Look left and see an interesting folder with a
gold logo.
Look close and check right of the monitor. Take
the note and see that it is Morse code legend. Exit the room.
Hallway: Check the
magazines on the table and learn about The Pamplestone Pumping Station.
Turn around from the table and check the locked
closet door. The WC is left of the office.
Front door: Turn right
towards the kitchen. Exit through the door at left and then go back in. Now
you can enter the apartment through this door.
Kitchen: Turn left
and forward to kitchen. Look around. Check the black piggy bank on top of the hatch.
Bedroom: Exit the kitchen
and go left to the living room. Enter the bedroom at left. Look around.
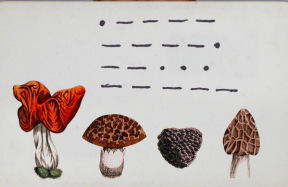
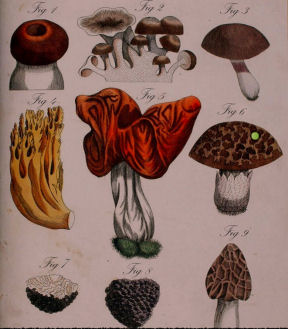
See a poster of mushrooms on the door at left.
Exit the room.
Living room: Turn right
2xs. Check the hatch left of the bedroom door. It is locked.
Check the magazine table left of the sofa. Click on the to do list that Harri wrote. It
mentions Sigge, manuscript to Amber and Carol.
Go to the hatch beside the dining table. Open the
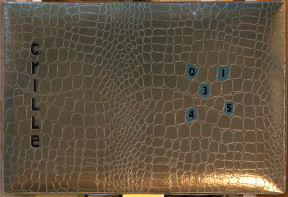
drawer and read the proposed chapters of Harri's book. It mentions Sigge and
Crille.
Get a text message from Jonas. It shows a picture
of a car Jonas bought.
Exit the apartment through the back door. Now you
can enter the apartment through this door.
Olof Palme's murder:
Autobiography: Jump to Amber's apartment. Talk to Amber. Learn
about Harri's autobiography.
Amber shows the first 2 pages of the book. It
mentions The Dead City where they first met Crille.
Turn the page and see the picture of Sveavagen/Tunnelgatan
intersection where Palme was killed.
Click on the address where the assassination
occurred (new location). Take the picture. Learn about Sigge the
former casino owner and drug dealer. Sigge has a hostel in Stockholm.
Get a ride: Click on the
murder scene in the map. Carol says to call Jonas. Use the cell phone and call Jonas.
Pyramid Elm Park: Jump to
the park. Talk to a uniformed Jonas. Get the key to Jonas' old car.
Steiner parking lot: Go
to the black car at left. Use the car key on the door lock.
Use the car key on the ignition. It did not
completely turn over and stalls. Take the car key.
Engine: Exit the car and
check the hood. Open the hood to see the engine. Pull out the sparkplug wire.
Go to the back of the car and raise the rear door.
Take the spark plug wrench.
Open the hood again and use the wrench on the
white sparkplug. Click it to see that the sparkplug is dirty.
Use the wire brush taken from the landing step by
the Wire Lookout on the dirty sparkplug.
Pull back and the sparkplug and wire are
automatically placed back.
Enter the car and use the key on the ignition. The
car starts.
Olof Palme Murder Scene:
Go forward and turn right.
See a bouquet of flowers on the ground. Look at
the flowers and take the floral wire holding the yellow flower
straight.
Go forward and read the plaque right before the
entrance of the Brunkeberg Tunnel. Turn around. Check the statue by left
stairs.
Climb the stairs. Read the plaque that described
what the perpetrator did after shooting Palme. He went to David Bagares St
which has been renamed Olof Palme St. Continue up the steps to the street.
Go back down the stairs and go right to the next
street. Turn right before exit and see the Best Hostel City. Exit the area.
Investigate Crille:
Jump back to Harri's apartment. Enter through the
front door.
Turn around and read the mail stuck on the mail
slot. It states that Harri has a storage locker A14 at
the Norrköping Central Station (new location).
Locked closet door: Turn
left while facing the main door and go forward to the WC. Turn right 2xs to
the locked door.
Use the copper wire from the Pumping Station on
the keyhole. Then use the wire taken from the flower on the keyhole.
Look around. Check the coat and get a note about a
key in the combustion furnace of the second boiler (the large furnace at the
station).
Look at the box at top shelf. It has Crille's name and
numbers. Exit the apartment.
Pamplestone: Enter the
building and forward to the table with tools left of the entrance to the
furnace room. Take the hammer.
Go to the furnace room and go right to the large
furnace.
Look close at left door. Check the door and then use the hammer on the
stuck door. The door opens. Take the Pamplestone key.
Close door.
Return the hammer to the tool table at next room.
Use the key on the locked door under the stairs at
left.
Note: Take a note from the rolls
at right wall. See that there are erased writing at the bottom.
Use the pencil taken from Carol's gutted bathroom
on the bottom part of the paper.
Click the exposed writing - it says: Put flowers
on Crille's grave on April 13. Exit the building.
Crille's box
in Harri's apartment: Go back to Harri's apartment and the
closet.
Take and look at Crille's box on top shelf inside
the closet.
Since Harri noted April 13 on the note; press
1304. The box opens.
Read-click on the newspaper clipping and learn
that Christer Pettersson is Crille.
Read the note inside the envelope. Learn that
Crille passed away and left the black piggy bank, key and a hex key to Harri.
Read the draft of Harri's manuscript about meeting
Crille. Learn that Sigge's father is the manager of Dead City. They met
Crille at Dead City. The kids believe there is a treasure left at Dead City.
Crille became strange after his brain injury. Harri noted that Dead City
holds a secret behind Palme's murder.
Read-click the next note and learn that after his
release; Crille
sleeps at Aviation Administration (new location). Roy
fixed him up there. Crille talks about Kim and her mother.
Take the hex key and Crille key.
Exit the apartment.
Crille's place to sleep:
Jump to the Aviation Administration. Check the
door and see that it is locked.
Go left and follow the directional arrows. Turn
left at park after the steps and lamp post.
Follow the directional arrows again. After
climbing the stone steps, turn right and read the poster on a red stand.
Learn about the Air Force bunker and the main
entrance at south side of the mountain.
Go back down to the right until the paved path. Go
forward until the "exit"; then turn left to see the bunker's main entrance.
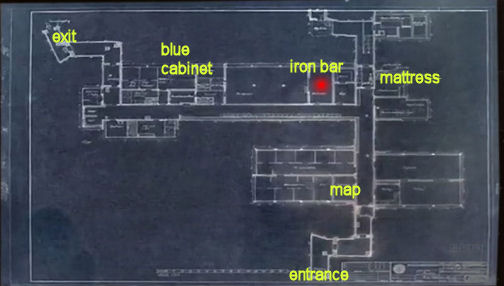
Bunker: Go to the gate
and use the Crille key on the padlock.
Enter the bunker and use the miniflashlight taken
from Carol's office on the dark room.
Turn left and turn the wheel to open the door.
Map: Enter the first room
at left. Turn left and move the #2 brick. Take the bunker map.
You can follow your location in the map. Exit
room.
Crille's mattress: Turn
left on main hallway and forward until the rusty door at the end.
Enter the room at right. See candles on the floor.
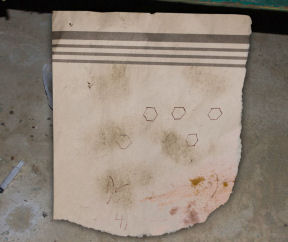
Move #3 brick beside the syringe on the floor and
take timeworn note from bunker. It has 2 rows of hexagons.
Lift the right corner of the mattress and see a
child's drawing given to Christer. Turn the drawing and see Kim's new
address (new location).
Exit the room and turn right. See a green locked
door with #27 at top right corner. Check the bar at top of the door and see
that it is stuck.
Other hallway: Go back to the
main hallway and turn right at the other hallway.
Go forward and enter the first room at right.
Check the opening on the right corner of wall.
Move the cover on the hatch at left corner
of floor. Take the iron rod inside. Exit room.
Blue wall cabinet:
Continue down this hallway. Enter the room second from last at right side of
this hallway. See a locked blue cabinet.
Other exit: Enter the hallway at
right. Go forward until the end of this hallway. Turn left and go forward.
See the other exit on the backside of
the mountain.
Go back to the main exit to leave the bunker and
the area.
Investigate Sigge:
Kim's apartment: Talk to
Kim. Learn that Crille babysat Kim. Kim is Sigvard-Sigge's granddaughter.
Learn Sigge's address (new location).
Sigge's apartment: Turn
left 2xs and enter Cedergren's open door. Look around the living-bedroom
area.
Check everything active on the floor in front of
the bed. There is a nicotine pills box, book of swear words and empty pill
packet.
Read Harri's note to Sigge. Check the paper with
yellow, blue, green and purple stars.
Check the electronic cigarette bag on the window
shelf.
Dresser: Turn left and
check the MP3 player on top of the dresser. Check the child's drawing on the
open drawer.

Locked drawer with stars:
See that the top drawer is locked. It has 5 stars.
Click on each star and see another star becomes
colored. Note the location of each colored star.
The clue on the paper on the floor shows (left to
right): yellow, blue, green and purple stars.
Press the location noted of those stars (left to
right): 2 5 3 1.
Read the letter to Sigge from his dying father. It
mentions a revolver box.
Read the newspaper clipping about The Dead City
(new location). A ghost town that was built to be a leper colony. Exit the building.
Dead City:
Pro Populo: Jump to Dead City. Enter the
second building on the right of the road.
Go forward to the great room. Take the solvent on
the ground at right.
Exit and then go right to the exit. See the map of
Dead City.
Male Quarters: Go forward
to the chapel and then exit back to the Dead City Map.
Hospital: Carol doesn't
look around because there might be snakes here.
Female Quarters: Jump to
the female quarters.
Go forward and enter building 9 at left end of
the road.
Go to the end of the hallway and look out the
window.
See the manager's residence (new location). Remember that Sigge's
father was the manager here.
Exit the building and then exit to the map.
Manager's residence:
Enter the building and turn left. Go up the ramp. Go up the stairs on the
second floor and then exit to the rooftop.
Look around. See tiles of different color on the
floor.
Go down 2 floors and exit the area. Go to the
large map.
Sigge:
Jump to Sigge's apartment. Talk to Sigge. Learn that Harri visited him about
what was hidden at the Leper Colony. Sigge gives maps and scribbling.
Learn about Crille's life and Harri's summer house. Take
the photo of the summer house. Read what is written in the back.
Harri's summer house:
Harri's apartment: Jump
to Harri's apartment and then enter.
Go right to the office-computer room. Look close
at the table under the window.
Look at the cutout. Combine the photo of the
summer house and the cutout to get the address of the summer house (new
location). Exit the area.
Enter the summer house:
Jump to summerhouse. Look close at the numerical keypad lock.
Decipher the note that Harri dropped with the
Morse code legend taken from the office. It is 2 8 8 6. The door opens.
Posters: Turn left and
see 2 posters on the wall. The one on the right is a 1951 poster about coal
mining jubilee.
Kitchen: Turn around from
poster and go forward to the kitchen.
See a wood stove. There is a sack of paper and
firewood left of the stove. Get some firewood and paper from the sack.
Try to place
the firewood and paper in the stove.
Turn right and look close at bread box by the
stove. Open the bread box and take key.
Suitcase: Turn around and
look close at the suitcase by the refrigerator. Open the suitcase and check
the camera. Click on on-off switch. It is missing a memory card.
Armoire: Go to the
armoire right of the posters. See that it is locked.
Use the key from the bread box on the right door. The key from bread box
doesn't work.
Use the key from the bread box on the center
mirrored door. Check Harri's shirt to get a key.
Use the bread box key on the left door of the armoire. Take
the memory card from the shelf.
Turn around and examine the bookcase on left
wall. Take the screwdriver left of the boom box.
Camera: Go around to the
suitcase and open it.
Open the cover at right end of camera. Insert the
memory card with the camera. Close the cover.
Flip the switch to the on position. Use the wheel
at right to see pictures.
See a pictures of 3b and building 5 at Dead City. See jewels on sofa. The
jewel picture shows an opened safe where the coal mining poster was hung.
Safe: Look close at the
1951 coal mining poster. Click to remove it and expose the safe with
numerical keypad on the wall.
Click on 1951. The safe opens.
Examine the bracelet and envelope. Read the blank sheet of
paper with Next drop off written on it. Place the poster back on the wall.
Upstairs: Climb the
spiral staircase. Take the female quarters map with colored buildings
from the wooden chair beside the cushioned armchair. Exit the summer house.
Air Force bunker:
Jump to the bunker. Enter the bunker by clicking
on the padlock.
Blue cabinet: Go down the
hallway and turn left to the next hallway just before the first door.
Go down this hallway and enter the second room at
right
before the end of hallway.
Look close at the blue cabinet on wall.
In inventory, combine the screwdriver from Harri's
summer house and the iron bar from the first room in this hallway.
Use the screwdriver with iron bar on the
lock of the blue cabinet.
Take the paper inserted on the legend at right
door. See a set of lines-symbols.
Inner door: Go back to
the mail hallway. Turn left and go to the second door (27 green).
Click on the bar at top right of the door. Carol
says it is totally stuck.
In inventory combine the steel brush from Wire
Lookout with the
solvent taken from the Dead City.
Use the steel brush with solvent on the
rusty bar at top of door. Now the bar can be turned.
Open the door: Turn the bar to
the position of the symbols-lines seen on the paper taken from the blue
cabinet.
The upright lines on the symbols are separation
lines. Press the red button below the bar to enter the moved position.
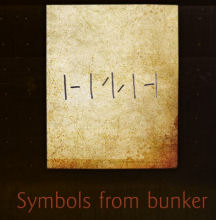
Turn the bar to point to the left W position;
press the red button to enter that position.
Turn the bar to point NE position; press the
red button to enter that position.
Turn the bar to point SW position; press the
red button to enter that position.
Turn the bar to point E position; press the
red button to enter that position. Door opens.
Inner bunker: Go down the
steps. Pick up the wooden stick floating in the water.
Go back up the steps and turn around. Go to the
left of the steps. Continue to the left.
Climb the metal ladder at right. See an open green
door. Look inside and see a silver metal box.
Use the wooden stick to bring it closer.
Open the silver box: See
that the box has 2 Allen screws one on top of the other.
Review the timeworn paper found by Crille's
mattress.
Use the Allen screwdriver-hex key on the screws:
bottom, top, top, bottom, top.
There is a reset at top left. The box is opened.
See pills. Check the rubber banded narcotic pills
and see it labeled for Roy. Turn it over to study the pills.
Exit the bunker:
Go back down. Exit the bunker through main door.
Eek! Ouch! Check the main gate and see that it
is jammed.
Go back to the other hallway by the blue cabinet.
Enter the last room at right.
Go forward 2xs through the open green door at the
end of hallway and then left to the exit.
Use the key on the lock. Exit.
Carol's apartment:
Go home. Click on door and realize that Carol's
key is gone.
Shake the door and meet the tattooed Bigge. The
door of her own apartment is closed on Carol's face.
Knock on door. Talk to the one fixing the
bathroom. He thinks he heard someone here while he's working.
He took the toilet bowl off but set up something for
Carol in the living room.
WC: Check the WC. Take
the chisel from the alcove at right wall.
Living room: Go to living
room and see the temporary toilet bowl left of the office door. LOL.

Office: Open the office
door. See the clown doll hanging by the door. Turn Len the clown doll and take
Carol's keys.
Read the attached note. The baddie threatened
Amber. Take doll. Place the doll back on the bed in the bedroom.
Exit the apartment and go to Amber.
Investigate Roy:
Amber: Talk to Amber. Learn about Roy, the kid that hangs out with
Crille and Sigge. Roy works at Aviation Administration.
Aviation Administration:
Jump to Aviation Administration.
Talk to Mikael at the reception desk about Roy
Stenson. Roy works at the old paper archives.
Roy: Talk to Roy. He gets
amphetamines as payment from Crille. Learn that Crille got his drugs from
Sigge.
Sigge: Jump to Sigge's
apartment. Talk to Sigge. Sigge parted from Crille because he stole from
Sigge and Crille was never sober.
Roy is staying at Sigge's hostel (the one Amber
mentioned).
Harri asked about Substrata, a painting in Sigge's
childhood home.
Roy's passcard: Jump to
Aviation Administration.
Roy is not in his office. Turn right and check the
scale on the shelf.
Take the passcard from the letter tray right of
the scale. Look at back of passcard and see the address of the hostel Roy is
staying in (new location).
Roy is in room 26 and the code after 7 pm is 3997.
Leave the area.
Roy's hostel room: Jump
to Sigge's hostel.
Look close at the numerical keypad right of door.
Enter 3997. The door is opened.
Enter and go down the hallway. Look around if you
want.
Climb the stairs located midway left of hallway.
Go forward and use the passcard on the lock of
room 26 at right. Pull the handle.
Enter and look around. Check the pills on the side
table.
Open the drawer and see the printed copy of e-mail
sent by Roy to K about drop off point. Click on picture.
Roy says that he'll be sending the destinations in
concealed writing. Just heat the paper. Roy used that process with Harri.
The pullover draped on the chair looks familiar.
Hmm. So it's Roy. Leave the area.
Drop off point:
Harri's apartment: Go to
the living room and turn left to the locked hatch-desk.
Use the key from Harri's shirt (summer house) on
the keyhole of the desk.
Take the lighter beside the cigarettes.
Read Harri's note about the revolver box.
Harri paid Crille to steal the revolver box from Sigge. Crille kept the revolver.
That gun was the murder
weapon that was used on Palme. Crille dumped it in the water between Finland and Sweden.
Harri's summer house:
Place firewood and paper in the wood stove in the kitchen.
Use the lighter from Harri's desk to light the
paper. Use the blank paper taken from the safe on the fire.
Read-click on the text exposed by the heat. It showed the
longitude and latitude of Nimis (new location).
Aviation Administration:
Click on Nimis in the map but Carol wants to return the card to Roy first.
Jump to Aviation Administration. Go forward and
turn right to the shelves room.
Look close at the cellphone on top of the table.
Read the text message about the delivery for a new time and place.
Hear a toilet flushing. Roy appears. Talk to Roy.
Nimis: Go forward and enter
the structure made from tree branches. Turn left immediately and pick up the
mallet from the ground.
Marine flag: Go forward
until the beach. Go pass the tree branch structure close to the water and
then turn right. See a marine flag at right.
Read the note hidden on right edge of the flag.
Click on: Estonia-Sweden by helicopter 160 mph: 36 minutes. Click on: Deliver in the Old Town tomorrow before
noon. Old Town is where Sigge had his casino.
View: Go back to the
structure close to the water and climb until the top. Look around the view.
Get a text message from Amber about receiving a
letter from Harri. Leave the area.
Harri's letter:
Amber's Apartment: Talk
to Amber. Read Harri's letter. It mentions the map taken from the loft in
Harri's summer house and something of importance hidden at the Dead City.
Harri mentions how to open the right side door of
the armoire (lift the door slightly to the right while turning the key). The
stolen revolver box is in that closet.
Learn about Sigge's old casino (new location). It
is now an antique store but is still used for drug dealing.
Harri's summer house: Use
the key from bread box on the right door of the armoire-cabinet. Carol
mentions how to open this door.
Read the to do list in the notebook at top shelf. It mentions
the map and female quarters; substrata, revolver box and code to A14 locker.
Read another excerpt written by Harri. Sigge's
father while ill mistook Harri for Sigge and told him about the
donated diamonds given by Aurora Rosvall. Sigge's father kept and hid the
diamonds at Dead City. The location clues are around Dead City and the
reminder is in his revolver box.
Harri's note about what to tell Carol states that
Roy is now involved in heroin smuggling. Harri now fears for his safety.
Take the lens filter on top of the revolver
box.
Open the revolver box and see substrata and a diagram.
Follow the substrata clues:
Amber: Go back to Amber.
Amber didn't get a code from Harri.
Old Town: Jump to Old
Town. Go forward
until the intersection.
Go right on the school crossing sign (Skola) and
street sign for Prästgatan.
Sigge's old casino: Walk
down the small path. Midway down the path (3xs forward), turn left and knock
on door.
Talk to the proprietor of the antique store that
mistook Carol to be in the same business as Amber.
The man gave Carol the message to Roy - a new
drop off info and map.
Substrata: He has a
Substrata reproduction for a recently passed away friend (Harri). The man
leaves to make himself sexy.
Check the side table beside the bed. Take the
key under the tag left of the candlestick.
Turn left and use the antique store key on the
door.
Pick up the reproduction of substrata.
Leave the store and the area.
Decoding the substrata clues:
Dead City: Go to Dead
City and the female quarters.
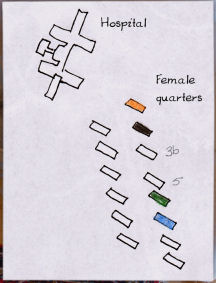
Diagram: Study the
diagram of the female quarters taken from Harri's summer house. Walk the
path in the female quarters area.
Note that the first building on the left is
#1, followed by 3, 3b, 5, 7 and 9.
Comparing the diagram with the building
numbers: 1 is orange, 3 is black, 3b, 5, 7 is green and 9 is blue.
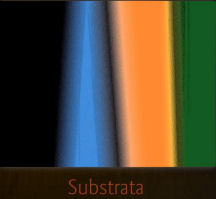
Substrata: Study the
painting. It has colors from left to right: black, blue, orange and
green.
So the numbers of the substrata colors based on
the female quarters numbers are: 3, 9, 1 and 7.
Harri's summer house: Go
back to the house and open the right side of the armoire-cabinet.
Open the revolver box.
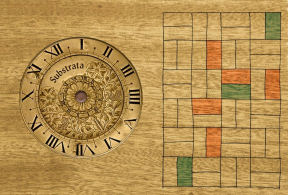
Turn the substrata wheel at
left to have the correct number at top of the circle. Then press the center
button after each number.
Turn to place III-3 on top, press center button, then
IX-9, button, I-1, button, VII-7 and button.
A block changes color to black. Click the button
at right of camera to get a photo of the diagram of the revolver box.
Decoding the revolver box clue:
Dead City: Jump back to
the Dead City and go to the Manager's (Sigge's father) residence.

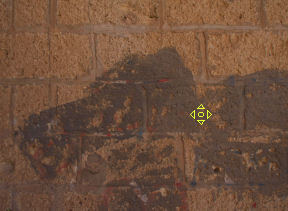
Colored tile: Climb
to the roof and turn left. Look at the colored tiles and compare it to
the photo of the revolver box.
Locate where the tile that changed to black in
the revolver box diagram is.
Use the chisel taken from Carol's bathroom on
that tile.
Turn the tile and read the clue left by
Sigge's father: t inside 4th stone, 5th row, left wall.
Chapel: Exit to the map.
Jump to male quarters and walk to the chapel at end.
Carol notes that it is terribly sunny here.
Treasure: Enter and
look left. Look close at the boring graffiti.
Look close at the hotspot brick. Use the
mallet taken from Nimis on the brick.
Take the dirty bag. Look inside to get the
diamonds donated to the Dead City by Aurora Rosvall before she died.
Roy: Exit the chapel and
meet Roy. Roy admits he murdered Harri.
Roy gives Carol the card that Harri carried. Take
Harri's mushroom card.
Use the lens filter on Roy. He is blinded. Go
right and automatically leave the area.
Carol talks to the police and reports Roy.
Decoding Harri's card:
Harri's apartment:
Morse code: Using the
Morse code paper, decode the card to know that it is 1970.
Mushrooms: Go to
Harri's bedroom. Study the mushroom poster on the closet door.
Learn that the mushrooms in the card from left
to right are figures 5, 6, 8 and 9.
Norrköping Central Station:
Finally, go to the train station.
Turn right and see lockers.
Harri's locker: Look
close at the panel at center. Press 1970 from Harri's card on the keypad to open Harri's A14
locker.
Take the green box with number. Press the numbers
decoded from the mushrooms: 5689.
Olof Palme's murder: Read
what Harri wrote about the event that fateful night.
Exit the renovated bathroom.
Olof Palme's murder is still open.
This document may not be
distributed without express written permission of the author and the content may
not be altered in any way.
For Questions or Comments
on this Walkthrough,
Please write to:
MaGtRo
Copyright © 03/2013
MaGtRo
 GameBoomers
Walkthroughs and Solutions
GameBoomers
Walkthroughs and Solutions


