|
Chronicles of Mystery: The Tree of Life Walkthrough by ronrob
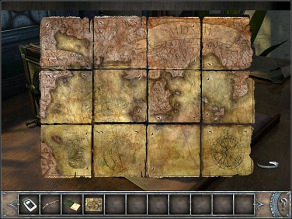
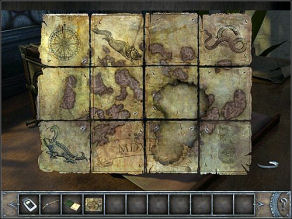
A few game play notes: 1. Double click to make Sylvie run. 2. The “?” at the lower right corner can be used to reveal hot spots. 3. Moving the mouse to the top of the screen displays various menu items along with the dialogs, journal, and documents. 4. Right click inventory items to see them in full view. 5. Left click to skip a dialog line. Introduction The opening scene actually takes place in Venice somewhat later. Three sinister people wearing masks discuss “Omega,” who is giving them trouble. They reach a decision that doesn’t sound good for Omega. A man sitting in his office hands a pocket watch to another man who appears to be a gondolier. After delivering the pocket watch to Sylvie, the gondolier is killed with a poison dart. This event will occur again later in the game. Brittany You automatically engage in conversation with Mr. Guillaume, the director of the Maritime Museum. He is happy to have you here. You are replacing Marcel who died from falling off a cliff. He managed to open a chest, but closed it before he died. Somewhere there is a report. The chest belonged to Ponce de Leon, the discoverer of Florida, 500 years ago. The chest was traced from Spain to Italy, where it disappeared. It showed up in England at an auction. The only other people here are Claire, the restorer, and Antoine, the janitor. You are here only for a quick look because you must give a lecture in Venice to promote your book. After Guillaume leaves, go through the arch on the left into Marcel’s workshop. Zoom in on the chest with the three dials. Try to open the lid, but it is locked. You can try to move the hands on the dials a few times, but you realize that you need the combination. Go back out of the workshop and zoom in on the 3D printer beside the arch. Judging from all the red lights, the machine seems to be stalled in doing something. Go through the door on the right and down into the exhibition hall. Talk to Director Guillaume. He doesn’t know the chest combination, and he advises you to find Marcel’s notes. He isn’t helpful with the 3D printer either. Go back and talk to Claire. Feeling threatened by you, she is a little snippy, but she soon warms up. Claire reveals that she and Marcel were an item. Marcel had trouble opening the chest. He called someone in Paris who should know, but that man soon died of heart failure. She talks as though that death and Marcel’s were just bad luck, but there is a note of skepticism in her words. Marcel recorded his notes on a dictaphone that you need to find. Go back upstairs to the office and zoom in on Marcel’s desk drawer at the back. Open the drawer and take the dictaphone and the tweezers. Take a close look at the dictaphone (right click it in inventory) and see that there is no memory card inside. Go back to the exhibition hall and talk to Claire about the missing memory card. She has it and gives the memory card to you. Go back up to the office and, in inventory, insert the memory card into the dictaphone. You hear Marcel say that he opened the chest, and he gives clues to the combination: gale, Jupiter, and Claire knows the last number. (You can replay the message by right clicking the dictaphone and pressing the play button.) You need to ask Claire for the last number. Go back downstairs, but Claire isn’t there. Exit down screen to the outside where you find her standing by a well. Claire is a little quirky, but in going off on a tangent, she speaks of March 2, “our day.” You decide that 2 must be the third digit. Return to the exhibition hall and zoom in on the ceiling (vault). Look at it and see that Jupiter is represented as the 5th planet from the sun. The second digit must be 5. Go up to the office and zoom in the bulletin board beside the armored man. The drawing at the bottom right is that of a fragment of a jug, just like what you saw in the 3D printer. Look at the ocean pictures. The one in the center shows a gale, which is 8 in the Beaufort scale. Now you have the three digits of the combination: Gale = 8 Jupiter = 5 Claire = 2 Go into the workshop and set the hands, left to right, to 8, 5 and 2. The numbers must appear in the little windows of the hands. When you have unlocked the chest, click the lid to open it. Take the 16th century pistol with a ramrod and the spanner (key). Look at the paper lying left of the chest. It is Marcel’s list of item that he found inside the chest. Note that the pistol and the ramrod are listed separately, so enlarge the pistol and click the ramrod to remove it. The only missing item is the ancient pottery fragment. At the front of the chest, right at the bottom, is a keyhole. Use the key you took from the chest to unlock a hidden drawer. Unfortunately, the drawer is blocked. Look at the left side of the chest and see a hole at the back bottom corner. Insert the ramrod into the hole to unblock the drawer. Open the drawer and take the old manuscript. Right click the manuscript to look at it in the large view. The left and right arrows along the sides of the frame allow you to flip through the pages. As you leaf through the manuscript, you find 11 map fragments sewn into the pages. Leave the large view and use the tweezers on the manuscript in inventory to remove the threads holding the map fragments. Display the manuscript in the large view again and click the first map fragment. That removes all of the map fragments, and they now appear in inventory. Finally, read through the now unobstructed manuscript for some background information about the Tree of Life. Note the reference to jug of seeds that was taken and to the many sea serpents. The next task is to assemble the map fragments. Right click them to see a large view. The fragments can be manipulated as follows: 1. Left click and drag a fragment to slide it. 2. With the cursor on a fragment, right click will rotate it. 3. With the cursor on the edge of a fragment, the cursor becomes a circular arrow. Clicking will turn the fragment over to the other side. The fragments will stick together when they are properly placed. Which side of the map you decide to work is up to you. The following show the two completed sides.
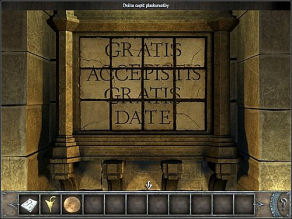
You note that the maps have no coordinates, so you have no idea of the locations. You decide to copy the map. Exit the workshop out into the office. The photocopier on the right side has two problems: the glass is dirty and the toner cartridge is empty. Nothing is ever easy. Take the empty toner cartridge. While you are at it, check the 3D printer again to find more problems. Open the bottom center panel to find that resin is missing. Open the left panel to find an empty powder container. Open the right panel to see that a toner cartridge is missing. Go to the exhibition hall and approach Claire. Take the rope from the side of the Viking ship. Back away and go to the toolbox on the table next to Claire. When you try to open the toolbox, you decide that you need to ask Claire for permission. Talk to her to get her permission. When you tell her about the need for toner in the photocopier, she suggests that you see Antoine. Go back to the toolbox, open it, and take the cloth, the varnish, and the brush. Talk to Director Guillaume and report the exciting news about opening the chest. As for the needed resin for the 3D printer, he suggests Antoine. Exit down screen into the courtyard, and go to the janitor’s lodge, the brown door that the vehicle is facing. Ring the bell and meet Antoine, an apparent old salt of the sea with tales to tell. Eventually he gives the toner to you. You explain why you need the resin for the 3D printer. Antoine goes inside to look for it. It appears that he is gone forever, and ringing the bell again is not an option. You might as well pay a visit to the inn and the cliffs. Go through the arch and the door on the left. Make some small talk with the innkeeper and then return to the courtyard. Antoine is waiting for you and gives the resin to you. He has no powder for the 3D printer, but he suggests that you use flour, which he doesn’t have. After some chat and tall tales, return to the innkeeper. Ask him for some flour, but first he needs you to get some water for him. If he is to be believed, he uncovers Antoine’s masquerade. Antoine is actually just a barber who got all his sea tales from his customers. There is considerable conflict between Antoine and the innkeeper. You are given a bucket to fetch some water. Return to the courtyard and zoom in on the well. Push the grate aside, and combine the rope with the bucket. Lower the bucket into the well and get a bucket of water. Go back to the inn and talk to the innkeeper to exchange the water for flour. Finish the conversation and return to the museum. Go upstairs and zoom in on the photocopier. Raise the top lid and clean the glass with the cloth. Open the front lid and insert the toner. Open the top lid and place the map on it. Close the lid and press the green copy button. Take the map copy and also open the top lid to retrieve the original Go to the exhibition hall and talk to the director to give the map to him. Talk to Claire. Report your success with the chest. Ask her about Marcel’s appointment, but she knows nothing about it. She gives a melodramatic account of their splitting up. Claire says there are letters in Marcel’s secretary and gives you the key. Finally, you get her perspective on Antoine and the innkeeper. Return to the office and zoom in the secretary that is right of the desk. Use the key that Claire gave to you to open it. Take the dye container from the second pigeonhole from the right. Read Marcel’s notebook. He describes his conflicted relationship with Claire. You also know now about the mysterious appointment at the inn. It was with an “antiquity lover” who will want to buy the chest, much to his disgust. Could this person have murdered Marcel? Zoom on the 3D printer and open the left panel. In inventory, put the flour into the red empty container and place it into the slot. Open the right panel and insert the container with dye. Open the lower lid and insert the container with binder. Press the Print button, open the front cover, and take the jug fragment. Look at the fragment in the large view and see that it needs to be hardened. In inventory, dip the brush into the varnish and paint the fragment. Start downstairs, but you stop to overhear a phone conversation between Guillaume and someone unknown. Possibly the same person who contacted Marcel? Apparently this person is in Venice, so Guillaume arranges for you to meet him while you are in Venice. Go downstairs and out to the courtyard. Continue on to the inn. Talk to the innkeeper about Marcel. He remembers Marcel coming to meet a man and that they left the inn together. After trying to patch up Antoine and the innkeeper, you decide to look around the area. Zoom in on the fence in front of the inn and take the wire hanging there. from it. Zoom in the slanted fence rail going down the cliff and see a coin in the stone wall. Use the wire to dislodge the coin. Look at the coin in the large view and examine both sides. Return to the museum and talk to the director about going to Venice. He tells you that a man named Saint-Germaine wants to meet you there. Off you go to Venice. That creepy trio has taken notice of you. Venice You are at the lecture hall where you are to give your speech, and you hold a long conversation with the lecture organizer. He wants you to look at the recess containing a marble tablet with a Latin inscription. The building used to belong to the Scuola, a “confraternity” with origins in the Middle Ages. He gives some historical background. The chest you were working on used to be stored in this building. The chest was said to contain a map to the Fountain of Youth. He offers some theories on how the chest came to be here. It was moved to an unknown location during the Napoleonic Wars. You can go upstairs later. For now, go to the desk at the left and take a book, the pen, the nail polish, the nail polish remover, and the swab. Back away and look at the shredder on the floor right of the desk. Go through the arch into the meeting hall. Look at the two locked showcases along the back wall. Go to the niche and take the short ladder leaning against the wall. Look at the bottom part of the bas-relief, and then look at the upper part. It is too high to examine closely, so place the ladder on the floor in front of the lower tablet. Now look up again for a better view. This is the old slider puzzle. The lower right square can be removed, so do that to make room for sliding the other squares. You don’t know what the inscription should be, but you can be guided somewhat by the locations of the letters on the squares. 1. A square whose letters are cut off at the top cannot go into the top row. 2. A square whose letters are cut off at the bottom cannot go in the bottom row. 3. A square whose letters are cut off at both the top and bottom go into the middle row. Once you have the inscription solved, replace the blank square.
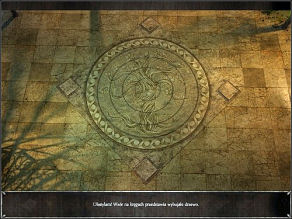
Back off the ladder and note that the bases of the two columns can now be rotated. Clicking on a column base causes the inscription to rotate left or right. The goal is to get the grated side to face you. One solution is to click the left column twice and the right column four times. Zoom in on the grate and open it. Take the dry seeds that must have been in the chest. Leave the niche and return to the meeting hall. Waiting for you there is a gondolier with a mask. He is a messenger from count Saint-Germain. He hands a chronometer to you and says that Saint-Germain would like your opinion of it. Suddenly he is struck down by a poison dart from the creepy guy with green eyes. You are distraught, and not just because your lecture had to be cancelled. In your talk with the somewhat cold-hearted lecture organizer, you get permission to use the tools and reagents from the showcases to examine the chronometer. However, the meeting room is sealed with police tape. The organizer left his papers in there and can’t get to them. The organizer is skeptical about your idea of temporarily removing the police tape. When you are done talking, get a large view of the chronometer. Open it to see that there is an inscription on the inner lid, but you can’t read it without some work. Zoom in on the sealed door and use the nail polish remover to remove the tape. Go inside and to the front. Take the organizer’s documents from a chair in the front row and pick up the gold coin from the floor. Check the display cases, but they are locked. Return to the outer room hall and talk to the organizer. He is so pleased to get his documents that he gives you the keys to the display cases. Return to the meeting hall and go to the display cases. Use the organizer’s keys to open the one on the right. Take all of the tools: the brush, the cloth, the silver cleaner substance, the silver patinating substance, the spatula, and the magnifying glass. The keys will not open the display case on the left. Leave the meeting hall and use the nail polish on the police tape to put it back in place. You now have what you need to clean and read the chronometer. In inventory, use a swab on the silver cleaner and then apply the swab to the chronometer. Look at the chronometer in the large view to see the result. The lid is clean now but it still can’t be read. Back in inventory, dip the brush in the silver patinating substance and apply it to the chronometer. Take another look a the chronometer in the large view. Back in inventory, use the cloth on the chronometer. Use the magnifying glass on the chronometer and then look at the chronometer in the large view: “Benjamin S. Briggs, Mary Celeste 1872.” Return the keys to the organizer and inform him that you have replaced the tape. You and the organizer discuss the mystery of the Mary Celeste and the chronometer that belonged to the ship’s captain. Let him know about the seeds you found in the cache. He produces a list of the contents of the chest from the 16th century. The list is consistent with Marcel’s list, but it gives a better description of the jug with two spouts. The organizer thinks the jug turned up in Cairo. The organizer tells you that a man called for you. At the end of the conversation, your phone rings, and you finally hear from Count Saint-Germain. He urgently wants you to restore a painted plank. He says that you can find him by referring to the chronometer. Come down screen, leave the building, and go to the square. Go to the trash container at the left and take an empty champagne bottle and some discarded police tape. Look in the toolbox and take the pliers and the scissors. Walk over to the couple and hold what has to be one of the most inane conversations in adventure game history. In the end, you agree to give them an autographed copy of your book. You automatically go to see another masquerader on the bridge. Yikes! It’s Creepy Green Eyes! Go near the steps into the lecture hall. In inventory, put the book in the large view to open it. Then, back in inventory, use the pen to autograph the book. (You can look at the book in large view again to see the inscription.) Go talk to the couple again to give them the book. They give you a plastic mask and a flare. Go up screen to the canal by the orange-ish building. You futilely call for a taxi. There is an empty gondola that might have to be your transportation, but you can’t access it from here. Note that it is along the side of the lecture hall building. Perhaps you can get to the gondola from somewhere inside the building. There is another problem, though. Even if you can get to the gondola, Creepy Green Eyes is standing watch at the bridge. Eventually you will have to deal with that. For now, return to the lecture hall and enter. You recall making smoke bombs out of table tennis balls, which suggests that a smoke bomb is your solution to getting rid of Creepy Green Eyes. The next steps are a bit of a stretch, but they are logical. Your flare is the closest you have to a smoke bomb, but if you light it, it will simply go off like fireworks. Table tennis balls are plastic, so if you could replace the contents of the flare with plastic, you could turn it into a smoke bomb. The only plastic item you have is the mask. Zoom in on the shredder on the floor right of the table. Insert the plastic mask into the shredder, open the side panel, and retrieve the plastic pieces. Now use the scissors on the flare to cut the top open and empty it. (Look at the result in the large view.) Finally, back in inventory, place the plastic strips into the flare. (Again, look at the result in the large view.) Now you have the ability to create a smoke screen, but you still have to find a way to the gondola. Go up the stairs, zoom in on the circular table, and take the tablecloth. Also, take the curtain, which includes a separate tie back. Notice the trapdoor at the back corner of the recess. It is fastened with nails, so use the pliers to remove them. Try lifting the trapdoor, but it is to heavy to hold open. However, you did get a glance at a canal and the tip of the gondola. Clearly, this is your access. Use the tie back on the trapdoor to hold it open. In inventory, combine the tablecloth and the curtain. Tie the line to the trapdoor handle. (This can be a little fussy, so keep trying different spots.) Go down the hatch to the ledge below. Go into the gondola and take the matches, the broken oar, and the key. (The key opens the door in case you need to go back into the building.) Go back up to the ledge and take the vertical stick that is along the front edge. Combine the stick with the broken oar and then bind them with the police tape. Now you are ready to go. Step back into the gondola. Place the flare in the empty champagne bottle, and then place the bottle in the ring of the gondola. Light the flare with the matches. Green Eyes gets smoke bombed, and you are able to slip by. Somehow you found the home of Count Saint-Germain. Move back to the grated bars and see a dial mechanism for raising the grate. He told you that the chronometer would tell you what to do. The inscription included “1872.” Because there are four number dials, it stands to reason that 1872 is the combination. Pull the handles to increment the dials until you have 1872. The grate tries to rise, but it is blocked. Look up and see a wedged stone. Use the oar to dislodge it. Look around the Count’s gardens. Zoom in on the pool and take the watering can and the green bowl. Use the watering can on the pool to fill it. Also, take the gardening gloves from the grass below the tree to the left of the pool. Go left to meet Saint-Germain. He is agitated about the death of the messenger and about the serious harassment he is getting. You return the chronometer to him. The Count is fully versed on Briggs. He outlines his theories on the disappearance of the crew from the Mary Celeste. He is certain that Briggs had the chronometer with him on the voyage. The Count tells of a plane accident in which he developed some amnesia. This is why he can’t remember how he obtained the chronometer. He wants you to remove the paint from an old plank with the hope of finding a sign or an inscription underneath. Zoom in on the table at the back wall. Use the spatula on the cracked paint to uncover some letters. Zoom in on the shelf beneath the table and take the lye, the polyvinyl acetate, and the scrub brush. Back at the plank, dip the brush (the small brush, not the scrub brush) in the polyvinyl acetate, and then spread it over the exposed letters to protect them. Use the gloves on the scrub brush to protect your hand, and then pour some lye into the bowl. Dip the scrub brush into the bowl of lye and scrub the plank. Now rinse the plank with the watering can full of water to clean away the old paint. Now you can easily see what was under the old paint, but use the spatula to peel away the polyvinyl acetate. You conclude that the plank must have come from the lifeboat of the Mary Celeste. Talk to Saint-Germain again. He got the plank from an antiquary in Cairo. He is evasive about why he is so interested in the Mary Celeste. He confirms that the chest was at the Scuola and believes that it was brought to this place. From here, his theory goes, Briggs got hold of it. The evidence suggest that Briggs survived the Mary Celeste, but why didn’t he return to his family. The Count thinks he might have been harassed and persecuted and had to go into hiding. You tell the Count that you found Ponce de Leon’s manuscript in the chest. He wants to hire you as his expert in solving the mystery of the Mary Celeste. You drive a hard bargain, but he eventually agrees. Over your protests, the Count wants the chest. He insists that you stop working for the Museum and work only for him. The Count thinks the jug that was supposedly in the chest might be in Cairo. You tell the Count about solving the slider puzzle and about the seeds you found. He agrees to your trying the figure out the floor design. Zoom in under the balcony at the left. Take the four shards. Zoom in on the floor design, then zoom again on the center to see that a fragment is missing. One of the shards you just picked up fills the hole. Back away once. Your objective is to turn the four circles into a proper arrangement. arrange a certain pattern on the relief. The circles are be moved by dragging them in either direction. The circles move in pairs. The finished product looks like this:
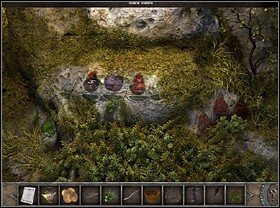
Now zoom in on each of the four square tiles. Under each tile you will find seeds, but in only once case are the seeds like those you found in the cache. They are under the upper tile. Take those seeds. Tell the count of your success. He feels there is a relationship between the tree pattern and the Mary Celeste. You tell him that you have seen the same tree on the two coins found near where the murders were committed. You have obviously spooked the Count. You tell him about the seeds you found, and you wonder whether they are from the tree shown on the map. He wants to see the map. You don’t have time to give the map to him, though. Old Green Eyes is seen looking in the window. You run to the gondola and make your escape. Alpha, Beta, and Gamma are holding another meeting. You are now on their radar. Cairo
Now you are in
a little hotel in Cairo. Talk to Ali, the mature, young lad who is
filling in as the hotel operator for his parents. After some amusing
small talk, you decide to take a room. Ali agrees to ask around about a
collector in the Old Town. There is a café nearby and you can use the
kitchenette.
Go up the short stairs to your room and look around. Slide back the screen and see a sink. Take the soap, the shaving brush, as well as the clothes pins and basin that are beneath the sink. Back away and zoom in on the mirror above the sink. Take it off and put the jug lip and the map copy into the recess. Replace the mirror and head back downstairs. Leave the hotel out to the street. Go farther down the street and arrive at the square. Go to the man who is standing under the “Antiques” sign. You ask about a collector, but the antique dealer is too busy and will ask around later. You make a deal with him to clean a soiled scarf. Leave the square through the large arch on the right. Zoom in at the area near the cart in the street and pick up the string from the ground. Continue on to the hotel and chat with Ali. Go up to your room. Go to the sink and fill the metal basin with water. Add the soap and then place the scarf into the basin. Back away from the sink and got to the coatrack on the wall to the right. Place the string on the coatrack. Combine the clothes pins and the scarf and then hang the wet scarf on the string. Leave the hotel back out to the street. Go up the street and talk to the café owner. Buried in a lot of small talk is your hope that he can tell you about the art collector. He explains his social networking, and the word will be put out. Go farther up the street to the square and tell the antique dealer about your work on the scarf. The embroidered inscription suggests that a Saint-Germain was one of the passengers on the Mary Celeste. There also appears to be an embroidered map, but it is covered by an ink stain. The dealer managed to find the collector’s servant, and she is waiting at the café. Return to the café, enter, and chat with the owner. Go into the room at the back right and meet Fatima. Before she will talk, she wants you to play a dice game with her. The rules are similar to twenty-one and straightforward. By clicking (lighting) the dice, you can choose the number of dice you want to roll. Your goal is to reach a total closer to 50 than Fatima does. The scores are shown a the upper right corner of the screen. You will probably need to play several games before you win. Press “New Game” to begin. Fatima is evasive about the collector’s name. As a child, you used to eat coffee grounds with sugar- - sort of a clue. You explain that you are looking for the chipped jug that was in the chest. Saint-Germain thinks it is in Cairo. You give the seeds to her so that she can compare them to the seeds in the jug. Fatima says the collector will consider meeting you and will send word through the antiquary.
Go back into
the café and talk with the owner. It appears you have been stuck with
the bill for the coffee, but you have no money. You go back to ask
Fatima, but she has disappeared. Return the to café owner. After an
amusing exchange, you will sweep the back room.
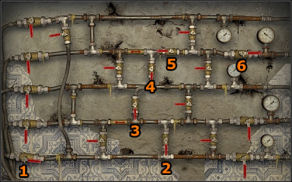
Take the leaning broom at the far right and go into the back room. Start by using the broom on the rug in front of the round table. This reveals something on the floor. Zoom in and, with one click, pick up two candy wrappers along with another gold coin. Given what has happened before, this can’t be a good thing. A brief cut to a man with an eye patch shows why. Zoom in on the table in the back right corner. Take the cookies and the two cups with coffee grounds. One cup has sweet grounds, the other grounds are unknown. Recall how you used to eat sweet coffee grounds and dump the sweet grounds into a candy wrapper. Dump the other grounds into the other candy wrapper. When you leave the scene, you replace the cups. Return to the café for a final and unremarkable conversation with the owner. You still have to finish the scarf job, so return to the hotel. Remove the dry scarf from the string. To get rid of the ink stain, you need citric acid and milk. Go downstairs to see whether Ali has any. He doesn’t, but he suggests camel’s milk from the bazaar at the town square. Go there and talk to the man at the fruit stand at the far left. (Note, also, the lemon high in the tree.) He won’t milk the camel, so you have to do it yourself. He lets you borrow a pot. Go to the camel and try to use the pot on it. You decide to fill the trough with water to pacify the camel. Go to the well square and zoom in on the water well pump. You see a jumble of pipes and valves. If you open (parallel to the pipe)and close (perpendicular to the pipe) just the right combination of valves, water will be directed to the trough. If you choose a wrong combination, the fruit vendor or the antiquarian will complain. However, even a wrong combination will retain any correct changes that you made. Thus, you need to have a good memory or a good set of notes. The most satisfying solution is your own trial-and-error attempts until you find the right combination. If you want a hint, the water must flow from the lower left valve to the right end of the second highest pipe. Finally, if you need the solution, here it is. (Credit: guide.gamespressure.com)
Go back to the
camel and use the pot to get a pot of
milk.
Now go back to the tree on the left, zoom in on the lemon, and try to take it. It is too high. Talk to the fruit vendor and get a whip. Zoom in on the lemon again and try to use the whip on it. You still can’t reach it. Talk to the fruit vendor again, and he suggests climbing up on the camel to reach the lemon. First you need to move the camel to the lemon tree. The intuitive idea is to lure him with your cookies, but of course that doesn’t work. If you were a camel, what would you like? Why, the sweet coffee grounds, naturally. Try that and watch the camel follow you to the tree. Mount the camel and use the whip to get the lemon. Now you are ready to tackle the ink stain on the scarf. Go back to the hotel and enter the kitchenette. Take the pot from the stove and the knife and the glass right of the stove. Pour the milk into the pot and place the pot of milk it on the stove. Be patient and then take the warm milk. Note: How do you know to warm the milk? You don’t, but if you go up and try the cold milk on the scarf, you say that it needs to be warm,. I just saved you a trip. Head upstairs to your room. Zoom in on the end table directly in front of you and take the swabs.
Zoom on the
table by the window and place the dry scarf on it. In inventory, use the
knife on the lemon and then squeeze the lemon juice into the glass. Dip
the shaving brush into the glass of lemon juice and wipe the brush on
the scarf. Then dip the swab into the milk and wipe the scarf with it.
Remove the clean scarf from the table.
You decide to copy the information from the scarf onto the map. Go downstairs to get a pencil from Ali. He can’t tell you anything about the collector yet. Finish the conversation and go back to your room. Zoom in on the mirror, remove it, and retrieve the copy of the map. (Leave the mirror in inventory.) Zoom in on the window and place the scarf on it. Now place the map over the scarf and try to copy the missing part with the pencil. Unfortunately, there isn’t enough light to shine through to the scarf. Place the mirror on the table beside the window. Now you can use the pencil to copy on the map. Remove the map and the scarf from the window and pick up the mirror. Go to the nook over the sink, hide the map in it, and replace the mirror. Exit the hotel and go to the square. Return the scarf to the antiques dealer. He plans to sell the scarf to the man who purchased a plank from him, i.e., Saint-Germain. Apparently he gave his name as Wunderman. The collector’s messenger will meet you at an unknown place, probably today. The dealer warns you of a bald man with an eye patch. Go back to your hotel room to find Fatima waiting for you. Her husband isn’t dead. He has gone missing after receiving a document with a picture of the tree of life. She is handling his collection affairs. Fatima has the jug, but she feels in danger because of it. For that reason, she is reluctant to give it to you. You tell Fatima about the chest, Saint-Germain, the murders, and the coins. She is greatly concerned when you tell her about the coin you found in the café. Fatima says the second map, the one with the coordinates, is in the hand of a descendant of Captain Briggs. The map is in Gibraltar. The only clue she has is to start at the cemetery. Ali calls to you to come downstairs for a message. The camel trader has something important for you. He also mentions a bald guy with an eye patch. He was here looking for you. Eeek! Go to the market square and talk with the camel trader and fruit vendor. You return his pot and his whip. When he asks for your name, tell him the truth to avoid a hassle. He will give your lost passport to you. (If you don’t give your real name, you will have to ask the antiques dealer for his help.) Return to the hotel and notice Baldy stalking you. Ali says that Fatima left. You give him the cookies and head upstairs to get some sleep.
You are
awakened by Saint-Germain. Fatima is dead and the two of you are in
danger. He has a yacht in Alexandria to get out of Egypt.
The Count’s Yacht As the Yacht sails for Gibraltar, the Creepy Trio continues its sinister plans. You are holding a lengthy conversation with the Count. You show the updated copy of the map to Saint-Germain. He notices there are no coordinates, so you tell him about Fatima’s information about the coordinate map being in Gibraltar. After finding Fatima dead, he took the jug with the missing spout. He feels safe on the yacht, but he has a gun just in case. The count has some delusional theories about who the murderers might be. Note his comment about feeling 200 years old and his visions of the murderers coming from some earlier century. Hmmm. . . The Count is tired and needs rest. He would like a cup of tea. After he enters his bedroom, you start to have some serious misgivings about him, and you conclude that you have to incapacitate him somehow. Take the Count’s cane that is leaning on the wall behind you. Proceed right into the kitchen area. Take the thermos with tea and the cup that are on the counter right of the microwave. In inventory, pour the tea into the cup. Open the cupboard door directly in front of you and find some sleeping pills. In inventory, put the sleeping pills in the cup of tea. Go left and open the door to the Count’s bedroom. Place the cup of tea on the stand. Return to the kitchen, zoom in on the drawer at the far left end of the counter, open it, and take the can opener. Check the cupboard under the sink and take some canned meat. Go back left and see a rectangular outline in the wall at the foot of the stairs. Open the compartment door and take the rope, the screwdriver, and the resin glue. Return to the kitchen and then out the glass doors on the right to the yacht’s bridge. Examine the radio on the right. Use the radio to put out an alert to the police. To disable the radio, use the screwdriver on the screws in the front panel. After you get the radio open, pull some of the wires. Use the screwdriver again to replace the front panel. Head back to the Count’s bedroom. You realize that you haven’t found his gun, and you suspect that it is in his bedroom. Open the door and call out to him. He is not asleep, and he doesn’t want to come out. To get him out of the bedroom, you come up with the idea of changing the yacht’s course. Go back to the bridge.
Look at the
control panel display and click it to change the course. Go back and
report the course change to the Count. He leaves to tend to the problem.
In the bedroom, look at the painting over the bed. Click it to reveal a safe whose combination you don’t know. Zoom in on the desk at the left and take the brush, the spatula, and the magnifying glass (all with one click). Open the desk drawer on the right and remove the pistol. Now you feel a little safer about confronting the Count. Go confront the Count on the bridge. He denies killing Fatima and gives his reasons for not informing the police. You outline your own thoughts about Saint-Germain being the murderer. The Count relates how someone had tried to take his life and is still hunting him. Your version of the past events is refuted, with some logic, by the Count. Your distrust begins to break down, and you release the gun to the Count. He promises to reveal his secrets in time. You decide to try affixing the model spout to the jug that the Count took from Fatima. Go back to the main room and zoom in on the jug resting on the coffee table. The jug needs to be cleaned first. Use the spatula and brush on the jug. Then put some resin glue along the broken edges. Place the spout on the jug. Use the wires you took from the radio to hold the spout in place. Pick up the repaired jug. The yacht moors at a pier in Gibralter. The police, responding to your radio call, are awaiting Saint-Germain and lead him off to the police station. Fatima advised you to start at the cemetery, so you need to find it. Zoom in on the cannon and take the metal ring from the ground in front of the monument. Go to the street at the left edge of the screen. Standing at the intersection and looking up the street, note that there is a “wicket” or gate on the right that can be approached. Do that and find that the gate is locked. Eventually, you will be coming back here. Back away from the gate and continue up the street. There are a couple of locked doors you can try, but for no purpose. Keep going up the street to the cemetery on the hill. You pass a woman leaving the cemetery. Zoom in on the bench, open the toolbox, and take the wire brush. Go up the main path and keep looking at tombstones and cleaning them with the wire brush until you find one that belongs to Captain Briggs. His grave is under the palm tree. Note the candle that must have just been placed there by the red haired woman. Use the wire brush to clean the inscription, but it is too dark to read. Pick up the candle and use it on the inscription. Sure enough, this is the grave of Captain Briggs, who died February 1, 1902. Note that he was born April, 1835.
Leave the
cemetery and return to the square. Enter the police station, the light
brown building at the end of the street. The front section is the police
office, and the lower section is the customs office. Go into the police
office and talk to the policeman. Saint-Germain is ill and needs his
medication.
You ask if they know the red haired woman you saw at the cemetery. The customs officer thinks he knows the person you mean, and he has a parcel for her. Go back to the yacht in search of the Count’s medication. Try the kitchen cabinet on the right end, but the medicine you need is not here. Go out the bridge to find the medicine on the counter in front of the radio. Go back into the kitchen and realize there is an intruder on board. WARNING: You are about to enter into a timed sequence. You will find that the intruder, Baldy Eye Patch, is in the Count’s bedroom. Your goal is to lock him inside. Your method will be to place the cane across the door and then tie it in place with the rope. Dummies like me would experience many frustrating failures without ever figuring that out, especially since the rope must first be tied into a knot, a not entirely straightforward process itself. So decide what you want to do. Given the hint above, you can see whether you can do those things in the time allotted. (The game is automatically saved, so you can reload and keep trying.) If you succeed, skip the next paragraph. Or you can use the next paragraph to solve the problem. Before you peek in the door to the Count’s bedroom, you can prepare a knot in the rope. Look at the rope in the large view. If you know what a bowline is, you can probably tie it easily. Otherwise, you are guided by the arrows. The blue arrow is to “undo” the previous action. The red arrows give you choices for tying the knot. 1.Click the top red arrow pointing right to move the loose end behind the standing line. 2. Click the down read arrow to bring the loose end across the standing line and down. 3. Click the remaining arrow to complete the knot. Now go to the Count’s bedroom door and peek in to see the bad guy. Note that he tosses a coin on the desk - - never a good sign. When you can, zoom in on the door. Place the cane and then the rope with the knot on the door handle. Go up the stairs and leave the yacht. Return to the police station and report Baldy Eye Patch. The customs officer won’t give you the woman’s address until they return. He warns you of a dog in her yard. Talk to Saint-Germain. Your repentance has little effect. You relate your experience at the cemetery, and you give the medicine to him. He says that he has money in the yacht safe. He tells of his vision of the Tree of Life on Bimini, the tree that will restore his health. Saint-Germain again alludes to the possibility that he has been there, but he can’t remember the circumstances except for the plane crash. You discuss the motives of the killers. Is Saint-Germain their guide in getting them to Bimini first? The key now is to find the woman who probably has the coordinates map. Zoom in on the customs section and open the grated window. Zoom in on the parcel, but it is too far away to reach. Back away and pick up the fishing rod. Zoom in on the parcel again and use the fishing rod to pull it to the window. Look at the parcel and see that it is addressed to Sarah Rivera at 2 Victoria Square. The parcel is to be delivered at the Nelson Street entrance. Leave the station and see Baldy Eye Patch being led away by the police. Look at the gate and see a vicious dog. This isn’t the Nelson Street gate for the delivery anyway. Back away, go to the Marina, and then go up the side street on the left (as you did for the cemetery). Go to the gate on the right. It is still locked, but this time you can look under the rock on the ground right of the grate. Move the rock and take the key. Use the key to unlock the gate, enter and go to the inner gate. Now that vicious dog has come around to this side. You need to find a way to distract him. Return to the square and to the main gate. In inventory, use the can opener on the canned meat. Note: Save your game here because you are about to start another timed sequence. If you don’t and you fail, you will need to go back to the yacht and get another can of meat. Place the open can of meat inside the gate and RUN! Go to the square, to the marina, and up Nelson Street. Enter the gate and then enter the inner gate. Place the metal ring over the inner gate to keep the dog out. Knock on the door at the back and meet the quirky Sarah. She refers to Briggs as her curse and hints at her relationship to him. Sarah tells the story of her grandfather, Jasper, finding a dazed Briggs. Jasper restored Briggs to health. In gratitude, Briggs gave him his chronometer. Briggs told Jasper about finding the Tree of Life, but he warned that a ship shouldn’t go into the Bermuda Triangle. Only an airship would do, and Jasper proceeded to build one. Jasper found a map in Briggs’’s chest, but then Briggs disappeared along with the chest.
You tell Sarah
what you know about the chest and the map you found. Sarah agrees to
show you the map with coordinates. She will call you from the main gate.
Go back to the square and enter the now open main gate. Sarah leads you into the hangar that holds an enormous airship built by Jasper and Sarah’s father. The airship will fly, but there is no helium. Talk with Sarah again. She wants no part of making the trip, but she will sell the airship to the Count for a million dollars. Go back to the police station and Saint-Germain about what has happened. The Count is anxious to buy the airship and tells you to get the money from his safe on the yacht. The combination to the safe is the month and year of Briggs’ birth - - backwards. Before you leave, get an update from the police officer and customs official. The return to the yacht and the Count’s bedroom. Take the gold coin from the desk. Then open the painting over the bed to reveal the safe. Recall that Briggs was born April, 1835, i.e., 041835. Backwards the combination is 538140. Enter that combination and press the pound (accept) key to open the safe. Take the money and the blank checks. Go to the hangar and see Sarah and the Count. Sarah explains that the airship need to be filled with hydrogen and that the coordinates are already on the console. You will need to enter the route you want to take and the computer will do the rest. The count pays Sarah the agreed upon amount. There is no hydrogen, so you will have to produce it with the electrolysis machine inside. However, the machine requires electricity and it has been cut off. Sarah hints that there is another way, although it doesn’t sound legal. Come down screen and take the cable that is on top one of the crates. Go to the boxes on the left and take the cable. Connect one end of the cable to the box by the hangar and the other end to the box by the gate. Go inside the hangar. Zoom in on the area below the platform and left of the stairs. Take the oil container. Look inside the light brown cabinet and take the oil can and the gear. Zoom in on the crates at the far left side. Take the chain from the ground and the link in front of the tall crate on the left. Climb the stairs to the platform and zoom in on the green device mounted on the wall. Install the chain and then insert the link into the chain. Place the gear between the two existing gears. Try to turn the handle, but there is too much friction. In inventory, fill the oil can with the oil container. Apply the oil to the device and try the handle again. Watch the ceiling doors open.
Zoom in on the
gas generator farther down the platform. Take the shovel and get a
shovelful of salt for the electrolysis machine. Nothing happens. Try the
switch, but nothing happens. Back away and zoom in on the pump. You see
a space in the pipe where a valve should be.
Go back outside the hangar and talk to Sarah. She forgot about the valve, which is what the waiting parcel is at the customs office. Now she has the money to pay for it, and she gives some to you. Sarah also describes the weather map that shows wind currents and places to avoid. You need to sail the ship with the wind as much as possible to conserve fuel. Go back to the police station and talk with the customs man. You pay for and get the parcel. You are to return in a half hour to sign the police report, and you are not to leave without permission. You agree, but somehow I don’t see that happening. Put the parcel in the large view, click it open it, and you get the needed valve. Go back to the hangar and out to the pump at the end of the platform. Insert the valve in pipe opening. Back away, go to the generator, and try the switch again. The airship fills with gas. Go back outside and talk to Sarah. After your goodbye, you and the Count go inside the airship. Go to the console on the right and place the map on it. Turn the red switch to superimpose the coordinates on the map. Now click all the panels that are active. There are five of them. Go to the control panel at the center. There you see the wind directions indicated by the arrows, along with the areas to avoid, the island with the palm tree (your destination) and the circle along the right edge that indicates the starting point of the airship. You need to chart your course. To do this, you need to use the four gold coins. Note: I spent a lot of wasted time clicking way on the map, all to no avail. I stumbled on to the gold coins completely by accident and desperation. I fail to see the connection, except, perhaps, that your destination is the Tree of Life and the coins depict the Tree of Life. You can play with charting the course, or you can follow this solution: Note: As far as I can tell, there is no way to reset the puzzle. If you make a mistake, just keep clicking various arrows until you run out of maneuvers. 1. Place the coins on the circle representing the airship. A series of dark arrows is shown. Still holding the coins, click the first arrow until it is facing northwest. 2. Go up to the next-to-last arrow of the series and click it to face due west. 3. Go to the next-to-last arrow of the series and click it to face northwest. 4. Go to the next-to-last arrow of the series and click it face “Perfect! The air route is ready.” Pull the red handle and off you go. Bimini Island You arrive over the island crater with the Tree of Life growing in it. Open the cabinet at the right and take the rope ladder, the brush, the spatula and the camp shovel. Zoom in on the floor hatch and open it. You need to secure the airship, so take the anchor that you see along the left side of the hatch. The anchor has to be attached to the structure on the right side. Because the ship is swaying, the arms of the structure come in and out of view. Pick up the anchor and hover in the general area. When the cursor becomes a bulls eye, you can attach the anchor to the structure, but you need to be quick. I found attaching it to the piece that sticks up in a northwest direction to be the easiest. Keep trying. Connect the rope ladder to the hooks at the bottom edge of the hatch and descend. You are on a ledge with a torch. Talk to the Count, who is euphoric. Zoom in on the rock beside the torch and see signs carved into it. Take the upper path to the thicket. Looks in the shrubs and gather some brush wood. Continue right and take some herbs and a dry branch. Go back to the landing area. and try to cross the bridge. The birds are threatening, so shoo them away with the dry branch. Now cross the bridge to the platform. Talk to the Count, who tells you about making juice from the Tree of Life fruit. Go to the back right to the fork. Zoom in on the junk beside the hut on the left. Take the rope, the fruit basket, and the torch. Zoom in on the down center screen stone covered with sand. Use the shovel to remove the sand and then use the spatula and the brush on the stone you uncovered. Note the symbols on the rock. Go to the village’s edge at the right. Zoom in on the crater wall at the right and take some moss. Underneath is what appears to be a drawing of fruit. Return to the fork and continue on to the village at the left. Keep going left to a bridge and take the wind sleeve. Use the lever to lower the bridge and cross over it. This brings you back to the thicket you have already seen. Keep going left back to the landing zone and take the bridge again to the platform where the Count is still standing around. Zoom in on the stone left of the elevator basket and the carved symbols. Look at the elevator basket to see that it isn’t working. The Count says it is activated in the village. Examine the three features of the vessel across from the Count.
Go to the fork
on the right and then on to the village at the left. Climb the ladder
built into the tall structure on the left. It leads up to the windmill
platform. Place the wind sleeve on the pole. Try to get a mental picture
of the direction of the wind.
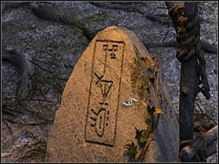
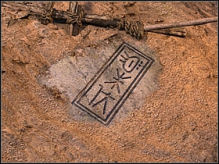
Note the lever right of the vertical shaft, but you don’t know what its use is yet. Go back down the ladder to the village. Zoom in on the panel at the lower left corner of the screen and see a lever on the left and two yellow buttons. The lever on the left is used to adjust the height of the windmill to one of three positions. The center yellow button turns the windmill clockwise, and the right yellow button turns the windmill counterclockwise. Your task is to turn the windmill so that it is facing into the wind. As you recall the wind sleeve, this means that the windmill should almost be facing you but a little to the left. A big complication is that at certain heights and directions, the levers are blocked and no more adjustments can be made. My solution, and there are surely many others, is to begin with the windmill facing to the left, due west, and at its lowest position (left lever all the way up). This is fairly easily accomplished. Now do the following: 1. Press the right button twice. 2. Lower the left lever once. 3. Press the right button once. The windmill, now facing into the wind and at the middle height, starts turning. Back away from the panel and go up the ladder on the tall left structure. The lever on the right is used to control the elevator and the water flow. You can experiment to see which way to pull the lever to activate the elevator, or you can use this hint. Pull the lever to the left. Go back down the ladder and go right to the fork. Follow the bridge in the lower left corner to the platform. Enter the elevator basket and take a ride up to the tree crown. Zoom in on the platform at the left, the part that is jutting out, and place the basket there. Place the moss in the basket to provide a soft bottom. Now you need to collect fruits to make the juice. The Count said that unripe and overripe fruits are used, as well as ripe fruits, so you need to pick everything you can find. Zoom in on the branches at this side of the platform. There are 7 fruits to pick here. Four are ripe, two are overripe, and one is unripe. Back away and zoom in on the branches at the right side of the platform. Here you can pick 6 ripe fruits. Back away and zoom in on the lone fruit hanging out over the chasm. You can’t reach it, though. Just left of the branches is a ladder. Take it up to the next level. Zoom in on the branches at the far left side. There are two fruits here, but you can’t quite reach them. Use the dry branch on one of them, and the 2 fruits fall harmlessly into the basket below. Zoom in on the bough at the right side of the tree. There is no fruit here, but touch it reveals that it is a solid bough. Use the rope on the bough. Back away and take the ladder back down to the lower level. Zoom in again on that lonely fruit at the right that you couldn’t reach. The rope you see is the one you just tied to the bough. Use it to swing out and grab that one fruit. Go to the basket on the far left of the platform and retrieve the 2 unripe fruits from it. Check your inventory and see that you now have 10 ripe fruits, 3, unripe fruits, and 3 overripe fruits. Go back to the elevator and take it down to the platform. Talk to Saint-Germain to report your progress. Now the fruits must go into the vessel. Look at the vessel and place your repaired jug in the tree stump just left of the vessel. Zoom in on the top part of the vessel and try to place a fruit into one of the holes. It’s not that easy. You need to know the “recipe.” Talk with Saint-Germain. He confirms that the fruits must be used in “proportion,” but he doesn’t remember the formula. He suggests that you talk to a native in the village. Show the coin to the native to get him to talk to you. Go to the fork at the back right and see the native sitting near the stone you uncovered. Talk to him, and he launches into a sing-song rendition of a poem. It was taught to him by Captain Briggs’ wife named Sarah. Click the coins on the native to get him to talk more. He tells you the rule: The proportion of ripe to unripe fruits on one side is the same as the proportion of ripe to overripe fruits on the other side. He won’t tell you which side is which. It sounds as though he is expecting Mrs. Briggs to return. Return to the platform at the lower left and zoom in on the vessel again. 1. On the left side, put 3 unripe fruits into the upper holes and 2 ripe fruits into the lower holes. 2. On the right side, put 3 ripe fruits into the upper holes and 2 overripe fruits into the lower holes. To fill the top holes, you are guided by the stone where the native was sitting.
The stone
shows one overripe fruit between two ripe fruits, so put the fruits I
that order in the center top holes. Now put the herbs you collected into
the bowl.
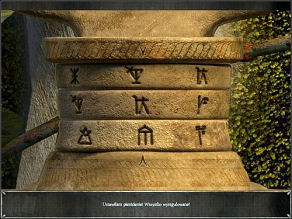
Suddenly, two members of the Brotherhood appear, and a startling story is told. They have been using the Tree of Life to attain immortality. You also learn more about Saint-Germain. Eventually, you are locked up in the prison hut. Talk with the Count who says that escaping is not enough. A weapon is needed. Clearly, he intends to remain here, even at his own peril. He is certain that the two of you will be killed because there is too little potion to go around. You deliver a morality speech, but the Count replies with his vision of a dark world in which all are immortal. He tells you about how he was here with Briggs and what happened to Sarah. Alpha and Beta were there, too. Now talk to the native and ask him to free you. He seems relieved that Sarah is dead, free from all of this. When he hears that you have four coins, he realizes that the prophecy will come true and the tree will die. He is glad that the end has come, and he frees you. Talk to the Count. He tells you to go the airship and get the gun. He will wait at the vessel. Click left and find that the bridge to the platform can’t be used. Keep going left to the bridge that you lowered earlier. (Or lower it if you haven’t already.) Cross the bridge and keep going left until you reach the landing zone. Climb the rope ladder to the airship. Go to the left bunk, slide the pillow away, and take the gun. Go back down the rope ladder and you give the gun to the Count. “It’s time to deal with them.” Go to the center screen and eavesdrop on the conversation between Alpha and Beta. Then the four of you engage in a debate and negotiation. Alpha knows how to set the rings, so he is ready to make a deal with the Count. The Count thinks you can figure out the settings. The interplay of greed and survival reaches a high pitch. Eventually you agree to complete the process of making the potion. First, you need water. Go to the fork at the back right, head left, and use the ladder on the left structure to climb the windmill. Pull the lever to the right twice to start the water flow. Go back down to the village. You also need fire, so cross the drawbridge on the left and return to the landing zone. You can’t take the torch, but you can light the one that you have. Come around to the left of the torch and zoom in on it. Use your unlit torch on the burning torch to get your own burning torch. Go down the bridge on the right to the platform and zoom in on the vessel. You recite the Count’s instructions. First, you need a fire to heat the water, so zoom in on the lower part (filter). Place the brushwood underneath and use the burning torch to light it. Note: After completing certain tasks, you will be distracted by further conversations in the group. When they are done, just return to what you were doing. Now you need to adjust the steam. This is done by pressing the buttons of the filter but not randomly. You will fail if you try to press a button that is adjacent to the previous button pressed. The easiest way around this is to press the buttons, alternately, in the first and third columns and then in the second and fourth columns. Finally, you need to align the rings in the neck of the vessel. When you zoom in on those rings, you see symbols similar to those on the three stones that you have encountered. If you haven’t made good notes, you can refer to the following
Your task is turn the rings to display the right symbols between the two arrows. But which symbols? The trick is to examine the three stones and determine which symbols are unique, i.e, appear only once on the three stones. For example, what looks like a gallows at the top of the stone on the left also appears on the stone at the right. That disqualifies that symbol. Here are the unique symbols: Left stone middle symbol Middle stone bottom symbol Right stone bottom symbol
Adjust the rings accordingly and watch the conclusion.
This document was provided to GameBoomers.com and may not be distributed without express written permission of the author and GameBoomers and the content may not be altered in any way. |