COGNITION: An Erica Reed Thriller
By Reverb Publishing & Phoenix Online Studios
Walkthrough by MaGtRo
Gameplay: This is a third
person game that can be played using either the keyboard or mouse.
When the game is opened; graphics (screen
resolution, graphics quality or windowed) and input (keyboard or mouse
changes) selections are shown. A check for updates is seen in the next
screen.
The main menu has new case, load case, settings
and quit.
Settings are for gameplay, audio and display.
The gameplay selections have hints, subtitles,
tutorials and language (English and German) options.
Audio selections have adjustments for master,
music, SFX and voices volume.
Display adjustment is for anti-aliasing.
Left click skips the cutscenes. Double click makes
the character run.
During gameplay; see a computer icon for main menu,
cell phone and question mark to show all active spots in the game screen at
top left of the screen.
The saved games can be relabeled.
The cell phone has the weather report, contacts,
web search, calendar, notes, text message, music and TSL episodes. Messages
in the cell phone have in game hints.
Cursor action: Click on
an item or character. See 3 choices appear: eye to look,
hand to take or suitcase to use the inventory.
Change characters: If
needed, different characters can play lead in the game. During those times,
see 2 character icons beside the power button-sphere.
To use the inventory:
Select the inventory square at top right of the screen. Select an item from
the icons on the column and
then select the action you want at left column. The actions available are
examine (eye), take (hand) and combine (+).
Thanks, Emily.
Review of Erica's current powers:
The
powers are activated by clicking the sphere at lower left
corner. See the aura on the game screen. Click the item with aura and
then the power icon inside the sphere to start that activity.
1.
Postcognition happens when Erica touches an object to see events associated
with its past. Postcognition auras are blue.
2.
Projection lets Erica see a past event manifest before her eyes, but she
must select three related objects first. Projection auras are green.
3.
Regression lets Erica view people's memories, but must physically touch the
person. Regression auras are rose-colored.
4.
Synergy lets Erica connect highlighted inventory items together while
cognition sphere is active to discover what past event links the items.
Episode 1: The Hangman
November 2012; revised February 2013
Get to Erica's brother.
Erica Reed, a Boston FBI agent and partner John
McCoy are rushing to get to the cemetery. Erica's brother Scott is held by
the Cain killer.
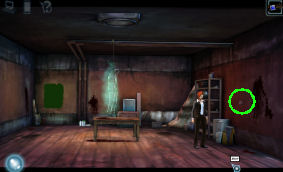
Cemetery gate:
Erica gets a message from her father and is told
to text him if she needs help.
A tutorial is seen.
The gate is already padlocked. Look at the
padlock.
Click on square at top right. Select the gun and
then the hand. See the gun icon inside the square.
The inventory has gun, Erica's badge
and cellphone.
Click on the padlock and then the suitcase
(inventory).
Center the crosshair on the padlock and fire.
Open the padlock. Erica enters the cemetery.
Cemetery courtyard:
Footprints: See
footprints and a dry fountain with a statue. Erica's intuition kicks in and
sees a past occurence.
Click on the footprint to open Erica's cognition
powers. It's seen as a sphere at bottom left.
Click on sphere and then the footprints to use
Erica's intuition on the footprints. See aura on the footprints.
Click the eye of the
cognition sphere. Erica sees the killer go behind the mausoleum right of the
sphinx statue.
Look at the statue and see that it is holding a
shovel.
Toolbox: Go behind the
mausoleum and find a toolbox. Open the toolbox and take the wire cutter
and hammer.
Soil: Use Erica's gift
on the footprints. See the killer dig at left side. Check the soil.
Shovel: Go back to the
statue at the courtyard. Look close at statue.
Use the hammer on the shovel to get the shovel.
See a vision of Erica's brother.
Talk to John to get him to follow her. Exit to the back of
the mausoleum.
Give the shovel to John so that he digs.
Take the item from the loose disk. Get a stone
wheel.
Mausoleum:
Entrance to mausoleum: Go
to the entrance of the mausoleum.
See the words written in blood: Only Reed Blood.
There is a camera on the left. They are being
watched.
Stone wheel:
Use the disk-wheel on the circular inset of the door. Try to turn it and it will
not go.
Look down on the floor and see a footprint inset.
It is a pressure pad. Stand on the pressure pad.
Turn the disk-wheel and see spikes come out of the wall.
So that is what the words mean. Continue to turn
the disk and Erica's legs and bent knees are stabbed.
The door opens. John is shot on the shoulder. Hear
Scott yell for Erica.
Scott: Enter the room at
right.
See Scott lying on the table tied to an electrical
system and a blade trap is pointed over him. He asks Erica to help him.
Examine the stone murals, candelabra and curtains.
The candelabra and curtains that are ritual trimmings are fire hazards.
Learn that the Cain killer targets siblings; like
Scott and Erica.
Check the trap over Scott and then the cable on
the floor.
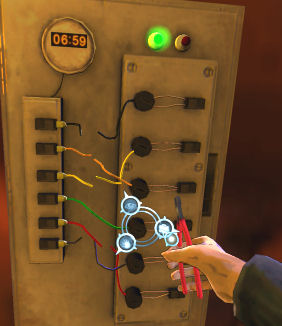
Control panel: Examine
the control panel at right wall.
Erica calls Terrence and asks help. After seeing
the control panel picture, Terrence says to cut the wires in reverse order
the wires are placed on the panel.
Use Erica's power on the black knobs that holds
the colored wires. See the order the wires were connected. Deduce the order
by the number of wires already connected. You have to do this for each wire.
Clip the wires attached to the knobs at right
(numbered from top to bottom wires on the left): blue (6), black (1), yellow (3), red
(5), orange (2) and green (4).
-If you do the sequence wrong Scott dies on the
table. You can continue or replay the control panel.
Cain killer: Whether the
control panel is disarmed or not - the killer
attacks Erica.
Be fast. Click on the killer's head and do action
punch. Then use the curtain behind Erica. Click to use the candelabra.
The Cain killer is wrapped in curtain and is
burned. He runs away burning.
Erica drags Scott to the entrance of the
mausoleum. Scott dies.
New Case.
3 years later:
Erica closes the Cain killer case on
her computer. Davies has ordered it be closed.
John arrives to inform her that there is a new
case.
Crime scene:
Officer Jonathan Duffer:
Talk to the policeman guarding the entrance.
Show Erica's badge to the policeman.
Duffer is a new graduate from the academy and is
very polite. Learn that the hanged man was found by a bum and there are no
witnesses.
Go through the police tape to go right by clicking
on the ground at right.
Check and enter-use the door to the warehouse.
Cognitive investigation:
Meet Director Davies.
Look around and use the cognition sphere on
the active spots.
Victim's body - Hanged man:
The cognition vision shows that the man was dropped on top of a dragged
table.
Table: The cognition
vision shows a circular artifact on the table. Erica's visions are
getting out of hand.
Blood on wall: The
cognition vision shows the circular artifact from the table kicked off
and rolled under the shelf at right.
Graffiti: Erica says
she will check it tomorrow when the others are gone.
Go to and check under the shelf. Get the
antique artifact.
Investigation information:
Terence Bowlby: Talk
to the man checking for fingerprint at back right.
Learn that no fingerprint is found in the
crime scene.
The victim can't be identified because the
fingers were skinned.
The killer had problem hanging the victim.
Erica shows him the artifact found under the
shelf.
Dr. Gallagher: Talk
to the coroner examining the body.
The victim is a white male in his early 40's
that died of strangulation.
There are no signs of struggle but the victim
looks like he was drugged first.
He suffered before he died. It took 30 - 40
minutes before he died.
Say hello to Gareth the photographer.
Director Madison Davies:
Report to Director Davies.
The victim died of suffocation.
The John Doe can't be identified. Victim
fingerprints have been skinned.
The leads on the killer show that the killer
was smaller than the victim. The killer struggled with the hanging of
the victim.
If a wrong answer is given, future events will
be slightly different.
Erica recalls the confrontation with Director
Davies when Davies closed the Cain killer case.
Erica gets another vision of picking up a gun and
shooting herself between the eyes.
John tells Erica to see Rose who runs an antique
shop. The shop is open all night; closed in the morning.
See someone looking from across the street where
the crime scene is located.
Antique shop:
Enter the antique shop. Talk to Rose. Be nice to
Rose; if not different sequence will happen later.
Learn that the antique artifact is a part of Le
Pendu. Le Pendu is a toy with roots from the French Revolution.
The artifact is old but has been modified to add
to the original.
Erica tells Rose about her vision problems. Rose
recalls John McCoy. He loves her coffee and sits by that table close to the
crystal ball.
Rose asks Erica to come back tomorrow. Erica leaves and rests for the night.
FBI Boston HQ:
Drive to Downtown; then to HQ.
Reception area: Look
around the reception area: Wall of Fame and Trophy case.
Talk to Gwen. Gwen offers help for any evidence
Erica needs.
Erica's desk: Work at
Erica's desk.
Sully talks to Erica about an antique piece that
is similar to the one Erica found.
-Choose to go out with Sully or not.
Computer: Use the
computer and read Davies e-mail to Erica.
The knowledge of Terence having the antique
depends on answering Davies' question at the crime scene correctly or not.
If correct; the antique is mentioned in the e-mail. If not, you have to
enter Davies' office and learn it from her computer later.
Erica wants to get into Davies'
office.
Read other e-mails from Sully, Terence and Erica's
dad.
Brian Reed writes that today is Scott's 3 year
anniversary. Dad reminds Erica to get some flowers. Logout.
Open the drawer and take some coins.
Check Davies' office and see that it is locked.
John: Go to the right end
of the room and go to John. Talk to John. He wants doughnuts.
Exit the building by going to the elevator. Use
the panel and select parking garage.
Morgue:
Drive to the morgue.
Terence: Talk to Terence
about the identifying the killer and John Doe.
Terence gives a lockpick now that Erica
checked Davies' office.
-After learning from Davies about the antique, Terence will show
Davies' antique part to Erica if she can find a way to get Gallagher give
Terence some storage space or you can force him to give it to you.
Gallagher: Use the
elevator to go to the morgue.
Talk to Dr. Gallagher. The victim was drugged but
the victim died of heart attack and stroke 45 minutes to an hour after the
strangulation.
Talk about Terence storage. Gallagher will
reconsider only after a direct order.
Examine the body: Check
the face and then use the cell phone to take a face picture.
Take a picture of the trident tattoo on his right
arm.
Examine the neck, right and left hands.
Examine the protuberance under a recent wound.
Exit and talk to Gallagher about the protuberance.
Get a piece of the antique from the stomach.
Take the Le Pendu piece from the cart
beside Gallagher. Note that the tape recorder is the old style one.
In inventory, combine the 2 Le Pendu pieces.
Check the desk and use the cell phone on the
telephone to get the direct line to Mary
Gallagher - x9154.
Exit the building.
Mt. Auburn Cemetery:
Go to Boston overview. Then drive to cemetery.
Erica forgot flowers.
Go to the bouquet of flowers on the grave at
foreground. Take a flower.
Place the flower on Scott's grave at left. Erica
talks to Scott.
Cordelia: Cordelia is the
sister of Max the grave that Erica took the flower from.
Talk to Cordelia sitting on the bench at left. Max
died 6 years ago.
Cordelia picks up Rose's card that Erica dropped.
She recognizes Rose and recommends her.
Erica's new gift - projection.
Antique shop:
Go to Rose at Antique Shop. Talk to Rose.
Erica is a Psion. Erica's gift is evolving to see
the future.
Rose teaches Erica to see memories from items.
Rose wants Erica to bring an item of John that is over 3 years ago.
Depending on the dialogue earlier with Rose, take
the box of donuts from the table.
FBI Boston HQ:
Drive to Downtown; then to HQ.
Davies' office: Use the
lockpicks on Davies' office door.
Enter and look around. Check the certificate,
whiteboard and painting. Check the mug on the desk.
Open the drawer and see a shredded paper - Another
one will be hanged tonight.
Examine the note from niece: Aunt Maddy, with love
Sammie.
Check the shredder and see that the top is off.
Computer: Use the
computer.
Password: Click on
the name down arrow to automatically get "Davies".
Click on the down drop menu arrow at right of
the password. Select "Aunt Maddy".
Click "submit".
Other mails: Look
close at the picture at right with He repented, will you? Davies
wrote Clarence to track the IP of the mail.
Read the mail about Antique. Davies wrote to
Terence about Erica's antique piece.
Terence's storage problem:
Click on Mary Gallagher's name under the contacts at right.
Automatically Erica writes a direct order to
give Terence storage space.
Logout and exit the office.
John: Look at and then
try to take the lighter on John's desk. Talk to John about Rose and the lighter
or distract him by giving him the box of donuts and then take the lighter.
Exit the building.
Antique shop:
Projection: Go to Rose at Antique Shop. Give John's lighter to
Rose.
Rose teaches Erica the power of projection.
Click on the sphere at left. See items with
memories in the room - green aura.
Select 3 items associated with John. Click on the
crystal ball at left where John likes to sit and then click on the table
that has the doughnuts. Lastly click on the lighter on the counter. Each of
these items changes to white instead of green colored.
Then click on the projector icon in the sphere.
Erica goes to John's projection. Exit the store.
Rose recalls her talk with John 3 years ago about
his demons and Erica.
Crime scene:
Drive to crime scene.
Graffiti: Use the
cognition gift to check the room.
Click on sphere and then check the graffiti. Click
on white smoke. See the killer leave a message and sprayed green paint over
it. Erica wants to see what is written.
Check the spray can on the floor and then examine
the green paint can to get GK4893.
Morgue:
Drive to the morgue. Talk to Terence. He was given
storage space by Gallagher.
Erica asks for the antique piece that was sent by
Davies.
Terence gives a gadget that is used for
reading graffiti. Choose the color of light similar to what you want to
project to and see what is behind. It can also transfer the picture to
computer.
In inventory combine the new piece of Le Pendu
with the assembled part to get partly assembled antique.
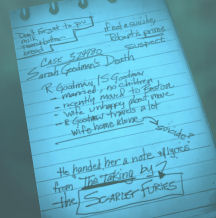
Old Case - Sarah Goodman.
Crime scene:
Drive to crime scene.
Graffiti: Take (hand
icon) the gadget. Enter the spray paint number color - GK4893.
Use the gadget on the graffiti. See the words
behind the paint: If your eyes could see what mine can't.
Projection: Click
the sphere. Select 3 items directly related to the victim: table, blood and
noose. Then click on the sphere at left.
Examine the projected body. Click on mouth, face
and then eyes. If I could only see what you saw. The message! What is
he looking at?
Go to the smeared wall at right and see a
niche.
Click on niche and Erica opens a small compartment
on the wall. Take the photo inside.
Erica e-mails the picture inside the niche to her
computer.
Turn the photo and see Not all hangings are
suicide victims. Search closer. Exit the room.
FBI Boston HQ:
Drive to Downtown; then to HQ.
Davies' office: Enter the
office.
Use the cognition sphere. Check the paper shredder
at right side of the desk.
Another one will be hanged tonight. When will
you see the signs? I've left something for you at the post office on Milk
Street. Maybe it'll open your eyes. Ask for Joey to help you.
Exit the office and building.
Post Office:
Drive to Post office. Look at and talk to postal
worker at right. His name tag says Joseph.
Show him the FBI badge. He gives Davies' package. Learn that there
is no sender info. It was postmarked from another
post office.
Package content: Use the hand icon on the
package in inventory to get scraps of paper and key. (Thanks,
Richard.)
Use the hand icon to see 4 pieces of colored
paper.
Use each paper to turn it to the back side.
Note only (no puzzle) that the words can be
arranged to form a sentence: She's my next victim -
6 1 7 4.

FBI Boston HQ:
Woman in picture: Drive
to Downtown; then to HQ.
Use the computer. Select Evidence from left side.
See the photo from the niche.
Use the magnifying lens on her extended hand to
show a bracelet with the name Sarah.
Click on Cases Databases. Use the Search by
Category at bottom of right frame.
On the drop down menu; select Suicide for Type of
Case, Hanging for Type of Felony/Cause and Sarah for Crossreference. Click
on search button.
Sarah Goodman: Read the case of Sarah Goodman File #000342980.
The investigators are Benjamin Trowler, Jared Sullivan and Madison Davies.
The FBI closed the case as suicide.
Click on the Print Evidence form request at top
right of the page.
Click on People Search. Select Sarah Goodman on
drop down menu. Read the info about Sarah.
Click on People Search. Select Robert Goodman on
drop down menu. Read the info about Robert. No known address.
Go to the printer at table bottom of screen. Take
the evidence form.
Evidence: Talk to Gwen at
Evidence counter at left about the Sarah Goodman case evidence.
Give her the evidence form. Gwen gives a
microcassette. There are several but she found only one.
Ask Gwen about a tape player.
John: If you went out
with Sully earlier, you can get the information from Sully directly. If not,
John will tell the information and how to get to Robert's location.
- Go to John and talk
to him. Inform him of what has been happening.
Sully: Go to Sully's
desk. Talk to Sully since he and Davies followed through the case.
Learn what they found at the crime scene and what
happened to Robert Goodman.
Sully gives the street where Robert a homeless
man now stays. Exit the building.
Robert's Alley:
Drive to Boston Overview and then Robert's Alley.
Talk to the bum. The bum turns out to be Robert.
- Show him the FBI badge. To convince him to help,
show Robert the picture of Sarah or just force him to to the station.
FBI Boston HQ:
Back at the FBI office, Erica leaves Robert at the
Interrogation room.
John: Go to John to
update him.
Save game here for choice on who
accompanies Erica in interrogation: John or Sully. (Thanks, John)
Interrogation room: Click
on the door of the interrogation room to enter.
Examine Robert to get close. Talk to Robert but he
is hungry.
Vending machine: Exit
the interrogation room and then exit the room John is in.
Go to Station. Take the egg sandwich bag
from Erica's desk.
Use the coins from Erica's drawer on the
vending machine.
The chips package is stuck. Hit the vending
machine to get the chips.
Go back to interrogation room.
Go close to Robert and then give him sandwich
(he wants something lighter) and then the chips.
-If you forced Robert to come here, he will
take the egg sandwich too.
-If Sully is with you, Robert will want to
talk to him. Ask for Sully's help.
-If John is with you, Robert now wants something sweet.
Antique shop: Exit
the 2 rooms and the building.
Drive to Rose's shop. Take the doughnut
box from the table.
Go back to Interrogation room at FBI HQ and
give the doughnuts to Robert.
New evidence: Show the
victim's photo to Robert. He recalls knowing the victim but can't remember
the name and where.
Use the cognition sphere and Erica wants to touch
Robert but he recoils.
Mt. Auburn Cemetery:
Exit the building. Go to Boston overview. Then
drive to cemetery.
Check the grave left of Scott's - it is Sarah
Goodman's.
Look close and move the leaves. Take Sarah's
necklace. Erica gets the vision of Sarah being murdered.
See that Cordelia is sitting on the bench. Erica
does not want to bother her.
FBI Boston HQ:
Recall memories: Go back to
the FBI office and Robert at interrogation room.
Show Sarah's necklace to Robert. It was an
anniversary gift.
Use the cognitive gift on Robert. Robert
tries to remember. The last time with Sarah was at a train station; when
Robert was leaving for a business trip.
Erica is now holding Robert's hand. Robert has
fragments of memories but they are fuzzy.
Erica says to ask Rose's help.
Erica's new gift - Regression:
Antique shop:
Go to Rose at Antique Shop. Talk to Rose.
Ask her about problems with Robert. Rose will
teach Erica regression.
Erica wants to recall Scottie's last moment.
Regression: Click on
sphere at left. See purple auras around a person. That means they are ready
for regression.
Touch the person and then click on sphere (head
icon).
Erica can't remember what Scottie's facial
expression and the color of his
jacket.
Click on Scott's face and change his expression to
smiling. Then change his jacket with green colored collar.
Click on head icon on the sphere.
Erica recalls the last moment at the mausoleum.
Cordelia was there at the time of Scott's death.
Erica grieves.
Morgue:
Tape recorder: Drive to
the morgue. Remember the tape recorder on the cart by Gallagher.
Go to the morgue; go close to body and to the cart.
Try to take the tape recorder. Gallagher refuses to let Erica use the tape
recorder.
Exit and talk to Terence. If you helped Terence
get the storage space, he will help with
Gallagher problem.
Automatically be at the morgue. As soon as Terence
starts talking with Gallagher, use the cart to get close up.
Take the tape recorder. Exit.
Use the microcassette with tape recorder
and then listen to the tape recorder in inventory.
- If you forced Terence earlier to get the antique
piece, distract Gallagher yourself by calling the morgue phone. While
Gallagher is answering the phone, take the tape recorder from the cart.
Robert's interrogation:
Hear Sully question Robert.
Last time Robert saw Sarah was October 12 2008,
Wednesday, their anniversary. Learn about the inside jokes written on
the note.
FBI Boston HQ:
Regression: Go back at the FBI
office and Robert at interrogation room.
Go to Robert. Do regression on Robert. Click the
sphere. Click his hand with purple aura and then click the regression icon
in the sphere.
Dress color: Click on
memory 1: Select a color of dress.
Ask Robert about Sarah's dress color.
Click on memory 2: See Sarah's picture on cell
phone.
Ask Robert about cellphone. Robert took a picture
of Sarah and then sent it to his sister.
Click on memory 3: See the text message from
Karina. Sarah is wearing a dress in Karina's favorite color.
Ask Robert about Karina. Learn that Karina's
favorite color is blue.
Go back to memory 1 and change Sarah's dress to
blue color. Exit regression.
Date and time: Use the
microcassette in tape recorder on Robert and he remembers the time 9:30 PM.
Use the cellphone and then select calendar. See
that the Wednesday before October 12 is the 8th.
Do regression again. Click on memory 2: Change the
date to October 08, 2008 and the time to 9:30 PM.
Talk to Robert again. He still can't remember
their anniversary date.
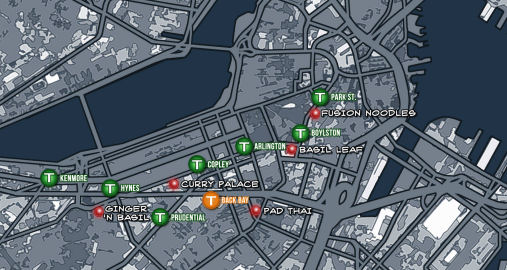
Station name and Thai restaurant:
Click on memory 4: See Robert and Sarah at the train station.
Click on the napkin both are holding and the
station sign behind them.
Ask Robert about napkin. It is a note. He cannot
remember the note.
Ask about the station. Robert remembers that they went to a
Thai restaurant by Boylston street and then went to the nearest station from
there.
Exit regression. Use the cellphone. Do a web
search. Select Restaurant. Click on lens search icon.
Then click on Thai for type and Boylston for
street. Click on lens search icon. See a map with the train stations and
Thai restaurants. Click out of map and see the list of restaurants.
Regress Robert again. At memory 4, talk to Robert
about restaurant name and see a list of the restaurants. Ask Robert by
clicking on the names of the restaurant. It is Curry Palace.
Change the station name to Copley; the closest
train station shown by the map. Robert still can't remember the station.
(One other way is to: Exit regression and the
room. Talk to John. John says that Curry Palace has the best curry in town.)
Note: Click on memory 5:
See partially readable note. Ask Robert about note message.
Exit and talk to John. Erica thinks reenacting the
events then will recall the note contents.
Projection:
-If you have John with you; go to Davies'
office at the station. Take the coffee mug on her desk.
Go back to Robert. Place the coffee mug on the
table.
Now we have 3 items needed for a projection. Click on sphere. Click on tape recorder, then
Davies' coffee mug and then Robert green projection. Click the projector
icon in sphere.
-If you have Sully with you; use projection on
tape player, Robert and Sully.
See the case note on the table. Read that Davies
closed the case as suicide because it is not a big case and will use up
resources.
Click - read the note. Read that the note written
by Robert for Sarah came from a song - The Taking by the Scarlet Furies.
Exit.
Get Robert to remember the note:
Open the cellphone in inventory. Select music. Check the music tone at
bottom: The Taking by the Scarlet Furies. Click set ringtone.
Use the cellphone on Robert and Erica will fake
that her phone is ringing. The music jogs Robert's memory about the song
and the note.
Get Robert to remember that day:
Do a regression on Robert. Click on all memories and click on the regression
icon.
He will recall the sequence of events and the name
of John Doe. John Doe is Antony Longmore, the only friend of Sarah.
Release Robert. Exit the room. John will take
Robert back to his place while Erica does a check on Antony Longmore.
The serial killer.
John Doe identified:
Automatically be at the station.
Erica gets a text message about good memories. The
sender O asks about Amy Lewis.
Longmore search: Go to
Erica's computer.
Select Person Search. Select Antony Longmore from
drop down menu.
See Longmore's fingerprint at right.
Select the light gadget in inventory.
Click on download below the fingerprint. Download
to inventory (light gadget).
Amy Lewis search: Select
Person Search. Select Amy Lewis from drop down menu.
Select Cases database. Select Amy Lewis from drop
down menu of case name search. It is another hanging.
John: Go to John at his
desk and talk to him.
Answer John:
They are looking for a serial killer.
His previous victims passed as suicides. This
was an obvious murder.
Sully: Talk to Sully at
his desk.
Longmore's apartment:
Drive to Longmore's apartment. The landlord said
that Longmore was moving out. Look around.
Rug: Check the rug and
then move it to see a compartment. Try to open the compartment and Sully
will take over.
Computer: Use the
computer. It needs a fingerprint bypass.
Use the light gadget with the downloaded
fingerprints on the fingerprint reader on the desk.
Read the letter written to Erica. It mentions that
Davies was not so perceptive.
The killer killed Longmore and implied that
Longmore is
a serial killer.
Click on the monitor to get the next page.
Read about Samuel Sewall. He is the only Salem
Witch Trial judge that repented.
It then asks for a memory card. Let's look for
one.
Safe: Check the safe in
the closet. A combination is needed.
Let's try the clue sent to Davies via the post
office package - the pieces of paper. Enter the clue deduced from those
scraps of paper - 6174.
Turn the handle.
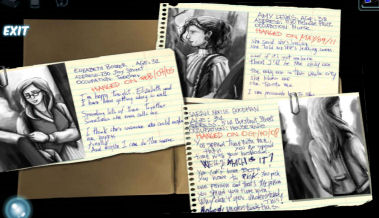
Case files: Take 4 Manila envelopes.
Read Tennessee victims folder. 3 women were killed
there.
Read Longmore's folder. He worked in NY and
Memphis in public transportation.
Read New York victims folder. There are 3 women
profiled in that folder.
Read Boston victim folder. See the 3 victims in
Boston - Elizabeth Bower, Sarah Goodman and Amy Lewis.
Read each victim's notes.
Check the victims:
Erica asks Sully to check the names. Sully calls the station.
Learn that all these women were suicides except
for Emilie Karlsson. She was reported as a murder. Nadia was not reported
missing or dead.
Select the correct dialogues to answer Sully:
Sully, Antony Longmore was a killer.
Those women from the safe are his victims.
He kills in groups of three.
He was moving out soon.
He killed three victims in every state except
New York.
Because of Emelie Karlsson.
He met them through public transportation.
Le Pendu: Sully finally
opened the compartment. It has ropes, tools and a Le Pendu piece.
In inventory combine all of the pieces to
get a complete Le Pendu.
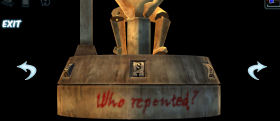
It has letters written on it - Who repented?
Turn the toy to the other side and see a keyhole.
Use the key on the keyhole. Now the letters can be
turned.
Start at letter above the words - Who repented. Click on the left arrow to form the name of the judge at the Salem witch
trial - SEWALL.
The noose comes down and pulls the hanged man. A
compartment reveals a memory card.
Memory card: Go to the
computer and use the memory card on the reader at right.
See a map and locations marked by yellow dots. A
trident (similar to the tattoo of Longmore) with circles at each point is at
right.
Turn the trident using the arrows so that the 3
top circles are over 3 yellow dots that show the address of the victims: 730
Joy St, 1170 Melrose Place and 514 Chestnut St.
If correctly placed, the yellow turns to red.

Old South Meeting House:
The bottom circle points to the Old South Meeting
house.
The 4 pieces of paper formed the picture of
Davies. She is the next victim.
Erica and Sully arrive at the building. Erica will
enter the building while Sully checks the tower. John is coming.
Erica enters and immediately shot upon. Her gun is
at other side of the aisle.
Killer: The killer is at
the pulpit at end of the aisle.
Look at the strange device at left. See the outlet
and debris at right of aisle.
Turn on the strange device and the killer shoots
at it.
Go right: Turn the
virtual presenter-strange device on again and immediately click on the gun at other side of
the aisle.
Take the power cord and Erica automatically plugs it on the
outlet.
Take debris from the pile at right.
Go left: Use the debris
on the virtual presenter and immediately roll back to the left.
Spotlight killer: Use the
lamp switch.
Take the gun in inventory. Continually shoot at the killer
at the pulpit.
Automatically, Erica shoots at the cord holding
the chandelier above the pulpit.
If the lamp is turned off, use it again and start
shooting at the killer.
Do this 3 times and see the chandelier fall.
Find out what happened to Erica, the killer and
Davies.
Episode 2: The Wise Monkey
January 2013
Watch a synopsis of the previous episode.
Review Erica's powers at beginning of the
walkthrough.
See a jar of ears and a jar of eyes. A hand picks up
a scalpel. Sully arrives and sees the crime scene.
FBI Boston HQ:
Inventory has Erica's badge-ID, gun,
tape recorder, lockpick and cellphone.
6 hours earlier: Erica
and Sully talks. Learn that a new director has arrived - McAdams.
Sully calls his new case The Wise Monkey. The
killer is a "her" because a recovered partial fingerprint was from a missing
girl and the latest victim was her teacher. Note that Sully's left ear has
an earclip.
The new office assistant Tess pours 2 cups of coffee
for Erica and Sully. Decide if you want a coffee or not. Sully takes his
cup.
John comes out of the Director's office and tells
Erica she's next.
McAdams: Erica enters the
office and talks to the new director.
Erica updates McAdams on how and what she
learned about Davies' connection in the case.
If you drank coffee, Erica starts getting
dizzy.
Answer McAdams anyway you want or select:
- Judge Samuel Sewell.
- I know I shouldn't have...
- The picture and the Fax...
- I thought you'd say that.
- I'm trying.
Sully:
If you did not drink coffee:
They hear a sound from outside the office.
Sully is gone. Erica sees the coffee cup, blood
and Sully's ear with the earring.
If you drank the coffee: Erica
goes out and sees the blond assistant take Sully. The killer cuts Sully's
ears off. Erica collapses.
McAdams wakes Erica.
Evidence: Look close at
the bloodstain. Pick up the silver guitar charm and check
the ear.
Click on the sphere at bottom left and then click
on the blue aura to use Erica's cognitive powers. Click on eye to activate
the memory within. They went down the fire exit stairs.
Parking lot: Go right
pass John's desk and enter the fire exit.
If you did not drink coffee: See
a sedan coming. Shoot at the car by placing the crosshair on the car and
click.
Erica notes that her tires are slashed. She calls
McAdams to report.
Erica experiences the old vision of being shot
between the eyes.
Car: Open the car trunk.
Hear a knocking sound coming from adjacent car. Take the tire iron.
Go to the yellow car at right and check the trunk.
Use the tire iron in inventory on the trunk. See
Tess tied in the trunk.
Interrogation room: Talk
to Tess Stamper completely. The killer does not have a southern accent; has
blonde hair and a coat.
Do a regression on Tess. Click on sphere at bottom
left; click on the purple aura on Tess and then the head icon at bottom
left.
Out of the 4 past memories, select the one with
Tess and the person by her car. See that the killer placed
something in her pocket.
Talk to Tess about pocket. Get a theatre masks
charm. Tess says that Cordelia came earlier to talk to Erica. Tess left Cordelia's phone number with Gwen.
Reception desk:
One hour later; Erica notes that the personnel were all called in.
Talk to Gwen at the reception desk. The 4 charms
from Sully's Wise Monkey case are missing and Gwen thinks the killer took
it.
Ask for Cordelia's number.
John: Talk to John
at his desk at far right.
Director's office: Enter
and talk to Samuel McAdams. McAdams gives Sully's case to Erica and access to
his computer.
Sully's desk: Look close
at Sully's desk (top left closest to Erica's now). Check the family photo and everything on his desk.
Check the Wise Monkey File.
Read ALL the cases:
Lavery, Colleen: Third
victim and killed at World Players' Theatre. Eyes and tongue removed.
G-clef charm found. She was a sophomore at Berklee College of Music.
Jensen, Luke: First victim
and his eyes removed. Silver violin shaped charm was found. She was a recent
graduate of Berklee College of Music.
Stewart, Nick: Alias DJ AB
Horrence. Ears were removed. Bell shaped charm found.
Anne, Heather: Recent victim
and music tutor. Eyes, ears and tongue removed. Piano charm found.
Partial fingerprint on piano charm confirmed
as that of Kelsey Gardner. Kelsey was reported missing and suspected
runaway.
Take the wise monkey file.
Computer: Use the
computer. Read the e-mails.
Check the Case Database. Click on the drop down menu of the "Search by case
name" frame. You can read about the old cases if you want (Cain, Sarah
Goodman and Amy Lewis).
Read the Wise Monkey case. Learn about Kelsey
Gardner, a former student of Heather Anne and at Berklee College. Why Sully?
Print the evidence form of the Wise Monkey case.
Check the People Search. Select Kelsey Gardner on
dropdown menu. Kelsey didn't report at the coffee shop where she worked after May
30th.
Logout.
Printer: Go left of
station to the printer. Take the evidence form printed.
Evidence desk: Go to Gwen and
give her the evidence form. Get the bell charm (second victim).
Erica says she has done everything here - time to
hit the streets.
Go to the elevator and exit.
Berklee College of Music:
See the map. Drive to Berklee College.
Talk to Dean Chapman completely.
Kelsey lost her scholarship and had financial
problems. She was majoring in singing and was in Dean Chapman's class.
Chapman says he didn't know Kelsey really well.
Luke Jensen tutored Kelsey in Composition class.
Her grades started getting lowered later (from B to D).
Colleen Lavery was a singer. The scholarship
that Kelsey had was later given to Colleen.
Dean Chapman will give Erica the address of
Kelsey's old roommate.
Check the items in his office. Beatles!
Check the Berklee stationary at bottom left of the
room. Try to get a stationary. Lie to get one now or later if you select "truth".
Exit and see roommate Melissa's apartment in the
map.
Antique Shop:
Click on Boston overview in the map. Drive to
Antique Shop.
Talk to Rose Duvalier.
In inventory combine Cordelia's phone number
with the cellphone. Click the + icon and then click on both cellphone and
phone number.
Erica calls the number and gets a recording that
the number is wrong or not in service.
Talk to Rose again and get a new dialogue. Select
"help". Rose says she can help if there is another item that is
present at
exact time the item that is being worked on was done - Synergy.
FBI building: Exit; go
downtown and drive back to the FBI HQ.
Tess' desk: Look close at
Tess' desk right of Gwen - reception desk. Take the fuzzy pink pen.
Antique Shop: Go back to
the Antique Shop. Give the pink pen to Rose.
Learn power of Synergy:
Click on the sphere at bottom left.
Open inventory and click-select the items that can
be combined or synergized. Combine pink pen and Cordelia's phone number.
Click on the combine icon - synergy at bottom left. Erica
learns that more items combined in synergy might make the memory clearer.
Cordelia's phone number: Use
the cellphone at top left and select Cordelia's phone number.
Cordelia will meet Erica at the cemetery where her
brother is.
Mt. Auburn Cemetery:
Go to the cemetery. Talk to Cordelia sitting on
the bench. Learn that she remembered Erica the night her brother was killed
because a man has been following her. The man is scarred (fire-caused?) but Cordelia remembered his eyes. The man was there at the cemetery also that
night.
Erica promise to send a car to the Enthon Towers
by the river where Cordelia lives.
FBI HQ:
Go back to the FBI station.
McAdams: Go to the
director's office and talk to McAdams about the patrol car. He refuses.
Get a car to Cordelia's place:
Talk to Gwen at the reception-evidence desk.
Ask about the guitar shaped charm left with
Sully's ear and learn that it is a new one.
Ask about interagency request form and Gwen
gives one. Gwen has a lot of papers to be signed by McAdams.
Offer to help and get a stack of papers to
be signed.
In inventory combine the interagency request form
and the stack of papers to get stack of paper with form.
Go back to Director's office and give the stack of
paper with form to McAdams.
McAdams signs the top one. Exit.
Go back to Gwen and give her the signed
interagency request form.
Erica asks Gwen to Fax the interagency form to
BPD. Erica calls Cordelia about the police car.
Melissa's apartment:
Go to Melissa Carubia's apartment now that the
Boston Police is sent to Cordelia's place.
Look around at the apartment. Check the Jaunty
Abyss poster right of the kitchen and learn that it is about DJ Ab Horrence
(the alias of one of the victims).
Talk to Melissa. She is a senior at Berklee. Learn
more about Kelsey's financial problems and the DJ that taught Kelsey her how
to spin.
Kelsey worked at the Dean's office.
Kelsey's boyfriend paid off the money owed to
Melissa. Joey worked at the post office.
There was a silver charm that was sent to her this
morning but she can't remember where it is.
Try to do a regression on Melissa. Talk to Melissa
and then click on the sphere at bottom left and the aura of her hand. Erica
tries to hold her hand but Melissa say not while she is trying to contact
the spirits.
Check the coffee table and see tarot cards.
Antique shop: Go to antique
shop. Get a Ouija board from Rose's counter.
Melissa's apartment: Go
back to Melissa. Give the Ouija board to Melissa.
Then do a regression on Melissa after she sings to
the spirit.
Click on all 4 events. Take note of the clock on
the desk.
See that when she did the yoga it was 7:35; she
drank water at 7:54; ate apple at 8:03 and got mail at 8:15. Exit.
Talk to Melissa and then click the order of the
earlier to latest events: yoga, water, apple and mail.
Melissa remembers that she placed the charm in the red jewelry box on
the dresser.
Erica goes to the jewelry box. Take the piano charm that
was originally left at Heather Anne's body (last victim).
Take the post office key that Kelsey left
with Melissa.
Erica warned Melissa about Kelsey and told to go
stay with friends.
Berklee College:
Go to Berklee College and talk to Dean Chapman.
Click on dialogue - Kelsey worked here. Erica will say that he will deny
this but the files should be at the cabinet.
Click on the filing cabinet left of window and
Erica will confront the Dean. Ask about a possible affair. Exit.
Kelsey's apartment:
Click on Boston overview in the map. Drive to
Kelsey's apartment.
Look around. Check the posters above the expensive stereo. The
3 posters are that of DJ Ab Horrence, Into the Woods that feature Kelsey and
An Evening of Opera that features Kelsey and Colleen.
Read the note left by Kelsey's parents on top of a
fancy electronic keyboard at bottom left.
Check the package on the table. It is addressed to
Sully. Open it and see a puzzle box.
Puzzle box: Try to
open the puzzle box.
Do a synergy action on the box. Click the
sphere at bottom left.
Open inventory and select-click the 4 charms
that have been collected: bell, piano, guitar and theatre masks.
Click on the synergy icon inside the sphere.
See Kelsey and Joey. Kelsey is upset and opens
the 3 monkey puzzle box. She places an SD card inside an envelope.
Another memory: See
another memory. Do another synergy action. After using the 4 charms; the
3 parts memory is still fuzzy. More charms are needed.
Open the box: Click the
puzzle box now. Erica automatically opens it since the trick was
shown by the memory.
Erica sees a vision of Sully and one of his
eyes are removed. The box contains Sully's eye, G-clef charm (third
victim) and Kelsey's demo CD.
Erica calls her dad for support.
CD: Use Kelsey's demo
CD on the stereo. Listen to Kelsey singing.
Check the TV, chair, bed and Erica notes that the
furniture are second hand.
Check the mail on the small table left of the
bathroom. Take Kelsey's empty envelope.
Check the vent above the small table. It is
missing a screw. We need something to open it.
Post Office:
Go to downtown and post office.
Go to the clerk and talk to him. Ask about Joey
Goethals.
Show the clerk Erica's FBI ID card to get Joey's
address.
PO Box: Go left to the PO
Boxes.
Use Kelsey's PO Box key on the PO Boxes.
Find out which box is Kelsey's:
Do a synergy action on the boxes.
Click on the sphere at bottom left. Open
inventory and click on Kelsey's PO box key and the envelope taken from
her apartment.
See a vision of the PO Box - #303.
Use Kelsey's PO Box key on the PO Boxes again.
Erica opens the PO Box. Look at envelope that
has been here for a while and is addressed to Kelsey.
Take the envelope and screwdriver
inside.
Letter: In inventory,
open-hand the envelope twice. Read the threatening letter. Learn that
Kelsey is asked to stop and is threatened if she continues. Part of the
letter has been ripped off.
Joey's place:
Drive to Joey's place. Check the door on top of
the stairs. See that the door doesn't have a handle.
Check the locked fuse panel and the wires that
connect it to the door. Leave.
Kelsey's apartment:
Click on Boston overview in the map. Drive to
Kelsey's apartment.
After noting that the vent is missing a screw, use
the screwdriver on the vent.
Take the envelope inside the vent. Open the
envelope in inventory to get a memory card.
Memory card: Combine the
memory card and the cell phone.
See the financial records of Dean Chapman.
Chapman has been getting money from Susie Kay Lending Institution that gives
out student loans. Erica is not sure if this is real.
Verify the letters: If
you do have a Berklee stationary, go to Berklee College and get one by using
the truth response.
In inventory combine the threatening letter and
Berklee stationary. They match.
Use synergy action on threatening letter and PO
box envelope. See Dean Chapman place the threatening letter in the envelope.
Berklee College:
Accuse Dean Chapman. As proof; show the memory
card to Chapman.
Show the threatening letter to the dean to show
that it is not falsified.
Talk to Chapman about truth.
Chapman got a package this morning. He gives
a violin charm (first victim) to Erica.
Crime scene:
Charms synergy:
Go to any location.
Do synergy
action on all 6 charms. Click on sphere at bottom left. Open inventory and click on all 6 charms.
Click on synergy icon and see three different
crime scenes: Dumpster, gate and street sign. This is the alley that
Longmore was killed.
Note which charms go with different
scenes.
Crime scene: Drive to the
crime scene.
Place the correct charm on the appropriate crime
scene.
- Use the G-clef and violin charms with the
street sign - Erithan Ave. Exit.
- Go right and look close at dumpster located
left of door. Use the guitar and theatre masks charms with the dumpster.
Exit.
- Go right and look close at gate. Use the
bell and piano charms with the gate. Exit.
Do projection action on the 3 crime scenes
with green aura. Click on the sphere at bottom left. See green aura on
crime scenes.
Click on all 3 green aura and they will turn
gray. Click on the projection icon at center of sphere.
Click on the projected body right of dumpster.
See Kelsey and Joey and what happened to her
charm bracelets. I will make you perfect.
John: Exit or click on
the car. Automatically Erica calls John and reports to him.
Go to either the post office or Joey Goethal's
home.
Wise Monkey lair:
Drive to wise monkey lair.
Climb to and click on door. Get an e-mail from
Oracle. Oracle writes that Sully didn't understand.
Use the lockpick on the fuse panel at left. Click
on screen (voice activated lock) and then press button. Select any dialogue. Erica's voice doesn't
work.
Morgue:
Drive to the morgue. Use the elevator to go down
to the morgue.
See that there is a tape beside Davies' head on
the table. Gallagher tells Erica to leave the autopsy room.
Get the tape: Erica
is now at front desk.
Use the fire alarm by the door.
Hide by clicking on counter - Terrence's desk.
Erica hides.
See Gallagher leave the building.
Go down to the morgue via elevator.
Look close at Davies on the table. Take the blank
tape by her head.
Examine Davies. Look at Davies' wrist. It is the same tattoo on
the hangman.
Use the cellphone in inventory on Davies' wrist. Learn about the
meaning of the tattoo - psi.
Exit the morgue and meet McAdams and Gallagher.
Kelsey's apartment:
If you haven't used Kelsey's demo CD on the stereo
do so now.
In inventory combine the blank tape and tape
recorder.
Use the tape recorder on the stereo and tape
Kelsey's voice.
Wise Monkey lair:
Drive to wise monkey lair.
Look close at the fuse cabinet and use tape
recorder with Kelsey's voice on the screen-voice-activated lock. Door opens.
Look around. Check the sketches by the door.
Jars: Check and examine
the shelves to see the 4 jars.
Check the tray below the jars. Open the tray to
see the organs-trophy wall.
Check Kelsey sketches at right corner. See that
Kelsey's sketch have mouth, ears or eyes erased.
Check the music sheets at bottom of screen.
The panel on the interior door at right turns
green.
SAVE HERE! There will be no saving possible when
the test starts.
Interior door: Check and
then use the panel on interior door.
See a closeup of the panel. Click on ENTER. See
Sully strapped on wall panel with lethal injection primed to be used if he moves.
The panel shows a quiz. (We need more info).
Exit the close up.
Turn left to the shelves (didn't leave
the test area).
Identify the organs: Click
on cognition sphere and see aura on the jars and organs. Do this on
individual organs and they will be identified and taken.
Eyes = Colleen, Heather, Joey and Luke;
Tongue = Colleen, Heather and Joey; Ears = Heather, DJ Ab
Horrence, Joey Goethals.
Synergy:
Do this procedure to perform the synergy
action:
Open inventory. Click on sphere at bottom
left. Click on associated items in inventory. Click on synergy icon
at bottom left. Check for unique items in the memory. Exit.
- sphere, Colleen's eyes, G clef charm,
Colleen's tongue, synergy icon, exit. See that Colleen is on
the HMS Pinafore.
- sphere, Heather's eyes, piano charm,
Heather's tongue, synergy icon, exit. See that the music sheet
beside Heather is La Boheme.
- sphere, Joey's eyes, Joey's tongue,
Joey's ears, synergy icon, exit. Joey is supposed to be the Wise Monkey
killer.
- sphere, Luke's eyes, violin charm,
synergy icon, exit.
- sphere, DJ's ears, bell charm, synergy
icon, exit. See DJ's cigarette falls off.
Quiz 1-4:
If a mistake happens in the quiz, Sully is
injected and it knocks him out.
If 2 mistakes in the test happens; Sully is
again injected and is paralyzed.
To give him oxygen so he can breathe,
answer another question. The first victim of the Wise Monkey is Kelsey.
If 3 mistakes are done, Jared is injected for
the third time and is killed. Game ends. You can quit or retry. A
mourning Erica is KIA.
Question 1: Match the
person with the charms.
A3 - Colleen and G clef charm.
B5 - Luke and violin charm.
C6 - Nick and bell charm.
D2 - Heather and piano charm.
E1 - Jared/Sully and guitar charm.
F4 - Tess and theatre masks charm.
Question 2: Last song of
Heather Anne is La Boheme shown by music sheet.
Question 3: Nick-DJ is
smoking a cigarette in alley.
Question 4: Colleen's
final performance is HMS Pinafore.
Quiz 5 - Configuration:
To answer this quiz, 4 clues are given. Each clue consists of the organs
in inventory.
You have to place the organs in respective
jars. Do cognition. Then Erica will say what configuration is in that jar.
Turn left to jars.
For each jar - Click on sphere; click
on jar; place correct organs in jar based on the clue given for that
jar-number by quiz 5 and then click on cognition
icon. Click jar again to get the configuration of that jar.
Jar 1: Tutor - Luke's
eyes, spinner - DJ's ears and rival - Colleen's tongue.
Configuration is angel.
Take all 3 organs again to be placed in
inventory.
Jar 2: Young woman -
Colleen's eyes, DJ's ears and old woman - Heather's tongue.
Configuration is lover.
Jar 3: Teacher -
Heather's eyes, teacher - Heather's ears and lady sailor - Colleen's
tongue. Configuration is starlet.
Take Colleen's tongue and Heather's ears.
Jar 4: Composer - Luke's
eyes, opera singer - Heather's ears and rival - Colleen's tongue.
Configuration is darling.
Turn right to panel. Go through the clues
again and then press enter.
Answer angel, lover, starlet and darling.
Press enter.
Quiz 6: The spare
organ is from Joey Goethals.
Erica enters the room and goes to Sully.
At Enthon Towers, see what happens to Joey.
Episode 3: The Oracle
May 2013
Watch a synopsis of previous episodes.
Erica is watching Sully at the hospital. Erica's
father; Brian arrives. John calls and informs Erica not to worry if he is
not in contact for a day. John is going to the Enthon Towers. Brian recalls
that there was a brother-sister murder case at the Enthon Towers. Erica leaves to
go to Enthon Towers. Brian recalls that the siblings in that case were Max and Cordelia
Smith.
Review Erica's powers at beginning of the
walkthrough.
Outside the Enthon Towers:
Erica arrives at Enthon Towers.
Talk to Officer Duffer. Learn that evidence were
removed immediately by order of McAdams.
Door: Try to open the
entrance door and see that it is locked. McAdams comes out and talks to
Erica. A dapper man comes out and talks to McAdams. The dapper man goes back
to the tower after doing something to the black panel on the column.
Continue to talk to McAdams. There is to be no
more investigation in this Tower. The case is now given to the local police.
Check the black control panel.
Officer Duffy: Do a
regression on Officer Duffer. Click on all the memories especially the one
with the sideview mirror.
Duffer remembers that a piece of metal fell from
above.
Crime scene: Go to the
destroyed police car. Check the police cruiser, broken glass, blood on
ground and street.
Cognition: Use cognition
power on the police cruiser. See Joey fall off the tower and a key chain
fell off too. Use the hand icon on the cruiser to get the keyfob. It
has that psi symbol.
Bushes: Look at the
bushes at right to see if the metal thing is there. Take the black flower
at upper left of the inset screen.
Check the bench and the police van. The van is
locked.
Police van: Talk to
Duffer. Duffer gives the van key.
Go to the police van and use the van key to open
the door.
Take the knife, road cone and
police tape. You can play with the lightbar later.
Synergy: Do a synergy on
the knife and black flower in inventory. See that the knife was used to cut
the flower from the garden balcony. That was where Joey fell from.
Make a distraction: If you get
near the door McAdams will yell to tell Erica to leave.
Use the road cone and police tape on the cruiser.
Now to get attention, go back to the van and use
the lightbar switch. McAdams comes out; then the dapper man.
Erica leaves the crime scene. Use the keyfob on
the black panel on the column.
Balcony of the Tower:
Lobby: Erica recalls her
nightmare again.
Check the sculpture, painting, camera and bush.
Use the elevator. Meet the Dapper man. He says his
job is to make that living here is frictionless. He also knows Erica's name.
Balcony foyer: Erica
mentions that something was installed in her phone.
Check the cell phone. Select Dossier and read
Terence's message. Erica can even check old scoring records in sportscasts.
Exit the cell phone.
Look around at the foyer and then exit to the
balcony.
Balcony: Look at the
view. Look close at the table and see John's lighter.
Do a postcognition on the lighter. See John and
he's following a lead. He mentions the name Jeff Therrrien
Take the lighter.
Check the flower, pot and then the blood
underneath the box.
Move-use the flower box to expose the blood.
Do a postcognition on the blood. See someone
with a gun pointed at him. Use the gun.
The next scene shows Davies interrogating
Cordelia. Cordelia admits that she killed her brother.
See the Hat killer holding Joey but the killer is
talking to Erica. The killer mentions that there is a connection with Erica
and how well she can investigate better than her co-workers. The killer says
that Erica might be able to save John yet but not Joey.
Cut Joey twice. The hat killer is revealed.
Cordelia says: Erica, please don't disappoint me.
See the Game intro.
Rose: Use the cell phone.
Call Rose by opening the contacts list and clicking on Rose's name.
Rose says that Cordelia is also a Psion. John is
in danger. Cordelia can see the future while Erica can see the past.
Table: Check the table and see
the ear that was the last evidence from the wise monkey case.
Take the penthouse keyfob. Exit the
balcony.
Penthouse:
Use the elevator and select 33 penthouse. Look
around at the different furniture.
Learn whose penthouse this is:
Go left to the kitchen and the dapper man arrives.
Talk to Skorobeus to learn that he is the Smith's
family lawyer and that this is Cordelia's penthouse. He leaves a note given
by Cordelia for Erica on the table.
Read the note written by John for Cordelia. It
mentions that John investigated Cordelia's brother's situation.
Do a postcognition on the note. Watch as Erica
sees a vision of Cordelia visiting the FBI office.
John vision:
Learn the tutorial. Erica can leave the vision by
clicking on the smaller right circle attached to the powers (orange for
Cordelia instead
of blue for Erica) at bottom left of screen.
You are now Cordelia. Talk to John. John gives
Rose's card to Cordelia. There is a notebook at top left that Cordelia
writes down her thoughts.
Call Rose: Open inventory
and use the + combine icon. Combine the cell phone and Rose's card.
Cordelia moves away and calls Rose Duvalier. Rose
teaches Cordelia to control her powers the same way she did with Erica.
Rose says that some things she sees are fixed but
some can be changed.
John: Back in front of John.
Look at the stack of folders on the table. It has
Maxwell Smith, Cordelia's brother on it. It also has the ID case#.
Click on the case number and Cordelia and Erica
make a comment about it.
Exit Cordelia's view. To exit, click on the small orange
circle right of the power orange ball.
Max' office:
Go to the door at upper right (left of the TV).
Look at everything in this room.
Envelope: Check the
envelope on the desk.
Do a postcognition on the envelope. See a
discussion between Cordelia and Max.
Keith vision:
Max: As Cordelia, look
around. Talk to Max. Learn that Max is upset because Keith, another brother
refuses to sign the paper that will release his claim on the Enthon Towers.
Keith designed the Enthon Towers. See Max opens a safe on the wall. Max
gives the unsigned documents to Cordelia. Max is worried that he is
becoming like his father.
Powers: Exit the office.
Cordelia's powers are evolving.
Do a postcognition on the black flower and see the
killer cutting the black flower.
Go to the left and up the spiral staircase. Look
around at the objects on the way.
Keith: See Keith, the
other brother at the Art room. Look around at the different art objects and
the model of planets.
Talk to Keith about his design problem. Keith is
proud of the Tower design. Talk to Max completely.
Orrery: Learn what
Keith's current project is. He is working on the orrery. His problem is to
know which right wrench to use on the right planet adjust and to know the
right direction to turn the wrench to.
Keith places the 3 wrenches on the table. Leave
the discussion and the vision.
Erica: As Erica, leave
the office and go left. Go up the stairs to the art room.
Do a postcognition on the orrery. See Keith and
learn that the small wrench is not the right tool and that the green planet
should be worked on. To use the wrench, it must be jiggled while
turning.
Cordelia and orrery: Return to
Keith vision by clicking on the small blue circle at bottom right and select
Keith.
As Cordelia, she knows what Erica learned. Talk to
Keith about fixing the planets.
Use the medium wrench. Work on the green planet.
Jiggle the wrench and turn it clockwise.
Documents: Now that Keith
can move on to the next project, give the unsigned documents to Keith. Keith
signs the documents after asking who is the other cosigner (Jeff Therrien)
on the document is. That is the same name mentioned by John in the balcony
vision.
Go downstairs. Cordelia walks to the kitchen and
sees a vision of Max dying. Cordelia faints.
John vision:
As Erica, check the small blue circle and see that
Keith vision is now done and grayed out.
Go back to John vision and see if there is
anything to learn there. Click on John circle.
John at FBI office: Talk to John about Max being killed. John is
worried about the football game. Talk about the vision.
John gives Rose's card. Ask about team losing to
learn about the Patriots-Redskins game and his money riding on it.
Say Goodbye to exit the discussion. Click the
small orange ball to exit the vision.
As Erica: Use the cell phone.
Do a web search; click on football and then the magnifying lens to do a
search.
Select Patriots from the AFC East and Redskins on
NFC East. Search. Get the info Oct 15; Patriots 22 and Redskins 20.
As Cordelia: Go back to
John vision. Talk to John about the Patriots winning.
John raised his bet on the game. John opens a case
file on Max. He gives Cordelia the case number to check the progress of the
investigation.
Cordelia leaves. Hear that the Patriots is winning
the game because of a Redskin fumble.
John vision is finished and grayed out.
Cordelia's room:
Go downstairs and go to the left of the spiral
staircase. Enter Cordelia's bedroom. Look around at all items.
Bed: Open the right
and then left drawer under her bed. Erica takes the folder 1 and
reads it. It is a folder about Madison Davies (episode 1).
Read the Samuel McAdams file behind Davies'. Learn
that Cordelia is after McAdams also.
Check the drawer of the desk and see that it
cannot be opened.
Closet: Open the closet
left of the bed. Check the books.
Read the journal-folder 2. The journal has
notes about the hangman and wise monkey.
Do a postcognition on the jewelry.
Cordelia's fainting vision:
See that Cordelia is lying on her bed after she
fainted in the kitchen. Keith and Max worry about Cordelia. Max talks to an
unconscious Cordelia.
Cordelia calms Keith and sends him away. Cordelia
warns Max about her vision of Max being killed. Cordelia tells Max how to
open her drawer. There's a push a catch underneath the drawer. Cordelia
gives the signed documents. Max is evasive about Jeff Therrien.
See Max getting their mom's necklace from drawer.
Cordelia and Erica meet face to face in the vision. Cordelia talks to
Erica.
Cordelia's vision is finished.
Cordelia's drawer:
As Erica, open the drawer of the desk. Read
Cordelia's notes on the Hangman's case and the psi symbol. Learn about her
thoughts about Jared-Sully and baiting Erica.
Take note of the order in which they suffered and
the connection to the combination of the safe.
Read John McCoy and Jared Sullivan's files.
Sully's file shows the reason why he was
targeted.
Max' vision:
Projection: Read the
Dossier and see the notes on Max' case #0651192C. Evidence was found on
glass table, trash can and chipped vase.
Go to the kitchen and do a projection on the 3
items mentioned on Max' case file. See green aura on several items.
Click on left chipped vase on dining room table;
trash can in kitchen and the glass table in living room. Click on projection
icon at bottom left.
See McAdams and Davies shapes appear in the living room.
Postcognition: Do a
postcognition on the McAdams and Davies forms. Watch as the 2 FBI
investigators ask about Max. Learn Davies mention John McCoy to Cordelia
after she asks for help about her vision of Max.
Max arrives and whispers to Cordelia to take the
papers in the dining room table.
Go to the dining room table at left and try to
take the papers. Davies stops Cordelia from picking it up.
Distract McAdams: See that
McAdams go to the kitchen.
Do a postcognition on the papers on the kitchen
island. McAdams says something about seeing something placed on the papers.
Go to the bedroom and take mom's necklace
from the jewelry rack.
Go upstairs to Keith. Talk to Keith. Look at
workdesk and take the pen. It's a handheld tracker that beeps when
combined-track non-ferrous metal.
In inventory combine the pen with the necklace.
Place the necklace on Keith's workdesk.
Exit the art room.
Place the pen-tracker on kitchen island. Watch as
McAdams finds the pen and goes upstairs to Keith.
Distract Davies: Do a
postcognition on Max' papers on the dining room table. Hear that Davies
wants to take Max after getting the papers on the dining room table.
Cordelia wants to change the events.
Look-click on Max to learn that Davies wants financial
records.
Go to Max' office. Use the phone on the desk. In
close up, click-use the phone at left.
Cordelia talks to Skorobeus.
Ask Skorobeus to bring files; Max' old financial
records (ask first about Jeff Therrien and Skorobeus sounds vague about it).
Then tell him to give the financial records to Max.
Go to living room and see Skorobeus bring the
papers to Max. Davies takes the papers.
Go to dining room and take Max' papers-signed
documents.
Enter the bedroom and try to read the signed
documents. Place the papers in Cordelia's closet.
Max: Exit the room.
An agitated Keith and Cordelia confront Max. Learn that there is something Max
is working on with Skorobeus.
Dossier:
Open the cell phone and read the different
dossiers.
Learn that Maxwell Smith died October 2005. He was
identified only by dental records because the body was severely burned.
Learn that Keith Smith's whereabouts are unknown.
Read John's investigation. Learn that Cordelia
confessed to killing Max. John does not believe it. The room where Max' body
was found is burned and the body is mostly bones. There was a bullet mark on
the rib as well as striations and impact marks. Learn about an argument
between Max and Skorobeus. Skorobeus had something in his hand when he left
the penthouse.
Look around:
McAdams: Use the elevator and
talk to McAdams.
Show John's lighter to McAdams. The situation is
delicate.
Lobby painting: Check the
lobby painting and see that it is an orange classical painting. It is signed
in red paint.
Garden Balcony: Use the
elevator to go to the garden balcony.
At the foyer, talk to Skorobeus. Learn that
Skorobeus struck Max one night with Cordelia's necklace when they were
burning old documents.
Balcony painting: Study
the painting. See that the red painting is signed in white paint.
Cordelia's room: Use the
elevator to go to the penthouse.
Go to Cordelia's room. Take the necklace
from the jewelry stand.
Bedroom painting: Look
close at the purple painting signed by Sean Patience in orange above the
bed.
Dining room painting: Exit and
look close at the winter scene painting that has a red Japanese stamp as
signature of the painter.
Art room: Go upstairs to
the art room and look at the blue painting of twin girls with heart problems signed in black.
Max' office: Go to Max'
office. Examine the green painting with white signature behind the desk.
Open the safe:
In Max' office, click the middle panel of the
painting to expose the safe.
Review Cordelia's journal in inventory. In the
last page, note that it is written: Remember to set the combination - the
order in which they suffered.
Look close at the safe to see that the keypad is
colored.
Victims: The order the
victims suffered is hangman, Davies, Sully and wise monkey.
Review the folder associated with these victims.
Hangman: Open Antony
Longmore's folder and see the signature in white. The red painting at
the Balcony foyer is signed white.
Madison Davies: Study Davies
file and see that it has the red stamp of the white painting in the
dining room.
Jared Sullivan: In Sully's
folder, the signature in red of the orange painting is seen.
Wise Monkey: The signature
in white of the painter of the green painting in Max' office is taped.
Combination: The possible
combinations are: (based on color of painting) red, white, orange and green
or (based on color of signatures) white, red, red and white.
Press the red, white, orange and green buttons or
3278 if you number the keypad.
The safe opens.
Take and read the laminated burned document. It
has Jeff Therrien on the document and was signed by Skorobeus. The rest cannot be read.
Erica says that she will send a picture to Terence
so that it can be read.
Synergy: Since Skorobeus
mentioned that he struck Max with Cordelia's necklace; do a synergy on the
necklace and burned document.
See Max confront Skorobeus about the documents he
got from the basement. Learn that Skorobeus had Max get Keith (and Cordelia)
to sign documents that gives all the assets to Jeff Therrien. A
birth certificate was held by Max. Max threatens Skorobeus by going to the
authorities. Skorobeus hits Max with the necklace and burns the documents.
Find out the code to the secret room:
As Cordelia:
Secret room: Cordelia
learns about what happened between Max and Skorobeus from Erica's vision.
Talk to Keith. Learn about the secret room in Max'
office that access the elevator to the basement. Max changed the code to the
elevator to prevent Keith from accessing the basement.
Keith shows the rocket ship for the orrery that he
fitted with a camera.
Go upstairs to the art room and take the orrery.
Go back down and go to Max' office.
Place the orrery on Max' desk. Place the rocket
ship with camera on the orrery.
Use the phone and automatically call Skorobeus.
Keith enjoys the joint adventure.
Take the camera from the orrery.
Play video: Use the
phone.
In closeup, open the USB cover at top right of the
phone. Use the rocket cam on the USB port.
Click on the blue console button at bottom of the
screen.
Keith explains that the console is unlocked with
Max or Keith's voice. Keith talks; press the button again.
Press the video play arrow to see Skorobeus on the
keypad. The video was too fast but Keith thinks he can get the code from the
sound.
Max enters and tells the 2 siblings to go.
Keith believes that Cordelia is siding with Max.
Keith leaves in anger.
Place the rocketcam on the orrery upstairs in the
art room. Cordelia asks Erica for help.
Max is depressed and apologizes to the picture of
his father.
As Erica:
Terence sends new message to Erica. Open the cell
phone, select Dossier.
Read Burned document. Learn that it was Skorobeus
that reported Max to the FBI. That report was misfiled on purpose and the
lead investigator was McAdams.
Terence also sent a Max Interview. Exit the phone.
Use the Max Interview chip to hear Max' rant.
Orrery: Click on orrery
and see that the camera is gone.
Do a postcognition on the orrery. See John take the
camera from the orrery just recently. John says he will show it to bossman-McAdams.
McAdams: Go down to the
lobby. Now that the Erica knows about McAdams is involved in the burned
document and John's reporting about the camera; talk to McAdams.
Erica purposely riles McAdams to the point that he
attacks-holds Erica.
Do a regression on McAdams. Click on the screen
that shows the rocketcam in his pocket.
Click on McAdams or his pocket to take the
rocketcam.
Video: Go back upstairs to Max' office.
Since the video is not clear; send the video to
Terence. In inventory, combine the rocketcam with the cell
phone.
Terence immediately sends a response. Open your
cell phone and select Dossier.
Read the Video Footage message.
Code: Combine the
rocketcam and cell phone again in inventory. This fixes the bad video.
Use the phone on Max' desk.
In closeup; press the console button. Use the Max
interview in inventory on the console button while the red light is flashing.
Open the USB cover at top right. Attach the fixed
rocketcam on the USB post.
Press the arrow to play the video. The audio was
analyzed to get the code - 26739.
Click on "back". Enter the code on the screen -
26739.
Erica enters the opened secret door.
Secret basement:
As Cordelia:
Check the nearest door and see that it is locked.
Enter the left door and...
As Erica: ...change to
Erica.
Click on message on dark wall by the door.
Use John's lighter on wall. Read the message:
Jeff Therrien killed them both to make Erica comment on it. Exit by
moving cursor out of the screen and...
As Cordelia:
...change to Cordelia.
Hear a groan - it's Max. Exit by moving cursor out
of the screen.
Enter the hole in the wall and...
As Erica: ...change to
Erica.
Hear John yell. It is coming from near the
elevator. Exit the closeup by moving cursor out of the screen.
Exit through door at right.
Go through the door by elevator and...
Trapped:
As Cordelia:
...change to Cordelia.
See Max tied up and attached to electric shock
machine. Cordelia is tied up to hold a gun pointed at Max. A hammer swings
close to Cordelia.
In front of Cordelia, there is a screen that shows
clues at right. In front of Max is a keypad.
Keypad: Do postcognition
on the keypad in front of Max.
See a hand press 3 numbers. Remember that the
keypad is facing Max. The numbers pressed are 256.
Talk to Max and tell him to press 256.
The camera moves after that action and the screen
shows numbers - #2 and #1.
Since we did #2 already; do postcognition on #1.
See a hand press 3 numbers. The numbers pressed
are 156.
Talk to Max and tell him to press 156.
The camera moves after that action and the screen
shows numbers - #1 and #4.
Since we did #1 already; do postcognition on #4.
See a hand press 3 numbers. The numbers pressed
are 456. There's a pattern here.
Talk to Max and tell him to press 456.
The camera didn't change-move much to show any new
number. But there was a #3 on top of Max.
Since there is a pattern here, tell Max to press
356.
Can: The camera moves and
the screen shows a can. Check-click on screen to remark about the
obstruction over the message.
Check the can above Max that is beside the #3.Talk
to Max. He says to shoot at can.
Use the can to get a target. Move the target to
center on the can blocking the view of what is written behind it. Fire the
gun. Cordelia missed the can.
Fire the gun again to remove the can.
Max is electro-shocked again.
Read the message on the screen at right: Only
his life will set you free.
Max talks to Cordelia to explain what is
happening. Do not rest until he's put behind bars.
Only one can leave this place alive.
Connecting the dots:
Confession:
Erica sees John inside the room. John confesses
that he could have stopped Scott's death (episode 1).
Talk to John. Learn how the FBI covered up Max
death and the release of Cordelia from jail.
See Cordelia being chased by a man and is
crying for help.
Learn also the change that happened to Cordelia
after her release. Cordelia also warned John about Scott being killed.
See a wounded man - Keith Smith crawl out from a
dark area. John
takes him to the hospital.
Wills:
Read the papers on the table. Erica sees some papers that show titles for
Jeff
Therrien.
There are 2 wills. One will showed that the Smith
parents left the money to be divided to the 3 children. The other one signed
by Skorobeus showed that all was left to Keith.
Do a postcognition on the 2 wills. Learn that
Skorobeus forged the will he signed.
See a birth certificate that showed that Jeff
Therrien is Skorobeus and Jane Smith's son.
Take the note from the Oracle with a key
attached. Exit.
Dark area: Check dark
area behind the book cases - where Keith crawled out from.
Use John's lighter on dark area. Look around.
Check the antiques, tools and chain. Keith made the equipment Cordelia used.
Examine Le Pendu at left side of worktable. Use
the key from note to open Le Pendu.
Who is the Cain killer? Turn the wheel to
enter the alphabet that will spell the Cain killer. Use the left arrow to
turn Le Pendu.
Enter Keith.
As Cordelia: Use the
gun.
Erica sees Keith walk away. Erica enters the
burned torture room. Erica picks up the gun left by Cordelia. A man walks
in. Erica fires. John!
Episode 4: The Cain Killer
September 2013
Review Erica's powers at beginning of the
walkthrough.
A recap of what happened in previous episodes is
seen.
Cordelia talks to Erica.
Reminder: The cell phone
at top left of screen has hints for the game. Press messages and get in
contact with Rose.
As Erica.
The night Scott died (3 years ago).
Outside Warehouse:
John and Erica are waiting in a police car outside
a warehouse. Talk to John.
McAdams: McAdams calls
Erica. Erica is going undercover to find out information about Cain.
Stelios sold things to Cain. Jetta is the FBI's
informant.
When given a choice of 3 questions from 5
dialogues to ask, select the ones that refer directly to the operation
process:
What's Jetta's code to pass me information?
Jetta will blink once for yes and twice for no.
Where will I get information about Cain?
A book at front desk.
What's my cover? Erica is to check a
Russian shipment expected by a Jack Stryker.
Trust meter: McAdams asks
that Erica keep Jetta safe. See a trust meter tutorial.
The response to a trust question decides how a
character will treat you.
See a character picture at bottom right. The
filled light color in that picture depends on how much trust is shown as a
result of the selected response.
Trust McAdams or not (your choice): I'll do my
best (trust) or I can't make promises (less trust). I trusted.
Inside Warehouse:
Erica walks inside the warehouse and stops in
front of a counter. Jetta is on the left background and Stelios is by the
counter.
Stelios: Stelios
questions Erica. If Erica gives a wrong answer or waits too long to respond
after being warned; Stelios shoots Erica.
Jetta: Jetta can give
hints when you look at her but too much help from Jetta will cause Stelios'
trust meter to go down and might eventually kill Jetta.
To get hints from Jetta, select Look around
and then look at Jetta. Jetta will give her signal with her eyes. She can
look right or down (center) and blink for yes (once) or no (2xs).
Questions and responses:
Your business? I'm here about the gun
shipment.
I thought you were blonde. Look
around. Check Jetta and she blinks twice for no. He's bluffing.
Stick to your story.
Shipment number? Look around. Check Jetta and she looks to the right. Check
the crates at right. Select 100-344.
Jay sent you? McAdams prompts Erica that
Stryker goes by Jay. Jay sent me.
Do you mind if I call him. Sure call him.
Stelios puts the gun down. If you choose the other dialogue, a later
dialogue is omitted and will result in death of a character.
Name. Ariel.
What do you want? I'm here to check the
inventory on the shipment.
What drawer? Check Jetta and she looks down.
Neither, it's the center drawer.
Check the book: Erica
can't read the book.
Use the postcognition power on the book. Click on
blue sphere at bottom left; then click on the blue aura at right pages.
See a memory of Cain-Keith sending a package.
Wire detected: Stelios
sees the wire Erica is wearing.
Focus on Stelios. If you chose an answer
that didn't cause Stelios to put the gun down earlier; this response will
not be seen. Any other answer will cause a death.
Erica sweeps the gun from the counter and tells
Jetta to run. John shoots Stelios. Stelios remembers Erica's name and
has a memory of Keith-Cain telling him about tonight's victim: Erica and
Scott Reed. Erica and John runs to the car to look for Scott. Erica finds
the bloody words on the wall - Come to Mount Auburn tonight alone.
Erica's dad is unconscious. (The rest of the story is in Episode 1.)
As Cordelia.
Morning after Scott's death.
Lake House:
Enter the house: Cordelia
arrives at the Lake House to stop Keith.
Check Keith's car. Cordelia comments that he must
be in pretty bad shape now (he was burned at the cemetery).
Use the ? icon at top left to see all active
spots. The front door is locked.
Pick up the broom.
Check the windows. Open the window on the side of
the house - extreme left.
Inside the house: Look
around. See Keith in the bathroom tending his wounds.
Check the cabinet and basement. Keith spends a lot
of time at the basement.
Hoodie: See Keith's
hoodie on the floor in front of bathroom door. There's keys on one of the
pockets.
Try to pick up the hoodie. Cordelia walks to the hoodie and steps on a creaky floorboard. If you step on that creaky
floor again, Keith shoots you.
Use the broom on the hoodie. In inventory,
use the hand icon to check the hoodie and get the house keys.
Exit through window and use house key on front
door.
What to do with Keith:
Car: Enter the house
through front door at bottom right. Pick up the car keys from the
coffee table.
Exit the house and go to Keith's car. Use the car
keys on the car. Cordelia opens the trunk.
Check the paper and the newspaper. Take Keith's
gun under the newspaper.
Powder: Check the powder
at top left. Use the precognition power (orange) on the powder.
See a secret compartment behind the powder. Open
the secret compartment and take (3) bags of drugs Keith use on his
victims.
Precognition: Go back
inside the house.
Use the precognition power (orange) on Keith in
the bathroom. See what to do in Cordelia's vision. Cordelia ties a wire in
front of the bathroom.
Pick up the wire from the worktable on
right wall.
Use the wire on the TV desk right of the bathroom.
Exit the house through front door at bottom right.
Enter through the left window.
Use the wire on the cabinet by window.
Keith: Use the gun on
bathroom-Keith.
Answer Keith with understanding to gain his trust.
If you get angry at him, he will eventually kill you.
Cordelia:
Cordelia talks to Erica at the cemetery.
She wants
Erica to understand what she is or what she had done and will do.
Cordelia tells Erica to ask Rose about Bao Thanh.
Antique Shop:
Erica wakes up from recollecting the past.
Rose and Bao Thanh: Erica
asks Rose about Bao Thanh.
Rose was a volunteer in Vietnam. One
day while sitting at the plaza; she saw a mad wretched man. The man started
scaring the children playing at the plaza. He screamed - Fires in the
sky. The soldiers took him away to prison. Later, a bomb exploded in the
plaza. Bao Thanh was tortured and interrogated as a spy. Rose started to
counsel Bao Thanh. He told her that he can feel things. Eventually, Bao
Thanh was executed. Rose understood what he went through.
Regression: Click on the
power button at bottom left; then click on Rose. Then click on regression
button.
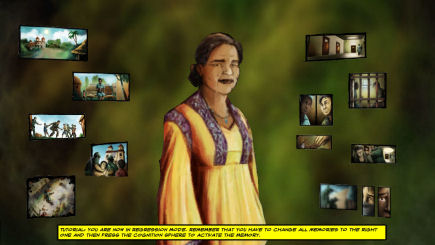
Talk to Rose and Erica asks permission to access
her memory so she can understand what Cordelia wants her to know.
You have to see which memory are not clear or
unanswered and then find the correct answer or memory.
Click-select all active things in the
screen.
Left 1 memory: Click
on Temple at top left.
Click on Rose to find out what temple it is.
Cao Dai temple. Goodbye.
Left 2 memory: Click
on Rose reading picture. Press space bar to see which spots are active.
Click on kids playing, tree and then on Rose.
Click on the left picture of an antique and then the book at right. The
book title can be cycled.
Find out what book Rose is reading. Exit and
ask Rose about book. She doesn't remember. Exit.
Left 3 memory: Click
on Villagers. Press space bar to see which spots are active.
Click on Bao-Thanh and then on the children to
ask what village it is.
Exit and ask Rose about Bao-Thanh and village.
She doesn't want to remember what Bao-Thanh said. The village is Trang
Bang. Goodbye.
Left 4 memory: Select
Taken away. Press space bar to see which spots are active.
Click on Bao-Thanh and the soldiers and then
flag. Exit and ask Rose about the blank flag. She doesn't remember the
flag.
Web search: Use the
cell phone at top left. Select web search; then Religious Imagery. Click
the lens at right to do the search.
Select Trang Bang for city and Cao Dai for
religion. Click the lens at right to do the search. See the flag. Exit
the cell phone.
Select the picture again. Cycle the flag to
put the correct flag on the picture. Exit.

Left 5 memory: Click on
Explosion. Press space bar to see which spots are active.
Select soccer ball, dead girl and burnt
figurine.
Select-click on Bloody Rose. Click the name
tag to see that Rose's name tag changes.
Exit and ask Rose about different name. She
said to check the drawer for clues. Goodbye. Exit the regression.
Counter drawer: Go to the
counter and open the drawer.
Check the books in the drawer. Open the
Alchemy of Happiness to see a piece of picture of Rose in Vietnam. Take
the torn photo.
Do synergy on the torn photo in inventory. See
a fuzzy picture of a young Rose.
Use the torn photo on Rose. Talk to Rose again
to go back to Regression.
Left 2 memory again:
Go back to Rose reading and select the correct book - Alchemy of
Happiness. Exit.
Right 4 memory:
Select Gift at right side. Press space bar to see which spots are
active.
Select hand and then antique hand. He gave her
something. Exit.
Ask Rose what was given. Rose said to check
the shelf. Goodbye. Exit regression.
Name: Check the shelf
for a close up. Pick up the ripped photo by the triangle relic
seen on a previous left #2 picture.
Do a synergy power on the 2 torn photos in
inventory. Click on synergy icon again. See a smiling Rose with a name
tag - Bailey. Exit.
Shelf: Look close at
shelf and note items that were seen in other pictures.
Do projection power on the items on the shelf.
Select: triangle relic, deflated soccer ball and burnt figurine. Then
click on projection icon.
See an image where the ripped photo was
before.
Click on Rose again to go back to her
regression.
Left 5 memory: Click
on Explosion. Change Rose's name tag to Bailey.
Right 4 memory:
Select Gift at right side. Change the antique in hand-gift to the one
seen on the shelf - wings raised V shaped.
Right 5 memory:
Select Death Row. Press space bar to see which spots are active.
Click on Bao-Thanh and soldiers. They are
going to execute him. Rose suffered.
Check the empty bubble - Rose response.
Exit and ask Rose about the phrase.
Fill the bubble.
Select what Rose said by cycling the responses - You can see the future.
Right 6 memory:
Click on the fuzzy memory.
If all memories are correctly selected - click
on the cognition sphere to see a recap of Rose's memories.
Bao-Thanh tells Rose that he knows what Rose can
do. That she does good. You are an Angel amongst people like us.
Cordelia's clue:
Rose: Erica deduced that Rose can see, read or hear
other people's thoughts.
Talk to Rose about Cordelia and John. Rose
explains the connection between Cordelia and Erica. Do you blame her?
Cordelia's memory: Ask
about Cordelia's thoughts. When Cordelia had sessions with Rose, she thinks of a
place that would calm her down.
Do a regression on Rose to see the place she
is seeing.
Rose sees a Lake House. Check all the characters
in Rose's memory. The man at the house is Skorobeus.
Rose advices Erica to use her best judgment on
what to do with Cordelia.
FBI station:
McAdams: McAdams
suspends-pulls Erica out of active duty because of what happened with John.
Skorobeus: The camera in
the interrogation room is turned off.
Erica enters the Interrogation room and confronts
Skorobeus. Skorobeus does not trust Erica.
Continue to question Skorobeus. Exit.
Do regression on Skorobeus. Skorobeus refuses to
be touched.
Interrogate Skorobeus again. This time, a new
dialogue is added.
There are 2 possible ways to get information from
Skorobeus:
- Push against the wall. Then do regression
power on Skorobeus.
- Apply force. Do this 3 times and
Skorobeus is knocked out. Then do regression power on Skorobeus. (Thanks,
Emily.)
Learn that after attacking Max, Skorobeus hid when
he heard Keith enter the office. Keith reads the papers that Skorobeus
tried to burn - his birth certificate. See Keith drag a stunned Max.
If pushed against wall; Skorobeus gives the address of the lake house.
If knocked unconscious; see a vision of Cordelia calling Skorobeus about
Keith and giving him the address of the lake house.
McAdams: McAdams comes
in with another agent. McAdams loses trust in seeing Erica. If Skorobeus is
knocked out, an additional trust is lost with McAdams.
Push Holmberg, then run.
Lake House:
Erica confronts Cordelia. Cordelia weakened Erica
by hurting the people close to her so that she will kill Keith.
Towel: Cordelia wants
Erica to work with her. Cordelia wants McAdams.
Cordelia hands Erica a towel she found at the
basement.
Do cognition power on the towel. Keith has another
victim.
Search the house:
Characters can now be interchanged using the icons
beside the power circle at bottom left.
Fireplace and mantel: Check
the pictures on the mantel and the fireplace.
Bathroom: Search the bathroom. Open the medicine cabinet. Check the items.
Take the empty cup, razor blade and
magnifying glass.
Basement:
Enter the basement. See the structures Keith used to
practice on.
Cordelia rationalizes to Erica that she did good by killing
her victims.
If you choose I understand, Cordelia's
trust is increased. If That wasn't your job is selected; Cordelia's
trust is lessened.
Examine the 3 traps: Scott's, Janelle's and
George siblings.
Open the sarcophagus:
Sarcophagus:
Examine the sarcophagus' levers.
Move the sliders several times until Cordelia says
that she is getting something and urges Erica to talk.
Slider 1:
Change to Cordelia. Look close at the sliders. Use the precognition
power on Slider 1. See Erica say Any ideas?
Change to Erica:
Move slider 1 until
Erica says what Cordelia saw in her vision - Any ideas?
Slider
1 is at position 2 when the dialogue is stated.
Slider 2: As Cordelia, do
a precognition on slider 2 to get a vision of ...this is frustrating. As Erica, move the lever until
Erica says ...this is frustrating.
Slider 2 is at 4th position when the dialogue is
stated.
Slider 3: As Cordelia, do
a precognition on slider 2 to get a vision of ...give up. As Erica,
move the lever until Erica says ...give up.
Slider 3 is at 4th position when the dialogue is
stated.
Slider 4: As Cordelia, do
a precognition on slider 2 to get a vision of ...don't have all night.
As Erica, move the lever until Erica says ...don't have all night.
Slider 4 is at 3rd position when the dialogue is
stated.
Trophies: The sarcophagus
opens. See the trophies collected by Keith from his victims. Erica's
graduation ring and Scottie's bracelet are here.
Take all the trophies and look at each souvenir in
inventory: Your blood will save him figurine, golden tooth,
nail clippings, gold wedding ring, Erica's graduation ring,
black hair, golden bracelet with inscription SC, Scottie's
bracelet strip, You bleed he breathes figurine and gold watch.
Wheel table:
Past, present and future:
Check the wheel table. See a map with
routes-lines, buttons on the periphery and the years 2018, 2011 and 1998.
As Erica, do a postcognition power on the wheel map. See that the
lines on the map are different in 1998.
As Cordelia, do a precognition power on the
wheel map. See that the lines on the map are different in 2018.
Compare the 3 maps of the past, present and
future. Note that 4 buttons have connected lines on all 3 maps - buttons 1, 3, 7 and
8.
As Erica, press buttons 1, 3, 7 and 8. See
figurines rise from the center of the wheel. Take 10 figurines.
Arrange the figurines:
There are 12 figurines collected from the wheel
table and sarcophagus.
Wheel table: See that
the wheel is separated into 5 parts by etched lines.
4 of the areas-quadrants have shapes on them. The single
button at top right has a lone button and no shapes.
The shapes in each of the 4 areas are:
circle, square and L-shape. There are 12 of those geometric shapes. Hmm...
As Cordelia: Do a
precognition power on all 4 quadrants. Take note of the figurines that are
seen in the visions.
As Erica: Place the
figurines seen by Cordelia on the 4 quadrants.
Quadrant 1 - top: Place the Bars and Moon trap
figurine on the circular slot.
Quadrant 2 - right: Place the Spiked stripe
trap figurine on the circular slot.
Quadrant 3 - bottom: Place the Erica's wheel
trap figurine on the circular slot.
Quadrant 4 - left: Place the Glass shard trap
figurine on the circular slot.
As Erica: Open
inventory and do synergy power on 2 items from the victims picked up at the
basement. Find the matching items and then click on the synergy icon to see
a memory. Note the important features seen on those memories.
Do synergy power on 2 trophies and then click
on synergy icon to see memories.
- black hair strands + fingernails. Memory
shows: Blood buys him time bloody writing; gate with spikes on
top, spikes inside a coffin and face of chamber.
- golden tooth + wedding band. Memory shows:
You bleed He breathes bloody writing; spikes outside a coffin and
opening a coffin.
- graduation ring + Scott's bracelet strip.
Memory shows Only Reed blood bloody writing; wheel trap and
Scott's body.
- gold watch + golden bracelet. Memory shows
Your blood will save him bloody writing, circular metal with
broken glass inside and twins on torture slabs.
Place the figurines on wheel table:
Based on the clues from Cordelia's precognition and Erica's synergy powers;
place the correct figurines on the slots.
Quadrant 1 - top: Bars and Moon trap figurine,
Blood buys him time figurine and iron maiden figurine.
Quadrant 2 - right: Spiked stripe trap
figurine, You bleed He breathes figurine and coffin trap
figurine.
Quadrant 3 - bottom: Erica's wheel trap
figurine, Only Reed blood figurine and Scott's trap figurine.
Quadrant 4 - left: Glass shard trap figurine,
Your blood will save him figurine and George siblings trap
figurine.
Cordelia figurine: The
center area of the wheel rises to show a Cordelia figurine. There are 3 more
slots for 3 figurines.
Do a postcognition power on the Cordelia figurine.
In the vision, Keith tells Erica that there is a Max figurine and
Cordelia knows where it is.
Use power again on Cordelia figurine. This time
the figurine has green aura for projection.
Find Max figurine:
As Erica: Go upstairs. Check the pictures on the mantel and the
fireplace.
Do postcognition and check the vision from the
bathroom.
As Cordelia: Check the
pictures on the mantel and the fireplace. The picture shows Daddy with
Senator Aaron Light.
Cordelia says that the fireplace is Max' favorite
place.
As Erica: Use the empty cup
from medicine cabinet on the sink in the bathroom to get cup with water.
Use cup with water on fireplace. Erica picks up
Max figurine.
Erica says there's writing on the figure but too
small to read. Use the magnifying lens on Max figurine and get the clue.
Find third figurine:
As Cordelia: Cordelia's
inventory has Max figurine.
Look close at mantel again and the picture of
Daddy with Senator Aaron Light.
Use Max figurine on Daddy's picture with Senator
Light. Erica and Cordelia talk about doing good and realize that the
picture is a clue.
As Erica: Use the razor blade
on the bulge at back of the picture. Get an Erica figurine.
Find out Keith's next victim:
Go down to the basement.
Place Erica and Max figurines on the wheel table
slots.
Now that there are 3 items on the wheel; do a
projection and click on all 3 figurines.
See Keith's next victim: Scott and Erica's dad -
Brian Reed.
Police: Police sirens are
heard. Erica lets Cordelia go. Cordelia says she they will save Erica's dad
- he's one of the good guys.
Cordelia wants Erica to bring McAdams to Mount
Auburn Cemetery.
Cordelia gives caltrops to Erica.
Erica is taken by police and McAdams.
Get McAdams to cemetery:
See McAdams's trust icon at bottom right.
Gain control of car: Talk
to McAdams about carsick and Cordelia.
Check the windows. The window is closed.
Talk to McAdams about the window.
Use the caltrop on the window. McAdams notices that
Erica is moving back there. She wants noise.
Talk to McAdams about the radio. McAdams turns on
the radio.
Use the caltrops on the window. As soon as control
is obtained, click on McAdams. Erica chokes McAdams.
Save game here.
McAdams's trust: McAdams
is in cuffs. Erica tries to explain about Cain and her father. McAdams
refuses to listen.
Select your choice of dialogue. I didn't want to go down like this
will increase in trust. If It didn't need to go down like this is
selected there will be decrease in trust.
McAdams says
that he has protected and backed her up.
About the past; select You're right to
increase trust. Select You're wrong to lower trust level.
About making it personal; if Jetta was protected
at start of game, McAdams's trust increases. If Jetta dies, trust lowers.
Erica explains about Cain and Erica's dad. About
feelings; select trust him to raise trust. Don't trust him
to lower trust.
Erica updates McAdams about Cain-Keith. Erica warns
McAdams that Cordelia wants him dead.
Cemetery:
Save game here.
Gate: Cordelia meets
McAdams and Erica at the gate to the cemetery.
Tomb: Before entering the
tomb, Cordelia wants Erica to trust her. Cordelia wants them to be caught by
Keith.
Erica being close to Cordelia sees a vision of the future.
Cordelia has the gun on the other side of a locked door. Cordelia walks
away.
Trust: If McAdams's trust
is lower than 50%, a dialogue option to give the gun to McAdams or Cordelia
is seen.
If you give the gun to Cordelia, her trust in
Erica increases. If you give the gun to McAdams, Cordelia's trust lowers.
If McAdams' trust is higher than 50%, this
dialogue will not appear. (Thanks, Emily).
Inside the tomb: See a
tortured Brian on a slab.
Keith orders Cordelia to tie Erica to the wall.
Cordelia signals (by lowering her eyes towards Erica's feet) Erica while tying her legs.
Cordelia says that McAdams is her problem. Keith
hits McAdams unconscious.
Keith taunts Cordelia about their relationship and
her conscience. She could not kill him. He explains why Cordelia suppressed
her conscience and warns what will happen if ever it is freed.
Keith warns Erica about the spike aimed at her and
what will happen to her father.
Escape from the wall:
Save game here.
Wall: When control of the
cursor is obtained; click on Brian-dad.
Tell Brian - Dad, do it now! This distracts
Keith to face Brian.
Immediately, click on Keith. Erica wraps Brian
with her legs.
If McAdams has the gun, he fires at Keith. Keith escapes.
McAdams: Cordelia pulls
out the gun or gets McAdams' gun from floor and points it at McAdams.
Erica talks to Cordelia. Select No, Cordelia
to increase her trust. Select Yes, he did to lower Cordelia's
trust.
Select He could have, and he didn't do his job
but he's a good agent to increase her trust. Select He could have,
but it wasn't his case to lower Cordelia's trust.
Select Listen to your conscience to
increase her trust. Select Let's find and kill Keith to lower
Cordelia's trust.
If Cordelia's trust is gained; Cordelia will not
shoot McAdams; if the trust level is below 50%; McAdams will be shot.
Tomb Trap:
Cordelia uses the remote to release Erica.
Erica chases Keith after leaving McAdams (if he's
alive) to take care of Brian.
John's spirit talks to Erica. Erica finds the
secret panel when her powers sees the opening of the secret door.
Keith hits Erica.
Trap: Erica is caught and
tied on a trap inside the crematory.
Cordelia is outside the enclosed room. The door is
locked and she doesn't know the code to open the door.
See Erica tied up on a bed that is chained to a
crane above.
The bed is over 3 vertical slabs with spaces in
between.
To the left are spikes that raises and lowers.
To the left of the spikes is a control panel that
has a code that will open the door.
Console: Cordelia has
control of the console that manipulates the bed Erica is tied on.
The console close up used by Cordelia is seen at top left of the screen.
There are 3 switches on the left. The left switch
does not work. The middle and right switches can raise or lower the middle and
right vertical slabs that the bed is on.
The up-down lever-chain lock in the middle controls the bed Erica is on. It works only if the bed is on its side.
The left-right/side to side lever at right moves
the bed Erica is on to left or right position.
Get Erica to the code panel:
The aim is to get Erica to the panel left of the
spikes. Erica has to do postcognition on the panel and to do that she has to
touch the panel.
Turn Erica on her side:
Use side to side lever to move Erica on the space between the middle and
right vertical slabs (see picture). Click on space between lever and right
end.
Flip the middle switch to top position to raise the middle
slab. This should turn Erica on her side facing right and her hands facing
left-spikes-panel.
Use the up-down lever-chain lock now that she is
on her side to the up position. This tightens the chain holding the bed and
it will keep Erica on her side.
Move Erica to the panel:
Lower the middle slab by flipping the middle button down. Erica is still on
her side.
Move the side to side lever to the left to move
Erica to the left. Move her close to the spike (space between the first and
middle slabs) and then when the spikes are
in up position; move her close as possible to the panel. Erica will scream
at Cordelia when she's in position.
Do postcognition on the panel to try to get the
code. Erica can't reach the panel.
Use side to side lever to move Erica to the right
to prevent her from being spiked.
Erica says that she has loosened her hands and to
try
again.
Move Erica again to the panel at left when the
spikes are raised. Time it well.
Do postcognition on the panel again to get the
code.
Move Erica to the right to clear her from the
spike. This time she should be able to get the code. Erica shouts the code
(753) to Cordelia.
Keith:
Cordelia opens the door. Erica frees herself and
runs to the door. Keith hits
Cordelia and faces Erica. Keith fights with Erica.
Fight: The aim is to hit parts of Keith's body
continuously and in a specific order
to prevent him hitting Erica.
If the order is not correct, Keith will block the
punch. Then he will be able to stab Erica. Immediately block his fist or
Erica will die.
If the block is successful, continue with the
correct sequence of hits (no need to start over).
Hit-click on Keith's: face, head, fist, toes, knee
and then finish him.
The Cain Killers:
Erica holds a gun on Keith. Cordelia says that
Erica is not like her. Keith hits the switch that closes the door. Cordelia pushes Erica outside.
The door is locked. Cordelia tells Erica that You will be an an Angel
amongst people like us.
Two shots are heard.
Cemetery:
Brian and Erica visit Scottie's grave.
Erica talks to John. Erica is holding John's
lighter.
This document may not be
distributed without express written permission of the author and the content may
not be altered in any way.
For Questions or Comments
on this Walkthrough,
Please write to:
MaGtRo
Copyright © September/2013
MaGtRo
 GameBoomers
Walkthroughs and Solutions
GameBoomers
Walkthroughs and Solutions