The correct order...
Conspiracies II: Lethal Networks walkthrough
© March 2011 Bert Jamin (http://www.gamesover.com)
This walkthrough may not be sold and may not be used for any commercial
purposes. Neither is it permitted to publish this walkthrough in any way without
the written permission of the author Bert Jamin. Feel
free to place this walkthrough on your web site or on your home page, on
condition that no part of this walkthrough is changed and that the name of the
author (Bert Jamin), the URL of the owner of this site (http://www.gamesover.com)
and his E-mail address are mentioned
unchanged. For the most up to date walkthroughs always visit http://www.gamesover.com.
If you have any suggestions to improve this walkthrough, let me know by sending
me an email.
Foreword
First of all I want to thank
Anima PPD Interactive
for making this excellent game. I know they worked very hard on this game for a
couple of years. And I must say... the result is an outstanding adventure. It
would be the understatement of the year to call the game just not too easy! It's
fair to say that it is quite difficult sometimes. But I think that that is what
adventures are made for. And I also think that the puzzles in the game are quite
logical and very well thought-out. I also want to thank Anestis Kokkinidis of
Anima PPD Interactive because he gave me a hint a few times to get me on track
because I got stuck myself now and then. Credits are where credit is due! So...
thanks for that!
Villa Amarillia
Cross the bridge to the entrance of the house.
At the end of the bridge step into the pond. Pick up some rocks at the left
upper corner of the water. Climb out of the pond. Walk to the right to the brown
wooden garden house. Take the blue lighter from the bench. Exit the garden
house. Turn to the left and walk further. Step on the tennis court. Look around
and notice the white seat at the right side of the net. Look behind that seat
and take the tennis ball.
Walk towards the green parasols. Stand under the center parasol and look up. Take the rubber band. Look at the left and notice the wheelbarrow at the opposite site of the garden beneath the trees. Walk to the wheelbarrow and take the pruning scissors. Walk further to the left. Notice the four blue-lit landing platforms. Pass those platforms. Walk further and pass the entrance of the house.
Notice the plant in the pot at the corner of the house. Cut a piece of wood from the plant with your pruning scissors. In inventory combine the rubber band with the V-shaped branch you just have cut. With the pruning scissors cut the tennis ball. Combine the yellow part of the tennis ball with the slingshot. Combine the rock with the slingshot. Walk back to the bridge in front of the house. Pick up some more rocks from the pond just in case.
In inventory right click on your slingshot to hear the word "Ready". Now in your inventory left click, right click and left click on the slingshot. Aim on the upper left window of the house. Repeat this until the alarm sets off. As soon as the alarm starts just walk to the front door and open it to enter the house. When the conversation with Anita is over you are in your room.
Take the magazine from the right nightstand. Read it in your inventory to find... nothing! Open the upper drawer of the right nightstand. Take the two USB-sticks. Walk around the bed and open the bottom drawer of the nightstand. Take the other two USB-sticks. Walk towards the glass display on the wall. Open the right door and it and take the cigar. Open the left door and look at the cup.
Turn to the right and open the door to the dressing room. Open all the cupboards to find and take: the pants, shoes and T-shirt. Turn around and walk towards the door to the left. Open the door and go down the stairs. From the silver tray on the table take the entrance card of the house. Examine the card in your inventory.
Turn around and go up the stairs at the right side of the table. Walk a little to the right and open the first door at the left side. Open the right door of the cupboard. Examine the plug and remember that you can find it here. You are going to need it later! Go back down the stairs. Open the door at the right side of the table at the opposite wall. Enter the room.
Go to the left and take the magazine from the table called XAMENOI. Open it in your inventory to find a pre-paid card. Examine the card. Walk further and go through the door to the kitchen. Walk to the left immediate and take the smiley magnet from the fridge door. If you like you can open the fridge and the microwave next to it but believe me, you'll find nothing.
Turn around and notice the knifes on the sink. Take a knife from it. You won't find anything else of use in the kitchen. Walk further and open the door to the swimming pool. Walk to the stretchers at the opposite side of the room. Try not to fall into the pool. If you do fall in, just climb out by using the steel ladder of it. Take the little blue device from the right most stretcher. In inventory put the golden USB-stick into the blue device. Turn it on to find out that the device is a kind of MP3 player. You'll hear Argyriou's log. Turn around and walk towards the door to the little square of the house at the right side of the pool.
Open the door and cross the square to end up in the entrance hall. Don't go out yet! In stead of that walk towards the brown square keypad next to the door. Take the little blue device from your inventory and play Argyriou's log on the keypad. When the log is almost ended you'll hear some kind of click. Would this have opened the door? No way... it isn't that easy. Study the keypad and you'll not only notice an ear symbol but also a nose symbol. In your inventory light the cigar with the blue lighter. Hold the burning cigar against the keypad. Hey... another click... would this mean??? Yep... open the door and enter the room to enter the study.
Walk behind the desk. From the left drawer take the white-orange USB-stick. In your inventory put that white-orange USB-stick into the blue device. Listen once more to it to ensure that Annita's message is on it. From your inventory take the very dark blue USB-stick and put it into the VID phone on the desk. Click on the VID phone. Click on the sentence on the screen. When ready, turn off the VID phone. Don't forget to take back the dark blue USB-stick from the VID phone.
Turn to the left and open the door to the music room. From the piano take Annita's scarf. Examine the scarf in your inventory to notice that it has Anita's perfume on it. Walk further and open the door of the projector room. Examine the very expensive projector that is hanging on the ceiling above the door. Use your knife on the lens of the projector which you can use as a magnifying glass. Head back to the entrance hall. Use the entrance card on the front door to unlock it. Open the door and go outside. Cross the bridge and click on the keycard in the gate. Go to ATH.
ATH
Exhaust all dialogs with Thanos Pekas. When finished turn off your cell phone.
May be it is a good idea to save your game here so you won't have to go through
that conversation anymore!? You'll end up in front of Anita's house. Enter the
house and go up the stairs at your left.
Villa Amarillia
Walk to the end of the corridor to end up in
front of Anita's room. Use the little blue device at the keypad next to the door
to play Anita's message. Hold Anita's scarf against the keypad. Open the door to
enter Anita's bedroom. Walk pass the brown cupboard and open the door to the
left. Enter the dressing room. Take the brochure World of Tennis from the table.
Read the brochure in your inventory. If you want you can search all cupboard but
you'll find nothing of interest. Exit the dressing room.
Walk towards the cupboard beneath the big TV-screen. Open the bottom drawer and take the cell phone charger. Walk to the closed curtain at the left side of the TV-screen. Open the curtain. Open the door to the balcony. Walk around the balcony until you end up with a table and two chairs. From the table take the connection cable. Walk around the balcony once more and re-enter Anita's bedroom.
Notice the door at the right side of the fireplace. Open that door and enter the bathroom. Open Anita's organizer that is laying on the sink. Read the message to get the phone number into your cell phone. Turn around and leave the bathroom. Walk back to the opposite side of the room. Exit through the door to the left. Enter the last door to the right to enter the bathroom. In your inventory combine the phone charger with... your cell phone.
Plug the cell phone with charger into the plug in the right cupboard. Wait until your cell phone is charged. Unplug the cell phone and exit the bathroom. Go down the stairs to the entrance hall. Go through the front door, cross the bridge and click on the keycard in the gate.
Venus Club
Go to the Venus Club. Walk to the guard in front of the entrance of the club. No
matter what you say to him, he won't let you in. Head back to the dark gray
doors. Click on the doors and go back to Villa Amarillia.
Villa Amarillia
Enter the house and go up the stairs to the
right. Enter your room. From your inventory get the pre-paid card and put it
into the VID phone on the table. Use the VID phone and call Thanos Pekas and ask
him about NovaTech. When ready switch off the VID phone. Turn on the VID phone
again and call the Venus Tennis Club. After your conversation with Gloria switch
off the VID phone. Exit the house and click on the keycard in the gate. Go to
NovaTech.
Nova Tech
Enter the passage to the right. Try to open both
elevator doors. Examine both of the purple eyes. Head back to your vessel. Enter
it to go to the Venus Club.
Venus Club
Walk to the guard in front of the entrance once
more. No matter what you say, he still won't let you in. That is... after his
first denial turn around and talk to him again... Exhaust all dialogs with
Gloria. After the conversation is over, switch off your cell phone. Enter the
corridor to the right. Walk to the gray door to the right at the middle of the
corridor. Notice the sign on the door that is telling you that this is the men's
room. Open the door and go inside.
Open the right upper locker at the left side of the room. Hmmm... it seems to be empty. Yep... seems but isn't! Walk to the right side of the room. See the little movable stairs next to the bench. Pick it up by left clicking on it. While carrying the little stairs walk towards your opened locker. Drop the movable stairs on the floor in front of your locker by right clicking it. Climb up the little stairs. Look into your locker and take the pen. In your inventory examine the pen to get a metal strip. Exit the locker room.
Turn to the left and exit the corridor. Go down the spiral stairs at the end of the corridor. Open the gray doors at the right side. Enter the bar. Walk towards the two posters with the tennis ball. Pan a little to the left and take the pin for receipts. Exit the bar. Go up the two spiral stairs. Take the bottle of shoe spray from the glass table. Walk straight ahead to the seats near the window. Take the paperclip from the floor.
Walk towards the bar. Walk to the left side of the counter. Open the counter and notice something laying on the floor. Walk towards it and take the receipt. Examine the receipt in your inventory to see that it is Rica Binis' receipt. Remember the number A12 on it! In your inventory bent the paperclip. Combine the paperclip with the metal strip. Exit the bar. Go down one spiral stair. Enter the corridor at the left side of the closed gray door.
Enter the women's room. Remember the receipt of Rica Binis and more important the number A12 on it. The row of lockers on the left side are lockers A. The locker are numbered from the left to the right and from top to bottom. I guess you can imagine which locker belongs to Rica. Yep... it's the fifth locker from the left on the second row from top.
Use the bent paperclip attached to the metal strip to lock pick her locker. Bingo! Open the locker and take Rica's purse. In your inventory open the purse to get Rica's cell phone and... her entrance pass for NovaTech! Examine her cell phone in your inventory to find out it isn't working. Hmmm... that sounds promising! Exit the locker room. Go to the right. Exit the building by opening one of the metal doors next to the spiral stairs. Walk all the way to the dark gray doors. Click on them to go to NovaTech.
NovaTech
Enter the green lit entrance at the right.
Notice the three circular shapes at the back wall. Press the center one.
Standing at the left side of the device you'll notice a red lit keypad and at
the left side of the keypad a rectangular dark gray button. On top of the keypad
notice the red lit light. Use the bottle of shoe spray on the keypad. Look at
the keypad with your magnifying glass to see some fingerprints on the keypad.
Great... now you know which key have been pressed. The only thing you have to
find out is the correct order of course. Well... I did that for you! First press
the center key, then the bottom left key and finally the upper center key with
the fingerprint. When done correctly the little red light will change to green.
Press the rectangular dark gray button at the left side of the keypad. A control
device will pop up. Press the bottom button on the control device.
Turn around and exit the corridor. Walk to the right into the direction of the big parking and landing platform. Look at the right side and notice the lowered window cleaning cable-lift. Open the front partition of the cable-lift. Step on-board and close the front partition. Press the up button four times to end up at the roof of the NovaTech building.
Walk to the left half way. Turn to the right and open the door. Welcome to the NovaTech roof garden! From the chairs at the left side take the coin. Notice the rake standing against the tree at your right side. Walk to that tree and take the rake. Walk towards the coffee and cola machines at the back wall of the garden. Put your coin into the cola-machine. Hey... this is not fair! After you inserted the coin nothing happens! So no cola!?!?!?
Well... look at the left and walk towards the garbage bin. Pick it up and walk back to the cola-machine while carrying the garbage bin. Slam the garbage bin against the cola-machine a few times until it releases one tin of cola. Drop the garbage bin and take the tin of cola.
Look at the right side of the garden and notice a pile of orange leaves on the ground. Walk towards those leaves and use your rake twice on the leaves. Hey... you just revealed a trapdoor. Pan a little to the right and notice another garbage bin. Drop the orange leaves on top of the garbage bin. Oeps... take the key that was hidden beneath the bin. Use the key on the trapdoor. Pour the tin of cola on the rusty lock. Use the key on the trapdoor once more and open it.
Press the c-button on your keyboard to bend down. Be careful not to fall down into the elevator shaft! So carefully press the green lit button to call the elevator. After the elevator arrived step into the hole. Step on top of the elevator. Look around and open the very hard to see hatch of the elevator. Jump through the opened hatch. Press the c-button on your keyboard once more to stand up.
Look around and notice the control buttons of the elevator. Go to the 14th floor. Step out of the elevator. Remember that the door of the elevator will open only for a few seconds. If you are too late to get out, just press the button of the same floor again. Once you are on the 14th floor walk to the right. Take the umbrella that is standing next to the bench. Re-enter the elevator.
Go to the 12th floor. Walk to the right and examine the high tech digital photo printer. Leave it alone for now but remember that you can find it here! Re-enter the elevator and go to the 16th floor. Exit the elevator and walk to the right. Put Rica's circular cell phone on the orange circular lock of the door. Hey... it seems to work fine after all! Open the door and go inside.
Walk towards the second door at the right side of the room. Use Rica's ID-card to unlock the door. Step into the office. Use Rica's ID-card on the computer screen on the desk. Read the incoming email. After reading press the left button on the right side at the bottom of the screen. Read the Corporation Code List. Press the left button once more. Click ONCE (!) on the Activate/Deactivate locks line. This is most important because this will open the doors of the other offices. If you press it twice you will loch them again. Press the left button on the bottom of the screen to zoom out. Exit the office.
Enter the next door office. Walk behind the large desk in front of the window. Use Rica's ID-card on one of the screens once more. Click on the screen and print the Corporation Code list. Turn around and take the printed code list from the printer. Examine the list in your inventory. Exit the office and enter the opposite left office. If it is locked, re-enter the opposite left office once more and press the Activate/Deactivate locks line.
From the desk take the pink photo print card. Exit the office and enter next door office. This office turns out to be guarded by a security camera. As soon as you step too far into the office you will be thrown out because of the security camera. The only thing we have to do is to deceive the security camera! So as soon as you enter the office stand still! Use your cell phone to take a picture of the opposite wall. Exit the office and head back to the elevator.
Enter the elevator and go to the 12th floor. Put the photo print card into the high tech digital photo printer. In your inventory connect the connection cable to your cell phone. Now connect your modified cell phone with the photo printer. Oeps... the photo will be spitted out by the machine. The only problem is that it disappears under the machine. How the heck do you get this photo? Well for every difficult problem there is a simple solution. Just use your umbrella on the high tech digital photo printer. Take the photo.
In your inventory combine the photo with the pin for receipts. Re-enter the elevator and go back to the 16th floor. Re-enter the office with the security camera, the second one at the left side of the room. Now carefully walk under the security camera, stay as close against the wall as you can and place the photo with the pin for receipts in front of the camera. Walk behind the desk. Take the newspaper from the desk. Examine the newspaper in your inventory. Exit the office and head back to the elevator. Press the c-button of the elevator controls. Step out of the elevator. Turn to the right and exit the corridor. Walk to the left and enter your vessel to go back to Villa Amarillia. Cross the bridge and enter the house. See what is happening to you and to Annita...
Prison
Look down and take the note from Rania your lawyer from the floor. Read it in
your inventory. From your inventory take the piece of cake and try to eat it.
Pick up the note with the red dots from the floor. Examine it in your inventory.
In your inventory use the bottle. In your inventory read the label that came off
the bottle. In you inventory use the label on the bottle. In your inventory
examine the card. In your inventory read the other note of Rania. By that time
the energy field of the prison cells have gone. Remember that from now on you
only have 10 minutes to escape from prison, although Nick says that you have 5
minutes! And believe me... there is a lot to do in those 10 minutes. If you are
not in time, gamesover :o) and you'll have to load a saved game!! So make sure
to be as quick as possible from now on!!!
Exit your prison cell and walk towards the last cell at the left side. Notice the broken down chair inside that cell. Open the right drawer beneath the bed and take the piece of iron. Exit the cell and turn to the left. Use the pass card on the lock next to the door. Open the door and enter the corridor.
Walk straight ahead into the room with all the screens. So don't pay any attention to the side corridors nor to the doors at the end of those side corridors. As soon as you entered the room with the screens, notice that there is laying something on the floor behind the last screens at the right side of the room. Walk towards that thing and take the wheels to carry heavy stuff from the floor. Turn around.
Go up the stairs at your right side. From behind the last screens at the right side take the fire extinguisher. Turn around and notice four dots on the floor in the room. Go down the stairs and walk towards that part of the floor. Put the piece of iron at the center of that part of the floor. Make sure that it is standing up! Attach the fire extinguisher to the piece of iron. Oeps... something bad happened to the floor.
Walk towards the heavy server in front of you that is standing against the wall. Use the wheel to carry heavy stuff on the heavy server. Left click on the server and drag it over the broken part of the floor. Move the heavy server to the side and right click on the server to release it. Press the c-button on your keyboard to go into crawl-mode. Jump into the hole in the floor. May be it is a good thing to do this some times over so that you'll do it in a time as short as possible. After that save your game before going on!!!
Look around to see three possible ways to go. Two corridors are blocked by a grate. Enter the corridor with the dark part at the end. Don't go all the way to the end! In stead of that take the first corridor to the right. At the end of that corridor look up and go further. Just keep on following this corridor until you reach a small sloping grate. Go up again and go a little to the left.
At the end of the corridor go to the right towards the light colored grate. Don't pay any attention to the sideways. Open the grate and press the c-button on your keyboard to enter normal standing mode. Do this as quickly as possible again and save your game when you have done this quickly enough!
Enter the next room. Open the right door of the green cupboard and take the shelf. Open the door of the WC at your right. Walk one room further and pass the sinks. Walk to the dark part to the right. Enter the equipment room. From the upper right drawer of the desk take the pincers with the yellow grips.
Pan to the right and walk to the lock on the door. From your inventory use the note with the red dots on the lock to see the correct buttons to press from the left to the right. Press the correct buttons and open the cupboard. Take the white envelope with all of your stuff. Walk to the right a little and climb up the ladder. Pan to the right and use the pincers with the yellow grips on the upper box to open it. Take the night vision equipment out of the box. Exit the equipment room.
Go to the left and open the first metal door to the right. Step into the metal corridor. At the end of the corridor go to the left and only open the door of the energy room. As soon as you opened that door turn around and enter the corridor to the left. Enter the server sector.
Step onto the elevator platform and press the red button on the wall to go down. To save yourself some precious time step down from the elevator platform before it reaches the bottom. Enter the first office to the left. Left click on the office chair and dump it on the elevator platform. Enter the second office to the right and do the same with that office chair. With the two chairs on the elevator platform press the red button to go back up.
Left click on one of the office chairs and while dragging the chair, enter the metal corridor. Go to the right and enter the energy room. Drop the office chair somewhere in the room by right clicking on the chair. Return to the elevator and pick up the second office chair. While dragging the second chair re-enter the energy room. Drop the chair in front of the brown pipes beneath the green lit power generator. Climb up the chair and up the brown pipes beneath the generator. Flip one of the red switches. Hey... it's good you brought the night vision equipment along! Flip the other switch too.
Use the fire extinguisher to cool down the generator. Step down to the floor. Place the shelf beneath the power generator. Place the two office chairs along the shelf. As soon as you can't move them anymore, they are standing on the correct spot. Climb up and take the generator to place it onto the shelf on the two chairs. Left click on the generator and drag it into the corridor. While dragging the generator enter the first corridor to the left and step onto the elevator platform. Press the red button to go down one more time.
Step from the platform without taking the generator with you. Enter the corridor and enter the server room at the end of the corridor. Walk towards the back wall. Go all the way to the right. Press your c-button once more to go into crawl mode. Open the grate and enter the green corridor. Enter the second corridor to the left to end up beneath the police station. Just follow the brown corridor. It has no sideways. At the end of the corridor open the grate and step into the water. Press the c-button on your keyboard again to stand up. Once you have made this in time it would be a wise decision again to save our game here! You just not only have beaten the system but also the timer!
Police station
Just follow the brown corridor. It has no side ways. At the end of the
corridor open the grate and step into the water. Press the c-button on your
keyboard. Walk a little to the left. From the wooden crate take the nails. Enter
the sewer pipe at your left. Walk to the end of the pipe. Enter the sewer pipe
at your right. At the end of the pipe pan to the left and take the saw. Turn
around and enter the pipe that is leading into the room you entered the first
time. Walk to the right and use your saw on one of the wooden crates.
Walk towards the platform at your left and climb up the steel ladder. Climb up the next steel ladder. Look around and notice some wooden crates. Walk to the left side of the crates. Pan to the right and take the hammer from the crate. In your inventory use the nails with your hammer. In your inventory use the hammer with the nails on the wooden planks. Press the c-button of your keyboard. Walk to wards the right most slowly rotating ventilation blade. Use the wooden structure you just made on the center of the ventilation blade. After the ventilation blade has stopped enter the space behind it.
Climb all the way to the top until you enter a brown corridor. Walk all the way to the end. Open the closed grate. Go to the left and pass the slowly rotating ventilator blade. Press the c-button on your keyboard. Walk towards the wooden crates at the opposite side of the room. Left click on the smallest crate. Drag it to the left most big crate. Drop it against that crate by right clicking on it. Step on the small crate and take the cork from the lid of the wooden crate. Walk towards the rotating ventilator blade at the left side of the crates.
Press your c-button and pass the vent. Press your c-button too stand up and climb up the steel ladder at the back wall. On top of the ladder open the ceiling grid. You may fall down the ladder. If that is the case simply climb it up once more. Walk to the left and enter the hangar with the broken police car. Take the fork-lift trick by left clicking on it. Drag it to the left most hangar at the opposite side with the wooden crate in it. Use the fork-lift truck on the wooden crate. Head back to the opposite hangar with the opened grid where you entered the area. Just drop the wooden crate through the opened grid.
Walk back into the hangar with the broken police car. Walk pass the left yellow steel beam of the hydraulic lift bridge. Press the red up button to lift the broken car. Press the c-button on your keyboard and walk under the lifted car. Take the green starter from the turbine of the car. Press your c-button to stand up.
Walk to the left and walk to the hangar with the only sleek parked police car. It is right next to the empty hangar. From the controls at the left wall take the cables. Now head back to the opened grid where you dumped the wooden crate. Just jump down the hole. Take the round electro magnet from the smashed wooden crate. Press your c-button once more and pass the rotating ventilation blade. Press your c-button to stand up and walk to the left. Climb down the ladder to the shuttle area.
Walk towards the opposite wall. Turn to the right and walk to the front side of the parked shuttle. Pan a little to the left. From the top of the left control panel at the wall with the red and yellow lights take the hardly to see keycard. Pan to the right and take the broken starter from the front part of the shuttle. Examine it in your inventory by left clicking on it to get a starter converter. In your inventory combine the starter with the starter converter. Attach the cables to the starter. Examine the starter in your inventory to get confirmed that it is ready now.
Walk to the crane at the center of the room. Take the gloves from the crane. Walk straight ahead to the other parked shuttle. Walk to the front part of the shuttle. Place the repaired starter into the shuttle. Be sure to get confirmed that it is okay now! Walk to the pedestal with the controls for the crane near the wall.
Press the center red button of the controls once. Walk to wards the opposite wall and attach the round electro magnet to the lowered part of the crane. Return to the controls for the crane. Push the center button once to raise the electro magnet. Press the left button three times to place the electro magnet above the parked shuttle. Press the center button once to lower the electro magnet on top of the parked shuttle. Press the center button once to lift the shuttle. Press the right button once to move the shuttle to the right. Press the center button once more to lower the shuttle.
Walk towards the placed shuttle. Climb up the little stairs behind the placed shuttle. Open the back door of the shuttle. Press your c-button and enter the shuttle. Once on board press the c-button once more. Look at the controls. Put the keycard into the slot at the left side of the engine start. Press the button at the right side of the engine start. Now you are ready to ride the sewers...
Attention:
possible bug ahead!
When you are in the sewers a nasty bug can occur. While having docked at your
ATI company or at Detronics you cannot leave with your shuttle. When you press
the red button to start the engine of your shuttle all seems fine. But when you
try to go forward, nothing happens. This means that you will be stuck there
forever. The maker of the game has made a patch to solve this problem. You can
download that
patch here.
Here is the route you have to go
to find some objects:
Go forward, right, right (red pipes), forward, forward, forward (yellow pipes),
forward, right, forward and go forwards to enter the square with the wooden
crates. Turn off the engine, open the back hatch and exit the shuttle. Take the
crowbar from the wooden crates. Re-enter the shuttle. Start the engine.
Turn the shuttle around and enter the corridor without the yellow pipes. Go right and keep on going forward to end up at your ATI building. Exit the shuttle. Walk towards the entrance of the building. Look up and get the pointer from above the entrance. Re-enter the shuttle and start the engine. Go forward, right, left (yellow pipes), right (red pipes), left, left (red pipes), forward, forward, forward (facing the circular grate in the wall), right and enter the square with the steel ladder leading down. Stop the engine and exit the shuttle.
Go down the steel ladder (you may have to press your c-button). Make sure that your back is facing the steel ladder. Go forward. In front of the grate at your left go to the right. In the room with the elevator go to the left. Keep walking straight ahead until you reach the room with the white floating bottle. Take the bottle.
In your inventory use the saw on the bottle. Fill the bottle with water. In your inventory combine the pointer with the cork. In your inventory open the white envelope with all of your stuff. Use the yellow smiley magnet on the cork with the pointer. Ohhh... you didn't bring the smiley magnet along? Well... in that case you have to start all over again. Just kidding of course!!! In that case head back to the shuttle area and use the pointer with the huge electro magnet (thanks for the tip Anestis). Put the cork with the pointer into the bottle of water.
Examine the cork with the pointer floating inside the cut bottle in your inventory. Turn around and re-enter the long corridor. In the room with the elevator go to the right. In the room with the grate go to the left. Climb up the steel ladder against the wall. Enter your shuttle. May be it is a good idea to save your game here. Start the engine.
Go forward, to the right, forward, right (red pipes), left (red pipes), forward (red pipes) and forward (red pipes) two more times. Dock at Detronics. Exit the shuttle. Walk towards the entrance of the Detronics building. Step onto the circular part on the floor in front of the entrance. After the body check open the door. Oeps... the door gets jammed. Use the crowbar on the door to open it further. Enter the building.
Detronics
Walk to the right and enter the central reactor room. Walk around the
reactor and stand in front of the compass shaped module of the reactor. In your
inventory look at the NovaTech Security Code Printout. Note down the code of
Detronics SA called EWNSNE. Now have a look at the compass shaped module. Don't
touch it before you know what to do with it though! Look at the bottom of the
module to see that there are lit four red lights.
Notice that is has a center circular piece that can rotate. Believe me when I tell you that it will rotate clockwise when you click on the right side of the center part end it will rotate anti-clockwise when you click on the left part. Also notice that the pointer is pointing to the N(orth) right now. Your goals is to get the pointer pointing to the East, West, North, South, North and East corresponding to the Detronics code. Of course it is not that simple that you just have to set the pointer into those directions. Things are a little bit more complicated of course. Here is the correct solution:
press the right side of the center
part twice
press the left side of the center part four times
press the right side of the center part twice
press the left side of the center part four times
press the right side of the center part four times
press the left side of the center part six times
Now look at the bottom of the module once more to see you have now three green lights but still one red light. Get your compass from your inventory and put it on top of the compass shaped module. If done correctly you'll get the reassuring words "It's okay now". When you look at the bottom of the module once more you'll see four green light now!
Walk back towards the entrance of the room. From the windowsill take the screwdriver and the cutter. From the corner at your right take the little dark upper rock. Exit the room and from the ceiling in the corridor in front of the entrance use your cutter to take the cables. Not only leave the sparking cable alone but also be sure not to touch it because you will get electrocuted and gamesover again!
Walk to the left. Notice the concrete reinforcement steel sticking out of the broken part of the wall. Use your cutter on one of those steel rods. Then take them all. Walk further until you reach the red lit part of the corridor in front of the elevator. From the wall at the right side of the elevator take the duct tape. In your inventory combine the duct tape with your gloves. Use the cables on the gloves with duct tape to get a long cable.
Use the pieces of iron you just took from the broken wall on the gloves with duct tape to get a long steel rod. If you want you can go to the upper floor with the elevator. But believe me, there is nothing to do yet. If you do want to see it yourself enter the elevator and use the control buttons and press P to go up. When finished re-enter the elevator and press the control buttons and press 3 to go back down.
Turn around and walk around the corner. When you walk halfway in the corridor you will notice some kind of pulsing sound. Look at the wall at your right side. Just before the part of the broken wall you'll see a moving jammed door. Drop the black rock between the opening of the door. Examine the square opening in the right doorpost. Use your screwdriver on the square opening to reveal even more cables.
Connect your long cable to these cables. Walk back to the sparking cable in front of the entrance of the central reactor room. I guess that now you know what was meant with "a long cable". Use your gloves with the duct tape on the cable that is hanging from the ceiling. Head back to the jammed door. Open the door and enter the room. Look at the hologram table and look at the strange red sign on the wall.
Examine the square red lit button beneath the big computer screen at your right. Attach your concrete iron to the button. Left click on the computer screen. First click on option 1. Articles Menu. Click on the options a and d. Click on Print. Click on the left button at the right side on the bottom of the screen. Click on 2. Installations. Click on B2. Detronics Base. Click on c. Space control. Click on 7. Recovery process.
Bingo!!! A code number! Write down the number. Switch off the computer. Turn around and have another look at the hologram projector table. Now that the two computers are connected you can admire a hologram projection. Don't forget to take the print from the bottom of the computer screen. Examine the print in your inventory. Walk to the left a little and open the closed door. You finally have found Dimitris Argyriou in the flesh. That is... after you entered the correct code on the screen behind the frozen compartment. Save your game here and press some signs to see what happens if you punch in the wrong code :o) After that load the saved game.
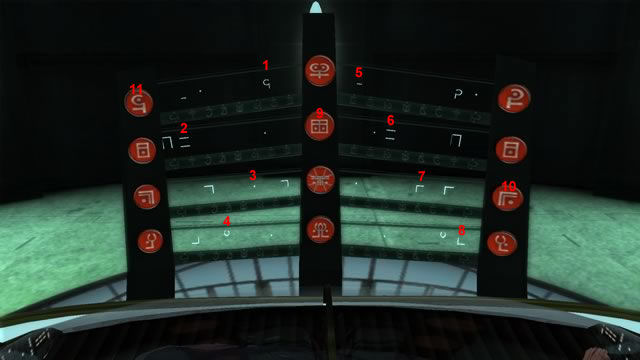
Now remember the code you just wrote down: 72641358 B2-C3-A1. Simple... isn't it? Nope it sure isn't. This one kept me off the streets for quiet a time. When you study the screen you will notice 8 digits at every row on the glass panel. Number them from the left to the right 1 - 8. Number the red signs from top to bottom A - D and from the left to the right 1 - 3. Whit this in mind the correct order of pushing the signs are as shown on the image below.
The correct order...
If done correctly the lid of the compartment opens once more. And this time without Dimitris getting killed. When he asks if you want to ask him any questions just say Yes and ask him about everything. When the conversation is over close your cell phone. Walk towards the brown wooden shelves at the right side of the door. Take the glove which turns out to be the hand of Argyriou when you examine it in your inventory.
Turn around and walk towards Dimitris who is still standing in the next room. When he asks you if you want to ask him anything else just close your cell phone because he has nothing news to tell you. Sometimes he won't get out of the way if you don't ask him again about everything. If that is the case just do so. When woken up walk towards the piece of furniture in front of the window. Press one of the two white buttons on top of it. Look at the screen to watch the morning news. Switch off the TV. Turn around and make the bed. Exit the bedroom.
Open the door to the right. Enter the walk-in wardrobe and take the trench coat. Examine it in your inventory. Exit the wardrobe. Walk pass the furniture and pass the gray screen. Take the white envelope from the floor. Open it in your inventory. Examine your new ID-card. Read the note of Dimitris and look at all the money you have! Open the door at your right and exit the room.
Walk to the right. Use the glove (Argyriou's hand) with the censor next to the door. Open the door and enter the office. Walk behind the desk in the next room. Open the left bottom drawer. Take the black card. Examine it twice in your inventory to find out it is the access card for the meeting room. Use the VID phone on the desk. Read B) Notes. After that read C) Personal list and be sure to read c. Sophie Lancy. After that click on the telephone icon and call the secure connection to Thanos Pekas. Exit the office after the conversation is over.
Walk to the right and enter the fitness room. Open the door to the right and enter the bathroom. Open the door of the WC. Enter the WC and take the hat from the hook on the wall. Exit the bathroom. Walk behind the bar. Open the fridge and take the bartender's glasses. Now you have all you need for your disguise and you are ready and able to go where you want without getting shoot down. Exit the fitness room.
Walk to the right. Use the access card for the meeting room with the censor next to the door. Enter the meeting room. Walk halfway the large meeting table and press the glass button to see another green hologram projected above the table. Right click on the hologram. Now note the P-sign on top of the hologram and the -3 sign at the bottom of it. Does this ring a bell? Yep... those are the possible floors you can reach with the elevator. Now notice the new added LX sign! Exit the meeting room and walk to the left. Press the button next to the elevator. Enter the elevator. Press the control buttons, enter LX and press enter. Go to the Space Port.
Iphestos Bar
Walk to the left. Cross the square with the concrete column with the spiral
stairs. Notice that there is something yellow attached to one of the gray
concrete garbage bins at the opposite side. Walk towards that garbage bin and
take the yellow tube from it. Turn around and cross the square. Enter Iphestos
Bar. Don't talk to the guy dressed in the white shirt yet!
Walk towards the niche with the big green lights. Go down the stairs and go all the way down. Walk towards the bar at the left side of the Karaoke Club. Take the bag of garbage. Examine it in your inventory to get the exit card. Examine the card in your inventory to learn that this is the exit card Level 1. Turn around and walk towards the green lit keypad next the nearby door to the left. Use the exit card on the green lit keypad. Open the door, the open the roller blind and go outside. Walk all the way to the right. Take the battery from the wooden crate.
Return to the roller blind and re-enter Iphestos bar. Go back up the first flight of stairs. Go to the left and enter the ladies loo at your right. Examine the signs on the wall. Enter the loo and walk towards the back wall. Open the garbage bin at your left. Take the 10 hour charging card. Exit the loo and go up the stairs. Go outside and cross the bridge in front of Iphestos. Look to the right and notice the stairs leading up.
Walk towards those stairs and go all the way up. Walk towards the parked shuttle at the right. Left click on the plug that is attached to the charging device. Place your battery at the end of the loose cable. Put your 10 hour charging card into the charging device and wait until it is ready. Take the charged battery. In your inventory combine the charged battery with the yellow tube you took from the garbage bin. Re-enter Iphestos Bar.
Go down the stairs all the way once more. Open the door at the left side of the Karaoke Club and go outside. Walk to the left and place your yellow tube into the yellow slot of the left garbage bin. Take the huge ham from out of the bin. Don't forget to take back the yellow tube from the garbage bin. Re-enter the bar and go up the stairs once more. Exit the bar.
Walk straight ahead and pass the Saiva Trans Hotel at the left side. Walk to the right and notice the fire escape against the wall of the hotel. Stand under the fire escape. Be sure to stand on the correct spot. That is where you'll hear that you can't reach it when you try to grab it. Use the huge ham on the lower part of the steel ladder to lower it. Don't forget to take the metal hook that has come loose of the huge ham!!!
Climb up the lowered ladder. Turn around and go up the next steel ladder. Do this until you reach the platform on top of the hotel. Walk to the right side of the platform to feel the power of the wind. Look up above the four ventilation shafts. Walk between these four ventilation shafts. Take the rope of the zeppelin. While holding the rope walk to the right part of the platform where you felt the power of the wind earlier.
When landed take the huge antenna. Take the rope that is hanging down from the zeppelin. Walk to the left a little and notice the steel grip on the roof. In your inventory combine the hook for meat with the piece of rope from the zeppelin. Attach the rope with hook to the steel grip. Because you are about to do some tightrope walking it would be wise to save your game here!!!
Stand at the end of the rope. You will use the big antenna to keep your balance. Now carefully cross the rope to the opposite side. Examine the parked Intertrade vehicle. Look around and notice the spiral stairs leading down. Go down the stairs but while going down look at the concrete wall at your left. From the first window in the wall you encounter take the key from the wooden board. Examine it in your inventory to see that is happens to be an Intertrade key.
Now go all the way down. Push the red square button to unlock the glass doors. Open the doors and step outside. Re-enter Iphestos Bar once more. This time walk to the guy dressed in the white shirt. Talk to him. Have a chat with Bloody Mary. Be sincere with her. After that react helpless and off you go to Rania's Chalet Hera.
Chalet Hera
Turn to the right and press the yellow up button on the pedestal to call the
elevator. Step onto the elevator. Press the yellow up button twice. Exit the
elevator and walk to the right a little. Turn to the right and enter through the
closed door. Inside the building walk to the left. Open the closed door. Walk
straight ahead and at the first intersection go to the left. Press the keypad
next to the door.
Open the door and enter the room. Walk to the left and take the white ventilator that is hanging on the wall next to the fire place. Walk towards the tables near the back wall and examine the holographic phones on the tables. You can't use them now but remember that you can find them here!
Exit the room. Go to the right and keep on following the yellow arrows to platform 373. Open the door and step outside. Step onto the elevator and press the down button twice to go all the way down. Walk to the right and enter the building. Go to the left. Open the door and go straight forward. At the first intersection go to the left. Open the door and meet Dimitris and Rania. On Rania's question react with Some gossip. Ask her about everything and especially about Intertrade where she invites you to go to a reception at the best hotel at Saiva.
From the table beneath the mirror take Rania's powder. Examine it in your inventory to get the paint brush. Exit your room, turn to the right and enter the corridor at the opposite side. Try to open the door to the left. Open the door to the right and enter the kitchen. Walk behind the counter. Open the drawer of the cupboard beneath the yellow brown striped dish. Take the knife and close the drawer.
Turn around and open the cupboard beneath the VID phone. Take the pot and close the cupboard. Turn around and walk towards the sink. Put the pot into the left sink. Left click on the tap. Wait until the pot is half full of water and left click on the tap once more to turn it off. Take the pot filled with water. Exit the kitchen. Turn to the left and enter the opposite corridor. Open the door to the right, opposite to your room, and enter the sauna.
Notice the force field that is protecting the sauna. Switch it off by pressing the bottom buttons of the controls at the right side, left of the door. Take the stones from the wooden crate. In your inventory put the stones into the pot filled with water. Exit the sauna. Look to the left and notice the circular part of the floor between the two corridors. Step on that circular part to call the holographic elevator. Press the green up button once.
Place the pot with stones and water into the fire place. Wait a while until you get the message that it is ready! When ready take the pot out of the fire place. Step onto the circular part at the center of the room to call the holographic elevator. Press the down button once. Re-enter the sauna. Drop the pot on the floor inside the sauna nearby the wooden crate. Wait until you get the warning message of the over heated sauna. Exit the sauna and quickly enter your room. Wait until you hear some steps.
Exit your room. Walk into the opposite corridor and open the door to the left and enter Rania's room. After your conversation with Thanos Pekas is over, turn around and open the right most door of the cabinet behind Rania's desk. Take the candies. Close the cabinet. Open the middle drawer of the cabinet at the right side of the door. Take the USB stick. Examine it in your inventory and open it to get the micro-camera. Close the drawer and exit the room. Save your game here just in case.
Step on the center part between the two corridors to call the holographic elevator once more. Press the down button once. Now you are facing a particular part of the game. As soon as you enter the room with the elevator it seems that you are stuck on the ceiling. When you look around you can right click on some items such as a note, a wig, the some kind of keypad next to the door and some kind of wire at the right side of the sofa.
Well... you are not stuck. You are only floating. If you don't react accordingly you can keep on floating there forever. It's good you brought that ventilator along! In your inventory examine the ventilator and switch it on. As soon as the blades start to rotate you'll see that you are actually moving around slowly! When you pass the wig quickly grab it! Do the same with the note!!
Read Rania's note that is stating that you shouldn't touch her things. In your inventory combine the rolled up note of Rania with the candies. Examine the notes and candies in your inventory to see it is all ready to fire. Now shoot with it on the keypad next to the door. As soon as you hit the keypad the floating will be over. Right click on the wire next to the sofa once more. Step onto the circular part of the floor to call the holographic elevator. Press the up button twice to go all the way up.
Exit the room and go to the right. Follow the yellow arrows once more to platform 373. Step onto the elevator and press the down button twice to go all the way down. Enter Rania's parked shuttle and go to Iphestos Bar. Walk to the right and enter the parking lot at the right side. Walk towards the glass doors. Open them and enter the building. Go up the stairs. Go all the way up and use your Intertrade key on the parked Intertrade shuttle. And off you go to... Intertrade!
Intertrade
Go forward and enter the glass entrance doors. From the third counter at the
left side of the room take the white note full of numbers. Examine it in your
inventory. Walk to the right and go up the little stairs. Walk to the right and
enter boot number 3. Touch the back side of the monitor. From the bottom of the
flipped monitor take the very hard to see note. Read it in your inventory to
find out it actually is the serial number of the monitor. Exit the boot and
enter boot number 1. Left click on one of the monitors and enter the code
Rex230581 you just found and press enter. Left click on the options a, b, c, and
d. Zoom out.
Walk towards the stairs you just went up. Look at the right and notice the conveyor belt running to the right side into the storage room. Head back into boot number 1 and left click on one of the monitors. This time press e and f. Zoom out. Exit the boot and go down the stairs. Walk to the right and enter the storage room by going through the sliding doors besides the conveyor belt. Walk all the way to the end. By the way you will have noticed the four flying robots by now searching the shelves. If you left click on them they will tell you what they are searching for, shoes, socks, gloves and uniforms. You actually can climb these robots and ride on them. Don't do the same thing as I did... spending lots of time riding and searching the shelves on all four of these flying robots! In stead of that just leave them alone. Press the dark gray circular center part of the huge gray door at the back wall. Notice the huge robot standing against the back wall. Yep... you are going to ride it in a moment!
Walk about half way the room, go to the left and take the parrot key next to the huge gray barrel. Walk back into the storage room and walk at the left side of the conveyor belt. Walk about halfway the conveyor belt and notice the red valve beneath the belt. Use the parrot key on the red valve. Head back into the room with the huge robot. Climb up one of the spiral stairs next to the robot. Enter the robot and left click on the lit screen to start it.
Walk towards the conveyor belt. While standing near the platform behind the conveyor belt look to the right. Notice the box that is standing alone on one of the shelves. Walk towards the rack with that box. Walk around the rack and crab the box by left clicking on it. While holding the box left click on it once more. While carrying the box walk towards the conveyor belt. Notice the yellow black stripes on the floor just pass the platform. Be sure to strand on those strips and hold the box above the conveyor belt. Left click on the box to drop it onto the conveyor belt.
Left click on the screen to turn off the robot. Climb out of the robot and walk back towards the room with the computer boots. Go up the stairs and walk to the right. Enter boot number 1 once more. This time press d. Activate Belt. Zoom out. Exit the boot, go down the stairs and walk to the backside of the conveyor belt. Wait a moment until the box will be delivered. Take the plastic bag with a pair of socks made of Texlan from the opened box. Open the plastic bag in your inventory and examine the socks.
Go up the little stairs to the computer boots one more time. This time walk to the left and enter boot number 1. From the single office chair behind the desk take the McBlast battery charger for guns. Examine it in your inventory. Go down the stairs, walk to the left and go through the glass entrance doors. Left click on the next gray doors and go to Iphestos Bar.
Iphestos Bar
Walk straight ahead and enter Iphestos Bar. Talk to the guy dressed in the
white shirt again. When Bloody Mary asks if you want a drink react Affirmative.
In your inventory read the note you just found in your drink. It is a
transparent note about Mira Saida, Villa Noima, sector 9 Saiva, lock with finger
print. Before you go there remember that Rania invited you to go and visit the
reception in the hotel at Saiva. So head back to the Chalet Hera to meet Rania.
Chalet Hera
Open the door and enter the room. Step onto the holographic elevator. Press the
down button once to go down. Enter your room and open the huge gray cupboard.
Examine the suit that is hanging in the cupboard. After you return from the
reception at Saiva use Rania's shuttle to go to Villa Noima.
Villa Noima
When you enter the holographic elevator press the up button. Step out of the
elevator. Walk in front of the closed roller blind at your left side. In your
inventory combine the McBlast battery charger for guns with your gun. Notice the
white pin sticking out at the right bottom of the roller blind. Press the
c-button on your keyboard to go into crawl mode. Use the parrot key with the
white pin of the roller blind. Go down the fallen roller blind.
Be sure to pull your loaded gun! Step onto the green grass and walk all the way in crawl mode until you meet the guard. After the guard has been stunned with your gun walk towards the guard that is laying unconscious on the ground. From the ground at his left side take his cell phone. Examine the cell phone in your inventory and take the black square memory flash card out of the phone. Examine the memory card in your inventory to find out it seems empty.
In your inventory examine the glass in the plastic bag you took away at the reception. Take the glass out of the bag. In your inventory use the paint brush on the glass. Press your c-button to go into normal mode. Walk towards the green lit keypad next to the door. Hold the glass in front of the keypad. Open the huge roller blind and enter the villa.
Walk forwards and at the end of the room walk to the right. Press the button next to the elevator and enter the elevator. Press the second button from bottom to go up one floor. Step out of the elevator and enter the glass doors to the left. From the sofa behind the stairs leading up take the pencil. Walk to the opposite side of the room. From behind the bar take the fish. Examine it in your inventory to find out that it is to save money and that it is made of lead. If you want you can play with the bar stools in front of the bar.
Walk to the opposite of the room and go up the stairs. From the large table take the organizer. Examine it in your inventory. Use the pencil on the organizer. Read the appeared message in the organizer to learn about the meeting tomorrow at Iphestos. Walk further to the right in the little corridor and enter the office to the right. Right click on the photo on the desk.
Notice the white square on the desk in front of the monitor. Put the finger printed glass on that white square which turns out to be some sort of keypad. Put the square black memory card onto that keypad. Left click on the monitor. Press b and after that press c. Wait until Nick has read the whole message. After that press Copy Data! Be sure NOT to press Print!! If you do so and take the print with you it will be burned as soon as you try to leave the villa and not only that you also will be shot down by the guard in the progress!!! So leave that Print option alone!!!
Zoom out and take back the memory card from the green lit keypad. Examine it in your inventory to find out it looks okay now. Now in your inventory put the memory card into the fish. If you don't protect the memory disk like this all data will be erased as soon as you leave the villa!!!
Exit the office and go through the glass door to the right. Walk towards the elevator shaft and press the button to call the elevator. Enter the elevator and press the bottom button to go all the way down. Step out of the elevator and walk to the left. Open the roller blind and step outside. Leave the unconscious guard alone and walk straight ahead. Walk onto the grass wand walk all the way to the left. Enter the holographic elevator and go down. Left click on the gray doors and go back to Chalet Hera.
Chalet Hera
As soon as you arrive combine your knife with the fish in your inventory to
retrieve the memory card. Open the door in front of you and enter the room. Walk
to the opposite wall towards the tables with the holographic phones.
After the conversation with Rania and Dimitris is over try to open the files on the computer. Zoom out. After you woke up walk towards the TV screen. Left click on it to watch the morning news. Notice the sound of a telephone ringing. Exit your room, go to the right and walk all the way to the end of the corridor. Enter the door to the left to enter Rania's room.
Left click on the VID phone on the desk to have a conversation with Joe Krantsman. As soon as he asks you if you have any questions for him react affirmative. Talk to him about everything. This will take a time so be patient! When the conversation is finally over exit the room. It would be a wise decision again to save your game here, hey? Step onto the holographic elevator between the two corridors. Go up. From the counter at the right take the remote control. Examine it in your inventory by right clicking on it. Then use it by left clicking on it. Be sure that you see the remote control now above your cursor. Notice the blue panel above the bar. Notice the five stars on it. You have to press the stars in the correct order to reveal a hidden room. See the image below for the correct order.

The correct order of pressing the 5 stars also notice the cursor with the remote
control
If done correctly you hear the sound of opening something. Turn around and notice that the bookcase at the opposite wall has moved aside. Enter the hidden room. From the lower part of the bookcase at the right take the photo of your friends. Examine it in your inventory.
Pan a little to the right and take the note from the table. Read it in your inventory to learn that you have to find the wrong word and that you have to press the wrong letter. Study both monitors. At the bottom right of them you'll that wrong word. It is spelled Incert in stead of Insert. Press the c of that word on one of the screens and quickly exit the hidden room. If you are too late just press the c once more.
Meet Mystery and learn a lot of her this time. During the conversation you receive a message on your cell phone about Fasma. Read it and continue the conversation with Mystery. When the conversation is over and Mystery has left notice Nick's word that he needs a drink. And what is the best place for a drink? Yep... a bar! So follow the yellow arrows to platform 373 once more. Go down with one of the two elevator platforms and use Rania's shuttle to go to Iphestos Bar.
Iphestos Bar
Talk to the man dressed in the white shirt once more. React Serious and
Impressive. When your conversation with Bloody Mary is over go down the stairs
to the left. When you arrive downstairs walk a little to the right. Notice the
green lit keypad next to the door for authorized personnel only. Use the Level 2
Iphestos exit card you just received from Bloody Mary on the keypad. Open the
door and go inside.
Walk forward and notice the yellow boxes at your right. From the floor next to the right most boxes take the waiter's shoes. Walk further and go up the stairs. From the sixth locker from the right take the waiter's shirt. From the second locker from the left take the waiter's pants. Turn around and walk towards the fridge. Walk behind the sink. Take the red ashtrays from the sink. In your inventory combine the micro-camera you took earlier from the USB stick with the ashtrays.
Pan to the right and walk towards the conveyor belt. Walk to the left and take the serving tray. Walk back towards the conveyor belt. Walk to the right and just for fun press the red button to get rid of the rubbish. Press the red button once more to stop the belt. Walk into the direction of the lockers and open the door to the left. Pan to the right and go up the stairs. Cross the floor and go up the stairs leading to the right. Sit back and enjoy the show...
After the show is over go to Chalet Hera. Open and enter the door in front of you. After the conversation with Rania and Dimitris is over follow the yellow arrows on the floor to platform 373. As soon as you step outside you'll notice Dimitris' spaceship parked in the hangar. Call and enter one of the two elevator platforms. Press the down button once to go down one floor. Walk to the left and left click on Dimitri's spaceship to go to Landosa Airport.
Landosa Airport
While standing in the docking bay you'll see the yellow lit sky of Landosa
at your left side. At your right side you see the entrance of the docking bay.
Walk through the entrance to enter the center hall. Walk to the right and enter
the third docking bay to the right.
Notice the bright gray lockers at the right wall. Walk towards the lockers. Notice that the third locker from top at the right side is opened a little. Open it. Pull your gun and drop it into the locker. Close the locker and take the card from the slot at the top of the lockers. If you try to enter the main hall of the airport with your gun, your way will be blocked by a force field and you won't be able to enter the airport armed! Exit the docking bay to the central hall. Go to the right and enter the first entrance at the right side to enter the main hall.
Walk towards the clerk who is standing behind the only occupied stand. Talk to him and just for fun be sure to ask him every possible option to be sure that he is not the cooperative type of person! Even Dimitris can't get him to other thoughts!! Return to the docking bay with the lockers. Put the card into the slot.
Open the locker and take your gun. Now pull your gun (right click and left click on the gun) and shoot the locker left of yours. When the locker has opened take the first aid kit. You can also get the first aid kit another way. Just stand as close as possible against the locker and notice the gap between the locker door and the locker cabinet. If you stand close enough you will see the red fabric of the first aid kit. Just take it out of the locker without opening the locker. In your inventory examine the first aid kit to retrieve the bottle of anesthetic spray. Drop your gun into the locker again. Close the locker and take the card from top.
Now head back to the clerk behind the stand in the main hall. While facing the clerk use the bottle of antistatic spray on the poor guy. Learn more about the expected space ship and it's content. Zoom out. When the party has left, head back to the clerk in the main hall who is still laying on the floor. From his chest take his service card. Look at his computer screen at the right corner of his stand. Left click on Activate/Deactivate Airport Sensors.
Head back to the docking bay with the lockers. Put the locker card into the slot. Take your gun from the locker. Close the locker and take the card from the slot just in case. Head back into the main hall. Notice the corridor with the blue lit clock between the two rows of stands. Enter that corridor and walk forward to enter the taxi terminal.
Before going down the stairs notice the two pairs of vending machines, one at the left side and one at the right side. Go down the stairs and walk towards the vending machines at the right side. Stand in front of the right vending machine. It's the only vending machine with two slots at the bottom.
Examine the vending machine to find out it is a taxi ticket vending machine. Insert the service card into the left slot at the bottom of the machine. Left click on the green signs of the machine. Choose Re-issue. Zoom out and press the red button. Take the ticket and the service card from the machine. Walk towards the parked taxi at your right. Left click on the taxi and go to the Amfitheatro.
Amfitheatro
Notice the red flag above the entrance of the cave. Also notice something
wrapped around the pole besides the flag. Stand under the flag and left click on
the flag until something is falling. Take the wire from the ground. Now stand
precisely under the flag and look up. Notice something red hanging down at the
bottom of the flag. Take the steel ring from the flag.
Turn around and walk to the rim of the rock. Go a little to the left and go up. Notice the grated cave entrance a little further away. Walk towards that entrance. In your inventory combine the red steel ring with the wire. Attach the wire with the ring to the grate. Now very carefully walk to the cliff side where the wire is leading down. Save your game just in case!
Look down and notice a little steel shack build against the rocks. Jump down at the left side of the shack so NOT at the side of the wire. We won't make things too easy... right? Carefully go a little step forward until you are lowered a bit. Now you are hanging down from the rim around the shack. Go all the way to the left around the shack until you reach the left side with the crank. Turn the crack and Nick tells you that you have made it.
Go a little to the left to let go the rim. Then climb up to the rock with the now un-grated cave. Press the c-button on your keyboard and enter the cave. As soon as you are inside the caves, press your c-button once more. Phew... you made your way inside. Getting out in once piece is another story!
Go to the right and enter the clone room straight ahead. After being locked up we will choose to escape with Dimitris first. Save your game here because later we will escape with Mystery. To do so you have to load this saved game later.
Escape with Dimitris
After having saved the game click on
option a. Argiriou's Escape. Look up at the ceiling. Take the loudspeaker. In
your inventory examine the loudspeaker to take the wire. After that examine the
woofer in your inventory to take the magnet. Use your magnet on the closed fence
of the storage compartment.
Open the door of the storage compartment. Take the piece of metal from the white fluorescent lamp. Now carefully look at the upper box at the right side of the lamp. Notice that there is something hidden in the side compartment of the box. Use the piece of metal on that part of the box. Press the c-button on your keypad. Take the remote control with fingerprint reader. Press your c-button once more.
Now climb up that pile of boxes. Open the upper box and take both the tripods. Open the box at the left, the one from which you took the remote control, and take both of the signal repeaters. Now climb up the pile of boxes at the left side. Open the upper box and take the remote pulse detonator and the remote control device. Exit the storage compartment and walk towards the close door.
Stand in front of the two red lights of the door. Use the piece of metal to break open the circuit board. Pres the c-button on your keyboard. From your inventory take the red wire and attach it to one of the rosé contacts of the lock. Take the connected wire back from the lock and attach it to another contact. The order of attaching the wire to the contacts is different all the time so I can't give you the exact order. Just keep on taking back the wire from the lock and attach it to another contact until you open the lock. May be it is a good idea again to save your game immediate after opening the lock!?
When standing in front of the room press the c-button once more. In your inventory combine the two signal repeaters to the tripods. Go straight ahead. At the last intersection go to the left and enter the clone room once more. At the center of the room drop the detonator on the floor. Be sure to hear the words "So now I think we're ready to destroy this small friendly gathering of clones"!!! This is your proof that you placed the detonator on the correct spot. If you don't hear those words after dropping the detonator just pick it up and try another spot until you do hear those reassuring words!
Exit the room to the corridor at the opposite side where you entered the clone room. When you are about halfway this corridor drop one of the tripods with the signal repeater on the ground. The only correct spot is where you hear the reassuring words "It's good that I know one or two things more apart from running companies". A little hint: the correct spot is where you are standing in the corridor and get a glimpse of the next (monitor) room.
Walk forwards into the monitor room. Walk towards the gray cabinet at the right side of the room and open it. Take the hanging red uniform, the white uniform and the alien circuit board from besides the two boxes. Open the upper box and take the two helmets and the two (!) badges. One badge is for the sound technician and the other one is for the network technician.
Walk to the left and enter the corridor. At the first intersection drop the second tripod with the signal repeater on the floor. The only correct spot is again where you hear the reassuring words "It's good that I know one or two things more apart from running companies". Save your game here!
Walk towards the closed door whit the white lit border at your right and open it. If you want to see what happens if you choose the wrong option, be my guest! In that case chose option a, b or c! Now that is what I call a decisive lady! After that load your saved game and now choose the correct option d. I am the new technician for the sound.
When everybody has gone you can search the place if you like of course. But believe me... you'll find nothing! So in stead of that go down the stairs and walk all the way to the left until you'll end up in front of the front door. Turn to the right and walk towards the central part. Notice the three tiny handles at the right side of the circular alien device. Flip those three handles.
In you inventory use your black remote control to blast the detonator in the clone room. Turn around and go through the front door. Walk straight ahead and open the next door. Walk behind the desk. From the upper drawer take your cell phone. From the bottom drawer take the USB-stick. In your inventory put the micro-camera inside the USB stick. Walk to the left and open the next door. Back inside the caves walk straight ahead. At the next intersection go to the right and open the door of the prison room... Sit back and enjoy the end!!!
Escape with Mystery
Now load your saved game to play the
escape with Mystery. After being locked up choose option b. The Surprise. Look
up at the ceiling right above Dimitris. Take the loudspeaker. In your inventory
examine the loudspeaker to take the woofer. In your inventory examine the woofer
to take the magnet. Use your magnet on the closed fence of the storage
compartment.
Open the door of the storage compartment. Take the piece of metal from the white fluorescent lamp. Now carefully look at the upper box at the right side of the lamp. Notice that there is something hidden in the side compartment of the box. Use the piece of metal on that part of the box. Press the c-button on your keypad. Take the remote control with fingerprint reader. When you are outside the room press the c-button on your keyboard once more.
Enter the corridor to the left. Mystery will tell you that she feels sick and that she must resume her telepathic powers... or she can't continue... We will work on that later! Keep on walking until you reach the door with the white lit border. Go to the right there and enter the monitor room. Open the gray cabinet at the left side of the room.
From the left side of the boxes take the circuit board. Walk a little to the right and stand n front of the monitors. Recognize the fellow at the bottom left monitor. It is that cooperative guy from the airfield who you temporally paralyzed with your anesthetic spray! Press the red square stop button at the left side at the bottom of the monitor. This will start an alarm. After that press the eject button at the right side of the stop button to flush the screen.
Turn around and notice the huge gray column at the center of the room. Walk around the column. Left click on the center part to open the clone DNA tray. Take the one but last circuit board from the tray, which turns out to be the weakest link. In your inventory use the bloody piece of metal on the circuit board. Put the circuit board into the front part of the tray. When the circuit has close we will shape up Mystery's health.
To do so go through the corridor to the right and enter the clone room. Open the empty clone chamber, the left most one at the right row of chambers. Step inside the opened chamber and close the door. You are standing on the correct spot if you hear the pulsating sound. When Mystery tells you that she is all right now and may continue... open the door and step out the chamber. Just for fun right click on one of the other clone chambers!
Head back into the monitor room and enter the corridor at the opposite side. At the intersection go to the right and open the door with the white lit border. When all speeches are over open the door in front of you. Walk all the way straight ahead until the end. Go up the stairs and re-enter the alien room. Walk to the right until you are standing next to the purple stair leading up to the right. Go up the stairs one floor.
Pan to the left and notice the red blinking light on the fourth table. Go there and left click on the red blinking light. Turn around and walk back to the stairs. Go down the stairs and walk all the way back to the front door. Turn to the right and walk towards the central part. Notice the three tiny handles at the right side of the circular alien device. Flip those three handles.
Turn around and go through the front door. Walk straight ahead and open the next door. Open the next door. Walk straight ahead. At the next intersection go to the right and open the door of the prison room. Touch Dimitris or Nick to save them as ordered after clicking the red blinking light in the alien room... Sit back and enjoy the end!!!
The End