Cracking the Conspiracy - Walkthrough
Comment by Game Boomers:
Cracking the Conspiracy was created by Brian and David Mennenoh from June 1996 to August 1998. These two lads took just over 2 years to create this game and they sincerely hope you enjoyed playing it. You may mail them at pixlshop@execpc.com.
Outside - The Miner's Shack
Begin game - Inside Car
Open the glove box and take the flashlight exit the car
Walk around the car to look at the trunk
Zoom in on the trunk and then open it.
Take the jumper cables
Back out and then walk to the Shack.
Upon trying to go in, the old miner
will appear.
To "what are you looking for" answer "mine" or "uranium"
(from the intro. animation and the letter in the communicator to you, from Kelsey.)
Answer "no" to "are you a claim jumper"
The answer to the miner's riddle is Ghost.
A host throws parties - The seventh sign is the seventh letter, or G
The miner will disappear and you can then enter the shack
Click the newspaper, and then the
skull to be under the bed
Take the skeleton key hanging on the leg of the bed
Get out from under the bed
Take the dynamite from the bench, and note the license plate numbers.
The year reflects the correct order.
You can, at this point, click the wood stove to your left, and then open it up to find the
miner's map to the mines.
Leave the shack and walk around
back.
Click the wood box to zoom in on it
Use the skeleton key on the lock.
Open the wood box and look inside.
Take the plunger. Back out and walk over to the entrance of the mine.
>From inventory, use the dynamite and place it in the center of the boulders. Now, use the jumper cables and attach them to the fuse of the dynamite. Next, attach the plunger to the free end of the jumper cables and the bomb is built. Click the handle of the plunger to blow up the boulders and gain entrance to the mines. You will lose 10pts of damage here - which is unavoidable.
The Mines & The Sewers
These are mazes, so directions are given as Forward, Right, Left, or Back. If you need to go Forward 3 steps then it would read as: F3.
Start - F, Bats come, F2, R (turn on flashlight from glove box of car), F, L, F (click red eyes), R, F, R, F, L, F, L, F, R, F, R, Take support beam, R, F, R, F3, L, F, R, F, Use beam from inventory on partially fallen beam - cave in will cease, F, Zoom in on puzzle lock on door.

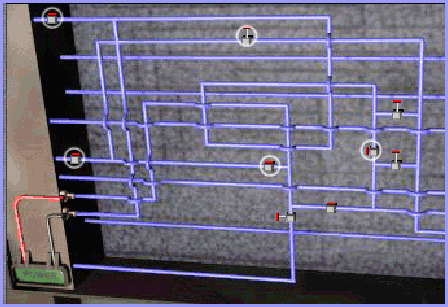
Just change the switches that are circled and press Power. Zoom out, and open the door to the Sewers.
The Sewers:
Start - F3, R, F3, R2 (see sludge, click it), F7, L, F, R, F3, L, F2, L, Zoom in on puzzle - panel on wall. To solve, click V3, then V2 (the lower right switch, then the lower left switch). Back out, Zoom in on the waste barrels, Zoom in on the cardboard box, take the electrical tape. Zoom out twice, L, F2, R, F5 (rats), F7, L, Zoom in electrical junction box, Use your tape on the wires, Back out, R, Open door to Area 51. Enter…
Area 51 - Level One
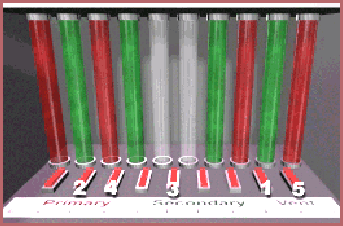
Start in Janitor's closet. Exit Room, Turn left and go forward until you reach the genetics lab, which will be the only door on your right. Zoom in on the door's lock.. Solve puzzle, Back out and open door. Enter Room. You will encounter Dr. Johnson. Pay attention to what she says. After she leaves, L, F, R, & Zoom in on the hydraulic lines, of the embryo lift, that are mis-configured (the red & green tubes at bottom center) Solve the Puzzle:
Back out, leave room,
& ride the walkway. Enter the Cafeteria, & walk over to Dr. Johnson. The Dr. will
ask you if you have anything to tell her, and if you paid attention to her in the lab you
will know to enter something like "I fixed the lift". She will leave, Turn
around and leave the way you came, & ride the walkway again, R, F3, R, & Enter Dr.
Johnson's office, which is now unlocked. You can answer "No" to her question and
she will leave.
Zoom in on the top drawer in her desk, open it, take the DNA scanner, Zoom out, Zoom in on
the computer screen, Enter "E" to finish the password. Think numbers for this
one. Note the current transformation matrix on the screen (1111 1010 1100 1110).
Back out, leave the room and return to the Research Lab. In the room, walk around to the
back side of the embryo lift. Zoom in on the computer screen under the alien, and enter
the Xform matrix, from the Dr's computer screen, to grow the alien Zoom out, and then Zoom
in on the dead adult alien Use the DNA scanner on the alien to get an incomplete sample.
Leave the room.
In Hall, R, F3, L, Enter Captain Sherman's office, Zoom in on plane model, Zoom in on base
of plane with data, Note length of plane (48ft), Back out, and walk to being behind the
Captain's desk. Zoom in on the desk blotter and take the pencil. Use the pencil to make a
rubbing from the torn sheet of paper to get the Captain's PIN . Note PIN. (Notice on
blotter the Cpt. likes to play Rock Hopper, in normal play you would have to play the Rock
Hopper game in the cafeteria to get the Captains initials from the High Score table.)
Zoom out from blotter,
L, Zoom in on the computer screen, Get the 1st (unlocked) message from the General. Back
out, R, F, Zoom in on the Captain's locker. Enter Personal ID code (Initials & 7 digit
PIN - JRS1872194), Open Locker, Take Level 2 Pass card from locker shelf, Click and hold
the mouse on the pic. of "Nina" for sometime… You can go read the 2nd
message from the General - Nina is the password.
Exit Room, Go back into the Cafeteria, Once in turn right and immediately exit through the
other door, Straight ahead is Garnet Hall, Go in. Go to the far end, Click on the glowing
red display, Now click the panel at the base of the display, Enter "RAMEY" to
unlock the EM field protector, Zoom out, Zoom into the Roswell metal piece to see the
alien writing. This sequence is the solve for the slider puzzle in the UFO.

Back out, Turn around
and walk back to the other end of the hall, to the last set of displays. Turn right and
walk over the USA looking display. Zoom in and click the button in the state of Nevada.
(this is where you are…). Back out, and note the number on the display (0000 1437
3890) Turn around and go over to the display directly ahead of you, Zoom in on the model
of the base, Click the model of the X29 plane and note that it tells you the plane is 1/3
the length of any hangar on the base (48x3=144=length of hangar in feet), Click the hangar
and note that it tells you the width of the hangar is 96 feet.
Leave Garnet Hall, and take the tunnel to the left. Enter the door on the left. Go to the
Blast door and zoom in on the card reader unit on right side. Use the Level 2 card on the
card reader to unlock the door. Back out and open the door. Proceed to Level 2
Area 51 - Level Two
From passing through blast door enter the first room on your left - The Contigency Planning Room. Go around computer console to sunken area at front of room, under wall map. Zoom in on Strategic Simulator:
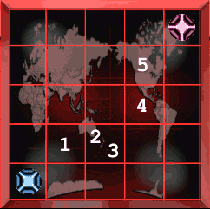
Solve and the access
cover will showing "Operation Red Tiger" which is the solve for the Contingency
Planning document in the communicator. Leave Room. L, go down hall and take the first
left, walk up to the guard blocking the entrance to the hangar He asks for the area in
Square feet of the hangar: It is 13824 (gotten from plane model in Captain Sherman's
office, and the Area 51 model in Garnet Hall)
Enter Hangar Go down stairs into hangar. F2, R, F, R Click the plug on the floor to plug
it together and reconnect the power to the degaussing system Return up stairs to the
control room Zoom in on the degaussing access panel, on the control panel. Open the
control panel to expose the red flashing button Wait until the scientist walks out onto
the hull and then press the button.
Go back downstairs and enter the UFO In the middle section of the UFO are three silver
cylinders. On the middle cylinder, is the locked access panel to the Element 115 chunk.
The solve to this puzzle is the letters on the Roswell metal piece in the cafeteria. Once
solved, take the piece of E115 Back out, R Go up ladder.
Once in Upper section of UFO L, F, R, zoom in on alien computer panel. Note word ELOKIEN This matches the large panel in the hangar except the big panel is translated. Elokien=Diagnostic and this is the solve for the UFO plans in the Communicator Leave Hangar and control booth.
Once in Hallway: F2,
L, F2, L Open door to Jarod's office and enter R, Jarod tells you to set his bath temp.
and leave… L, F, L Zoom in on control panel on side of bath Enter 76.5 and press
enter. Jarod will go into his bath - (the temp is gotten from reading the UFO plans in the
communicator and it says in there the solution has to be 9º Glumbah, this is translated
to ºF by using the formula on the blackboard in the embryo lab)
F, to behind Jarod's desk, R Zoom in on computer screen, Click unlocked document from Dr.
Snidley, Note frequencies - 166 is the one we want. Back out, F, R Zoom in on safe on
floor, Zoom into safe's control panel Use the DNA scanner from inventory and plug it into
the scanner port on the safe Since the scan was incomplete you will have to manually
complete the sequence. Solved:

Solve. Back out. Open safe door. Take Level 3 access card. You can take the scanner back too. Back out. Leave room. L, F2, Zoom into card reader in door Use L3 pass card to unlock door Back out, open door, enter elevator to Level 3
Area 51 - Level Three
From the elevator, L, F3, Open door to Weapons development, Enter room, F, R, Open door, Enter room and Zoom in on the missile prototype, Zoom in on access panel, Open access panel and solve Sinewave puzzle (it's always a combination of two waves in the buttons) Take piece of Element 115 from the open fuel well. Zoom into fuel well and Note the Missile ID which is used to open the Excalibur plans document in the communicator.
Leave Room, L, Leave room, F3, L, F2, L, F2, R, Enter Super Technology Research Lab, L, F, Zoom into animated control panel on monkey's cage, Change the 80Hz to 166Hz (from Jarod's cpu) and hit Enter. The Monkey will kill the scientist. Zoom into folder, on cage, next to the now off control panel. Note Code Name: 20/20. This is used to open the MK Ultra document in the communicator.
Back out, R2, F2, L, F, R, Zoom in on the heater on the scientist's desk (left of monitor) Take heater by the handle, Back out, L2, F, Zoom in on transporter control, Open the E115 Fuel Chamber Place both pieces of E115, from inventory, into the fuel chamber. Close the chamber Enter coordinates to Dreamland Gate: 0000 1437 3890 (hit enter) (this is from the USA map, in Garnet Hall)
Back out, R2, F, L, F, Standing in front of transporter, F, Go to dreamland. Once in Dreamland, Walk down pathway into the cave. Zoom in on the informational plaque. Note the atmosphere: H2CH4 This is used to open the Dreamland Project in the communicator. Back out & get onto the transporter.
Return to Upper Level 3. L2, F4, R, Open Door and enter the MJ12 Meeting Room, L, F, - down the stairs, L, Try and go forward (you will get the clue about the fire from the general) If you like, Save here and try and go forward twice more and you'll end up in the hole…
Leave Room, and return to Weapons Development & Testing Room Once in WDT Room - F3, L, Open door, Enter room, L, Put heater, from inventory, onto base unit on table - (heater goes on), L, Open door, Leave Room, R, F, Zoom in on weapons control panel & Press the Remote Sensor Button.
Back out, Back again, Open door, Enter room, L, Use piece of paper from Janitor's closet (or map from wood stove in shack) and place it onto the heater. It will start on fire and signal the alarm. The general will come in, and if the weapon is on he will walk through the beam and die… After general dies: Return to the weapon's Control panel and put weapon into safe mode.
Return to MJ12 Meeting Room. Go into Library section, where the general was, R, and get a close up of the document above the active fireplace - The MJ12 Member List. This document gives you the two remaining solves for the communicator: "Truman" for "Leader" in the Project Release document "Hollenbates" for "Roscoe H." in the Majestic Member List. Note that the Truman clue for "Our Leader" can also be had by looking at the name tag under Truman's picture hanging on the wall. All files in the communicator should be unlocked now.
Return to the Super Technology room where the transporter is. Go to the transporter control panel and enter Kelsey's coordinates: 4589 4534 2198 (from the letter to you in the communicator) Back out, R2, F, L, F, Standing in front of transporter. From Inventory, use the communicator and drop it on the base of the transporter. You'll toss the communicator onto the transporter and it will disappear, but sound the alarms in the process.
Alternative: Save here and then try going up the elevator (Kelsey warns you not to in her letter) Winning: Go back to the transporter control panel and enter the coordinates to the miners shack: 1896 2534 4896 (from license plates - order is from year stickers) Get onto the transporter and enjoy the ride.