Cydonia (Lightbringer): A Walkthrough
By
Dan Kennedy
Introduction
What came first – the puzzle, or the story?
Cydonia (or Lightbringer, as its DVD re-release is known) attempts to grapple with a fundamental problem facing most puzzle-focused adventure games – how to successfully marry a series of somewhat unrelated puzzles to a coherent story.
Supposedly based on actual data from NASA and the Russian space program, the gameplay in Cydonia centres around investigating the remains of an ancient race on the planet Mars. Cydonia certainly throws enough graphically intense cut scenes and plot references at us during the beginning stages of the game. A novel timed sequence at the very beginning of the story that ultimately determines the ending of the game is also a nice touch. In fact, the meaty cut scenes made this game a perfect candidate for re-release in DVD format (as Lightbringer).
However, once the puzzles begin to take hold of the game, the story degenerates into silliness involving dimensional travel, an alien language that our computer can somehow already translate, and someone named The Ambassador.
Silliness aside, the game is entertaining mainly because of the varied and unique puzzles that are challenging but mostly fair (some noted exceptions to this occur near the end of the game). The developers should be applauded for at least making a stab at a plot for this mostly puzzle game – but one wonders how much more this title could have been with a greater focus on the story.
Be sure to run the Cydonia 1.1 patch before playing (or alternatively the Lightbringer CD-ROM patch) in order to ensure that you can get past a colour matching puzzle near the start of the game.
Connections
The year is 2012, and the Earth’s instability has sent everybody into orbit. You are part of a small team blasting off to Mars on the Prometheus to investigate signs of ancient life, and the opportunity for colonizing the red planet. Unfortunately for you and your shipmates, a force field is encountered near the planet’s surface that sends the ship crashing into a Martian gully.
After the really long cut scene ends, the game begins with you standing in the cockpit of the spaceship. Turn to your left, and listen to your commander – the fuel tanks have ruptured, and it’s up to us to patch into the ship’s computer and empty the tanks. We’ve actually only got a few minutes to do this task before the ship will explode, so let’s get cracking. The actions that must be completed are fairly simple, though, so don’t worry too much about the deadline (plus you can always start over since you are so close to the beginning of the game).
Following the directions of your commanding officer, turn around and face the wall behind you. The “Aux. Computer Uplink” location is fairly easy to spot on the wall – just look for the orange and yellow colouring. The cursor changes to a small magnifying glass with a “+” sign inside it when placed over the uplink - click on the location to get a close up. We now must find a way to connect our personal computer to that of the ship.
Right-click the mouse to open the inventory / menu option screen. You access your inventory by mousing over the icon in the bottom left corner of the screen – it spills out to the right. Click on the uplink cable (the left-most inventory item), and see a close up picture of it at the top of the screen. To use the item, click the “Use” button to the left of the close-up picture. We now must click on the object that we want to use the item with. Click on the uplink port on the wall, and watch the cable plug into the socket.
Computer…Hello? Computer?
Right click again to open the inventory screen, open your inventory pack, and click on the right-most item – your personal computer. Click “use” to enter a simulated computer grid, find the “Lander Uplink” node and click on it. A dashboard comes up containing the status of the Cockpit (Code Red), Lower Shaft (Code Yellow) and Engines (Code Red). Click the brown “Engines” button on the left side of the screen to enter an engine-specific page.
The computer advises us to dump all three fuel tanks (including the one with oxygen), so click on the three buttons to the left. All three tanks return to green status. Hit the “Back” button in the bottom left corner of the screen. Next, click on the “Lower Shaft” button to learn that a fire is burning here. Hit the “back” button again, and then click on the “Cockpit” button. The reason for the Cockpit code red isn’t clear, so click on the “Suit Diag.” button to learn that the co-pilot’s spacesuit visor has sprung a leak, and that he (or she) has 15 minutes to live.
Hit the “back” button twice more to return to the dashboard, and click on the “close” button in the top left corner of the screen to return to the simulated grid. Pan up or down to find one of the “QUIT” nodes, and press it to return to the cockpit location. Back away from the uplink panel by locating the magnifying glass icon with the “-“ sign inside it, and clicking away.
Damage Control
Turn around, place the cursor over your commander to get a “TALK” icon and click. You get a number of questions displayed near the bottom of the screen that you can ask (just click on them). The responses are brief, so be sure to ask all of the questions. We learn the following information:
· There is a fire extinguisher in the ready room that can be used to put out the lower shaft fire
· There are pressure patches in the ready room that will seal the co-pilot’s broken visor
· The commander’s leg is trapped under a fallen conduit, which can be cut away using a torch in the ready room
· The mission can only succeed if you can deactivate the force field, and allow the crew to return home.
· There is a hovercraft in the main bay that can be used to travel outside the spaceship
Once the Q&A session is completed, turn to the left, find the “dancing arrow” cursor that indicates that you can move in a certain direction, and walk toward the cockpit door. Since we do have 15 minutes (loads of time!), let’s go look at the co-pilot. Turn around and walk towards the person reclining to the left. Turn to your left and observe the air whooshing out of a crack in the co-pilot’s visor. Now turn around and note the position of the conduit pinning your commander’s leg.
Turn towards the door again and walk to it. Click on the circular locking release to open the door and send you into the ready room. Turn to your right until you spot the locker containing the fire extinguisher. Click on the locker for a close-up, again on the handle to open the locker, and then click on the extinguisher on the right to place it into your inventory (the inventory symbol briefly flashes in the bottom left corner of the screen). Click on the hand icon to close the locker door, and back away from the locker.
Turn to your right, past the cockpit door, and face the wall here. You should spot a series of drawers on the wall just to the left of a grill. Click on the drawers to get a close-up of Bin 2B, and then click on it to open the bin up. Click again on the emergency pressurization patch at the front of the bin to place it into your inventory. Close the bin, and back away from the wall.
Pressure Under Fire
The fire seems to be your biggest concern at present, so turn to the right, and walk towards the large depression on the left side of the room. Look down, and click on the depression to lower yourself down to the door here. Clicking on the circular locking mechanism opens the door and takes you onto a ladder beyond. Click on the dancing arrow cursor near the bottom of the screen to descend the ladder.
At the bottom, turn to face the wall behind you, and note the burning electrical panel. Open the inventory screen, open your pack, select the fire extinguisher, click the “use” button, and click on the burning panel. The extinguisher makes quick work of the fire. Now for the pressure patch – turn around and click on the top part of the ladder to climb back up. Click on the latch to open the door, and back away from the depression in the floor.
Turn around and walk towards the door into the cockpit. Click on the latch to open the door and send you through into the cockpit. Notice in the cut scene that your bum is probably the smoothest and roundest of any bum in any adventure game. Walk towards the co-pilot on the left, and turn to face him (or her). Open the inventory page, open your pack, click on the pressure patch, press the “use” button, and click on the co-pilot’s visor. The leak is sealed up nicely.
Now we can rest easy since we’ve beaten the 15-minute deadline. Our next task is to cut our commander free of the conduit. Turn back towards the door, walk to it, and re-enter the ready room using the latch. Walk forward to the depression in the floor, and then walk forward again towards the door on the far wall. You should spot the “laser welder” locker containing the cutting torch by panning to the left. Click on the locker for a close-up, click again to open the doors, and click on the torch to place it into your inventory.
Close the locker and back away from it. Turn to the left and cross the ready room to the cockpit door. Enter the cockpit, and walk towards the co-pilot again. Turn to the right, open your inventory, select the torch, hit the “use button, and click on the side of the conduit. The torch cute the beam in half, freeing the commander (although not a word of thanks from either rescued party!)
No Escape
Now we can explore the rest of the ship – turn to your right, walk to the door and re-enter the ready room. Walk towards the ladder visible on the right side of the room, and click on the dancing arrow to ascend the rungs. At the top, click on the latch to gain entry to the escape pod. There are six seats, but only one can be accessed right now – find the seat that can be used and click forward to sit down. Turn to your right in the seat and note the red “Launch” button – but suppress the desire to click it – you pod will simply rocket upwards, crash into the force field, fall back to the surface and explode.
Instead of certain death (would you really want to leave your ship-mates behind anyway?), get up again, and click on the door at your feet. Open the latch and descend back down to the ready room. Turn to your left, walk to the door leading outside and click on the latch to its left to go through. Inside the airlock turn to your left and click on the latch for the exterior door – which promptly shorts out in a blaze of sparks. This door isn’t going to work – turn to your right, and click on the latch that lets you re-enter the ready room.
Walk to the depression in the ground, turn around, and click by your feet to get to the door. Go through the doorway using the latch, and descend the ladder. At the bottom, turn to the left, and click on the latch on the wall to open the door to the hold. The hovercraft is located in the centre of the room. Turn a bit to the right and walk forward to get a view of the bay doors, which are closed right now. Turn around, walk back towards the hold door, turn to the right, and walk forward. Turn to your right to face the hovercraft door and click there to enter the vehicle.
Walk forward to the front of the craft, and then look down at the dashboard. Find the “Engines” buttons located on the right side of the dashboard and click on the left one. The support arms holding the craft in place in the hold are withdrawn. Facing the bay doors, click to move forward – your ship crashes through the doors and out into the Mars landscape.
My Hovercraft is Full of Dust!
Your ruined ship is located directly behind you right now – turn around to see it, and the wreckage from the crash landing lying about. Facing away from the ship, move forward along the crevice until the hovercraft stops. Look around – the way ahead appears blocked. We’ve got to get out of this depression. Find the “Jump Jets” buttons located to the right of the Engine buttons and press here to send the hovercraft out of its prison.
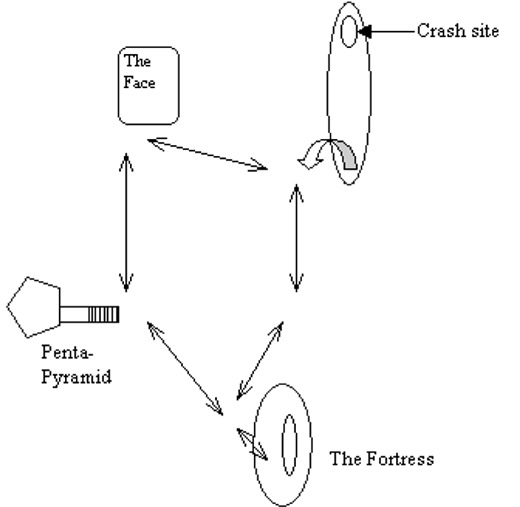
Spin around to see your new surroundings – the crevice that you just escaped from is behind the large brown cliff that forms a large part of your present view (see map below). You can now travel between the three locations that may indicate ancient civilization: the Face of Mars, The Penta-Pyramid, and the Fortress.
Begin with the Face – facing the rock wall, turn towards the opposite direction, find the dancing arrow, and move forward (look for a small rock in the foreground). The hovercraft speeds over the Martial terrain, eventually stopping by a sandy slope, with a shallow cave located near the top. Press the engine button to shut off the hovercraft, turn around, walk to the door and click on it to exit the craft.
Once outside, turn to your left and click on the cave up the slope to walk towards it (we see a quick shot of the face from the air). As you reach the cave, a strange portal at the back opens in response to our arrival. Click on the portal to walk over to it, and the click on the blue shimmering doorway to enter.
You are transported along a shimmering blue conduit to an ornate hall. Walk forward to properly enter the room. A short staircase leading to a landing lies directly in front of you, with a staircase spiralling up from the landing to the right. Instead of walking onto the landing, turn to your left and walk forward.
The Gong Show
Turn to your left to see a large golden gong – clicking on it produces a ringing sound, and causes some strangle alien symbols to appear on the surface. The symbol string on the top left part of the gong appears as follows:
What do these symbols mean? Well it just so happens that our personal computer can translate all of these symbols into English for us (how we know the language beforehand is beyond me).
Open up your inventory page, click on your computer helmet and press the “use” button to enter the simulation grid. Pan around to reach the Decryption node and press it. The Dictionary provides an alien equivalent for a variety of English words. The Transcript node holds alien conversations and other learnings, and the Semantica section has a variety of Martian symbology and other notes. Finally, the Keypad allows us to enter alien symbols and get a translation of them.
Press the Keypad button, type in the string of symbols that we read on the gong, and press “Search”. Typing in the above noted symbols yields a translation to “MERCHANT”.
![]()
Turn to the right, away from the first gong, and walk forward. A second gong is available for banging to the left. The symbol string reads (and translates to “LABOURER”):

There are three more gongs present in the room that can be gonged, read and translated before we return to our starting point in front of the landing. The remaining three gongs contain the following symbol strings, and are translated to “JUDGE”, “WARRIOR”, and “SCHOLAR”:
The Downward Spiral
Once you are back at the entrance door to the room, turn to your right and walk up the short staircase onto the landing. Turn to your left and note that the stairs spiral downward into some sort of liquid. Click to go forward, and watch yourself descend into the murky depths.
A large grey inverted triangle greets you as you come to a stop. There are three strange devices present under the triangle. Click on the panel to the left to see three interlocking coloured circles in the close-up. Nothing here can be touched, so back away. Click on the item in the centre – we can see something inside the folded-up mechanism, but have no way of opening the device. Back away from the device, and click on the panel to the right. The close-up view shows a series of buttons arranged in a spiral pattern about a central circle. Six circular buttons on each spiral turn a different colour when pressed, but it is not yet evident what needs to be done here.
Back away from the panel, look down towards the ground, and click on the close-up cursor. There are five plates in the ground here with a group of alien symbols written in green on each one. The groups of symbols match those on the gongs in the room above. Numbering the gongs 1 through 5 in the order that we first visited them, the symbol plates represent the following gongs from left to right: 2 1 4 5 3. Back away from the plates, turn to the right, and ascent the stairs.
Back on the landing, turn to the right and walk forward. We will now bang the gongs in the order that was indicated below. Turn to the right, walk two steps forward, turn to the left and bang the second gong. Turn to the left, walk forward one step, turn to the right, and bang the first gong. Turn to the left, walk forward three steps, turn to the right and bang the fourth gong. Turn to the right, walk forward one step, turn to the left and bang the fifth gong. Finally, turn to the left, walk forward two steps, turn to the right and bang the third gong. Turn to the right, and walk forward three steps to the front entrance.
Colour Me Bad
Turn to the right, walk forward onto the landing, turn to the left and descend the spiral staircase again. At the bottom, the inverted grey triangle will immediately flash three colours at you (for example, I just got blue, blue, green). Note that the central panel has now opened – try clicking on it. The panel has a whole series of alien symbol buttons, and what appears to be some sort of alien numbering system on buttons around the outer ring of the panel.
Our goal here is to punch in the names of the colours into the keypad, pressing the centre “enter” button after each word. But first we’ll need the alien translation of the colours that flashed in the grey triangle. Open up your inventory page, and enter your computer simulation. After pressing Decryption, enter the Dictionary node. Find the symbols that represent the name of all three of the colours that flashed in the triangle by looking up the colour alphabetically.
Once you’ve got the proper colours translated, use the buttons on the alien keypad to type in each colour name in order, pressing “enter” at the end of each colour. When successful, the triangle hums, and folds over itself.
If the colours do not seem to work properly, get a new set of colours by backing away from the keypad panel, and then try entering the symbols for the new colours. Assuming you’ve installed the patch, you may have to try this several times before it works properly (sometimes it’s hard to tell apart the colours, and you might be getting the symbols wrong). Note that the second (g) and third (È) characters in the colour translations are the same for each colour – the buttons for each are respectively found near the centre of the keypad at the 3 o-clock position, and at the 7 o’clock position. The first symbol should be one of the “number” buttons along the bottom of the panel.
Loving the Alien
An alien’s head appears in the triangle above the keypad, and is now available for questions. The quick version of the story is that a superior alien race interceded in a division between the Martian people, and set up a gateway that would lead to enlightenment, and the “time stream” (where all times exist at once). The force field that our ship encountered protected this gateway site. Only the Ambassador can deactivate the force field, and we must travel the time stream to find him (or her). Therefore we must travel the path to enlightenment, which can be found in the Penta-Pyramid.
Turn to the right, and walk up the stairs again. At the landing, continue forward to follow the spiral staircase upwards. At the top of the stairs walk forward, and click on the gold ball on the wall directly in front of you. This causes the wall panel to flip around, revealing some sort of location map. Click on the multi-coloured pyramid to the left for a close-up. The pyramid is divided into 5 horizontal sections, each of which can be rotated to show one of 5 symbols.
![]()
Look closely at the 5 green squares found along the base of the pyramid – they show 5 symbols from left to right:
The object here to have these 5 symbols showing in the same order from top to bottom on the pyramid. Just click on each layer to turn it clockwise according to the following directions: Top layer – click twice; Second layer – click once, Third layer – nothing; Fourth layer – click four times; and Fifth layer – click three times.
The top of the pyramid turns red and lifts up – click on it to place it into your inventory, and back away from the pyramid. Turn to your left, and walk towards the strange contraption with the gold legs ahead in the hall. Click on the panel to get a close-up, and watch the four spheres on the panel light up. There is an orange triangle (exactly like the ones in the centre of the panel) on each of the four spheres. Your task is to make the orange triangle appear at the front of all four globes in the same position as the triangles in the centre.
Each globe can be rotated along its vertical axis by clicking at the top of the sphere, and along one of its horizontal axes by clicking on the right side of the each sphere (the sphere cannot be rotated along its axis that goes into the screen, but I digress). Follow these directions from the start to align the triangles properly:
· Left sphere: click three times on its top, then click once on its right side
· Top sphere: click once on its right side, then click three times on its top
· Right sphere: click twice on its right side
· Bottom sphere: click three times on its right side
Ramble On
A large metal cage opens to the left of your current position – turn towards the entrance and walk forward. You now stand beside a reclined chair, with large wires running from strangely shaped holes in the floor to a point suspended above the chair. Click on the chair to climb in, and note the keypad present on the right side of the screen. Since we don’t have a clue as to what to enter, back your way out of the chair, turn to the right, and exit the room.
Turn to your right, walk forward, and click again to descend the stairs. At the bottom, turn to your left, walk forward twice, look up, and click on the blue conduit to travel back outside the face structure. Walk forward one step, and then descend the slope towards your hovercraft. Turn to your right and click on the hovercraft’s door to enter the ship. Walk to the control panel and press the engine button. Facing the cave on the slope, turn in the opposite direction and move forward towards a round hill.
The hovercraft eventually stops by a stone staircase leading upwards to a large temple – the Penta-pyramid. Feel free to get out and explore the pyramid if you wish, but you are missing a key component that will prevent you from accomplishing anything here yet. Instead, point your hovercraft in the opposite direction from the staircase and move forward. Your ship comes to a stop facing towards a rocky hill. Click on the hill to move forward – your ship climbs the hill and comes to rest in front of a large round stone in the ground.
You can get out of your hovercraft, and attempt to gain entry to the mysteries below, but the stone is much too heavy for you to lift. Instead, find the buttons marked “Remote Arm” on the left side of the dashboard and press there. Your mechanical arm swings over and quickly cracks a hole in the stone lid. Click on the Engine button to shut off the hovercraft, exit the vehicle, turn to the right and walk towards the stone lid. Aim your cursor at the hole, and click to descend.
What Lies Beneath
A platform takes you down into a richly decorated, nine-sided room. You are surrounded by 9 wall panels bearing more alien symbols. Each panel has a central symbol, with two related symbols below the central one:
Don’t know what they mean, but they sure do look swell. Find the dancing arrow at your feet and click to finish your descent into the room below.
You find yourself in the centre of a circular room. Walk forward to the large circular panel, and click on it once you’re there. The doors slide open to reveal a large circular blue and gold design with some missing sections. Nothing here can be taken, so turn to the left, walk forward and turn to the right to face the wall. Some drawings are on the wall showing some figures doing something. Interesting (yawn).
Turn around to face the opposite direction and walk forward twice. The wall in front of you has some symbol-laden writing on it. Click on the writing to activate a scanner that zaps the words into your computer. Open up your inventory screen, select and use your computer, go to the Decryption node, and choose the Transcripts button. After an initial phrase click on the Forward corner button, and peruse the alien text that has been converted into English.
The text lists nine descriptions of planets, as follows:
1. planet with giant red eye (MATTER)
2. ringed planet (TIME)
3. distant blue planet (EQUALITY)
4. sideways planet (POWER)
5. blue planet (LIFE)
6. bright planet (LIGHT)
7. red planet (SPIRIT)
8. small, fast planet (MOTION)
9. cold pair (RELATION)
Battle of the Planets
Back out of the Decryption area, exit your computer, turn to the right and move forward. Now turn to the left to see a large circular area surrounded by three smaller circular frames. Click on the frame located at the top of the circular area. After the flashes and light show, a picture of a planet appears in the frame. Continue clicking to cycle through all nine planets - obviously the ones from our own solar system.
If you have any doubts as to which planets correspond to which picture, enter your computer, click on the Mission Data node, and click on the Planetary Data button on the right hand side of the screen. The pictures and identities of the nine planets are displayed here, and should convince you that they appear in the frame in order from closest to furthest to the sun: Mercury (grey), Venus (beige), Earth (blue), Mars (orange), Jupiter (multi-coloured), Saturn (gold), Uranus (blue), Neptune (blue) and Pluto (green). In addition, the pictures and your general knowledge about the planets should help you match up each planet to its description in the alien text:
1. planet with giant red eye (MATTER) – the planet with the big red patch is Jupiter
2. ringed planet (TIME) – Saturn of course (plus Uranus shows up later)
3. distant blue planet (EQUALITY) – not much to go on, but appears to be Neptune
4. sideways planet (POWER) – the only sideways-looking planet is Uranus
5. blue planet (LIFE) – blue, life? Must be Earth
6. bright planet (LIGHT) – Venus, the bright star planet
7. red planet (SPIRIT) – obviously Mars
8. small, fast planet (MOTION) – small and fast, that would be Mercury
9. cold pair (RELATION) – Pluto, which forms a pair with its similarly sized moon
The positions of the three frames seem to suggest that the triads of alien symbols we saw in the entranceway may be involved. But how do we connect the symbols to the planets? The key is the word in capitals shown next to each of the nine clues in the alien text. Look up each of the nine words in the Dictionary function of the Decryption node to get the following translations:
1. MATTER 2. TIME
3. EQUALITY
4. POWER
5. LIFE
6. LIGHT
7. SPIRIT
8. MOTION
9. RELATION
Jupiter Saturn
Neptune
Uranus
Earth
Venus
Mars
Mercury
Pluto
Combining this information with the 9 sets of symbols we found on the walls in the entranceway, we come up with the following 9 sets of planets to input into the wall’s frames:
(top planet - left planet - right
planet)
Jupiter – Saturn – Neptune
Saturn – Mars – Uranus
Neptune – Uranus – Mercury
Uranus – Venus – Pluto
Earth – Mars – Neptune
Venus – Earth – Jupiter
Mars – Mercury – Saturn
Mercury – Venus – Pluto
Pluto – Jupiter – Saturn
Input each set of planets into the three frames on the wall using the pictures of the planets. Once the correct match is made, the central circular area opens revealing a small golden object with a planet symbol on it. Grab each piece to place it into your inventory, and continue with the list of planet combinations until all nine objects have been collected.
The Circle Game
Once you are finished, you should have 9 gold objects with symbols on them – 6 small fang-like ones, and 3 bigger ones. Turn around to face away from the frames, and walk forward twice to stand in front of the large circular panel we encountered earlier. Click on the panel to open it up, and note that the gold and blue decoration inside the panel has exactly nine pieces missing from it.
The gold sections must be placed into the decoration, but how do we go about this? Remember the phrase that preceded the planet descriptions in the alien message: “From greatness to smallness they are to be planted”. The gold pieces should be placed in order of largest planet to smallest planet (which just so happens to be the same order as in the alien descriptions).
 |
1. Jupiter 2. Saturn 3. Neptune 4. Uranus 5. Earth 6. Venus 7. Mars 8. Mercury 9. Pluto |
Take out each of the nine gold objects in your inventory and place them on the decoration in the proper order as noted above. It should be fairly evident from the orientation of each piece as to where it should go, but look for the cursor to change (the open hand points with one finger when the right spot is found) over the correct hole.
After the last piece is inserted, the decoration spins itself out of the wall like a discus, and into your willing hands (it’s a lot smaller than I thought!). Turn around, walk to the centre of the room, look upward and click on the dancing arrow to return to the entranceway. Click up once more to return to the ground surface. Turn to the left, and walk towards the back of your hovercraft. Click on the doorway to enter, return to the control panel, and turn on the engine. The way out is located just a bit to the left of the rocky cliff ahead – aim for the horizon and off you go. Go forward once more, and cruise up to the Penta-Pyramid.
Hollow at the Centre
Shut off the hovercraft, exit your vehicle, turn to your left and click on the stairs to climb. At the top, click on the door to open it, and walk through. Proceed up the reddish corridor, and admire the view from the platform at the end of the hallway. Click forward to descend the stairs, and when you reach the bottom, move forward once again. Pan to the right, and note the large gold door on the pillar here – the design in the centre looks a lot like the patterned discus that you just assembled back at the Fortress. Turn around to face the opposite direction, and walk towards the centre of the pyramid.
Descending to the centre, we encounter a small circle of stone. The plaque facing us has a series of characters that we know mean “JUDGE” from our puzzle solving back at the Face. The alien mentioned something about undergoing tests at the Penta-pyramid, and the plaque may have something to do with this. Now click on the circle of stone itself – it appears to be empty at present. Back away from the circle, turn around to face the opposite direction, and proceed back to the gold door on the pillar.
Now, it seems pretty obvious that the discus needs to be used to unlock this door. Open the inventory screen, click on the discus, but notice the large inset picture of the item at the top of the screen. Each one of the nine gold sections that we added back at the last location can be clicked – in fact, one of them must be selected before the discus can be used to open the door.
Which symbol should be selected? Well, we know that each of the 9 symbols is associated with a planet, and also a conceptual meaning (i.e. SPIRIT, LIFE, etc.). Since the planets don’t seem to help here, which of the nine conceptual meanings can be most closely associated with the JUDGE occupation? A quick review of the nine meanings (found in the previous sections) will point you towards EQUALITY (or balance).
Select the EQUALITY / Neptune symbol (<<Neptune.jpg>>) and press the Use button (it’s the “fang” shaped piece located at the bottom of the discus). Click on the pattern in the centre of the doorway, and watch the door slowly open.
Judge Dread
You find yourself looking down a long ramp – click to move forward along it, and enter a room at its base. There’s a small staircase off to your left that leads to a walkway along the wall, and a platform directly ahead of you. Move forward to approach the platform, and what appears to be a puzzle ahead. Click on the puzzle for a closer view. There are ten red pegs located along the base of the vertical game board, which has exactly 10 holes in it. Click on each of the pegs to place them into your inventory.
<<judge.jpg>>Open your inventory, and click on one of the pegs to view it in a close-up window. The pattern is fairly complex. Now click on another one to spot the difference between the pegs – about 2/3rds of the way down the surface of the peg, there’s a horizontal gap in the pattern that has one of four things in it: a single star, 2 triangles, 3 circles, or 4 squares. Go through each of the 10 pegs, and count how many pegs of each pattern there are. Only one peg has the single star, while there are 3 pegs that show either triangles, circles, or squares.
It isn’t a huge logic jump that the star must be placed at the top of the game board in front of you. Following the pattern of increasing number of shapes as you drop down the game board, the three 2-triangle pegs should be placed in the V-shaped row below the star peg, the three 3-circle pegs in the middle V-shaped row, and the three 4-square pegs in the bottom V-shaped row.
A light flashes above, and an entity coalesces and flows into a large gold ball above the puzzle. Turn away from the puzzle, walk back to the entrance to the room, turn to your right, ascend the stairs and proceed along the walkway. Click on the gold ball at the walkway’s end for a close-up, and click again to open the ball up. Inside, find a dodecahedron (a 12 sided object) – your reward for solving the puzzle.
Back away from the ball, turn around, walk back to the stairs and down, turn to your right, and move forward up the ramp. At the top, click on the door to proceed through once again. Turn to your right, and set out across the pyramid to the next pillar.
The Ultimate Warrior
You will arrive at a similar pillar with a gold door to your right – turn to your left and walk back to the centre of the pyramid. This time the symbols on the plaque indicate “WARRIOR”. Click on the circle of stone to see that a sections of a platform has emerged. Back away, turn around and walk back up to the pillar with the gold door.
Take out the discus, and review the symbol meanings to find a match with WARRIOR – this time its POWER (Uranus). Click on the <<uranus.jpg>> symbol (the “fang” closest to the top of the discus), hit the use button, and click on the door. Proceed down the ramp into the puzzle room below, and walk forward to the puzzle.
Click on the puzzle to begin – 6 little warriors (5 white, one gold) stand on various blocks of different heights. The object here is to have the little gold warrior to the left be the “last miniature standing” on the centre red square. A move of any of the warriors is only possible when one figure can jump directly over another figure to an empty space, either horizontally or diagonally. The warrior that has been jumped over promptly explodes.
Getting the gold guy to the centre square on his last jump necessitates moving several of the white figures around. Think of it as a checkers puzzle – you want to set the board up so that your little gold friend makes a series of jumps that eliminates the others and sends him to the centre square. The following solution accomplishes this nicely:
The final jump should trigger the coalescing light force that deposits another prize in the gold ball on the walkway. Turn from the puzzle, walk back to the door, and up the stairs to the gold ball. Click twice to open it up, and take the cube inside. Back away, return to the door of the room, travel up the ramp, and exit through the door. Turn to the right, and walk to the next pillar.
The Colour of Money
At the next pillar, turn to your
left and walk back to the centre of the pyramid. This time the symbols on the
plaque indicate “SCHOLAR”. Click on the circle of stone to see that a second
piece of the platform has emerged. Back away, turn around and walk back up to
the pillar with the gold door. Take out the discus, and review the symbol
meanings to find a match with SCHOLAR – although it might be SPIRIT or RELATION,
it’s actually LIGHT (Venus). Click on the ![]() symbol (the
bottom left “fang”), hit the use button, and click on the door. Proceed down the
ramp into the puzzle room below, and walk forward to the puzzle.
symbol (the
bottom left “fang”), hit the use button, and click on the door. Proceed down the
ramp into the puzzle room below, and walk forward to the puzzle.
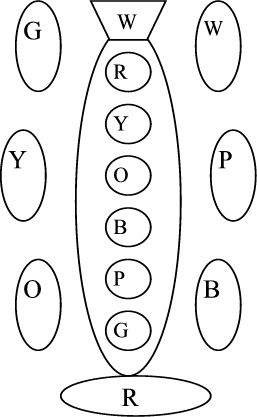
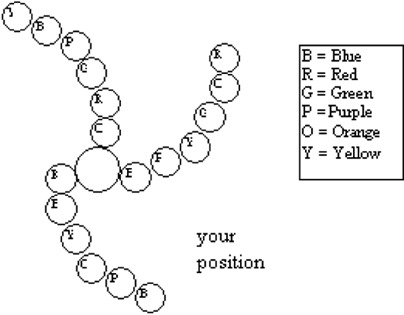
An Egyptian figure sits between seven ladies. Click on the puzzle - the Egyptian sits up, and six coloured disks begin to spin on his body (as shown in the diagram, with W-white, R-red, Y-yellow, O-orange, P-purple, B-blue and G-green). Locate the 4 pans of coins located on the ground in front of the statues, and transfer all 16 of the coins found there into your inventory. Once you’ve got them all, there should be 2 each of the red, blue, green, purple and orange coins, and 3 each of the white and yellow coins.
Note that the seven women statues surrounding the Egyptian each have one of the seven coins around their necks. To convert the coins into colour dye, take out each of the coins in your inventory, and click on the hands of the matching woman statue. A drop of dye the same colour as the coin is placed into your inventory as a replacement for the coin. Repeat this for all 16 coins.
To brighten up the six spinning disks on the Egyptian, take out each drop of dye and click on the corresponding coloured disk. Each disk will take on a whitish hue once you’ve added two drops of dye. Be sure to add all of the drops, but don’t bother with adding the white ones to the white steam above the Egyptian’s head.
The spinning coloured disks on the Egyptian can now be re-arranged to match the pattern of a rainbow. To switch the location of any of the disks, first click the disk you want to move, and then click the new location you want to move the disk to. The colours should be arranged in the following order top to bottom: (white), purple, blue, green, yellow, orange, and red. Success!
Turn away from the puzzle, walk to the door, ascend the stairs, and click on the gold ball to retrieve your 20-sided (an icosahedron) geometric prize. Back away, return to the door of the room, travel up the ramp, and exit through the door. Turn to the right, and walk to the next pillar.
Rich Man, Poor Man
At the next pillar, turn to your
left and walk back to the centre of the pyramid. This time the symbols on the
plaque indicate “MERCHANT”. Click on the circle of stone to see that a third
piece of the platform has emerged. Back away, turn around and walk back up to
the pillar with the gold door. Take out the discus, and review the symbol
meanings to find a match with MERCHANT – MATTER (Jupiter) seems most
appropriate. Click on the ![]() symbol
(the bottom right “fang”), hit the use button, and click on the door. Proceed
down the ramp into the puzzle room below, and walk forward to the puzzle.
symbol
(the bottom right “fang”), hit the use button, and click on the door. Proceed
down the ramp into the puzzle room below, and walk forward to the puzzle.
Begin the game by picking up the 10 green crystals found in front of the of the gold picture box to the left and right. The current picture on the front of the box shows a person removing one of five smaller figures from a group. Note the two levers in the top corners of the picture – the levers are currently in their ”middle” positions, and can be turned one position up or down by clicking above or below the levers. Try putting the levers in different positions – placing them both in their “up” positions triggers a shelf to slide out near the base of the picture.
Click on the left edge of the picture to rotate the picture box. The new illustration shows the same person now removing another smaller figure from his now smaller group. Play with the levers at the top again – placing the left lever all the way up, and the right lever all the way down, will slide the shelf out.
Click on the left edge to turn the picture box again. The new illustration shows the person with only one smaller figure left. Place both levers in the “down” position to slide the shelf out. Rotate the picture box a fourth time; the picture shows the person celebrating with a number of smaller figures around. Place the left lever down, and the right lever up to have the shelf slide out for the fourth picture. Rotating the picture box once more brings it back to the first picture.
We must now place the 10 green crystals on the four shelves of the picture box to mirror what has happened in the illustrated story. We see a person losing “value” through the first three pictures, but then claiming lots of value in the last picture by not sacrificing loved ones. Assuming that the most value is held in the last picture, we can divide up the ten stones into 3 crystals for the first picture, 2 crystals for the second, 1 crystal for the third, and 4 for the fourth.. Place the appropriate number of stones on each shelf, and watch your prize be delivered.
Turn away from the puzzle, walk to the door, ascend the stairs, and click on the gold ball to retrieve your 8-sided geometric prize. Back away, return to the door of the room, travel up the ramp, and exit through the door. Turn to the right, and walk to the next pillar.
Circular Reasoning
At the next pillar, turn to your
left and walk back to the centre of the pyramid. This time the symbols on the
plaque indicate “LABOURER”. Click on the circle of stone to see that a fourth
piece of the platform has emerged. Back away, turn around and walk back up to
the pillar with the gold door. Take out the discus, and review the symbol
meanings to find a match with LABOURER – how about MOVEMENT (Mercury)? Click on
the ![]() symbol (the top right “fang”),
hit the use button, and click on the door. Proceed down the ramp into the puzzle
room below, and walk forward to the puzzle.
symbol (the top right “fang”),
hit the use button, and click on the door. Proceed down the ramp into the puzzle
room below, and walk forward to the puzzle.
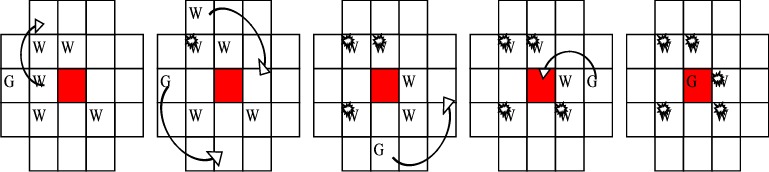
You are faced with a game board of three concentric circles that are divided into yellow, green and red zones. There are 6 blocks (2 of each colour) located at various positions on the circles. The object here is to move each of the 6 blocks to its respective coloured area (and to the outer and middle rings of that area). The difficulty is that only a limited number of moves is allowed to accomplish your goal. The moves include the following (in order):
· The outer ring rotates in a counter-clockwise direction (required)
· Two blocks can be moved one position
· The middle ring rotates in a clockwise direction (required)
· Two blocks can be moved one position
· The inner ring rotates in a counter-clockwise direction (required)
· Two blocks can be moved one position
After the final move, if the puzzle has not been solved, the game board reverts to its initial settings.
Begin the puzzle by clicking on any of the blinking block-holders on the outer ring – the ring rotates in a counter-clockwise direction. You now have two moves before the middle ring must be rotated. But if you think about it, you really have no choice: since the outer ring will never be rotated again, you MUST move the red block in the yellow area to the middle ring (which in turn requires you to move the green block in the yellow area to the inner ring). Click on the green block in the yellow area, and then click on the empty space on the inner ring to move it there. Now do the same thing to move the red block in the yellow area to the middle ring).
Click on the middle ring for it to rotate in a clockwise direction. Things look much better now, don’t they? Move the yellow block on the middle ring in the yellow area to the outer ring, and then do the same for the green block on the middle ring in the green area. Click to rotate the inner ring in a counter-clockwise direction, and then shift the yellow and green blocks from the inner to the middle ring to complete the puzzle.
Turn away from the puzzle, walk to the door, ascend the stairs, and click on the gold ball to retrieve your 4-sided (tetrahedron) geometric prize. Back away, return to the door of the room, travel up the ramp, and exit through the door.
Rise Above it All
Walk directly forward to the centre of the pyramid, and step into the stone circle. Click on the platform again to take a ride up through the centre of the pyramid, and into a control room. Is this some sort of vehicle? Nothing appears to be operational on the main panel (note the empty metal bowl located above the panel), and the red capstone from the Face does nothing here. Look down, find the dancing arrow and click to descend back down to the floor of the pyramid.
Back off the platform, turn around and walk back towards the last pillar you came from (make sure it’s the “LABOURER” one). At the pillar, turn to the left and go forward to the next pillar. Once you’re there, turn to the right, find the dancing arrow just to the right of the pillar door, and click here to return to the base of the long staircase. Turn to the left, ascend the stairs, and then walk forward along the long red corridor to the exterior door. Click to open the door, and move forward down the oversized stairs.
Time to return to the Face location for some follow-up work. Turn to the right, get into your hovercraft, turn on the engines, pan to the right past the stairs, find the dancing arrow and move forward. After arriving at the Face location, shut off the engine, get out of the hovercraft, and head up the slope to your left to the entrance cave. Move forward towards the entrance, and click on the blue conduit to go inside.
Walk forward twice to get onto the landing, turn to your right, and ascend the spiral stairs. At the top, pan to the left until you see the upright panel that allowed you to enter the inner control room, and click to walk towards it. Turn to your left, and enter the control room ahead.
Square Pegs
Remember the odd-shaped holes in the floor in here? We’ve found a spot to use our odd-shaped prizes for completing the tests back at the pyramid. Begin by taking the cube item out of your inventory (open inventory, select item, press “use”), pan around to the left, and click on the square shaped hole in the floor behind you (there’s a coiled wire running out of it towards the centre of the room). The finger-pointing cursor lets you know if you’ve selected the right hole. The cube settles down inside the hole quite nicely.
Next, take out the tetrahedron (the one shaped like a pyramid), and click on the hole located to the right of the one currently holding the cube. Next, take out the 8-sided object (looks like a diamond), and click on the hole that’s located on the far side of the gold bowl set into the floor at the foot of the chair. The dodecahedron (12-sided object, each side is a pentagon) should be placed in the hole nearest to the headrest of the chair, and the icosahedron (20-sided object, each side is a triangle) should be placed in the hole to the left of the dodecahedron.
If you were expecting something to happen, keep waiting – we haven’t placed the connector yet. Open up your inventory, take out the red capstone object, and click in the area where the five wires running from the holes come together above the room’s chair (again, look for that finger-pointing cursor). Not so spectacular, so take a load off and click on the chair to sit down.
We’ve got a keypad in front of us, so its natural to assume we’ve got to enter something into it. What command would be most appropriate here? No, not shazam. This is actually out of left field (actually, the next set of puzzles all come out of left field). Wouldn’t it be great to shed some light in here, OPEN this place up? OPEN your computer, OPEN the Decryption node, and then OPEN the Dictionary. Think of a word that will help you OPEN you mind to the possibilities on Mars. What, you think OPEN might be that word? You’d be correct!
Ladies and Gentleman We are Floating in Space
Copy down the verb tense for OPEN
![]() , close the computer, click on those five keys in order
(first symbol is on the left, second is near the centre, third is at the top,
fourth is near the centre, and fifth is at the bottom). Press the centre button
after you have completed the word – the roof of the building opens, and then 5
geometric shapes produce some sort of concentrated power source that is
deposited in the gold depression at the foot of the chair.
, close the computer, click on those five keys in order
(first symbol is on the left, second is near the centre, third is at the top,
fourth is near the centre, and fifth is at the bottom). Press the centre button
after you have completed the word – the roof of the building opens, and then 5
geometric shapes produce some sort of concentrated power source that is
deposited in the gold depression at the foot of the chair.
Get up out of the chair, and pick up the blue glowing ball in the gold bowl. Turn to the right, exit the room, turn to the right again, walk forward, and click again to descend the stairs. At the bottom, turn to your left, walk forward twice, look up, and click on the blue conduit to travel back outside the face structure. Walk forward one step, and then descend the slope towards your hovercraft. Turn to your right and click on the hovercraft’s door to enter the ship. Walk to the control panel and press the engine button. Facing the cave on the slope, turn in the opposite direction and move forward in the vehicle (towards a round hill).
Back at the Penta-pyramid, turn the engine off, exit the vehicle, turn to your left and ascend the stairs. Enter the door, proceed up the hallway, and descend the stairs ahead into the main pyramid chamber. Walk forward to one of the pillars, turn to the left, and walk forward to the centre of the pyramid. Click on the circle of stone, and click on the platform inside to ride it up to the strange vehicle at the top. Take out the strange blue power globe from your inventory, and click on the metal bowl located just above the centre of the control panel.
The top of the pyramid explodes as your little pyramid-shaped ship takes off for the heavens. You somehow use a laser to blast a hole in the sun, zip around a bit, and then come out again. You approach a blue planet (judging by the pictures from before, it looks like Uranus), and touch down on some strange looking landing pad near some giant toadstools.
The Crystal Method
Look down, and click to drop down out of your ship. Across the water, there are several large triangles, some old looking sculptures, and some other stuff. As you spin around, there are 5 coloured crystals on pedestals (green, yellow, blue, purple and red). Click on each of the crystals to hear a series of notes chiming. These notes are frustratingly difficult to hear and pick out. Starting from the right of the green crystal (the one just to your left when you first descended from the ship), take note of the number of notes that are played for each crystal: yellow - 4, blue - 3, purple - 6 (or so), red – 1, and green – 2 (see diagram below)
Look down towards the ground, and click here to descend into a grid of metal beams. There are four black mechanisms here that are found amongst the metal beams – clicking on each of them plays a single note similar to the tones that the crystals above played. You’ll go mad though trying to reproduce the tones of all of the crystals – which ones do you play, and in what order?
Instead concentrate on the number of notes that each crystal played when clicked. Standing at the “gap” in the beam-work (the one spot where there are no criss-crossing beams, number the sound generators 1 through 4 as you pan to the right (see below).
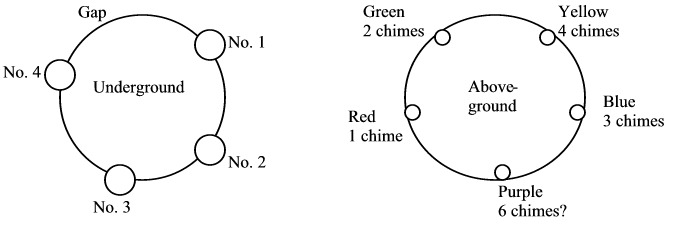
Following your number convention for the sound generators, and using the number of chimes each crystal plays (clockwise starting with yellow, and avoiding that pesky purple one), we get the numeric progression 4 3 1 2. Hit the sound generators in that order, and a large whale with leaves sticking out of its back arrives to take you away. (And, if you’re wondering, I’m quite aware of the lameness of my solution to this puzzle – if you have an explanation that actually makes sense, e-mail me).
Find the gap in the beam-work again
and click here to drop down onto the back of the whale. Look down into the water
ahead of the whale, and click here to take a journey through the water. You
arrive at a cave – walk forward onto the waiting ramp, and click forward to walk
to the door across the room. The door has three panels on it, and the symbols
![]() above it. Try clicking on any of the door panels – one
of the three symbols will appear in the small box above the symbols. Match the
panels up with the three symbols, and then click on them in order to recreate
the pattern above (the correct order is right panel, bottom panel, and left
panel).
above it. Try clicking on any of the door panels – one
of the three symbols will appear in the small box above the symbols. Match the
panels up with the three symbols, and then click on them in order to recreate
the pattern above (the correct order is right panel, bottom panel, and left
panel).
The Garden of Earthly Delights
Move forward through the open doorway, and float upward through the water to emerge through a stone well. You stand atop a lush, slightly strange garden island. Admire the beautiful view, and click straight ahead to descend a series of stone steps. As you turn to the right, note the series of tall stepping stones that allow access to another part if the island. Keep turning to the right, and encounter a series of alien symbols carved into the rock.
Copy down the symbols exactly as shown on the rock, open your inventory screen, access your computer, enter the Decryption node, and click on the Keypad button. Enter each group of symbols into the display on the right and hit enter for a translation. You should be able to assemble the following message: IT IS THE BRIDGE OF NOW AND THE FUTURE WITH IT YOU CAN FORM YOUR REALITY IT IS THE MOST POWERFUL THOUGH POWER. Note that the capital L at the start of the message is really a vertical line with a dot to the left combined with a ~ symbol.
Exit the computer, and before you turn away, pick up the angular purple object that sits just to the right of the carved riddle. Are there any more hidden around here? Turn to the right, and see another rock face with alien symbols on it. This one looks a bit different though – there are a number of symbols spaced out evenly (4 rows of three columns, with one symbol at the top and bottom).
Look around – is there anything here that resembles the symbols on the rock face? Yes – the stepping stones! Could the symbols imply that we’ve got to spell out a word or words while crossing the chasm? You betcha – and the word is probably the solution to the riddle we found earlier. In other words, we must be able to spell out the answer to the riddle by stepping on certain stones as we cross to the other side.
Now the riddle – something
future-looking – Thought? Ideas? How about imagination? Look up the word in the
dictionary and it will yield the following spelling:
 We can easily spell that by stepping on the
correct stones as we cross the chasm.
We can easily spell that by stepping on the
correct stones as we cross the chasm.
Step in Time
Before you cross to the other side, return up the hill by clicking over the top of the rocks where the riddle is carved into the stone. Turn away from the stone well to the left, and find a hotspot in the grass located to the right of the red toadstools. Clicking here yields another angular purple piece. Turn back to the right, past the stone well, and find a similar hotspot just to the left of a clump of three toadstools. A third purple piece – this must be part of some puzzle.
Keep turning to the right, and descend the stairs again. [Save your game now, since one false step will end your life here.] At the bottom, turn to face the stone steps, and click on the furthest stone to the right in the first row (representing the second symbol in the word – the first is our starting point). Your two next steps should also be to the stepping stones furthest to the right in the next two rows. Step to the centre stone in the last (fourth) row of stones, and then continue onto the ground on the far side of the chasm.
Turn to your left to spot another set of alien symbols on a rock here – looks like we’ll need to step on a different step of stones to get back across (we’ll come back to this riddle). Turning to the right, spot two low trees here – another puzzle piece lies just to the left of them. Keep panning to the right, past the stairs leading upward, until you can see another narrow tree against the rock face. Another piece (the fifth so far) can be found just to the left of this tree. Pan back to the left, and click on the stairs to move forward.
You enter a clearing at the top of the stairs that contains a series of coloured stones set in a familiar spiral pattern. Remember the panel on the right hand side when you descend the spiral staircase inside the Face complex? Well, here it is. Make sure you jot down the positions and colours of the stones in the clearing – you’ll definitely need them later.
Facing the left side of the spiralled rocks, pan to the left until you see a purple tree. Another purple block can be found on the ground between this purple tree, and a blue tree to its left. Keep panning to the left, and note the path that leads off towards a cliff to the right of the stairs you just came up. Another purple block can be found on the ground between this path and the staircase.
Continue panning to the left until you see another path heading into the trees to the left of the stairs. Click here to move down the path.
Don’t Touch Me
Ahead of you sits several rocks that are propped up on each other, creating an accessible space underneath. Before you go diving down under there, turn to the right – another purple block lies just to the right of the rocks. Keep turning to the right, past the open cliff – another piece can be found on the ground between the cliff and the path back to the clearing. Continue to the right, and find a third block lying on the slope to the left of the propped-up rocks.
Find the cavity under the rocks again and click to go under. You are faced with a round panel with a gold ring set into it. Click on the panel - evidently it’s made up of a number of smaller sections, as one in the top left section of the panel lights up. Try clicking on the panel to discern the shape of the individual pieces.
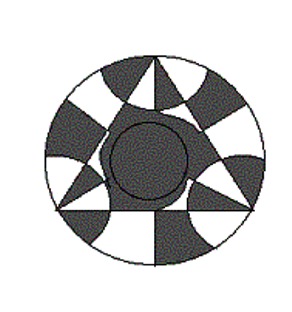
Back away from the panel, and then click on it again. The same section in the top left portion of the panel lights up. Take this as your only clue as to what sections you need to light up in order to solve the puzzle.
Unfortunately, this is one of those twiddly puzzles where the solution has absolutely nothing to do with the game. We are supposed to “lighten up” any other section of the panel so that no two lightened sections share the same border (see diagram), starting from the section that is already been lighted. You should end up with something that looks like the diagram to the left.
The gold ring will emerge from the panel – click on it to place it into your inventory, turn around and emerge from the hollow under the rocks. Continue forward to return to the spiral clearing.
Building Blocks
Find the path located to the right of the stairs, and walk forward. Just like the last path, several rocks are piled up to form an accessible hollow straight ahead. Turn to the right of the rocks and grab another purple block just to the right of the rocks. A second block lies directly in front of the cliff. Pan around to the right, and pick up the very last block (the 13th) by the base of the tree to the right of the path back to the clearing.
Turn around to face the hollow again and click here to go under the rocks. Underneath, find only a small red platform. Open your inventory, ensure that you have all thirteen purple blocks (one is a small pyramid), select one of the 4 pieces that are light grey in colour (with some small red dots) and click on the red platform to place it there (as usual, use the pointing hand cursor to tell you where a block can be placed). Use the three other greyish blocks to complete the first layer of the pyramid.
Enter your inventory again, select one of the 4 purple blocks with a very dark side pointing to the left, and place it on top the first layer to begin the second layer. Complete this layer with the other three similar blocks, and then build the third layer with the four remaining blocks. Finish the pyramid off with the capstone. The completed pyramid spins, and then suddenly alien symbols appear on the pyramid’s faces.
Let There Be More Light
Each side of the 4-sided pyramid has characters on it – click to the side to spin the pyramid around to see all of the surfaces. Here’s what you’ll see:

Open your computer up, consult the Decryption node, and input each of these 4 sets of characters into the keypad. The words you will get back include “ABOVE”, “LIGHT”, “CREATE”, and “PLANT”. The third word implies something we must do, and there are certainly lots of plants above us. Do we have anything that will help us create more light for the plants here? About the only thing that could do this is our torch from the ready room.
Open your inventory up, select the torch, press the “use” button, and click on the browny-red fern-like plant above the pyramid. The torch cuts a hole in the vegetation, and the flower behind the pyramid yields a red ring. Click on the ring to place it into your inventory, turn around, and exit the hollow.
Walk forward to return to the clearing, and watch a light-being coalesce in the sky. Click the “Talk” cursor on the alien to learn that the spiral panel back at the Face complex will deactivate the force field surrounding the ship. The coloured rings work with the left panel at the same location, and start a terraforming process on the surface of Mars. Once you’ve finished with the Ambassador (did he say “Eh”?), check your inventory – he’s deposited the final blue ring there. Turn to the right and click on the stairs to descend to the stepping stones.
Steppin’ Out
Turn to the rock with the alien symbols written on it, and record them exactly as written. Enter your computer, go to the Decryption node, and enter each group of symbols to get a word by word translation of the message, which should be: THE SPARK OF LIFE THAT BURNS INSIDE AWAKEN THE SENSE AND KINDLES THE FIRE OF REALITY.
The answer to this is
CONSCIOUSNESS, which is not at all obvious. Look up the word in your dictionary
to get the alien translation: ![]()
Begin the walk across by stepping on the centre stone of the first row. Step to the right-most stone in the second row, and then the left-most stone in the third row. Step on the centre stone in the fourth row, and then step onto the other side. Turn to your left, climb the hill (above the writing on the stone), and then click on the stone well to descend back to the whale.
Walk forward towards the whale, and
then forward again to get on its back. Turn to the right, and click on the water
in front of the whale to make your return journey to your ship. Back at the note
sounding room, click straight ahead to climb back off the whale, and then click
upward to rise up to the crystals. Click up again to return to your pyramid
ship, take out the blue ball of power from your inventory, and place it into the
cup above the instrument panel to initiate your journey back across space and
time to present day Mars.
After your return journey through the sun has ended, look down and click here to
descend back to the floor of the Penta-pyramid. Back off the platform, check to
make sure you are standing in front of the JUDGE plaque (if not, walk around the
stone circle until you find it), turn around and walk back towards the pillar.
Once you’re there, turn to the right, find the dancing arrow just to the right
of the pillar door, and click here to return to the base of the long staircase.
Turn to the left, ascend the stairs, and then walk forward along the long red
corridor to the exterior door. Click to open the door, and move forward down the
oversized stairs.
Face the Face
Time to return to the Face location to finish our last set of puzzles. Turn to the right, get into your hovercraft, turn on the engines, pan to the right past the stairs, find the dancing arrow and move forward. After arriving at the Face location, shut off the engine, get out of the hovercraft, and head up the slope to your left to the entrance cave. Move forward towards the entrance, and click on the blue conduit to go inside. Walk forward twice to get onto the landing, turn to the left, and descend the spiral staircase to the basement.
At the bottom, click on the panel to the left with the three coloured circles on it. In the close-up view, take out the red ring from your inventory, hold it over the red circle on the panel and click to install. Next, take out the yellow ring and place it over the yellow circle. Finish the installation by taking out the blue ring and placing it over the blue circle. We hear ominous rumblings from below the surface as the terraform process begins. [Note: completing the terraforming of the Mars planet is not necessary to finish the game – in fact, failing to finish this puzzle yields an alternate ending.]
Back away from the panel, and click on the spiral patterned panel to the right. There are 6 circles on each spiral that can be turned one of six colours by clicking on the circle until the correct colour comes up. Following the colour of the rocks in the clearing back on the Ambassador’s planet, input the proper order of the colours on the panel (use the diagram from before as a guide). Note that in the bottom spiral, blue occurs twice, while green doesn’t show up at all (all six of the colours are represented on the other two spirals). When you’ve got the correct colour pattern, click on the centre button to deactivate the force field (you’ll hear a “powering down” sound in the background).
The Final Countdown
Turn to the right, walk up the stairs, turn to the right, walk two paces forward, and click on the blue conduit to take you back outside. Walk forward, and then down the slope to the hovercraft. Turn to your right, get into the ship, walk forward, and turn the engines on. Pan to the right past the entrance cave, and click on the next big smooth hill to go forward. Your trip ends outside the large crevice that currently houses your crashed ship. Hit the “Jump Jets” button on the extreme right side of the instrument panel to raise the hovercraft up and back down into the crevice.
Turn the ship around, and move forward to the crashed spaceship site. Turn off the engines, get out of the hovercraft, turn to the left, and walk toward the left side of the big ship. Turn to the right, and click on the open bay door to re-enter the ship. Walk forward to the door on the far side of the room, and click on the latch to the left of the door to go through. Click on the ladder to go up, and then on the latch at the top to enter the ready room once more.
Back away from the depression in the floor, turn to the right, and walk to the ladder that leads up to the escape pod. Click on the ladder to go up, and again on the latch to enter the pod itself. Look around – your two saved colleagues are already in position for the escape flight. Your seat is located directly across from the colleague on the left – turn around and click forward to strap yourself in. Finally, turn to the right and press the red Launch button to trigger your flight.
Endings
If you’ve saved both of your colleagues, solved the terraforming puzzle, and turned off the force field, you make a successful journey back to Earth as the hero. The people of Earth make a return journey to Mars, and humankind’s new life begins.
If you’ve done all listed above, but failed to solve the terraforming puzzle, you still return a hero, but the resettlement of the Earth’s peoples is a little less successful, since we’ve got to live on the dusty surface of Mars in what appears to be little bubbles.
Obviously if you have not turned off the force field, you and your companion’s trip is a short and disastrous one. It’s essentially the same ending as if you’d set off in the escape pod alone at the beginning of the game. The game boasts several other endings, but they centre around how many companions you save at the beginning of the game (I’m assuming that you’ll want to take both your buddies back with you!).