Normally, I encourage people not to print walkthroughs, it's better to open them in their browser (on- or off-line, it doesn't matter) then switch between the game and the walkthrough by pressing Alt-Tab. Unfortunately, this game does not allow switching between applications. For that reason, I have written a second walkthrough; a printable, checklist-style listing of tasks; simple and to the point.
It is possible to die (get killed, actually) so what I'm giving you right up front, are the places where you should be careful to save your game, and how to survive the various attackers. This way, those of you who want to survive those parts, and still want to explore the rest of the game on your own without everything being spoiled, can check right here. Here are the trouble-spots in the sequence they appear:
| In the museum, you will be caught snooping around and get locked in a basement storeroom by the Curator. It is dark, and you will have to repair the light switch. As soon as the lights are on, save your game before exploring. After you look at a certain object, you will hear someone coming, and have only about ten seconds to prepare. Hide behind the statue to survive. |
| On the boat, the second time you explore room 20, and find a note on the headboard, you will hear voices outside. Save your game BEFORE you pick up the note. When you open the door, the Mummy attacks you. He is already dead, so your gun has no effect. Fight magic with magic: use the statuette to scare him off. You will be stunned, and wake up in your room. If you tried the pistol, be sure to return to that room later, to find it behind the bed. |
| When the boat is docked at an island, you will make your way to the top of a hill, and see the Mummy through a telescope. He sees you too, so save your game before proceeding down the hill. When the Mummy appears, you have no weapons, so turn around and choose the left path to find a place to hide. |
![]()
Enter the Hotel. Look to the right, and find the Cairo Newspaper story about a man going berserk in the marketplace. Speak to the Concièrge, who gives you the key to room 17 and informs you that Moïra has gone to the Museum. Upstairs, find your room by turning left then right after reaching the top of the stairs. Look on the nightstand and take the key to the Museum and read the note from Moïra. On the other nightstand, find the brochure. Look in your attaché case and take your lockpicks and flashlight. Go downstairs to the lobby. The concièrge is away from his desk, giving you the opportunity to read the hotel register. The cab has honked, he is ready to take you to the museum.
Please feel to explore the entire Museum. There are many exhibits to see, but unfortunately, there is not much to learn from them. I was anxious to read descriptions, or possibly listen to tour-tapes, but none of that exists. There is the main floor, an upstairs area, and a basement. You came here to find Moïra. Let's look for her in the offices. Upon entering the Museum, go RF, LF5, LF, L. You are facing a locked door with some carving on it. Try the lockpicks to get in. This is the Curator's office. There isn't much to do in here right now, but have a look at a couple of things: the desk drawer with some odd things in it, and a locked chest with an Ankh symbol on it. Let's assume we need an ankh-shaped key of some sort. Pick the lock on the other door, to find your way into Moïra's office. You can confirm it's her office by peeking in her purse. There is a tiny key there but you can't take it (yet.) Look at the items on the desk. There is a card describing Isfet. It goes into your inventory. Look at the report to see an inventory of items from the dig site. Look also in the card-catalog. There are several cards to read, but only one goes into your inventory, the card describing Mâat. Looks like we have a conflict of good and evil going on.
Exit the other door from Moïra's office, to return to the Museum's exhibits. Turn right, forward once, and look right to find the display case containing the Ankh. Sharpen your lock-picking skills once again to retrieve the device. Return to the Curator's office and use the Ankh to open that locked chest. There is a fancy key waiting there for you. Take it, and exit the office. Go upstairs, using the right side of the nearest staircase, and turn right again. You are looking for a locked door. Use that new key to enter, and go through the red curtain. This appears to be a ceremonial room of some sort, but not much is happening. You can find an empty chest on the floor, and two empty niches on opposite walls. The setup in the center of the room appears to be an altar of some sort. Exit the room, and return to the curator's office. You will be stopped by the Curator, the guy in the fez, and escorted to a "meeting with Moïra." Actually, he traps you in a store-room in the basement. Besides that, the lights are turned off.
|
Use the flashlight to find your way around. Looking to the left, you discover the light switch. Try it. Oh no, there is a broken wire inside. Go all the way to the other end of the room, and look on the floor to your left. Find the wire fragment. Use the wire to repair the switch, and turn on the lights. Now you are able to explore some other objects in the room. You could peek inside the sarcophagus if you like. After you look closely at the crate with the label for the Cairo Museum, you will hear someone approaching. Turn left, and duck behind the statue. Don't try to hide in the sarcophagus. At the end of the cutscene, you and the Germans have returned to the Hotel.
As you enter the Hotel, turn around and look under the cab. Find a piece of paper the Germans must have dropped. The Concièrge is away from his post again, so go behind the desk and take the key to Moïra's room. Go inspect her room. It is on the opposite side of the hotel from your room. Only two items of interest in her room; a note from the curator to be found in the nightstand, and her Diary, on the top shelf in the wardrobe. As you depart the room, you can hear La Destrière dishing up some sweet-talk. After that scene, go to the bar downstairs and have a conversation with the German guy sitting in the corner. He's Herr Doktor Maximilian von Bosardigheist. The scene will end on a sour note. Read the newspaper sitting there on the table. Now go to your room to find someone has ransacked it. What could they be looking for? And where's that voice coming from? Pick up the chair and place it under the air-vent to overhear the two Germans talking in the next room. Head back to the Museum.
| Here's a handy tip - the Hotel Brochure has a picture of the Museum on the reverse side. You can zip back and forth between the Hotel and the Museum by clicking on their pictures. This works from any location. |
| Go to Moïra's office, open her purse and take the tiny key. Use the key to open the diary, and read it. Now go into the Curator's office Look in the desk drawer. All that weird stuff is gone. But there is a notebook, which appears to have the last message torn out of it. Take a pencil from the jar on the desk, and rub the notebook to reveal the message. |  |
Let's check out the ceremony-room. Someone's been here. You can almost feel the aura left over from some kind of ceremony. Have a little ceremony of your own. Examine the altar. Take the glass bottle and pour its contents into the ceremonial cup. Put the feather into the liquid and crush it with the pestle. Now use the blue jug to collect the material you have created. Look in the two niches on the wall and retrieve two statuettes. Also look in the chest on the floor to discover the items that were in the Curator's desk.
Return to the Curator's office, and go to the ankh-chest. Place the two statues in their places, and click to open the next drawer. Use the objects found there to construct a Balance. Pour the concoction you made into the scale-pan to balance it, and open the final drawer. Take the Warehouse Key.
The door to the basement level, if you haven't already explored down there, is diagonally opposite from the offices; in the same corridor where you first arrived. Go down two levels, turn around and examine the tool shelves. Find the Bolt-Cutters. Take them, and open the tool-box sitting on the floor. Take the Pry-Bar from the box. Use your Warehouse Key to enter. This is the same room where you were trapped before. Look at the coffin. Previously, you could open it, and it was empty. Now it is chained shut. Use the bold cutters on the chain. Look inside. Think you're having a bad day? Pity the poor caretaker. Look at the crate you examined before, and use the pry-bar to open it. Take the note inside. It's a clue. Go to the Hotel.
As you return to the Hotel, the Concièrge presents you with a pair of tickets for the Wonder of the Nile, and an invitation from M. de la Destrière to join him in the cocktail lounge aboard the boat.
![]()
Have a look in your inventory. Everything unnecessary is gone, thankfully. Notice your key, to room 15. The sensible thing is to have a look in your room. There's not much to do in there, you can't even open your own luggage. Go into the bathroom and look under the sink. Holy Smoke! Literally. What in the world is going on down there? Exit your room. You are able to knock on doors #18 and #20, but you have no key and the lockpicks aren't up to the task. Go back up to the middle deck. Go to the sunny side of the boat, and enter the bar. Talk to the bartender. It seems he's the twin brother of the Concièrge. The Countess comes in and speaks with you. Whew, she's a strange one! Look at the table, examine the brochure describing the area, and eat one of the Turkish Delights. Yummm.
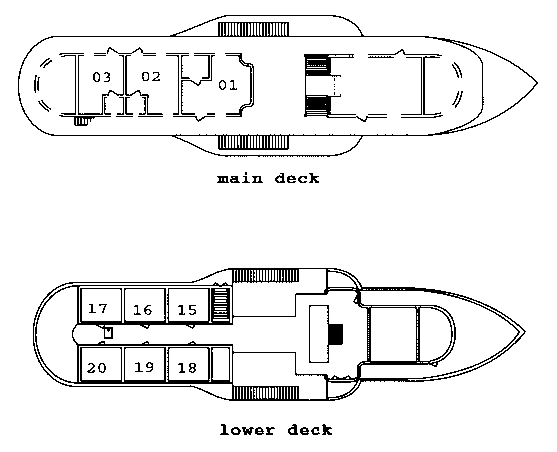 |
Return to the lower deck. At the bottom of the stairs, turn right, and find the louvered door, which is locked. It's a simple lock, and the lockpick works. Inside the linen closet, find the diagram of the boat, the passenger-manifest, and take the stethoscope from the drawer. |
Go to the end of the corridor, where Room #20 is. See the trapdoor on the floor? Find the tool to open it in the little box on the wall. Look behind you to find a ladder. Put the ladder down the trapdoor, and climb into the hold. Your flashlight will come in handy. Before walking around, look to your left and discover a Hammer sitting on the barrel. Take it, and go into the next compartment. Examine a locked chest that looks like it might belong to the Germans. Go to the next gate, discover that it is locked, but you can see what's inside in the close-up view. Holy Smoke! That's where the orange fumes are coming from.
Climb out of the hold, and return to the middle deck, where the outdoor tables are. A cutscene plays, showing la Destrière being attacked. The barman will tend to him while you look around. Go down to the staterooms, and listen at la Destrière's door. Go up to the shady side of the middle deck, and go down the outer stairs. Peek in the window. La Destrière is being hypnotized by the Curator! This would be a good time to snoop around the Curator's room. Unfortunately, the lockpicks still don't work. Go to the bar, only to discover the barman taking a little nap. Look behind him, and discover the two keys sitting on his wallet. One of the keys is a passkey to the whole boat. Handy! While you are there, eat another Turkish Delight. Seems someone else likes them, too. Also notice the book on the table by the shady-side door. That wasn't there before. Seems like one of the Germans is into some pretty heady stuff. Sein und Zeit (tr. "Being and Time) is by the philosopher Martin Heidegger, and has to do with Being, and it's connection with inanimate objects. Maybe he's trying to understand the power of the statuettes. Or maybe he's about to go right off the deep end. von B. didn't sound too philosophical when we talked to him before.
Go to room #20 and unlock it. In the nightstand drawer, find the Believer's Book. This little volume is chock-full of useful clues. Something about four deities (They are Horus, Ra, Isis and Osiris; what the clue is for, we don't know yet.) Also something about three scarabs, red, blue and green. Also the symbols for 1, 2, 10 and 100. Hey - those look familiar. Check out the papyrus you found before. It's not yet possible to guess what the numbers are for, but you can at least decipher some of it. It seems like there are four instructions: 120 six times, 130 three times, 220 five times, and 270 twice. Look in the closet and find the Mâat Statue.
Unlock la Destrière's door, room #18. He's in some kind of trance. Notice the ornate ring on his hand. Open his luggage and notice the emblem from the ring. Go into the bathroom, and take a bar of soap. Also notice the disguise kit. What's he up to anyway? Use the soap on his ring finger, take the ring and use it on the emblem in the suitcase, and take the diving mask (?) the rasp and the paper in the passport.
| Go to the Middle Deck, and find Room #2. It's on the Sunny side. This is Doktor von Bosardigheist's room. Peek in the mirror to see some powder-sugar fingerprints on the end bracket of the mantel. (You won't see fingerprints unless you have noticed that "someone else likes Turkish Delights.) Push the wooden bracket to reveal the safe. Use the stethoscope on the safe, and open it with the following procedure: Begin by turning Right. Click one step at a time until you hear a loud clunk. Now go left until you hear the clunk. (It's only one click this time) then go right until it clunks, finally left until the clunk happens. Now, careful - don't click any more; find the exit cursor to back away from the dial, and the safe opens. Take the locked chest, pistol, and mission instructions. | 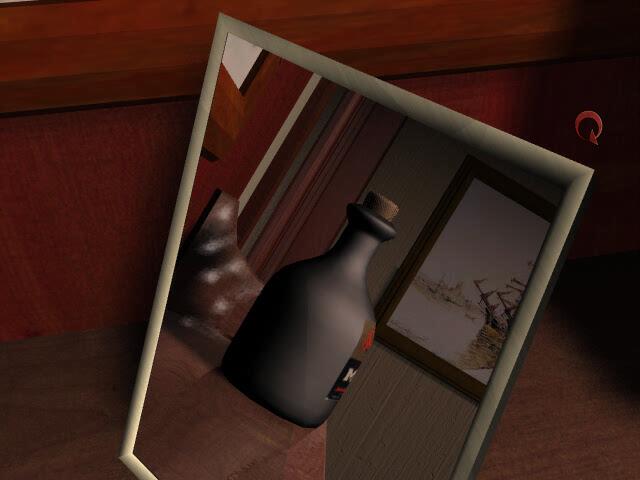 |
Look in the closet. Find the key hanging out of one of the pockets. In the far corner of the room is an Enigma Code machine. Open it and click on it to receive a message. Hmm - that strange note from the crate said something about numbers corresponding and letters in place. Let's try to decode that thing. Looks pretty easy.
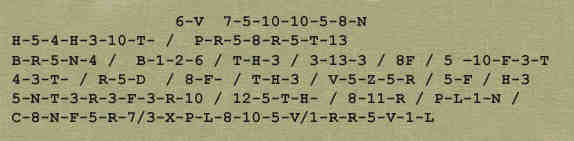
| K-V M-I-S-S-I-O-N H-I-G-H-E-S-T / P-R-I-O-R-I-T-Y B-R-I-N-G / B-A-C-K / T-H-E / E-Y-E / O-F / I-S-F-E-T G-E-T / R-I-D / O-F / T-H-E / V-I-S-I-R / I-F / H-E I-N-T-E-R-F-E-R-S / W-I-T-H / O-U-R / P-L-A-N C-O-N-F-I-R-M / E-X-P-L-O-S-I-V / A-R-R-I-V-A-L |
I can't help it if their spelling is not perfect. The message is clear enough. Exit the room, and go down the stairs to the entrance to the hold. Use the Warehouse key to unlock the control-box on the wall. Turn the crank to unlock the door to the ramp. Go down the ramp. and look around. That little key you just found will open the German's locked chest. Holy TNT Batman, there's enough here to blow the pyramids! Use the rasp to cut through the chain on the gate. Look in the coffin, only to discover the statuette and package of incense. Return to the Curator's room, #20.
|
Read the message on the headboard. You will hear a peculiar voice outside the door. If you didn't take my "save-your-game" advice a minute ago, please do it now. The Mummy is right there, and he attacks you. You have only seconds to survive. If you like, try shooting him with your pistol. However, he has been dead for centuries, so that's no help. Instead, use the Statuette on him to counteract evil with good. Oooohhh. You wake up in your own room, and have a brief conversation with the Countess. As you leave, someone slips a note under the door. Read it.
![]()
Go up to the middle deck, and step toward the shady side of the boat. You can see that the boat is docked at an island. You see and hear an explosion. It seems the archeologists are at work. Before going to the island, you have some items to retrieve. Go the the curator's room and find your pistol, dropped during the struggle. It's on the floor, behind the bed. Now go down to the hold again. No surprise, the dynamite is gone. Look under the ramp and take the Steel Bar. Go to the coffin. It's gone too! They sure have a lot of mobile corpses. Look to the right and take the Rope. Time to visit the island.
Go to the small boat. You see a light flashing from the top of the hill. Step forward toward the bow. This takes you halfway to shore. Step forward again. This takes you to the dock. (To return to the Wonder of the Nile, enter the small boat and step twice toward the stern.)
Step on land, and go toward the warehouse. Enter it, and when you step into the room, someone locks you in. Shades of Loch Ness! Straight ahead from the entrance, there are some barrels next to the wall. Look behind the barrels and pick up the Iron Rod. Go into the middle of the shelves and look for a box of Pitons. Take some. Against the far wall, near the other door, is a waste-bucket. Find the Mirror Fragment. On the right side of the door is a broken area you can peek through. See Karl Blitzstrum, von Bosardigheist's assistant. He's the dude from the introductory cutscene. You see him once, then he is out of view. Use the mirror on the hole to see where he is. Step away, and hear him leave. Look in the mirror again to confirm that he is gone. Now, how to get through that door. since you do not have the key?
Try this: looking close-up at the bottom of the door, put the Wonder of the Nile brochure under the door and give it a push. Now use the Iron Rod to dislodge the key. You can hear it fall. Now "Eeeeasy," pull the brochure toward you. Gotcha! Collect the brochure, unlock the door, and enter the operations office. Across the room, you can look at a map of the area on the wall. Also, turn left, toward the filing cabinets, and go forward. Look up and right, to read records of the excavations. Looks like someone has taken the information on Pinkerbottom's work out of the book. Next to the rear exit, see the newspaper clipping showing Pinky, Moïra, and de la Dest. with their two statuettes.
Go out the back door, and climb the hill. You reach an impasse, and wonder how the view is from up there. Turn around and anchor your rope to the previous iron rungs. Then, facing the cliff, put a Piton into a crack, and hammer it in securely. Then attach the rope to the Piton. Go up, and attach the rope to the bottom rung. This lets you climb to the top. Have a look around. You can see the boat from here, and on the ground, it looks like the Germans have been here. Cigarette butts and an empty flask litter the area. Take a look through that telescope. Oh! Moïra and the Curator; what? The Mummy attacks the Curator, and seems to have control of Moïra. He also has exceptional eyesight; being able to look right through the telescope at you.
|
Just so you know it's there, go over the back side of the hill and see the rope-and-pulley apparatus. You'll be coming back. Now, climb down the hill. After about five steps down, you spy the Mummy. Again, you have only seconds before he discovers you and it's all over. Turn around and look uphill. There are two ways to go. Before, you took the path to the right. This time, take the path to the left, hiding from the Mummy until he goes elsewhere.
| Now it is safe to return to the bottom, and go back into the office. You are concerned for the Curator, but let's do this first. Go into the office, and hear a ruckus in the storeroom. You will observe von Bosardigheist carrying on. Has he lost it or what? Listen carefully as he goes out the back door. Sounds like he dropped a key. Look at the bottom of the back door and find a small key. |  |
Use that key to open the metal box in your inventory. You could wait until the end of the game to open the box, but you will be in sort of a hurry at that time, and might not think to unlock it. Go back to the big boat, and into the Curator's room, #20. Yikes! Another zoned-out specimen. Look at his hands, and take the Scarab Medallion. Look at his neck and take a Tiny Key. Look on the nightstand behind the plant and take another Tiny Key. Those two keys are for his luggage. Use one to open the case, and the other to open the compartment inside. Take the Statuette. Go into the bathroom. There's that ceremonial urn again. Use the Scarab Medallion in the urn to activate it and take it back. Return to the island.
As you reach the island, there is a path to the left that takes you to a small stone marker. Use the Scarab Medallion on the bottom indentation to reveal a Blue Scarab at the top. Take the Blue Scarab first, then the Medallion. To be on the safe side, look in your inventory to confirm you have kept both the scarab and the medallion. Enter the small boat. Look closely at the barrels, and find the Steel Wheel. Use the small boat to return to the mainland.
This time, go to the left, and find another stone marker. Use the Medallion to create a Red Scarab. Take them both. Now, climb way back up to the top, where the telescope is, and find the pulley mechanism. In your inventory, combine the Steel Rod you found on the big boat with the wheel. Use the wheel to ride down the cable. Whee! I love it when he rolls his eyes. Go forward, and down the rung ladder. Be sure to look around, you have dropped the Scarab Medallion and you will need it.
|
Boy, it sure is hot! So hot in fact, that if you don't find a drink of water soon, you will perish. Go directly to the tents. You can only enter one, and find the chest to the left. You will find a canteen of fresh water, saving your life. Also take the lamp oil and the lighter. Go into the tent to find Pinkerbottom has been zombiefied by the mummy. Take the map from the table.
Exit the tent, and proceed counter-clockwise around the outer perimeter of the Pit to find the final stone marker. Use the medallion and get the Green Scarab. Check your inventory. Do you have the pistol, the mask, all three scarabs and the scarab medallion? If not, you will have to return to the warehouse area somehow. To do that, go down in the pit and find the ladder. You can exit the dig site by finding your way around to a rockfall, and use the ladder to scale it. You can always come back via the pulley. If, however you do have all the items, you can proceed, and ignore the ladder.
 |
Go into the pit and examine the lock on the gate. You have only one item that will get you in there: shoot the lock with your pistol. Go in, and down once. Find the Oil Lamp. Fill it with oil, and light it. Continue into the tomb until you come to a room with the gods' cartouches. You are looking for Mâat. Remember what she looks like. Place the Medallion first, followed by the blue, then red, then green scarabs. The clue for this sequence is in the Book of the Believers. The door to the lower tomb will open. Step through, only to be trapped. |
Proceed into the Four Pillars Room. Now, more of the clues in the Believer's Book become relevant. Near the back of the book is a two-page riddle; suggesting a sequence of deities, and also suggesting that all is not as it seems at first glance. Part of the problem lies in identifying who is who. As you enter the room, the pillar to your right is a goddess. She must be Isis, the only female in the group. To the left is the bird-god, Horus. Going forward to the next two, on the right is Osiris, and on the left is Ra. On the outer wall, opposite each pillar, is a door containing an ankh-shaped depression. Straight ahead is a fifth door, with a golden ankh in place. Take it. After it's in your inventory, examine it to see the symbol engraved on it. That is Isis. Place the ankh on her door to open it. Inside, you will be able to take another ankh. Examine it. Looks like a bird. Use it to open Horus' door. Take the new ankh from the statue. Examine it. A man with a staff and double headdress. Must be Osiris. Open his door, and by elimination, the last one must be Ra, the god with the circular headdress. Don't mix him up with Horus, also with a round thing on his head. Open Ra's door and take the final ankh, examine it and compare the icon to the image of Mâat above. Yep, this is the final one, the ankh that will open the fifth door.
Use it on the door, and take it back to open the door. Also, go around the Pillars room and retrieve the other four ankhs. You should have five now, and in your inventory slots, they are from left to right; Mâat, Isis, Horus, Osiris, and Ra. You can confirm this by sliding your cursor over them and seeing the symbols in the magnified window.
Now for the sarcophagus. You have seen those seven hieroglyphs several times before, and you can review them now, in the Book of the Believers. You must press the buttons on the lid in the correct sequence. They are arranged on the lid in almost the reverse order that you see in the book, except that two of them are reversed. Press then in this order:
|
|
|
|
|
|
|
As you proceed down and into the corridors, you are
hampered by a heavy fog. Besides, that, it's lethal. Put on the mask, and the
timer stops. You are safe, more or less. Observe that the mask contains a
compass. You only need to know which way to go. The clue is found on that
papyrus with the symbols and walking figures. Read the Believers Book to
translate the symbols for 1, 2, 10 and 100 Interpret the clues thus: The top row
says 120, followed by six walking men. This means you should walk in a direction
of 120° six times. If you do it correctly, you see the fog change color. The
complete directions are: 120° - 6 steps; 130° - 3 steps; 220° - 5 steps and 270°
- 2 steps.
If you need to return (missing inventory perhaps) you can do so by reversing the
path. The complete steps are: 90° - 2 steps; 40° - 5 steps; 310° - 3 steps, and
300° - 6 steps.
![]()
Enter the central temple. You will see Karl Blitzstrum one last time; meeting his demise at the hands of the Mummy. You must find a way to prevent the same thing from happening to you. Go around the perimeter of the pit until you find the projecting ledge, the first step in a descending staircase, which is retracted. There is an ankh depression in the step. In order to extend the steps, you must place the correct ankh in the imprint. The sequence is the same as it was in the Pillars Room. Start with Isis. Her ankh is the second one from the left in your inventory; she wears a flat crown.
If you choose correctly, you hear the steps sliding into place. If not, well it's Game Over. Be glad you saved. To extend the second set, use Horus the bird. For the third set, Osiris will work. Now you must stop him. The timer is running. Use the pistol to shoot the statuette he is praying to. There's not much time now; use the Ra ankh to reveal the final stairs. (If you did not think to unlock the Scarab Chest before, do it now!) Use the chest on the Mummy to paralyze him for a moment. The timer runs again. Use the Statuette from your inventory to finish him off.
- Here's the sequence from the top of the stairs:
- Isis ankh; walk down
- Horus ankh; walk down
- Osiris ankh, walk down
- Shoot Mummy's Statuette
- Ra Ankh; walk down
- Unlock chest if you haven't done that
- Use chest on Mummy
- Use Statuette on Mummy
- Use Medallion on Moïra
Now the pressure is off, but Moïra must be revived. Place the Scarab Medallion around her neck and sail off into the sunset. Thank you Allan Parker Cameron, for saving the world once again.
![]()
Questions and comments are welcome. Tally Ho
This document was provided to GameBoomers.com and may not be distributed without express written permission of the author and the content may not be altered in any way.