THE CAPRI CONNECTION
By S-G Software
Walkthrough by MaGtRo July 2014
Installation:
After installation, examine the "read me" file for instructions.
If the game installed is a digital download, follow the instructions for the antipiracy security system. Push the Generate Code button to get a code. E-mail the code to capri@caprisaga.com. Exit. You will get an activation code by e-mail.
Introduction page:
The full screen changes the screen to the resolution of the computer. Center changes the game screen to windowed.
A choice of Italian with French subtitles, Italian with English subtitles, English and Italian is available by clicking on the flags.
There is an Exploration mode that describes highlights of the different locations at the coast. Click on the Exploration mode and read instructions.
Click on Adventure game to start playing the game.
In-game (Services-tools) menu:
Start gives selection on where to start the game: from the beginning, where you left off - are or from a saved game. Click on the number of the saved game.
The direct "Jump to" the locations of the game can also be accessed from 'start'. It is available only on exploration mode.
Save has 9 slots for game saves.
Screen explains the changes in screen resolution and the screen layout.
Instructions explain the icons seen in the game. It is recommended that you read this information.
The laptop icon is where you can read the dialogues spoken by the characters.
The tools icon shows the in game menu.
The world icon shows where you are in the map.
The suitcase icon is the inventory.
The white flag icon seen on certain puzzles will skip-solve the puzzle for you.
Map shows the locations where the storyline occur. The "jump to" is available only on exploration mode.
Credits shows the sponsors, music and cast of the game. At the last page of Credits, see a frame that you can enter a name (player's name or other choice) to be the protagonist of the game.
Hotspot when selected shows a black or gray rectangle on the game screen where actions can be done. I strongly recommend using it while playing.
Scene number when selected shows the identification number of that scene.
Right click during gameplay accesses the icons at the bottom of the screen.
Anacapri, April 29 2013.
A Space - Time Rip occurs.
House of Nico Fredi:
Space - Time Rip: The TV is turned on via remote. See a rock group performing on TV.
A ripple in the room occurs. What happened?
Right click on screen to show the in-game icons at bottom of screen.
Go forward to chess set left of the wall entertainment unit. Take money - 50 caprini under the chessboard.
Examine the platter with rocks, crystals, arrowheads and fossils at right. Take the Teletransportation LTD Frigo-T 1-way ticket that cost 10 caprini.
Turn around. Go to dining table. Take interdimensional cell phone on the table (InterDcom).
Inventory has credit card of Nick Freuds and home key.
Gennaro Gravitiello's call: Walk away for 2 clicks and the phone rings. Open the inventory bag, select cellphone and then examine.
Gennaro Gravitiello calling from Parallel Universe #1 says that a Space - Time Rip occurred. Costanzo Gravitiello, Gennaro's counterpart of universe #3 caused the Rip because of his last experiment. The experiment caused randomly selected people from universe 1 and 3 to swap minds into their corresponding bodies.
Nico Fredi is now in the body of Nick Freuds.
House of Nick Freuds:
Exit through lavender door across the dining room table.
Go left forward to end of road. See a sparkling barrier, a road block.
Turn around and forward passing the red building, home of Nick Freuds.
Gennaro Gravitiello's call: Answer the cell phone. Gennaro gives an update.
Objects may also have been swapped in the Rip or they may have disappeared. The Rip has increased in size. Gennaro asks for Nico's help. He wants you to find Costanzo Gravitiello. Costanzo might be hiding in Naples.
Frigo teletransportation: Continue to end of road. See an old fridge blocking the way.
Insert - use the Frigo-T 1-way ticket on slot. Click on monitor inside the fridge. Press the red button.
Since you don't know where to go, the teleporter chooses for you. (It will do so the entire game). Press the red button. It sends you to Parco Virgiliano.
Parco Virgiliano
Get more information.
Look around and enjoy the sights. Behind you is the view of the Gulf of Naples and the city.
If you turn left, you will see kiosks, playground and other viewing areas.
Turn right on the path. Go forward pass the viewing area with a bust.
Gennaro's call: Get a call from Gennaro about a time machine that was used at A Quiet Weekend in Capri. The time machine then is a hydraulic press. It has since then been destroyed.
Continue forward pass the viewing area with a Gulf of Naples view.
Stairs: 7 clicks from the call, see steps at right. Go down that red brick stairs.
At the bottom of the stairs, see a small park. If you go forward, you will see the far view of the coast.
Turn right here. See a grilled fence blocked by trays of plants. Go through right side of the fence.
Meet the guitarists:
Guitarists: Go forward until you see 2 guitar players. Talk to the young men. They want to be professional musicians.
They give a catalog of Costanzo Gravitiello's inventions.
Learn their experience about a man in record industry. The man changed and gave them a break in their career. After learning about the Rip, they do not want to return to their own Universe 1. They recommend to make a tour of Castel dell'Ovo. You might meet somebody that can help.
Costanzo's Catalog: Open the suitcase - inventory and read the catalog. Learn the different inventions and know their functions.
Return to Frigo: Turn around and return to the small park and climb the steps. At the top of the steps, go back to the left.
Gennaro's call: Get another call from Gennaro.
He mentions 3 things to do:
- get an interdimensional glasses.
- get coloured crystals that shines when hit by ray of light.
- visit Mariolina Angelone, an artist who invented Log Art. Her last work is made of those coloured crystals. Try to get a few of the crystals.
Meet Diana:
Continue forward (~3 clicks) and see a woman looking out to the water at left.
Talk to Diana. Learn her experience in Capri. In her hotel room, she heard singing and she went out to the beach. She swam towards a rock in the sea.
She got a cramp and sunk into the water. She was saved by a skindiver; was lifted up by 2 dolphins and brought back to the beach.
At the beach, she found a bracelet with a ruby. When the light hit the jewel it flashed.
She went back to hotel and the next day back to New York. She returned here now looking for the man that saved her.
Take the book - Bracelets of Light by Donna Ovist.
She will give the bracelet in exchange for finding her man with the dolphins. Read the book.
Castel dell'Ovo
Not everyone wants to return to normal:
Continue to the left.
Gennaro's call: Get another call from Gennaro about butterfly effect and stress that you look for Costanzo. It's understandable that he's getting desperate.
Frigo-T Ticket Distributor: Go forward and then turn left at shaded area - starting point in the park.
See the red ticket distributor. It automatically takes 10 caprini from inventory and issues a ticket.
Frigo: Use the ticket on Frigo's slot. Click on monitor and see that you are given a choice; to go to Castel dell'Ovo or to Mariolina. Frigo knows best. Press the red button.
The teleporter sends you to Castel dell'Ovo where the guitarist recommended.
Castel dell'Ovo: Go forward and hear noise and voice behind you.
Turn around and see 2 guys on motorcycles. They hit you and take the cell phone, money and credit card from inventory. They mention Mata Haprik.
Stand up and forward. Pick up the 1 caprini coin from ground.
Mata Haprik: Turn right to the covered walkway. Go up the stairs at left. Pan left and then go to the woman sitting on the farthest cannon.
She doesn't want the world to change back to what it was before Costanzo's mistake. King Caprillo V, her ex-husband is a better man and he pays her regularly. He also governs the country better.
Find money for the Frigo:
Go to the small steps going up at right. Climb up to the top pass another landing. At far end is the view of the water. The Island of Capri appears at distance.
Turn around and go back towards the steps.
Tiles: Look close at the tiles on top of the parapet left of stairs.
Pan left to right and see the different buildings in the city. The city is seen at the horizon.
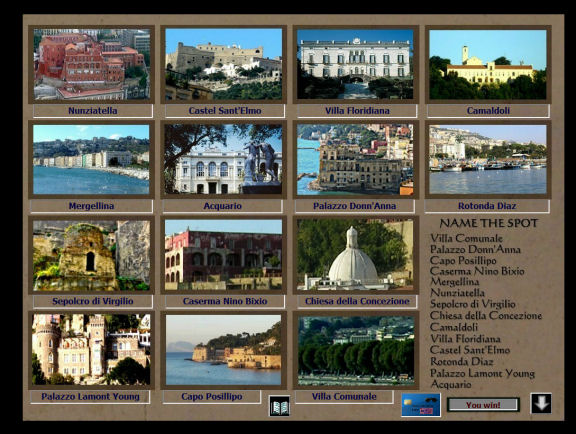
Quiz: Look close at the Name the Spot quiz below the tiles.
It needs 1 caprini to play. Insert the coin on the slot at top left.
Read the instruction (book icon) at bottom of the pictures.
Select a picture and then select the name of the building from the list at right.
The number of correct selection is seen below the list of building names. If the number does not increase, the response is wrong.
Pulling out of the pictures resets the puzzle.
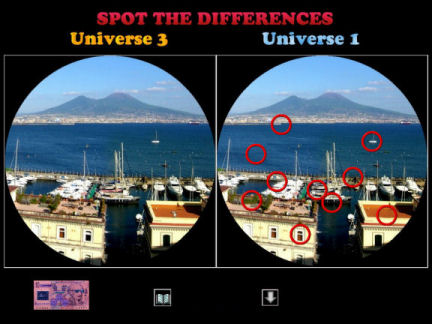
Pull back after winning and take the ticket. Win a ticket (Spot the difference card) to an interdimensional binocular. The prize for winning that puzzle is 10 caprini. Yay!
Interdimensional binocular: Go back down the steps to the cannon platform.
Go forward to the steps at far right. Go left at next level. See the binocular at far wall.
Use the just won ticket on the interdimensional binocular.
Spot the differences: Look for differences between the 2 pictures.
Click the difference on right view. Read the instructions (book icon).
Pull back after winning. Take the 10 caprini.
Frigo: Turn around and go left to the covered walkway to go back to the outer walkway.
Go left to the Frigo. The red ticket distributor appears and does its thing. Get a Frigo 1 way ticket.
Use the Frigo ticket on the fridge. The machine decides to take you home rather than go to Mariolina (the machine has strong authoritarian traits). Press the red button.
Get money to continue the search:
Home at Anacapri: Go forward to the door of the red building. Use the home key on door.
Search drawers for money: Open the drawers of the hutch at left.
Turn around and open the table with the gorgeous flower arrangement at right. Take 200 caprini and a Frigo 1 way ticket.
Mariolina Angelone
Start collecting Light Crystals:
Exit the house and go back to the Frigo at right. Use the ticket on Frigo. Press the red button. Frigo has a sense of humor. Press the red button.
Mariolina: Press the doorbell button.
Mariolina Angelone gives the official Log Art book. After showing Warhol's painting, The Cows and the 7 sisters and 7 brothers; follow Mariolina to the bedroom.
Mariolina shows the Crystals of Light. She said that she can give you one of her spare coloured light crystal. You need to answer a few questions about Log Art. She says to go to island of Procida and meet with the Director of the local Art Gallery. Get a booklet with some questions about Log Art. Then come back here with the answers.
Follow Mariolina to the door.
Procida
Get the Log Art Quiz book:
There is a Frigo across Mariolina's door. Look around and then a red ticket distributor appears. It takes your money and issues a ticket. Use ticket on Frigo.
Press the red button. See Procida destination. Press red button again to be there.
Nabis Art Gallery: Go forward pass the church at the piazza. Turn right to the street at left side of the church.
Midway down the street, enter the art gallery at left side.
Learn that one of Mariolina's coloured light artwork was bought by Mata Haprik. Learn also what happened when a tourist went crazy and destroyed an artwork with coloured crystal.
Take the Log Art Quiz book from Benny.
Log Art Quiz book: Examine the Log Art book given by Mariolina and the Log Art Quiz book in inventory. Answer the quiz as you please (there are no wrong answers.)
See the changes caused by the Rip and possible consequences:
Adele, the niece: Go right from the gallery. Turn right at the end to the street going up the hill.
By the scooters at right, see a young lady wave at you. Adele talks to you. See her use the coffeemaker transporter.
Other end of island: You are transported to the other end of the island.
Go forward twice, turn right and Adele talks to you about the coffeemaker.
Continue to go forward 7 times, turn right and Adele talks to you about La Chiaiolella's unusual lack of tourists and people.
Click and wait to talk to her again.
~10 clicks forward, turn right and talk to her again. She brings you to the beach.
Beach: Go forward to the white house ahead.
Adele shows the change of the local bridge to island of Vivara to Golden Gate Bridge.
Bridge to Vivara: Go forward once and talk to Adele at right.
Go forward to the bridge and see the bridge change. Turn right and talk to Adele.
Go forward until the building at end of the stone stairs.
Light crystal: Go back down and talk to Adele. Learn about the story of the customer at the gallery that went crazy. She gives an orange coloured crystals she picked up from the gallery.
Later, Adele met the customer. He says he's Rembrandt. Only you can close the Rip.
Adele says that the water from the waterfall in Pogerola is so clear that sometimes it solidifies into Light Crystals. This happens every 2-3 years.
She gives a good luck charm - key rack.
7 clicks from Adele, turn right and talk to Adele again. She leaves you here. Learn who her uncle is. :)
Frigo: You are back at the city where you met Adele.
Go forward pass the church, and up the step to the water barrier/boat docks.
Go forward to the Frigo. The ticket dispenser appears and does its thing.
Use the ticket on Frigo. Press the red button and the teleporter decides to send you to Pogerola. Press the red button again.
Pogerola
Find the waterfall and meet some otherworldly beings:
This is a long trek to the mountains. Go forward until you reach a warning sign. It says the woods are infested with elves, leprechauns and witches.
Chestnuts: Continue on with the adventure. From end of the stone stairs, go forward twice. Look at chestnuts and chestnut husks at left side of path.
Elves, leprechaun and witch: Onward and forward. Sometime later, hear voices - Lep, Dark Elf, Blonde Elf and Witchy. They want to play tricks on you.
Go forward. Later, see a wood trunk at left.
Break in fence: Watch for wood fence at right (12 clicks from wood trunk). Go right through break in fence.
Go forward and see a ruined house. On the shelf right of door is a makeshift altar with flowers. Try the lock but nothing happens.
Crag: Go forward or right of house and see the view by the crag. Back up and look left. Go back to the path outside the fence.
Back at the path: Continue to the right. Along the way, see some moss covered tree trunks and flowers.
Elves, leprechaun and witch again: Hear the voices talk again. They know your name and what you are doing here.
Blonde Elf wants to help you while Witchy wants to let you get the crystal then they'll steal it from you.
Learn from Dark Elf that you need 7 good luck charms to get anything.
Elves, leprechaun and witch appear: Go forward and the beings appear to you.
Dark Elf says that they decided to help you. Learn from them that you need 7 good luck charms to produce a light crystal.
The other 6 good luck charms are found in the cracks of fallen tree trunks. Place the lucky charms on 3 tree branches shaped as a triangle and follow the indication on the map. The map is inside the ruined house. The key of the house is close to the chestnut eaten by the stone wolf.
Collect the charms:
Get the key: Best to go back down to the chestnuts at start of path. It's easier to see the trunks that way.
- Look close at chestnuts by the bench (second bench seen while going back down the path). Take the key under the chestnuts. Turn around to climb back the mountain.
- Look close at tree trunk at left (32 clicks from chestnuts). Take the Kennedy dollar charm.
Ruined house: Enter the break in the fence at right (12 clicks from dollar charm). Use the key on the door luck.
Wow! That is some ruined house; it is now the Waldorf -Astoria. Back out and go back to the path.
Hear the otherworldly beings talk. They realize that the enchanted forest can change. Blonde Elf got the map from under Lep's hat.
Continue collecting the charms: Meet the beings again. Blonde Elf says that they got the map and hung it on a branch along the path to the waterfall.
- Go 3 clicks from broken fence. Examine the tree trunk with cyclamens on the left. Take the arrow point charm from top left of the crack in the tree trunk.
- One click away, examine the tree trunk on the left. Take the jade dagger charm beside the dried leaf at left.
- 5 clicks from the jade dagger charm, examine tree trunk on the left. Take the eagle pendant charm above the moss at left side of the trunk.
- 3 clicks from the eagle pendant, examine the tree trunk at right. Hmm. No charm - let's look at the other end.
- One click from the tree trunk with cyclamen with no charm, turn around and check the end of that tree trunk. Take the Willy and the International pin charm.
- Turn around and go one click. Examine the trunk at left. Take the red horn charm.
Map: Now look for the map. Go forward 9 clicks, take the map hanging from the branch at right.
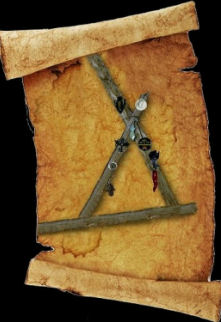
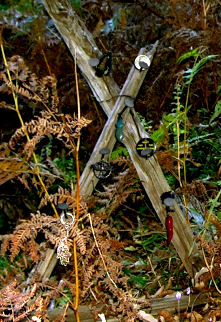
Triangular three branches: Go one click forward and look close at the triangular three branches at left.
Examine the map of the triangular tree branches in inventory. See the arrangement of the charms on the 2 crossed branches.
Place the charms starting at:
- top left - arrow point.
- top right - Kennedy dollar.
- at the crosspoint - jade dagger.
- middle left - eagle pendant.
- middle right - Willy and the International pin.
- bottom left - key rack.
- bottom right - red horn.
Pull back and continue.
Get the second Light Crystal:
Waterfall: Go forward to the waterfall.
Look close at the pool at the base of the waterfall. Take the white light crystal.
More information:
Warning: Go back down the path.
Dark Elf warns you that there is an intruder in the woods. She took lots of pictures for unknown reasons. She is sitting before the crag now.
Blonde Elf wants them to go now before elf and witchy play mean tricks.
Donna Ovist at the crag: Go down until the break in the fence that goes to the ruined house. Enter the fenced area.
Go forward and talk to Donna Ovist, the author of the book given by Diana Ovist. Learn that Diana is a fantasy character from Donna's book and made real by the Rip. Donna is from universe 1.
The man of the dolphins Diana wants to meet is Arion Gavino. He's also a fantasy character.
Donna gives an envelope. The information inside will get Diana find Arion right away.
There is a man in universe 3 named AlMartino that can teleport himself when he plays his music. Find him and shower him with kindness.
Envelope: Check the envelope and see that it has Arion's picture, address and cell phone number.
Frigo: Go back down the mountain to the Frigo at city's edge. Get a ticket from the magic red machine.
Use the ticket on Frigo. Press the red button. It decides to bring you to Mariolina's house. Press red button.
Mariolina's House
Third Light Crystal: Press the doorbell. Give her the Quiz book. She said that any answer is correct.
Mariolina gives the lilac light crystal.
After showing some of her work, she gives a hint about another crystal. She wants you to bring back to her the solved ESA 37 that she gave to a friend of hers in Amalfi. She will then give another light crystal. Exit.
Frigo: Turn around from the Frigo, turn back and the red ticket machine will appear. It does its thing. Insert the ticket on Frigo.
Amalfi Coast
Track down the ESA 37 box:
Find Mariolina's friend: Go forward down the hillside pass the view of a cruise ship at right and an apartment house on the left.
Continue forward until the end of the stone path. Go left to the green door of the garage and a balcony with a hanging pants.
Talk to the man. He doesn't care about the ESA box since there are more important things to worry about - Amalfi Cathedral disappeared.
He gave the box to the owner of Lido delle Sirene, the bathing establishment at the beach.
Find Lido delle Serene: Continue to the left, cross the road and down the ramp. Go down the stairs until the road below.
Cross the street to the boat dock. Immediately turn right, forward, go around the rounded wall and see Lido delle Serene.
Go there and enter the restaurant on the left.
Owner of Lido delle Serene: Talk to the man close to the windows. He shows a tablet that has the before and after of the Cathedral.
Press the button at left, then click on the screen. Turn the button off.
He gave the puzzle to his cousin who is down at the beach.
Lifeguard: Exit the restaurant, go left and down to beach. Go right and forward until the end.
Talk to the lifeguard. Turn around and see 3 mermaids.
Talk to the lifeguard again. Turn around again and see the Amalfi Cathedral.
Talk to the lifeguard again. He gives the keys to his place up at side of the hill.
Find the lifeguard's apartment: Exit the beach and restaurant area. Go back to the boat dock, cross the road by the signs and climb the mosaic tiled steps.
Climb more steps, then the ramp, cross the road and up the side of the hill.
Enter the apartment house on the right midway up the hill. It has a clay pot on the banister.
Search for the box:
Enter the lifeguard's apartment: Climb the stairs until the brown door with white bar.
Use the key given by life guard. Look around.
See a hutch close to main door that has a scale.
Balcony: Exit to the balcony at left. Look around.
See a sundial on the wall. Continue forward by railing and enter the dining room, the first door at right.
Dining room: Go forward and then turn around. Take the message under the yellow Dresden lady lamp on the hutch at right.
Check the message: Remember you won't go too far if you don't give the right weight to everything and if you don't do always the right things.
Master Bedroom: Go left and see the master bedroom at left and the master bath at right.
Kitchen: Go pass the living room and see the kitchen at left. Continue down and enter the side door.
Other bedroom: Go pass the bathroom at right.
Continue to the bedroom. Look around the bedroom. Look out the window and see a magnificent view.
Take the ESA 37 box from the desk. Go back up to the living room pass the kitchen.
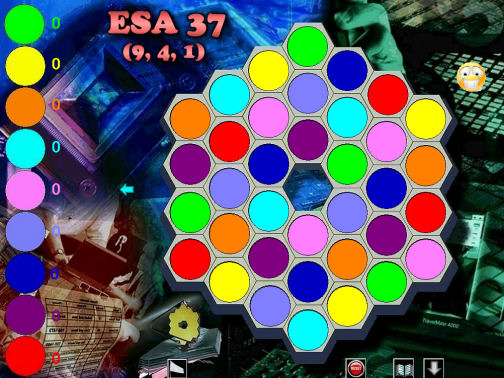
Solve the ESA 37 puzzle:
ESA 37: Examine the ESA 37 in inventory.
Read the instructions by clicking on the book.
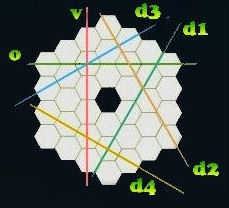
The object of the puzzle is to place all 36 colors in the hexagons with no color repetition at horizontal, vertical and diagonals. There are 4 diagonal points (see game diagram).
The picture shown is just one possible solution.
Time to leave:
Leave keys: The lifeguard said to leave the keys.
Remember the note found under the Dresden-like lamp. Remember you won't go too far if you don't give the right weight to everything and if you don't do always the right things.
Scale: Look close at the scale on the hutch by exit door.
Take the 3 weights: 20, 10 and 5 grams.
Use the keys on the left pan.
Balance the scale by placing the 20 and the 5 grams weights on the right pan.
Now you can exit the apartment.
Go back to the right until the Frigo and ticket dispenser. Use the ticket.
Capri
Almartino:
You are now in Capri. Remember that Donna Ovist advised us to find and treat with kindness a man named Almartino.
Turn around from the lift. Climb the steps. Look around at beautiful Capri.
Go forward and down the steps to the building. Go right and then down the steps at left to the hillside.
Almartino: See the mystical man at cliff's edge.
Almartino is convinced to help you get a light crystal. He will play his music to find the one light crystal in Capri.
Listen to his music played with saxophone, flute, hang and giant flute.
Almartino gives the blue light crystal.
Frigo: Go back to the Frigo. Climb up the stairs pass the building. Go forward at top of stairs. Go straight pass the orange mums. The exit down is by the parapet and has a sign.
If you want to look at the view; go right and look around.
Turn around when the lift is in front of you. Get a ticket.
Scrambled ticket: The machine gives a scrambled ticket.
Examine it in inventory. Turn the ticket.
Unscramble the ticket by rearranging the tiles to their correct positions to form the picture of Frigo ticket.
Click on a tile and then click on the place you want it to be.

Use the ticket on the Frigo. The Frigo sends you to Parco Virgiliano again.
Parco Virgiliano
Get the ruby bracelet:
Search for Diana: Go right at the path. Diana is not at the same place.
Continue forward pass the red brick stairs at right.
Gino & Patty's stand: Go to the snack stand. Talk to the water vendor.
She met Diana, the depressed lady in black. Diana wants an alcoholic drink. There's a bar down the road. The vendor leaves a cup of coffee on the counter.
Find Diana: Turn around and go left.
Turn right by the rose bushes (one click away). Go forward until the refreshment area.
Continue on until you curve back and then left.
Diana: See Diana sitting on bench. Talk to Diana.
Give the envelope to Diana. She gives the ruby bracelet.
Go back to Frigo: Go right to the stand area. Climb the path going left. Turn left when the playground is seen at far right.
Go pass the stand and forward until the starting point at left (just before another refreshment stand).
Use the ticket on Frigo.
Mariolina's House
Get another Light Crystal:
Ring the doorbell. Mariolina takes the solved ESA37.
Take the green light crystal.
If you want the last spare crystal she has, solve another quiz. The art consultant at Franco Senesi Fine Art Gallery in Positano has the quiz called Quatto. She wants the solution.
Positano
Find and solve Quatto 13:
Turn around and back to Frigo, see the ticket dispenser. Use the ticket on Frigo.
Franco Senesi Art Gallery: Go forward twice and enter the gallery at right.
Look around the artworks. The office is at right.
Talk to the art consultant. He shows some of the gallery's art works.
At the office, he gives the Quatto 13. Learn also that Mata Haprik bought one of Mariolina's work already.
Gennaro calls: The phone rings and it is for you. Gennaro finally tracked you down.
Gennaro says that the Rip has worsen, anomalous entities from the past are now crossing the Rip. A friend of yours is at the beach.
First go to Rotonda Diaz in Naples to meet Paola de Vito. She can bring you to Costanzo. Costanzo reached the same conclusion as Gennaro. Only the Chaos Theory may stitch the Space-Time Rip.
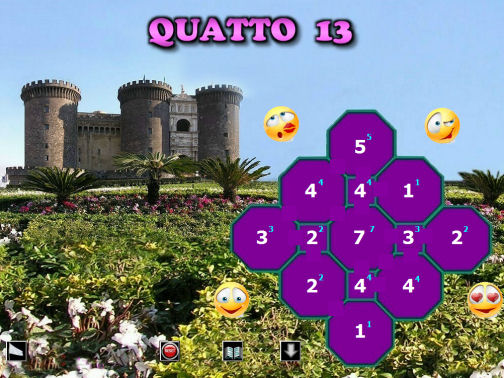
The Quatto 13: Examine the Quatto 13 quiz in inventory.
Read the instructions (book icon).
The aim of the puzzle is to have the yellow and blue numbers match.
The yellow numbers are the numbers of doors that are presently open and can be seen from inside that room. The blue numbers are the numbers of doors that should be opened and seen from inside that room.
Click on doors to open them. Adjust the number of doors to match the numbers in blue.
Frigo: Exit the gallery. Go left and get the ticket. Use the ticket on Frigo.
Naples
Get information from Paola:
Rotonda Diaz: You are dropped off at Rotonda Diaz.
Go forward twice and right to Paola de Vito sitting at the railing.
She won't bring you to the Dept. of Mathematics at the University until you have solved the math puzzle. Meanwhile, she will take a walk at Villa Comunale.
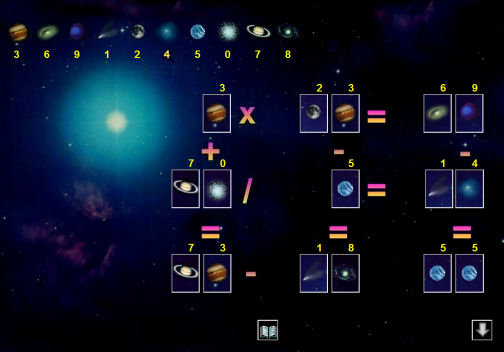
Space Math puzzle: Examine the space math book in inventory.
Read the instructions of the puzzle.
Click on the space symbol at top left to change the number associated with it (shown below it).
This will change the numbers on the mathematical operations on the page.
The aim is to get correct numbers to form a solution and the "=" stops blinking.
The puzzle resets when exiting without solving it.
How to close the Rip:
Costanzo's letter: Take and read the red envelope at front part of book.
Learn that Napoleon is after Costanzo.
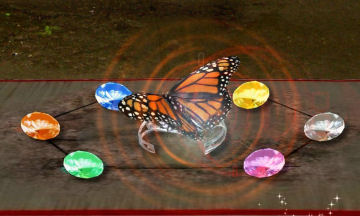
Instructions: A hexagon must be built from light crystals. The ruby must be at the center of the hexagon.
When the crystals and ruby are hit by 7 rays of light, a butterfly will be attracted to the ruby at center of hexagon and will close the Space-Time Rip.
A Lt. Nelson of Anacapri the Dream wants to go back to 1808 Capri and knows how to make the raylights that will light up the crystals-ruby.
Costanzo prepared a map on a half burned paper marking the positions of the crystals and the ruby.
He also prepared a mat that is to be used with the crystals and ruby positioning.
He asked a porter to hide the map and mat at Villa Comunale.
Locate the map and mat:
Find Villa Comunale: Turn around, forward and then right to the statue across the street.
Turn right after crossing the street. Go forward to the sidewalk and then left at sidestreet.
Cross the street to Villa Comunale.
Burned paper: Before entering the park, turn right and see tables with merchandise for sale.
Go to the far end. Look close at the table with light blue tablecloth.
Take the half burned paper.
Find Paola de Vito: Turn around, forward and enter the park - Villa Comunale at right.
Go forward, pass the white bust and left to the columned white building at left.
Give Paola the finished Space Math puzzle.
Learn that Napoleon has kidnapped Costanzo. She will not bring you to the University.
Look for the mat: The mat is supposed to be here also at Villa Comunale.
Turn around and forward to left side of the park. Go forward to the gazebo.
Learn about fishes:
I recommend that you change to Italian with English subtitles for this part. The fish names might be more memorable when read.
Aquarium: Enter the building right of the gazebo. Enter the aquarium at right entryway.
Talk to Sandra Hochscheid. Learn about the Aquarium.
Take a tour and look at the fishes. Remember the names and what the fishes look like. There will be a quiz later. Study all the active displays.
The second to last display at left of first hallway has 3 items. Look, pull back and look again.
See Diana and Arion on display at left of second hallway.
The second and fourth cases at third hallway have 2 active displays.
Go around the displays. Sandra has to leave.
Box office attendant: Get stopped by the attendant. He wants to see your admission ticket. You're fined 125 caprini for trespassing.
If you're really a famous marine biologist, you can solve the quiz he gives.
Take the fish quiz book.
Fish quiz: Read the instructions.
Go to the right hallway and check the last tank on the left. It has sea anemones. The number of the tank is at top of the display. It is tank number 19.
Identify the fishes in the quiz book.
Click on a fish and then click on its name at bottom right. It will show below the fish.
The number of correct selection is seen below the list of fish names. If the number does not increase, the response is wrong. Cool!

Give the completed quiz book to the attendant. The attendant says that the University porter left a mat from Costanzo at the Sound of Music Gazebo.
Get the mat:
Mat: Exit the Aquarium. Go left and exit the building.
Go to the gazebo. Before climbing the steps, go right.
Stand outside the gazebo while facing the stairs of the gazebo with the statue far back behind the gazebo and with the long palisade on your back.
Check the base wall left of the stairs. See something active there.
Look close and open the secret compartment. Take the mat.
Frigo: Go back to Frigo.
Go straight pass the statue and towards the white building where you talked to Paola.
Turn left before that white building to get out of the park.
Cross the road and continue to the sidewalk until the large statue. Cross the road and forward to the Frigo.
Get ticket and use it on the Frigo.
Positano
Find Lt. Nelson:
Go to beach: Go forward pass shops, restaurants and hotels. Turn left at the split in the path. Turn right at the corner.
Go down the steps to go to the beach.
Lt. Nelson: Turn right at the beach. Enter the Chez Black restaurant at right and then go left and right.
Go to the man close to the bar. Talk to Lt. Nelson who saved your life in Anacapri the Dream.
He reminds you that you owe him a debt. You promise to send him back to 1808 Capri.
He warns you that you are in danger. Napoleon hired a professional killer to do away with you. Learn that he saw Napoleon kidnapped Costanzo, brought him to France and locked him in the dungeon. Napoleon was in cahoots with Mata Haprik. You are the last obstacle to their plan.
Captain Church of 1808 Capri built 2 weapons that can help you. Nelson lost the user manual. The Cumaean Sybil also practices her art at the Subsoil Museum in Naples. She can find where the 2 weapons are hidden.
The Multiple Laser Projector will serve your purpose and the Microwave Reflector will protect you.
Find the weapons' user manual:
Exit the restaurant and go back to the left and out to the beach.
Go left at the beach to the very end. Walk the sand and up on the amphitheatre.
Go down the ramp to the water's edge.
Pick up the user manual on the hole in the ground.
Manual: Read the manual written by Captain Richard Church.
Multiple Laser projector: Learn how to program the multiple laser projector. The half burned paper must be placed on its scanner.
The machine is activated by remote control. Push the fire button.
Microwave reflector: The microwave reflector is automatically armed the first time someone shoots at you. It casts a powerful microwave that melts the weapon used. It has only one burst of power.
Frigo: Go back to the amphitheatre, down the steps to the sands and then walk the sidewalk.
Turn right by the rent a boat signs. Climb up until you reach the Frigo. Use the ticket on Frigo.
Mysterious Woman: See a woman peeking out of the Art Gallery. She's not inside the gallery. Hmm...
Continue to the Frigo. Get a ticket. Use it on the Frigo.
Mariolina's House
Get the 6th and last light crystal:
Frigo delivers you to Mariolina's house.
Ring the doorbell and give Mariolina the brown solved Quatto 13 book.
Get the yellow light crystal.
Get the ticket and use it on Frigo.
Museo del Sottosuolo
Find the Cumaean Sybil:
Enter the Museo del Sottosuolo; the Subsoil Museum. Look around.
Matteo Scarpati: Go left and talk to the man at the desk.
The museum shows the pits and cisterns of the ancient Greeks and Roman times. They were used as anti-aircraft shelters during the Second World War.
The Cumaean Sybil might be here today.
Poster displays: Go through the back rooms to check the displays. Look right and left at the posters.
Subsoil Museum: Go back to the front room.
Go down the steps straight ahead from the office door. Look around.
Large room: Go right after the steps and up the steps to a large room. Look up and down.
Bar: Go down the steps ahead. See the bar at right.
Tile room: Continue to next room and see tiles displayed on the walls.
Lady Killer: At the upper balcony, see the woman that peeked at you at the gallery in Positano. Talk to the professional killer.
Bar: Turn around and go forward to the bar at next room.
Talk to Matteo. He is selling liquor. He calls Sybil on his cell phone. Sybil will come if she gets a whole bottle of Glenfiddich.
Take the Glenfiddich that cost 60 caprinis. Pay Matteo with caprinis from inventory.
Matteo warns that Sybil is usually high when she comes here. Her revelations are mixed up so further "decoding" is needed.
Main room: You can reach the stage at the main room by going right or left from the bar.
Let's try it this way; go left, up the steps and see a strongbox on the wall. It needs a key.
Go down the steps into the main room.
The main room has 3 side alcoves and the stage on top of the stairs at end of the room.
Sybil: Go up the steps leading to the stage.
Place the scotch whiskey on the stage.
Turn around, forward and wait. Hear a sound. Turn around again and go forward to Sybil.
Sybil's words: Sybil says some words seen at top of screen. They are mixed up.
Read the instructions. Arrange the 6 sentences in a meaningful order.
Click one word on another word until a coherent sentence is made.
If correct, the sentence turns red.
The interdimensional glasses are under the esoteric swastikas.
The microwave reflector is among the four amphoras.
The strongbox near the red ghost contains the remote control.
The strongbox' keys are close to the museum's maps.
Find everything, then come back here to get my gift.
Lay the mat on the green carpet here behind me.
Bravo!
See the green carpet behind the stage.
Find the items:
Main room search:
First alcove: Go down the steps and go right to the first alcove. Look around.
Take the map under the rock and cord at center bench.
Second alcove: Look around.
Alcove by the stairs: See glassware and potteries from the dig.
Take the microwave reflector amidst the amphorae on bottom shelf.
Showroom search: Climb the stairs to be at the front room upstairs. Look around.
Go to the poster rooms back of the office. Check the posters on the left.
See maps. Take the strongbox' keys between the 2 maps.
Large room: Go back downstairs - underground. Turn right at foot of stairs.
Climb up to be at large room. Go forward towards the stairs going down. Turn around at top of the stairs.
See the strongbox on the wall with red spatters.
Use the keys taken from upstairs poster room on the strongbox. Take the remote control.
Tile room: Turn around and go down the stairs.
Go to the tile room pass the bar. Go forward and then turn around. Go left to the tiles on the wall ahead.
Take the interdimensional glasses from the wheelbarrow that is under the blue and black tiles with swastika design.
Gennaro contacts you through the glasses. He can now see what you're doing.
Fix the Space-Time Rip:
Stage: Turn around and go forward (left of the tiles on wall) pass the tiles displayed on the walls. Exit to the main room.
Green carpet: Go to the stage at right end of the room. Climb the steps and see the green carpet at back of stage.
The multiple laser projector appears left of the green carpet. This is Sybil's gift.
Light crystals: Place the mat on the green carpet.
Going clockwise, place the light crystals in their appropriate place on the mat.
Multiple laser projector: Use the half burned paper on the laser projector. The projector scans the burnt paper.
Try to use the remote control on the projector. Hear a voice calling you.
Lady Killer: Turn around and see the Lady Killer you met earlier.
Go down and talk to her. She points a bazooka on you. Get down, Nick!
The microwave reflector saved your life. The bazooka melts. The Lady Killer leaves to get another bazooka.
Butterfly: Turn back to the projector.
Use the remote control on the projector. Press red arrow - fire button. Laser rays hit the crystals.
The butterfly flies in and lands on the ruby at center of the Light Crystals.
Look at the butterfly. The Rip is mended.

Home at last:
Nick is back in his home.
Use the TV remote control on TV. See the cast of characters.
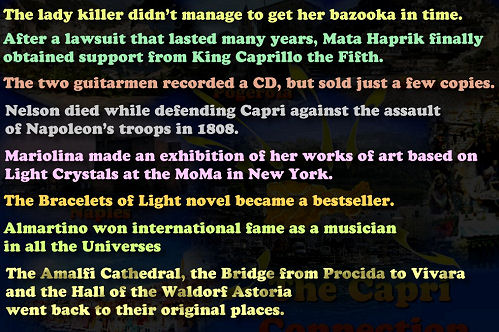
Read what happened to the other characters.
Right click to go to main menu and then exit.
THE END
This document may not be distributed without express written permission of the author and the content may not be altered in any way.
For Questions or Comments on this Walkthrough,
Please write to: MaGtRoCopyright © 07/2014 MaGtRo