Walkthrough by Witchen =O)
June 2000
all photos property of Kutoka Interactive Inc., 1996
Walkthrough by Witchen =O)
June 2000
all photos property of Kutoka Interactive Inc., 1996
Introduction
Welcome to the Cassandra Mansion!
Once you click the Entrance arrow on the options menu, you are in the Mansion's lobby. You are immediately greeted by a male family member who explains some of the details involving the mysterious disappearance of famous art collector, William Cassandra, and his beautiful daughter, Maya.
When the introduction cutscene is complete, and your host invites you to meet him in the dining room, go forward, then right and through the door on the right side of the staircase. Tun right, go forward twice, turn left, go forward and you are in the dining room. Once you've arrived, your host provides brief additional information about the Cassandra family. He then leaves you to explore the Mansion at your leisure. You can opt to do this. But, if you want to get right to the game, take your host's advice and head out for Maya's upstairs studio.
Turn R, F, F, R, F, F, L, F, R, F, R, F, up the stairs. At the top of the stairs, turn left. Go forward twice to find that the door directly in front of you is locked. Turn right and go forward to the door on the left. Enter Maya's studio.
In the studio, carefully examine objects, pictures, and furnishings for possible puzzle clues, before focusing on the pedestals with the four urns. When you come across a hot spot, the white cursor will shrink to indicate that you can interact with an object. Particularly notice the sheet music on the white piano and the geometric prints on the wall to the right of the door where you entered the studio. Now take a look at the urns.
THE URNS - From left to right, the four urns displayed for Part 1. of the game are:
1. Art Deco (bronze) 
2. Modern (tall blue) 
3. Victorian (painted) 
4. Medieval (studded)
For Part 2. of the game, you will later see additional urns:
5. Oriental World (small painted jar)
6. Nostalgia World (two pink columns) 
7. Ancient World (large black)
You may select any urn and carry it with you to its proper display location somewhere in the galleries below, where the surrounding art collection is appropriate to that particular urn. In each of the seven galleries the actual display location for the urn is highlighted when your cursor passes over it. When you place the urn in the proper position, you will be transported to that World and may begin solving the puzzles.
The walkthrough follows a logical progression and selects the urns from left to right, beginning with the bronze colored urn for the Art Deco World.
Note: As outlined on page 7 of the game manual, you may access the map of the Cassandra Galleries at any time by clicking on the Mansion Floor Plan arrow in the menu:
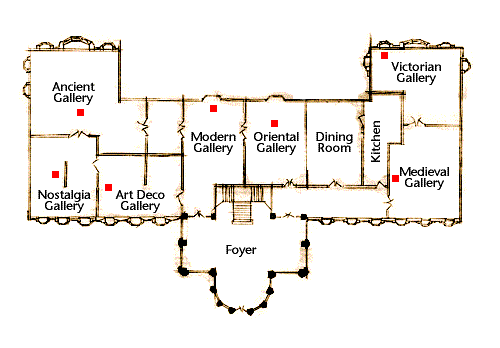
CLICK ON THE ICONS TO BE TRANSPORTED TO THE DIFFERENT WORLDS
|
|
|
|
|
|
|
|
|
|
CHAPTER I
Puzzles:
1. The Turing Machine
2. The Stained Glass Window
3. The Elemental Puzzle
4. The Famous Artists Puzzle
5. The Zodiac Puzzle
6. The Radio Puzzle
7. The Olympics Puzzle
Take the left most Art Deco urn from its pedestal. It will
reappear on the lower right of your screen. Turn left and exit the
studio. Go down the stairs to the lobby and turn right. Go
F, R, F . Immediately turn left and go through the door in front
of you. You are in the Art Deco gallery. Go forward three times.
Turn right, go forward, turn right to the display stand for the Art Deco
urn. Click on the stand to place the urn on the stand. You
will see a cutscene of the Art Deco World. After the cutscene, turn
right and straight ahead to the Turing Machine Puzzle on the opposite (red)
wall. Click on the dancing arrows to activate the puzzle.
1. THE TURING MACHINE PUZZLE
Clue for Turing Machine Puzzle: Look at "Code Breaking", a book stored in William Cassandra's study on the Mansion's second floor.
(Note: Any time during the game, if you wish to return to the
Mansion for clues, go back to the urn's stand and click on it.
You will be taken back to your start position in the particular gallery
of the Mansion. Just continue
from there to gather clues in the appropriate location in
the Mansion.
You can access the Mansion Floor Plan at any time by using
the space bar.)
Turn around from the Turing Machine and go back to the mezzanine, where the urn is located. Click on it to reappear in the Art Deco Gallery. Go R, F, L, F, F, F, F, R, F, out into the lobby. Turn left and go forward. Turn left to face the stairs. Go up the stairs, turn right at the top, and go straight through the door into Cassandra's study. Turn right and access the "Code Breaking" book on the right hand side of the bookcase. The book's narrative explains how to solve the hexidecimal code in the Turing Machine.
Return to the Art Deco Gallery to solve the Turing Machine Puzzle. To return, go B, B, B, R, F, F, F, L, F, F, R, F, R, F, L, F, F, F, F, R, F, R. Click on the stand, or the urn, and go back to the Art Deco World. Go R, F, F, and click on the Turing Machine. The hint in Cassandra's book explained that the number 0 is represented by a single 1. And, the number 5 is represented by six adjacent 1s. The machine obviously wants the tally of three plus two, or a total of five.
Turing Machine Puzzle Solution:
00001111110 (one of several possibilities)
Reward for solution: London
After solving the Turing Machine puzzle, go L, F, R to the Stained
Glass Window Puzzle. You must color the windows on either side of
the center pane appropriately. Click on the button under the center
window and carefully note the array of colors displayed and their relative
position to one another.
2. THE STAINED GLASS WINDOW PUZZLE
Clue for Stained Glass Window Puzzle:
No two alike colors may be touching one another.
Solution for The Stained Glass Window Puzzle:
In the hallway of the Mansion, downstairs, there is a painting that has similar colors. There are many, many possibilities. The above clue will easily get you through.
Reward for solution: Helsinki
When the Stained Glass Window puzzle is solved, turn left and go
forward to the Elemental Puzzle on the wall ahead of you.
3. THE ELEMENTAL PUZZLE
Clue for The Elemental Puzzle:
There is a four panel watercolor painting (blue, orange, brown and black) of the four elements on the wall in the Mansion's Oriental Gallery. The painting is on the left if you are facing the Buddha.
Solution for The Elemental Puzzle:
FIRE WIND
EARTH WATER
Reward for solution: Melbourne
Turn left after solving the Elemental Puzzle. Go F, L, F, R,
F down the stairs. Go forward to the machine standing between two
red settees. Press the middle button to activate the Famous Paintings
Puzzle.
4. THE FAMOUS PAINTINGS PUZZLE
Clue for The Famous Paintings Puzzle:
There are no clues available in the Mansion for this puzzle.
When a painting and an artist's name are displayed, use the arrows to position the correct painting above the artist's name. When you think you have the right combination, press the center button. As you correctly match the artist with the painting, the number of possibilities decreases.
Solution for The Famous Paintings Puzzle:
Monet -Blue iris on left side of path
Renoir - Nude
Seurat - Park scene; women with parasols
Gaugin - Native in dark jungle
Lautrec - Woman in black walking on street
Van Gough - Old man with hat
Degas - Ballerinas
Cezanne - Still life
Manet - Reclining woman in white dress
Pizzaro -River/village landscape
Reward for solution: Los Angeles
Back out of the Famous Artists' Puzzle and turn left to the object
that looks like a ship's wheel, the Zodiac Puzzle.
5. THE ZODIAC PUZZLE
Clue for The Zodiac Puzzle:
In the dining room of the Mansion, there are six chairs on each side of the dining table. The Zodiac signs are displayed on the backs of the chairs, in order.
There are four positions that aren't initially movable on the puzzle; at the 10, 11, 5 and 7 o'clock positions. Your start position is at 10 o'clock. But, you can't place the Ram at that position, so start with the Bull in the next position and place all the signs in order where you can. As you progress, the positions that were not open, will open.
Solution for The Zodiac Puzzle starting at the 10 o'clock position and moving clockwise:
Aries - The Ram
Taurus - The Bull
Gemini - The Twins
Cancer - The Crab
Leo - The Lion
Virgo - The Virgin
Libra - The Scales
Scorpio - The Scorpion
Sagittarius - The Archer
Capricornus - The Goat (looks like a unicorn with a tail)
Aquarius - The Water Bearer
Pisces - The Fishes
Reward for solution: Paris
Back out of the Zodiac Puzzle and turn left twice. Go forward
to the Radio Puzzle at the bottom of the staircase.
6. THE RADIO PUZZLE
Clue for The Radio Puzzle:
There is a book on the nightstand in William Cassandra's bedroom entitled "The Complete After Dinner Speaker".
Solution for The Radio Puzzle:
Gandhi: "Nonviolence is the first article of my faith".
Roosevelt: "The only thing we have to fear is fear itself".
Churchill: "What is our policy you ask: to wage war".
Stalin: "To the enemy must not be left a single pound of grain".
Edward VIII: "I now quit altogether public affairs".
Chamberlain: "I believe it is peace for our time".
Reward for Solution: Berlin
Back out of the Radio Puzzle twice. Turn right and approach
the exhibit cabinet under the staircase. Note the dates associated
with each city. This is The Olympics Puzzle.
7. THE OLYMPICS PUZZLE
Clue for The Olympics Puzzle:
In William Cassandra's study, there is a display case with Olympic souvenirs. There's a newspaper clipping, an epee, and a list of gold medal fencing champions. All Olympic memorabilia reflects an appropriate date.
At the puzzle, put the cities in the correct order according to the year the Olympic games were held in that city.
Solution for The Olympics Puzzle:
Melbourne - 1956
Los Angeles - 1932
Berlin - 1936
Helsinki - 1952
London - 1948
Paris - 1928 ( the games were actually held in Paris in 1924)
Reward for Solution: You are rewarded with a dark, crystal
flower and are transported back to Maya's studio. This is the end
of The Art Deco World.
Puzzles:
1. The Geometric Art Puzzle #1
2. The Geometric Art Puzzle #2
3. The Alpha Collage Puzzle
4. The City Geography Puzzle
5. The Flag and Coin Puzzle
6. The Match the Squares Puzzle
7. The What Sound Puzzle
8. The Smiley Puzzle
Pick up the blue Modern World urn from the second pedestal. Turn left and exit the studio. You will be greeted by a business associate of Cassandra's. He will fill you in a bit more on the story. When he's finished talking to you, go down the stairs. Go R, R, F into the Modern Gallery. Go forward to the blue stand at the end of the room, in front of the windows. Place the blue urn on the stand.
When you've been transported to the Modern World, turn right and
go forward toward the grid pattern on the terrace wall. Click on
it to unlock the Geometric Art Puzzle #1.
1. THE GEOMETRIC ART PUZZLE #1
Clue for The Geometric Art Puzzle #1:
The solution for both Geometric Art Puzzles can be found in the Ancient (Egyptian) Gallery, in a lighted display case.
Use the two upper buttons to place the tiles back on the side panels. Use the two lower buttons to rotate the tiles.
Solution for The Geometric Art Puzzle #1:
1. Place the T shaped tile in the upper right corner.
2. Turn the tiles on the right panel once.
3. Place the now vertical bar under the T along the
right edge.
4. Turn the tiles on the left panel twice.
5. Take the M shaped tile and place it on the upper
left, next to the T.
6. Turn the tile on the right panel once.
7. Place it along the bottom of the T and the M.
8. Turn the 2 tiles left on the left panel three times.
9. Place the tile at the bottom, along the bottom of
the grid.
10. Turn the remaining L shaped tile three times and place it in
the grid.
Reward for solution: A smiley >:
Turn around and walk to the other side of the terrace and click on
Geometric Art Puzzle #2.
2. THE GEOMETRIC ART PUZZLE #2
Clue for The Geometric Art Puzzle # 2:
The solution for both Geometric Art Puzzles can be found in the Ancient (Egyptian) Gallery in a lighted display case.
Solution for The Geometric Art Puzzle #2:
1. Turn the tiles on the right panel once.
2. Place the square C shaped tile in the upper right corner of the
grid.
3. Place the + shaped tile, from the left panel, into the notch
under the C tile.
4. Take the lower tile from the right panel and place it top left
on the grid.
5. Turn the left panel tiles three times.
6. Place the L shaped tile on the lower right of the grid.
7. Place the last tile from the right panel on the left side of
the grid.
8. Place the last tile from the left panel appropriately.
Reward for solution: A smiley >:->
Back out of the puzzle and go right into the Modern World.
Go forward and turn right to the Alpha Collage Puzzle.
3. THE ALPHA COLLAGE PUZZLE
Clue for The Alpha Collage Puzzle:
There are no clues available for this puzzle.
On the left control panel, the left and right buttons control forward and reverse scrolling through the 26 letters of the alphabet. The upper and lower buttons control forward and reverse scrolling through a series of words, numbers and letters to be matched with the beginning letter. Example: e - mail As you get the correct answers, the number of word possibilities decreases. So, it gets easier as you go.
Solution for The Alpha Collage Puzzle:
1. a - frame
2. b - side
3. c - saw
4. d - day
5. e - mail
6. f - 111
7. g - string
8. h - bomb
9. i - ou
10. j - walk
11. k - rations
12. L - shaped
13. m - c2
14. n - yc
15. o - d
16. p -brain
17. q - tip
18. r - rated
19. s - curve
20. t - square
21. u - turn
22. v - chip
23. w - w2
24. x - ray
25. y - mca
26. z - zzzz
Reward for solution: A smiley :-D
Back out of the Alpha Collage puzzle and go left to the wall and
the City Geography Puzzle.
4. THE CITY GEOGRAPHY PUZZLE
Clue for The City Geography Puzzle:
Upstairs, in one of the Mansion's bedrooms, on the back wall of the mezzanine, there is a city poster. The border photos, down each side, have the correct images and matching city names.
Match the map names on the grid panel with the picture above. Move the map using the blue arrows. Change the picture using the left button. Submit your answer using the right button.
Solution for The City Geography Puzzle:
| Map | City | Description |
| Palazzo | Di Montecitario Rome | circular plaza |
| Plaka | Athens | black circled mountain in bckgrnd. |
| Fifth Avenue | New York | sail boats American flag |
| Botafogo | Rio | mountain top view of city and bay |
| Fontaine des Innocents | Paris | aerial view, park and architecture |
| Whitehall | London | large fountain |
Reward for Solution: A smiley :->
Back out of the puzzle. Turn right and go F, F, F, F across
to the opposite corridor. turn left to see the blue Flag and Coin
Puzzle.
5. THE FLAG AND COIN PUZZLE
Clue for The Flag and Coin Puzzle:
One of the Mansion's upstairs bedrooms has a wall mounted display of flags and coins with the correct country's name. At the puzzle, you need only click on the flags to scroll through to the correct image.
Solution for The Flag and Coin Puzzle:
| 1. Guinea
red, yellow, green vertical stripes |
2. Hungary
red, white, green horizontal stripes |
3. Western Samoa
red with blue corner displaying stars |
| 4.South Africa
peach, white, blue horizontal stripes, small flags in center |
5. Zaire
green, yellow center, circle and torch |
6. Brazil
green with yellow center diamond and blue globe |
Reward for solution: A smiley <:-|
Back out of the Flag and Coin puzzle and turn right. Go forward
and turn right again to the Match the Squares Puzzle.
6. THE MATCH THE SQUARES PUZZLE
Clue for Match The Squares Puzzle:
Go to the upper floor of the Mansion and look at the geometric panels in Maya's studio and Cassandra's bedroom.
Solution for The Match the Squares Puzzle:
Random puzzle. No set solution. Remember its the pattern, not the size:
pinwheels with pinwheels
Xs with Xs
stars with stars
blocks with blocks
Reward for solution: A smiley 8-)
From the Match the Squares puzzle, back up, turn left, go forward
and turn right. Go forward twice into the central gallery.
Turn R, F, R to see the black and blue stylized H design on the wall.
Go forward to the What Sound Puzzle.
7. THE WHAT SOUND PUZZLE
Clue for The What Sound Puzzle:
You need to match six descriptions with the sounds you hear. The big button at the bottom repeats the sound. Click the box next to the description when you think you have the right answer.
Solution for The What Sound Puzzle:
Random puzzle. No set solution. There are over 20 possible answers.
Mine were:
bacon frying
cassette rewinding
tennis exchange
plastic bag opening
laundromat dryer (listen for bell)
balloons rubbing together
Reward for solution: A smiley :'-(
Back away from the What Sound puzzle and go to the Smiley Puzzle,
the black standing sculpture, in the center of the gallery.
8. THE SMILEY PUZZLE
Clue for The Smiley Puzzle:
Click on the descriptions to change them. Click on the smiley above, to match the emotion stated in the description. The smileys shown are from your solution rewards.
Solution for The Smiley Puzzle:
<:-| user is a dunce
:-> user made a sarcastic remark
:-D user is laughing
>:-> user made a devilish remark
:'-( user is crying
8-) user is wearing sunglasses
Reward for solution: A second black crystal flower. Watch
the cutscene in the studio with another of Cassandra's suspicious associates.
Puzzles:
1. The Rebus Puzzle
2. The Islands of the World Puzzle
3. The Great Inventions Puzzle
4. The Literary Classics Puzzle
5. The Classical Music Puzzle
6. The Punch and Judy Puzzle
7. The Periodic Table Puzzle
Turn and walk to the pedestals and select the Victorian urn in the third position. Leave the studio and descend the stairs. At the bottom of the stairs, go L, F, L, F, F in the hallway. Turn right. Go straight through the light-colored double doors at the end of the hallway. This is the Medieval Gallery. From your position just inside the door, go L, F, F, R, F, L, F, F, F, L, F, F, F, R to see the highlighted stand for the Victorian urn. Go forward and place the urn on the stand.
When you've been transported to the Victorian World, turn left and
go forward into the arched alcove, where you see a painting of a bow hunter.
Turn right and go forward to the green Rebus Puzzle.
1. THE REBUS PUZZLE
Clue for The Rebus Puzzle:
Look at the hyphenated words in the sheet music on the piano in Maya's studio.
To create a correct end word, change the first two word/syllable pictures, by clicking on the buttons below. Example: pea + nut=peanut. When you think you have the correct three picture combination, pull the handle on the right. If you can't change one of the first two pictures to get the correct answer, pull the handle again.
Solution for The Rebus Puzzle:
Pine + Apple = Pineapple
Pipe + Heart = Pipe Organ
Pin + Wheel = Pinwheel
Light + House = Lighthouse
Wheel + Barrel = Wheelbarrow
Pen + Knee = Penny
Reward for solution: Phosphorus (with its chemical formula)
Turn right and leave the alcove. Turn L, F, L to view the library.
Go F, L, F to view the Islands of the World Puzzle.
2. THE ISLANDS OF THE WORLD PUZZLE
Clue for The Islands of the World Puzzle:
In one of the Mansion's upstairs bedrooms is a wall mounted travel poster entitled "Islands of the World." Check out the border around the center ship photo.
Use the left and right lower handles to scroll the map from side to side. Click on the map where you think the island (name displayed) is located. Click on the ship picture on the map, to change the island name.
Solution to The Islands of the World Puzzle:
New Zealand - Low and right, off Australia and Tasmania
Newfoundland - Off eastern Canada coast about parallel with Lake
Superior. Look for a big indent in the map.
Tahiti - Far out to the east off northern Australia's east coast.
Falkland Islands - Just east of the southern tip of South America.
Sri Lanka - South east of the southern tip of India.
Iceland - Top. Just east of the middle of Greenland.
Canary Islands - off the northwest coast of Africa, below Spain.
Galapagos Island - Off the northwest coast of South America, opposite
Ecuador.
Madagascar - On third of the way up the east coast of Africa.
Bermuda - off the east coast of the USA, opposite the Carolinas.
Reward for Solution: Beryllium
Back out of the puzzle. Turn right and go forward to the book
shelves. Go L, F, L, F to find the Great Inventions Puzzle.
3. THE GREAT INVENTIONS PUZZLE
Clue for The Great Inventions Puzzle:
There are no clues available for this puzzle.
Any six correct answers to random questions will solve this puzzle.
Solution for The Great Inventions Puzzle:
watch 1458
cannon 1346
refrigerator 1913
polaroid camera 1947
telescope 1609
insulin 1921
thermometer 1599
locomotive 1804
dynamite 1867
computer 1937
telephone 1876
television 1926
aspirin 1853
Reward for Solution: Fluorine
Back out of the puzzle. Go L, L, F, R, F, F, F, R, F to the
roll top desk under the staircase. Click on the desk to reveal the
Literary Classics Puzzle.
4. THE LITERARY CLASSICS PUZZLE
Clue for The Literary Classics Puzzle:
In one of the Mansion's upstairs bedrooms there is a newspaper laying on a vanity chair. Click on the it to reveal the "Top Five Of All Time" pictures and corresponding descriptions of book titles.
Any six correct answers to this random puzzle will solve it.
Solution for The Literary Classics Puzzle:
Jane Eyre - Woman standing on a windy hillside (hard to see).
Walden - Cabin in the forest.
The Last of the Mohicans - Indian fighting bear and couple watching.
The Raven and Other Poems - Man seated in chair; ghostly figure
to the left of him.
The Call of the Wild - Man and dog in the snow.
Tom Sawyer - Two boys seated.
The Hound of the Baskervilles - Men in carriage; running horses.
A Tale of Two Cities - Couple and child clinging; soldiers standing
next to them.
A Christmas Carol - Small old man in white nightgown on the right
side.
Alice In Wonderland - Rabbit
Reward for Solution: Sulfur
Back out of the puzzle. Go R, R, F, F, L, F, F, F, L, F, to
the piano. This is the Classical Music Puzzle.
5. THE CLASSICAL MUSIC PUZZLE
Clue for The Classical Music Puzzle:
Go to Cassandra's study. Find his stereo system and click on
the play button to hear a discussion and discover the composer's names.
Six classics must be heard and correctly matched with their composers.
There are many selections to choose from, but they must be identified as
played on the stereo.
Solution to The Classical Music Puzzle:
1. 9th Symphony - Beethoven (piano)
2. Carmen - Bizet (violin)
3. Barber of Seville - Rossini (violin)
4. March - Mozart (piano)
5. Death March - Chopin (piano)
6. Scherherazade - Ravel (flute)
Reward for Solution: Carbon
Back out of the puzzle. Go L, F, F, L to the Punch and Judy
Puzzle.
6. THE PUNCH AND JUDY PUZZLE
Clue for The Punch and Judy Puzzle:
There are no clues available for this puzzle.
Keep trying to respond to random questions until you guess six correctly.
Solution to The Punch and Judy Puzzle:
1. What did the American painter Audabon mainly paint? BIRDS
2. What is the radio code word for the letter B? BRAVO
3. Where was spaghetti invented? CHINA
4. I bet you don't know what rabbit means? GROOVE
5. What basic element is inherent in the earth's crust? OXYGEN
6. What planet is second furthest from us? NEPTUNE
7. What is the weight of a thirty pound ball at the center of the
earth? ZERO
8. On what culture do historians believe that America's founding
fathers based the Constitution? IRIQUOIS
9. What kind of person can be referred to with the same attributes
as a canary, a lemon, or a New York cab? COWARD
10. What came first, the chicken or the egg? EGG
11. Which is the shallowest of the Great Lakes? ERIE
12. Who wrote The Scarlet Pimpernel? BARONESS ORCZY
13. Tell me what a mole ain't? A LARGE TOOTH
14. How fast does the earth go round the sun? 20 MILES PER SEC.
15. Which of the following was discovered after Christ was born?
OXYGEN
16. What is the Roman Numeral for 500? D
17. Who said, "The end justifies the means?" MACHIEVELLI
18. People may refer to it as austere, brackish, flaggy or tinny...?
BEER
19. How many compartments does a cow's stomach have? FOUR
20. What links a false idol, the entrance of the Bosphorus and a
much desired animal skin? GOLD
Reward for Solution: Hydrogen
Back out of the puzzle. Go L, R, F, R, F, F, F, R, F, R, and
up the stairs. At the top, to R, F, R to the Periodic Table Puzzle.
7. THE PERIODIC TABLE PUZZLE
Clue for The Periodic Table Puzzle:
The Periodic Table is displayed on the wall in Cassandra's study.
You have only six tiles, which will appear across the bottom of
the table. There are twelve empty spaces. Place the tiles you
gathered from the puzzles (fluorine, beryllium, phosphorus, hydrogen, sulfur
and carbon) in their proper positions on the numeric grid above.
Solution for The Periodic Table Puzzle:
Click and drag:
Hydrogen to square 1
Beryllium to square 4
Carbon to square 6
Fluorine to square 9
Phosphorus to square 15
Carbon to square 16
Back out of the puzzle to receive another black crystal flower, as
a reward for completing The Victorian World. After being transported
back to the studio, a woman associate of Cassandra's will tell you more
of the story.
Puzzles:
1. The Sword in the Stone Puzzle
2. The Music Box Puzzle
3. The Blue Star Puzzle
4. The Chess Queen Puzzle
5. The Numbers Puzzle
6. The Fountain Puzzle
7. The Alchemy Puzzle
Go down the stairs and go L, F, L, F into the hallway. Go all
the way to the end of the hallway and through the double doors. Go
L, F, L and place the Medieval urn on its stand. When you arrive
in the Medieval World, turn left twice and go forward to the Sword in the
Stone Puzzle.
1. THE SWORD IN THE STONE PUZZLE
Clue for The Sword in the Stone Puzzle:
There are no clues available for this puzzle.
Answer the questions either true or false (white or black).
You need six correct answers. Then, you must lift the sword from the stone.
Solution to The Sword in the Stone Puzzle:
1. Sir Lancelot never repented of his love for Guinevere.
F
2. Tristran killed La Belle Isolde's father in battle.
T
3. Mordred deceived Queen Guinevere into marriage.
F
4. Queen Guinevere never remarried on Arthur's death.
T
5. According to their fellowship, the Knight's of the
Round Table could not do battle for riches. T
6. The white shield was destined to be worn by Sir Lancelot.
F
7. Tristan and Isolde drank a secret potion to seal
their love. F
8. The spiteful Mordred was the son of King Arthur.
F
9. Sir Gallahad belonged to the line of Joseph of Aramethea
who came to possess the Holy Grail. T
10. Arthur was still a boy when crowned King of England. T
11. The Round Table was a gift to King Arthur on his marriage. T
12. Sir Gawain was the most renowned knight at Arthur's court.
F
13. Sir Gallahad was killed by Sir Percival in a quarrel over possession
of the Holy Grail. F
14. No one but one could sit at the Seat Perilous with being destroyed.
T
15. King Arthur eagerly laid waster to Lancelot's lands when he
was banished from the Round Table. F
16. Avalon was the setting for the Arthurian court.
F
17. The Lady in the Lake gave Arthur his sword, Excalibur.
T
18. The cross on the white shield was drawn by Joseph of Aramethea
in his own blood. T
19. Arthur was entrusted to Merlin on his father's death.
T
20. Sir Lancelot searched many years for the Holy Grail. F
21. Arthur was married to Guinevere at Camelot. T
22. On King Arthur's death, his sword, Excalibur, was returned to
the Lady of the Lake. T
23. The Knight's of the Round Table went their separate ways in
search of the Holy Grail. T
24. Sir Gawain pulled the sword form the stone floating above the
water. F
25. Lancelot willingly accepted his banishment from the court of
King Arthur. T
26. Merlin helped arrange King Arthur's marriage to Quinevere.
T
27. King Arthur was overjoyed by Sir Gawain's vow to search for
the Holy Grail. F
28. Lancelot chose Morgan LaFey, King Arthur's sister, as his bride.
F
Reward for Solution: Mercury
Back out of the puzzle and go L, F, R to the Music Box Puzzle.
2. THE MUSIC BOX PUZZLE
Clue for The Music Box Puzzle:
Go look at the music box on the nightstand in Maya's bedroom for
an explanation of the four different instrument groups: 1. blown
2. bowed 3. plucked 4. percussive. Listen carefully to
the first instrument that plays. Identify it by selecting which of
the four types it is. Then move on to the second instrument as it begins
to play. Click the left disc on the music box to submit your answer.
For example:
I - PLUCKED
II - BLOWN
Solution for The Music Box Puzzle:
Random puzzle. And, it is not possible to convey the actual sounds of the musical instruments played, to the walkthrough.
Reward for solution: Iron
Back out of the puzzle and go R, F, R, F, L, F to the Blue Star Puzzle.
3. THE BLUE STAR PUZZLE
Clue for The Blue Star Puzzle:
In the Modern Gallery, there is a picture with a blue 12 pointed
star.
Count the four sets of spikes on the star as the star rotates and
they appear. Change the numbers at the bottom, from left to right,
to indicate the number of spikes you counted in each rotation.
Solution for The Blue Star Puzzle:
Random puzzle. And, it is not possible to convey the multiple visual displays possible, to the walkthrough.
Reward for Solution: Silver
Back out of the puzzle. Turn around and go straight across
to the Chess Queen Puzzle.
4. THE CHESS QUEEN PUZZLE
Clue for The Chess Queen Puzzle:
In the Nostalgia Gallery, there's a picture demonstrating the correct
moves the Queen must make:
6 5
2
start > X
1 4
3
Solution for The Chess Queen Puzzle:
There are several possible solutions for the puzzle, depending on where the Queen is positioned at the start of each sequence. Try to cover (depress center button) the whole chess board in six moves. That's the key. In the above example: If the Queen is positioned at the middle left position, move her down to position 1, up to 2, down to 3, left to four, up to five, and left to six! In fact, if you want to make it as easy as possible, you can keep restarting the sequence until she appears in the position shown in the example.
Reward for Solution: Gold
Back out of the puzzle and go L, F, R, to the Find the Numbers Puzzle.
5. THE FIND THE NUMBERS PUZZLE
Clue for the Find the Numbers Puzzle:
This one is much easier than it appears. There's a radio in the kitchen. Listen to the newscast for three key numbers; 63, 15, and 26.
Solution for The Find the Numbers Puzzle:
Look at the small circular display of numbers at the top of the puzzle. The numbers are generated randomly. BUT, as you see each one of the three numbers appear, click on it. When you have successfully clicked on 63, 15, and 26 you've solved the puzzle.
Reward for Solution: Electrum
Back out of the puzzle. Go R, R, F, L, F, R, F, R and down the stairs
to the Fountain Puzzle.
6. THE FOUNTAIN PUZZLE
Clue for The Fountain Puzzle:
Look at the inscribed word, under the lion bathtub tap, in William Cassandra's bathroom.
Solution for The Fountain Puzzle:
LEFT SIDE OF FOUNTAIN:
From left to right:
Row 1: Section 1 and 2 face to the side. Section 3 faces front.
Row 2: Section 1 faces front. Section 2 to the side.
Row 3: Section 1 and 2 to the side. Section 3 faces front.
Row 4. Section 1 faces front. Section 3 to the side.
RIGHT SIDE OF FOUNTAIN:
Make the water flow from the left side lion's mouth down the spouts
until the wheel at the bottom turns, and water pours from the lion's mouth
on the right panel.
Then, highlight the correct word from the letters on the right panel
to match the inscription in Cassandra's bathroom (AQUEDUCT). Pull
the handle.
Reward for solution: Copper
Back out of the puzzle. Turn right and go forward twice to
the Alchemy Puzzle.
7. THE ALCHEMY PUZZLE
Clue for The Alchemy Puzzle:
No clues are available for this puzzle.
Match the element with the proper planet on the wheel. Turn
the wheel by clicking on the center. Put the correct element, from
the rear shelf, on the planet name appearing at the front of the
wheel.
Solution for The Alchemy Puzzle:
1. Gold - Sun
2. Copper - Venus
3. Electrum - Jupiter
4. Iron - Mars
5. Mercury - Mercury
6. Moon - Silver
As a reward for solving all the puzzles in the Medieval World, you receive another black, crystal flower. And, after a cut scene with two of William's male associates, you are transferred back to Maya's studio.
CHAPTER II
Puzzles:
1. The Gong Puzzle
2. The Asian Map Puzzle
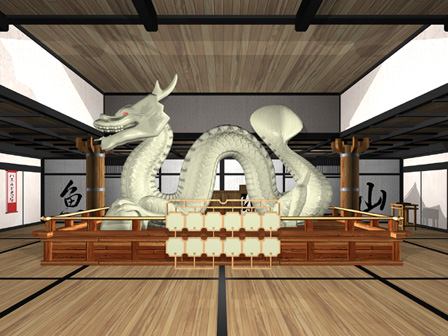
3. The Dragon Gate Puzzle
4. The Abacus Puzzle
5. The Magic Coin Puzzle
6. The White Pagoda Puzzle
7. The Chinese Year Puzzle
Go to the urn pedestals and select the left most Oriental urn.
Leave the studio. Go down the stairs and go L, L, F, F to the Oriental
gallery. Go F, F, L, F, R and place the urn on the stand. Once
you have arrived in the Oriental World, turn left, go forward and
click on the Gong Puzzle.
1. THE GONG PUZZLE
Clue for The Gong Puzzle:
On the nightstand in William Cassandra's bedroom, there's a book entitled "Martial Arts". The correct titles for each martial art are shown.
When the picture appears in the center of the gong, click on the ? at the bottom until you think you have the correct picture depicting that martial art. Then click on the small black button on the gong support to the right. This is a randomly generated puzzle.
Solution for The Gong Puzzle:
No set solution. You must get six correct answers. Below is a list which includes each art and a description of the matching picture:
1. AIKIDO - Man standing over another man who is on all
fours. Standing man is bending the other man's right arm.
2. IAIDO - Sword fight with no face masks.
3. JUDO - One man throwing second man to floor.
4. KARATE - One man, black belt, familiar forward knee
thrust position.
5. KEMPO - Boxing with gloves and face masks.
6. KENDO - Bamboo sword fight with face masks.
7. KOBUDO - One man holding a small stick-like weapon
to one side at shoulder height.
8. KUNG FU - One man, knees bent. Right arm up
at elbow.
9. KYUDO - One man with bow and arrow.
10. TAEKWONDO - Man on right has his right foot in high kick position.
Both men wear black belts.
Reward for solution: Monkey
Back out of the Gong Puzzle. Go R, F, F, F, F, L to the Asian
Map Puzzle.
2. THE ASIAN MAP PUZZLE
Clue for The Asian Map Puzzle:
There are no clues for this puzzle. Listen to the description and identify the country.
Solution for The Asian Map Puzzle:
Country Listen for......
BURMA Britain separated from India. WWII partial rule. Capital Rangoon
CHINA Paper
JAPAN Shinto
KAMPUCHEA Ankor Wat
KOREA Printing before Gutenberg
LAOS Currency is "kip"
MALAYSIA Koala Lumpur is the capital.
THAILAND Buddha...spectacular costumes.
VIET NAM Puppets. Hanoi is capital.
Reward for Solution: Dragon
Back out of the puzzle. Go L, F, L, F, F, L, F to the Dragon
Gate Puzzle.
3. THE DRAGON GATE PUZZLE
Clue for The Dragon Gate Puzzle:
Check out the dresser in Maya's bedroom for the solution. You
can move 4 places with each turn. As long as you move to the correct
squares during each of five sequenced turns, the Dragon will complete the
sequence and position you for the next move.
________________________
Just follow the numbers in order. The dragon will move to positions 5, 10, 15, and 20 automatically.
EXIT
24 21 20 17 16
23 22 19 18 15
10 11 12 13 14
9 6 5 2 1
8 7 4 3 0 START
Reward for Solution: Goat
Back up twice from the puzzle and turn right to the Abacus Puzzle.
4. THE ABACUS PUZZLE
Clue for The Abacus Puzzle:
In William's study, there's a book in the book case entitled "Oriental Mathematics." There you will find the rules for correctly operating the Abacus.
Solution for The Abacus Puzzle:
When the puzzle comes up with the number 1427 , just ignore the far left highlighted column on the Abacus. You only need four rows to input a correct solution in the thousands. So, in the next row (1000) and moving to the right, push one of the lower buttons up to the cross bar. In the next row (100) push four buttons up to the cross bar. In the next row (10) push two buttons up to the cross bar. In the last far right row, push one button down to the crossbar (from the top section); and push two buttons up to the crossbar. That's it.
Reward for Solution: Pig
Back out of the puzzle. Turn around and go forward once.
Turn left and click on the Magic Coin Puzzle.
5. THE MAGIC COIN PUZZLE
Clue for The Magic Coin Puzzle:
The object is to create a circle. There's a bulletin board in the kitchen of the Mansion. On the board is a diagram with the puzzle solution.
Solution for The Magic Coin Puzzle:
You start with a triangle shape like this:
1
2 3
4
5 6
Move 1 to the left of 2.
Move 2 above and right of 1.
Move 6 up between 2 and 3. Voila.....you have
a circle.
Reward for Solution: Rat
Go back to the stand in front of the Oriental Urn. Turn around
and click on the White Pagoda Puzzle.
6. THE WHITE PAGODA PUZZLE
Clue for The White Pagoda Puzzle:
No clues are available for this puzzle. Push the appropriate button to indicate your choice of a BC or AD response to the questions asked. If you get one wrong, you have to start over. This is a random timed puzzle with numerous possibilities. Here are numerous correct responses to help you solve the puzzle:
1. The Arabs destroy Carthage AD
2. Venus de Milo is created BC
3. Rome destroys Carthage BC
4. Rome was founded BC
5. Rome celebrates 1000th anniversary AD
6. Cleopatra commits suicide BC
7. Judas Macadeus ridicules the Temple of Jerusalem
BC
8. Iron is first used in China BC
9. The Arabs conquer Lisbon AD
10. Florence is founded BC
11. Book of Daniel is written BC
12. The origin of Chess AD
13. Burning water, petroleum, in Japan AD
14. The Great Wall of China is built BC
15. Cairo is founded AD
16. The first church bells introduced to Rome AD
17. Hannibal commits suicide in exile BC
18. Tapestry weaving is estab. in Peru AD
19. Marco Polo visits the Orient AD
20. London is founded AD
21 Gaul is conquered by Julius Caesar BC
Reward for Solution: Cat
Back out of the Pagoda puzzle and go R, F, R, F, R, F, L to the Chinese
Year Puzzle.
7. THE CHINESE YEAR PUZZLE
Clue for The Chinese Year Puzzle:
There are four chairs in the Mansion's dining room along one wall. There are three symbols on each chair.
Solution for The Chinese Year Puzzle:
Top row (left to right):
rat, bull, tiger, cat, dragon, snake
Bottom row:
horse, goat, monkey, rooster, dog, pig
When you have successfully completed the puzzle, you are rewarded
with another black, crystal flower and are transported again to Maya's
studio. You will see another cutscene. Afterward, return to
the urn pedestals and select the gray and pink Nostalgia World urn.
Puzzles:
1. The Television Trivia Puzzle
2. The One Liner Puzzle
3. The Chronology Puzzle
4. The What's That ? Puzzle
5. The Broadway Puzzle
6. The Oscar Puzzle
7. The Van Doren Quiz
Leave Maya's studio and go down the staircase. Turn R, F, R, F, L, F into the Art Deco gallery. Go F, F, F, R, F, F, L, F in the Nostalgia Gallery. Find the stand for the Nostalgia World behind the wall in the center of the room. Place the urn on the stand.
Turn left and go forward to the Television Trivia Puzzle.
1. THE TELEVISION TRIVIA PUZZLE
Clue for The Television Trivia Puzzle:
The correct responses may be found on the computer in William's study. There are five separate trivia games in the Television Trivia Puzzle: Doctors and Lawyers, Talking Heads, Westerns, Cops N Robbers, and SitComs. Make sure you hang in right there until all five have been solved. You must get three correct answers.
Solution for The Television Trivia Puzzle:
Three possible correct answers are provided below:
Doctors and Lawyers
B. Hamilton Burger
A. Marcus Welby, M.D.
B. St Elsewhere
Talking Heads
C. Steve Allen
C. Dick Cavet
C. Oprah Winfrey
Cops N Robbers
C. Telly Savales
D. All of Above
D. Alan Alda
Westerns
A. Rossini
C. James Arness
D. Roy Rogers
SitComs
A. William Frawley and Vivian Vance
B. Sheila McRae and Jane Keane
C. Richard Diamond, P.I.
Reward for Solution: "The Van Doren Quiz"
After the Television Puzzle, go right then F, F to the One
Liner Puzzle.
2. THE ONE LINER PUZZLE
Clue for The One Liner Puzzle:
There are no clues for this puzzle.
Solution for The One Liner Puzzle:
One Liners is a randomly generated puzzle. Following are the correct responses to eighteen of the One Liners you may hear:
1. "Your money or your life". "I'm thinking it over."
Jack Benny
2. "Mom always liked you best." Tom
Smothers
3. " I suspect everyone and I suspect no one."
Peter Sellers
4. "God'll get you for this."
Beatrice Arthur
5. " You should never assume. Because, when you assume,
you make an ass out of you and me." Tony Randall
6. "You have a sister See...., Sue....., So...... "
Zero Mostell
7. " My name Jose Jimenez." Bill Dana
8. "Do you know that Richard Nixon was the only President
who's portrait was done by a police sketch artist?"
Johnny Carson
9. "Its not the men in my life that count, its the life in
my men." Mae West
10. "As we say in the sewers, 'time and tide wait for no man'. "
Art Carney
11. " I don't get any respect." Rodney
Dangerfield
13. "Isn't that boiling water you're putting in the frige?
Gracie Allen
14. "Take my wife, please." Henny Youngman
15. "Tonight's forecast, dark." George Carlin
16. "Don't call me Shirley." Leslie Neilsen
17. "I don't believe in the afterlife. But, I'm bringing a
change of underwear." Woody Allen
18. "If love is the answer, what's the question?"
Lily Tomlin
Reward for Solution: "The Van Doren Quiz"
Turn right. Go forward twice. Turn left to the Chronology
Puzzle.
3. THE CHRONOLOGY PUZZLE
Clue for The Chronology Puzzle:
There are no clues for this puzzle.
Solution for The Chronology Puzzle:
| yo-yo | frizbee | skateboard | Rubiks cube | rollerblades |
| coffee | cheese | popsicles | bread | cookies |
| blk triangle phone | white with vertical receiver | green rotary dial | blue slim line | red rotary dial |
| blk suit w/peplum and hat | wide brim hat white blouse gloves | white blouse
long skirt white gloves |
short, flared dress | short dress with scarf |
Reward for Solution: "The Van Doren Quiz"
Back out of the puzzle. Go R, R, F, F to the What's That ?
Puzzle.
4. THE WHAT'S THAT ? PUZZLE
Clue for The What's That? Puzzle:
There are no clues for this puzzle. Identify what you are looking at in a close up view.
Solution for The What's That? Puzzle:
| Description | Answer |
| red and yellow texture | leather |
| green and yellow circles | mushroom |
| red and yellow spikes | fur |
| white stripes with yellow | toothbrush |
| crumbly beige shapes | cantaloupe skin |
| white with small circle pattern | microphone |
| grey pebbly texture | elephant skin |
| pink and grey object | blender |
| all blue w. white whisps | toothpaste |
| red/pink and white texture | watermelon |
Reward for Solution: "The Van Doren Quiz"
Back out of the puzzle. Go L, L, F, R, F to the Broadway Puzzle.
5. THE BROADWAY PUZZLE
Clue for The Broadway Puzzle:
No clues are available for this puzzle.
Solution for The Broadway Puzzle:
Cabaret - "what good is sitting alone in your room.........."
Funny Girl - "People...people who need.........."
Fiddler on the Roof - "Sunrise, sunset........"
The Fantastiks - "Try to remember the kind of September........"
Man of La Mancha - "To dream the impossible dream......."
Hair - "When the moon is in the seventh house........"
Reward for Solution: "The Van Doren Quiz"
Back out of the puzzle. Go L, L, F, F, R, F, R to the Oscar Puzzle.
6. THE OSCAR PUZZLE
Clue for The Oscar Puzzle:
There's a Movie Guide on the computer in William's study.
Solution for the Oscar Puzzle:
Jack Lemmon Save the Tiger Best Actor 1973
Cher Moonstruck B. Actress 1987
Rod Steiger Heat of Night Best Actor 1967
Jon Voight Coming Home Best Actor 1978
Dustin Hoffman Kramer/Kramer Best Actor 1979
Humphrey Bogart African Queen Best Actor 1951
Reward for Solution: "The Van Doren Quiz"
Back out of the puzzle. Go R, F, L, F, R, F, R to the Van Doren
Quiz.
7. THE VAN DOREN QUIZ
Clue for The Van Doren Quiz:
Look for a tabloid newspaper, The National Scoop, in the Mansion's guest bath. Click on it.
Solution for The Van Doren Quiz:
"THE CONTESTANTS HAD THE ANSWERS BEFORE THE SHOW".
You will receive your sixth black, crystal flower and be transported to the studio for one more adventure.
Go to the pedestals and pick up the black urn for the Ancient World.
As you descend the staircase, you will be greeted by the art dealer again
for more of the Cassandra saga. When he's finished filling you in,
go R, F, R and thru the double doors. Turn left and enter the Art
Deco Gallery. Go to the back of the room. Exit through the
single door to the Nostalgia Gallery. Go R through the double doors
to the Ancient Gallery. The stand for the Ancient World urn is directly
in front of you. Place the urn on the stand to take a trip to the
last stop on your journey, the Ancient World.
Puzzles:
1. The Family Crest Puzzle
2. The Aesop's Fables Puzzle
3. The Roman Magic XV Puzzle
4. The Seven Ancient Wonders Puzzle
5. The Ancient Gods Puzzle
6. The Tomb Door Puzzle
7. The Sarcophagus Puzzle
Go L, F, L and click on the Family Crest Puzzle.
1. THE FAMILY CREST PUZZLE
Clue for The Family Crest Puzzle:
A family crest is mounted over the main entrance in the lobby of the Cassandra Galleries.
Solution for The Family Crest Puzzle:
K, A, stylized E, stylized E, A, N, triangle, P, A
C A S S A N D R A
Reward for solve: Deer glyph
Back out of the puzzle. Go R, R, F, F, L to the Aesop's Fables Puzzle.
2. THE AESOP'S FABLES PUZZLE
Clue for The Aesop's Fables Puzzle:
Look in the Medieval Gallery. There's pedestal against the wall between two paintings. The four story titles are written there.
Solution for The Aesop's Fables Puzzle:
1. The Tale of the Crow and Pitcher
Necessity is the mother
of invention.
2. The Tale of the Frogs and the Bell
Think twice before you act.
3. The Tale of the Gnat and the Bull
We are often more important
to ourselves than to others.
4. The Tale of the Goatherd and the Goat
It's no use trying to
hide what can't be hidden.
5. The Tale of the Horse and the Wolf
There's no virtue in giving
to others what is useless to oneself.
6. The Tale of the Hare and the Hound
He is no friend who plays double.
7. The Tale of the Sheep, the Wolf, and the Stag
Two wrongs do not make a right.
8. The Tale of the Cat and the House of the Birds
A villian may disguise himself
but he cannot deceive the wise.
Reward for solution: Monkey glyph
Back out of the Aesop's puzzle. Turn left and walk forward
around the corridor, past the urn. Turn toward the wall, to your
right, at the next corner. This is the Roman Magic XV Puzzle.
3. THE ROMAN MAGIC XV PUZZLE
Clue for The Roman Magic XV Puzzle:
Check out the "Roman Magic" painting in the Oriental Gallery. It
uses the numbers 1, 2, and 3 in oriental style.
Solution for The Roman Magic XV Puzzle:
Row 1 IV III VIII
Row 2 IX V I
Row 3 II VII VI
Reward for solution: a panel with three glyphs
- the first one looks like a rectangular birthday cake with
candles.
- the second looks like a range of identical mountain tops
- the third looks like a crude canoe
Back out of the puzzle. Go L, L, F, F, R to the Seven Ancient
Wonders Puzzle.
4. THE SEVEN ANCIENT WONDERS PUZZLE
Clue for The Seven Ancient Wonders Puzzle:
In the Victorian Gallery there's a display case with an old book, opened to the correct page.
Turn the tiles to the number where you think each "wonder" is located. Then, pull the ring on the right side.
Solution for The Seven Ancient Wonders Puzzle:
1. Statue of Zeus at Olympia
2. Temple of Artemus at Ephesus
3. Mausoleum of Halicarnassus
4. Colossus of Rhodes
5. Lighthouse at Alexandria
6. Pyramids of Giza
7. Hanging Gardens of Babylon
Reward for Solution: a glyph that looks like a partially inflated balloon, with ears and two string tails.
Back out of the puzzle and go L, F, L, F, R to the Ancient Gods Puzzle.
5. THE ANCIENT GODS PUZZLE
Clue for The Ancient Gods Puzzle:
Go to Maya's bathroom, the rear section, and look at the gold framed, black-matted picture.
There are plenty of gods and goddesses and multiple choice responses
to this puzzle.
If you know your Greek mythology you will win quickly. If not, listen
for the six descriptions identifying items from the picture in Maya's bathroom.
Solution for The Ancient Gods Puzzle:
1. SWAN
SEA/SHIP
2. APHRODITE
POSEIDON
3. PEACOCK
FIRE
4. HERA
HEPHAESTES
5. CROW
CANNON
6. APOLLO
ATHENA
Reward for solution: Duck glyph
Back out of the puzzle and go R, R, F, L, F, L, F, F, R to the Tomb
Door Puzzle.
6. THE TOMB DOOR PUZZLE
Clue for The Tomb Door Puzzle:
Enter, in the correct order, the five glyphs you collected for solving the five prior puzzles.
Solution for The Tomb Door Puzzle:
1. DEER
2. MONKEY
3. BALLOON
4. CAKE, MNTNS., CANOE
5. DUCK
Approach the standing sarcophagus in front of you. Click on
it to see a set of seven different patterns.
7. THE SARCOPHAGUS PUZZLE
Clue for The Sarcophagus Puzzle:
Look at the calendar on the Mansion's kitchen wall. Look HARD! Are those blue patterns really stylized numbers 8 and 9?
Solution for The Sarcophagus Puzzle:
EASY! Just put in the numbers 1, 2, 3, 4, 5, 6, 7 from left to right.
_____________________________________________________________________
YOU WIN! The game is over! After the first cutscene, put the last urn in place and watch another brief movie.
A less than satisfying ending to an interesting and often challenging journey through the Cassandra Galleries.
______________________________________________________________________
This document may only
be distributed with permission from the author Witchen =O)
email
GJan1@aol.com
Usage of the document
on any website must include a link to GameBoomers.The
content of the document may not be altered without the express written
permission of the author.
Any proposed changes
or additions to the walkthrough may be submitted to Witchen =O) at GJan1@aol.com
copyright © 2000 GameBoomers