| ||||||||||||
PASHA PALACE HOTEL | ||||||||||||
| The hotel receptionist is not very obliging and suggests that you ask the waiter about the old citadel. After speaking to the waiter (in the dining room) about Topkapi Palace, you're able to go there when exiting the hotel. | ||||||||||||
TOPKAPI PALACE | ||||||||||||
| The guard at the palace entrance tells you that Eamon O'Mara is the only journalist still expected. In order to impersonate Eamon O'Mara and enter the palace, you need to show him acceptable ID. | ||||||||||||
PASHA PALACE HOTEL | ||||||||||||
| Examine the picture of the receptionist holding a golf trophy (next to the computer) on the reception desk to trigger the 'golf' dialog topic when you speak to her. Discuss Eamon O'Mara with her to find out about a letter (left end of the reception desk) to him from the palace. Ask Anna Maria to take the letter (or use her icon from the inventory on the letter) when you distract the receptionist. Select the 'golf' dialog topic with the receptionist, allowing Anna Maria to sneak up and take the letter. Speak to Anna Maria to get the map and ID card. Separate them in your inventory noting that you also have a paper clip. Go to the dining room and pick up the knife from the second table on your right. Use the knife to remove the photo of George from his Bail Bond ID and attach it to Eamon's ID card. | ||||||||||||
| Before returning to Topkapi Palace examine the map of the palace (either the one on the wall or the one in your inventory) and click the Lover's Vestibule hotspot. This triggers the required dialog topic with the waiter, which you must discuss with him to activate an action later in the game. | ||||||||||||
TOPKAPI PALACE | ||||||||||||
| Show the ID for Topkapi to the guard at the entrance, then enter the palace grounds. First try going along the path to the left, but the guard tells you to proceed to the gate. After this, ask Anna Maria to distract the guard patrolling on the left (or use her icon on him) and you can then go along the path uninterrupted. Note that she won't help unless you discussed the Lover's Vestibule with the waiter back at the hotel. | ||||||||||||
| The only way into the palace is over the broken part of the wall accessed from the left section of the scaffolding. Unfortunately the routine of the two patrolling guards is such that it's in constant view of one of the guards. What if their routine could be changed? Go to the right section of the scaffolding and examine the top of the wall to find a guard's cell phone. When the guard is out of view, take the phone. Examine it in the inventory to get the number, then replace it in the same place. The number will now be entered in the PDA. Use the PDA to call the guard on his phone. When he returns to his patrol after answering, study the guards' routine and note that their timing has changed. Go back to the broken part of the wall and when both guards are facing away from you, climb over the wall. | ||||||||||||
| On the other side of the wall you must get to the open archway, avoiding the guard in the process. | ||||||||||||
| ||||||||||||
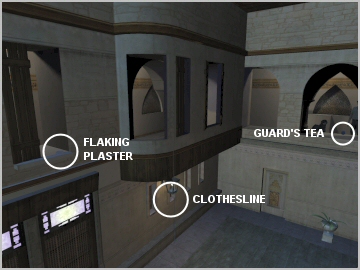
| During the cut scene you see the guard with a dog in the corridor around the corner. Take note that the guard is drinking tea. Did you see a clothesline hanging down outside the window in the alcove? There's also flaking plaster on the window sill where you entered. For a detailed view of the entire area walk into the alcove. | ||||||||||||
| ||||||||||||
| ||||||||||||
| After the guard leaves to fetch more tea go to the courtyard below. You now need to find a way past the dog. Cutting off a slice of salami (with the knife) and attaching it to the clothesline would distract the dog away from the archway. You first need to untie the clothesline, and the easiest way of doing this is to click on it (selecting the 'gears' icon) while still in the courtyard. George automatically goes upstairs to untie it, and the slice of salami can then be attached to it. | ||||||||||||
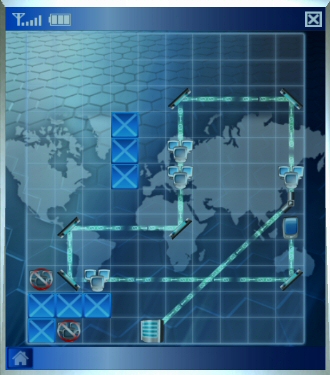
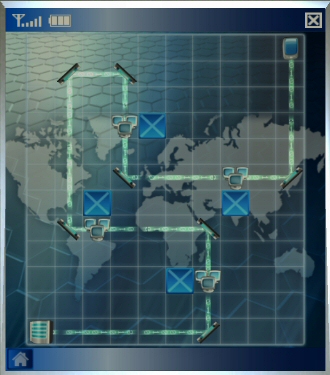
| Go through the archway and along the corridor to the left to the museum entrance. The computer is password protected, so use the PDA to hack into the security system. One possible solution to this network puzzle is illustrated in the diagram below. | ||||||||||||
| ||||||||||||
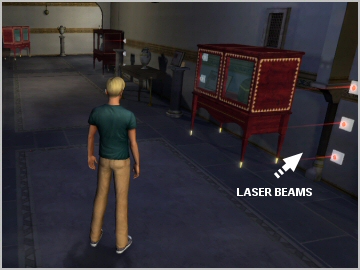
| You cannot turn the system off so select the 'service' option to temporarily disable the laser beams. Enter the museum and open the air vent on the wall to the right of the gate. Insert the hotel flyer into the vent, then set it alight with the lighter. The resultant smoke will make the laser beams visible. | ||||||||||||
| ||||||||||||
| There are four lots of beams to get past. Watch the beams carefully and only cross if they are off. | ||||||||||||
| The side door is locked by means of a bar held in place by four metal poles. The handles on the left are used to manipulate the poles as follows: | ||||||||||||
| ||||||||||||
| To open the door pull the 1st, 2nd and 4th handles down. | ||||||||||||
| The large door opposite the side entrance leads to the courtyard fountain. The two macabre heads on either side of the door need to be simultaneously turned, so ask Anna Maria to turn the one while you turn the other. | ||||||||||||
| Make your around the courtyard perimeter (behind the guards) to the power switch that controls the fountain's water pump. If the pump is switched off the guard sitting on the bench gets up to switch it on and then returns to the bench. You need to move the fountain but the guard returns to the bench before you can do this, so find a way to keep him away longer. Use either the paper clip or the knife to short-circuit the power switch. Now after unsuccessfully trying to switch the power on, the guard goes to talk to the other guard, allowing you uninterrupted access to the fountain. Get Anna Maria to help you move the fountain, then climb down the hole to the catacombs. | ||||||||||||
CATACOMBS | ||||||||||||
| Study the system of pipes running along the wall carefully. At the far left end, next to the single pipe that leads upwards, is a large loose block. Perhaps the block could be dislodged by maximising the pressure of the water flowing through the pipes. The pressure gauge (on the bottom pipe of the last section of pipes to the left) initially indicates that no water is flowing through the pipes. To maximise the water flow, adjust the various valves as follows: | ||||||||||||
| ||||||||||||
| Climb through the hole (where the block was) and make your way to a large chamber with a locked stone door. Try pushing the release button next to the door, and although nothing happens you hear what sounds like a stone moving. If you listen carefully when walking over the knight painted on the floor in the centre of the chamber, you hear the same sound. Also, the first latin paragraph on the manuscript reads: | ||||||||||||
| ||||||||||||
| The sounds of a 'stone moving' and the first latin paragraph are clues to opening the door. | ||||||||||||
| ||||||||||||
KNIGHTS CHAMBER | ||||||||||||
| The chamber has five alcoves, three of which have knight statues in them. Initially all but one of the alcoves are sealed. The knight in the open alcove is the first of three 'knight puzzles' to be solved. | ||||||||||||
| ||||||||||||
| After finishing the three knight puzzles all five alcoves are open. The second latin paragraph on the manuscript reads: | ||||||||||||
| ||||||||||||
| To 'close the circle' all five alcoves must be occupied, so get Anna Maria to stand inside one empty alcove while you stand in the other. The floor lowers, allowing access to the Map Room. | ||||||||||||
MAP ROOM | ||||||||||||
The third latin paragraph on the manuscript provides a set of clues on how to disable the poisonous gas that prevents you from taking the cherub. | ||||||||||||
| ||||||||||||
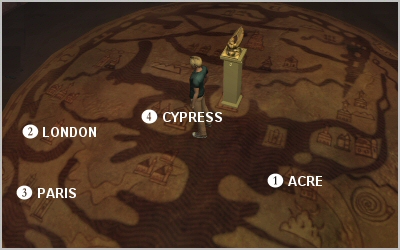
| By reading the third latin paragraph when in the Map Room you learn that to lift the cherub you need to follow the route taken by the Master (Jacques de Molay). You also learn that the 'fortress' is Acre, 'Longshanks' is London and the 'Temple of Villeneuve' is in France. From the historical database in the PDA you also know that in the year 1292 he moved his base to Cypress. | ||||||||||||
| Examine all the hotspots on the large map on the floor to learn where the various cities are located. Follow Jacques de Molay's route by clicking the cities (use the 'gears' icon) annotated, in the exact same order - ACRE. LONDON, PARIS (only city in France) and CYPRESS. You can then take the cherub from the plinth. | ||||||||||||
| ||||||||||||
After removing the cherub you need to find a way out. The fourth latin paragraph provides the key to doing this. | ||||||||||||
| ||||||||||||
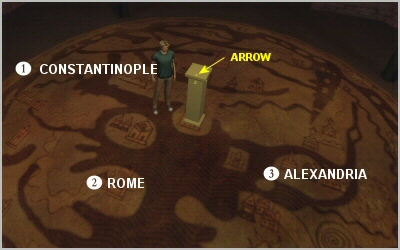
| Examine the plinth that the cherub was on, noting the arrow at the top and that it 'stands' directly on Jerusalem, or Sion. Read the 'Constantinople' section of the historical database in the PDA to learn that the Roman empire was split, with the Western Empire based in Rome and the Eastern Empire based in Constantinople and that the Coptic Church was in Alexandria. | ||||||||||||
| ||||||||||||
| Begin by rotating the plinth (use the left or right control) so the arrow points towards Constantinople on the left, then use the down control to lock the setting. Repeat this process for the cities of Rome and Alexandria (i.e. in the order they are mentioned in the latin paragraph) to activate the exit door. | ||||||||||||
JAIL | ||||||||||||
| Watch carefully to see a rat running into a hole in the wall. After removing the rat from the hole, you find a bracket inside the hole. Use the bracket to dislodge the protruding block on the opposite wall, then remove it. This triggers a visit from a priest and nun, who bring you some toys. Did you notice the nun wink at you? She also tell you to be on the roof in one hour. | ||||||||||||
| Examine the drain in the centre of the cell, noting the groove leading past the door. Open the bag of marbles and roll them along the drain. Climb through the hole to the adjoining cell and summon the guard by clicking on the door. After he slips on the marbles, return to your cell and take the cell key from him. Unlock the cell, then use the cloth to gag the guard and the string to tie him up. Along the corridor you get to a room with a guard dog inside. | ||||||||||||
| ||||||||||||
| Examine the mechanical mouse in your inventory to get a mouse key. Use the key to open the can of beef and empty it into the dog's bowl. | ||||||||||||
TOPKAPI PALACE | ||||||||||||
| Go up the stairs, then along the corridor until the outside wall is visible. Note the vine growing on the wall. You can get to the roof by climbing up the vine, but the guards must first be distracted. Do you remember the laser beams inside the museum? | ||||||||||||
| ||||||||||||
| Now climb up the vine to get onto the roof. Place the squeaky toy in the gap between the stone and the buttress to attract the guard's attention. | ||||||||||||
| ||||||||||||
| ||||||||||||
| George and Nico re-united! | ||||||||||||
PASHA PALACE HOTEL | ||||||||||||
| As Nico, talk to the receptionist and discuss Eamon O'Mara with her to get the key to his room. | ||||||||||||
To get to George's room after climbing through the window: | ||||||||||||
| ||||||||||||
| Remove the credit card receipt from the waste basket in the bathroom and pick up the rosary lying on the bedroom floor. | ||||||||||||
| Look at the reception desk downstairs to learn that the hotel has a wireless hotspot. Then use your PDA to hack into the Credit R Us and get Anna Maria's address. The diagram below illustrates one possible solution to this network puzzle: | ||||||||||||
| ||||||||||||