IRELAND |
| |
| This part of the road leads to medieval Ireland. You will be 'transported' into the body of Brother Felim, one of the monks. On arrival Brother Liam mentions your illustrations (a clue to the Book Puzzle) and asks you to find out what has happened to Brother Finbar. Leave the church and explore the surroundings. |
| |
| |
| |
SKULL PUZZLE |
| Brother Finbar appears unable to speak - as if he's been moonstruck. Take the fork from the garden next to Brother Finbar. Walk around the area and pick up all the skull pieces scattered around. There are 5 of them in total. The first one is inside the beehive, second from the right. The fox in the foxhole is chewing another one - but he runs off when you try take it. Note the sound of chickens in the background shortly after he runs off - a clue to finding where he leaves the skull piece he had. Another piece is lying next to a rock among the sheep. Return to the church to find the remaining pieces. The one the fox had is next to the chicken at the well. Climb up the ladder onto the roof and look down (through the hole) to see another piece on the wooden cross. Use the fork to knock it onto the church floor, then enter the church and pick it up. The last piece is in the bookcase inside the church. |
| |
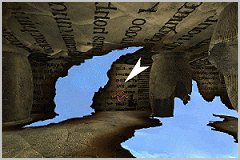
| Ask Brother Liam about the weeping head on the wall at the church exit. He says that it's Aine, the pagan goddess who killed Ailill, the king buried on the mound. Note the running water below the weeping head. |
| |
| Before further progress can be made, the Book Puzzle has to be started. Sit in front of the easel and get as close as possible to the book. Take the paint brush out the tin above the book. While holding the brush 'enter' the book. Doing this triggers Brother Liam leaving the church. It's not necessary to do anything in the book at this point and you can exit immediately. To exit the book go to the far wall (in line with Dian, the craftsman) and click on the word 'exit'. |
| |
 |
| |
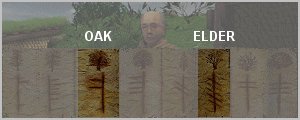
| Brother Liam will be outside one of the shacks near the church. If, while exploring, you saw the carvings on the outside church wall and the stone horse (on the rock in front of the mound) these dialog topics will be activated with Brother Liam. Ask him about the carvings on the outside church wall to get the key. The key unlocks the small wooden chest inside the shack. Take the knife and vellum out the chest. He explains that the vellum drawings are trees. Show him the vellum, then click on each tree to get a full explanation. From the explanations you learn that two trees, Oak and Elder, once grew near the standing stone. Do the symbols underneath the trees look familiar? They are similar to the carvings on the outer church wall. |
| |
 |
| |
| Inside one of the other shacks is a pitcher. Take it and fill it with water from below the weeping head. |
| |
| Go to the mausoleum on the mound. Re-construct the skull by putting back the 5 skull pieces you found. To get Ailill to talk, give him the pitcher of water. He tells you to 'read the stone to ride the white horse'. He also says you need the knife to read the stone, so give him Liam's knife and he casts a spell on it. |
| |
| |
| |
WHITE HORSE PUZZLE |
| The 'white horse' Ailill spoke of is etched into the standing stone, so you must find a way to remove it. Go back to the carvings on the outer church wall. The symbols on the left (top, middle and bottom) represent three trees and the 'swirl' on the right is the activation button. Begin by activating the knife. Clicking the knife to the left of the 'tree' symbols changes the positioning of the symbols. You can rotate through tilt, to the left, to the right and normal. Symbols can also be erased by clicking them in the centre, starting at the bottom and moving upwards. The symbols on the vellum drawing (for the two trees that grew near the standing stone) must be replicated. The Oak (taller) must be at the top and the Elder in the middle. All the bottom symbols need to be erased. After replicating the symbols click the activation swirl again. The wall should then recess into the ground. Pick up the stick on the ground. |
| |
| Before continuing it's a good idea to find out the basic storyline from the Book Puzzle. You need to have spoken to Dain and heard about the tower of glass before you 'ride the white horse'. |
| |
| Ailill tells you to use the stick to free the horse, so strike the standing stone with it. Note that the easiest way to get to the standing stone is by going left from the mound entrance. After setting the horse free, it runs away and has to be captured. If not, the horse returns into the stone and you'll have to free it again. The easiest way to capture the horse is to wait near the stone for him. Go right (toward the mound), then left (to the mound entrance) and finally right again (to the left of the mound). The horse should come to a brief stop in front of you and can be captured. If you studied the standing stone you should have noticed that the horse was running on waves - a clue that it must be ridden across water. At a certain point at the water's edge the horse can be placed into the water. Do this and head off across the water to an island. |
| |
| |
| |
ISLAND PUZZLE |
| The man sitting in the tree is Fintan, the poet. |
| |
To speak to Fintan in 'human' talk, the three dialog topics in 'bird' talk must be completed correctly. This is done by matching Fintan's bird talk (heard when clicking a dialog topic) with the identical chirp (heard when clicking one of the blackbirds). The three dialog topics have to be consecutively matched correctly (in any order) without a wrong selection in between. Both Fintan's bird talk and the blackbird chirps are randomly generated and are different each time you select a particular topic - so a fixed solution cannot be provided. However, there are a few tips I can offer.
1) turn the 'music' volume off - this makes it easier to listen to the chirps
2) each blackbird's chirp can be previewed by 'swiping' your cursor across it
3) don't 'hover' the cursor over the chirp as this repeats it continuously
4) when a chirp is selected (by clicking it) an extra bit is added on at the end
5) the extra bit at the end indicates whether the selected chirp is wrong or correct |
| |
| Press the buttons below to listen to the respective 'extra bits'. |
| |
|
| |
| |
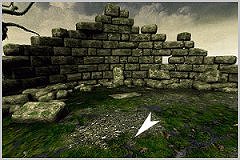
| Speak to Fintan about the tower of glass to get a diving rod. Face the larger broken wall and then use the diving rod to find the well. |
| |
 |
| |
| Although the tower of glass is inside the well, the giant snake prevents you from taking it. Talk to Fintan to learn that Airmid (Dian's daughter) can help with the snake. This triggers a changed dialog topic about Airmid when you next speak to Dian. |
| |
| How the tower of glass is ultimately retrieved is dealt with in the Book Puzzle. |
| |
| |
| |
BOOK PUZZLE |
| To begin sit in front of the easel and get as close as possible to the book. Take the paint brush out the tin above the book. While holding the brush 'enter' the book. To exit go to the far wall (in line with Dian, the craftsman) and click on the word 'exit' - see graphic above. |
| |
| Talk to Dian, the craftsman, to learn about the story in the book. King Nuada's silver hand has been taken by the shadow (Bres). He tells you that the hand is in a tower of glass down in a watery hole. He asks you to find the glass tower. Speak to King Nuada, who says he also doesn't have his sword, although it wasn't taken by the shadow. |
| |
| To retrieve the tower of glass the other puzzles (as detailed above) need to be completed. The remainder of this part of the walkthrough assumes that this has been done. |
| |
| Ask Dian about the statue (Airmid) - even if you already did so previously. Dian explains that his daughter was turned into a statue by the goddess Aine. This triggers the Airmid dialog topic with Ailill. |
| |
| Go to the mound and ask Ailill about Airmid. Ailill talks about the goddess Aine not having been seen since the 'ancient sun stopped spinning across the sky'. This triggers the 'spinning sun' dialog topic with Liam. |
| |
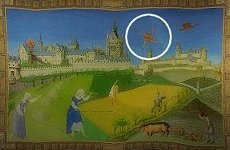
| Talk to Brother Liam about the spinning sun and he gives you Brigid's Cross. Did you notice the tapestry in the church? The characters in the tapestry are pointing to 'something' in the sky. Brigid's Cross needs to positioned on the tapestry - in the general area where the characters are pointing. There are a number of hotspots where it fits, but only one is correct. Place the cross directly above the tower to the right of the large building. The tapestry comes to life and you hear a voice saying "I have come". Aine will be behind you so turn around to talk to her. After discussing either Fintan or Airmid she agrees free both of them. |
| |
 |
| |
| Enter the book again and head towards Dian. Airmid approaches you and thanks you for saving her. Speak to her again and ask for help with the giant snake in the well. She needs her salmon, and (as with Nuada's sword) it's missing, even though it wasn't taken by the shadow. |
| |
| To recover both the salmon and sword, exit the book and with a few deft strokes of you brush, they can be 'painted' into the story. Do this by clicking on Airmid and Nuada while holding the brush. Note that if you haven't spoken to King Nuada you won't be able to 'paint' the sword. Similarly, you cannot 'paint' the salmon before Airmid has spoken about it. Re-enter the book and talk to Airmid about the snake to get the salmon amulet. While you're about it, take the sword (next to Nuada). |
| |
| Armed with the salmon amulet head back to the well on the island. Enter the well and then go as far down as possible. While holding the salmon amulet remove the glass tower. |
| |
| Give the glass tower to Dian. Use the sword to smash the glass tower, then take the silver hand and sword to King Nuada. |
| |
| Exit the book and church to complete this part of the road. |
| |
| |
| |
CRYSTAL JOURNEY |
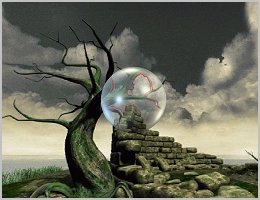
| At the very beginning you're given the crystal and told that it contains a number of journeys. The lines on the crystal are a partial outline of a specific scene in whatever place you are. When the correct scene is viewed through the crystal, the lines will turn red. To get an exact match the screen resolution should be set to 800X600. Click the crystal when the lines are red and take a short trip into space. This also adds a journey to the crystal. Click the Earth to return. |
| |
| The matching scene can be found on the island you travelled to on horseback. Face towards the left edge of the broken wall (behind the well). The matching outline is part of the wall and part of the tree. |
| |
 |
| |
| To return to the ship click on the weeping head in the church. |
| |
| |
| |
|