

Welcome to My
BLACKSTONE CHRONICLES
Walkthrough
Written by: Linda Shaw
11/21/98
WARNING:This walkthrough will take you step by step through the entire game......leading you from the very beginning all the way to a happy ending!!
![]()
Begin by going up the stairs to the portrait of Malcolm Metcalf. Ask him everything. Turn right from the portrait, enter the elevator (left arrow) and notice the handle is missing. Exit the elevator, go downstairs and into the Drawing Room. Pick up the knife, latel and other objects inside the Kitchen. Sharpen the knife on the strap to the right of the dripping faucet.
MALCOLM'S OFFICE:
Enter the Office up the stairs and to the left. Take the teapot (behind the desk).
Click on the Portrait of Olivia. Open the drawer of the desk and take the nutcracker. Look
at the picture of Oliver and his twin sister. Note the date on the photograph. Move to the
computer. Look at the post-it. [Password: Scooter]. Operate the computer and enter the
name of Oliver Metcalf.
Move to the front door of the office, turn left, take the handle and the key ring. Exit the office, get in the elevator, put the handle in the control panel and go to the 2nd floor.
MARILYN'S ROOM:
Turn left out of the elevator and enter the door. On the right down the hallway is
Marilyn's room. Enter her room and click on everything in front of you. Turn left and
look/take the item(s) inside the case. Now turn right 2 times and click on the photos and
items on the board. Read and take the journal. Click on the photo of her sitting on the
dresser. Ask her everything.....
MALCOLM'S OFFICE:
Return to Level 1, Office... Enter her name (Marilyn Wilson) into the computer. Read
the patient information. Now exit and go down the stairs to the Kitchen.
KITCHEN:
Use the knife on the cabinet above the dripping faucet. Take the wrench. Now is as good
a time as any to look at the coffeepot in your inventory. Notice anything on that? Look at
the Nutcracker as well and talk to Malcolm.
MARILYN'S ROOM:
Go back upstairs, talk to Marilyn. Ask her everything. Diary pages are stuck together.
Hmmm...how do we unstick them?
HYDROTHERAPY ROOM:
Go down to the Hydrotherapy room in the basement. Talk to Jane. Get the blanket off the
shelf. Turn right and right again. Talk to Jane again. Click on the Heat Chamber. Move
forward, open the steam box, try the switch (upper left), turn right. Control panel has a
secret code!
MARILYN'S ROOM:
Go back to Marilyn, ask about the Steam. Ask her all possible questions. She gives you
the code. You know where to go from here...
HYDROTHERAPY ROOM:
Push the correct buttons on the control panel (2nd and 3rd from the top) and the others
should remain off. Turn and flip on the steam machine. Open the box, put in the diary,
close the door and turn on the machine again. Steam the diary pages open. Now listen to
your son, Josh. Read the diary pages that were stuck together...
MARILYN'S ROOM:
Return to Marilyn's room. Click on the photo of her. Ask her about the Furnace. Now go
there!
FURNACE ROOM:
Talk to Seamus, and ask all questions. Turn right, use the wrench (from the kitchen
cabinet above the dripping faucet) on the furnace door. Use the prongs for the lighter.
Move forward to the rear of the Furnace room and turn left. Notice anything on the circuit
board? You'll need to get that item a little later. For right now, just try the padlock,
and perhaps try a few items you may have in your inventory! Now head for the Hydrotherapy
room. Sequence follows where you will need to use your lighter on the thermostat inside
the box.
MARILYN'S ROOM:
Show the lighter to Marilyn. Place the lighter on the stand next to the Baby book. Talk
to Marilyn, then open the door that leads down the other hallway. Enter the room on your
left down that hallway.
VI'S ROOM:
You'll be facing a tapestry. Turn right and look/take the item(s) inside the case. Turn
left twice and enter the main area of the room. She'd like her knitting needles or
something that would be similar.
Do you have anything in your inventory you could give her? How about something you got from the Kitchen? Turn right from the knitting basket and yarn, click on the pen/ink well on the desk. Ask Vi everything. Now leave, turn right and enter the next door.
MS. MARTIN'S ROOM:
Enter Ms. Martin's room. Read the book above the case. She's had an item stolen by
Malcolm. Take the magnifying glass. Open the case on the table. Take the compact. Use
magnifying glass on the coffeepot in your inventory....see anything on the bottom? Head
for the basement and the Fever Therapy Room.
FEVER THERAPY ROOM:
Talk to Nick, then turn right and click on the items on the hutch. He will tell you
about Mandy Lee and what you need to do in order to open the drawers. Take the lancets.
Now head for the Furnace room, turn left upon entering the room and take a fuse. Head for
the Kitchen.
KITCHEN:
Replace the old burnt out fuse with the new one you just got. Feel the freezer.
Move to Level 2 and the woman who thinks she's the Queen, Vi.
VI'S ROOM:
Enter her room, notice that the locket is missing from her case. Use the coffeepot on
the tea cups. She will tell you about herself at that time. Listen carefully to what she
tells you. Time to move on now... ECT treatments? She tells you which key on the keyring
to use to get into the ECT room.
ECT ROOM:
Examine everything. Turn right, take the stethescope and head for Malcolms office.
MALCOLM'S OFFICE:
Use the stethoscope on the frame (lower left corner). Click on that and the portrait of
Olivia will open. The combination to the safe is the date on the photograph on Malcolm's
desk...but the picture shows a date of 4-24-55, and Malcolm says that it was taken on
Oliver's 3rd birthday, so subtract 3 years from 1955 and you have 52.
Turn the safe dial very carefully to the right to number 4. This is done by placing the TIP of the arrow on the 4. Now turn the dial to the left and click on 24 (this takes patience, I know, as it took me several attempts before I figured out exactly where and how to place the directional tip of the arrow). Finally, spin the dial to the right and click on 52. The safe will open. Inside, take the Fabrege egg (with a secret way to open it), and the box. Get the box, open it and get the key.
MS. MARTIN'S ROOM:
Return to Ms. Martin's room, talk to her portrait in the case. Ask her about Mandy Lee.
Go to Lorena's room and get the feather from the hat on the counter. Open the make-up.
There's your pen and ink. Go back to Vi's room, put the feather and opened make-up
container in the pen and ink well on the desk. Now she lacks her handkerchief.
MALCOLM'S OFFICE:
Look up Mandy Lee in the computer. Now head for the Fever Therapy room.
FEVER THERAPY ROOM:
Click on the appropriate drawer according to the picture below.
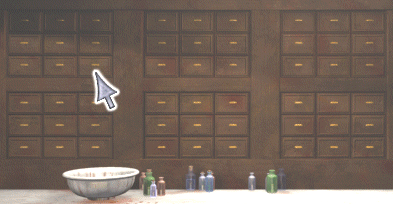
Take the casket, use the key from the box and then return the handkerchief to Vi's case. She will offer a gift to you. Turn and head for her bed. No time to rest now that you've been injected with some sort of deadly virus/disease! Click on the Crown of the bedpost and take the file. Now click on her portrait in the glass case again, and ask her the two questions you are given. In your inventory, use the nutcracker on the Fabrege egg. Read the message inside: "The word you seek is the word itself!"
DRAWING ROOM:
Make your way to the kitchen doors and turn left. Use the awl on the HINGES of the
cabinet. Attach the file to handle of the hacksaw. Time to move to the Furnace room.
FURNACE ROOM:
Once there, use the hacksaw on the padlock at the rear of the room. Throw the sheet
from the Hydrotherapy room shelf on the floor. BEFORE TAKING THE LOCKET, SAVE YOUR GAME.
Now grab the locket (an automatic timed sequence occurs). When you find yourself sitting
in the chair, and facing the hallway of the basement, click on the compact in your
inventory. Open it, and look in the mirror. See the numbers? Remembering that this IS a
mirrored reflection, turn to the right and set the 3 dials to the appropriate settings
(mirrored reflection of 851 is 128. Try this: write down the three numbers you see in the
mirror of the compact, then move to a mirror in your house, hold the paper with the
numbers on it up to the mirror and what do you see?).
MARYL MARTIN'S ROOM:
Go and replace the locket on the glass stand. Talk to Mandy Hartwick. She tells you
some information about a secret room. She tells you that the entrance to the secret room
is in Malcolm's office and that he pushes in 4 books on the bookshelves.
MALCOLM'S OFFICE:
Make your way to the bookshelves to the left of the computer. Read the books. Look at
the books. For the correct books to push in, see the picture/graphic below.
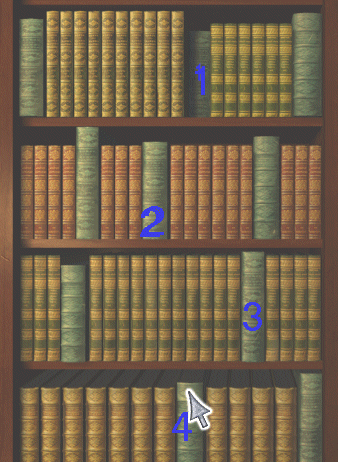
Enter the secret room. Turn right, examine the box, use the antidote for Bubonic Plaque. Turn around, read the journal all the way through, turn right, go down the spiral steps to the Surgical Room.
SURGICAL ROOM:
Turn left, examine the bottle/jar on the bottom left of the cabinet. Talk to the boy.
He will tell you that his doll is missing (Samantha), and he describes what she looks
like. Play the "Eye Spy" game with him. The "T" is the table in the
surgical room, and the "L" are the lights above the table.
CHAPEL:
Turn right, take the hammer and ice pick. Turn left, click on organ pipes. Talk to
Frank Morgan, and ask him everything. Move forward to the altar (on the right side of the
benches). Click on the pillars, the altar, and then turn right. Tap on the Armor and
Lance.
SURGICAL ROOM:
Use the ice pick on the locked drawer of the cabinet. Look at and open the music box.
Play the game again with the boy. "White" is the Diploma on the wall by the
green keypad door. "Tiger" is the Grate to the left of the surgical table. Now
talk with the boy again and he will tell you that his favorite movie was the Wizard of Oz.
He talks about and compares the TinMan in Oz to the Knight in the Chapel. He mentions that
he use to open the visor of the Knight and hide things inside.
CHAPEL:
Use the hacksaw on the Head of the Knight. SAVE YOUR GAME HERE. Use the Knife from the
Drawing room on the straps. Take the doll.
DUNGEON:
Immediately turn left, use the lance to reach the key. Turn right, use the cage key on
the lock. Open the door. Turn left and note the memorials, and plaques on the wall. [This
is a good time to make a note of the names you're given for later. You may want to look up
these patients on the computer.] Look at the sarcophagus and try to open it. Turn right
and go up the stairs. When you arrive up the stairs, turn around and click on the
iron/steel door again. Try to open it. Malcolm will give you a riddle as to the location
of the key. The riddle is:
My office quite fast, you did keys manifold.
But you'll find the last....
In the one who knows Cold.
Return the doll from the Knight to the shelf by the boy. Play the game 1 more time. Something "Red" is the book on the cabinet. Now talk to the boy. He tells you that his name is Abraham Wagner and that the "code" used by Dr. Metcalf was 125. Remember that code.
CHAPEL:
Play the music box inside the chapel. Listen to Frank Morgan (3-part invention by Bach
in F-)
Talk to Morgan. Ask him about the crypt and the cage.
SURGICAL ROOM:
Click on the green door and then select Push Buttons. Enter the appropriate 4-digit
code. The code to enter is 2138. The door automatically opens. Go down the steps.
LABORATORY:
Turn left and look at the crowbar, the knife, the hand drill, the fingerbox, the mallet
and the flayskin. Ask everything of Paul Becker. Take the fingerbox.
Turn right twice and look at the wheel, the blade, the shelves and the table. Now turn left, move forward and look at the cage and the bags. Turn left again and look and take the club. Look at the mace and the wheel.
Now turn left once, and look at the pincers, the knife and the lash hanging on the wall. Turn left again. Look at the Iron Maiden. Look and take the rope. Look at the device and at the symbols. In your inventory, shake the fingerbox. Is that any help identifying what might be inside? No, so let's not go sticking our noses, I mean fingers!, is places they don't belong....
Leave the laboratory for the moment and go up the stairs to the surgical room. Place the fingerbox inside the X-ray machine. Turn on the machine. Now we know what's inside. Return to the laboratory and Paul welcome you back. Tell him what is inside. Ask all questions. Move to the Iron Maiden and push the panels in the order according to the picture/graphic below.
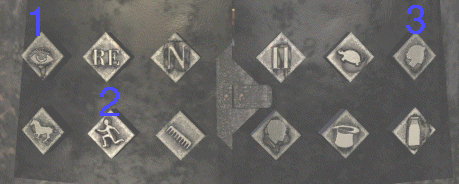
Look at the stereoscope. Use your club on the maiden doors to prop it open. SAVE YOUR GAME HERE. Take the stereoscope (automatic sequence begins again). In the Automatic timed sequence you will find yourself on the table underneath the blade. Turn left and use your rope on the lever.
Click on the flayskin and talk to Marilyn....yes, Marilyn. Ask her everything. She tells you that the Hydrotherapy room gave her a runny nose and that the entrance to the Secret Room is in the Crypt. Runny nose? Take the crowbar. Leave the Laboratory and head up the stairs, out of Malcolm's Office and into the elevator. Watch and listen to your son and your wife.
Go back to the Iron Door behind the bookshelves. Click on the door to open. Listen to Marilyn say: Rhino virus. Rhino, huh? Okay, you remember seeing all those stuffed animals down in the main entry, right? Use your lance on the Rhino and get that key.
END OF GAME COMING UP!
Be prepared for fast action!
Before opening the Iron Door, this would be a
GOOD TIME to save your game........ôô
IRON DOOR:
Use the key on the iron door and go down into the crypt. Use the crowbar on the
Sarcophagus. Look at the Sarcophagus, then get IN the Sarcophagus. Trust me here, it's ok!
Listen to Malcolm, and then listen to Joshua and Malcolm.
Turn and look at the clippings on the door, then click on each item inside the glass case. Combine the knife in your inventory with the nutcracker, then rip up the journal. Use the crowbar on the skull of the skeleton bones. Use the crowbar on the glass case. Take the lighter. In your inventory, click on the light (flick the lighter). Then click on the lighter again and use it on the Portrait!
End of Game Sequence and Video.
The End!
![]()
This walkthrough will be updated
frequently.
This document may be freely distributed by any means as long as the context is not altered
in any way and reference/links are provided to this site. Copyright 11/21/98 - LINDA SHAW.
Let me know what you think about my page. Send mail by clicking here.
Modified February 17, 1999 @ 4:37am CST.