The Dark Eye: Chains of Satinav
by Deep Silver
Walkthrough by MaGtRo June 2012
Gameplay: This is a third
person point & click game.
The intro page has New Game and Main Menu links.
The Main Menu has Return to Game, New Game, Savegames,
Settings, Extras and Exit Game.
The Settings menu has selections for settings,
graphics, volume and controls as shown by icons. Click on the icons to show the
settings for each of them.
Settings-gear icon has selection for subtitles,
hotspot indicator, combinations indicator and action indicator. Move the
cursor over the selection to get an explanation for each of them.
The action indicator activates the name-label of
the hotspot (when the cursor is hovered over it) to change color: blue shows
no action done yet; white means there are still some actions possible and
grey color when all the actions are done.
Graphics-monitor icon has screen size (full or
window), HD video, additional effects and colour depth.
Volume-loudspeaker icon has the voices, music and
effects volume settings.
Controls-game control icon has the settings for the
mouse and other keyboard keys.
Left mouse button is the perform the action
control and the right mouse click is the "look at" action.
ESC key opens the main menu and skips cutscenes.
T key toggles the subtitle and speech options to
get one or the other or both.
M key mutes the game. It toggles it back on.
F1 opens Geron's diary that shows the current
task.
F5 opens the save menu.
F8 opens the options menu.
F9 is quicksave which will overwrite the last
quicksave.
F10 loads the last quicksave.
F11 takes a screenshot and is saved in the user
folder.
Spacebar highlights all active spots, person and
exits in the screen.
Extras are picture, videos and achievements. I did
not unlock all of the achievements in the game
Game difficulty: At start of a new
game, game difficulty is selected: casual with all help features enabled or
challenge with no help feature but can be reinstated in the settings menu at
anytime.
It is happy days for dreamy Andergast. Andergast is
expecting to have peace with their enemy Nostria, Nostria's Queen Yolande II is
coming for a visit.
To prepare for the visit, Efferdan I. Zornbold, the
King of Andergast laid a cheerful challenge for the young men of the country.
Chapter 1
The Oak Leaf Challenge:
Tutorial:
Olgierd watches his man dunk Geron's head in the water
trough. They want Geron's copper oak leaf.
Pig sty: Follow the
instructions to learn the game manipulation.
Talk to Olgierd. Learn that Geron collects copper
oak leaves and Olgierd collects brass oak leaves. They need 4 oak leaves to win
the king's challenge. They want to take Geron's copper oak leaf since he is
one oak leaf ahead of Olgierd.
Look at and pick up the hammer right of
Geron. Try to use it on Ulfried.
Learn that a blind seer on the day of his execution
foretold that Geron "will bring misfortune" to Andergast and everyone believes Geron is bad luck.
Use the yellow disassemble clay icon at
extreme left of inventory bar on the jug by the well.
Gwinnling's house:
Geron places the broken cage on the table.
See Gwinnling examines
the innards of a dead crow on the table. It cannot be. Gwinnling is a
hunter that adopted the child Geron and raised him to be a bird catcher.
Talk to Gwinnling.
Gwinnling will fix the cage because of the crows. The examined crow is filled with
black bile.
Learn about Gwinnling's
dreams of eyes and the murder of the Knight Olderich. Learn why the dark seer
was burned at stake.
Inventory has: 4
Kreutzer, hammer, cast net, dove's egg and net
trap.
Check the drawing
right of Gwinnling. Take the walking
cane leaning on the butterfly collection frame.
Find the fourth oak
leaf:
Press F1 to read
Geron's diary to learn about the oak leaf challenge.
Geron's room:
Go down to the stairs at center of room.
Check the picture of
Geron's parents on the left wall.
Take the 2 copper
oak leaves under the pillow.
Open the clothes trunk
at foreground and take the flute.
Check the catapult
under the window and learn that the strings rotted away.
Check the hinge on the
closet door made by Jindrich's father when they were still friends.
Street:
Exit through door to be on the street. Hear Olgierd and Ulfried talking at
right.
Enter the door right of the 2 bullies. See Geron at upper window.
Olgierd repeats the clue
given by the guard. The guard says that a guard standing by castle gate has
a trouser and shirt; one of those has one of the oak leaves. I give you my
word.
Market:
Go to the market by clicking on the road at center beside the barrels.
Look around. Check the
Temple of Rhodra.
Talk to former friend
Jindrich the blacksmith that is honing a sword. He thinks the knight Bogumil Wrathling
is the best but he can't compete at the joust.
See a tankard right of
Jindrich.
Look at the clothes on
the clothesline above the street. There are underclothes and doublet hanging
there.
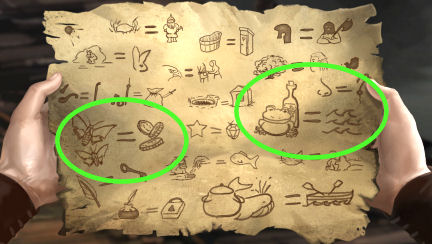
Hilda and Lottery:
Talk to Hilda. She wants a lark.
Learn about the pot
with lots-acorns at right. There is a drawing. One draw costs a
Kreutzer. The prize is a choice of a straw puppet, plum spirit or wheel of
cheese.
Buy a lot and lose.
Question the odds and learn that the winning acorn is marked with a pattern
and kept in the box at left.
Learn that Magistra Dorata is
dead; her dead eyes were torn from socket like Knight Olderich.
Hilda might not hold
herself back and go to the musician; if the minstrel plays her favorite song
Bruin's bride.
Check-right click the
plum spirit, straw puppet and the cheese. Learn that the pigs are given plum
spirits.
Distract Hilda:
Talk to Gleeman Fredhelm, the minstrel and learn how he became a fiddler.
Ask for Hilda's song. Encourage him.
While Hilda is
clapping, open the box at left and see acorns. Geron takes the winning
acorn that Hilda marked.
Ask the fiddler for
another song so that Hilda will not be entranced anymore.
Buy another lot from
Hilda. Geron exchanges a blank acorn with the patterned acorn.
Ask for the plum
spirit. It can be exchanged for another prize later.
Get the fourth copper
oak leaf:
Pig Sty:
Go back to top left and be in front of Gwinnling's house again.
See the pig sty where
Geron was dunked. Check the pigs.
Use the plum wine on
the pig trough. Hahahaha.
Left and right click
the pig trough to get Geron's copper oak leaf.
Get the stolen copper
oak leaf:
Get Olgierd's brass
oak leaf:
Market:
Go back to the market through the middle road.
Castle gates:
Go left of the pigs to be at castle gates. Talk to Trogar, the
castle guard. Note his doublet.
Market:
Go back to the right and get the doublet hanging on the clothesline. Too high.
Use the cane on the
doublet to get the doublet.
In inventory, right
click the doublet to get a brass oak leaf.
Get the stolen
copper oak leaf:
Go back to Olgierd
standing by the pig sty and Gwinning's house. Talk to Olgierd. Learn about Olgierd's
feeling about the Nostrians.
Geron shows the brass
oak leaf from castle guard's clothes to Olgierd.
Swap oak leaves to get
the stolen and last copper oak leaf.
Get the prize:
Go to the castle gate
and talk to Chamberlain Newcastle, the Royal Chamberlain. Chamberlain wants
another task done.
Hang the banner of
Andergast at castle gate: Place the banner of
Andergast on the pennant fastener left of the chamberlain.
Turn the crank on the
pole to raise the banner.
The chamberlain
instructs Geron on how to act in front of the King.
King's audience: Chamberlain reports to
the king.
Use very formal
address and confirm about Gwinnling's relation.
Assure the King that
you can do the job.
The king gives Geron
the duty of ridding the royal guest chambers of crows.
Crows:
Look around and see
that the room is torn apart. There are 3 crows here.
Catch the first
crow: Place the net trap on the rug on the floor.
Place the egg on the
bird-net trap as bait.
See that one crow is
caught. The other 2 crows check the trap. The stag head falls off the
fireplace.
Pick up the bird
trap with crow.
Catch the second
crow: Pick up the stag head. Place it back on the
fixture above the fireplace.
Take the
chandelier-candlestick by window and place it on the fireplace.
Use the cast net on
stag's head. Geron drapes it in front of the fireplace on the antlers and
chandelier.
Use the caught crow on
the cast net as bait. See one crow get
caught in the net.
Memory:
The third crow attacks Geron causing Geron to recall a memory of the burning
of the seer.
The blind dark seer
points at Geron and says You spell doom! Ah - doom for whom?
Geron is told by the chamberlain that he
has until 6 PM to catch all the crows.
To catch a
fairy:
Gwinnling:
Go back home by going right and then up. Enter the house at the corner with a
bird drawn on the door. Climb up the stairs.
Gwinnling wants Geron
to catch a fairy. Talk to Gwinnling. Gwinnling believes
that the seer is back.
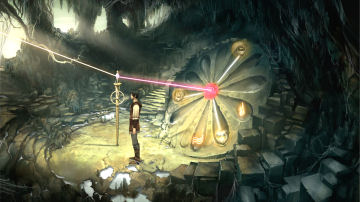
Harp: Learn that the Fairy
is the only one that can unleash the power of the harp. No man can play the
harp without dying.
The magic harp is from
the realm of the fairies and is the one shown on the drawing at right.
The seer wants the
magic harp as gateway to power. If the magic harp sounds; Andergast will
perish.
Learn that Gwinnling
led the group that burned the seer at stake.
Gwinnling caught the
crow with the use of an attractant and water touched by a fairy.
The Fairy is in Stone
Oak Forest; near an old sealed portal. If you hear a great waterfall, you are
there. Lure the fairy with the flute.
Take the cage.
See the fairy:
Exit through the door
at cellar. Leave town through the archway at left.
At the waterfall, look around.
Geron plays the
flute. Talk to the fairy hidden inside the hollow tree.
Since Geron does not have forest friends, he needs to make up
forest friends.
Catch the hedgehog:
Check and touch the pile of leaves at bottom right and get stuck by a hedgehog.
Check and take the snail
from the rocks at left. Place the snail inside
the cage.
Use the cage with
bait on the pile of leaves hiding the hedgehog. The hedgehog is trapped.
Make up a forest friend: Try to pick up the hedgehog in cage and get
hedgehog spikes.
Collect the
chestnuts twigs from the ground close to rock wall at right.
Combine the chestnuts and the
hedgehog spikes to
make chestnut mannequin.
Use the chestnut
mannequin
on the tree hollow. The tree entrance is opened. Enter.
Get the fairy
to be able to
leave the Fairy Gate:
Talk to Nuri. Learn
that she cannot go far away from the sealed fairy gate. She needs to be near the
water of the fairy gate or else she gets sick.
Check the fairy gate
and see a brittle spot on the wall holding the water. Check the mandrakes
dressed as dolls on the tree.
Check and take a leather
ribbon from the rock at right.
Go back outside and
release the hedgehog from the cage. Pick up the cage
and snail shell.
In inventory combine
the snail and the leather ribbon to get snail shell with leather ribbon.
Go back inside the
tree.
Use the hammer on the
brittle spot on the wall of the fairy gate. Water pours out.
Use the snail shell
with leather ribbon on
the runlet.
Use the blank acorn
with the snail shell with well water.
Give Nuri the snail
shell amulet.
Geron and Nuri set
out to leave the forest.
Danger at Gwinnling's
house:
Raven:
Outside the town gate, Nuri talks to the Raven perched on the scarecrow.
The Raven warns them
that 2 dark creatures entered the town. Learn that the Raven was given a
human's conscience as punishment.
Hide Nuri:
Geron and Nuri find the cellar messed up. There is blood on the floor and
stairs.
Open the closet at
right. Geron tricks Nuridarinellavanda to enter.
Gwinnling:
Go upstairs. See Gwinnling with his eyes out and dying. The seer is back.
Talk to Gwinnling
completely. The old fairy scholar is next. They want the fairy. Learn that
the creatures were sent by the seer and have pale faces and pointy claws.
The fairy scholar was
the one that sealed the Fairy Land. He is at Blood Barrier at Red Lake in Orkland.
Gwinnling wants Geron
to kill the fairy. Gwinnling dies.
Bad leads to
Worse:
Save Nuri:
Nuri:
Hear the mob outside yell "witch". See that Nuri is on the roof of the house
across Gwinnling.
Go back inside the
house. Pick up the broken knife from the foot of Gwinnling.
Go down and outside.
Raven:
Talk to the Raven perched at foreground. Learn that Nuri let the animals free.
The crowd chased her and she fell on some bowls in a stall. Nuri fixed the
bowls while the crowd was watching her.
Barrels:
Check the barrels beside Nuri.
Use the hammer on the
stake on the ground holding the rope of the barrels.
Enter the door at
right. Talk to Nuri. Get her to fix the broken knife.
Use the knife
on the rope holding the barrels. The barrels roll over the street.
Get Nuri:
Go back to Gwinnling's house.
Use the hammer on the
hinge of the closet door at right. Pick up the cabinet door.
Go upstairs. Look out
the window.
Use the cabinet door
on the barrels to make a ramp. Geron calls out to Nuri.
Nuri enters
Gwinnling's house. Geron tells her about Gwinnling's orders to kill her. They
leave the town.
Outside town, they
talk to the Raven. The bell sounds the 6th hour of the evening which is
Geron's deadline to catch the crows. The Raven calls Geron, Night-hair.
Chapter 2
Northwards:
Carnie widow:
Talk to the woman. Tell
the truth. She doesn't like Raven. Learn that she is Isida, the carnie bride but
is a widow now.
She has a broken wheel
and is going to Andergast. Darian her husband was an acrobat that fell off the
high rope. Geron convinces her to not to go to Andergast and to take them with her
north. She will take them with
her if the wagon wheel is fixed.
Fix the wagon wheel:
Collect the parts of
the wagon wheel: Look around. The wagon is locked.
Pick up 2 parts of
cart wheel from the ground and the one attached to the axle.
Check-right click the
bank slope at right. Take the last part of cart wheel to get broken cart
wheel.
Talk to Nuri. Learn about Aves. She explains how to mend items. Nuri's reassemble shell blue magic ability
is now at left of the inventory bar above Geron's
yellow disassemble broken pot icon.
Use the blue reassemble
magic on the broken cart wheel. It is now whole.
Isida:
Isida shows them her magic. Nuri notes that she threw white powder on the camp
fire to make them blaze.
Wagon wheel:
Place the fixed wheel on the axle.
Talk to Isida about the
cart wheel. She gives the key to the wagon.
Inside the wagon:
Use the key on the trailer door lock. Look around.
Nuri opens the brass
cauldron on the left to see magnesium white powder that Isida used on the camp
fire.
The Seer's creatures:
Distract the
creatures: Hear Isida cry. See the seer's creatures threaten
Isida to tell them where Geron and Nuri are.
Check behind the curtain
and see puppets. Take the hollow puppet head that has fallen and the
rag on the open drawer.
Open the brass cauldron
left of the door. Use the puppet head on the magnesium to fill it up. Use the
rag to plug the opening of the puppet head with magnesium and get
plugged puppet head.
Take the ladder
from right wall. Use the ladder on the skylight at the ceiling.
Go up. See the creatures
kill Isida. Geron lies to Nuri about Isida. One creature is at the door. Go back
up the ladder.
Use the plugged puppet
head on camp fire. It doesn't explode.
Use the destruction
spell on the puppet head in the camp fire. The creature is stunned.
Go down to the wagon.
Escape:
Open the door latch right of the bed.
Release the brakes right
of the window.
Take the whip
hanging above the window.
Use the whip on the
horse.
The other creature
breaks in and attacks Nuri. An injured Nuri pushes the other creature out of the
wagon.
Thasch Mountain
Range:
Geron and Nuri stop in a
small town at Thasch Mt.
Raven:
Talk to the Raven on top of the wagon about Fate and will of the Gods. Learn
about Satinav.
Wagon:
Enter the wagon. Check the puppet hanging by the bed.
Collect the drumstick
on the drawer; reins on the gate at right, tin bottle on bed,
lid left of door and staff of bells by the stove. Exit the wagon.
Nuri:
Talk to Nuri. Learn about her power of moonlight that burned the creature and
that the creatures are sad fairies; ones that lost all their magic.
Knight Wrathling:
Talk to Knight Bogumil Wrathling that blacksmith Jindrich mentioned.
Learn where they are now
and what the knight is doing here. There is unrest with the zholochai.
Gram has the provisions
needed by Geron. The knight has a beef with Gram about the death of his horse.
He will buy the horse from Geron when he settles on a price.
Gram:
Check the shutter of the building at left. It's closed.
Get Gram to open his
store: Examine the tower at right. Check the storm bell's
engraving: lone dwarf in battle with the orcs. Check the mechanism to
ring the storm bell.
Use the reins on the
mechanism.
Use the staff of bells
on the mechanism to use as crank.
Now turn the mechanism
to ring the storm bell.
Gram the dwarf opens the store screaming the alarm about orc attack.
Talk to Gram. He is
asking one ducat for the provisions. Stay out of the argument between knight and
dwarf.
The fairy scholar passed
by here but he won't give any information until Geron does a favor in exchange.
Get provisions:
Now that you know how much the provisions cost, talk to the knight about selling
the horse.
Convince the knight
using Nuri's dialogues and get help for Nuri. Being a chivalrous Knight, he
gives the ducat for the horse and for Nuri's smile.
Buy the gear from the
dwarf. He still doesn't want to give info about the scholar.
Rope,
flintstone and tinder, water bladder and blanket are now added
to inventory.
Get information about
the scholar: Check the vial with blue liquid on the window
at left.
It is Jenner Creek Blue
Shine Beard dye for the dwarf's beard. It is the dwarf's most beloved
possession.
Use the disassemble
yellow magic on the vial. The bottle breaks and spills all the tincture.
Smell the glass shards;
it smells like juniper berries.
Click on the oneberry
bush on the top window at left. It is too high.
Talk to Raven and ask it to get oneberries. Pick up dropped oneberries from the table.
Combine oneberries and
lid. Use the drumstick with the lid with oneberries to get juice.
Combine oneberry juice
with the tin bottle to get tin bottle with oneberry juice.
Talk to Gram to
offer the beard tonic.
Learn the whereabouts of the Fairy scholar and why he was
here at the mountain. The scholar is in a cave close to the orc statue. The
scholar has an imp.
In the Blood
Barrier:
Watch the travels of
Geron and Nuri through the Blood Barrier. Nuri nearly gets killed on a hanging
bridge.
In the camp of
the Zholochai:
Camp:
The party reaches the
camp of the Zholochai, the fiercest of the blackhides-orc tribe.
Raven says that the orcs
are here to perform a ritual that could take days to do.
Check the orcs sitting
above the camp. Eavesdrop on the orcs.
Talk to Nuri to know the translation. Nuri mentions
about Tairach, their Blood God. They are waiting for a sign from their god.
Look around. Check the
rubbish and take the wooden board beside it.
Take the split skull
from the ground.
Use the reassemble blue
snail magic on the split skull to get a skull.
Check the red rock on
the left. The rock is bleeding color. Use the knife on the rock to get red
stone.
Check the neglected orc
pony. Take the empty fodder bag right of the pony.
Check the upper jaw
hanging on top of the pole of the left tent.
Ask the Raven to get the
upper jaw. Raven takes and drops the upper jaw. Pick the upper jaw.
Ritual area:
Go left and be at the
ritual area. See the shaman talk/pray/shout in rhythm of the drums.
Look around. Check the
smoking basins on the ground.
Check the puddle and it
has a different frequency-rhythm than the drum.
Check the Orken war horn
tied to a drum behind the drummer.
Check the pipe weed bag
under the sleeping dog at right.
Check the shaman and the
drummer.
See the statue of an Orc
God on the wall of the mountain across the abyss.
Orc God:
Go up the path at right
and see the close up of the face of the Orc god. It has a gap on its jaw.
See water flowing at
left. Go back down to the Ritual Area.
Disrupt the chanting
of the shaman:
Remember that the
drummer is not too steady in his drumming. Use the skull on the puddle at left
to get a different rhythm.
The shaman's screeching
stops and he scolds the drummer.
Use the knife on the
rope tying the war horn behind the drums.
Make a sign for the
Orcs:
Go up to the Orc God's
face.
Place the wooden board
on the abyss; then cross to the other side.
Combine the rope with
the upper jaw to get a grappling hook.
Use the grappling hook
on the rotten tree to divert the flow of water close to the face.
Combine the red stone
with the war horn.
Use the war horn with
red stone on the gap in the jaw of the god's face. Now the god is bleeding in
his mouth.
The shaman and the orcs
are screaming down there at the camp.
Go back down to the camp
and see that the camp is empty.
Nuri and Geron leave
the camp.
The Fairy
Scholar:
Imp:
The imp appears on top of the tree at Red Lake. See that he wears a hat with a
buckle.
Talk to the imp. He
jumps on top of the strange plant and then on the red rock at left. He would not
tell where the scholar is located.
Look around. See nice
flowers. The blossom on the left across the water is the Lily Queen. She has the
brightest spot of all. See a butterfly on a flower on a red rock. There is a
flower inside the strange plant - maybe to attract insects. There are flowers in
the shadows of the rock at bottom area.
Check the gap in rock at
far right.
Orc camp:
Go back to the right to be at the orc camp.
Take the bracelet
hanging on the rock at top right and the orc shield at top middle rock.
Use the knife on the
roast to get meat.
Pipe weed:
Go to the ritual area at left.
Give
the meat to the now awake
bulldog. Pick up the pipe weed.
Go back to Nuri and the
imp at Red Lake.
Catch the imp:
The imp was telling Nuri
his life story.
Prepare the trap:
Pick up the blossom under the butterfly to get the butterfly to go to the
Lily Queen across the water.
Give the blossom to Nuri as a small present.
See that the sun shine
through the gap on the Lily Queen. Use the orc shield on
the gap at right.
The butterfly flies to
the only flower with the sun shining on it - inside the strange plant. The plant
closes itself and drools after it eats the butterfly.
Take the slime of
the strange plant.
Use the slime on the imp's favorite spot - the red rock on the left.
Catch the imp:
Now talk to the imp to get him to jump on his favorite spots.
The imp falls in the
lake. He climbs back up. He says that his pipe weed is wet.
Nuri noted that he is
bald; making him realize that he lost his hat.
Give the imp what he
demands: Give the imp the pipe weed taken from the dog.
In inventory, combine
the fodder bag from the orc pony with the jewelry-necklace taken from the orc
camp to get decorated fodder bag.
Give the decorated
fodder bag to the imp.
The imp gives the
direction to the cave where the scholar is located. The scholar might
be with his fairy artefact.
The Cave:
Cave:
Nuri and Geron arrive in the cave. The scholar is not in the cave but he might
be with the fairy artefact.
Look around. Check the
fireplace and get charcoal.
See a dark niche with a
basin in front of it.
Check and take the
drawing on the rock at center of the cave.
Open the chest at left.
Take a stone tablet with something written that Geron cannot decipher.
Check the tunnel to the
right and Geron says they need directions.
Light up the dark
niche: Check the butterfly-summerling inside a jar at top
right pedestal.
Use the disassemble
magic on the jar to release the butterfly. Nuri gets upset for breaking the jar.
Use the reassemble magic
on the jar. Nuri fixes the jar.
Place the blossom on the
basin in front of the dark niche. The butterfly settles on the blossom and lights
up the niche.
Find the explorer:
The maze map:
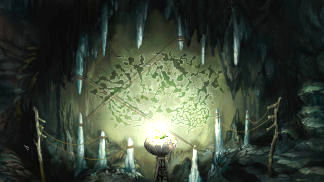
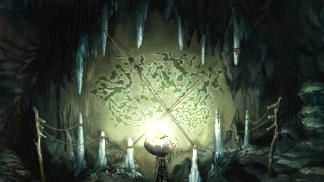
See the map on the wall.
There are 6
dripstones-stalactites on the ceiling and 6 threads tied to stalagmites-posts on the cave floor.
The threads can be
untied from the stalagmites and attached to any dripstones above.
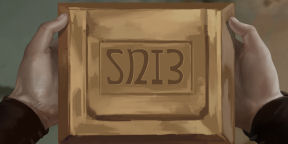
Stone tablet:
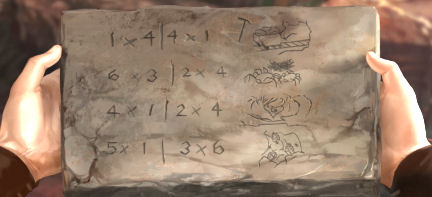
Study-right click the stone tablet in inventory.
The numbers are the posts and dripstones that are to be connected with the ropes.
Only one location needs be done but you can do all if you want.
1x4|4x1 is the location
of the copper mine (optional).
Place the thread from #1
leftmost post to the 4th dripstone.
Place the thread from
the 4th stalagmite to the first dripstone.
Untie the threads from
the dripstones.
6x3|2x4 is the location
of emerald spider nest (optional).
Place the thread from
3rd post to the 6th dripstone.
Place the thread from
the 4th stalagmite to the second dripstone.
Untie the threads from
the dripstones.
5x1|3x6 is the location
of the diamond grotto (optional).
Place the thread from
1st post to the 5th dripstone.
Place the thread from
the 6th stalagmite to the third dripstone.
Untie the threads from
the dripstones.

4x1|2x4 is the location
of the fairy artefact.
Place the thread from
1st post to the 4th dripstone.
Place the thread from
the 4th stalagmite to the 2nd dripstone.
I think I know where
the explorer is now.
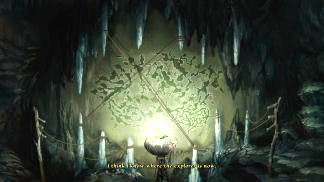
The orcs are coming to
the cave.
Enter the tunnel at
right. They need to copy the directions.
Click the charcoal on
the drawing and Geron copies the map. Now enter the tunnel.
Fairy artefact cave:
The scholar is entranced
with Nuri. Jacomo Nauta introduces himself.
Don't touch under any
circumstances! Nuri touches a crystal. A cave-in occurs.
Talk to Nuri. Nuri
starts talking in another language and giggles uncontrollably.
The scholar is stunned.
There is a gap that separates Nuri from the men.
Scholar:
The scholar coughs. Give the water bladder to the scholar. Talk to the scholar.
Get the backpack:
Try to get the backpack. It landed far from Geron.
Pick up the half a
yardstick from the ground.
Try to get the other
part of the yardstick under the rubble at left.
Use the half a yardstick
on the rubble to raise and pick up then other part of yardstick.
Use Nuri's reassemble
magic on the broken yardstick.
Try to use the yardstick
to get the backpack but Geron wants a hook.
Pick up the arm of
the fairy knight statue. Use the arm with the yardstick to get yardstick
with arm.
Use the yardstick with
arm on the backpack. Give the backpack to the
scholar.
Give the direction to
Nuri: The scholar draws a map for Nuri to follow. They
will meet at the mill.
Give the direction to
Nuri. Geron throws the paper but it flies away. The scholar says it is fairy
interference.
Talk to the scholar to
get another direction. Click the direction on the wicker basket in front
of Nuri. (If you threw the direction into the basket first; you might get an achievement).
Nuri takes the direction
and leaves to go to the Mill.
New Prospects:
The scholar talks to
Geron. Learn that Jacomo sealed the fairy gate at the Stone Oak Forest after the
seer was already captured. This was to prevent other fairies from being captured.
There was rumor of a fairy that was saved.
To help Nuri, Jacomo has
to know more about her homeworld which he suspects is Neirutvena. The
location of the magic harp is not known. The scholar will help save Nuri. Learn
about Satinav the steersman of the barge of time. He was chained to barge and
can see the past and the future but he cannot change them.
The scholar recommends
that Nuri go back to her world. There is another gate to Neirutvena located in
the swamp lands. Meander Goswin in Enqui has a crystal-prism from Neirutvena. It
points to the gate and also opens the gate.
The scholar will go to
the university in Andergast to find more about the Magic Harp. Jacomo gives Geron
his notes about the gates and fairy world. There is a creature that has eyes like a basilisk
that guards the gate.
New Old
Enemies:
Geron arrives at the
mill at nighttime.
Enter the mill. Geron is overpowered by
one Seer's
creature. Geron has vision of the burning of the seer. Learn that the Raven is the seer's
spy. Geron is left in darkness. One creature is left to guard the mill while the
other one goes and fetch the Raven.
Nuri:
See that there are 3 holes in the ceiling.
Call Nuri on the left
hole. Geron asks for moonlight. Nuri gets sick when she uses magic.
Release the foot
fetters:
Click on right ceiling
hole and see the broken mill. Check the gear to see that it is broken. Use the
blue reassemble magic on gear.
Click on middle ceiling
hole. See several items.
Use the disassemble
yellow magic on the oil lamp close to the ceiling hole. It drops on the stool
close to the saw.
Use the reassemble blue
magic on the glass shards of the oil lamp. The oil lamp pushes the saw close to the foot
fetters of Geron.
Use the saw and Geron
saws the foot fetters off.
Release the hands:
With the moonlight
through the middle ceiling hole, kick the leg of the cupboard. This tilts the
cupboard and the hourglass on top shelf is moved to the left.
Click on left ceiling
hole. See the hourglass tilted.
Nuri's shard is on the
other pan of a broken scale. Use the blue reassemble magic on the scale.
Use the yellow
disassemble magic on the hourglass and it pours the sand on the other pan. This raises the pan with
Nuri's shard close to Geron's hand fetters.
Take Nuri's shard. Use the shard on Geron's hand fetters. Geron is free of the
fetters.
Take care of the
creature:
Pick up the fetters
from the floor.
Click on right ceiling
hole. Take the straw and all of Geron's gears removed by the
creature.
Click on middle ceiling
hole.
Try to open the
trapdoor. Use the fetters on the trap door. Now open trapdoor. Look down the
hole. It is far down and no ladder.
Take the stool
and twin saw.
Use the blanket on the
opening of the trapdoor.
Use Gwinnling's knife on
the sagging blanket.
Place the straw over the
blanket to camouflage the trap.
Nuri gets sick and Geron
calls to Nuri. The creature enters and falls in the trap. The trap door closes.
Bring Nuri down:
Exit the mill.
See Nuri sick at right.
Talk to Nuri. Lie about what the scholar said and how to fix things. Fanglari is
a made believe realm where Nuri will be safe.
Place the stool on the
catwalk below Nuri. Describe Fanglari to encourage Nuri.
Use the twin saw on the
beam as the second step for Nuri. Tell about the Raven but Nuri doesn't believe Geron.
Chapter 3
Nuri believes in the
existence of enchanted realm of Fanglari. She now understands that she has to go
back to the fairy realm to be safe from the seer and she wants to take Geron
with her. They arrive at the swampland.
The Prism:
Geron knocks on the door
of Meander Goswin's house.
Jarre:
The man says that Goswin was murdered a year ago. Talk to the Jarre. He listens
and knows what Geron said to Nuri. He recommends to check at the bathhouse to learn more. He
wants money for more information about the prism.
Check the rubbish in
front of Jarre to get a broken hand mirror. Fix the mirror using
Nuri's blue reassemble magic.
Boat:
Check the boat with tarp over it. It's knotted tightly.
Use the knife on the
tarp. Take the grappling hook.
Use the blue reassemble magic on the tarp since Nuri doesn't like destroying things.
Drunkard:
Take the empty spirit bottle beside the drunkard at end of pier. Try
talking to the drunkard.
Find news in the
bathhouse:
Enter the building
behind the drunkard. Geron leaves Nuri outside and she talks to the drunkard.
Look around. Hear the
woman messenger that is being treated by Minka. Her beau is the one in the tub
that whistled.
Take the towel
hanging on far tub and the bucket by right wall. Take the tap on
the left foreground.
Check the frog figurine
sitting above the bath woman - Minka. Try to get bandages behind her.
Talk to Minka. Learn that Goswin became a boozer and talks about far world and prism. Learn that honest merchant Harm bought Goswin's house. Frog statue is a gift from Harm.
Talk to the injured
woman. Learn that the message is from Aarauken her boss. Try to open the
backpack in front of the messenger.
Talk to the guest in the
tub who is the messenger's boy friend. His name is Rahjard. Learn that the
message is for Harm. Aarauken is the King of the Ghost Light Hill.
Get the messenger's
message:
Talk to the messenger
again. Ask about Harm and learn that Harm is always at his ship. She will not
let Geron take the message. Make the messenger jealous. Geron says that the
lover is with a girl but the messenger can't check that is so.
Exit the bathhouse.
Talk to Nuri. Send Nuri
to bathhouse.
Go back in the bathhouse
and see that Nuri is in the tub with Rahjard.
In inventory, check the
mirror and see that it is foggy. Use towel with mirror.
Give the polished mirror
to the injured messenger. Now she sees the tub and is distracted.
Use the backpack to get
the message to Harm.
Deliver the message
to Harm:
Jarre:
Talk to Jarre in front of Goswin's house. Learn about Harm. He is called honest
merchant. Learn about stone figurines that he sells to Aarauken and his
smuggling. Harm is in his ship Therbunera.
Ferryman:
Go up through the covered path left of the water. Talk to the ferryman. It is nice
that Geron can understand him. He doesn't want to give a fish. He charges too
much for passage to the swamp. Ask about other way of paying and learn that he
wants booze for passage.
Take a smoking hook
right of the ferryman.
Therbunera:
Go right and see Harm's ship.
Talk to the guard
standing by the ramp. Tell the guard you have a message from Aarauken.
The guard asks for the
passwords: Harm's profession and preferences for animals and wine.
What is Harm's
profession? Select Honest Merchant.
Which animal does Harm
likes best? Ah... Select any answer and it will be wrong.
Jarre:
Go back to Jarre and talk to him about Harm. Harm likes only money.
Guard at ship:
Go back to the guard at the ship and answer him with "honest merchant" and
"money".
The guard asks what
money is in smuggler's banter.
Jarre:
Go back to Jarre and talk to him about smuggler's banter.
In exchange, Jarre wants to know to
know where Harm's transfer site of the smuggling operation is located and he
wants a carving of a kraken-newt used by the smugglers.
Find the transfer
site:
Go back to the ferryman
area. Check the beam on top of the post left of the ferryman.
Use the grappling hook
taken from the boat on the beam. Go across from the beam now.
Transfer site:
Look around at the transfer site of the smugglers.
Take the hammock.
See petrified cat, water
pipe and kraken-newt on the top shelf.
There's a barrel on the
right with a petrified rabbit on top.
Get the Kraken Newt:
The statues are too high to get.
Take the cupboard bolt
off and see that the middle shelf inclined.
Use the yellow
disassemble magic on the middle water pipe. This tilts the cat that pushes the
kraken-newt down to the inclined shelf and down to the floor.
Take the kraken-newt
carving.
Get the passage fare
to the swamp: Check the barrel at right; it has an orc's
head on it.
Use the tap taken from
the bathhouse on the barrel.
Take the petrified
rabbit. Look at the rabbit in inventory - the animals are petrified.
Use the petrified rabbit
on tap to hammer it in.
Use the empty spirit
bottle taken from the drunkard on the tap to get bottle full of Fever Dream
Spirit.
Jarre:
Go back to Jarre. Give him the carving of kraken-newt.
Jarre gives the crib
notes for smuggler's banter. Check the crib notes for smuggler's banter in
inventory.
Note that the banter for money is moths. Water-sea is frog's wine.
Harm:
Guard:
Go back to the ship and answer the guard: honest merchant, moths and frog's
wine.
Meet Harm:
Take note of the fishbone key on his neck.
Ask Harm about his rash.
Geron was robbed. Aarauken warned Harm that the whale hunters are planning an
attack tonight to get the prism. Select lie or truth.
Ask for task. Harm gives
an anchor that all messengers wear. Prism is the key to a world full of
healing and light.
Ask about remedy for
rash. Harm asks for cod liver oil.
Prepare
to steal
the prism:
Look around.
Noise:
Check the wooden box or the candle from the armoire at right. Geron determines
that it is too quiet.
Open the window. The
sound outside will mask any noise Geron makes.
Chest with prism:
Take the candle from the armoire.
Check the whale
chest at right. There is light coming from the mouth. There are jingle bells on
top of the whale.
Light the candle with
the flintstone and tinder. Use the burning candle on the jingle bells on
top of the whale chest. That will stop them from ringing.
Get cod liver oil from
top cabinet of the armoire. Give the cod liver oil to Harm.
Return the candle on the
armoire.
Boat:
See a hole on the window at top left corner. Exit the cabin.
See a lifeboat hanging
just in front of the captain's cabin.
Go up and turn the crank
twice to lower the life boat to the lowest level. Note that the first turn of
the crank
lowers the lifeboat just close to the window with hole.
Get Harm to remove
the key from his neck:
Bathhouse:
Go back to the bathhouse.
Hear the messenger complain about the powder that makes her itch and burn.
Ask Minka for powder and used bandages. The messenger nixed
giving the used bandages because of fear
of being cursed.
Minka says she throws
the old bandages into the sea.
Get used bandages:
Exit the bathhouse.
Place the smoking hook
taken close to the ship on the iron ring left of the bathhouse.
See old bandages thrown
out of the window at right.
Place the bucket taken
from the bathhouse on the smoking hook.
Wait for a used bandage
to be thrown in the bucket. Take the bandage with itchy powder.
Make a fake key:
Talk to Nuri and send her to the ferryman to coax a fish from him.
Go to the ferryman. Talk
to Nuri about the fish from ferryman and get the herring.
In inventory, use knife
with fish to get fishbone.
Combine fishbone with
miniature anchor necklace given by Harm to get miniature anchor with fishbone.
Harm:
Go to Harm on the ship.
Open the sideboard and
get a cod liver oil.
Combine the cod liver
oil with the bandage with itchy powder.
Give the cod liver
oil with itching powder to Harm.
Harm itches and removes
the fishbone key. He hangs it on the crossbow beside him and under the window
with hole.
Steal the key and the
prism:
Nuri: Go back to Nuri by the
ferryman. Talk to Nuri and send her onto the lifeboat.
Follow Nuri to the
lifeboat. Give Nuri the miniature anchor with fishbone. Geron explains what she
has to do.
Go back to the top of
the ship. Turn the crank once so that the lifeboat is even with the window
with hole.
Go inside to Harm.
Talk to Harm to distract Harm from Nuri. Keep on asking until Nuri replaces
the key with the false one.
Go to the crank and lower Nuri to the lowest level.
Go down to Nuri. Ask
for the key. Nuri gives a great idea for hiding the key from the guard - hide
it under his tongue. Tell Nuri to exit the lifeboat.
Prism:
Go back to Harm's cabin. Use the key on the whale chest.
Take the prism.
Take the wooden box
on the armoire. Combine the prism and the wooden box.
Throw the wooden
box with prism out the window.
Exit the cabin and go
down where the lifeboat is located.
Use the hammock taken
from the transfer site to get the prism and the wooden box.
Fanglari Ho:
Go to the fairy gate:
Ferryman:
Talk to the ferryman to bring them to the swamp.
Camp:
Nuri and Geron are in a camp. Nuri believes all of Geron's stories about Fanglari.
Nuri gives her
necklace and her magic to Geron. Answer her anyway you want. The lovers slept.
While Geron sleeps,
Raven arrives. Nuri tells the Raven about Fanglari.
Get a working boat:
Geron wakes up and needs only a paddle to get to the gate.
Take the blade of
the spade at bottom right.
Take the hatchet
on the post of the ruined house.
Use the hatchet on the
cart left of the fire to get handle.
Combine the blade of
the spade with the handle to get spade-paddle.
Check the boat wreck.
Use the blue reassemble magic on the boat wreck to repair the boat.
Use the spade-paddle
on the boat and away the two go.
Find the Fairy Gate:
Marsh:
In the middle of a marsh, look around.
Take the rope
from the boat and the perforated boot close to the swamp. Check the ghost light
on the water.
Try to take the
strange plant at right. Use the spade to dig out the strange spitting plant.
It spits stingy substance.
Check the hollow tree at
center of the marsh.
Use the hatchet on the
tree trunk at left to make a bridge.
Use the rope on the
hollow tree. Go down.
Disable the guardian
of the gate:
Look around. See a large
eye watching everything.
Peacock:
Check the peacock on a stand. Right click the statue of the peacock and Nuri
will want to check the peacock. When she touches it, a light beam is produced.
The light beam is
directed to the nearest mirror. The eye follows the light.
Disable the eye:
Ask Nuri to touch the
peacock again. The eye is fixed on the bright light.
Turn the peacock to
focus on the pool of lamp oil at left. Now the eye faces left.
Take the nearest
mirror at right.
Go right and see a
mushroom and a hovering dragonfly. Take the mushroom. Use the hammock to
catch the dragonfly.
Examine the petrified
woman. Take the petrified bat at bottom right.
Examine the eye and see
that there is a lens protecting the eye.
Use the yellow
disassemble magic on the eye to break the lens.
Examine the giant worm
at right. It is full of holes.
Place the spitting plant
on the large hole on the body of the giant worm.
Use the flint and tinder
on the large hole to irritate the spitting plant.
Then the plant spits on
the eye and it recedes.
Open the fairy gate:
Pool: Go left and take the
broken oil lamp. Use the blue reassemble magic on the broken oil lamp to get
fixed oil lamp.
Use the water bladder to
collect lamp oil from the pool.
Prism:
Continue to the left.
See a contraption-stand
in front of the gate. Place the prism on top
of the contraption.
Go back to the giant
worm. Place the mirror on one of the small holes on top of the worm.
Go back to the peacock.
Turn the peacock to focus light to the mirror on top of the worm. See that the
light beams down to the entrance below.
Go back down to the
contraption. See that the light now beams through the prism and produces a color
on the wheel at center of gate.
Gate:
Read-right click the fairy scholar's notes. Learn that symbols mean the
hovering, the burning and the magical. Those are the 7 elements of the fairy
world.
Magical:
Blue color at center shows bricks and waxing moon on both sides of a basin.
Place the
magically reassembled
oil lamp in the basin.
See light from the
center wheel is connected to the basin now.
Hovering:
Turn the gear of the prism contraption.
Green color at center
shows beetle and bird-freedom on both sides of a basin.
Place the caught
dragonfly in the basin.
See light from the
center wheel is connected to the basin now.
Burning:
Turn the gear of the prism contraption.
Red color at center
shows fire and water on both sides of a basin.
Place lamp oil in the
basin; then light it with the flintstone and tinder.
See light from the
center wheel is connected to the basin now.
Now all are lit. Turn
the prism; the light turns white and it opens the gate.
Geron calls Nuri. The
Raven flies in. Talk to the Raven. Learn that he is the Seer. He wants
immortality.
Learn about the madness
of the fairy queen and the slow death of her realm.
Nuri pushes Geron into the fairy world. She thinks that the
Raven is the Bird-man.
Chapter 4
Geron relives the memory
of the burning of the seer again. This time there is a ring.
In Nuri's
world:
Well room:
Talk to the eye creature
- guardian of the gate seen at bottom right. He doesn't want to open his eyes
anymore because he causes death. He is a very curious fellow.
Look around. Check the
strange contraption at right.
Check the well at center
of room. The water is icy because it is winter, of course.
Check the chute on the
ceiling above the well.
See light fixtures on
stands. Geron yells.
Check the light fixture by the stairs at left. It's whispering
something. She's looking for her daughter.
Main chamber:
Climb the stairs at left
and see that this is the area where the rooms meet.
A guard at left stops
Geron. Talk to the guard. The guard brings Geron to the Queen.
Three
Impossible Tasks:
Queen and tasks:
The Queen talks about
the bird man foretelling the arrival of night-hair to Neirutvena and that he
brings doom (but he might bring new beginning).
The Queen is at a loss
on what to do with Geron.
Keep silent unless given
permission to speak. Ask for hospitable arrest. Appease the concern voiced by
the Queen. Ask about the second gate.
Geron is given 3 tasks
and if he succeeds; he will be given access to the dream chambers where the
second gate is located.
1. Get an apple from the
garden and bring it to the Queen.
2. Get a life size
statue of the Queen in the 6 colors of rainbow and bring it here.
3. Get the statue of the
blind bird man to look at the Queen.
Find out more about
the Bird Man, Neirutvena and the tasks:
Talk to the Queen again
and ask about the bird man. The bird man had a black bird with him when he came
here.
Pick up the goblet
from the stand and the wicker basket by the entrance.
Blind birdman statue:
Look at the big face outside the balcony. It is the statue of the birdman and it
has no eyes.
Garden:
Look out through the round glass window and see the garden. The apple tree has
no leaves; the bees are in hibernation and the waterfall is frozen. The well at
the ceiling looks familiar.
Guard:
Exit to the left and be at the main chamber.
Talk to the guard. Learn
about the blind birdman statue. It is accessible and has paint all over the
place.
The birdman's
description does not fit Nuri's description of the birdman.
Learn about the dream
chamber and the end of the mist.
New laws are passed so that what was foretold by the birdman will not happen.
The Weaver of Dreams is
in the Dream Chamber.
Peacock:
See a giant peacock at center of the chamber.
Talk to the peacock. The
clock-peacock is blind. Pavaurus is his name.
He gets his bearing from
the wind. The wind blows in the direction of the sun that rises in the west in
winter and east in summer.
The hermit's sigh tells
the peacock where the wind blows.
The peacock knows if it
is winter or summer by the flow of the water. If it flows it must be summer.
It also sleeps for a
short time during the season.
The peacock's friend;
the eye-creature has not visited him since his birthday. The eye-creature loves
music of flutes and harps.
The hermit above is easily
distracted by a nice scent.
Seashell:
Check the new laws by listening to the seashell at left.
Waterfall:
See that it is winter because the waterfall is frozen.
Get an apple from the
garden and bring it to the Queen:
Garden:
Look through the round window at left and see the other side of the frozen
garden.
Picture gallery:
Enter through the door right of the round window.
Look around. Check
the sculpture at left. Take both horns of the sculpture and the stake
in front of it.
Check the mirror and the painting that depicts the garden in winter. The painting can be turned
(just like what Nuri did to the drawing in the cave). Check the painting at
right; it's a ledge.
Take the light
crystal from the left stand and see that the right painting becomes flat.
Place the light crystal
on the right stand. Go through the right painting which is now a passage.
Come out on top level.
Take the light crystal off the stand and see that the paintings become flat.
Place the crystal back on the stand.
Check the rainbow
colored steps at center painting. Note that orange is missing in the rainbow
colors.
Take the spear
from the mouth of the sculpture at right.
Take the colour-stone
from the basin on the floor at center. The colors in the room disappeared. It is
all gray now.
Turn the garden to
summer: Go back down through the left passage.
Place the colour-stone
on the basin at lower level. The garden painting is now colorful.
Exit through door at
right and check the garden through the round window at left.
See a beautiful garden.
The bees are busy making honey. The water is flowing on the waterfall and the
apple tree is fully leafed and has an apple on top.
Get the apple:
Bow:
In inventory use the blue reassemble magic on the horns-halves of bow to get a
bow.
Spear: Combine the spear and the bow to find out that the spear is too big.
Waterfall:
Look at the waterfall that was frozen before and see that it is flowing.
Stand at bottom water
basin and see that Geron is large. Go to the upper water basin and see that
Geron is now smaller. Huh!
Place the spear in the water at upper water basin.
Go down to lower basin
and take the shrunken spear - arrow.
Apple: In inventory combine the
arrow and bow to get bow and arrow.
Go to the round window
at left to see the garden in summer.
Use the bow and arrow on
the apple at top of the tree.
Gallery:
Go to the gallery next door. Turn the painting upside down.
Go back to the round
window next door. See that the garden is upside down and the ceiling hole is now a
well.
Go right to the exit
left of the guard and be at the well room.
Pick up the apple
from the well.
Get a life size
statue of the Queen in the 6 colors of rainbow:
Well room:
Take the figurine of the Queen light fixture from the stand at left.
Get honey:
Go left and look through the round garden window. See the upside down garden and the beehive is dripping honey.
In inventory combine
the stake from the gallery and the goblet taken from the Queen's room to get
goblet with handle.
Use the goblet with
handle on the dripping honey to get goblet with honey and stake.
Gallery:
Go to the gallery. Take the colour-stone from the basin.
Turn the garden
picture right side up.
Hermit crab:
Remember that the hermit crab is the one that tells the peacock where the wind
blows and that it likes scents.
Go right to the
Queen's room with guard and out through the entrance behind her to be out on a
platform with a compass.
The stone
pedestal-plinth to the dream chambers mentioned by the guard is at the end of
the platform.
See that the hermit
crab on top of the compass is facing east at the moment. Click on east pie
area and it smells like something burning.
Get a peacock
feather: Place the goblet at different cardinal points
to see the change in season.
Place the goblet of
honey at south pie area and see that the hermit crab faces south.
Note that because it
is winter (no color to the right side up gallery garden painting and the wind blows south); the peacock goes to sleep.
Go down to the sleeping peacock
and take a peacock feather. Look at the feather
in inventory, it is a waning moon.
Gallery:
Go to the gallery and place the colour-stone back on the basin in front of the
garden picture. Exit.
See that the peacock
is awake.
Statue face:
Go back up via the Queen's room to the compass-hermit crab again.
Take and place the
goblet with honey on the west part of the compass. The hermit crab faces west
and a path is formed at side of the statue face across the way.
Take the goblet of
honey again. Exit through the Queen's room.
Go through the door
left of the garden round window.
Remember the guard said that the face is being painted.
Enter the side door of
the face. See that the eye sockets are windows.
Get orange paint:
Remember that the large rainbow painting at the top level of the gallery is missing orange color.
There is a pot of red paint here. Take the lid off.
Use the pot of honey
on the red paint to get orange paint.
Use the peacock
feather on the orange paint to get feather with orange paint.
Exit the face and go
down. Go to the gallery.
Gallery:
Take the colour-stone
from the basin. Go to top level via the doorway right of the garden picture.
Place the colour-stone
on the basin of the top level. See the rainbow colors
of the center picture.
Get a Queen statue
with the colors of the rainbow: Place the light fixture on
the rainbow colors. See that it is the statue of the queen.
Left and right click the
painting to note that orange is missing.
Take the crystal
off the stand to make a flat surface painting.
Use the feather with
orange paint on the 2-D flat painting. Now orange is added.
Place the crystal back
on the stand. Now the painting is 3D again.
Take the rainbow
colored light figurine of the Queen.
Make the statue life
size: Take the colour-stone
from the top level basin.
Go down to the lower
level and place the colour stone on the basin here.
Also be sure that the
garden painting is upside down.
Go to the bottom water
basin at main chamber.
Use the rainbow colored
light figurine on the lower water basin.
Take the rainbow
colored statue from upper water basin.
Get the statue of the
blind bird man to look at the Queen:
Eye-creature:
Exit the gallery and go to the well room across the way.
Talk to the eye-creature
now that you know all about his birthday from the peacock.
The eye-creature is very
depressed. He wishes that he can find a place where he can spend eternity in grief.
Tell about a place for
him. Since he is feeling guilty; select dialogues: dark, empty eye socket and he can spend
time in dream.
He can dream about his
birthday. Geron picks up the eye-creature.
Statue face:
Go to the blind birdman face across the compass. Enter through the side
door.
Place the wicker basket
on the left eye socket that faces the Queen's room.
Place the eye-creature
on the wicker basket. He falls asleep immediately.
Get the eye-creature
to open his eyes: Talk to the eye-creature about his
birthday.
Tell him about the
players, dance and raisin cake (all that was banned in the fairy world).
Queen and completed tasks:
Go back to the Queen in
her room.
See the eye-creature
peering out from the eye socket of the blind birdman statue.
Talk to the Queen now
that you have the apple and the rainbow colored light statue.
The Queen gives the key
to the dream chamber.
Talk to the Queen again
about the birdman and the ring on the statue.
The ring is a present
from the priests. The ring fills his priests with enlightenment. The priests
went with him.
Dream Chamber:
Exit to the compass
outside. Use the key given by the Queen on the stone pedestal at edge of
platform.
A doorway is formed. Go
through the doorway.
Fairy Gate:
Go forward and see scenes of Geron's past and future.
Go forward until the fairy gate. Enter the gate. The fairy gate rejects Geron.
Weaver of Dreams:
Talk to the Weaver of Dreams at right. She is the sister of the Queen. Nuri is her niece
and daughter of the Queen.
There is a shadow over
Geron and others like him. They do not challenge their fears and can't find the
serenity of the here and now. The gate won't open for anyone driven by fear.
The magic harp makes one
dream of the past and future. The Harp is a window to your soul.
Enter the dream:
Challenge the dream.
Geron recalls his dream:
a crowd of people; unholy voice, black feather falling from the sky, fire
burning and a wooden ring.
Geron falls asleep and
wakes up in his room in Gwinnling's house.
Collect the shards of
his dream - trunk: Open the clothes trunk beside the bed.
Hear taunting voices.
Take the magic flute.
Enter the trunk and be
in the Carney widow's camp.
Take the key
hanging from the door.
Go inside the wagon or
click on door and
be back in Geron's room. Exit through the door and be back at the camp.
Take the petrified
fire at the fire pit.
Look at the hourglass
hanging above. The sand is not trickling anymore. Use the yellow disassemble
magic on the hour glass. Pick up the glass shard from the ground.
Go back inside the
wagon.
Collect the shards of
his dream - closet: Use the key on the lock of the closet
door. Enter and be in Nuri's
hollow
tree.
Pick up the Raven's
feather on the ground.
Talk to the Raven at
right. Use the magic flute on the Raven. The Raven disappears.
Look at the curtain of
the water basin. Use the glass shard on the curtain. The voices taunt Geron.
Talk to Nuri. Nuri gives
the ring - seer's artifact.
Lay to rest all the
shards of his dream: Exit the tree-closet and be back in
Geron's room.
Arrange in order the
shards-items taken on the hooks right of the door.
From left to right
hang: curtain (people taunting), magic flute (voice - you
spell doom), raven feather (falling from sky), fire (burning of the seer) and
seer's artifact (ring around his neck).
Automatically recall the
event. The falling black feather entered the ring. The Seer says Corvus. Someone
picks up the ring.
The seer used the ring
to transfer his spirit into the Raven.
Talk to the Dream
Weaver.
The fairy gate:
Go to and exit the fairy gate.
Chapter 5
A full moon
has passed since Geron left Andergast.
Back Home:
Nuri's treehouse:
Geron is in Nuri's
treehouse. It is full of ice. Check the fairy gate.
Use the knife on the
thorny hedge.
Take the magic icicle
from the side of the fairy gate. Look at it and see something inside.
Check the mandrakes on the rocks. They are rotten.
Take the plant-mandrake
on the ground. Exit the tree.
It is icy in the forest
also. Use the knife to take the lichen on the rock wall.
Knight Wrathling:
See the knight
despondent outside the town. Talk to the knight.
Learn that he failed in
finding the Seer and the situation in Andergast.
Take the brown oak
twig on the tree trunk.
Enter the town.
Olgierd:
Talk to Olgierd. He
killed Ulfried because of his dreams caused by the crows.
Talk him out of suicide.
Win his trust; bad luck charm and get the pitchfork.
Take the jug
beside Olgierd.
Castle Gate:
Go to the center road, then to the left to be at the castle gate.
See the crows on top of
the castle gate. They tore the town's banner.
Trogar:
Talk to the window above the castle gate.
He would not let Geron
see the king until the crows are taken care of.
Learn of the misfortune
of Trogar.
Take care of the
crows:
Herb stand:
Go right to the market place.
See the body of Ulfried
right of the herb stand.
Use the knife on the
herb stand curtain to get white canvas.
Move the washing bowl
and get the root.
Gwinnling's house:
Go to and enter home.
Check the bird cage with
droppings to get a dove's egg.
Open the clothes trunk.
Take the needle and thread and the green doublet.
Go upstairs and pick up
the glass shards by the stairs.
Pick up the herbarium.
Get recipe for crows
reverse the curse remedy: Open the drawer at the corner.
The left side is wedged
in. Pull out the right side drawer. Use the knife on right side drawer to remove
the bottom.
Take the recipe.
It requires one mandrake root, one yoruga, 2 ounces thrashbeard, one that
attract crows and one that contains fairy magic. All of that is heated in a
glass bottle.
Make the recipe:
In inventory, use the
herbarium on the root taken from the herb stand and see that it is yoruga.
Use the herbarium on the
lichen and see that it is thrashbeard.
Use the blue reassemble
magic on the glass shard to get glass bulb.
Use the glass bulb on
the tripod on the table.
Place the yoruga,
trashbeard, mandrake root, dove's egg and magic icicle in the glass bulb.
Use the flintstone and
tinder on the oil lamp.
Take the reverse the
curse remedy. Now it only needs for the crows to touch it.
Make a banner:
Remember that the crows attacked the town banner and shredded it.
Exit town left of
Gwinnling's house and talk to Knight Wrathling. Ask for the pennant.
Combine the pennant with
the red crown with the white canvas taken from the herb stand to get white
cloth with red crown.
Combine the brown oak
twig taken from the tree by the knight on the green doublet.
Use the knife on the
green doublet with oak twig to get green oak twig.
Combine the green oak
twig with the white cloth with red crown.
Use the needle and
thread on the combined cloth to get the town banner-improvised flag.
Reverse the curse on
the crows: Go to town gate.
Lower the shredded
banner by using the winch. Geron takes off the shredded banner from the pennant
fastener.
Combine the improvised
flag with the reverse the curse remedy.
Place the improvised
flag with reverse the curse remedy on the pennant fastener.
Automatically, use the
winch to raise the banner. See what happens to the crows.
King Efferdan:
Trogar gives Geron access to the king after seeing what happened to the crows.
Talk to the King. The
Raven flies in and demands the ring.
When the Raven leaves,
ask access to the Magic Academy.
The King gives Geron a
charter as his envoy.
Academy of
Magic:
Go to the marketplace at
right. Go right of the Ulfried's dead body.
Talk to the guard in the
guard's hut. The snotty guard finally allows Geron in after showing the royal
charter.
Courtyard:
Check the Circle of the Gods on the ground. Note the names of the gods and the
central hole.
See that there are
lights on the top floor and that the windows are boarded up. Enter the building.
Library and Fairy Scholar: Enter the door at right. Find Jacomo. Talk to Jacomo completely.
Discuss the artefact and know how to
do soul exchange. Magister Oakward hid the ring. Geron wants to use the ring
as bait.
Look around the library.
Check all the tablets on the left wall and Jacomo translates them.
Take the magic glass
and decanter from the scholar's table.
Find Magister Oakward:
Exit the library. Check
the firmly latched door left of the stairs.
Check-right click all
the tablets on the left wall.
Check and take off the
carpet-doublet of the guard hanging on the wall at left.
Exit to outside. Go to
the boarded up window at right.
Use the pitchfork to
remove the boards and then enter.
Check the alligator
monster and the notes on the table. Eius causa discimus. The Magister
repeats the same words.
See that there is a crow
here already.
Take the magician's hat from the floor. Talk to the comatose magister repeatedly. He repeats the same
Latin words. We saw those words before.
Read the tablet on the
wall. Exit through the window and go back inside the building.
Find the artefact:
At the hallway, check
the third tablet - Eius tablet. Remember this tablet has the same words repeatedly said
by the magister.
Use the knife to remove
the Eius tablet and get a key.
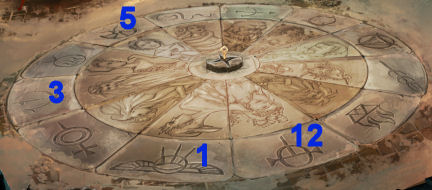
Circle of the Gods:
Exit down the stairs to be outside.
Examine the Circle of Gods again. Note that the hole is
not even one span deep.
Use the key taken from behind the Eius tablet on the
hole. It fits.
See a close up of the
circle of the Gods.
Note that there are 12
Gods. Check-right click on each God's symbol.
Learn that Praios is the
first of the Gods.
Study the Eios tablet in
inventory. Geron turns the tablet upside down and it turns into numbers = 5, 12
1, 3.
Since Praios is 1 and
going clockwise: left click Boron as 5, Rahja as 12, Praios as 1 and Efferd as
3.
A spiral stair is
formed.
Get the ring:
Go down to the hidden
chamber.
See the artefact in
magic cage. Above is a chandelier and below is a stand with a tablet.
Read the tablet. Try touching the magic
cage. Ouch.
Study the chandelier
above. It cannot be moved.
Fill the magic cage
with wine: Use the decanter on the magic cage and then the
chandelier. Hmm...
Place the magician's hat
on the chandelier.
Fill the hat with wine
from the decanter. See if you can cut the magician's hat. Geron says that the
wine might go through.
Make container for
wine: Use the yellow disassemble magic on the clay jug in
inventory to get clay shards.
Use the clay shards on
the magic cage. See the shards float around the ring.
Use the blue assemble
magic on the clay shards. The ring is now inside the jug.
Get the ring:
Now cut the wine filled magician's hat with the knife.
The wine fills the jug
and the ring is raise to the top and out.
Pick up the Seer's
artefact.
Find the location of
the magic harp and Nuri:
Gwinnling's house:
Exit the hidden chamber and the academy. Go back to Gwinnling's house.
Go up the stairs.
Examine the painting of the magic harp at right. The print is so small.
Use the magic glass on the painting: Raven's Peak.
Academy's library:
Go back to the library at the Academy.
Check the bookshelves at
right. Read all 4 books.
Learn about
transmigration in Ars Magica and the location of Raven's Peak in Geographia.
Disarm the ring:
Jacomo Nauta:
Talk to the fairy scholar. Learn that the ring needs a focus for the transfer
and it can only be used only once more.
Ask Jacomo about the
focus. The focus has to have an actual part (hair, fingernail, blood) of the
target's body and the body part must be conjoined with the ring (touch it).
Artefact as bait:
Ask Jacomo how to change the magic word. The original words have to be said
backwards and use another word.
Ask about Corvus. Select Satinav as the new
magic word. The scholar and Geron (automatically-not shown) change the magic
word.
Geron says farewell to
the scholar.
The Harp:
Geron travels
to Raven's Peak.
Outside the cave:
Look around. See the
seer's creatures. The Raven's statue is surrounded by sacrificed knight and several
animal bodies.
There is a catapult at
left.
Large catapult:
Go up the steps at side of mountain. See a large catapult.
The mechanism is
completely frozen. Use the flintstone and tinder on the mechanism.
Turn the winch. It
needs a lock lever.
See a dead horse's
body at left.
Get a lock lever:
Go back down. See another catapult at left.
Distract the creatures
by using the disassemble spell on the Raven's statue. The ice around the
statue cracks.
Go to the catapult now
that the creatures are around the statue.
Take the lever
at left side of catapult. Go back to the large catapult.
Arm the large
catapult: Use the lever on the mechanism.
Use the winch and it
lowers the arm. See that the chains do not have a sling.
Use the knife on the
horse's cadaver to get hide. While here, use the knife again to get
meat from the horse's body.
Use the hide on the
chains.
Pick up a
projectile from the ground and place it on the sling.
Use the lever to give
Geron an experience he wanted. Hear screams.
Go down to the statue
area. See that the ice cracked. The creatures and the statue are gone.
Take the broken
sacrificial pole at top left of the circle.
Cave:
Enter the tunnel. Look
around.
See a pile of rubble by
Geron's feet. The arch below has black birds guarding the entrance.
At far middle is the
harp with Nuri playing it.
Remove the crows:
Go back to the pile of rubble at left.
Fix the broken
sacrificial pole with blue reassemble magic to get sacrificial pole.
Use the sacrificial pole
on the pile of rubble.
Place the horse meat on
the pole. The crows fly to the meat.
Creature:
Enter the cave and be attacked by a creature.
Look around for
something to use. There's a broken knife at right and skeleton at top right.
Above the skeleton is an icicle.
Use the reassemble blue
magic on the broken knife at right.
Use the disassemble
yellow magic on the icicle above the skeleton. A rib rolls down to Geron.
Geron picks up the
rib. Use the rib on the knife at right.
Use the knife on the
creature.
Nuri, Harp and Raven:
Geron goes to Nuri. Talk
to Nuri (as she is seen in the future vision at Dream Chamber).
Raven flies in. Nuri and
the harp are one.
Raven wants the ring. He
wants to be king of realm of dreams.
Find another way. Raven
has seen the future - Geron will give the ring to the seer.
Quit the dialogue and
talk to Nuri completely.
Nuri sheds tears.
Use the seer's artefact
on Nuri's tears.
Give the artefact with
Nuri's tears to the Raven.
Raven wears the ring as
crown.
Raven and Geron discuss
the Keeper of Time.
Nuri was free.
This document may not be distributed without express written permission of the author and the content may not be altered in any way.
For Questions or Comments on this Walkthrough,
Please write to: MaGtRo
Copyright © 06/2012 MaGtRo
 GameBoomers Walkthroughs and Solutions