Dead
Mountaineer's Hotel
by
Electronic Paradise & Akella
Walkthrough by
MaGtRo November 2011
Gameplay:
This is a third person point and click.
The main menu has new
game, load game, settings, credits and exit.
The settings option
has subtitles, shadows, dialog volume, music volume and effects volume
adjustments or selections.
Move the cursor around
and the cursor changes over locations, items or actions.
Right click opens the
notepad seen at right side of screen that has items (inventory), diary and in
game menu.
The diary has notes,
characters, plans and events. An arrow at top left brings back the main
selections after selecting a document in the diary.
Double click on an
exit (side of screen) hastens the transition to the next screen.
Lieutenant Peter
Glebsky drives up the mountain. Peter arrives
in front of the Dead Mountaineer's Hotel and is welcomed by Alec Snevar, the owner of the hotel.
Alec relates the death
of the mountaineer because his carabiner failed and the ensuing avalanche.
Talk with Alec:
Alec wants you to
follow him to his study. Follow Alec inside the hotel.
Go left to follow Alec
at the lobby. Dinner is at 6 at the dining room.
At the side corner of
the lobby, see a golf bag.
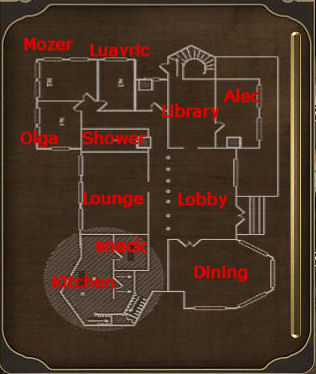
Hotel floor plan:
Check the frame on the wall to place the hotel plans from basement to 3rd floor
in the diary.
Library:
Follow Alec to the room at right. Meet Lel, the victim's dog. Pat the dog.
Check the picture of
the dead mountaineer.
Study:
Enter through the door at left. Talk with Alec.
Victim's room -museum:
After checking in, Alec brings Peter to the preserved victim's room - museum.
Check then cigarette burning on the ashtray. Check the perpetual motion
machine at left.
Go to bottom left to
see the bedroom area.
Check to take the
boots with fresh dirt. Check the newspaper on the dining table.
The call bell by the
bed is yellow.
Talk to Alec. Learn
that someone else is smoking the leftover cigarettes of the victim. Alec made
the perpetual motion machine. The shoes are du Barnstocre's lost shoes. Give
the shoes to Alec.
Peter's room 4:
Bedroom:
Talk with Kaisa completely.
Learn that Mr. & Mrs. Mozes,
Mr. Simone, Messrs du Barnstocre, Bruen and someone else are the guests here.
Ask about all the
guests until the dialogue is removed. Simone is the scientist across the hall
and the Mozes stay in rooms 1 and 2 and possibly 3. du Barnstocre is the hypnotist. Bruen, a young person has a motorbike. She
doesn't know the someone else that leaves wet footprints and reads the papers.
The call button above
the bed is purple-violet.
Open the suitcase and
take the cigarettes and lighter.
Bathroom:
Enter the bathroom at right. Take the straight razor from the sink,
towels from top of chest and the mirror at left shelf.
Exit the bathroom. Try
to exit room through door. The door is locked.
Sitting room:
Go to bottom left of the room. Check the small sitting room.
Exit at left to go the
balcony.
Open room 4 door:
Balcony:
Check the frozen carpet over the balcony railing. Go around to the left.
Check the floor plan,
second floor in the diary. See that room 5 is beside Peter's room 4.
Room 5:
Try the door at left. It is locked from the inside.
Look through the
window and see a man reading inside. He can't hear Peter's knock on the
window.
Catch the attention
of the man:
Right click to open
the notebook. Open items. Select the mirror.
See the mirror at
right and a hand cursor on the window. Click the window.
See the inside of the
room.
The object of the
puzzle is to get beams of light to surround the man and catch his attention.
Click on the bottle in
front of the man and see a circle and a bobbing light.
Maintain the light
inside the circle until the circle is filled with red and light bounces to
another item.
The beam of light from
mirror to bottle on floor to lamp at right wall and then to lamp of the
dresser beside the bed forms a triangle around the man and eventually shoots a beam to his face and catches
his attention.
Talk to Simon Simone.
He is a physicist.
Check the call button
by the bed. It is red.
Exit at bottom of
screen to the hallway.

Park the car:
Room 4:
Check the lock and automatically take room 4 key.
Peter wants to park
his car. Go to bottom of screen.
Check the floor plan
of the second floor to see where the stairs are located.
See the stairs at
bottom left of the floor plan that will lead to the front door.
There is stairs close
to your room at back. Let's take that one. Go down to the first
floor.
Alec:
Talk to Alec about being locked in. He mentions a "him". He is fixing the call
system.
Talk to him again
about the car. Take the garage key.
Go through entryway to
the library at left. Go forward until the lobby.
Garage door:
Go outside and enter the car. Click forward to drive the car.
Click on garage door
and see that the lock is frozen over.
Go right to go around
the hotel and enter through main door or go left to enter through side door.
Snack area:
Find the small snack area. It is the second door by the stairs at bottom
left stairs. Check the floor plan.
See Simone waiting for
dinner. Talk to Simone.
Get hot water: Go to bottom of
screen.
Pick up the thermos bottle on counter at right and the tea
kettle on the table left of door.
Beside the tea kettle
is a hot plate. Switch it on. Place the tea kettle on hot plate.
Wait until it boils.
Use the thermos on boiling tea kettle.
Hear Kaisa remind
Peter to turn off the hot plate. Switch off and Peter will unplug the hot
plate.
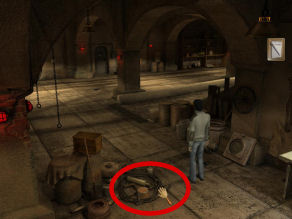
Enter the kitchen and
talk to Kaisa. She talks about the call system always ringing.
Take the matches
on the work table at center of room.
Exit through the door
at bottom screen at left or through the dining area door.
Thaw the garage
door lock: Exit the hotel by going down at the hallway
outside the kitchen and then right to the lobby area. Exit through main door.
Go around to the
garage door left by the skis or right on the road.
Look close at garage
door. Use thermos with boiling water on frozen lock.
Use garage key on
lock. Drive inside the garage.
Garage:
Go to bottom screen. Go to bottom screen again to see the work area.
Take the
screwdriver from the worktable at right.
Basement:
Go back to bottom screen. Enter through door ahead and be at basement.
Check the
electrogenerator drawing on the wall.
Take the funnel
on crate at bottom of screen.
Wine cellar:
Go to bottom of screen. Look around and check the wine cellar at end. See a room at far end that has a generator.
If you
climb the stairs at the end of the wine cellar, you will be at the kitchen.
Go back to the
basement by the garage. Climb the stairs.
Fix the call system:
You are now at the
base of the stairs at top of the floor plan. The door at left leads
to outside.
Go forward and talk to
Alec again about the call system. Have a shot at it.
See colored wires
crisscrossed on the panel. The colored wires should be correctly attached to
the correct room numbers (4 -10).
Find the colors of
the call buttons in each room: We already know some of
it.
Room 4 (Peters) is
purple or violet. Room 5 (Simone) is
red. Room 10 (Victim's
room) is yellow.
Go through library and
then through the alcove left of the floor plan wall.
Lounge:
Enter the double doors at left. Go to the fireplace area.
Talk to du Barnstocre,
the hypnotist. Bruen by the fireplace is his brother's child.
Talk to Bruen and
eventually give him-her a cigarette from the suitcase.
Bruen is in room #7
and has an orange call button.
Go to bottom of screen
and see bookcase and revolving globe.
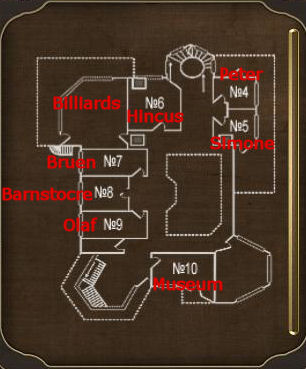
Other rooms:
Exit the lounge.
Check the floor plans.
See that other rooms are at second floor except for rooms 1-3 of the Mozeses.
Go down the hallway
and up the stairs. Go forward and check rooms right of the balcony.
Knock on room #9 at
left. No one is home.
Knock on middle door -
Room 8. du Barnstocre talks to Peter. Check the call button beside Barnstocre.
It is blue.
Room #7 is at right.
Bruen is at the lounge.
Go right and check
room #6 beside the billiards room. No one at home.
Fix the call
button: Go down the back stairs right of room 6.
Go forward and look at
the panel worked on by Alec.
Take the screwdriver
from inventory.
Click on the numbers
to remove all the wires from the holder.
Click on a number and
then click on the end of the colored wire.
Attach the correct
colored wires to the bare wires with the correct label:
Room 4 (Peters) is
purple or violet.
Room 5 (Simone) is
red.
Room 7 (Bruen) is
orange
Room 8 (Barnstocre) is
blue.
Room 10 (Victim's
room - museum) is yellow.
Room 6 and 9 are
unknown. Connect light blue for room 6 and green for room 9. Alec will say if
they are wrong.
Alec says it is
correct. He says Kaisa should have dinner ready.
Dinner:
Go forward and then go
left. At the lobby, enter the double doors.
Baptism by Fire:
Alec offers an exotic liquor, distilled from Edelweiss petals to Peter.
Accept - sounds
charming.
Drink the liquor and
click on center of the red circle until the red is emptied out of the circle
and Peter gives a thumbs up. Commentary by Bruen will inform you if you did it
correctly. The game continues even if you lose the puzzle.
Buffet:
Click on the buffet table. You have to select one from each course.
Do not repeat any of
the ingredients on the different courses. If you already selected chicken in
either the soup or salad or casserole; do not choose it for meat.
I chose mushroom soup,
Tuscan salad, chicken and vegetable and pepper beef.
Pull back. Commentary
by Bruen will inform you if you did it wrong. Kaisa says Bon appétit.
Dinner:
Talk around the dinner table ensues. Talk to everyone at the dinner table.
Learn that someone is
peeping at Olga Mozes' window.
Mozes complains about
the shoe thief.
Simone says his boots
are always wet.
Bruen leaves to ride
his-her motorcycle.
Alec invites Peter for
port.
Kaisa says there are
wet footprints.
End the talk when
dialogue repetition occurs.
Go to your room and
have a nap. After the nap, Peter mentions Alec port.
After dinner drink:
Go down to the lounge. Use the front stairs down to the first floor and then
go forward. Enter the double doors at left.
Talk to Alec sitting
by the fire.
Mozes is not a
businessman. Mrs. Mozes is supposedly beaten by Mozes. He has a whip.
Bruen enters and says
that someone rattled his-her doorknob. Someone is coming.
Olaf Andvaraforce and
Hincus enter. Alec brings them to his study.
The next day:
After waking up, exit
the room and meet Olaf. He invites Peter to ski.
Ski:
See Peter on skis pulled by Bruen.
The object of the
puzzle is to keep the arrow at green area. Use the keyboards left and right
arrows.
The game continues
even if you lose the puzzle.
Find out who is in
the shower:
See that a line is
formed in front of the shower room on the first floor.
Standing in line are
Simone and du Barnstocre. Talk to both completely.
Hincus arrives and
Barnstocre returns Hincus' flask. He leaves to get fresh air.
Olaf stands in line.
Talk to Olaf completely. He will wait at the foyer.
Go to the kitchen and
get breakfast from Kaisa.
Go to the foyer and
talk to Olaf completely.
Go to Alec's study and
see Mozes there with Alec. Talk to both of them completely.
Go to garage via the
basement. Go through the door left of the stairs at top part of the floor
plan.
Exit to garage through
the door at left. Go to bottom screen to the work area. Talk to Bruen. She-he
wants a cigarette and mentions that someone has lain in his-her bed. Go right and
see Bruen's motorcycle Bucephalus. Talk to Bruen again.
Go back to the
basement and up to the hotel. Climb the stairs to the third floor. Check the
floor plan.
Go left to side hall
and enter the dark room at left.
Go back to main
hallway and enter the room at left before the greenhouse door at bottom of
screen.
Take the generator
belt hanging on wall at right. Look around.
Peter realizes that no
one is in the shower room. All characters are accounted for. Lel is missing though. LOL.
Enter the greenhouse
and talk completely to Olga Mozes.
Exit the greenhouse at
back door. At the balcony, talk to Hincus. He asked about the skier (that's
you)).
Go to bottom screen
twice. Check the floor plan and see that the open door at left is way to a
staircase leading down to the billiard room.
It is dark in there.
Use the lighter in that dark room and read the inscription on the wall - There
is no way out.
Shower:
Go down to the shower room at the first floor. Enter.
See the dead
mountaineer's jacket and radio.
Click on the shower.
Later, Peter wants to hang his towel since it is wet.
Exit and talk to the 2
men in line.
Thefts and notes:
Room 4:
Go back to room 4. Peter says someone has been here and to look around.
Check the suitcase. Go
to the bathroom and place the wet towel on top of the chest.
Go to the sitting room
left of the bed.
See an anonymous
note glued to the desk.
Read the note. It states that a dangerous gangster
named Khinkusa also known as Eagle-owl threatens death to one of the clients.
Exit and go down the hallway.
Room 10 - Museum:
Peter hears something at the museum.
Enter room 10 by going
right of the balcony and take the door at right.
Talk to Mozes
completely. He lost his gold watch which was on the table that morning. Exit
the room.
Room 6:
Peter says that he should try to check Hincus' room.
Go to room 6 by the
billiard room and see that it is locked.
Win the gift of the
fair lady:
Hincus:
Go to the back staircase and meet Hincus. Talk to Hincus.
He's pale and scared.
He says that he has tuberculosis. Hincus wants a drink.
Olga:
Go down the stairs to first floor and see Olga standing there.
Talk to Olga. She
invites Peter to join her at the billiard room.
At the billiard room,
Simone challenges Peter to billiard contest. Accept the challenge.
Billiards
(necessary): Olga leaves her shawl as the prize and
then leaves.
See the billiards
table. The object of the game is to shoot more balls into the pocket than your
opponent.
To not get "foul" --- Hit a ball you want to go to
the pocket by hitting it with another ball. (Thanks to oldbroad.)
Left click the ball
you want to shoot.
Move the cursor to the
ball you want to hit while adjusting the cue to face the ball.
Move the
crosshair over that ball to adjust the angle of the hit.
Left click-hold the
cursor and see the bar at bottom of screen change length depending on the
strength you want to hit the ball.
Release the cursor to
shoot the ball. Win Olga's shawl.
Darts
(optional): Click on the dartboard right of the door.
The object of the
puzzle is to shoot when the red bar at right hits the top or close to top.
Move the cursor close to the bull's-eye.
Click the dartboard to
start the game.
Get master key:
Library:
See Olaf and du Barnstocre playing 21 or black jack. Join if you want
(optional).
To end the game, press
ESC key of your keyboard.
Alec study:
Go down to Alec's study.
Talk to Alec about the
watch, Hincus, note and keys.
Click the hotel
registry on the desk. Alec's handwriting doesn't match the note.
Click on the keys on
the desk. Peter says to lure Alec out of the study.
Lure Alec:
Go outside through the main hotel door. See the bell right of the door. Ring
doorbell.
Go back inside and to
the study. Meet Alec on the way out. He locked the study door.
Keep door unlocked:
Go out of the library to another screen or go to the lounge or kitchen. Then come back and
see if the door is now unlocked (Alec is back inside).
While standing on
other side of door (library-picture side), use the matches taken from the kitchen's
worktable on the door.
Get key:
Use the doorbell again. Go back to Alec's study and meet him again on the way
out.
Check the door and
then enter. Take the master key from desk and leave.
Check the rooms
(before doing Hincus' room):
Climb the stairs at
left and look around Alec's private room.
Check the map, the
safe and the books. Alec might come back in soon but Peter makes an excuse. Leave the study.
Check Olaf's, du
Barnstocre's and Bruen's room.
Bruen's room:
Take the wrench-spanner from the tools on the floor. See a woman's bag on
the chair.
Go to bedroom and open
the bottom drawer of the dresser with the phonograph.
See some illegal weed
and Bruen's handwriting on the cover of the notebook. Bruen did not write the
note.
Simone:
Check Simone's room across from Peter's.
Look at the papers on
the wall left of the bed. Simone did not write the note.
Dead mountaineer's
secret:
Power the generator: Go down to the garage via the
basement.
Go down to the work
area. Use the straight razor on the hose on the ground.
Go down and then right
to Bruen's motorcycle.
Take an empty gas can
beside the motorcycle.
Go forward and then
right to go to Peter's car.
In inventory combine
hose and empty gas can.
Use the can with
hose on Peter's car to get can with petrol.
Go back inside - exit
to basement. Go left and then forward pass the 2 closed doors.
Enter the door and see
the generator at bottom left.
Use the wrench-spanner
taken from Bruen's room on generator.
Use the funnel taken from basement by stairs and
then the can with petrol taken from garage on generator.
Use generator belt
taken from room before the greenhouse at third floor on generator.
The generator starts.
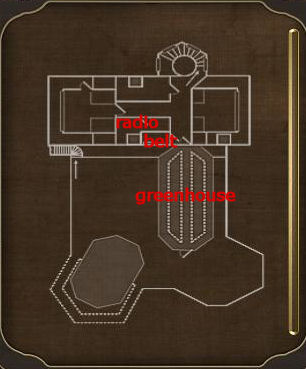
Radio room:
Go to third floor and left to side hallway. Enter the dark room at left.
See that there is
light now. It is loaded with radio equipments.
Pick up the key
on the floor.
Go down to Alec's study. Climb the stairs.
Now that you have the
key from the radio room, click on the green safe.
Take the optical disc.
Exit the study.
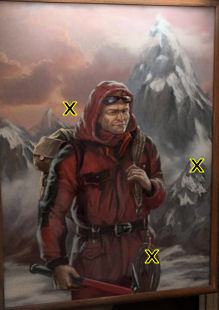
Mountaineer: Go to where the 2 guys
are playing at the library.
See a spinning globe
at back wall. Go there and then use the optical disk on the spinning globe.
See 3 areas that have a
black X around the picture of the mountaineer.
Go to the painting
close to Alec's study door.
Look close at
painting. Click on those 3 areas where the Xes were seen: above mountaineer's
right shoulder, mountain at right by left elbow and on the rope attached to
belt.
In inventory, get photograph album. Click on it to see the pictures.
Check Hincus' room:
Hincus' room 6:
Go to second floor - room 6. Use the key on the room right of the billiards
room.
Enter and check the
suitcase. Take the gold watch and the woman's handgun from top
right of suitcase. Someone is trying to frame Hincus. Exit the room.
du Barnstocre:
du Barnstocre shows Peter a note he found by Olaf's door. It is a threatening
note.
Dinner is ready.
Get together:
Get Hincus to join
them at dinner: Learn that Hincus doesn't want to join them
at dinner.
Remember that Hincus
wants a drink when you last met him by the back stairs.
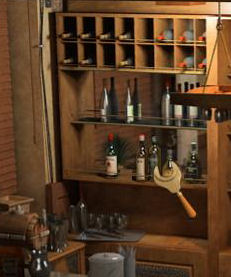
Bar:
Go to bottom left and be at the bar. Check the bottom left shelf behind the
bar.
There are 5 bottles: Stolyar British whiskey, Taddy, Old Bushhills, Cutty Spark (Scotch whiskey)
and Tomorrow Dew.
Take the orange
labeled Cutty Spark second from right.
Go to third floor
using the back stairs. Go through the greenhouse and out to the balcony.
Talk to Hincus to give
him the Scotch whiskey. He agrees to go to dinner.
Dancing:
See du Barnstocre and
Albert Mozes playing cards at left.
Talk to Kaisa and
learn about fresh footprints from the shower.
Go right of Kaisa and
see Simone, Olga and Olaf dancing.
Click on Olga. Talk to
all of them. Dance with them. Peter stops dancing.
Bar:
Go left and then bottom left to the bar.
Talk to Hincus. He
leaves to go get fresh air.
Talk to Bruen. Ask her
to dance and give her cigarette.
Dancing again:
Go right to dining room. Talk to Kaisa. Simone and Kaisa leave the dining
room.
Go right and talk to
Olga dancing with Olaf. You're up next, Lieutenant. Olaf will pass the
dancing to Peter when he's done dancing.
Go back to the bar and
talk to Alec now that you saw all of the characters. Alec says he will sit by
the fireplace.
Olaf:
Olaf enters and goes behind the bar. Bruen leaves. Have drinks with Olaf.
Olga:
Olga enters. Use the shawl on Olga to show her that you won it. (Thanks, Ludwig).
Olga invites Peter.
Accept.
In Olga's room, talk to Olga. It was amazing.
While with Olga either
in her room or dancing, an avalanche occurs.
Talk to Albert Mozes.
Avalanche:
Alec:
Go to Alec at the lounge with fireplace around the corner.
Talk to Alec and learn
that they are cut off. They will wait for rescue. Learn about Hincus' friends.
A man collapses upon
entering the hotel. Peter looks for Hincus thinking that this is one of Hincus' friends.
Hincus:
Hincus is not at the balcony.
Go down to second
floor. Peter hears something at the museum. Enter room 10.
Go to bedroom and see
Hincus tied up. Use straight razor to untie him.
Talk to Hincus. He
wants a drink.
Kaisa:
Go down to lobby and see Kaisa. Talk to Kaisa.
Get whiskey:
Go down to the bar by dining room. There is no whiskey on the shelf. Peter
says there might be some at the wine cellar.
Exit dining room and
go right.
Enter through the last
door (kitchen) before the staircase.
Go through door at
right to the cellar. Enter through door at left to be at wine cellar.
Take the Scottish
Temples whiskey from the shelf at middle left.

Hincus' attack:
Go back to Hincus at room 10. Talk to Hincus about the strange man and the
attack. He was attacked around 9 o'clock. Hincus wants to be locked up in his
room.
Go to room 6 and lock
Hincus inside the room.
Stranger:
Go down to room 3 by
the Mozes' rooms 1 and 2. Go downstairs to the
shower. Turn the corner and check the room where Lel lies guarding.
See the sick man.
After talking to him, the man says he wants Olaf.
Alec and Peter go up
to get Olaf.
Olaf:
Alec tries Olaf's door. du Barnstocre exits his room.
Check the note tacked
on Olaf's door. Read du Barnstocre's note to Olaf.
Enter the room. Find
Olaf dead. Talk to du Barnstocre.
Take the suitcase
by the bed. Open it and see some energy cells.
Exit the room. Talk to
Alec.
Check the other
characters:
du Barnstocre:
Enter room 8. Interrogate du Barnstocre. He admits that he plays tricks but not the ones
concerning Peter and notes. Half past nine was when he separated from the Mozes.
Simone:
Go to room 5. Hear a noise.
Simone thinks that Olga is dead. He relates that he was to meet her for a rendezvous.
Alec:
Talk to Alec sitting at the side lobby. Learn about the incident concerning Olga. Mannequin.
Hmm...
Kaisa:
Go to the kitchen and talk to Kaisa. Learn who she saw after the party.
Mozes:
Go to the Mozes' room. See that Olga is not dead.
Talk to Mozer outside
the room. Tell him that you need to talk to him about statements that might be
invaluable to the investigation.
Inside the room, talk
to Olga and Albert. Be placating to get information.
At 8:30 she saw Hincus,
Bruen and Olaf. du Barnstocre was with them at around 9:30.
Simone:
Tell Simone about Olga and show him the suitcase.
Bruen:
Go upstairs and knock on Bruen's door.
Talk to Bruen. Learn
what happened between her and Olaf. After the avalanche,
Olaf threw her out and locked the door.
One armed stranger:
SAVE GAME HERE!
Luavric L. Luavric:
Go down to the ill stranger's room.
After informing that
Olaf is dead, he wants to authenticate the body.
Bring him upstairs to
Olaf's room.
After seeing the body,
Luavric identifies Olaf. He wants the suitcase.
If you select "Take
this" - the first ending is seen - game ends.
If not (describe the
suitcase), continue with the game. He wants to lie down. Exit the room.
Automatically, Luavric goes back to his room.
Hincus' confession:
Go to Hincus' room.
Talk to Hincus until he divulges information. He saw someone that looks like
him and that someone tied him up.
Go outside the room. Alec
gives Peter a handgun with an inscription. that Lel found - from Champion to Owl.
Question Hincus as Owl
and learn about Champion, Beelzebub and the woman with Beelzebub. Beelzebub
never looks the same.
Champion will come to the hotel with 3 guys and
kill Hincus for starter. Exit and lock the room.
Beelzebub:
SAVE GAME HERE!
Go down to Alec'
study. Talk to Beelzebub. Learn what this is all about.
If you select "Take
this" about the suitcase - the second ending is seen.
If you do not give the
suitcase, see the third ending (if you did not give the shawl back to Olga) or
the best fourth ending at the cave (if you gave the shawl back to
Olga).
At the cave, go right
to another cave and ask for explanations.
This document may not be distributed without express written permission of the author and the content may not be altered in any way.
For Questions or Comments on this Walkthrough,
Please write to: MaGtRo
Copyright © 11/2011 MaGtRo
 GameBoomers Walkthroughs and Solutions