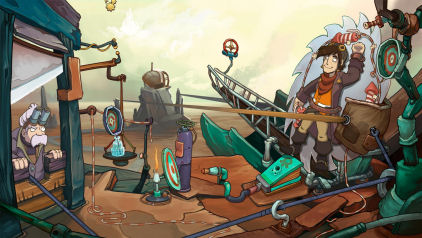
CHAOS ON DEPONIA
By EuroVideo & Daedalic Entertainment
Walkthrough by MaGtRo November 2012
Gameplay: This is a third
person point and click game.
The Main Menu has New Game-Continue, Load-Save,
Settings, Bonus, Credits and Exit Game.
The settings option has speech, music, effects,
videos and general volume adjustments. Subtitles, fullscreen-window mode,
high resolution videos, screen resolution and open inventory in one
click selections are seen.
The cursor has 2 wheels; each has icons inside
them to show the possible actions that can be done. The left larger gear
actions are done by left mouse click and right gear action is implemented by
right click of the mouse.
The inventory can be accessed by mouse wheel click
and scrolling or if the option is selected; click the handle at top right
corner of the screen.
Active spots in the screen are shown by pressing
the space bar. The space bar also pauses the cutscenes.
The minigames can be skipped by pressing the
"skip" or X button at right edge of screen.
This walkthrough is just one way in finishing the
game. The game is non-linear.
Tutorial: Learn the game
interface.
The past:
The Organons came to Deponia to look for Goal, an
Elysian. Cletus, Goal's fiancé was in cahoots with Ulysses the mysterious
leader of Organon. Ulysses and Argus, his right hand wanted the ascension
code that is in Goal's brain implant. After acquiring the code, they plan to
erase her memory. They want to suppress the knowledge that Deponia is
inhabited so that they can blow up the world.
The one that restored Goal's memory is Rufus.
The future: Goal listens
to Rufus tell her how he got here. Goal can't remember.
The present:
Grandma Utz can't believe that the hero described
by Doc is Rufus.
Get the hammer from Grandma Utz' house:
Rufus says that he has changed and that he wants
to borrow a hammer to get Bozo's cutter shipshape.
Go to the toolbox under the plant box at right.
Take the power inverter and then the hammer.
Listen to the conversation between Grandma Utz and
Doc.
The hammer nails John Thomas the bird to the post.
Pull out the hammer.
The bird is flung inside the bathroom and the
hammer falls under the table.
Open the bathroom door and see John Thomas inside
the power box.
Pull out the bird and it falls inside the toilet.
Use the flush handle. It doesn't work. He's just getting a hammer.
Try to pick up the hammer from under the table.
Fire! Rufus has the tablecloth.
Use the power inverter on the box in the bathroom.
Now the bathroom has pressure.
Pull the flush handle. John Thomas is in the tank
under water.
Press the flush button at the sink. John Thomas is
floating in the sink.
Press the button at right and see that it is for
garbage disposal.
Use the tablecloth on the water in the sink. The
tablecloth is caught in the blade of the garbage disposal.
Press the button at right. (I'm sorry.) Take the
soaked tablecloth.
Use the soaked tablecloth on the fire. Take the
hammer.
Save Doc or go to Elysium:
See Rufus attached to a large blade ready to be
shot to Elysium. Doc talks to him while under the guillotine blade. Rufus
explains his Rube Goldberg contraption.
Step on the bellows to pop the cork. The cork
travels through Rufus' contraption and knocks Doc out cold under the
guillotine blade.
Step on the panhandle right of bellow to get the
knife. Use the knife on the fireworks above Rufus.
The gunpowder passes through Rufus' sleeve and is
now in the pan. Step on panhandle again to get the gunpowder inside the
bellows.
Step on the bellows to blast gas that propels the
gas cylinder into Doc. That action saves Doc from the guillotine and also
blasts Rufus into space with a whirling stopover at the rock.
Escape pod, Goal and Cletus:
Rufus lands inside the escape pod where Goal and
Cletus are on. They are on the way to Elysium.
Cletus explains that Goal is split into three
persona: naive one, the fighter and the one that sides with Cletus. Goal
can't remember a thing because Goal's implant is damage.
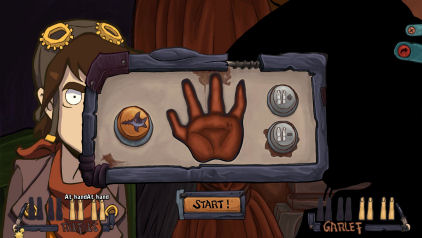
Check the badge on the floor. Rufus blows the dust
off and see ejector seat, heat ray and attack bear icons.
Press the button after selecting which action is
appropriate. Oh No. It ejects Goal off the escape pod.
Goal is holding on the rope of the escape pod.
Cletus fires and the rope is cut into 2.
At the Rust Red Sea, Bozo says not to worry; Rufus
is like a wombat. Aaaaaaaaaah. Goal! Rufus!
Cruiser: Bailiff Argus is
in the cruiser and talks with the Chief blaster. They are planning to
destroy the zone around the Rust Red Sea before they blow up the whole
planet.
Argus is waiting to hear from Inspector Cletus.
Cletus is heard from.
Floating Blackmail Market:
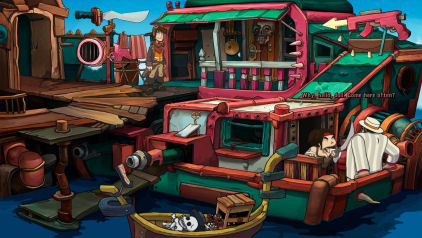
Bozo's cutter:
Rufus wakes up alone. Rufus reads Bozo's note
tacked on the door. Doc took Goal to his office. Goal is sick; blood in her
ears. Bozo is at the tavern. Bozo reminds Rufus to go to Doc's office to
help.
Look through the trash can and get the old
anchovy bait. Check the radar at right and see that the Floating Black
Market Rust Red Sea is far from the routes of the Organon. Exit the cutter.
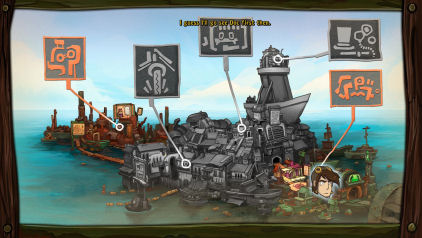
Harbor: The fisherman
talks to Rufus. He is a lucky fisherman. Read the map. At the map, jump
to-click Industrial park where Doc's lab is situated.
Doc's lab:
Doc's lab entrance: Enter
the door at right and then look around.
Take the crank and electrical tape
from the shelves by entrance door. There's a white paint bucket on the
floor. Take the stick on the pile of junk by the robot dog.
Clever-Byte: Talk to
Clever-Byte the superior highly developed guard dog. Clever-Byte finds
Rufus' replies and actions humorous.
Use the stick on the Clever-Byte. Clever-Byte
doesn't play fetch.
Pick up the stick and see that the lamp
flickers. Clever-Byte continues to laugh at Rufus' actions.
Check the lamp and get electrocuted. Buzz...
Hmm... Use the stick with the electrical tape. Then use the insulated
stick on the lamp.
Use insulated - highly charged stick on
Clever-Byte. Clever-Byte short-circuits from laughing so hard. Enter through
door at right.
Doc: Go through another
door at right, go down and talk to Doc. Goal needs to be operated on because
her implants are damaged.
The data cartridge carries all her memory and
character. Doc wants empty cartridges; the good kind from the gadget shop at
the harbor. They can be charged to his account.
Look around the town:
Dock:
Doc's workshop: Look
around the office. Take the screwdriver on the table at left of ramp.
Try to open the drawer right of the table.
Check the freezer and switch at top of the ramp.
Ice is made and thawed in the freezer.
Go to the room at left and check the clock and the
electrodes attached to the machine at left. Exit the workshop.
Organon rebels: Exit the
lab complex and meet 2 characters. They want what Rufus has. Death to the Organon.
Look around. Check the nest, map and furnace.
There is an egg in a funnel on top of the chimney.
Under the green pipe is an airbag (replacement
airbag for gondola) crate at right edge of screen.
(If you go left, you will be at the Weapons Shop.)
Marketplace:
Take the ramp at bottom left and be at
marketplace.
Pharmacist: Go left to
the pharmacist and talk to him.
Learn that the pharmacist is blind. Learn that
there is a free mind altering Cucumis Agnitio available but only if you have
a coupon. The coupon is in the pharmacy magazine that he must have taken
with him in the bathroom of Gulliver's Tavern.
The marketplace has an arena that is used for
competition that has something to do with platypuses. The music here is very loud.
Check the dumpster at left and get expired
tranquilizer pills.
Pipe diverter:
Check the pipes at right to learn that the red pipe leads to Little Venice, green pipe
to heart of Industrial Park and yellow to the dark alley.
Right now the red pipe is connected to the yellow
pipe.
Other exits:
Bellevue: Go to the exit
at top of the arena. See that there is a gate. The gate is guarded by a
snotty nose sensor on the wall that sniffs the people that wants to enter.
Dark Alley: Go through the
adjacent
entryway and see eyes peering out of the trash. There is an empty crate in front of the yellow
pipe.
There is a door here. Knock on door and learn that
a secret knock is needed.
Harbor:
Go through the entryway at right.
Little Venice: Go left
and be at Little Venice. Check to take the antenna at right.
See a submersible. Check the periscope and hatch atop the submersible.
A masked man comes out and tells Rufus not to come back again.
Note the tournament hand hanging on the bridge of
the submersible at bottom left.
Weapon shop: Go left
and be at a weapon shop. Look around and see a red pipe with pipe valve
left of the shop.
Knock on the door of the weapon shop and talk
to the lady proprietor.
Go back to bottom screen to Little Venice or
left to Doc's workshop. Go to the right to be at harbor.
Gondolier: At harbor, talk to the
gondolier. Learn that he has only one musical sheet to sing from.
See an egg under the ramp going down to the
gondolier.
Gulliver's
Tavern: Note the generator above the tavern. Enter the
tavern and talk to Bozo. Learn where the gadget shop is situated.
Pier:
Exit the tavern and go right to the pier.
Meet 2 goons that want the ascension codes. They
beat Rufus up and leave to report to Donna.
Gadget shop: Enter the
shop at left. See Gilligan inside a bubble at right.
The robot clerk says that there are 2 kinds of
cartridges: the Platinum Proof Professional which is good kind and the
cheaper Cowboy Dodo all-purpose kind that comes with a free colorful
lollipop. Select any reply and still get what Rufus wants.
Doc:
Back at Doc's, Rufus who is enjoying a lollipop gives the
cartridges to Doc. Doc operates.
Goal wakes up in one of her persona; the snotty
kind that believes in Cletus and leaves.
Doc can meld all 3 personae but he needs all 3
personae to agree to the operation and all 3 cartridges.
Rufus takes the other 2 cartridges -
personae from the hopper and the remote to switch Goal's personae.
Gulliver's
Tavern:
Go to the marketplace at bottom left and then
harbor at right. Enter the tavern.
Razorfish: Check the
razorfish hanging on the wall. Try to take it and the fish would not stay
still.
Garlef: Talk to Garlef at
right. Learn that he is one of the revolutionaries and is a professional
rock-paper-scissor player.
Nod: Talk to masked Nod
at lower level. Note that his mask has the right eye open. He is one of
those that beat up Rufus. He is a member of the Unorganized Crime.
Rufus can join if he does something very reckless
like shave Donna's cat. His partner Wink is blind in the right eye.
Jukebox: Check the
jukebox on the right. Be sure to select Mating of the Junk Crabs in the
jukebox selection.
Use the screwdriver on the jukebox flap and see
Alex the jukebox dwarf playing the piano from a music sheet. Talk to Alex.
Gulliver: Talk to the bartender
serving Goal. Going to the bathroom requires a signed waiver.
Better ambiance is uptown. Learn that
rock-paper-scissors is played with tournament fingers.
Learn about Bozo's girlfriend; the owner of the
weapons store at Little Venice. Janosch, Liebold and Garlef are the members
of the Organon Resistance.
Learn that the tavern occasionally loses power and
sugar in the tank breaks the generator. The platypus bataka happens only
when 2 squabblers meet.
The jukebox plays Mating of the Junk Crabs.
Ask about using the bathroom. Rufus signs the
waiver. If he wants to use the bathroom, ask Garlef for the key.
The 3 Faces of
Goal:
Meet the 3 personae of Goal:
Lady Goal:
Talk to Lady Goal. Goal is hungry. Gulliver gives a bowl of peanuts
loaded with flu germs. Goal is enthusiastic about a romantic dinner.
Spunky Goal: Use the
cartridges with the remote. Use the remote including the cartridges on Goal.
Select the left choice.
Talk to Spunky Goal. She wants a fight and Rufus
says he'll find a way to make her weak.
Baby Goal: Use the remote
including the cartridges on Goal.
Talk to Baby Goal. She wants to join the
Resistance.
Bozo's love words:
Go to Bozo's table and take the sugar dispenser.
See a lit candle at next table.
Talk to Bozo. Bozo gives advice about the 3 Goals.
Spunky Goal needs the right choice of words. Rufus should talk to Baby Goal.
Rufus should get advice from Seagull to work on Lady Goal.
Ask Bozo about his Bambina. Rufus convinces Rufus
to go back to his Bambina.
Weapons
shop - gondolier: Go to the weapons shop via Little
Venice at left or by Doc's workshop. See a spiffily dressed Bozo.
Bozo enters. See what happens with Bozo and
Bambina.
The gondolier sails in and Bozo's magic love words
are not heard over the singing. His singing also goes through the red pipe to
come out the yellow pipe at the dark alley. Just as is shown by the pipe
diverter beside the pharmacist.
Gondolier: Go back to the
harbor and talk to the gondolier. He has only one music sheet.
Check his gondola's bumper. Hit it and the air bag
deploys. He swims to get replacement airbag for gondola.
Get a new romantic music sheet:
Remember what Gulliver said about sugar in the generator. Use the sugar
dispenser on the generator on the roof of the Tavern. That stops the
generator.
Enter the dark tavern. Take the razorfish
on the wall.
Go down to the jukebox. Take the music sheet of
Mating of the Junk Crabs from Alex' piano.
Gondolier: Give the music
sheet to the gondolier. See that there is a replacement air bag crate in the
gondola now. Remember that the replacement airbag crate is under the green
pipe at Doc's place.
Weapons shop part 2 - junk crabs:
Go to the weapons shop via Little Venice at left or by Doc's workshop.
Convince Bozo to go in the shop again.
The gondolier arrives again singing the new music.
It is not appreciated by the couple but the junk crabs from the dark alley
love it.
The crabs aggregate at the red pipe left of the
weapon shop. Use the pipe valve to trap the crabs.
Pipe diverter: Go to the
marketplace and then to the pharmacist. Use the pipe diverter to go from red to green pipe
(from Weapon shop to Doc's place).
Crabs: Go to the weapons
shop and open the pipe valve to free the trapped junk crabs. See them come
out of the green pipe by Doc's workshop into the airbag crate.
Gondolier: Go to the
gondolier by the tavern at harbor. Kick the gondola's bumper again to
release the airbag. Again the gondolier swims to get a new one.
Weapons shop part 3 - love words:
Go to the weapons shop via Little Venice at left or by Doc's workshop.
Convince Bozo to go in the shop again.
Again, the gondolier arrives singing Mating of the
Junk Crabs. Close to the end of the song, the junk crabs hidden in the
replacement airbag crate come out and attack the gondolier.
Hear Bozo's magic words: Why, hello, doll. Come
here often?
Courting of Lady Goal:
Lady Goal is hungry and wants a romantic dinner.
Bozo also recommends that Rufus get advice from Seagull.
Discover Bellevue:
Bellevue is the uptown part of the city.
Enter Bellevue: Look at
the fine nose that smells entrants to Bellevue. Let's stop him from smelling
anything. Use the bowl of peanuts that has flu germs on the
fine nose.
Enter and look around.
Seagull: Go to the
mansion at right and enter. Seagull is Rufus' dad. Talk to Seagull. Learn
how to treat a true lady. Seagull recommends a romantic dinner at Chez
Schlumpi but remove platypus from their menu first.
Look around the room: Look at
the plant at left and get water memo.
Look at the goldfish bowl and get bread memo.
Look at the window above aquarium and get coal
memo.
Look at the bookcase at left and get candle
memo.
Seagull keeps on talking, loses his trend of
thought and gives a thread memo.
Hoedown the Gardener:
Exit the mansion and talk to the gardener. Harrump!
Crane the poet: Enter the
door below the mansion. Talk to Crane.
Crane says that he doesn't need what Captain
Seagulls needs.
One at a time show Crane the memos written by
Seagull and then take that item. Get candle and water from
window shelf; bread by the door, thread above the door and
coal by the stove.
Crane says take anything you want. Take the urn
left of the stove. It is the ashes of Crane's mother. Exit the room.
Join the Platypus Club:
Platypus Trapper: Enter
the archway left of the main gate of Bellevue. Talk to Platypus Trapper
at Platypus Paradise.
Platypus Trapper supplies the restaurant with
platypus and is the Chairman of the Platypus Club. He is also a poet.
Learn about unguarded nest of platypuses. In every
generation of platypus is a nest guardian that protects their nest. You can
learn about platypuses in the field guide given to new members of the Club.
A Platypus Club trial membership was inserted in a
fortune cookie that is served at the restaurant. If Dame Fortune looks at
you, you might get that special fortune cookie.
Check the platypus nest on the balcony across the
souvenir shop.
Restaurant: Look around
the restaurant. See an egg in a sock hanging on the clothesline above the
alleyway.
Ring the bell and talk to the attendant. Every
question asked is referred to the McThulu the Lord of Darkness Chef below.
Get a free fortune cookie:
The fortune cookie is free courtesy of the house.
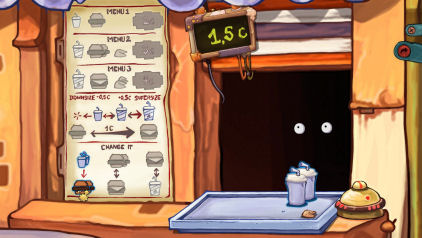
Ask to order a takeout. See the takeout menu.
Menu 2 has one fortune cookie. Click on Menu 2
and see 2 small platypus burgers, one medium drink and one fortune cookie
on the tray. It cost 3c (zlottis).
Click-hold-move on both burgers (both will be
highlighted) and then click on the bottom middle selection of change it
on the board. The 2 burgers will be changed to one large one. Cost is
3c.
Select and then change the large burger to one
large drink. There are now a large drink, medium drink and a fortune
cookie. Cost is 3c.
Click on large drink and select the
small drink on change it board. Cost is 2c.
Change the medium
drink to small drink. There will now be 2 small drinks. Cost is 1.5c.
Select 2 small drinks together and then change
them to 2 small burgers on the change it board. Cost is 1.5c.
Change the 2 small burgers together to 1 large
burger. Cost is 1.5c.
Change the 1 large burger to 1 large drink.
Cost is 1.5c.
Change 1 large drink to 1 medium drink. Cost
is 1.0c.
Change 1 medium drink to 1 small drink. Cost
is 0.5c.
Change 1 small drink to nothing. Cost is 0.0c.
The fortune cookie is left.
The server asks if this is your order and gives
the free fortune cookie.
Lady Fortune shine on you: Who
is the self-professed lucky person in town?
Use the map by the exit or go to the harbor and
then to the dock. Talk to the fisherman.
Give the fisherman the fortune cookie (do not open
it). He gives back the Platypus Club membership ID card.
Take a hook from the jar of hooks beside
the fisherman.
Take the bucket hanging on pole right of
the fisherman.
Learn about the 4 platypuses:
Platypus Trapper: Go back
to the souvenir shop at Bellevue and show Platypus Trapper the ID card.
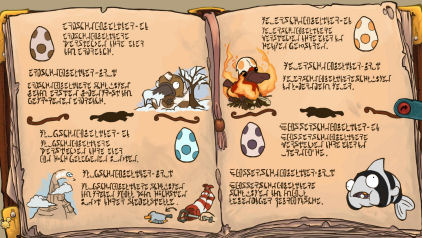
Get a Platypus Field Guide. Read the Guide
and learn that there are 4 kinds of platypuses.
All Rufus has to do is find all 4 eggs, hatch them
and then bring them to the nest.
Flying platypus:
The guide shows that the flying platypuses have
blue spotted egg.
Get the egg: Look at the
egg on the sock hanging on the clothesline. Go up to be on the
window.
Use the crank taken from Doc's workshop on the
crank shaft-handle. Turn the crank. Take the flying platypus egg.
Hatch the egg: Exit the old
town and look at the balcony above the mansion.
Check the field guide and see the next drawing
shows the egg being thrown in the air from a very high point.
Enter the mansion and look at the bookcase. Read
the red Book for Dummies.
Pull the white books at top right corner of the
bookcase. The secret door moves aside.
Climb up the ladder and see the windsock on the
Flag-O-Mat. It is the highest point of the habitat.
The Flag-O-Mat needs ashes. Use Crane's mother's
ashes in the urn on the pipe. The crow's nest comes down.
Use the thread with the hook to get a hook on
thread. Use hook on thread on the windsock to tie it close and then tie
the hook-thread to the frommet of the pipe.
Use the egg on the tied windsock. It is still not
taut enough.
Go back down. Take the vacuum cleaner by
the ladder. Pull the hatch and then the red handle of the lint trap. Use the
vacuum cleaner on the lint trap to get lint (ashes) from the pipe above.
Go back up and see that the crow's nest or flag is
now up since the ashes were removed. The windsock is now at highest point
and also very taut.
Use the razorfish from the tavern on the
windsock. See the egg hatch midair and the platypus is flying.
Bring the platypus to the nest:
Take the hanging windsock.
Read the drawing of the windsock at bottom left
page. It's a drawing of a landing net.
Go back down and check the birdhouse by the gate
or fine-sick nose.
Place the bread inside the birdhouse. The platypus
hovers above the birdhouse.
In inventory combine the antenna from Little
Venice and the windsock to make a landing net.
Use the landing net on the hovering platypus to
get flying platypus.
Go to Old Town and place flying platypus on nest
across the souvenir shop. Flying platypus is off the menu now.
Earth platypus:
Check the field guide and see that the earth
platypus is brown spotted.
Get rid of the rake: Go
in front to the gate of Bellevue and see a circular patio. Enter the patio
but the
rake blocks the way. <sigh>
Go to Hoedown the gardener by the mansion. He
doesn't want to be bothered.
Click and then kick the tree with yellow leaves.
Hahahaha. Rufus crash lands at the center of marketplace.
Go back to Bellevue. The rake is gone and being
used by the gardener. Take the shovel from the circular patio.
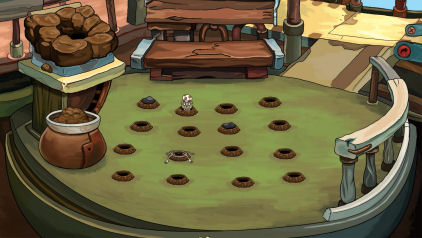
Get the egg: Look at the
egg in one of the holes. A meerkat comes out and moves the egg.
Use the 2 rocks and trap from right to cover the
frequently used holes.
The meerkat cycles-pops up from 4 holes 2 -3 times and change
to another set of 4 holes. So place the rocks and the trap on 3 of those
holes and eventually it will be trapped.
Get the earth platypus egg.
Hatch the egg: Read the field
guide. It says that the earth platypus egg hatch in frozen soil.
Use the bucket from fisherman on the tub full of dirt to get
bucket with soil. In inventory add the brown spotted egg to bucket with
soil.
Jump to Doc's workplace at Industrial Park. Enter
through the 3 doors to get to Doc's office.
Open the freezer. Press the red switch. Place the
bucket with soil and egg on the frozen water. The earth platypus egg
hatches.
Bring the platypus to the nest:
The platypus is aggressive.
Press the red switch again and the ice melts. The
platypus swims.
Press the red switch again the water freezes
trapping the platypus.
Use the shovel to take a frozen earth platypus.
Exit Doc's place. Use map to jump back to
Bellevue.
Place the frozen earth platypus on the nest at
circular patio. Earth platypus is off the menu now.
Fire platypus:
Read the guide and it says the orange spotted eggs
are laid in geysers.
Jump to Doc's workshop at Industrial Park.
Check the egg in the funnel left of the chimney.
Get and hatch the egg:
Open the furnace and place the coal from Cain inside.
Go to Gulliver's Tavern at Harbor. Use the candle
from Cain on the lit candle on the table.
Go back to the furnace by Doc's place. Use the
lit candle on the coal.
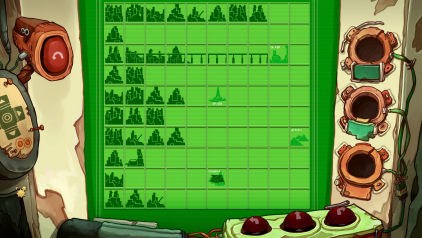
Take the fire egg from the funnel. It jumps into
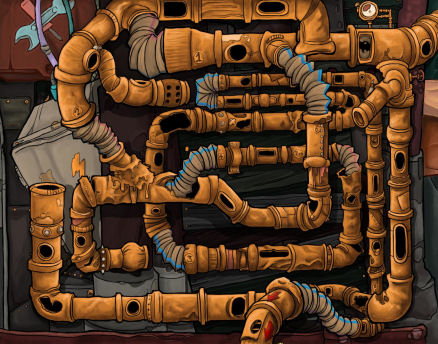
the pipe system full of holes.
See the egg travel through the pipe system.
There are hoses that can be moved and attached to other pipes.
Guide the egg through the pipes to exit at
bottom pipe.
Each of the hoses is labeled. Click on pipes
2, 3, 4, 5, 7 and 8. The pipes will change connections.
Take the fire platypus from the
furnace.
Nest: Place the fire
platypus on the nest at left. Fire platypus is off the menu now.
Water platypus:
Get the egg: Read the
field guide and learn that the water platypuses hide their eggs near shore.
Go to where the gondolier was earlier - close to
the tavern. Take the purple spotted egg from under the
ramp.
Hatch the egg: Read the
field guide and learn that the water platypus hatch in the mouth of living
zebrafish. Zebrafish is a freshwater fish.
Find a zebrafish: Go to
the fisherman at the dock. Talk to the fisherman.
Show the razorfish from the tavern to the
fisherman. He's impressed and wants to know the secret.
Tell him "use a special kind of bait". He wants to
see Rufus' special bait. He will give a tigerfish just to see the bait.
If you haven't yet, get the old anchovy on a
stick-bait from the cutter's trash can. Show the anchovy on stick-bait
to the fisherman.
He catches a tigerfish and lays it beside him. Try
to get the tigerfish from the fisherman's left side. It jumps back to the
water immediately. Ugh.
Use the sedatives-expired pills from the
pharmacist's trash on the bucket of bait. Then talk to the fisherman again
about your bait. Show him the bait.
Rufus picks up the doped tigerfish from the
fisherman's left side.
Jump to Doc's workshop at Industrial Park. Enter
and use the zebrafish in the white paint on the floor. Now it's now a
doped zebrafish.
Wake up the zebrafish:
Place the water platypus egg inside the doped zebrafish's mouth.
Enter the door at right. Use the zebrafish on the
electrodes of the machine. Space is beginning to bend. Live. Live. It's
alive!
Get a zombie zebrafish now. Whenever Rufus says
that the fish is twitching, use the glass of water with the zebrafish.
Jump to Bellevue. Enter the mansion and use the
zebrafish with the goldfish bowl.
Take the water platypus.
Nest: Go to the harbor.
Place the platypus on the nest atop the pole right of where the gondola used
to be. Water platypus is off the menu now.
Poem for Goal:
Jump to Bellevue and talk to Seagull. It sounds
like he wants to be the date. Seagull wants a poem for the date.
Convince Cain: Go to Cain
below the mansion. Talk to Cain.
Go to Old Town and talk to the Platypus Trapper.
Check the greeting cards left of the souvenir man.
Talk to the man. He recites a poem for Rufus.
Go back to Cain. Talk to Cain again and ask for
help. Recite the poem by the Platypus man. Here am I. There are you.
Platy-poo.
Cain was disgusted with that poem. Learn about
ghostwriting. He gives an ear bug so that he can whisper the correct lines
to Rufus on his date.
Romantic dinner with Goal:
Go back to Seagull. Talk to Seagull about the
prompter. He will make the reservation for dinner.
Seagull gives Rufus a dinner invitation to be given to Lady Goal.
Lady Goal: Go to the
tavern. Use the remote on Baby Goal. Select the right side Goal to change to
Lady Goal.
Talk to her and then give her the invitation.
Dinner: A dapper Rufus
enters the mansion and sees the leftover cocktails on the
table.
Take the radio equipment memo on the desk.
Go to the restaurant at Old Town. Rufus confronts
the couple. Learn that Rufus is a trash baby.
Poetry: Go to Cain. Try
to borrow his radio. Give him the radio memo and get the radio.
Go back to the restaurant. Use the radio on
Platypus Trapper. The platypus poet whispers poem to Seagull. Splash!
Lady Goal thanks Rufus with a kiss.
Tavern: Lady Goal feels
jealous that Rufus is now going to talk to her other 2 personae.
Fighting with Spunky Goal:
Remember that Spunky Goal wants a fight and Rufus
says he'll find a way to make her weak.
Pick a fight:
Spunky Goal: Use the remote on
Lady Goal. Select Spunky Goal.
Talk to Spunky Goal and then give Bozo's magic
words. She punches Rufus.
Gulliver the bartender tells them to settle the
difference the way it is done here - Platypus Bataka.
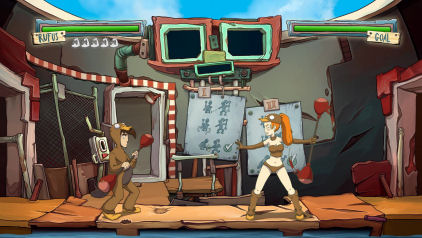
Platypus Bataka: See
Rufus and Spunky Goal face off in the arena at marketplace.
The aim is to get as much hits done to Goal and
the green bar is removed.
Goal will expose a part of her body, so click on
that part. Click the area of Goal's body you want to hit:
head, torso or legs.
Watch where Goal looks at Rufus's body and protect
that area. You can protect Rufus by clicking on head, torso
or legs. Check the chart at center.
Speed is a requirement.
A miss is seen as an X and a hit is seen as a
bullseye on a target at top of the page.
The green bars are seen above the name of the
fighters. Good luck.
The skip feature for the Bataka fight is seen as
an X at right side of the screen.
If you lose, a training feature is seen. A
training dummy flashes areas to be hit.
The skip feature for the training minigame is seen
as an X at right side of the screen.
Rufus explodes and destroys the arena. Rufus gets
a kiss from Spunky Goal.
Impressing Baby Goal:
Remember that Baby Goal wants to join the
Resistance.
Use the remote on Spunky Goal. Select Baby Goal.
Talk to Baby Goal and tell her Bozo's magic words.
Join the Resistance:
Garlef: Talk to Garlef
sitting upstairs. Talk to him about the Resistance. He gives the bathroom key since he's done
with it.
Ask if Rufus can join if he defeated Garlef in
Rock-Paper-Scissors. Rufus needs to have an official tournament hand.
Submersible:
Remember that a tournament hand is seen hanging at
the bridge of the Unorganized Crime's submersible.
Remember also that Nod wearing the mask with right
eye open said that in order to join them; Rufus has to do something very
reckless like shave Donna's cat. His partner Wink is blind in the right eye.
We learn that Wink is on guard duty at the submersible.
The periscope is used to check outside the
submersible. We need something to block that periscope lens.
Enter the bathroom: Enter
the bathroom at bottom right. Hear Rufus scream.
Rufus exits the bathroom. Nod alerts Rufus on a
stuck toilet paper on his shoe.
Pharmacist: Go to the
pharmacist at the marketplace.
Give the toilet paper to the pharmacist. It's one
of his free coupons. Get a free sample of Cucumber of Revelation.
Get sunglasses:
Gilligan's Gadget Garden:
Go to dock. Enter the gadget shop. Look around.
Talk to Shop-O-Mat 2000. The missing owner's wife
is named Camilla. He said that Rufus can try anything in the store except
the Golden Dragon of Invisibility.
See the Golden Dragon of Invisibility at left.
There is a Banana strengthener and Lott-O-Mat.
See the antigravity socks, juicer hat and
shredder. The sunglasses of Eternal Darkness is just below the ceiling.
Use the antigravity socks and take the
sunglasses from the top shelf.
Take the juicer hat. Combine the Cucumber
of Revelation with the juicer hat. Use the hat and get a revelation.
See another Rufus talk to the Shop-O-Mat about the
destroyed sunglasses. The robot wears it and covers one eye.
Let's do that then. Use the sunglasses on the
shredder. Show the broken sunglasses to the robot. He wears it and now can't
see anything.
Take the Golden Dragon of Invisibility.
Right click the Golden Dragon of Invisibility in inventory and Rufus
uses it on himself.
Take the broken sunglasses from the
counter. Exit the store.
Enter the submersible:
Jump to Little Venice. See the Tournament hand at
the bridge of the submersible.
Note that the periscope has 2 lenses. Wink is on
guard duty and he is blind on his right eye. You can get him to come out and
see that his left eye is open on his mask.
Check inventory to see that the sunglasses is made
up of left and right frame and one dark lens.
Combine the left frame and the sunglasses lens.
Then combine the left and right frame to get left lens repaired
sunglasses.
Use the repaired sunglasses on the periscope. Open
the hatch to enter the submersible.
Inside the submersible:
Curtain: Rufus doesn't
want to go through the curtain.
Radio room: Open the
radio room. Cletus comes on the monitor and wants to talk to Wink.
He shows pictures of Goal and the ascension code
cartridge. Cletus is on an Organon Blast Tower at a direct Cruiser route to
Porta Frisco. Wink should tell him when they are coming or their sub will be
fired upon. The last boat to Deponia from Porta Frisco leaves tomorrow and
Cletus has to be on it with the ascension codes. The trip to Elysium will be
in a week. If not, Argus will release a bomb from this Blast Tower to destroy
areas around the Rust Red Sea. See the blast area.
Get 4 slides shown by Cletus.
Shave Donna's cat: Press the
red button at bottom of the radio setup. The pink door opens. See a kitty.
Use the razorfish on the kitty. Rufus enters. Uh
Oh.
Donna: See pink haired
Donna. Her glasses' right lens is covered. She twitches. Take note of her
movements and what it might mean.
Use dialogue: What did she say? That I'll
be made into shark food. Go Ahead. Rufus is now a member of the
Unorganized Crime.
Bridge: Go through door
at left side to be on the bridge. Take the tournament hand. Exit the
submersible.
Rock-paper-scissor:
Garlef: Go back to the tavern and Garlef. Talk to Garlef
sitting upstairs about playing the game.
Rock-paper-scissor:
2 fingers mean scissors, closed hand-fist
is rock and open hand is paper.
Scissor defeats paper; rock defeats scissors
and paper defeats rock.
Any attempt to play with loaded fingers
automatically loses round.
The stakes are fingers. First person to lose
all fingers loses the round.
See button that add fingers at top and button
that takes off finger at bottom right.
I believe the razorfish at left is "loading the
hand" which automatically lose round.
Garlef likes to use scissors at first round
and rock on the second round. Have fun.
Garlef teaches the secret knock to Rufus. Go down
and talk to Baby Goal about the Resistance and secret knock. Baby Goal
leaves ahead of Rufus.
Resistance:
Knock, knock:
Go to Dark Alley and be by the door to the Resistance movement. On the way,
the loud music at marketplace makes Rufus forget the knock rhythm.
Knock on door. Rufus messes up the secret knock.
Go back to Garlef at Tavern to learn the secret
knock again.
Leave the tavern. In in-game menu; lower the music volume under
settings and then go through marketplace to get to dark alley. See Garlef
enter the door.
Knock on door and Liebold is not sure if that is
the new knock. He asks to knock the old one. Try another knock and it isn't
that one either. Liebold warns about knock-knock jokes.
He says to try again. Hide in the crate at right.
Wait and Liebold will come out looking for Rufus. He knocks the old rhythm
to enter.
Exit the crate and knock on the door again. Finn
asks that you raise the music volume again.
Janosch and the Conshept:
Meet Janosch and hear his lispy words. Rufus
cannot stop laughing.
Talk to Janosch. Learn about the concept. Show
Rufus' conshept by using the slides on the projector.
After the presentation, the rebels want Rufus
to summarize the information.
Select any choice that doesn't have any
words in the dialogue that is difficult for Janosch to repeat. This will
let Rufus control himself from laughing.
The blot is a symbol. An Organon bombing fort.
Our enemy will try to eradicate Deponia.
Baby Goal verifies what Rufus says.
Our team will dare to attack. I obtained
topographical data locating one particular Organon fort.
...detonate a bomb here and put an end to all
life, marine and on land. Goal and her brain implant might mean an
important trump in our hand.
Argus landed at the blast tower where Cletus is
right now.
Baby Goal is very impressed with Rufus. Now all 3
Goals agree to have surgery.
Release the hostages:
Get in Doc's office:
Janosh and the others are standing in front of
Doc's workplace. They have a plan to take Goal's cartridge with the
ascension code.
Donna and her goons are inside the office and Doc
and Goal are hostages.
Knock on the door. Someone inside gives Rufus a
remote and tells him to use it on Liebold.
Use the remote on Liebold. A portal opens inside
the shed. Enter the portal.
Meet the future Rufus. Present day Rufus
doesn't believe the time travel event and thinks the future Rufus is
Cletus.
I used these dialogues: I want proof. Genital
rash. Oh well. I'll rescue Goal, then.
Future Rufus will take care of the rebels and
tells Rufus to free Goal and Doc.
Rufus enters the right portal.
Donna, Nod and Wink:
Rufus comes out of the asbestos cabinet. See that
Doc and Goal are bound and gagged. Nod has a crowbar and Wink has the
weapon that Rufus wanted.
Talk to Lady Goal and then Doc. Learn that Donna
has an implant.
Open the drawer by the ramp. Take Donna's blue
remote and Liebold's purple remote.
Exchange implants: Talk
to Lady Goal about the implant and remote. She refuses to give her
cartridge.
Goal looks for the non-existent bottle of champagne
and Rufus takes her cartridge.
In inventory combine Donna's remote with Lady
Goal's cartridge. Use Donna's remote on Donna.
Donna's body is taken over by Lady Goal.
Donna-Lady Goal shoots Nod and Wink.
Donna-Lady Goal gives Spunky Goal's cartridge and
asks for Donna's remote.
Take the crowbar and weapon.
Take care of the rebels:
Portal: Go through the
mysterious anomaly-portal. Rufus sees Liebold and an unconscious Garlef.
Future?
Prepare the portals: Back
at Doc's office, exit through the door at top of the stairs. Hear the other
Rufus knock on the door.
Future Rufus does the dialogue done earlier. He
gives Liebold's remote with a cartridge to the other Rufus.
The portals have to be connected. Use the crowbar
on the machine with electrodes.
Both doors become portals. The other Rufus drops
in. Both Rufus do the dialogue done earlier.
Select Zeeblezooble - the word that Rufus used
earlier.
Wait for the resistance to enter at the top of
the hour: Rufus waits for the resistance to enter as
Janosch planned.
Check the clock and get punched when Rufus shakes
it. Hear Janosch start the plan.
Garlef enters and Rufus' weapon jams. Garlef was
taken care of by the clock.
Liebold enters after the other Rufus used the
remote on him. Rufus kisses Liebold thinking that he is Spunky Goal and Liebold faints.
Lady Goal: Rufus enters
the office and sees that Lady Goal is gone and the hostages are still tied
up.
Learn from Doc that Lady Goal went through the
portal and that the cartridge is a cleaner; not one of the Goals. Janosch enters through door. The portals are now gone.
Lady Goal-Donna talks to Rufus. She bolted the
door to gain time to find Cletus. Talk to Lady Goal-Donna.
Learn that Lady Goal wants to go home. Also learn
that Elysium is a starship to go to Utopia. Elysium needs to generate energy
for the travel and for that the destruction of Deponia is needed. It took
decades to build the blast towers and they have to go now or Elysium will
fall back to the planet.
Lady Goal has to be at Porta Fisco by day
after tomorrow and be with Cletus or else it is too late.
Chase Lady Goal:
New plans:
Janosch: At Floating
Black Market dock, Janosch waits for Rufus. Rufus uses the Dragon of
Invisibility to try to pass past Janosch.
Janosch informs Rufus that he is not going with
them at the cutter because he will go to Porto Fisco to recruit the other
revolutionaries there. They need members to fight the Organon. He gives the
paper with the new secret knock code (+ - +).
Radar: Rufus enters the
cutter and decides where they are going. Doc wants to track Lady Goal.
Check the radar to see 4 islands in Rust Red Sea. The
bottom one is the Floating Black Market. The right one is North Pole. The
second from top is Isla Watchit and Porta Fisco at top right.
North Pole:
Click on the island icon at right. Exit the cutter
and look around.
The bell and water faucet are frozen. Take the
hose from the water faucet. Get ice from the snow pile at bottom
right.
See a frozen man in the frozen North Pole. He is
holding a torch. The stars are visible here.
Go back in the cutter. Talk to Spunky Goal.
They went ice swimming.
Kidney tea: Check the tea
on the table. Drink the tea. Add ice taken from outside to the tea.
Rufus relieves himself outside. Take the torch
from the frozen man.
Isla Watchit:
Go to the radar and click on the icon of a
transmitter second from top place.
This is the island Doc wants to modify
the transmitter on the radio mast so that they can track the submersible.
The island is at the center of permanent storm.
Check the diesel generator. Follow Spunky Goal.
Check the pump and the area in front of it that is
a perfect place to be hit by lightning.
Take the broken transmitter.
Climb the radio tower and get hit by lightning. We
have to find a way to make a lightning rod. Go back to the cutter.
Give the broken transmitter to Doc and he repairs
it. Take the transmitter.
Porta Fisco:
Select Porta Fisco on the radar.
Goon the bum: It smells
here. Talk to the
bum, the source of the smell.
Goon is hungry. Rufus messes his umbrella. Rufus will give him something to eat in exchange for the umbrella.
Learn about Porta Fisco. The seer can predict
lottery winners. The rebel's hideout is here at the sewers.
Rebel's hideout:
Enter the sewers. Check the old power turbine that
needs a power inverter and fuel.
Secret knock: Knock on
the door.
Enter the secret knock:
The note given by Janosch has + - +. Use the paper on the door.
Do not do any number that will result is an
answer that will be more than 5. The
graphics only allow that much space. :(
1. In close up, knock on door. Remember how many
knocks are done (example: 3). Click check mark above.
Hear a knocking response. Count how many
knocks are done (example: 1).
Based on the note: add Rufus' knock and the
response (3 + 1 = 4)
Now knock the sum of the knocks (example: 4).
Click check mark above.
2. Hear the knock answer. Count the number of
knocks (example: 3).
Based on the note: subtract them from
the knock Rufus did (4 - 3 = 1).
Now knock the difference of the knocks
(example: 1). Click check mark above.
3. Hear a knocking response. Count how many
knocks are done (example: 4).
Based on the note: add Rufus' knock and the
response (1 + 4 = 5).
Rufus is allowed in.
Janosch: Talk to Janosch.
See #26 Toni who is training dolphins.
Talk to Janosch again. Learn that he
sold the torpedoes to the gadget shop at the Floating Black Market.
Toni: Talk to Toni. Rufus
flexes his boss muscles. Ask her about dolphins. The dolphins are depressed.
Dolphins: Take the gas
canister left of the baby dolphins.
Check the baby dolphins in the wading pool. Exit
the hideout.
Get the torpedoes:
Seer:
Go up the ramp. Take the power inverter at
top of the ramp. Talk to Spunky Goal.
Enter the tent at right. The Seer talks to Rufus.
The Seer does couples counseling now. He can predict the lottery winning
numbers.
Check the bananas. Take the bananas. Exit
the tent.
Couple counseling: Talk
to Spunky Goal. She doesn't want to go to the tent.
Use the remote on Goal to get Baby Goal. Talk to
Baby Goal about the tent and she excitedly rushes in.
Any question asked has to be rephrased as
counseling oriented. Hear all the answers given while with Baby Goal.
Lottery numbers: Enter
the tent again with Baby Goal.
Ask about the crystal ball and get the cursor
back. Then use the remote to change Baby Goal to Spunky Goal. Now ask the
same questions.
Select 2 questions and it strains Spunky Goal's
patience.
On the third question, ask about "wealth". Spunky
Goal loses her patience and chokes the Seer.
The Seer says the lottery answers lies with the stars.
North Pole:
Enter the cutter at left. Select North Pole on the
radar.
Look at the stars and Rufus sees a set of numbers
flash through the stars.
Enter the cutter. Select Floating Black Market on
radar.
Floating Black Market:
See Bailiff Argus talking with Seagull. Seagull
ends up in the water. The city is sealed.
Rufus and Goal arrive at the pier. Take a fish
bait from the bucket beside the fisherman.
Try to enter the gadget shop. Click on bowl
outside the shop and the cat on the window of the shop.
Go back to the cutter and go back to Porta Fisco.
Organon HQ:
Use the torch taken from North Pole on the burning
barrel to get burning torch.
Enter through the large entryway. See the customs
of the city. See the Upper Ascension station and mountain of tires.
Use the burning torch on the mountain of tires.
Pick up the burning tire. Exit right.
Dolphins:
Go back to the rebel hideout. Play with the baby
dolphins.
(I hate this part.) Place the burning tire on the
service hatch.
Use the fish bait on the burning tire. Take the
cans of tuna and the wading pool.
Floating Black Market:
Exit and go to the cutter. Select Floating Black
Market on radar.
Enter gadget shop: Use
cans of tuna on the bowl in front of gadget shop.
See the cat come out of the cat flap. Try to enter
through cat flap.
Talk to Spunky Goal to go through cat flap. Goal
opens the door to the shop.
Bananas: Use bananas
on the banana straightener to get a straight banana.
Torpedoes: Check the
Lott-O-Mat and see that the prize is a complete functional torpedo
equipment.
Use the lottery machine and win to get a prize
ticket.
Use prize on Shop-O-Mat. Take the torpedo
equipment.
Fix the transmitter:
Get the umbrella from bum:
Fisherman:
Exit the shop. Talk to the fisherman. Whenever
Rufus is there; all he catches are boots.
A patience contest happens. Goal gets cold while
the contest happens.
The fourth time Goal complains and sneezes,
the fisherman catches a boot-shoe for Rufus. Enter the cutter and go
to Porta Fisco.
Goon the bum: Give the
shoe to the bum and get the umbrella in return.
Isla Watchit:
Go to cutter. Go to the radar and select Isla Watchit. Check the
diesel generator. It's a closed system.
Use the bunch of banana to plug the exhaust.
Use the hose from the cutter and then the canister
on the diesel generator to get diesel fuel.
Lightning rod: Go to the
right. Use the remote to change Spunky Goal to Baby Goal.
Place the wading pool on the plateau in front of
the pump. Pump water-oil on the pool.
Give the umbrella to Baby Goal and ask her to
stand in the plateau.
Nothing happens. Talk to Baby Goal about the
thunderstorm rules. Ah. Don't stand under a tree.
Ask her to step down and go back to the cutter.
Get trees:
Go back to Porta Fisco. Enter the sewer by the
bum.
Check the old power turbine. Use the diesel on the
tank. Press the blue button. See that it exhausts the air from the rebel camp
to outside.
Place power inverter in the hatch of the turbine.
Press the blue button and see that the smell of Goon the bum is sucked into
the rebels' camp.
Enter the camp and see air freshener trees
everywhere. Take all the air freshener trees. Turn off the turbine.
Make the lightning rod:
Go back to Isla Watchit. If you haven't yet, get
Doc to fix the transmitter.
Go right. Be sure that you have Baby Goal with
you.
Combine the air freshener trees with the broken
umbrella.
Give the umbrellas with trees to Baby Goal. Ask
Baby Goal the thunderstorm rules again.
Ah - lottery. Give the lottery prize to Baby Goal
standing in the water. Nothing is happening.
Use the fixed transmitter on the radio tower.
The lightning tries to hit Rufus again but is
diverted to the living lightning rod.
Find Lady Goal's submersible:
Fighting dolphins:
Go back to Porta Fisco and to the rebel camp.
Entertain the adult dolphins:
Remember the dolphins are depressed. Try to talk to the listless dolphins.
Remember Toni said the dolphins like physical
comedy. Enter the back entryway to be at other side.
Remove the drain cover. That didn't work.
Place banana on the drain. That didn't work.
Use the straight banana on the drain. The guy just
passed by it. Rufus is frustrated but accidentally starts a physical comedic
routine.
The dolphins applaud and are now energetic.
Arm the dolphins: Go back
to the front area where entrance is located.
Use the lock of the big pipe left of the entryway.
The dolphins are really intelligent.
Exit and see the dolphins. Use the torpedo
equipment on the dolphins. The armed dolphins go out to sea.
Corner the submersible:
Go to the cutter and then the radar. See a close
up of the radar.
Now that the transmitter picks up where the
submersible is located and the dolphins are armed; all are ready to corner
the submersible.
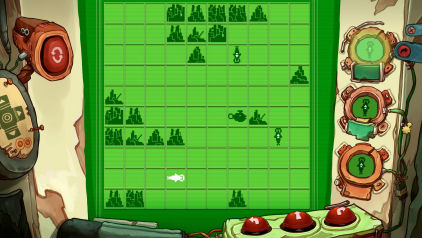
See that one of
the 3 dolphins is white which corresponds to one of the circles on the
right. This shows the dolphin you want to move.
The directions to move the selected dolphin are at
bottom of the screen: left, forward or right.
The aim is to get one of the dolphins on the
square where the submersible is located.
The best way is to corner the submersible at top
left of the grid; then move one dolphin over the submersible.
There is a reset arrow at left. The X-skip button
and go back to screen button are at right side of screen.
See the 3 dolphins fire at the submersible and
disable it.
Go to submersible:
The cutter is beside the submersible. Check the
hatch of the submersible at right. It's closed.
Open the locker at left and take the diving suit.
Use the diving suit on the hook hanging from the crane.
Click on the diving suit to use it and Bozo lowers
Rufus underwater.
Take the 2 hoses on the panel.
Press the button and the dolphins show aggression
towards Rufus. Go up to surface.
Make another Rufus:
Combine the 2 hoses to make a long hose. Use long hose on diving
suit.
Turn on the water faucet to fill the diving suit
with water. Rufus says he has a plan. The dolphins want a target.
Go inside. Change Baby Goal to Spunky Goal; she has more
muscles. Exit the cutter.
Press the bell and trick Spunky Goal. Do this 3
times. After she loses her cool, see Rufus' face on the door.
Take the candle from the lantern left of
the faucet. Enter the cutter.
Use the candle on the pot over the stove at center
of room. Rufus takes the pot of wax.
Use the pot of wax on the dent-facial impression
on the door.
Use the impression on the diving helmet.
Talk to Bozo to lower the dummy. An explosion
occurs and the knotted dummy is raised to the surface.
Another dive: Click
on diving suit and Rufus dives again. Open the hatch and see the submersible
move dragging Rufus underwater.
Rufus surfaces at the Blast Tower. Doc tells him
that they were kidnapped by Donna-Lady Goal and brought here. She also got the 2
cartridges and remote.
Cletus is here also and took both Goals with him.
Argus' cruiser is parked by the tower; so he must be here also.
The rebels started their attack.
Find the 3 Goals:
Transporters:
See 3 transporters at left. One has a fly; another
has a frog and the third a platypus.
Talk to Doc about the transporters.
Get to the right tower transporter:
Enter the bottom outside transporter with the fly. Come out at bottom
left tower transporter by the rebels.
As a merged fly; go to the tower's
right transporter and come out of the top left outside transporter that
once had the platypus (now has a fly).
Enter the bottom empty transporter to be
in the tower. Talk to Janosch.
Go up and enter the top tower transporter.
Exit out from the top right outside transporter that once had the frog.
Enter the bottom empty transporter now to be
in the tower.
Go up and enter the top tower transporter with
the frog. Appear as a merged frog at middle outside transporter.
As merged frog, click on fly at left
transporter. Burp.
Click the same transporter you are in to go
back to the tower and be separated.
Enter bottom tower transporter to come out at
bottom outside transporter.
Enter the top left transporter to exit at
right tower transporter.
Bomb Control Room:
Climb ladder to go up. Eavesdrop on Argus, Cletus
and Lady Goal.
Cletus leaves to get his bag. Go right and see
Cletus fiddling with the bomb control.
Donna: At level above
Rufus is Donna. Check Donna and see that she doesn't have an implant.
Click on Donna's bag and take Donna's remote
and the other 2 cartridges. So no picture no sound when you use the
remote with either one of the cartridges on Donna.
Baby Goal: Use the blue
cartridge alone on Donna to get Baby Goal. See Baby Goal try to confront Lady Goal.
Spunky Goal: When Baby
Goal
returns to the right; use the green cartridge alone on Baby Goal to get
Spunky Goal.
Listen to Spunky and Lady Goal argue.
Bomb control: Go left and
see that Cletus is gone. Click on the bomb control panel. A countdown
happens. Rufus stops the countdown.
Cletus locks Rufus inside the room. Cletus
arranged it only to destroy the tower and not the area around the tower.
Click on control panel again to make a short
countdown. Exit.
The fight:
Fight happens.
Click on Cletus to be on top.
Click on blue button of remote to change Baby Goal
to Spunky Goal in Donna's body. She will then be on top of Lady Goal.
Click on Spunky Goal-Donna when she is winning to
get her to press the red remote beside the ladies.
When Donna is in Lady Goal's body, press the red
button that is now beside Rufus.
The edge:
Rufus is hanging on the edge of the tower. Use the red button
remote to change Donna-Lady Goal back to Lady Goal alone.
Admit that Cletus didn't lie.
Watch what happens.
Not The End
This document may not be
distributed without express written permission of the author and the content may
not be altered in any way.
For Questions or Comments
on this Walkthrough,
Please write to:
MaGtRo
Copyright © 11/2012
MaGtRo
 GameBoomers
Walkthroughs and Solutions
GameBoomers
Walkthroughs and Solutions