GOODBYE DEPONIA
By Euro Video & Daedalic Entertainment
Walkthrough by MaGtRo October 2013
Gameplay: This is a third person point and click game.
The Main Menu has New Game-Continue, Load-Save, Settings, Bonus, Credits and Exit Game.
The settings option has language, music, effects, videos and general volume adjustments. Subtitles, fullscreen-window mode, high resolution videos, window size, screen resolution and open inventory in one click selections are seen.
The cursor has 2 wheels; the icons inside show the possible actions that can be done. The left larger gear action is done by left mouse click and right gear action is implemented by right click of the mouse.
The inventory can be accessed by mouse wheel click and scrolling or if the option is selected; click the handle at top right corner of the screen.
Active spots in the screen are shown by pressing the space bar. The space bar also pauses the cutscenes.
The minigames can be skipped by pressing the "skip" or X button at right edge of screen.
Tutorial: Learn the game interface from Toni.
Prime Controller Ulysses announces to the Elysians that they are still waiting for Inspector Cletus and companion to return from the ruins of Porta Fisco. Cletus is checking if Deponia is inhabited and then the Organon will be given the go ahead to blow up the world of Deponia.
Bozo's cutter:
Goal wakes after smelling the smoking breakfast Rufus is cooking. Rufus is fishing at the moment. They are supposed to be at the Sea of Shards but Rufus changed destination to the cruiser route-ramp of the Organon monorail. The route will take them to the Upper Ascension Station in Porta Fisco where the Organon HQ is located.
The diving crane that Rufus attached to Bozo's cutter at the Sea of Shards catches something even though they are out of the water. Whatever it is pulled off the top of the cabin of the former Organon cruiser-Bozo's cutter.
Upper deck: Go on deck to follow Goal. See that Bozo's cutter is on the monorail and has no roof. Go to the prow and see that the Organon cruiser is towing them.
Inside the cruiser, Cletus tells Bailiff Argus to stop because he realizes that Donna and not Goal is in the body of his fiancée. Oppenbot is to go with Cletus to find Goal.
Get to Goal: Go to the stern. See Goal holding on the rope.
Climb the side wall of the container. See a signal stand at right side of screen that hits Rufus every few seconds.
Place the cursor on the signal label and then keep on clicking on it.
See Rufus hold onto the signal stand and dive to the front part to get closer to Goal.
Release Goal: Rufus caught a big one - an Organon cruiser.
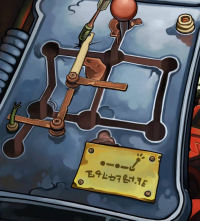
Check the crane fitting right of Goal holding on the rope of the diving crane.
Goal wants Rufus to tighten the screws while she releases the cable from the gear.
Turn the middle screw; then turn the right screw. The left screw falls off.
Turn the middle screw twice and the right screw falls off.
Turn the middle screw again and it falls off. Uh oh!
Hold on to Goal. Rufus ends up with Goal's jumpsuit.
Organon cruiser:
Barry the fan: Goal holding on to the cable is turning round and round on the cable spool. Rufus is holding on the ramp of the cruiser. A guard stands by the cannon.
Barry, a Rufus' fan with a camera wants to know the technique Rufus will use to get rid of the guard. Barry will adjust his camera to whatever techniques Rufus will try.
Answer with any technique but the one that works is: I'll confuse him with my blackout tactics. The guard is blinded and falls off.
Recap of Deponia series: The dialogue is a recap of the past Deponia storyline with a Rufus twist.
Release Goal: Use the cannon panel. The aim is off.
Press the large red button on right wall to expose a lever. It is the manual speed control.
Pulling the lever to slow down gets Barry to want an extreme action maneuver.
Push the lever to the red and see that the cable pulls the cutter to the cogs.
Click on the lever twice and fire ensues. Barry is on fire.
A box with a fire axe and hose drops down from ceiling rendering Barry unconscious.
Take the fire axe.
Take the hose and use it with the cannon. Fire the cannon and it wraps around the cable spool.
Click on the hose to get Rufus join Goal. Use the fire axe on the hose.
Goal and Rufus land on Bozo on the released cutter.
Hotel Menetekel:
The group walks the rail to the hotel. Enter the hotel.
Reception: Enter the first door on the next level. There is a warning sign beside the door.
Ring the bell on the reception desk. Talk to the receptionist.
Rufus' friends are in room 5. Get key to room 5.
Room 13 might be haunted and members of an apocalyptic group are in the laundry. Menetekel means impending doom.
Restaurant: Go right to check the restaurant.
Take the corkscrew in the hutch inside the service room.
Take the moldy salt shaker and pepper shaker from the stand by the table.
Check the coffee maker and get dust. (See the dwarf platypus egg on the top pipe of the coffee maker.)
Check the crookedly hang picture. Behind it is a nut that might hold the key panel or the clock or both of them. Exit to the left.
Rooms: (See a long hair platypus egg left of the door to the rooms.) Enter the door at the next level. These are the rooms.
Soothsayer: Enter the first door at left. Hear a prophetic statement - the destroyer come through the door and he will bear the sign of the beast.
Talk to the soothsayer from Porta Fisco. He is an apocalyptic leader. The end of the world will happen tomorrow before the evening news.
Check the hood of the bathrobe he is wearing and Mister Toffee the tarantula in the jar.
Check and then take the toothpaste on the bathroom door. The toothpaste causes fever, sweaty feet and permanent loss of awareness of danger. It is not to be mixed with rug cleaner because chloroform gas will be produced. Exit.
Closet: Check next door and get a pillowcase with head lice.
Ghost: Enter next door at left. Talk to the ghost. Pick up the broken dishes to get a fish knife.
Talk again to expound on guilty secrets. The ghost's secret is - it likes to listen to people while they sing in the shower.
Rufus cannot look through the hole or exit through the window.
Room 5: The back right room is locked while the front right room has voices.
Use room 5 key on the front right room. See that Goal is in a neurofusion chamber.
Talk to Doc. Learn that Doc is trying to repair Goal's brain implant. Goal will be returned to her old self when her implant is fixed.
Bozo wants Rufus to take a shower.
To get Rufus out of the room he is sent out to do a professional difficult task. He is to get a plasma exchange whoop dee doo mammoth fur relay.
Talk to Bozo. Bozo is hungry. Rufus is bothered by a naked Bozo. Bozo's clothes are in the laundry. He is not cold because the heater is on.
Bozo might also catch whooping pox. The symptoms are blue tongue, cough, sniffles and fever.
Take Bozo's bag below Doc's desk. Check the bag to get a shampoo that will get a full head of hair.
Check and use the intercom right of door.
Get Bozo to put some clothes on:
Turn off the heat: Go down the stairs.
See a pie vending machine by the stairs. It electrocutes Rufus.
Heater control: Check the heater machine left of the pie making machine.
It has 3x3 squares. It controls the heat in the rooms. To turn off the heat, all lights should be blue.
There are buttons to control the diagonal, right column, middle column, left column and sides.
Press the diagonal button at right. Pull lever.
Press the middle button, side button at left and diagonal button again.
Balcony: Exit the door at left. See the pipe leaking on top floor (rooms).
Check the trash bin and see a pelican that doesn't want Rufus to check the fish guts. (See the snow platypus egg left of the balcony.)
Go back inside, then go up and out the main door.
Laundry: Enter the room at next lower level.
See the members of the mysterious laundry sect. They would not let Rufus move. Check the washing machine below. (See the wooly platypus egg left of the middle washing machine.)
Take Bozo's suit and the hanger.
Bozo: Go to the rooms and enter room 5.
See that Bozo has icicles. He is still hungry and stubbornly won't wear his clothes because of Rufus.
Exit the room and the hallway.
Get food for Bozo:
Toilet: Go to the toilet at next lower level. Talk through the door to the time traveler.
He came here from the past to watch the end of the world. There is toilet paper but it feels like sandpaper.
Get smooth paper:
Cletus and Oppenbot: Go to the top door and enter reception. See Cletus and Oppenbot.
Cletus wants his clothes cold washed. Cletus gets his room 1 key.
Cletus tells Oppenbot to watch the bag with money. The bag is similar to Oppenbot's bag that has his plasma exchange whoop dee doo mammoth fur relay.
Go to the restaurant and exchange the bag with Rufus' bag. Check the bag in inventory and get paper money.
Time traveler: Go to the time traveler at the toilet.
Give him the paper money through the door. He gives a coin in exchange. The time traveler leaves.
Toilet: Open the door. Take the rough toilet paper.
Flush the toilet to learn that there must be a leak in the pipes because it didn't flush correctly.
Get the pie: Go to the pie vending machine and use the coin. It is too thick.
In inventory use the toilet paper with the coin to get an abraded coin.
Use the abraded coin on the slot of the machine to get a pie.
Get to the balcony where the pipe leaks:
Remember the open window in the ghost room that Rufus is not allowed to go to. That is where the leaky pipe is located.
Also remember the guilty secret of the ghost - it likes to listen to people while they sing in the shower.
Get the soothsayer to take a shower: Go outside to the balcony. Use the salt shaker on the trash bin to spice up the fish guts.
The pelican gets thirsty and gets a drink of water from the dripping pipe.
Use the hanger in the pelican's beak. Take the fish inside the pelican's mouth.
Use the fish knife on the fish to get scales.
Go to the soothsayer room; back left door at the rooms level.
Use the scales on the hood he is wearing.
Talk to the soothsayer. Learn that the members in the laundry are waiting for their guru.
Choose: What are you doing again? I think you look just fine. He will pull up the hood. He believes he has dandruff but doesn't have shampoo.
Fix the pipe leak: Give him the shampoo taken from Bozo's bag. The seer tells Rufus to leave. The seer showers.
Go next door to the ghost room. See that the ghost is peeking on the hole to listen to the seer.
Go through the window and go left to the seer's window. Take Mr. Toffee the tarantula.
Use the corkscrew on the tarantula bottle to get cork and empty bottle. Mr. Toffee escapes.
Use the cork on the leak on the pipe just outside the ghost's window.
Exit the ghost room.
Enhance Bozo's pie:
Get blue dye: Go to the toilet now that the pipe is fixed.
Flush the toilet. Look in the toilet bowl to see something - a freshener. Take the blue urinal cake.
Prepare the whooping pox pie: Add the toothpaste, urinal cake, pepper shaker and dust to the pie.
Bozo: Go to Bozo at room 5. Give him the pie with the ingredients that causes fever, blue tongue, sniffles and cough.
Give Bozo his clothes and he gives the red towel.
Get Cletus' clothes:
Ghost room: Enter the ghost's room and take the sheet from the floor.
Get the seer's habit: Go to the seer's room. The seer now has a head full of hair.
Use the blue pillowcase with lice on the seer's hood.
Choose - What are you doing again? I think you look just fine from the dialogue. He puts the hood up and starts itching.
Rufus is asked to leave. Go back inside the room and take the habit on the bed.
Be the guru: Go to the laundry. The members want the relics engraved with insignia six.
Give the relics in this order: sheet from ghost. blue pillow case and red towels.
The items are hung in front of Rufus and sent to the laundry.
Get washed: Rufus is also thrown in the washing machine (that cleans him also).
Rufus has to come out together with Cletus clothes.
Choose from items hung at the balcony: sheet, Cletus clothes, Rufus, sheet, red towel and blue pillow.
The washing is complete. Now for the ritual dental operation. I think his teeth are cleaned. Get Cletus' clothes.
Get Cletus out of his room:
See the menu: Go to room 5 and tell Doc that Cletus is here.
Use the intercom and say that you are in room 1.
Ask about dining now. You need a menu to be taken from the reception desk.
Ask about laundry and be told to pick the clothes yourself.
Ask to talk to the assistant. Oppenbot is asked to sing on the way. Exit the room.
Go down the stairs at foreground to hide from Oppenbot.
See Oppenbot talk to Cletus outside room 1 while Rufus sneaks out the door.
Go to the receptionist and ask to see the menu. Rufus is asked to sign a waiver.
Automatically Rufus hides when Oppenbot is heard.
Change the clock: Go back to room 5. Use the intercom again and order food for room 1.
Learn that food is served at 12 on the dot at the restaurant.
Go to hallway. Change to Cletus clothes by right clicking the clothes in inventory. Rufus automatically wears Cletus clothes.
As costumed Rufus; enter room 5. Doc and Bozo hide from Cletus. Take the screwdriver from Doc's table.
Go to the restaurant. Use the screwdriver on the nut on the wall twice. This turns the clock to 12 noon.
The receptionist calls Cletus to tell him his food is ready.
Cletus comes down and turns in his key to room 1. Cletus goes to the restaurant.
Get the plasma exchange whoop dee doo mammoth fur relay:
Enter room 1: As costumed Rufus, go to the reception to ask for room 1 key. The receptionist gives a key.
Go to room 1 and try to use the given key. It is the wrong key - it is room 9 key since the clock-key holder was turned.
Go back to the receptionist. Show room 9 key to the receptionist.
Cletus finished eating and goes to the reception desk. Automatically costumed Rufus hides at the restaurant but first tells the receptionist to give his opinion about something before giving his room key.
Immediately, turn the nut twice to mix the key holder again. Cletus gets the wrong key.
Turn the nut twice again to put the key holder and clock in the correct position.
Go back to the receptionist and tell him you got the wrong key again. Give him room 5 key.
Get room 1 key. Oppenbot notices strange things going on.
Go to room 1. Use the key and enter.
Take the bag from the floor that has the plasma exchange whoop dee doo mammoth fur relay.
Take care of Cletus:
Find a way to knock out Cletus: Hear Cletus returning to his room. Hide in the closet right of door and behind the mirror.
Cletus says he needs to remove the taste of the food at the restaurant from his mouth. He has a bowl of champagne truffles.
Take the mothballs and carpet cleaner from the closet shelves.
Combine the toothpaste with the warning label and the carpet cleaner to get chloroform toothpaste. Smell-check the chloroform toothpaste in inventory. LOL.
Look close at mirror and see 2 screws holding the back of the mirror. Use the screwdriver to remove the bottom right screw.
Replace the toothpaste on the shelf with the chloroform toothpaste.
Back out from close-up with the arrow at right of screen.
Get Cletus to brush his teeth: Look at the air conditioning pipe at top of the closet.
See that the air ends up above the bowl beside Cletus.
Use the mothballs on the air conditioning pipe. Mothball drops on the bowl and Cletus eats the mothball. Cletus brushes his teeth.
Mimic Cletus: See Cletus brush his teeth. Look close at mirror. Move the mirror.
Copy his movements.
Check the small arrows at top left of the bar at left. It shows the direction of the toothbrush movement: up, down and around.
Place the cursor a bit below Cletus' toothbrush to watch his movement. Time the rotation similar to the rotation of Cletus' toothbrush.
Get the bar to the right.
When successfully done, Rufus realizes that he was using the chloroform toothpaste on himself. Rufus passes out.
Cletus looks through the mirror to see Rufus. The mirror drops down and hits his head. Cletus is knocked unconscious to the shower.
Oppenbot: Oppenbot enters the room and asks for the bag with money to pay part of the bill.
Give Oppenbot a bag. Of course, Rufus realizes that he gave the wrong bag.
Go to reception and automatically talks to the receptionist. Cletus calls from his room. Rufus talks to Cletus.
When Cletus arrives, Rufus hides and automatically gets the other bag.
Musical doors:
Goal: Go back to room 5 and see Goal is repaired to her old self again.
Rufus gets upset upon realizing that he was given a useless task to get him out of the way.
Rufus leaves the room. Goal tries to defend Rufus to Doc and Bozo.
The baddies: Bailiff Argus and Donna arrive. They talk to costumed Rufus.
Goal follows Rufus. Cletus comes out of his room.
Trap the baddies: The aim of the puzzle is to try to get Donna and Cletus together in a room.
Donna should think that Cletus is Rufus. They should see each other in the hallway.
The cursor becomes active when it is costumed Rufus in the hallway.
Note: Goal enters the dark room when she sees Argus and Cletus.
Goal goes down when she sees Donna.
Argus follows Donna in dark room.
Rufus should stay away from Donna as much as possible.
As soon as control of Rufus is possible, enter: Doc's room (room 5), dark room (Ghost room), dark room, closet, stairs at foreground and dark room.
If mistake is done - start over after Donna beats up Rufus in the closet.
Donna beats up Cletus in the closet.
Bailiff Argus sees costumed Rufus and Goal at the hallway. They are to go back to Porta Fisco to catch the last highboat to Elysium. Rufus convinces Goal to go and do the ruse.
Organon cruiser cabin:
Rufus and Goal are now on the way to Porta Fisco. Rufus is still mad at Doc and Bozo. Goal writes her report to the Council. She asks Rufus to go to bed.
Look around. Take the letter opener beside Goal.
Press the top drawer button right of Goal. Take Cletus' shoes from the open drawer at right wall. Push to close the drawer.
Check the air duct above the drawer. It leads to the interior of the cruiser.
Open the closet left of the drawer to see Cletus' clothes.
Open the door and talk to the guard. The guests are told to remain in their cabins. There are intruders - Deponian rebels that might have gained access to the cruiser.
Open the door left of exit door to see a coffee dispenser. Get a cup of coffee.
Bed: Press the bottom button right of Goal to open the bed. Go to bed.
Rufus takes his clothes off and calls Goal. Rufus learns that the room is filmed by security cameras. He realizes that he has to get to the computer core to erase the film because he took off his disguise.
Air duct: Use the letter opener on the air duct. Climb up to the duct. See the computer core. Go back.
Remove the guard:
Make an intruder: Open the closet. Place Cletus' shoes under the clothes.
Remove the mattress from the bed. Take the slatted frame.
Use the slatted frame on the open air duct.
Trap the guard: Open the door and talk to the guard. Ask him to check the room again.
He sees the opened clothes closet and the shoes.
He checks where the intruder went and climbs the slatted frame.
Use the top button to open the drawer. The guard under the slatted frame falls in the open bed.
Push the bed button to hide the bed on the wall. You can check on the guard if you want.
Locate the computer core:
Exit the room and see a doormat in front of the room.
Go around to see if Rufus can find the computer core. He just goes around in circles.
Go back to the room with the doormat.
Make a trail: Climb up the air duct. Look around the computer core and check the terminals.
See a very clean floor mat below the air duct.
Use coffee on the doormat. A tidybot comes and cleans the mat. Check and talk to the tidybot. See that it even has a cup holder.
Go back to the room and outside. Pour coffee on the doormat outside the room. The tidybot comes and cleans the coffee.
Use the coffee cup on the tidybot. Use the knife to make holes on the coffee cup. Now the coffee cup drips.
Go back inside and get another cup of coffee.
Go to the air duct again. Pour coffee on the computer core room doormat again.
The tidybot comes to clean again. See that the coffee cup on the tidybot is empty.
Pour coffee on the tidybot's empty coffee cup. If you don't, the tidy bot will clean the trail of coffee he makes.
Go back outside the room and follow the trail of coffee.
Meet the tidybot cleaning his trail of coffee. If you did not add coffee to the empty cup earlier, you will have to start over.
Go to the computer core room.
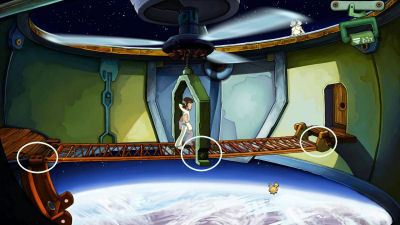
Distract the security cameras:
Goal follows Rufus to the room. Goal knows what Rufus is up to.
Goal says that the cameras cover only in 45 deg angle.
The squares are colored by the camera that can see it.
The cameras are 3 yellows, 2 reds and 3 blues.
Remember that yellow+blue=green; red+blue=purple and red+yellow=orange.
The aim is to clear a path for Goal to get to the terminal to be checked.
Move one square at a time only.
 |
Terminal 1 (left): There is an arrow on the left terminal. Walk the perimeter of the squares until in front of terminal at left. The go back to the back area until an area is clear for Goal. Talk to Goal to get her to the terminal. Goal fixes the left terminal.
|
|
|
|
 |
Terminal 2 (right): There is an arrow on the right terminal. Follow the line on the picture. Talk to Goal to get her to the terminal. Goal fixes the right terminal. |
|
|
|
 |
Terminal 3 (center): There is an arrow on the center terminal. |
|
|
|
 |
When Rufus is standing on this red square after doing above, tell Goal to move. |
|
|
|
 |
Immediately move to the purple square which turns orange and blocks Goal from terminal 2. |
 |
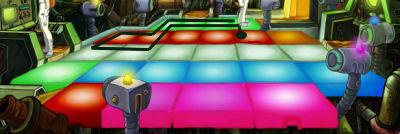
Then move to square in front of terminal 2. Talk to Goal to get her to the terminal. Goal fixes the center terminal. Disco time! |
Caught:
After the Saturday Night Fever scene; see that Bailiff Argus and his guards surround the couple. Argus believes that Rufus is Cletus and wonders why he changed his heart about Deponia.
Goal is taken to the bridge while Rufus as Cletus is to be executed.
Rufus asks for a last wish. Select have a last cup of coffee. Rufus automatically spills the coffee. Tidybot comes to the rescue.
Leave the room to the main ship at left. See 2 guards play at not watching the exits.
Rufus goes back to the computer room. Exit through the right doorway.
End for lover and enemies:
Hear Bailiff Argus ask about the interrogator. He wants him at the bridge immediately.
Rufus as Cletus comes out of the computer core room.
See Oppenbot in a glass case. (See the clown platypus egg left side (behind pipe) of Oppenbot's glass case.)
Cletus and Donna enter from above.
Hide at the good hiding place - a round container at right. Rufus removes his costume. The cover goes down and seals Rufus inside.
The guard that tidybot pushed arrive and captures a willing Cletus. Donna follows Cletus.
Argus and Goal: Rufus as the interrogator arrives. Argus removes his mask and looks like Rufus-Cletus.
Argus says that Prime Controller Ulysses is the evil one. He wants to save Deponia but would not leave it in the hands of Rufus.
He asks Goal to go back to Elysium as his fiancée.
Press buttons and in the end Goal is given an injection of Sodium amytal - truth serum. Because I love Rufus.
Rufus is thrown overboard.
Where am I?
Get light: Rufus lands at the tutorial room. Pick up the black yin from the floor.
Go right and step on the red indented area of the platform. Light comes on at far right. Rufus moves off and the light turns off.
Use the yin on the odd floor panel to hold the panel down. (See the fire platypus egg above the chair at left and behind one of the pipe.)
Console: Go to the console and check it out.
There are 5 fuses with icons on them. Each one are on a colored stand.
Pick up the power inverter at base of the console.
Conveyor belt: Use the power inverter on the indentation at the center of the panel on the platform. The press closes.
Press the button left of the stand. The press separates and a big hole at the base opens up.
Jump in to be at the conveyor belt. Rufus is hit with a bat, burned, cut with a blade, frozen and cut with light saber.
After that torture, Rufus is dropped back to the platform.
Fuse console: Go to the fuse console and see that the treatment on the conveyor belt corresponds to the arrangement of the fuses.
Arrange the fuses to get Rufus through the conveyor belt somewhat intact.
From left to right, arrange the fuses: snowflake, circular blade, light saber, fire and baseball bat.
Get processed: Press the button on the stand again and jump down to the conveyor belt.
If the fuses are arranged correctly, Rufus is body whole and stands up.
Light: Go to the light. Rufus presses the light and turns it off. See that Rufus is in a factory - not hell.
Factory:
Rufus is not dead. Look around.
Check the gauges for fat, carbohydrates, water, minerals, protein and the mysterious gauge.
Check the funnel. Take the junkball bat from the last stand of the conveyor belt.
Go left. See a very old man with a sickle at the walkway above.
See a time clock at right by the factory entrance.
There is a light gate at left blocking access to the patio.
Residence:
Go forward and then right to the residence.
Look around. The door is locked
See pots and an olive plant by the window. Pick the olives.
Pick up the sack of soybeans at end of table.
Take the oil bottle with olive oil from the island at right.
Check the oil mill. Use the picked olives on the oil mill. Pick up the vial of olive oil.
Take the water cooler at back wall. (See the earth platypus egg on the shelf above the water cooler and right of fan.)
Follow the man with scythe:
The door is bolted from outside. Use the junkball bat on door.
Exit and go left.
Hermes: Talk to Hermes, the old man with the scythe.
Learn that this is the place where the Organon was created - a cloning factory. Yes - it is a waste processing plant.
Hermes calls Rufus - Prototype R. Hermes was the former head of this facility.
Learn that Rufus is one of 3 prototypes that predated the Organon. Prototype A, C and R: Argus, Cletus and Rufus. They were made with no respect for life; that is why there are only 3 left of the first batch.
Put back Hermes' eye.
Rufus was recloned after he died from the crash. Everything is organic except the nucleic acid; it is synthesized from radioactive waste.
The prototypes have hope. Rufus never learned from his mistakes. LOL.
Rufus releases his rage: Use the bat on the 4 red steel beams.
Hermes is now the one that is depressed. He blames himself for what happened to Elysium and Deponia. He leaves to end his life.
A chamber opens and Goal's body collapses. She's still dead.
See Hermes commit suicide. He lost hope.
Cloning machine:
Go back to the left and check the console.
See that the skeleton is Rufus. Press the purple button above and see the one for Organon and then Hermes.
See the 6 bulbs at top left for materials. There is also a 1, 11 and 111 selection and a lever.
Pull back at right side of screen.
Check the pipe at left to see a vampire platypus and a nest of its eggs. The platypus hisses if you try to get the eggs. (See the vampire platypus egg in the lower pipe.)
Collect ingredients for cloning:
Time card: Go back to the residence and then to the time card machine by the entrance to the factory.
Take the time card. The punches have now closed up.
Go back to the clone lab and then the pipe.
Use the time card on the vampire platypus to get stamped punch card.
Use the stamped punch card on the time clock. Get a reward for the length of the overtime. Take the garlic.
Patio: The light gate opens after the time clock gives Rufus a well-deserved off time.
Food truck: Go to the food truck and try to open the door. It is very rusted.
Use the oil bottle on the door. Rufus refuses to use the oil bottle on it because it is too old.
Use the freshly made olive oil on the food truck door. Open door and check everything.
Take the ancient fryer grease, bag of fries, swill- o-fizz and iodized salt. (See the potbellied platypus egg at right side of counter.)
Platypus eggs: Go back to the pipe at clone lab.
Use the garlic on the vampire platypus. Get the vampire platypus eggs.
Fill the tanks:
Go back to the factory. Check the funnel at front left. It is where the ingredients are added to fill the tanks.
Add oil bottle and fryer grease for a full tank of fat.
Add sack of beans for carbohydrates and protein.
Add French fries for carbohydrates.
Add water cooler for water and minerals.
Add soda to complete water.
Add iodized salt to complete minerals.
Add eggs for proteins.
Check the gauges and see that they are now at maximum. The green mysterious sixth gauge is not known.
Clone Hermes:
Go back to the clone lab. Use the console.
- Select Hermes' skeleton.
- Check the bulbs and see that all the yellow lights are enough for 3 clones.
- Select 3 on the red knob at bottom left.
- Press the lever.
See 3 clones of Hermes. All 3 went off to commit suicide again. The third was saved by the pillow on the right chopper.
Clone Goal:
Talk to Hermes the third. He got a scan of Goal before she died. He gives Goal's brain scan cartridge.
Go to the console at the clone lab.
Goal: Automatically insert Goal's brain scan cartridge on the console.
Flip the switch to 1 and see the lights turn yellow.
The mysterious 6th gauge is flickering red.
Pull the lever.
Uh oh! There's no nucleic acid left to get Goal to mature.
A baby Goal is cloned. The baby falls down the sewer pipe. She is now in the sewers under Porta Fisco.
Clone Rufus:
There is not enough time to stop Argus and the highboat from leaving, getting Goal and contacting the Resistance.
Hermes sacrifice himself and Rufus to get enough biomass to make 3 Rufus clones. Only one will have the nucleic acid to get Goal to mature.
The cloning was started by the vampire platypus using the setup with sandbags that pulls the lever of the cloning machine.
3 Rufus' appear in the cloning chamber.
Check all 3 Rufus' inventory to see who has the nucleic acid. The right Rufus has the nucleic acid.
Middle Rufus and Right Rufus fight over the nucleic acid.
Select Left Rufus to control the other 2 Rufus'. As the Left Rufus, take the nucleic acid.
The nucleic acid falls into one of the sewer pipes. The 3 jump into the sewer pipes and go their separate ways.
3 Rufuses: The 3 clones are seen at bottom of screen:
Left Rufus is the one in the sewers with baby Goal.
Middle Rufus is the one that is looking for the resistance in the city of Porta Fisco.
Right Rufus is the one that will try to stop Argus from leaving with the highboat.
Inventory: Sometime in the game, the 3 Rufuses can exchange inventory items.
Select the item from inventory and then click on the Rufus that you want to give it to.
Switching Rufuses: Click on the picture of the Rufus you want to change to.
The active Rufus' picture is grayed out.
Left Rufus:
Sewers: In the dark, Rufus is with a crying Baby Goal.
Move the cursor around or press the space bar to see the hotspots.
Move the cursor to top of the 2 set of eyes and feel a branch. There is a crevice and brush at bottom of the eyes.
Baby Goal cries whenever Rufus tries something.
Middle Rufus:
Change-click to the middle Rufus.
Ruined settlement:
See Bozo by the porta-potty. Mrs. Mook says that Bozo is afraid of the end of the world. Bozo says not.
Bozo enters and Rufus pops out of the toilet. Rufus runs home.
The Mooks: Look around. Talk to the Mooks. The resistance camp is down the stairs and across the square.
Rotary clothes dryer: Check the rotary clothes dryer.
Check and wear Cousin David's firefighter outfit.
Turn the rotary clothes dryer. Check and wear Cousin Alec's ninja outfit.
Turn the rotary clothes dryer. Check and wear the romper. Mrs. Mook throws a caffeine lollipop to Rufus.
Mailman: Check the bag of the mailman hanging on the window.
Open the bag to see a letter. Take the letter. It is from Papa Bozo to Mama Bozo.
Bozos: Enter the house. See Grandpa Bozo, Mama Bozo and Baby Bozo.
Talk to the mailman and to Grandpa Bozo.
Mama Bozo: Talk to Mama Bozo. Learn that Bozo's doll is Fifi fairyfrills.
Learn about the new general of the resistance. Learn that the full head of hair on Baby Bozo was because of her breast milk.
Grandpa will fix dinner if a girlfriend of Bozo visits. Remember Bozo's girlfriend is Bambina.
Baby Bozo: Check Baby Bozo with the pacifier. Take the baby phone.
Give the lollipop to Baby Bozo. Baby Bozo spits the pacifier and it goes down the sewer pipe. Baby Bozo crawls out of the house.
Bozo: Go to Bozo in the bedroom. Talk to Bozo.
He's depressed. Check and try to take the piggy bank.
Check and take the note on Bozo's coat at right. It is a doctor's referral to a therapist.
Try to give him the letter or the baby phone.
Exit the house and then go down the stairs at left.
District Center:
Bread wrap woman: Check the sign left of the woman. Take the sign - Male assistant wanted.
Talk to the bread wrap woman. She needs a male assistant. (See the naked platypus egg at top left of the entrance to the ruined settlement.)
Storm drain: See a storm drain left of the stand. It is where the Rufuses can talk to each. Now items can be exchanged between the clones.
Office buildings: See 2 adjacent buildings across the road. Go there and enter.
Rope store: Enter the first building and be a rope-noose store. Listen to the rope seller and therapist.
Talk to the rope seller. Look around. Take the flyer on the desk. Rufus made it into a paper airplane.
Newspaper office: Click on Barry at the newspaper office at bottom right to go there.
Remember that he was the one that took pictures at the Organon cruiser that Rufus set on fire.
Go right and take the letter case on the blue cabinet. Take a paper from below the blue cabinet and printer's ink below the sink.
In inventory combine the paper and the printer's ink to get a blackened paper.
Talk to Barry. Rufus will look for a subject of a heroic deed. This will be the proof of his selflessness. A finger focus for the deed is now in inventory.
Therapist: Go to the therapist. Rufus needs a referral. Give the therapist the doctor's referral taken from Bozo's coat.
Talk to the therapist completely.
Rufus is given a Rorschach test. See 3 ink blots. Remember your answers and the shape of the ink blots.
Check the medicine cabinet. It is where the antidepressants are kept.
Rebel camp:
Go right from the bread wrap stand. Look around. Check the Upper Ascension station.
Check and take the antenna. In inventory combine the antenna and baby phone to hear a conversation.
Sgt. Bambi and Pvt. Lotti: Look at and talk to Bambi (Bozo's girlfriend) and Lotti (former City Hall receptionist). They talk about the new general.
Gate to rebel camp: Go upstairs to the rebel camp gate.
Liebold needs someone else to verify Rufus' identity.
Go back down to the 2 women. They want to have a tattoo design first before they help Rufus.
Find Baby Bozo and get heroic deed: Look at the moving blob on the scaffolding.
Use the finger focus on the moving object on the scaffolding at top right. It's baby Bozo!
Go back to the district center.
Right Rufus:
Change to the Right Rufus. Rufus comes out of the drain. The Organon army is withdrawing from the city and marching towards the Ascension Station.
See the guards on the platform prepare crates for delivery to the station.
Check the sewer drain in front of Rufus. Nobody is down the sewer at this moment (this is where Left Rufus will be later).
Enter the sewer pipe at right side of the platform. (See the poison dart platypus egg on the posts left of the right pipe on the water.)
Rufus emerges at the platform.
Press the red button on the lamp post close to where Rufus is located. This turns on the TV as well as the lamp at the sewer.
Cowboy Dodo is doing his show. The Organon surveillance guard and the other guards like Cowboy Dodo. They all watch the TV.
Move forward and check which crate is open to hide in.
Left Rufus:
Change to Rufus at left.
Stop Goal from crying: In the dark, move the cursor somewhere below the left eye of Goal to find the pacifier. Take the pacifier and use it on Goal.
Now that Goal can't cry; take the branch at top of the eyes and the brush somewhere below Goal's right eye.
Use the brush on the crevice below Rufus. Then use the branch on the crevice.
Rufus sets fire to the beast. The beast tries to swallow Rufus.
Baby Goal in a pot floats by. Rufus is spat out by the beast.
Lantern:
Look around. Check the window - storm drain at top of the wall. (See the water platypus egg at bottom of the ramp above Baby Goal.)
Talk to Goaly. See that the lamp on the turnstile is on (because Right Rufus turned on the power above).
Turn the turnstile. This caused the TV show above to change to the B side and play the Look Around music. Right Rufus is caught.
See that the darkness hid 3 children. Rusty, Gritchen and Hansel want to follow Rufus because he's an adult.
Pipe Forest:
Go to top left and be at the Pipe Forest. See a witch and pipes. (See the Mimicri platypus egg left of the mushroom behind Rusty.)
Learn that the witch found the nucleic acid vial and sold it to the Sewers Inn for 5 zlottis.
Talk to the bottle witch. There is no exit from the sewer.
Leper Colony:
Go left. Talk to the bouncer in front of the Inn. He would not let Rufus in because of the children.
Talk to the Monkey and Organ grinder. Climb the rung right of the monkey. The kids can't follow. The kids are called by the Creep.
Talk to Goon the Bum and June in a gondola. Rufus wants to do a good deed for Goon after what he did to him in Deponia 2.
Exchange items at Storm drain grate: Go to the storm drain grate at top left.
Talk to the Middle Rufus at the Bread Wrap Shop. They can now exchange items.
Change to Middle Rufus. Select the inventory you want to give - blackened paper and then click that item on Left Rufus' picture.
Change to Left Rufus again by clicking on his picture.
Creep: Go down the rung and talk to the Creep at the van.
Rufus goes inside to pet the the cute furry animal (active spot is on the wall). Rusty doesn't believe that Rufus petted a furry animal.
Go back inside the Creep's place and then use the blackened paper on the cute furry animal (active spot is on the wall) to get imprint.
Exchange item again: No need to go to a sewer drain. Select the imprint from inventory and click it on Middle Rufus.
Middle Rufus:
Change-click on Middle Rufus. You now have the imprint taken by Left Rufus.
Tattoo design: Go to the Rebel Camp at right.
Give the imprint to Sgt. Bambi. She uses it as tattoo design for the squad insignia.
Tank: Take the deck chair leaning on the building and the crowbar left of Lotti. Rufus doesn't need the instructions for the deck chair.
Talk to Private Lotti. She can't help with the gate until her tattoo swelling goes down.
Enter the Tank. Bambi can't help with the gate either because she has to watch the radio for new orders.
The Major is Rufus' ex girlfriend Toni.
Open the locker to get Lotti's lunchbox. Check the lunchbox in inventory to get hormones. See a picture of Cowboy Dodo on the locker door.
Get girlfriend to Casa Bozo: Talk to Bambi. Show her the letter from Papa Bozo. Bambi worries about Bozo and leaves.
Agitate Toni: Talk to Toni. Toni is very mellow and relaxed. There is a secret plan made by the new leader - the general. Toni has a new therapist.
Rufus tries to agitate Toni. He tells Toni that there are 3 Rufuses.
Look at the CB radio and get the frequency of the CB radio. Use the baby phone on the CB radio and automatically Rufus enters it on the baby phone.
Give the baby phone to Left Rufus. Change to Left Rufus and right click-use the baby radio.
Left Rufus appears on the monitor. Toni loses it after seeing the Rufuses and runs to her therapist.
Exit the tank. Change back to Middle Rufus.
Therapist: Go left to District Center. Enter the first doorway to get to the Rope store.
See Toni on the couch in therapy.
In inventory, combine the paper airplane made from the flyer and the Yrk key.
Use the weighted flyer on Toni or Therapist. It flies but a draft lands it on the wall of the Ascension Station.
Exchange: Give the crowbar to Left Rufus.
Right Rufus:
Change to Right Rufus. See that Rufus is put in the cell.
Check the wrapped body on the ceiling. It is Cletus but Rufus thinks it is a clone.
Escape the Cell: Talk to the cell guard completely. He gives all the hints to escape the cell. :)
Food cabinet and the bathroom are now opened.
Take the breakfast: coffee, bagel and pepper.
Take the toothpaste, toothbrush and urinal cake from the bathroom.
The guard mentioned that the rug has just been cleaned. Use the coffee on the rug. Tidybot arrives. Take the dust bag from his back.
In inventory; combine pepper, toothpaste, urinal cake and dust with bagel.
Give the flavored bagel to Cletus.
Cletus throws up. Talk to the cell guard. Rufus hides.
Cletus is sent down to sick bay and the cell is opened to be aired out.
Flyer: Exit to the right and be at the balcony. See the sleeping guard.
Take the flyer on the wall thrown by the Middle Rufus. Rufus gets the Yrk key and throws the flyer out the balcony.
It lands back to the therapists and he thinks it's a good medicine for Toni.
Check the mail pneumatic mail chute on the corner wall.
Application form: Open the cover of the terminal at right.
Check the crate right of the terminal. There are application forms for medical assistance #27, screwdriver- Holla 55 and for a Yrk key - Yrk 122.
Use the application form on the terminal. Apply for Yrk-75 (sanitary service or ask for a doctor).
The Yrk is not working. Use the Yrk key sent by Middle Rufus on the terminal.
Use the application form again and request for Yrk-75.
Get entry to medical bay: Go down and press the red door sensor of the medical bay at left. See a Sanbot and an ill Cletus.
Find the resistance: Go through the crawl space at right and through the door.
Argus talks to Oppenbot. There are 11,000 Organons. Oppenbot will stay here at Ascension Station. Check the highboat and the Officials.
Talk to Janosch and Cowboy Dodo. Cyndi, Hotti and Cutis vote for Cowboy Dodo. The plan is to lower Cowboy Dodo down to Argus' office below and take the ascension codes.
Talk with Janosch. Borrow the screwdriver.
Use the screwdriver on the pneumatic mail tube to get hit by a pneumatic tube cartridge.
Cowboy Dodo: Talk to Cowboy Dodo. The two heroes do not get along well.
Exit and Cowboy Dodo follows Rufus outside. A challenge is issued.
Rufus leaves. Go back to the balcony and the pneumatic mail chute.
In inventory combine the pneumatic mail cartridge and the filled application form.
Place the filled pneumatic mail cartridge on the mail chute. The request for medical help was approved. The medic is on the way.
Rufus runs and hides while the Medic continues to Cowboy Dodo.
Go to the crawl space above Argus' office. See that the medic is tied up with the rope.
Talk to the captured Organon Medic to get his Organon outfit.
Treat Cletus: Go back to the medical bay.
Wear-right click the Organon outfit. Press the door sensor of the medical bay.
Enter and talk to the Sanbot. Cletus has a tapeworm. Rufus might operate at once.
Remove the organs: Take the organ where the head of the tape worm appears.
First the stomach at bottom right, liver at middle left, spleen-heart at middle right, intestines at bottom and lungs at top.
Take the tapeworm.
Put back the organs: Right click to turn.
Place the lungs on top with the trachea at top and hole at right.
Place the intestines at the bottom with hole at right side.
Place the heart at middle right side with the purple spleen at right side.
Place the liver-bumpy pink random organ at middle left with the hole pointing right.
Place the stomach at bottom right with holes attached to intestines and the liver.
Where does the last part go?
 |
 |
 |
Cletus: Cletus follows Rufus. Bring Cletus to the rebels.
The vote was for Cletus to get the codes. They now need a rope. Talk to Cletus and Rufus and they agree to get rid of Cowboy Dodo.
Get rid of Cowboy Dodo: Go to the terminal again. Get application form from crate.
Use application form on terminal. Request a screwdriver - Holla 55. Place the application form in the pneumatic mail cartridge.
Place the pneumatic mail cartridge in the mail chute. Get a screwdriver.
Go back to the rebels at the crawl space. Give the screwdriver to Cletus. He will now get Cowboy Dodo's help to open the pneumatic mail tube.
Get another application form, fill it out for anything except a medic. Place the filled form in cartridge and send it on the chute.
Go back to the rebels at the crawl space. Find out that Cletus saved the life of Cowboy Dodo and is unanimously voted to get the codes.
Give the tapeworm to use as rope to Janosch.
Lower Cletus to Argus office: Upper middle, lower middle, lower right, upper right, upper middle, upper left, lower left, lower middle, lower right, upper right, upper middle, lower middle, lower right, upper right, upper middle, upper left, lower left and destination.
Cletus identifies himself to Rufus. Cletus is caught.
Argus: See that the rebels are gone. Go out.
See that the rebels are in the cell. Argus orders the guards to line up at the balcony.
Go to the balcony. See Argus reprimands the guards.
Oppenbot is assigned to lugging crates. He then asks the Organon guards who is responsible.
Use the Organon outfit and Rufus does a clothes change.
Go up to talk to Argus and assume responsibility. They sing the Organon hymn before they toss him out the balcony.
Left Rufus:
Left Rufus should have the crowbar from Middle Rufus now.
Do a good deed for Goon: Climb the rung. Talk to Rusty. Rufus calls the children close to him.
Talk to Rusty. Rufus climbs over the kids to get to the van.
Look at the banana crate on top of the van.
Use the crowbar on the crate. Take the banana. Drop down to the water.
Give the banana to the monkey and organ grinder. The organ grinder takes the banana.
Take the crank. The monkey takes his fez off and wants the crank back later.
Use the crank on the jack right of the monkey.
Turn the crank and the gondola with Goon and June rise up to the city.
Middle Rufus:
Change to Middle Rufus. Go to District Center.
Talk to Goon and June. The gondola is under the bread wrap shop of the vampiress.
Give the deck chair to Goon so that he'll exit the gondola. Goon tries to open the chair.
Back to Left Rufus:
Change to Left Rufus down at the sewer. Use the crank again on the jack. The monkey says that Rufus can only use the crank only once more. June in the gondola drops back down to the sewer. June cries.
Get a new monkey: Talk to the Monkey. Try to take his fez.
Use the crank release button and give the crank back to monkey or place it on the organ.
Take the fez. If Rufus gets a replacement monkey, the monkey will give the first take of the replacement monkey to Rufus.
Go to June. Talk to June about working and getting the crank to go back up to the surface. Give the fez to June.
Take the space heater above the entryway of the gondola.
Get a paying audience: Go down to the sewer. Go right to the pipe forest.
Talk to the bottle witch who sold the nucleic acid. Tell her about the new monkey.
Go back to the left. The witch gives 5 glottis on the tray.
Take the 5 glottis from the tray. June finds out that Rufus sold her to the monkey.
Exchange: Give the 5 glottis to Middle Rufus.
Middle Rufus:
Change to Middle Rufus who has 5 glottis.
Get a male assistant: See that the bread wrap stand is back on the ground.
Goon is sad. Talk to Goon because of June. Give the male assistant wanted sign to Goon. The vampiress pulls in Goon.
Give the 5 glottis to bread wrap Goon and get 4 XXL bread wraps.
Casa Bozo: Go to the settlement and Bozo house.
Try to talk to a bonding Mama Bozo and Bambi. They are engrossed in Bozo's picture album.
Talk to Grandpa Bozo who is now cooking dinner because Bozo's girlfriend came to visit.
Take the mother's milk and pump on the counter. Take the pot of roast drippings - gravy.
Exchange: Give the gravy, mother's milk, 4 bread wraps, antenna and hormones to Left Rufus.
Left Rufus:
Change to Left Rufus.
Campsite:
Take care of the children: Go right to pipe forest and then to the top path.
See 2 slime monsters. The green at right is a vegetarian. The green slime monster goes to sleep with his mouth open.
Rufus and the kids arrive. (See the swamp platypus egg in a hole of a pipe by the children.)
Check the monster's tongue - ideal spot for a campsite. Rusty thinks it's dark and cold.
Get heat and light: Place the space heater on the tongue.
Climb up the ladder. Pull up the lever to get power on the outlets. Go down.
Take the plug by the fuses and socket. Plug it on the bottom outlet because it can't reach the top socket. There's no power because there is no fuse beside it.
Take the top fuse. It's stuck and will only fly out during electrical spike.
Use the antenna fork on the top socket and see Rufus' X-ray. The lever goes down and turns off the power.
Give the antenna fork to Rusty. Then pull up the lever when Rusty is in position.
Go down and take the top fuse. Place the fuse on the bottom socket. The heater is on.
Time to sleep: Get the children to sleep.
The 4 kids climb onto the teeth of the slime monster.
Talk to the children. They want to be tucked in.
Give each one a XXL bread wrap.
Talk to Rusty or other kids and they want a bedtime story.
Adjust the TV antenna by moving it higher. Turn the TV on. Get a cooking show.
Talk to Rusty again. They are hungry.
Use the gravy on each of the kids. Gravy is poured on each kid.
Leper Colony:
Go back to the Inn. Now that kids are asleep, enter the Inn.
Inn: See the nucleic acid above the barkeeper.
Talk to the barkeeper. He will sell the nucleic acid for 6 glottis.
Rufus can earn 2 glottis tip if he serves the customers.
He would not give the picture of Elysium.
Look around. Check the mushroom swill green tap. The barkeep stops serving because it caused the customers to fling items at each other.
Check the hormone swill pink tap. They don't serve it anymore because of the bad effect on the customer that can be changed only by surgical intervention.
Check the hair growth swill yellow tap. They don't serve them anymore because of hair problem.
Take the mushroom swill advertisement poster at right.
Talk to the delivery man on top of the barrel at left. Take his tankard and use it on the swill left of the barkeep. He says it doesn't taste as the yummy hair growth swill. Fill his tankard again and this time, mix it with the mother's milk. Give him the hair growth swill. He becomes hairy as a monkey.
Talk to the fruit seller at left. Take his tankard and use it on the swill left of the barkeep. He says it doesn't taste as the yummy hormone swill. Fill his tankard again and this time, mix it with the hormones. Give him the hormone swill. He changed gender.
A romance is blooming between the monkey and blond person.
Talk to the plumber at right. Take his tankard and use it on the swill left of the barkeep. He says it doesn't taste as the yummy mushroom swill.
Get mushroom: Exit the inn. Go to the bottle witch. Ask her about the mushroom. Check all 4 of the red-white mushrooms here.
Show her the mushroom advertisement. Take her toe fungus - mushroom. Go back to the pub.
Fill the plumber's tankard again and this time, mix it with the mushroom. Give the mushroom swill to the plumber.
Uh Oh. Attention is given to the blond person and the monkey does not like it.
Rufus is thrown out of the pub. Go back in.
Take the picture of Elysium that fell down on the bar.
Exchange: Give the picture and the leftover soup to Middle Rufus.
Middle Rufus:
Change to Middle Rufus.
Save Baby Bozo: Go to the rebel camp. Enter the tank and talk to Toni. Note that she is back to her normal self.
Take the prescription below the monitor.
Go to the rope store. Give the prescription to the rope seller. He gives the rope.
Go to the editor's office and Barry. Show finger focus to Barry.
Automatically be at the scaffolding. (See the flying platypus egg at left scaffolding.)
Climb on support. Oh.
Talk to Baby Bozo and see that he crawls to the other end.
Use the rope on the hook of the post. Talk to Baby Bozo and the baby moves on the noose.
Climb on support. Rufus is caught in the trap and is choked by the noose.
Click on rope end tied to the post. A scared Barry saves Rufus. Rufus ends up holding the baby and one end of the rope. The other end is held by Barry. Take the picture!
At the editor's office, Rufus shows the hero photo to poor Barry.
Get medicine for Bozo: Go to the therapist above the editor's office.
Go to Bozo at Casa Bozo. Show Bozo the 3 pictures. Remember Bozo's answer to each picture.
Go to the therapist at District Center. Rufus asks for another session.
Can we play card game again?
Imprint from the Creep - That's terrible. Why would you show me something like that?
Picture of Elysium - Elysium is crashing into Deponia.
Hero Photo - It's the devil.
The therapist tells Rufus to help himself to the medicine cabinet.
Open the cabinet and take antidepressant and emetic.
Cure Bozo: Go back to Bozo.
Combine the left over soup and the antidepressant.
Open the inventory and see that Baby Bozo ate the soup with all the antidepressant.
Give emetic to Baby Bozo. Use the green-faced Baby Bozo on Bozo. Baby throws up on Bozo's face.
Bozo releases his anger. He feels liberated.
Take the piggy bank while Bozo is busy putting his coat on.
Rebel camp: Bozo vouches for Rufus. Enter the camp.
See Garlef guarding the door. The General cannot be disturbed. Organon has retreated.
Exchange: Give the picture of Elysium and the piggy bank to Left Rufus.
Right Rufus: Change to Right Rufus.
Fire the cannon. The rebels think they are being attacked. Garlef mans one of the guns.
Meet the General: Enter through door. See Doc manning a gigantic cannon. Toni is here too.
Meet the General - Dad - Seagull. Seagull berates Rufus.
Learn that they plan to blow up Elysium before the Elysians blow up Deponia. They are going to use Doc's cannon and the planet destroyer taken by Toni's group.
Left Rufus:
Change to Left Rufus.
Still at the pub, Give the piggy bank to the barkeeper. Get the nucleic acid.
Campsite: Go to the children at the campsite.
Only Gritchen is here and a straw. Goaly was taken inside the tunnel.
Lantern: Go to the tunnel and see Goaly inside a barred location.
Go in any entryway and end up back at the Lantern area.
Right Rufus:
Change to Right Rufus.
Argus calls his guards to attention thinking that the rebels are attacking.
Go to the Goods Transporter behind the window next to the mail chute.
Oppenbot has finished lugging the crates. Rufus comes through the transporter.
Enter the pipe next to the lamp post to exit to the water.
Go left to the storm drain at left. Look in and see Left Rufus.
Exchange: Change to Left Rufus and give the picture of Elysium to Right Rufus (Middle Rufus cannot do this).
Change back to Right Rufus.
Go back to the platform. Use the picture of Elysium on the barrel left on the platform.
Enter the barrel of leeches. Call Oppenbot.
Left Rufus:
Automatically change to Left Rufus.
See that Goaly is sucked by the whirlpool.
Exit through the entryway at top left to be at bottom right.
Follow Goaly down the whirlpool and through drainage pipe.
Right Rufus:
Automatically change to Right Rufus.
At the Ascension customs, Oppenbot leaves to report to the bailiff. Rufus comes out of the barrel.
Press the button right of the door to the highboat. Look at the code entry on the wall. There is a cartridge lock.
Argus' Office: Go to the door at the tower at right to be in Argus' office.
Check the safe on the wall.
Go to the desk and take the Dictaphone. Listen to Argus talk. The cartridge is in the safe and the combination is 4437. Hear the bailiff enter.
Hear Argus say to change to silly clothes and then get the cartridge from safe. Argus comes out dressed as Cletus. He can't remember the safe combination.
Go under the desk.
Argus goes to the desk and didn't see the Dictaphone. Argus calls Oppenbot. Argus is dressed as Cletus only for invading Elysium.
Examine the Dictaphone in inventory.
Eject (right button) the minicartridge.
Place the empty Dictaphone on the desk.
Argus takes the empty Dictaphone. Talk to me.
Click on Argus - Answer: The cartridge is in the safe. The combination is 4437.
Argus opens the safe and the alarm goes off.
Oppenbot tries to switch off the alarm.
Go the window at left through the pipe.
Open the window.
Go back behind the desk.
Take the Dictaphone from desk.
Press the red button beside Rufus. The alarm is turned off.
Argus goes back to the desk and cannot find the Dictaphone.
Go to the window again.
Go out the open window.
Place the minicartridge with the Dictaphone.
Play (middle button) to listen to the safe combination: 4473.
Record (left button) - The cartridge is not in the safe. It fell behind the desk.
Go back inside and go behind the desk.
Place the Dictaphone on the desk.
Automatically, Rufus goes back to the window again.
Argus listens to the Dictaphone. He goes behind the right chair to look for the cartridge.
Go out the window.
Cletus enters and sits on the desk chair.
Go to the window close to the safe and then enter to Argus office.
Open the safe with the known combination.
The alarm goes off and Rufus hides under the lamp. Argus calls Oppenbot. Cletus hides by the red button.
Open the safe again and take the cartridge with the ascension code.
Exit and is seen by the guards.
Automatically go right to dressing room and come out dressed as Cletus.
The guard alerts Argus and they look for the intruder. Cletus is caught.
Exit through the door again.
Middle and Left Rufus and Right Rufus:
Automatically change to Middle Rufus at the Rebel's camp.
Baby: Left Rufus and Baby Goal come through the drainage pipe.
Left Rufus gives the nucleic acid to Baby Goal. The baby turns out to be Donna. Hermes!
Seagull: Seagull places the order - Aim that cannon. They will blow up Elysium.
Right Rufus: Use the cartridge on the code entry inside the door of the highboat.
Hear the officer ask if Rufus will leave without Goal. Goal is here. She was never dead.
It was Donna that was thrown down. They demand the code or else Goal will be thrown off the platform.
Back at Rebel camp: Seagull demands an apology from Rufus. This is to teach him a lesson.
Talk to Seagull completely. Rufus' friends are defending him. The third Rufus can still turn the tide.
Seagull pulls a gun on Rufus.
Go through the dialogues again. Middle Rufus faces Seagull.
Left Rufus goes beside the cannon. Try to pull the plug left of Rufus while Middle Rufus shouts all of his faults.
Caused Mom to die - Middle Rufus is shot by Seagull.
The 2 Rufuses jump in the cannon and attempt to climb to the end.
Right Rufus: Argus demands the codes or Goal is to be thrown down.
Goal is thrown.
Jump down. Rufus jumps on Oppenbot.
2 Rufuses: The 2 Rufuses come out of the mouth of cannon. Seagull waits for them.
Answer: Rufus number three didn't screw it up. The baby phone rings. Hear Right Rufus scream.
Right Rufus lands behind Seagull.
Enter the tank at left and in front of the cannon's mouth.
The 2 argue who will drive the tank. Click on the gas lever.
Hit the wound of Middle Rufus. Left Rufus drives the tank. Click on gas lever.
The tank goes on reverse and plugs the mouth of the cannon.
Middle Rufus makes his last wish. Select all the dialogue. I believe in you. I love you.
The one and only Rufus:
See the highboat rise. His friends blame Rufus. Goal arrives and defends Rufus.
Learn that Right Rufus saved Goal.
Masterplan: Rufus is asked to make a plan. Talk to Doc. The Ultimate Maneuver.
Look at the plan board beside Toni. Take the pen. Use the pen on the plan. See the plan.
Lift off: Rufus wearing the Right Rufus' costume is seated with Goal on the tank; waiting to be fired to the highboat.
Push the ignition. Nothing happened.
Push the door button and see the Deponians packed like sardines.
Push the ignition again. The tank flies.
Highboat:
The tank hits the side of the highboat. Rufus is in the midst of Organons.
Talk to the Organon. Atten-tiooon! Division Halt!
Go right to the center of the highboat.
Elevator: Rufus enters the elevator and sees 3 guards. Behind the guards is the real Bailiff.
Push the lever and then stop.
This is the right floor? Of Course. The guards leave and exposes Argus.
Bailiff in elevator: Argus wants a fight.
Step on the pedal on the floor. The cover opens and hits Argus.
Check the throttle valve inside and then take it. Now the elevator does not have speed control.
If Argus closes the door, open it again using the pedal.
Pull down the lever to the down position. They stick to the ceiling.
Place the lever to stop position. Argus falls through the opening on the floor.
Organon speech: Go right to exit the elevator.
The Organon is waiting for the bailiff to make a speech.
Rufus is caught saying a word not intended to be heard. Rufus expounds on the word.
Have fun making a speech.
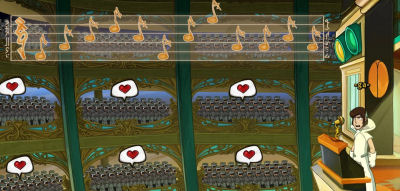
Organon Anthem: The speech is concluded with the singing of the Organon Anthem led by the Bailiff.
Choose a note and place it in the correct position in the stave-staff. The notes are sung continuously to show if correct or not.
If it is correctly placed, the Organon will show hearts when that note is sung.
Prime Controller Ulysses: Go to the end of the hall. Meet Ulysses.
Rufus, Argus and Cletus try to stop Ulysses from destroying Deponia.
Learn about Ulysses' reason for saving Elysium - his daughter Goal.
The Organon and the first prototypes such Cletus, Argus and Rufus are destined to die. Not wanting to die is a flaw in the first prototypes' design.
Goal enters.
Stop the destruction of Deponia:
Stop the transmission: Ulysses presses the radio signal that will send a message to activate the blast towers in the planet. Elysium will then travel to Utopia ahead of schedule.
Aborting the detonation is impossible. The only way to stop it is to destroy the transmitter at the antenna.
The 3 prototypes led by Rufus volunteer to destroy the transmitter.
Note that Rufus' beard is made up of 3 small pointy hair while the other 2 have a goatee.
Transmitter: See the huge antenna connected by a cable to the main highboat's bridge.
Take an antenna beside the prototypes.
Use the antenna on the cable. Rufus tightropes to the antenna. The others follow.
See the transmitter flashing yellow at center of the complex.
Use the antenna on the transmitter. The transmitter falls down to the rotor and is still flashing.
Pass the blades: Talk to the other 2 guys and see the chances of dropping down there.
Cletus calculated that there is 1 out of 3 chances of succeeding.
Talk to Argus to start the count.
Place the cursor under Rufus. The count starts. At count 2 or first chance the down arrow appears - jump.
If the others caught on; start over by talking to Argus again. Jump at count 2.
Cletus and Rufus jump.
Get to the transmitter: A dazed Rufus is woken up by Argus. Cletus is nowhere to be seen.
See the flashing transmitter at bottom left. Look around.
See screws holding the bridge. The arch at under the rotor blades at center of bridge has holes for missing screws.
Tilt the bridge by removing one screw at left side. Place that screw on the middle of the bridge.
Remove the other left screw and the 2 screws at right end. This makes a seesaw.
Move over to the left and take the transmitter.
Destroy the transmitter: Use the transmitter on the rotor.
Rufus can't just throw it on the rotor because it will just ricochet.
Use a screw on the hole where the transmitter was to hold the bridge steady. Go close at right end under Argus.
Use the transmitter on the rotor. One, two and three.
Deponia is saved.
Stop the destruction of the highboat:
The rotor is blocked by the transmitter and will cause the breakup of the highboat.
Before Rufus is helped by Argus; Argus wants Rufus' help in the coup of the Council of Elders.
Goal felt the shaking of the highboat. She can already see the airlocks of Elysium.
Ulysses will keep the ship steady while Goal organize the evacuation of her friends from Deponia and possibly the Organons.
Rufus declines to help with the coup.
Argus removes the transmitter blocking the rotor.
Cletus wrestles with Argus.
The 3 end up on a blade each.
Goal: Goal has to choose the one to save.
I am Rufus!
I know something that the other two definitely don't.
Doesn't matter what I say... we're just going round in circles here.
Who cares which one of us is Rufus? Just leave us here and save yourself.
It's true. I'm not Rufus. Rufus points to Cletus.
Absolutely sure.
Use the down arrow and Let go. Rufus sacrifices himself.
Barry? Barry lands on a space station.
Elysium: Cletus is dressed as Rufus. He gives his ideas to save Elysium to the Council of Elders.
Goal looks out from the balcony. Remember what she said under truth serum.
This document may not be distributed without express written permission of the author and the content may not be altered in any way.
For Questions or Comments on this Walkthrough,
Please write to: MaGtRoCopyright © 11/2012 MaGtRo