Diamon Jones: Amulet of the
World
by Litera Laboratories
Walkthrough by MaGtRo February 2009
Gameplay: This is a third
person point and click game. The main menu has continue, new game, save game,
load game, exit (suitcase) and options.
The options menu has video and audio selections. Video
has resolution, volumetric shadows and brightness choices. The sound selections
are general volume and music volume.
The gameplay has automatic subtitles.
ESC key or the menu button in inventory access the
main menu.
Right click opens and closes the inventory frame and
also enters the items picked up during gameplay.
There are 10 saved game slots and can be overwritten.
The hand cursor holding an item turns bright when
above a spot it can use it on.
Watch 2 adventurers trigger a trap while walking on a
stone path inside a pyramid. Large swinging hammers trap the 2
adventurers. One of the men falls into the lava pool and the other escapes.
??Cairo??
Learn about the treasure:
Bar:
See Diamon Jones in a bar. A coin is in inventory.
Look around. Talk to Ahmed al Kasim, the bartender.
Go to tables at left screen. Look around.
Talk to John Milton, the surviving adventurer. He
tells about what happened in the desert and evil that will rise from the
earth. The artifact is already bringing some attention. John Milton wants good wine before he talks more
about the treasure or artifact.
Get good wine: Diamon thinks
to distract the bartender.
Go right to the bar. Look at the bottles on the
shelf behind the bartender.
Click the moving hand cursor over the box-bottle
at middle right shelf. Diamon will say that is the wine he wants.
Talk to the bartender and then give him the coin
to buy the cheapest wine. Take the bottle of olive oil from the
counter.
Right click opens and closes the inventory frame
and also enters the items picked up during gameplay.
Take the bottle of oil from inventory and click it
on Diamon. Diamon spills it on the floor.
Samuel Johnson walks in and slides on the oil
spill.
While the bartender talks to Johnson, go behind
the bar and take the bottle of wine at middle right shelf.
Go back and give the bottle of wine to John Milton.
Learn about the pharaoh's tomb, disasters, dream and the rest of the
expedition.
Steal the map:
Go back to the bar at
right. Click on Johnson and Diamon says he owes him money.
Try to exit to exit. Johnson stops Diamon. He wants Diamon to steal a scrap of
paper-parchment-map from the museum.
Outside bar:
Exit and be outside
the bar. Look around. Check the
menu.
Go right and talk to
the craftsman under the awning about tools, tavern and museum.
Learn that he lost his
sledgehammer and point tool-chisel when he repaired the front of the bar and
got drunk.
Find the tools:
Go down to the screen in front of the bar.
Look and click the
cart of the watermelon several times until Diamon takes the sledgehammer.
Look and click on
the board on the ground beside the barrel right of the door and leaning on a broken barrel. Take
the chisel.
Go back to the
craftsman and give him the 2 tools. He gives an item - ruby that brings
him luck. He also allows Diamon to use his tools.
Look close at the
craftsman's table and take the sledgehammer and chisel.
Museum:
Enter the museum and
see the guard sleeping. Look around.
Click and study the
artifact on the glass case left of the sarcophagus. It is a device that can
help climb high walls. It is made up of 2 wheels attached to a rope. It gives
Diamon ideas. Diamon is kicked out of the museum.
Outside the museum:
Enter the museum:
Check the top open
window left of the museum entrance. Diamon says it is the only way in.
Look and click the
bush left of the screen. Take the crowbar.
Look and click on the loose stones on the ground
left of the stairs to the museum.
Use the crowbar on
the broken corner where the loose stones fell off. 2 stones are taken in
inventory.
Go back to the
craftsman's table in front of the bar.
Place the stones on
the table. Use the tools on the stones to get 2 stones with holes.
Go left and look
close at the crate beside the awning pole. Take the rope.
In inventory,
combine the rope and the stones with holes to get a device (like the
one in the museum).
Go back outside the
museum and under the top window.
Use the device on
the flagpole. Climb up.
Climb the rope:
When the left
arrow flashes, immediately click the left mouse button.
When the right
arrow flashes, immediately click the right mouse button.
Diamon
automatically enters the window.
Museum Office:
Look around.
Check-click the trash
bin and take the pieces of paper.
Torn pieces of
paper:
Put together the
pieces of paper by click-hold-drop them in place. The attached piece will be highlighted.
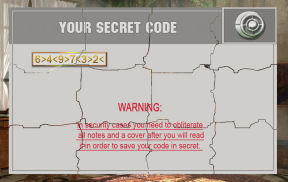
Safe:
Click on the painting right of the book shelves.
Click the right
mouse button to turn the dial to the right. Click the left mouse button to
move the dial to the left.
Press the space bar
to reset the puzzle or open the safe.
Use the code seen on the completed torn pieces of
paper:
Click the right
mouse button 6 times.
Click the left mouse
button 4 times.
Click the right
mouse button 9 times.
Click the left mouse
button 7 times.
Click the right
mouse button 3 times.
Click the left mouse
button 2 times.
Press spacebar to
open the safe. Take the key from bottom shelf and the map from
top of books.
Diamon wants to go
through the back door because of Johnson's thugs.
Check the desk and see
a drawer with padlock.
Go to museum storeroom
at left screen. Look around. Take the hammer from the floor.
Use the hammer on the
padlock on the desk drawer. Take the revolver from the drawer.
Go to left screen.
Click the door to see that it is locked. Use the key from the safe on the back
door to side street.
As Billy Smith:
Johnson talks to Billy
Smith about taking the map from Diamon. Claire gives Billy a revolver.
Exit the bar and go to
museum. Talk Andy Rain
standing by the bench outside the museum.
Escape from the
baddies:
As Diamon Jones:
Take care of Billy
Smith:

You can use the
revolver on Billy Smith.
Look around. Click on
the open window at top right 3 times. Diamon knows that it is a way out.
Click on the
watermelon cart several times until Diamon thinks he can move it.
Click on the stone
wedged under the back part of the right wheel. Now Diamon knows what's holding
the cart.
Click the stone under
the wheel and see Diamon shoot the stone.
Climb to the window:
Click the big crate at
center of road.
Move crate:
See a bar at the bottom screen. Watch the moving
arrow and when you think it is at the center or green part of the bar -
click to hold the arrow at that position.
I tried to get the
arrow to stop at the start of the green part of the bar (one dot).
Once the crate is
under the window, stop and click the open window for Diamon to climb through.
Fatima's room:
Diamon talks to a
crying Fatima. She wants freedom.
Look around and then
check the door. Take the hairpin on the table with the fruits.
Use the hairpin on the
side street door.
Pick the door lock:
Click a bar and
see if it will stay up-recessed. Find the correct order of bars that will stay up.
From left to right:
click on 1 3 2 5 4.
See Diamon and Fatima
run away from the house while the baddies talk at the other street.
Find transport to the desert:
Hangar:
Look around. Click on
Fuffy Wilson, the pilot and see that he is drunk.
Go to the shelving
rear of the room. Take the cup with water at middle shelf.
Open all the drawers
to get: coffee, coffee pot, sugar,
ammonia and matches.
Go back to the front
of the plane. Try to use the ammonia on Fuffy.
Make coffee:
In inventory, combine cup with water and coffee pot.
Combine coffee pot
with water and coffee. Add sugar to coffee pot with water and coffee.
Click on small gas
stove left of the green cloth.
Place the filled
coffee pot on the gas stove.
Use matches on gas
stove. Diamon automatically takes the boiled coffee.
Combine the boiled
coffee with empty cup to get cup of coffee.
Use the cup of
coffee on Fuffy Wilson.
Diamon tells Fatima to
tell Wilson that he'll buy him a new plane since he will fly the plane
himself.
Fly the plane:
The aim is to maintain the plane upright, flies
forward and miss the birds.
Press the left mouse
button if the plane banks right and click the right mouse if it banks left.
The course to go to
is seen at top of screen.
I find that it is
easier for me to watch the wings of the plane rather than the bar at the
bottom.
Also, I tap the
right-left mouse buttons to keep the plane straight and press hard only if the wings are tipping bad.
Good luck. Diamon
parachutes to the desert leaving the plane to crash.
Pyramid in the Desert
Enter the pyramid:
Archeologist camp:
Look around. Take the lighter from top of the
cloth covered rock in front of the campfire.
Take the flask from the rug at left inside
the tent, screwdriver in front of the crate (left of the pickaxe) and
the bottle of kerosene from top of the crate at left.
Click twice on the knapsack left of the tent pole to
get 2 clay tablets.
Take rod from the carpet at right. Click on
the silver suitcase right of the tent pole.
Open the suitcase:
Press the correct order of the wheels to open the
suitcase. The wheels should recess.
Right mouse button is the reset.
This is a random puzzle. The numbers I got are
from left to right: 1 2 5 4 3, 5 3 4 2 1 and 4 2 1 5 3.
Take the rope and 2 emeralds from
the opened suitcase.
Outside pyramid:
Go left to the pyramid. Look around.
Open the door of the pyramid:
See a hole on the left side of the hieroglyph
covered door. Use the rod on the hole. Pull down the inserted rod.
See a stone slab turn over on the ground. Look
close at the slab and Diamon says it is missing 2 elements.
The slab is made up of tablets with emerald,
sapphires and rubies.
Emeralds were taken from the opened suitcase at
the tent.
Look up and click on the eyes of the statue
several times until Diamon states something strange about the eyes.
Click the screwdriver on the eyes. Diamon climbs
up and uses the screwdriver to get 2 sapphires.
In inventory combine a tablet and an emeralds. Do
this to the other tablet.
In inventory combine a tablet with emeralds
and a sapphire. Do this to the other tablet.
In inventory combine the tablet with concave notch
and the ruby given by the craftsman.
Use the clay tablet with jewels on the slab on the
sand. Add the other jeweled clay tablet.
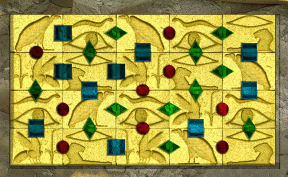
Arrange the jeweled tablets:
Click the slab with jeweled tablet to see the
puzzle.
The aim is to place the jeweled tiles-tablets in
the slab in a way that the same jewels touches each other.
Do the corners first and then sides before adding
the center tablets.
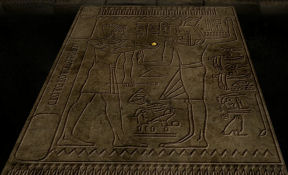
Explore the pyramid:
Entrance - Fire room:
Enter the pyramid and meet Mary Ocean. She's been
trapped inside the pyramid for 2 days.
Look around. Check the 2 statues holding rods by the
doorway.
Ruby:
Note the 3 hands holding torches on the wall. Check the bas relief at the ceiling.
Pull the top right torch.
Pull the bottom left torch.
Pull the bottom right torch.
Take the ruby from the floor.
First - Water room:
Go to next room and see 3 swinging hammers on
the path
Pass the swinging hammer:
You can save the game at each passing of a hammer.
Go close to a hammer and when it starts to swing
away, place cursor on next chain and double click to run to the next chain. Save the game then. Do the same for the next 2
hammers.
Horus: Go left and look close at
the Horus - Falcon god statue. It protects something here as well as the 2
guards outside.
Click on it twice and Diamon stops the swinging
hammer using something in the statue.
Sapphire:
Note a blue light below the bridge.
Check the rock opposite the Horus statue. It was
another statue that broke.
Use the rope on the rock on the bridge. Climb
down. Take the blue gem - sapphire from wall.
Click the water that flows out. Spring water. Use
the flask on the water to get flask with water.
Take note of the lines above the flowing spring
water.
Climb back up.
Second room:
Go to next room and click several times on a stand
with levers to learn that it is missing 2 levers.
Click the blocks with drawing several times and
learn
that it can form a bridge to the other side.
Take the levers from the guard statues:
Go back to the room with torches and Mary. The 2
levers are held by the guards cannot be taken.
Go back to the room with levers. Pull the left
torch on the wall.
Go back to the 2 guard statues by the entryway and
take the 2 levers they are holding.
Arrange the blocks to form a bridge:
Place the 2 levers on the empty slots of the stand
with levers.
Arrange the blocks to form a picture.
Left click pulls a lever and the block moves
towards the back.
Right click pushes a lever and the block moves
towards the front.
Click the stand to start the puzzle. Labeling the
levers at top 1 2 3 4 and the ones at side A B C, move:
Left click 2. Left click 3. Left click B. Right
click C twice. Right click 2. Right click 1. Right click B. Left click B.
Take the topaz from the hand of the etched
man.
Third room:
Look around. Check the skeleton. Nice hat.
Study the 3 stands and see lines on the stands and
hole on the basin on top.
Stands:
Right stand - See that this stand has the lines
similar to that over the entryway and below the bridge of the first-water
room.
Place the sapphire taken from that room on the right stand's hole. Use
the flask of spring water on the basin and see blue globe (Water) floating above
the stand. Ah - the elements.
Middle stand - Place the ruby on the hole of the
middle stand. Use the kerosene on the basin. Use lighter on the kerosene.
See Fire above the stand.
Left stand - Place the topaz on the left stand.
Go back to the entrance. Exit the pyramid and take sand from the
ground left of the entrance.
Go back to the last room and see that Mary went
deeper in the pyramid.
Place sand on the basin. See earth floating above
the stand.
The amulet of the world appears on the main stand.
Talk to Mary. Earth to Earth; fire to fire;
water to water. I don't understand.
Take the amulet.
Watch the meeting with Johnson's minion.
London
Find where Diamon is staying:
As Billy Smith:
Watch the talk with
Johnson. He wants Billy to find Diamon. There's a watch and revolver
in inventory.
Get money:
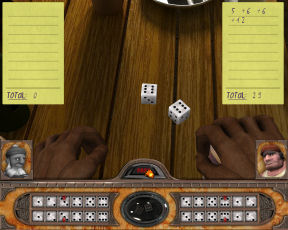
Take the dice
from the bar counter. Check the bar.
Talk to Sea Dog.
Getting money back from Sea Dog is a painful process.
Click the dice on Sea
Dog and Billy will challenge him to another game.
Dice game:
The aim is to throw the dice several times and get
a total score as
close to but not go over a 30 points.
Click on the dice at
the center to shake the dice.
The arrow at bottom
right (Billy's) moves and when the arrow is above the dice count you like -
click the dice at center again to stop the arrow and throw the dice.
The count is entered
at the paper above Billy.
Press the pass
button when you want to stop Billy's part and to get Sea Dog to play.
Get money
when you win.
Find where Diamon is
staying:
Exit the bar. Talk to
the constable about Diamon. He knows where Diamon is staying but being a
gentleman he won't tell.
Talk to to the
constable again (might be several times) and give him the money won from Sea Dog. He tells Billy where Diamon is staying,
Talk to Andy Rain. Go
to bottom screen.
Hotel:
Billy and Andy Rain go
to the hotel as Mary leaves.
Try to open the door.
Escape the hotel:
As Diamon Jones:
Shortly before this...
Go to the left screen
and talk to Mary. Mary wants to go to Tibet to return the artifact. She says
that the taking of the artifact upsets the balance of the worlds. The amulet is the
key to other worlds. The Tibetan monks can harness the power of the artifact.
Mary learned this through a vision. Mary will leave with or without Diamon.
She took the amulet with her.
Read the note on top
of the desk by the entryway.
Go back to the bedroom
and to the window. Diamon sees the baddies waiting for him below.
Close the front door:
Go to the front room
and then right to corridor-hallway. Look around.
Check the door and
realize that Mary took the key. Diamon needs something to block the door.
Go back to the next
room and take the candelabra from the table. Use the candelabra on
the front door. Hear Billy shouting.
Go back to the
bedroom.
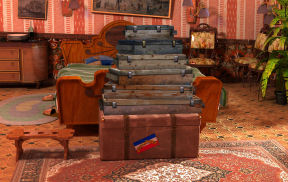
Get the gun:
Click the bottom
suitcase under the pile of Mary's cases by the bed. Diamon says that the gun
is that bottom suitcase.
Tower of Hanoi:
The object of the
puzzle is to place Mary's cases on the right side of the pile arranged from
large at the bottom to smallest on top.
A smaller case
cannot be under a larger case. The small bench on the left is rickety, so it
cannot stand holding cases for long period.
Click on a case and
then click on the side you want to set the case on. The case will be placed
there.
Numbering the
cases 1-6, with 6 as the largest case and 1 as the smallest:
Place case 1 on
left side and case 2 to the right side. Then move case 1 over the case 2 at
right side. Move case 3 to left side. Move case 1 to middle. Place case 2
over case 3 at left side. Place case 1 on left side. Place case 4 on right
side.
Place case 1
over case 4 at right side. Place case 2 on middle. Place case 1 over case 2
at middle. Place case 3 over case 4 at right side. Place case 1 on left
side. Place case 2 on right side. Place case 1 on right side. Place case 5
on left side.
Move case 1 on
middle. Place case 2 over case 5 at left side. Place case 1 at left side.
Place case 3 on middle. Place case 1 on right side. Place case 2 on middle.
Place case 1 on middle. Place case 4 on left side. Place case 1 on left
side. Place case 2 on right side. Place case 1 on right side. Place case 3
on left side. Place case 1 on middle. Place case 2 on left side. Place case
1 on left side. Place case 6 on right side.
Place case 1 on
right side. Place case 2 on middle. Place case 1 on middle. Place case 3 on
right side. Place case 1 on left side. Place case 2 on right side. Place
case 1 on right side. Place case 4 on middle. Place case 1 on middle. Place
case 2 on left side. Place case 1 on left side. Place case 3 on middle.
Place case 1 on right side. Place case 2 on middle. Place 1 on middle. Place
case 5 on right side.
Place case 1 on
left side. Place case 2 on right side. Place case 1 on right side. Place
case 3 on left side. Place case 1 on middle. Place case 2 on left side.
Place case 1 on left side. Place case 4 on right side.
Place case 1 on
right side. Place case 2 on middle. Place case 1 on middle. Place case 3 on
right side.
Place case 1 on
left side. Place case 2 on right side.
Place case 1 on
right side.
The suitcase is
opened. Take the revolver from the suitcase.
Escape through the
window:
Look and take the
bed sheets and blanket on the bed.
Go left to the
other room. Click on the tablecloth several times until Diamon says
that it will work as a rope.
In inventory
combine the bed sheets with the tablecloth to get improvised rope.
Go back to the
bedroom and open the window.
Click the
improvised rope on the bed. Exit through the window.
Go to other side
of street:
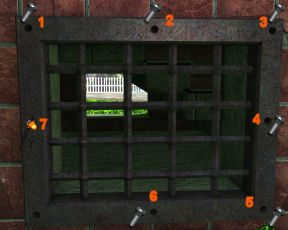
Click the grate on
the side of the stairs.
Grate bolts:
The aim is to
remove the screws in correct order.
If the correct
screw is removed it will be placed on the side of the hole.
It the wrong
screw is removed, the holes that are blocked are highlighted red.
Remove screws 6
4 2 1 3 5 7.
The grate is
removed. Enter the opening and go to the right.
Find a schooner:
Diamon talks to
Mary. Mary missed her steamboat. Diamon needs to
find a schooner.
Enter the bar and
talk to Fuffy Wilson. Wilson was persuaded by the dancer to come to London and
then she disappeared.
Talk to Sea Dog
twice until Diamon makes a bet.
Shoot the
bottles:
The bet is to
shoot the 5 bottles behind the counter using only 8 shots or less. This must
be done correctly 5 times.
In between the
tries, a glass of rum is to be drank.
Press the left
mouse button to shoot at the bottles.
I watched
the movement of the crosshair left to right. I positioned the end of the swing
of the crosshair on the bottle I want to hit and then click to shoot the
bottle.
Diamon gingerly
exits the bar to check the harbor-landing place.