| ||||||||||||||||||||||||||||||||||||||||||||||
| On arriving in Cairo, your first task is to find accommodation. From the town square take the exit to the right behind the camels to get to Mustapha. Talk to him, noting his offer of a camel. | ||||||||||||||||||||||||||||||||||||||||||||||
| To get to the Egyptian Museum, return to the square and take the bottom right exit. | ||||||||||||||||||||||||||||||||||||||||||||||
EGYPTIAN MUSEUM | ||||||||||||||||||||||||||||||||||||||||||||||
| Talk to the assistant director, who agrees to help if you find the artefacts on the list he gives to you. He also explains about a deben and gives you a copper deben and scribe's stylus. This information and the items he gives you are needed later in the game. | ||||||||||||||||||||||||||||||||||||||||||||||
MUSEUM MAP | ||||||||||||||||||||||||||||||||||||||||||||||
| ||||||||||||||||||||||||||||||||||||||||||||||
| There are five aisles inside the museum. Note that only aisles 2, 3 and 4 can be accessed from the museum entrance and only aisles 1, 3 and 5 can be accessed from where the assistant director is sitting. There's a passage linking aisles 1 and 2, and another one linking aisles 4 and 5. | ||||||||||||||||||||||||||||||||||||||||||||||
The locations of the six items on the Director's List of Artefacts (in your 'Reports') are as follows: | ||||||||||||||||||||||||||||||||||||||||||||||
| ||||||||||||||||||||||||||||||||||||||||||||||
In addition to the above items, you also need to find 7 miniature pyramids. These are found at: | ||||||||||||||||||||||||||||||||||||||||||||||
| ||||||||||||||||||||||||||||||||||||||||||||||
| After collecting all the items, again talk to the assistant director. He tells you that the Demonomicon of Vliwggi is in a tomb near a spot known as The Blood Rocks. He also talks about a solar disk that was found in the robes of a bedouin who visited the tomb. | ||||||||||||||||||||||||||||||||||||||||||||||
MUSTAPHA'S CAMELS | ||||||||||||||||||||||||||||||||||||||||||||||
| Return to Mustapha and ask him about hiring a camel. After a string of rather descriptive expletives, he tells you that his camels have fallen ill. | ||||||||||||||||||||||||||||||||||||||||||||||
| To find the Coptic priest (Herodotus of Judas) that Mustapha mentions, take the exit to the left from Mustapha's inn. Speak to Herodotus about the camels and he tells you to try find the cause of their illness. Go back to Mustapha and examine the water trough in front of the camels, noting that there are some herbs in it. To remove them, first take the fork from the wheel barrow on the left, then use it to remove the curious plants. Return to the Coptic priest and while holding the curious plants, talk to him again. He gives you medicine for one of the camels and says the others should recover after a weeks rest. Return to Mustapha and while holding the medicine for camels, talk to him. Now that you have cured one of his camels, he lets you take it and you set off to The Blood Rocks. | ||||||||||||||||||||||||||||||||||||||||||||||
THE BLOOD ROCKS | ||||||||||||||||||||||||||||||||||||||||||||||
| Enter the temple only to be trapped inside by Suleyman Ozbiboulouglou, Dracula's henchman. You need to find an alternate way out of the temple. | ||||||||||||||||||||||||||||||||||||||||||||||
| Inside the first chamber pick up the plank, turban and pick head lying on the floor. Make your way to the next chamber with an abyss that has stakes at the bottom. Place the plank across the abyss to get over it, then take the lantern on the rock. There are a further two chambers at the far end of the passage, one to the left and one to the right. Inside the chamber to the left is a large door that has a lock puzzle. The lock cannot be opened at this point in the game, but you need to take note of what van Helsing says when you examine the centre and four points of the cross on the lock. Pick up the belt found on the ground in front of the dead woman. Go to the other chamber (to the right from the passage) and take the linen strips on the medicine table as well as a flask of oil on the small table. | ||||||||||||||||||||||||||||||||||||||||||||||
| Go back to the chamber with an abyss. Combine the turban, belt and linen strips (in your inventory) to make a rope that can be attached to the plank you placed there earlier. Fill the lantern with the oil from the flask, then light it with the matches. Now climb down the rope into the abyss. | ||||||||||||||||||||||||||||||||||||||||||||||
| At the bottom, pick up the loose spike lying on the ground. Go through to the next chamber and take the curious plants (the same as used to poison Mustapha's camels) lying next the satchel near the skeleton. Insert the spike into the pick head, then use the pick to dig a hole near the top right corner and make your way out of the temple. | ||||||||||||||||||||||||||||||||||||||||||||||
| The Coptic priest is waiting for you outside. Talk to him to learn about the Seal which you now know is the lock puzzle on the door inside the temple. He says that the objects at the corners of the Seal and the sacred disk in the centre were removed and need to be replaced. He also gives you a list of artefacts belonging to the Coptic cult, that were confiscated by the authorities and are being kept at the museum. He needs these artefacts returned in order to help you recreate the Seal. | ||||||||||||||||||||||||||||||||||||||||||||||
HERODOTUS' LIST | ||||||||||||||||||||||||||||||||||||||||||||||
Before going to the museum (to try recover the artefacts on Herodotus' list) you need to have found and taken the following inventory items: | ||||||||||||||||||||||||||||||||||||||||||||||
| ||||||||||||||||||||||||||||||||||||||||||||||
| Head off to the museum, and while holding Herodotus' list, talk to the assistant director. During your conversation Dracula's henchman attempts to kill you with a knife. Watch the cut scene carefully to see the assistant director smash the mirror on his desk when you push him backwards to prevent him being struck by the knife. After the attack he gives you a receptacle (the capacity of a hinu) and a list of items stolen from the museum. He says that if the items are recovered, there should be no problem with giving the Coptic priest the artefacts he wants returned. He also gives you a necklace, on which one of the beads is a diamond of great value. Before leaving the museum take the broken piece of mirror on the assistant director's desk as well as the knife thrown by the henchman. | ||||||||||||||||||||||||||||||||||||||||||||||
| Go back to Mustapha and, while holding the knife, talk to him. He tells you that the knife belongs to a Turk. To get to the Turk's house take the left exit in front of the market square. | ||||||||||||||||||||||||||||||||||||||||||||||
TURK'S HOUSE | ||||||||||||||||||||||||||||||||||||||||||||||
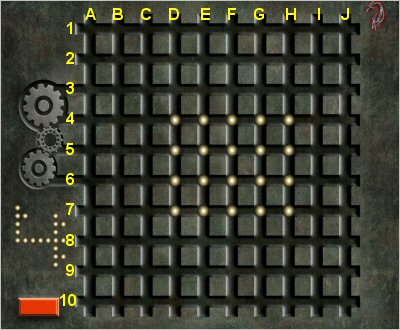
| To solve the lock puzzle on the Turk's door you must replicate the pattern of lights displayed below the cogs on the left. Rows or columns (consisting of one or more lights) are moved simultaneously as indicated by the red directional arrows that appear when hovering your mouse over a light. Note that sometimes a particular row or column cannot be moved until additional lights are added to it, or until another row or column is moved. The red button (bottom left corner) resets the puzzle. | ||||||||||||||||||||||||||||||||||||||||||||||
| ||||||||||||||||||||||||||||||||||||||||||||||
| There are various ways to complete the puzzle, one of which is to move the rows (marked 1 to 10) and columns (marked A to J) as follows: | ||||||||||||||||||||||||||||||||||||||||||||||
| ||||||||||||||||||||||||||||||||||||||||||||||
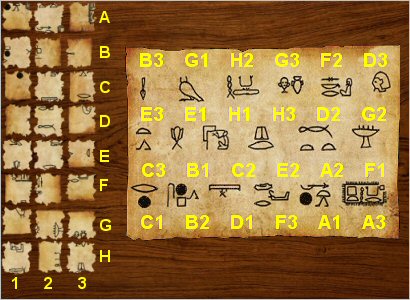
| Enter the Turk's house and take the axe, another miniature pyramid and the black sphinx. Note that the hieroglyphs on the black sphinx are copied to your 'Documents'. The torn parchment pieces on the table need to be reassembled. As with any jigsaw puzzle, begin with the four corner pieces and borders, then add the pieces in the middle. Note that a piece can be rotated by right-clicking on it. | ||||||||||||||||||||||||||||||||||||||||||||||
SOLUTION TO PARCHMENT PUZZLE | ||||||||||||||||||||||||||||||||||||||||||||||
| ||||||||||||||||||||||||||||||||||||||||||||||
| After putting all the pieces together correctly, the Turk' letter will be in your inventory. | ||||||||||||||||||||||||||||||||||||||||||||||
| When you look inside the large vase (next to the other door in the room) it breaks, releasing a cobra that was inside it. In the hope that the cobra is less resilient than camels, put the curious plants into the glowing brazier on the table. The poisonous fumes kill the cobra, allowing you to pick up the key on the floor amongst the broken vase pieces. Use this key to open the other door. | ||||||||||||||||||||||||||||||||||||||||||||||
| Inside the second room you find a sachet of gold powder, a solar disk and two letters written by the Count to the Turk. | ||||||||||||||||||||||||||||||||||||||||||||||
| Having taken all the required items, go back to the museum to report to the assistant director. | ||||||||||||||||||||||||||||||||||||||||||||||
EGYPTIAN MUSEUM | ||||||||||||||||||||||||||||||||||||||||||||||
| In return for having found all the stolen items at the Turk's house, the assistant director gives you a bag containing the Copt's treasure. | ||||||||||||||||||||||||||||||||||||||||||||||
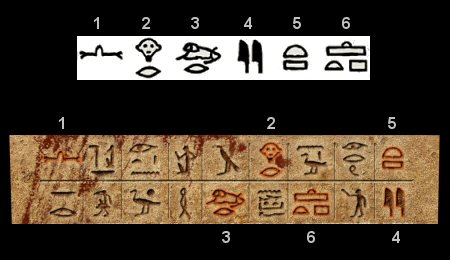
| Talk to the assistant director about the Turk's letter (parchment) to learn that the symbols on it can be deciphered using the book on the corner of his desk. From the notations on the right page of the actual book you should be able to work out some of the symbols. Move the corresponding words to the parchment (below these symbols) as follows: | ||||||||||||||||||||||||||||||||||||||||||||||
| ||||||||||||||||||||||||||||||||||||||||||||||
| To work out which of the remaining words and symbols correspond to one another requires a bit of logic and thought about sentence structure. For example, the first symbol in the first row resembles a sword (Weapon) and the last symbol is a head, so you know which symbols match these words. Unfortunately you cannot work them all out and a certain amount of 'trial-and-error' is required. The correct positions for all the words is as follows: | ||||||||||||||||||||||||||||||||||||||||||||||
| ||||||||||||||||||||||||||||||||||||||||||||||
| Also talk to the assistant director about the black sphinx statuette. He tells you that it represents the black sphinx without a face and that the hieroglyphs are a name pronounced as 'Ny ar lut hotep'. He says that it brings bad luck and should be destroyed as soon as possible. | ||||||||||||||||||||||||||||||||||||||||||||||
| Before leaving the museum, take the sketch of the Giza Pyramids on the assistant director's desk. | ||||||||||||||||||||||||||||||||||||||||||||||
SEAL OBJECTS | ||||||||||||||||||||||||||||||||||||||||||||||
| Exit the museum and go to the Coptic priest. Give the bag containing the Copt's treasure to him by holding it when you speak to him. He gives you a host, but says he needs water that hasn't touched the earth to make holy water by performing a benediction ceremony on it. Although he doesn't know what the other two objects are, he tells you they are common items feared by demons. | ||||||||||||||||||||||||||||||||||||||||||||||
| According to folklore (as mentioned in the game's opening cut scene) vampires detest the smell of garlic and cannot endure the fact that they don't see their reflection in a mirror. From examining the points of the cross (on the Seal inside the tomb) you know the box on the right arm smells of garlic, the receptacle at the bottom previously contained liquid, the solar disk must fit in the centre and that objects have to be inserted in the fissure at the top and the cavity on the left arm. Assuming that the host and mirror (the broken piece you took from the assistant director's desk) fit into the fissure and cavity, the clove of garlic goes on the box and the solar disk fits in the centre, you still need the holy water for the receptacle at the bottom. | ||||||||||||||||||||||||||||||||||||||||||||||
| Go to Mustapha's inn, noting the lit barbeque in front of the barrel. Fill the casserole dish with water from the trough in front of the camels, then heat it on the barbeque to get a casserole dish full of hot water. Next, put the broken piece of mirror over the casserole dish (in your inventory) to get a mirror with condensation. Pour the condensation (from the broken mirror) into the flask so that you have a flask with condensation. Give the flask to Herodotus (talk to him while holding it) and he will produce some holy water for you. | ||||||||||||||||||||||||||||||||||||||||||||||
| Take note of what Herodotus says about what must be done on the other side of the Seal. | ||||||||||||||||||||||||||||||||||||||||||||||
| Finally, ask Herodotus about the sphinx by holding it while talking to him. Like the assistant director, he tells you it's cursed and must be smashed. | ||||||||||||||||||||||||||||||||||||||||||||||
RECREATE THE SEAL | ||||||||||||||||||||||||||||||||||||||||||||||
| When you get to The Blood Rocks, enter the temple through the hole you dug previously. Climb the rope hanging from the plank and make your way to the chamber with the Seal on the door. | ||||||||||||||||||||||||||||||||||||||||||||||
Examine the Seal, noting that all the objects you need, except the mirror, are visible to the left of the Seal. The mirror has to be 'shaped' to fit in the Seal, so access your inventory by clicking the black grid. Using the knife, remove the diamond from the necklace and cut the broken piece of mirror into a square mirror. After doing this, the square mirror will be visible to the left of the Seal. You can now insert the objects into the Seal as follows: | ||||||||||||||||||||||||||||||||||||||||||||||
| ||||||||||||||||||||||||||||||||||||||||||||||
INSIDE THE TOMB | ||||||||||||||||||||||||||||||||||||||||||||||
| The chamber on the other side of the Seal door has a large basin with swirling water in it. There are numerous objects in the chamber, so take your time and look around carefully. The information that Herodotus gave you and the symbol translations on the Turk's letter (parchment) contain the details of what must be done. | ||||||||||||||||||||||||||||||||||||||||||||||
The first row of symbols on the Turk's letter (parchment) were deciphered as: | ||||||||||||||||||||||||||||||||||||||||||||||
Weapon - With - Magical Powers - Within - Seker - Head | ||||||||||||||||||||||||||||||||||||||||||||||
| The broken statue lying to the right of the basin is that of the god Seker. Use the axe to smash open the statue's head and then remove the silver spear tip that was inside it. | ||||||||||||||||||||||||||||||||||||||||||||||
| Herodotus told you to put a gold deben and a hinu of cursed blood into the basin, so you need both of these items. | ||||||||||||||||||||||||||||||||||||||||||||||
GOLD DEBEN | ||||||||||||||||||||||||||||||||||||||||||||||
| You find another copper deben inside the bowl on the right hand ledge. Also pick up the bowl on the left ledge next to the broken slab. Put the scale on the broken slab, then click it for a close up view. Note that both the copper debens, the scribe's stylus and a spoon are on the slab. Also, the sachet of gold powder is on the ground next to the slab. The assistant director told you that copper debens weigh 27.3 grams and gold debens weigh 13.6 grams. The weight of the stylus is 1.44 ounces. | ||||||||||||||||||||||||||||||||||||||||||||||
| You first need to convert the weight of the stylus to grams. 1 ounce = 28.349523125 grams, so you can calculate it manually. Alternatively, put the stylus in one pan of the scale, then use the spoon to add seven scoops of gold powder to the other pan. This will balance the two pans, and the indicator in the centre of the scale will read 41.00. You therefore know the stylus weighs 41.00 grams. | ||||||||||||||||||||||||||||||||||||||||||||||
| Note that the middle tile on the edge of the slab is a reset button. | ||||||||||||||||||||||||||||||||||||||||||||||
Study the various weights carefully to work out that the weight of both copper debens (54.6 grams) minus that of the stylus (41.00 grams) equals 13.6 grams, which is the weight of a gold deben. You can therefore get 13.6 grams of gold powder as follows: | ||||||||||||||||||||||||||||||||||||||||||||||
| ||||||||||||||||||||||||||||||||||||||||||||||
| Place the bowl containing a gold deben into the large basin the centre of the chamber. | ||||||||||||||||||||||||||||||||||||||||||||||
HINU OF CURSED BLOOD | ||||||||||||||||||||||||||||||||||||||||||||||
The second row of symbols on the Turk's letter (parchment) were deciphered as: | ||||||||||||||||||||||||||||||||||||||||||||||
Cursed - Blood - Hidden - Under - North - Altar | ||||||||||||||||||||||||||||||||||||||||||||||
You won't know which of the four altars is to the north, but you can only interact with the one on the left. Examine this altar to zoom in to close up view. Certain of the hieroglyphs on it are the same as those on the black sphinx. Click the black grid to access your 'Documents' in which the hieroglyphs appear. The corresponding hieroglyphs on the altar must be clicked in the same order as displayed on the black sphinx. The solution is as follows: | ||||||||||||||||||||||||||||||||||||||||||||||
| ||||||||||||||||||||||||||||||||||||||||||||||
| When the altar slides open, fill the receptacle (the capacity of a hinu) with the blood on the floor. | ||||||||||||||||||||||||||||||||||||||||||||||
| Place the blood (in the receptacle) into the large basin the centre of the chamber. | ||||||||||||||||||||||||||||||||||||||||||||||
PYRAMIDS | ||||||||||||||||||||||||||||||||||||||||||||||
| After putting the gold deben and hinu of cursed blood into the basin the swirling water turns to sand. Herodotus told you that directly after this, the sun must hit the summit of the Pharaohs' tombs. The tombs that Herodotus referred to are pyramids. | ||||||||||||||||||||||||||||||||||||||||||||||
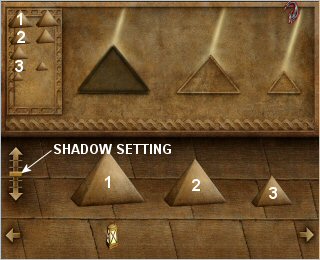
| The middle column on the left has a drawing of three pyramids, each bathed in a beam of light. You need light, so examine the pillar while holding the lit lantern. | ||||||||||||||||||||||||||||||||||||||||||||||
| ||||||||||||||||||||||||||||||||||||||||||||||
| To solve this puzzle, first place the top left pyramid below the large outline, as shown in the graphic above. Slide the lantern to below this pyramid using the directional arrows at the bottom. The slider on the left must be adjusted so that the shadow fits the outline exactly. The correct shadow setting is shown in the graphic. Repeat this for the pyramids marked '2' and '3' in the graphic. Note that the shadow setting must be the same for all three pyramids. | ||||||||||||||||||||||||||||||||||||||||||||||
| After solving this puzzle there are three new hotspots on the sand in the large basin. Also note that you only have three pyramids left in you inventory. These pyramids must be placed on the hotspots in the same order as the Giza pyramids appear on the sketch you took from the assistant director's desk. The correct order is as follows: | ||||||||||||||||||||||||||||||||||||||||||||||
| ||||||||||||||||||||||||||||||||||||||||||||||
| When done correctly, the sun's rays shine through onto the tips of the three pyramids and you see a stone door that leads to the secret passage opening. | ||||||||||||||||||||||||||||||||||||||||||||||
SECRET PASSAGE | ||||||||||||||||||||||||||||||||||||||||||||||
| There's a crocodile infested moat at the bottom of the secret passage. To cross the moat you need to get the funery barge down the stairs in the secret passage. | ||||||||||||||||||||||||||||||||||||||||||||||
| Take the metal bar that the large Egyptian statue on the left is holding and the piece of column lying on the ground next to the statue on the right. Cut both support beams on which the barge is resting with the axe. Put the piece of column under the right end of the barge, insert the metal bar between the column and the barge, then pull down on the metal bar to catapult the barge down the stairs. | ||||||||||||||||||||||||||||||||||||||||||||||
| You can now cross the moat at the bottom of the stairs, but the way forward is blocked by some or other supernatural force. | ||||||||||||||||||||||||||||||||||||||||||||||
The third row of symbols on the Turk's letter (parchment) were deciphered as: | ||||||||||||||||||||||||||||||||||||||||||||||
Before - Enter - Darkness - Destroy - Guard - Curse be on you forever | ||||||||||||||||||||||||||||||||||||||||||||||
| You were also told by the assistant director and Herodotus to destroy the black sphinx statuette, so use the axe (in your inventory) to break it in half. While holding the broken sphinx (to break the spell) walk forward through the mist. | ||||||||||||||||||||||||||||||||||||||||||||||
| Take the papyrus on the large altar in the next chamber, then exit through the door you came in. | ||||||||||||||||||||||||||||||||||||||||||||||
BACK IN CAIRO | ||||||||||||||||||||||||||||||||||||||||||||||
| On your return to Cairo, speak to Herodotus while holding the papyrus you took from the altar in the tomb. He's unable to translate it for you, but says that Brother Alberto (at the Saint Carousel Abbey) in Vienna could possibly do so. | ||||||||||||||||||||||||||||||||||||||||||||||
| Before leaving, speak to Mustapha and give him some comfort regarding his niece. | ||||||||||||||||||||||||||||||||||||||||||||||
| ||||||||||||||||||||||||||||||||||||||||||||||