| ||||||||||||||||||||||||||||||||||||||||||
MIA'S APARTMENT | ||||||||||||||||||||||||||||||||||||||||||
| Your visit to Mina's apartment was prompted by the letter you got from Jonathan Harker. Read both the letter and News Times carefully, noting that the newspaper article makes reference to a similar report in last Tuesday's edition. | ||||||||||||||||||||||||||||||||||||||||||
Look around the apartment to find three more newspapers: | ||||||||||||||||||||||||||||||||||||||||||
| ||||||||||||||||||||||||||||||||||||||||||
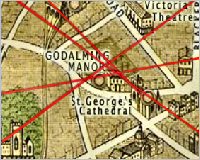
Open the red curtain on the far wall to reveal a map of London. All the newspaper articles are about vampire attacks on young women and detail the place of the attack as well as the direction in which the assailant fled. The relevant locations described in the newspapers are: | ||||||||||||||||||||||||||||||||||||||||||
| ||||||||||||||||||||||||||||||||||||||||||
| Use the red crayon (at the bottom of the map) to draw a line between the location of the attack and where the assailant fled to for all four incidents. Do this by clicking the red crayon on the location of attack and, with the mouse button depressed, drag it to the place of escape. Note that the inventory screen can be accessed from the map by clicking the black grid at the bottom left. Also, the eraser at the bottom of the map can be used to delete an incorrect line if need be. | ||||||||||||||||||||||||||||||||||||||||||
| ||||||||||||||||||||||||||||||||||||||||||
| The four lines all intersect at Godalming Manor, so click this location to complete the puzzle. | ||||||||||||||||||||||||||||||||||||||||||
GODALMING MANOR | ||||||||||||||||||||||||||||||||||||||||||
| Knock on the front door of the manor. The butler won't allow you in, but you do learn about his fetish for eating flies. This is important later in the game. | ||||||||||||||||||||||||||||||||||||||||||
| Go through the large iron gates to enter Bloomsbury Cemetery. | ||||||||||||||||||||||||||||||||||||||||||
MAP OF THE CEMETERY | ||||||||||||||||||||||||||||||||||||||||||
| ||||||||||||||||||||||||||||||||||||||||||
TOOL SHED | ||||||||||||||||||||||||||||||||||||||||||
| Long, the grave digger, is at the location marked '2' on the map above. When you talk to him about the combination to the lock on the tool shed, he tells you to think of the ages of J. B. Lemon and his wife, as marked on their mausoleum. He also says the numbers must be flipped. Take the scraper on the ground in front of Long and go to the mausoleum marked '3' on the map. In close up view of the mausoleum use the scraper to remove the dirt. Even after the inscriptions are legible, continue scraping until van Helsing says: 'Perfect! I can read the inscription...' | ||||||||||||||||||||||||||||||||||||||||||
The two inscriptions are: | ||||||||||||||||||||||||||||||||||||||||||
| ||||||||||||||||||||||||||||||||||||||||||
| From this you know their respective ages were 69 and 68. Flip the two numbers to get 9698. | ||||||||||||||||||||||||||||||||||||||||||
| Go to the tool shed (marked '1' on the map) and enter the combination (9698) on the lock. Click the gold catch on the right to open the combination lock and enter the tool shed. | ||||||||||||||||||||||||||||||||||||||||||
| Take the shovel and iron bar against the wall next to the door, as well as the lantern on the table. | ||||||||||||||||||||||||||||||||||||||||||
WATCHMAN'S MAUSOLEUM | ||||||||||||||||||||||||||||||||||||||||||
| Return to the grave digger and talk to him about getting into the manor. He says that the watchman knew about a tunnel, but he's unfortunately dead and is buried in the mausoleum on the lower level. | ||||||||||||||||||||||||||||||||||||||||||
| Go to the mausoleum (with two monk statues at the entrance) marked '4' on the map above. Using the iron bar, prise apart two bars on the grate in front of the watchman's mausoleum. Combine the matches and lantern (in the inventory) and then attach the lit lantern to the shovel to form a sconce. Put the sconce through the hole in the grate and then read the inscription. | ||||||||||||||||||||||||||||||||||||||||||
Two references in the inscription (poem) provide a clue to opening the grate: | ||||||||||||||||||||||||||||||||||||||||||
| ||||||||||||||||||||||||||||||||||||||||||
| The celestial henchmen are the four 'martyred angels' in the cemetery. Three of these are 'up high' and one is 'down low'. These are marked '5', '6', '7' and '8' on the map. After reading the inscription, puzzles are activated at each of the four martyred angels. | ||||||||||||||||||||||||||||||||||||||||||
WHITE MARTYRED ANGEL MARKED '5' ON THE MAP | ||||||||||||||||||||||||||||||||||||||||||
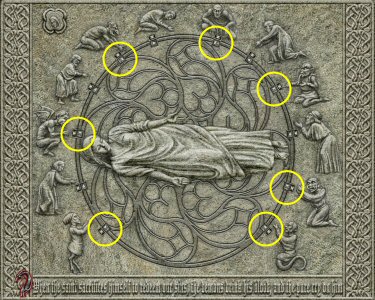
| The tumblers in front of each character can be set to either a wine goblet or a tear. The inscription at the bottom of the design explains what must be done to solve the puzzle: | ||||||||||||||||||||||||||||||||||||||||||
When the saint sacrifices himself to redeem our sins, | ||||||||||||||||||||||||||||||||||||||||||
| ||||||||||||||||||||||||||||||||||||||||||
| In order for the demons to 'drink blood', set their tumblers to wine goblets. These are indicated with a YELLOW CIRCLE in the diagram. All the other tumblers must be set to a tear. After adjusting the tumblers, click the button near the top left corner. If done correctly blood will flow through the design and you hear the mechanism start working. | ||||||||||||||||||||||||||||||||||||||||||
MARTYRED ANGEL MARKED '6' ON THE MAP | ||||||||||||||||||||||||||||||||||||||||||
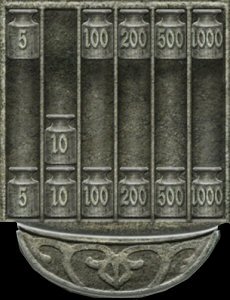
| The weights on the right of the scale must equal the total punishment given to the seven sinners as described in the riddle in the centre of the puzzle. | ||||||||||||||||||||||||||||||||||||||||||
| ||||||||||||||||||||||||||||||||||||||||||
| ||||||||||||||||||||||||||||||||||||||||||
| Slide weights making up 1825 (being the total years punishment for all seven sinners) from the top down to the bottom as illustrated in the diagram, then click the receptacle below the weights. | ||||||||||||||||||||||||||||||||||||||||||
MARTYRED ANGEL MARKED '7' ON THE MAP | ||||||||||||||||||||||||||||||||||||||||||
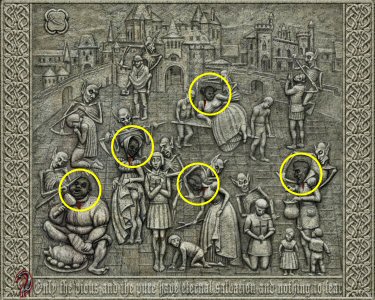
| There are eight people about to be beheaded. From the inscription you know the ones to be spared: | ||||||||||||||||||||||||||||||||||||||||||
Only the pious and the pure have eternal salvation and nothing to fear | ||||||||||||||||||||||||||||||||||||||||||
| ||||||||||||||||||||||||||||||||||||||||||
| The heads of those who must be killed are indicated with YELLOW CIRCLES in the diagram. After identifying the ones to be beheaded, click the button near the top left corner. | ||||||||||||||||||||||||||||||||||||||||||
MARTYRED ANGEL MARKED '8' ON THE MAP | ||||||||||||||||||||||||||||||||||||||||||
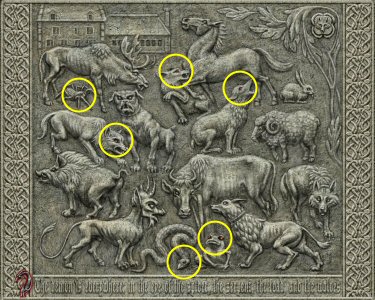
| Read the inscription at the bottom very carefully to learn which eyes have to be clicked: | ||||||||||||||||||||||||||||||||||||||||||
The demon is everywhere: in the eye of the spider, the serpent, the toad and the wolves | ||||||||||||||||||||||||||||||||||||||||||
| ||||||||||||||||||||||||||||||||||||||||||
| The first three are straightforward, but finding the correct wolves is more complex. Only three of the wolves are performing 'demonic' actions, so the others must be excluded. The eyes that have to be clicked are indicated with YELLOW CIRCLES in the diagram. After selecting the correct creatures, click the button near the top right corner. | ||||||||||||||||||||||||||||||||||||||||||
| Solving all four martyred angel puzzles opens the grate in front of the watchman's mausoleum. | ||||||||||||||||||||||||||||||||||||||||||
SECRET PASSAGE | ||||||||||||||||||||||||||||||||||||||||||
| Inside the watchman's mausoleum, above the bottom coffin, you find a book. Read the extract from the book to learn that the entrance to the secret passage is at a false tomb located in the north-east corner of the cemetery, between a tomb without a cover and a large Gothic cross. It is marked '11' on the map of the cemetery above. | ||||||||||||||||||||||||||||||||||||||||||
| Remove the cover of this tomb with the iron bar, then enter the passage. | ||||||||||||||||||||||||||||||||||||||||||
| The lock on the door leading to the manor basement consists of six sliders that need to be shifted to the right side. Moving any of the sliders also causes two others to move as well. The chart below details which sliders are affected when a particular slider is moved: | ||||||||||||||||||||||||||||||||||||||||||
| ||||||||||||||||||||||||||||||||||||||||||
| From this you work out that moving any of the following pairs of sliders to the right opens the lock: | ||||||||||||||||||||||||||||||||||||||||||
| ||||||||||||||||||||||||||||||||||||||||||
GETTING PAST THE BUTLER | ||||||||||||||||||||||||||||||||||||||||||
| The stairs in the basement lead up to the kitchen door. The butler is crawling around on the kitchen floor, eating insects. To get to the other rooms in the manor you must find a way of distracting him. Did you notice the enormous flies above the receptacle at the cemetery entrance? You find a black veil on top of a cross in the cemetery, marked '9' on the map above. Use the black veil to trap a few flies above the receptacle (next to the 'Rest in Peace' sign) at the location marked '10' on the map. You also find an empty glass bowl under the workbench in the manor basement. Fill the glass bowl with a few flies (trapped on the black veil) to get a bowl of flies. Go the kitchen and throw the bowl of flies on the floor by clicking the butler while holding it. | ||||||||||||||||||||||||||||||||||||||||||
| As soon as he starts eating the flies, you are able to go through the other door in the kitchen. | ||||||||||||||||||||||||||||||||||||||||||
WALL SAFES | ||||||||||||||||||||||||||||||||||||||||||
| The safe on the wall in the lounge (the room opposite the kitchen) has 12 dials at the bottom. Above the dials are 6 protruding bumps and above these is a Latin phrase. | ||||||||||||||||||||||||||||||||||||||||||
| There's a similar safe in the library (the upstairs room on the right) except that it has no dials. | ||||||||||||||||||||||||||||||||||||||||||
| Take the pile of writing paper found on the table in the library. | ||||||||||||||||||||||||||||||||||||||||||
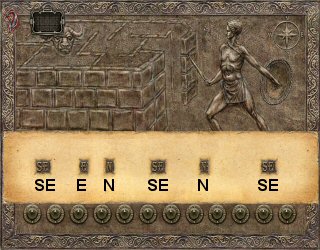
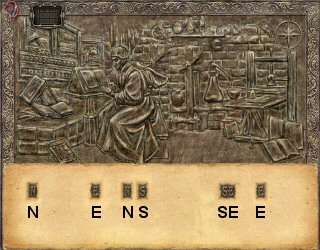
| Go to each of the safes, and while holding a sheet of writing paper, zoom in on the safe. Note that it is also possible to take the writing paper while in close up mode at a safe by clicking the black grid. Shift the writing paper to the bottom of the safe (over the protruding bumps) and click on it to make 6 holes in the paper. Place the paper with holes (from the other safe) over the Latin phrase on each safe. In other words, use the paper with holes made on the library safe at the lounge safe, and vice versa. In each case, certain letters from the Latin phrases will be visible through the holes. | ||||||||||||||||||||||||||||||||||||||||||
| ||||||||||||||||||||||||||||||||||||||||||
LOUNGE WALL SAFE | ||||||||||||||||||||||||||||||||||||||||||
| ||||||||||||||||||||||||||||||||||||||||||
LIBRARY WALL SAFE | ||||||||||||||||||||||||||||||||||||||||||
| ||||||||||||||||||||||||||||||||||||||||||
| You should recognize these letters as compass points. Each of the 12 dials on the lounge wall safe has 8 settings that correspond to the 8 major compass points as follows: | ||||||||||||||||||||||||||||||||||||||||||
| ||||||||||||||||||||||||||||||||||||||||||
| Set each of the 12 dials to the compass points referred to by the letters visible through the holes to open the safe. Remove the key found inside the safe. | ||||||||||||||||||||||||||||||||||||||||||
| ||||||||||||||||||||||||||||||||||||||||||
SECRET DOOR | ||||||||||||||||||||||||||||||||||||||||||
| The upstairs room on the left is Lady Godalming's bedchamber. Pick up the message found on the floor next to the table near the door in her room. | ||||||||||||||||||||||||||||||||||||||||||
It's from there that I saw him enter, | ||||||||||||||||||||||||||||||||||||||||||
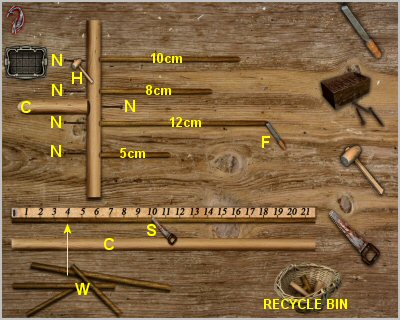
The word 'torcheres' refers to lamps or candlesticks, so check those in the manor to learn that the candlestick on the landing midway up the stairs is loose. The words 'Master is there' painted on the left wall of the landing are a clue as to which candlestick to check. Use the pliers (found against the pillar to the left of the workbench in the basement) to remove the candlestick. You find a lock behind where the candlestick was, that requires a key specifically made for it. To measure the depth of the four holes on the lock you need the following items: | ||||||||||||||||||||||||||||||||||||||||||
| ||||||||||||||||||||||||||||||||||||||||||
| To make the measuring instrument first attach the tape measure to the wooden spoon then add the spool of thread. Use this tool to measure the depth of each of the four holes. These measurements are recorded in your 'Reports' as follows: | ||||||||||||||||||||||||||||||||||||||||||
| ||||||||||||||||||||||||||||||||||||||||||
Use the workbench in the basement to make a key for the lock. You will need the following items: | ||||||||||||||||||||||||||||||||||||||||||
| ||||||||||||||||||||||||||||||||||||||||||
| ||||||||||||||||||||||||||||||||||||||||||
The process for making the key is as follows: | ||||||||||||||||||||||||||||||||||||||||||
| ||||||||||||||||||||||||||||||||||||||||||
| Use the makeshift wooden key to open the secret door in the landing wall. Go through the door and up the stone stairs where you find a locked metal door. Unlock this door with the key you took from the wall safe and enter Dracula's room. | ||||||||||||||||||||||||||||||||||||||||||
DRACULA'S BOOK | ||||||||||||||||||||||||||||||||||||||||||
| Read the book on the middle shelf of the right bookcase at the far end of the room. Study the blood stained page carefully, noting that there's an arrow pointing down at a five-point star from the bat at the top of the page. This is a clue to solving the puzzle in this room. | ||||||||||||||||||||||||||||||||||||||||||
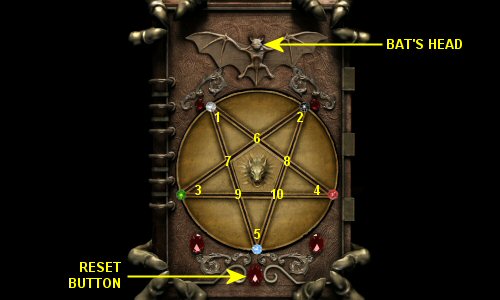
| Zoom in on Dracula's book on the table below the portrait of Count Dracula. The lock on the book is a two part puzzle. The segments in and around the five-point star drawn on the blood stained page have symbols and words on them, so these must be replicated on the star on the lock. | ||||||||||||||||||||||||||||||||||||||||||
| ||||||||||||||||||||||||||||||||||||||||||
| ||||||||||||||||||||||||||||||||||||||||||
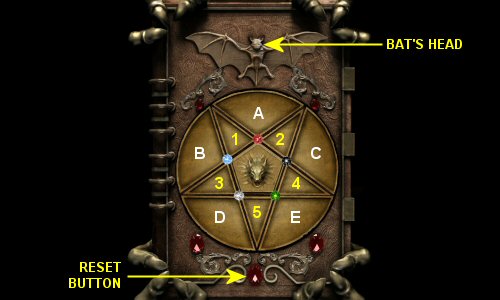
The second part of the lock puzzle relates to the five coloured jewels on the star. These must be moved to the five points of the star. There are no clues as to which point a specific jewel should go, so this requires a process of 'trial and error'. When a jewel is at the correct point, it glows when you click the bat's head. The correct positions are shown in the diagram below as follows: | ||||||||||||||||||||||||||||||||||||||||||
| ||||||||||||||||||||||||||||||||||||||||||
| ||||||||||||||||||||||||||||||||||||||||||
| To position the jewels correctly, from where they are originally, click the points marked in the above graphic in the sequence below, then click the bat's head: | ||||||||||||||||||||||||||||||||||||||||||
| ||||||||||||||||||||||||||||||||||||||||||
| Read Dracula's book (journal) to learn he has gone to Egypt in search of a secret rite known as the 'Demonomicon of Wliwggi', which is located inside a tomb near Cairo. | ||||||||||||||||||||||||||||||||||||||||||
| To avoid being caught by the butler, make your out of the manor. | ||||||||||||||||||||||||||||||||||||||||||
MIA'S APARTMENT | ||||||||||||||||||||||||||||||||||||||||||
| While holding the crucifix (from your inventory) enter Mia's bedroom to find that she's been attacked by Count Dracula. You send a telegram to Dr. Seward, the Director of Carfax Sanatorium, who you hope can assist you in finding a cure for Mina. | ||||||||||||||||||||||||||||||||||||||||||
| Zoom in on the map in Mina's apartment and select Cairo (bottom right corner) as your destination. | ||||||||||||||||||||||||||||||||||||||||||
| ||||||||||||||||||||||||||||||||||||||||||