| ||||||||||||||||||||||||||||||||||||||
THE INN | ||||||||||||||||||||||||||||||||||||||
| The rear door inside the inn leads to the stable. The key to the door is hanging next to it. When you try to take the key or go through the door, the innkeeper won't let you. Talk to the innkeeper, then try reading the 'menu' on the bar counter, but again he won't let you. After trying all of this, van Helsing automatically talks to Seward about getting him some medicine. Ask the innkeeper about a remedy, and he goes to the stable to fetch a potion. | ||||||||||||||||||||||||||||||||||||||
| While the innkeeper is in the stable pick up the spoon, silver paper and two pretzels (the round and straight one) from the table Seward is sitting at. Read the documents (menu) on the bar counter to learn about the order to be delivered to the Castle. There's also a torn extract from Harker's journal, in which he writes about being liberated from the curse. | ||||||||||||||||||||||||||||||||||||||
| When the innkeeper closes the stable door on his return, the wild boar's head falls off the wall. Pick up the wild boar's molar that came loose and fell to the floor. Use the spoon to remove some sticky substance from the bench (or the floor) in front of the table Seward is sitting at, then attach it to the silver paper in your inventory. Wrap both pretzels and the wild boar's molar in the silver paper glued together, then combine all three objects to make a false key. Substitute the stable key hanging next to the door with the false key made from pretzels. Suggest to the innkeeper that he gets something stronger, and he goes to get bootleg from the bar. Now unlock the door and go to the stable. | ||||||||||||||||||||||||||||||||||||||
STABLE | ||||||||||||||||||||||||||||||||||||||
| Walk to the rear of the coach, then examine it to learn it contains goods ordered by Count Dracula. You can get into the Castle by hiding in the cask on top of the coach, but to do this you must empty the contents down the hole in the ground behind the coach. | ||||||||||||||||||||||||||||||||||||||
| Go to the workbench area, pick up the empty bucket and fill it with some oats from the small barrel. Return to the door and add a few drops of blood to the bucket of oats from the carcass hanging on a hook next to the door. Feed the bucket of oats and blood to the horses to calm them, allowing you to walk to the front of the stable. | ||||||||||||||||||||||||||||||||||||||
Take the chest and funnel from the table, the trough under the table as well as the tube and beaver carcass found on the floor. Return to the rear of the coach and assemble these items as follows: | ||||||||||||||||||||||||||||||||||||||
| ||||||||||||||||||||||||||||||||||||||
| Open the tap on the cask to drain the contents into the hole in the ground. When van Helsing hears the coachman approaching, click on any of the assembled parts to trigger your trip to the Castle. | ||||||||||||||||||||||||||||||||||||||
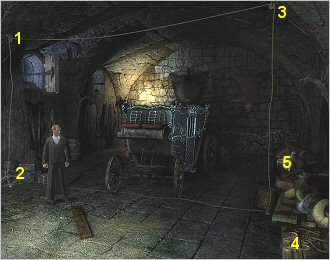
CASTLE STABLE | ||||||||||||||||||||||||||||||||||||||
| Set a trap for Igor (the coachman) as follows: | ||||||||||||||||||||||||||||||||||||||
Take the leghold trap on the bench near the front end of the coach. Go to the rear end of the coach and take both ropes that are found on top of the barrels under the open window. Use these items to set a trap for Igor (the coachman) as follows: | ||||||||||||||||||||||||||||||||||||||
| ||||||||||||||||||||||||||||||||||||||
| ||||||||||||||||||||||||||||||||||||||
| Next, you need to bait the trap. Take both hooks on the bench (marked '4' in the graphic above) and then zoom in on the dead rat found at position '5' in the graphic. Insert the two hooks into either side of the trap to release the rat, then pick up the dead rat and place it in the leghold trap at position '2'. | ||||||||||||||||||||||||||||||||||||||
| Speak to Igor twice, noting his comment about 'the beauty with black hair' and that he wants a heart with jam. Also pick up the axe lying on the ground near him. | ||||||||||||||||||||||||||||||||||||||
| There's a pink package and a vase (gold dish) on the blocks to the left of the coach. Take the vase and cut open the pink package with the arrow for crossbow. Take the jam pot containing preserved hearts that was inside the pink package. Give the jam pot to Igor, who says the he 'owes you'. Go to the front end of the coach and fill the vase with blood from the bucket on the floor next to where you found the leghold trap. | ||||||||||||||||||||||||||||||||||||||
| With Igor out the way you can now enter the Castle through the stable door. | ||||||||||||||||||||||||||||||||||||||
SMALL ROOM | ||||||||||||||||||||||||||||||||||||||
| From the stable you get to a small room with doors on the left and in front of van Helsing. The door on his left leads to the crypt and the door in front of him is the entrance into the Grand Hall. Pick up the golden thread curtain cord found next to the red drape and the fur coat lying on the barrel. | ||||||||||||||||||||||||||||||||||||||
CRYPT GRATE PUZZLE | ||||||||||||||||||||||||||||||||||||||
The entrance to the crypt is blocked by a large iron grate. A control panel on the right wall operates the opening system for the crypt grate. The panel consists of: | ||||||||||||||||||||||||||||||||||||||
| ||||||||||||||||||||||||||||||||||||||
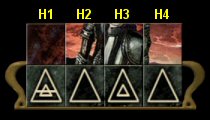
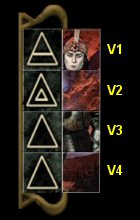
| Begin by hovering your cursor over the 4 horizontal triangle symbols, noting that each corresponds to one of the squares in the puzzle template. These are marked H1 - H4 in the graphic below. | ||||||||||||||||||||||||||||||||||||||
| ||||||||||||||||||||||||||||||||||||||
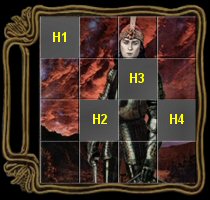
| Click each of these squares in the puzzle template to remove them from the template. | ||||||||||||||||||||||||||||||||||||||
| ||||||||||||||||||||||||||||||||||||||
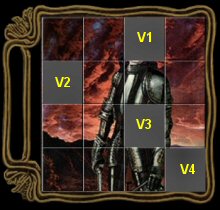
| Drag the template onto the large grid and move it so that the top left square (H1) is over the triangle symbol in row 6, column 2 of the grid. The 4 triangle symbols that are visible in the template should correspond with the 4 horizontal ones at the top of the grid, as shown in the graphic below. | ||||||||||||||||||||||||||||||||||||||
| ||||||||||||||||||||||||||||||||||||||
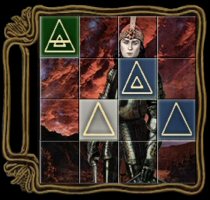
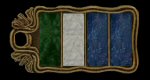
| The horizontal colour sequence of the triangles (GREEN, GREY, BLUE, BLUE) must be duplicated on the horizontal plaque as follows: | ||||||||||||||||||||||||||||||||||||||
| ||||||||||||||||||||||||||||||||||||||
| The same process must be followed to find the correct colours for the bars on the vertical plaque. | ||||||||||||||||||||||||||||||||||||||
| ||||||||||||||||||||||||||||||||||||||
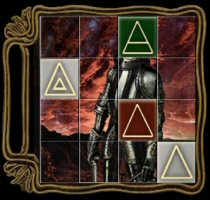
| Drag the template onto the large grid and move it so that the top square, second from right, (V1) is over the triangle symbol in row 5, column 9 of the grid. The 4 triangle symbols that are visible in the template should correspond to the 4 vertical ones on the right of the grid, as shown in the graphic. | ||||||||||||||||||||||||||||||||||||||
| ||||||||||||||||||||||||||||||||||||||
| Now duplicate the vertical colour sequence (GREEN, GREY, RED, GREY) on the vertical plaque. | ||||||||||||||||||||||||||||||||||||||
| ||||||||||||||||||||||||||||||||||||||
| Once the bars on both plaques have been adjusted to the correct colours the grate opens. | ||||||||||||||||||||||||||||||||||||||
CRYPT | ||||||||||||||||||||||||||||||||||||||
| Inside the coffin closest the entrance you find the skeleton of a woman. Examine the lid of the coffin (either before or after removing it) to see the woman's name (Moana) and a number (12176) written in blood. In close up mode, click both the name and the number to enter them into your Reports. | ||||||||||||||||||||||||||||||||||||||
| The next coffin, on the left of, or counter-clockwise from, the first one is empty. | ||||||||||||||||||||||||||||||||||||||
| You find the skeleton of an antediluvian woman inside the third coffin. As you did with the first coffin, examine the lid and in close up mode click the name (Illona) and the number (8954) written in blood to enter them in your Reports. | ||||||||||||||||||||||||||||||||||||||
| Examine the decorative coffin to learn that Dracula rejuvenates in it, so smash it with the axe. | ||||||||||||||||||||||||||||||||||||||
| Open the last coffin to find Harker's body. Remove his journal, a book (Myths and Legends from the First Order of Knights) and glasses from the coffin. Read Harker's journal and the book carefully as they contain vital clues to other puzzles. From the extract of his journal (found on the bar counter at the inn) you know Harker wants to be liberated from the curse. Combine the spike and the hammer in your inventory, then use the 'hammer' to drive the 'stake' through his heart. | ||||||||||||||||||||||||||||||||||||||
GRAND HALL | ||||||||||||||||||||||||||||||||||||||
| ||||||||||||||||||||||||||||||||||||||
The numbers in the map above refer to the following items in the Grand Hall: | ||||||||||||||||||||||||||||||||||||||
| ||||||||||||||||||||||||||||||||||||||
ARMOURY CAGE | ||||||||||||||||||||||||||||||||||||||
| Click the sword on the armoury cage ('9' in the map above) to see that it has a combination lock. | ||||||||||||||||||||||||||||||||||||||
Return to Igor in the stable and ask him about the numbers and arsenal. Note that these two topics are only triggered if you have: | ||||||||||||||||||||||||||||||||||||||
| ||||||||||||||||||||||||||||||||||||||
| Igor tells you the numbers represent how many nights his master's favourites 'held on' before going crazy and being liberated by him. He also gives you a clue to the combination of the armoury cage: | ||||||||||||||||||||||||||||||||||||||
| ||||||||||||||||||||||||||||||||||||||
| Return to the Grand Hall and try to open the door marked '4' on the map. When confronted by Jada, Dracula's current mistress, listen carefully to the dialog with her to learn that she has spent exactly 5777 nights with him. In the first conversation with Igor he called her 'the beauty with black hair' and Harker's journal (found in his coffin) referred to her as his 'black-haired initiator'. | ||||||||||||||||||||||||||||||||||||||
| Examine the portraits found at '1' and '3' on the map. Click the plaques at the bottom of the portraits to learn that they depict Illona and Moana. From the actual portraits you know that Illona was blonde and Moana had flaming red hair. | ||||||||||||||||||||||||||||||||||||||
| Using all this information work out the combination to the armoury cage lock as follows: | ||||||||||||||||||||||||||||||||||||||
| ||||||||||||||||||||||||||||||||||||||
| Adjust the dials on the combination lock on the armoury cage to 80099 to open it. | ||||||||||||||||||||||||||||||||||||||
| Take the crossbow without a bow string and the coat of mail from the left side of the armoury. | ||||||||||||||||||||||||||||||||||||||
SHIELD OF PELOR | ||||||||||||||||||||||||||||||||||||||
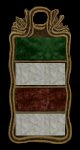
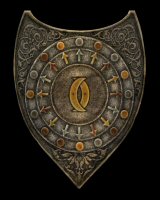
Examine the right side of the armoury to see three shields. Each shield consists of: | ||||||||||||||||||||||||||||||||||||||
| ||||||||||||||||||||||||||||||||||||||
From Harker's journal (found inside his coffin) you know there were a multitude of forgeries, so you need to identify which of the three shields is the original one. Read the Myths and Legends from the First Order of Knights (also found in Harker's coffin) carefully to learn how Philotomus manipulated his weapons. The first part was: | ||||||||||||||||||||||||||||||||||||||
Crossing the two moons... | ||||||||||||||||||||||||||||||||||||||
Experiment with the moons on the three shields to learn that you can only 'cross' the two moons on the middle shield as depicted below. You therefore know the other two shields are forgeries. | ||||||||||||||||||||||||||||||||||||||
| ||||||||||||||||||||||||||||||||||||||
| The second part of Philotomus' manipulation was aiming the arrows as follows: | ||||||||||||||||||||||||||||||||||||||
...golden darts target the neighbouring silver and that | ||||||||||||||||||||||||||||||||||||||
| a silver, in his turn, points towards a nearby bronze | ||||||||||||||||||||||||||||||||||||||
| The easiest way of working out how many times to rotate the outer or inner dials is by analysing the initial positions of the silver and bronze dots and arrows. List the sequence of the dots on the outer dial, starting from the top and note where the bronze ones appear. Next list the sequence of arrows on the inner dial, again starting from the top and note where the silver ones appear. | ||||||||||||||||||||||||||||||||||||||
| ||||||||||||||||||||||||||||||||||||||
| From this you see that each bronze dot is exactly one position ahead of each silver arrow. To align the bronze dots and silver arrows you can either rotate the outer dial (clockwise) 15 times or rotate the inner dial (counter-clockwise) 15 times. | ||||||||||||||||||||||||||||||||||||||
| By manipulating the two moons to 'cross' and aligning the dots and arrows correctly, the legendary shield of Pelor is automatically added to your inventory. | ||||||||||||||||||||||||||||||||||||||
LARGE TAPESTRY AND PAINTING BEHIND THE CURTAIN | ||||||||||||||||||||||||||||||||||||||
| These two items are marked '6' and '7' respectively on the map above. | ||||||||||||||||||||||||||||||||||||||
| The large tapestry, partially burnt at the top, depicts the Knights of the Order of the Dragon. In close up mode you can examine the shield held by the knight in the centre as well as a pink ribbon on the wrist of the knight on the left. | ||||||||||||||||||||||||||||||||||||||
| Pull the cord (on the right) to remove the curtain that covers a painting of a young woman. Zoom in on the painting to see that the paint around her hands has been scratched off. Move the glasses at the bottom over this area, release and then click the mouse button to learn that the object someone wanted to remove was a rose. | ||||||||||||||||||||||||||||||||||||||
| Take the golden thread curtain cord (on the ledge) that came loose when you removed the curtain. | ||||||||||||||||||||||||||||||||||||||
| Although that the large tapestry and painting do not provide any clues, nor is it necessary to interact with them, they are included for sake of completeness. Note, however, that you do need to take the golden thread curtain cord. | ||||||||||||||||||||||||||||||||||||||
CONFRONTING JADA | ||||||||||||||||||||||||||||||||||||||
| You're able to entice Jada to again come through the door (at '4' on the map) by placing the blood in the vase on the floor in front of the door. Before doing this you must have the shield of Pelor in your inventory and you also need to examine the half burnt remnants of a wooden panel lying on the floor at '5' on the map. You can read the Latin text 'Fiat Lux' inscribed on the wooden panel. The English translation of the text is 'let there be light'. Some of you may recognize this text as a spell Buffy, the Vampire Slayer used to create light to help her defeat vampires. | ||||||||||||||||||||||||||||||||||||||
| After placing the blood in the vase on the floor Jada enters, but is destroyed by a combination of the shield of Pelor and the 'Fiat Lux' spell. | ||||||||||||||||||||||||||||||||||||||
MASTER'S BEDROOM | ||||||||||||||||||||||||||||||||||||||
| After destroying Jada enter the master's bedroom through the door at '4' on the map. There are two coffins in the room, both of which must be smashed with the axe. Inside Dracula's coffin you find a key and the 'Mysteries of the Worm' book. Inside the other coffin is a portrait of Jada as a human. | ||||||||||||||||||||||||||||||||||||||
| Pick up the grease pot found on the floor in front of the dead body tied to a stake. Note the sign with the initials 'VH' on a second stake. Has Dracula earmarked this stake for van Helsing's body? | ||||||||||||||||||||||||||||||||||||||
| Use the arrow for crossbow to cut off one of the strings from the mandolin at the foot of the bed. | ||||||||||||||||||||||||||||||||||||||
FINAL CONFRONTATION | ||||||||||||||||||||||||||||||||||||||
| The other door in the Grand Hall (marked '8' on the map) leads into Dracula's lair. Use the key that you found inside Dracula's coffin in his bedroom to open the door and enter his lair. | ||||||||||||||||||||||||||||||||||||||
| The colour of the text in the Mysteries of the Worm book is a clue that it refers to the green cloud of ethereal spirits that prevent you getting to Dracula. The relevant extract is: | ||||||||||||||||||||||||||||||||||||||
Only the elemental forces, the terrestrial | ||||||||||||||||||||||||||||||||||||||
powers that come from the centre of the | ||||||||||||||||||||||||||||||||||||||
earth or flow from the skies can create | ||||||||||||||||||||||||||||||||||||||
doubt in the depths of these black souls | ||||||||||||||||||||||||||||||||||||||
and sometimes even destroy them. | ||||||||||||||||||||||||||||||||||||||
| Examine the left statue to learn it is made entirely of metal. Join the two golden thread curtain cords together (in your inventory) and tie them to the foot of the statue, noting that the other end trails into the green cloud. Place the coat of mail on the ground between the feet of the statue and the puddle of water. Lubricate the rails next to the puddle of water with the grease pot, then slide the bookcase across to the right to act as a 'lightning conductor'. | ||||||||||||||||||||||||||||||||||||||
| The gap in the clouds created by the lightning strike is charged with electricity, so place the fur coat on the floor to form a bridge across. You need a weapon capable of stopping Dracula, so attach the mandolin string to the crossbow and then load it with the arrow. While holding the loaded crossbow go through the gap in the green clouds. | ||||||||||||||||||||||||||||||||||||||
Sit back and enjoy the final confrontation with Dracula... | ||||||||||||||||||||||||||||||||||||||
...OR MAYBE NOT? | ||||||||||||||||||||||||||||||||||||||
| ||||||||||||||||||||||||||||||||||||||