| |||||||||||||||||||||
| Duchess Orlowski speaks about the key to the library door, which was to be donated to the winning chemistry student in a challenge arranged by her late husband. | |||||||||||||||||||||
| Examine the painting of a piano keyboard, noting the chemical formulas on it. The painting and the formulas are copied into your 'Documents'. When you talk to Duchess Orlowski again, she hums a tune. After discussing the strange melody with her, the music notes are listed in your 'Reports' as: | |||||||||||||||||||||
| |||||||||||||||||||||
Note that # is the musical notation for 'sharp' | |||||||||||||||||||||
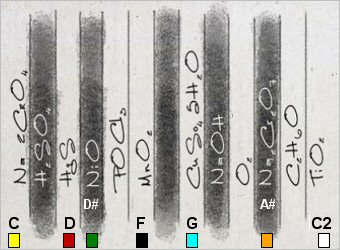
| Remove the chemistry book page from the pigeon holes on the fourth shelf of the middle bookcase. From the black and white paint stains on it you know it has something to do with the piano keyboard painting done by Professor Orlowski. The page shows a formula and colour for each chemical. | |||||||||||||||||||||
CHEMISTRY LABORATORY PUZZLE | |||||||||||||||||||||
| There's a chemistry laboratory on the fourth shelf of the left bookcase. The painting that you copied and the chemistry book page will be displayed in the laboratory. | |||||||||||||||||||||
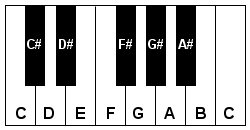
| This is a music puzzle with a difference. Instead of having to identify notes by their sound, you need a working knowledge of actual music theory, specifically relating to the piano. For those who don't know much about it, the notes of the first thirteen piano keys (from the left) are as follows: | |||||||||||||||||||||
| |||||||||||||||||||||
Note that # is the musical notation for 'sharp' | |||||||||||||||||||||
| The same thirteen piano keys are depicted on Professor Orlowski's painting. | |||||||||||||||||||||
There are three parts to solving the chemistry laboratory puzzle: | |||||||||||||||||||||
| |||||||||||||||||||||
| |||||||||||||||||||||
| Insert a sheet of paper from the pile near the bottom right into each of the test tubes corresponding to the colours indicated on the chemistry book page. This must be done in the same sequence that the notes were hummed. Make a note of the numbers that appear for each colour tested. | |||||||||||||||||||||
| |||||||||||||||||||||
LIBRARY DOOR | |||||||||||||||||||||
| Examine the safe found inside the large cylinder in the corner of the room. Following the sequence of numbers you got by solving the chemistry laboratory puzzle (now listed in your 'Documents') set the dial to the first number, i.e. 2 and turn the handle on the right. Repeat this with each of the other numbers (6, 8, 12, 14, 15, 18) to open the safe. | |||||||||||||||||||||
| Remove the key, wooden angel and letter from the safe. Note the reference to 'angels and demons' in the Duke's letter. Use the key to unlock the door next to the piano painting and enter the library. | |||||||||||||||||||||
ANGELS AND DEMONS | |||||||||||||||||||||
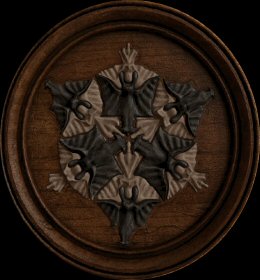
| Take the near side (bottom of screen) exit from the central area of the library. Open the red curtain to reveal a wooden plate. Examine the plate, noting the five black demons and a white angel on the right. The white angel is the one you found in the safe and is no longer in your inventory. The angels and demons must be assembled in the wooden plate to form a specific pattern. However, there are missing pieces that first have to be found. | |||||||||||||||||||||
| Return to the central area, then go up the stairs. Examine the map of Europe hanging on the wall to find a hotspot on 'Transylvania'. Click the hotspot to reveal another wooden angel. | |||||||||||||||||||||
| |||||||||||||||||||||
| While upstairs, exit to the right and you find another wooden angel (with the book containing Robert Herzog's work) on the third shelf of the bookcase. | |||||||||||||||||||||
| Go back downstairs to the workbench in front of the staircase. Take the paper cutter and dissecting tweezers found on the workbench. Use the paper cutter to force open the glass cabinet against the wall behind the workbench and remove the wooden angel inside it. | |||||||||||||||||||||
| Examine the large antique radio (to the right of the glass cabinet) to find another wooden angel. | |||||||||||||||||||||
| Go to the alcove on the left of the staircase. Take the poker found leaning up against the bookcase. Turn the crank handle on the 'rope and pulleys' mechanism in the bookcase to lower the chandelier in the central area. | |||||||||||||||||||||
| Go to the alcove on the right of the staircase and remove the braces on the left skeleton. | |||||||||||||||||||||
| Click on the rolling staircase in the central area to get it into your inventory. Then, while 'holding' the rolling staircase, click the large chandelier. Note that you must first lower the chandelier as detailed above to do this. Now climb the rolling staircase and remove the wooden angel from the chandelier. | |||||||||||||||||||||
| Return to the near part of the library (exit at bottom of screen) and examine the jar on the third shelf of the bookcase. Combine the braces and poker in your inventory to make an obedience collar. Use the obedience collar to open the jar and remove the wooden demon with the dissecting tweezers. | |||||||||||||||||||||
| Zoom in on the wooden plate and there should now be six wooden demons and six wooden angels on the right. Assemble the twelve wooden pieces in the plate as follows: | |||||||||||||||||||||
| |||||||||||||||||||||
| When the angels and demons are correctly assembled, a secret door to the abbey opens. | |||||||||||||||||||||
STAR SAFE | |||||||||||||||||||||
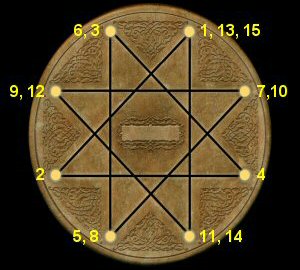
| Inside the first room is a desk with a wolf head on the front. Remove Saint Michael's spear from the statue on the shelves behind the desk, then use it to turn the wolf head. To open the safe you need to turn on all eight lights on the star. This is done by clicking the points in the following sequence: | |||||||||||||||||||||
| |||||||||||||||||||||
Note that the button in the centre of the star can be used to rest the puzzle. | |||||||||||||||||||||
| Remove the chalice (Cup of Targoviste) and a black key from inside the safe. | |||||||||||||||||||||
STUDENT'S PACK | |||||||||||||||||||||
| In the third room of the abbey you find the body of Baker (the student mentioned in Duke Orlowski's letter) hanging from a meat hook. Below the body there are two rats gnawing on the student's pack. Note that the hotspots for the rats and student's pack are very close to one another, so you need to ensure that you click on both. In your inventory combine the linen cloth (found in the basket near the entrance in the first room) with the broom stick (found on the floor next to the shelves in the second room) to make a torch. Light the torch with the matches and use it to frighten off the rats. Note that you must use the lit torch on the rats, not the student's pack. You can now open the student's pack and remove the holy water inside it. | |||||||||||||||||||||
SECOND DOOR | |||||||||||||||||||||
| Examine the old cask on the shelves in the second room to learn that it's filled with schnapps. Use the paper cutter to open the spigot of the cask and some of the contents spill on the floor. Go to the fourth room and try opening the locked door. Return to the second room to trigger a monk (creature of hell) entering through the locked door. Note that you must try to open the locked door after having taken the holy water out of the student's pack and spilled the schnapps to trigger the monk's arrival. Dispose of the monk by using the lit torch to set alight the schnapps spilled on the floor. Pick up the gold key lying on the floor next to the charred remains of the monk. | |||||||||||||||||||||
| Return to the fourth room and take the monk's robe hanging on the wall. Use the gold key to unlock the door and enter the ceremonial hall. | |||||||||||||||||||||
CEREMONIAL HALL | |||||||||||||||||||||
| On entering, watch the satanic ceremony closely to see the monk on the right drink from a chalice. | |||||||||||||||||||||
| Talk to the man imprisoned in a cage (bottom right of your screen) to learn that it's Brother Alberto. In your inventory, empty the holy water into the chalice found in the safe, then substitute the chalice of holy water for the one (on the pillar) that the monk drank out of. The holy water affects the monk rather severely, and while the other two monks 'feast' on him, return to the cage and talk to Brother Alberto. Although he cannot read the texts, he tells you the only way of saving Mina is by conquering the Prince of Darkness (Count Dracula) on his own soil. | |||||||||||||||||||||
| Use the black key to unlock the large wooden doors to the right of the cage... | |||||||||||||||||||||
| |||||||||||||||||||||