Dracula 4: The Shadow of the Dragon
by Anuman Interactive, Koalabs & TotM Studios
Walkthrough by MaGtRo June 2013
Gameplay: This is a point
and click game.
After a profile is selected; the game mode
selection is shown:
Casual mode has display of markers/hotspots
and has the skip the puzzle feature. The skip bar can hide as a pull
down tab at top of the screen.
Adventure mode has the option to have markers
and has more challenges.
The main menu has new game, continue,
prologue-tutorial, load a game, options and quit the game.
Options have audio settings, general options and
credits. Audio settings have adjustments for sound effects, music, videos
and voice volume.
General options have selections for: mode (casual
or adventurer), subtitles, display of the markers (hotspots) and rotation of
the view (normal or reversed).
Profile can be changed using Ellen's picture at
top right of screen.
The game has no manual saving feature but autosaves at
certain points and when one exits the game.
Inventory is seen at bottom right of the screen.
The inventory when opened has a frame for
items-object (suitcase), medicine (cross), dosage of medicine and
achievement (trophy).
Objects in inventory can be combined. The
items that can be combined is shown by a gear at bottom right.
Click-hold-drop one item over another item that can be combined.
Medicines and food items can be combined and
can be taken separately or combined with other medication-food. Knowing
items or combination will help Ellen increase her energy or it might
harm her.
Bottom left of the inventory screen shows the main
menu link and the score obtained during gameplay. Certain specific actions
in the game give the gamer points. The center bar shows the description of
the highlighted icon or item in inventory bar.
At right of the notebook are tabs for the journal
(pencil), to do list (bull's-eye) and dialogue done in the game.
The game is video extensive. It is best to check
if your computer can handle the game.
Thanks to Henryk77 for the
achievements.
A cargo ship carrying a prestigious painting
collection to be given to the Museum of Art sinks. Professor Vambery goes
down with the ship.
A tunnel leading to a door is seen. The door opens
to a columned room.
Ellen Cross is an art restorer for the
Metropolitan Museum of Art in New York.
Ellen's medicine that keeps her alive is
discontinued. She has a blood disease. The doctor gives Ellen her last set
of medications.
One of the 15 lost Vambery paintings surfaced in
Budapest. Ellen is sent there by the museum director to check its authenticity.
Prologue: Budapest
Examine the painting to figure out if it's a Turner:
Talk to Bizlos Lazlo, the police inspector.
Turn right and check the painting on the easel.
Open inventory at bottom right and click to
highlight the ultraviolet lamp.
Exit inventory and see the lamp at bottom right.
Click the painting to use the lamp on the
painting. +2
The painting is Whitby by Turner. There are 2
scenes that were retouched by the painter. Obtain the Expert Eye award for
identifying the painting.
Put the Turner painting in the safe under seal:
Collect items needed:
Take the framed painting from easel.
Check the box left of the easel. Place the
painting inside the box.
Turn right and take the seal on top of the
safe.
Go towards the door. Turn left to the table. Take
the red wax and plastic packing strip from table.
Go back to Lazlo. Take the scotch tape
and lighter from Lazlo's desk.
Use the plastic packing strip on box with painting
left of easel.
Look close at the round metal clip on the box.
In inventory, combine the lighter and wax to get
melted wax. Use melted wax on the round metal clip. +2; 4
Use the seal on the red wax to get a BR seal on
the wax.
Take the sealed case. Open the safe at right and place the sealed case
inside.
Restore the recording that was made in the suspect's
cell:
Go towards the door at end of the room. Check the
pictures of the lost paintings on the bulletin board on right wall.
Turn to the tape recorder at left.
Click on the tape box at left and learn that the
suspect talks in his sleep. The tape is damaged and Ellen volunteers to see
what she can do.
Take the damaged audiotape. In inventory combine
the damaged audiotape with the scotch tape from the Inspector's desk to get
audiotape. +2; 6
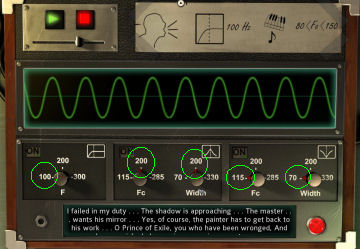
Use the audiotape on the tape recorder. Look close
at machine. Note the requirements needed at top of the
machine.
Turn the machine on by clicking on the green arrow
at top left. See that there are noise green waves.
Get rid of the noise: Turn the on button at
left panel. Turn the F knob to 100 to see orange waves.
Attenuate the music volume:
Turn the n button at middle panel. The aim is to combine the 2 waves to show
the peak at top and the 2 waves of the same height.
Turn the left Fc knob to 200 and the right width
knob to 200.
Increase the voice volume: Turn
the on button of the right panel. The right clue above shows 80<Fc<150.
Turn the FC knob to 115 and the right width knob
to 70. +10; 16
Listen to the suspect's voice.
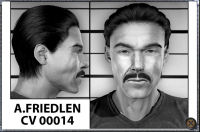
Look at Friedlen's file in the Inspector's archives:
See that Lazlo is gone from his desk. Go forward
to the board on the wall by the easel. See the suspect A. Friedlen CV 00014.
Go to the file cabinet behind Lazlo's desk.
Open the cabinet CV at bottom left (AD label on
top row of letters and UZ at column at left).
Pull the #14 file and read Friedlen's file. +5
Take the strip of paper. Learn that Friedlen shared a cell with Yacub Kilic file
NI 0008.
Click on the tab at right to open another page.
Learn that he has a notebook with encoded notes and that he is having panic
attacks.
Look at the file of Friedlen's former cellmate:
Yacub Kilic's file is NI 0008.
Open the cabinet that is under MQ at top and HM at
left; second from top. +5; 26
Read file #8. Kilic is from Turkey.
Check the suspect:
Go through the door by the desk and forward to
Lazlo in the suspect's cell. Friedlen has just died. There are disturbing
details in his death.
Look at the tattoo on his wrist. Talk to Lazlo. The last
sentence in the fixed recording is familiar to Ellen. The security cameras stopped
working.
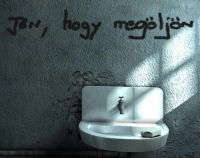
Turn left to the sink and check the soap bar. It
seems that the suspect used it to write something on the wall. Lazlo gives
the key to the cabinet in the hallway.
Exit the cell and go left. Use the key with
cabinet. Open both doors.
Pick up the materials from the cupboard in front of the cell:
Take the Polaroid camera, empty sprayer,
film, batteries and fingerprint powder.
In inventory combine empty sprayer and fingerprint
powder to get sprayer with powder.
In inventory combine Polaroid camera with film;
then combine it with the batteries to get completely equipped Polaroid
camera. +8; 32
Go back to cell and use the camera:
- on Lazlo and get Paparazzo award.
- on the victim's wrist tattoo and on his
terrified face. +3; 35
Examine cell walls:
Use the sprayer filled with powder on the wall
above the sink. +5
Read the words. The sentence is translated as He's coming to kill me.
Take a picture of the written words. +3; 43
Phone the museum director:
Energy-Medications: Go back
upstairs to the office. Ellen gets sick. Her energy is very low.
Take 2 cikloprex-red white capsules. Then swallow
one hemapromazine-blue tablets
and one propoethyne-white blue capsule.
Check the
energy given by each of the medications under the prescription icon. Take
medicines or food when energy goes low or the bar turns yellow.
Know what food or drink is bad for Ellen (sleeping
pills and alcohol).It is best that only 2 (not 3) items are taken.
Museum: Use the phone on Lazlo's desk Call the museum to
talk to the director.
The director gives a new mission. The professor's
assistant said that there is an extra painting that was sent together with
the 15 in the list. The director wants Ellen to find out which painting it
is. She is to go to the manor in Whitby.
Get From Budapest with Love award after
finishing the prologue.
Get the Amateur Detective trophy after solving 3
puzzles.
Vambery Manor
Go to Whitby to meet Professor Vambery's assistant:
Enter the manor and talk to Adam Stoker, Vambery's
research assistant. Learn that Adam is Bram Stoker's great grandson.
Vambery's room:
Turn left and climb the stairs. Adam left the
notary's number by the phone. Adam will check the inheritance.
Enter the first door at right and look around.
Check the side table drawer by the bed. Take the
sleeping pills. This pill is bad for Ellen.
Read Vambery's notes about the passage, burial
plot and model mechanics.
Examine the list of paintings sent by Vambery:
Exit and see the door to Adam's bedroom. Continue
to the balcony library.
Go around to the
desk and read the list of the paintings. The 16th painting is by Kaneyek
with a call number A III 07.
Find where the call number A III 07 is:
Go to the wall with books. Check the books in the
shelves. Learn that the As are at left.
Move the ladder to the left by the window. Click
on the topmost book shelf at left. See that the slot for A III 07 has C II
15.
Find where the call number C II 15 is:
Move the ladder over the entryway. Check the book
above the entryway.
Check A III 07. It is A Guide to Building Model
Ships.
Examine closely the Guide to Building Model Ships:
Take the viewer and look close at the text on the
left; starting from top to bottom.
Look for letters or numbers that has a dot below
that character. Click it to have that character written down. Find F IV 0.
Click the scalpel to highlight it. Cut the tape at
corners of the slide. Take the slide.
Pick up the viewer again and look at the text
hidden under the slide. Find 5. So the new call number is F IV 05.
Use the viewer on the drawing at right page.
The bottom picture of a model ship has "The Dark
Key" written on it. +10; 53
Find where the call number F IV 05 is:
Check the shelves left of the desk. See that Fs
are close to the corner.
Learn that the letters are arranged from left to
right and the rows are arranged from top to bottom. So 4th shelf from top is
IV. Check the 5th book on that shelf.
It is Dracula by Bram Stoker. Take the books out
and see a keyhole.
Find what lies behind the shelf F IV 05:
Model ship: Go to the curtain
of the balcony balustrade. Use the tie to pull the curtain close.
See a box on the wall. Click the model ship
hanging over the sitting room below. It looks like the one from the book.
Hmm...
Look down below and click on the compass rose.
See also a deer head on the wall which is not seen
when you are downstairs. LOL.
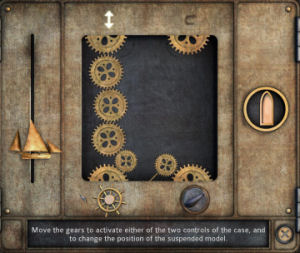
Box: Look close at the
box on the wall that holds the rope of the ship.
The right set of gears when arranged turns the
ship.
The left set of gears when arranged lowers the
ship to the bottom floor.
Turn the
model ship: Take note of the directions of the arrows below
the top 2 gears. When the center movable gear at bottom is attached to the
rest; it will change the direction of the arranged gears.
The wheel turns the gears and the knob at right
changes the direction of the small middle gear.
Arrange the gears at right and position the middle
gear to be part of the arrangement.
Turn the wheel and see that the ship model at
right changes direction. Position the ship to have the front part pointing
up.
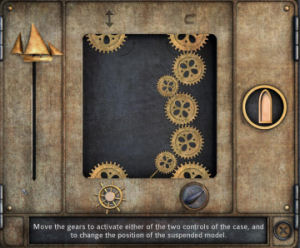
Lower the
model ship: Arrange the gears to be on the left side. The
middle small gear is not needed to change direction on this set.
Turn the wheel to lower the ship. +10; 63
Take the key: Go down to the
main floor. Go to the sitting room.
Look close at the lowered model ship. Take the
key that is in the lifeboat. +3; 66
Open the keyhole behind F IV 05:
Go back upstairs to the library.
Use the key from the model ship on the keyhole
behind F IV 05. See a keypad plate.
Find the "passage" that Vambery mentions in his notes:
Slide: Go right of
balustrade. See a slide projector.
Take the slide viewer rack. In inventory combine
the slide viewer rack and the slide taken from the model ship book. +2; 68
Use the rack with slide on the slide projector.
See a map of the Slavic countries. Use the arrows
at bottom left to move the red circle projected on the map.
Click on the red circle to look close at what
place is pinpointed.
When the red circle is at top right corner; it is
on Vladoviste in Rumania. Numbers 2517 is under the label. +8; 76
Keypad: Go back to the keypad on
the bookshelf. Press 2517. +5; 81
Restore electricity in Vambery's secret office:
It is dark in the secret office.
Kitchen: Go down to the
main floor and enter the kitchen. Look around and pick up everything. LOL.
Open the cabinet right of the stove hood. Take
bleach and flashlight.
Turn left and take the container left of
sink. Use the container on faucet to get full container.
Turn left and take the penetrating oil from
the hutch. Open the drawer. Take fuses and tube of glue.
Turn left and take as many fruits as you can - 2 pears and 3
apples from the basket on the table. Take the knife
beside the basket.
Secret office: Go back
upstairs to secret office. Use the flashlight from kitchen on secret office.
Turn around and check the fuse box left on
doorway. Use fuses from kitchen on the fuse box at left.
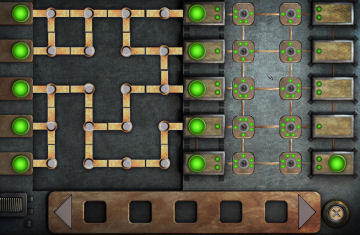
Open the fuse cabinet at left. See a 2 part
puzzle.
Arrange the metal bars at left so that all are
connected and ends on the 5 plates at center. When they are correctly
arranged, all 5 green lights turn on. Click a bar to turn it.
Place the squares at bottom bar on the empty
squares at right. This is the same principle as dominoes. The same
number dots must be adjacent to similar numbers on the next square. Use
the scroll arrows to see all the squares. Light turns on. +15; 96
Obtain the Real Adventurer award for solving 5
puzzles
Inspect Vambery's secret office:
Look around.
Monitors: Turn to the
right and see 3 small monitors and one large one. See the places where the security cameras are
focused on.
Turn on the large monitor.
Keypad: Look at the
keypad left of the large monitor. See 4 lit squares. Each square is a
monitor.
The places the cameras are focused on are the
columns. The left column is the entrance of the manor.
Press the squares on the second from left column.
See that the
monitors now show hallway at main floor.
Press the squares on middle column to see the passage in the
library.
Press the squares on the 4th column to show a Latin
engraving. Check the large monitor to read the text.
Press the squares on the fifth column to show a storage room
or vault.
Manor picture: Turn
right. Check the manor picture on the wall.
Click on the pictured statue on the pedestal at left corner
of manor.
Table: Check the table.
Take the vitamins, St Benedict's medal and hydrogen
peroxide.
Prepare a solution that removes traditional ink:
Look close at the letter with ink stain. Ellen
says she can remove the ink stain.
In inventory, combine the full container of water
with bleach from the kitchen to get diluted bleach.
Combine diluted bleach with hydrogen peroxide to
get ink remover.
Use ink remover on the ink stained letter. It
is about the burial plot of Vambery's parents the Wambergers. +9; 105
Listen to the cassette tape found in the secret
office:
Turn right to the cassette tape recorder. Open the
cabinet at bottom. Take the audio cassette and whiskey.
Whiskey is bad for Ellen.
Use the audio cassette on the machine. Hear
Vambery speak about an oppressive portrait that was owned by his parents. He
thinks to give it to the museum. It is the added 16th painting. +5; 110
Contact Adam:
Use the phone downstairs in front of the front
door. Adam translates the Latin prayer.
Adam says there is an old cemetery at the back of
the manor.
Contact the museum:
Use the phone and call the museum. Ellen talks to
the director about the painting.
Find and examine the statuette on the facade of the
manor:
Exit and check the corner that is shown by the
manor picture. It's too high.
Go right of manor yard. Turn to face the right
corner of the manor. Take the shears and the ladder.
Go back to the statue on the manor corner.
Use the ladder on the wall and then use the shears
to remove the ivy.
Turn the statue around and take the small key.
+3; 113
Visit the Wamberger tomb where the professor's
parents are buried:
Go right to the right side of the manor. Climb the
steps to the cemetery gate now that Adam mentioned it to Ellen.
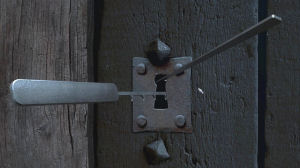
Look close at the lock. The key in the lock is
jammed.
Use penetrating oil from the kitchen on the lock.
The gate is opened. +2; 115
Find the family mausoleum:
Look around the cemetery. Check the name on the tombstones or mausoleum and
then click the name on the label at bottom of screen.
Pick up the metal bar on the ground in front of
the Porter mausoleum.
Turn left and forward to the mausoleum at left
side of cemetery. Click on the name on the top of the building.
Enter the mausoleum: Use the
shears on the ivy covering the door.
Use the small key from statue on the door of the
mausoleum. Enter the mausoleum and look around.
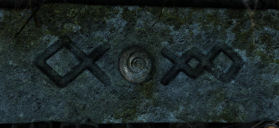
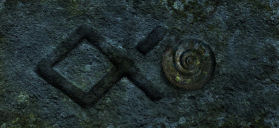
Find the crypt: Check the
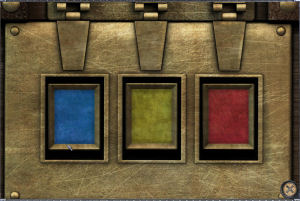
engraving.
Look close at the circles below the engraving.
The aim is to form triangles on the circle.
The triangles must be the same color as the
central design. Left is blue, right is red and top is yellow. Remember
these colors.
The 2 chain rosettes in between the circles
are used to exchange small adjacent triangles from one circle to another.
The diamond at center of each circle is used
to turn that circle.
Place all similar colors in the correct
circles with care to the position they are placed on that circle.
The bottom left circle has the most formed
engraving on it but of mixed colors. Use it as reference.
The plate on the floor opens. It's a big drop
down there. +10; 125

Open the side tombs: Use the
metal bar on the right tomb but the lid is too heavy for Ellen.
Use the metal bar on the tomb at left. Take the
rope ladder and pick axe inside the tomb. + 2; 127
Explore the crypt under the tomb:
Energy: Check Ellen's
energy to see if she needs food. Remember that whiskey and sleeping pills
are bad for Ellen.
Use the rope ladder on the opening on the floor.
Go down to the crypt.
Crypt floor: Look around.
Take a bone, 3 stone snakes and a terra cotta pot from
the ground.
See a mound of dirt in front of the middle door.
Click to remove the dirt.
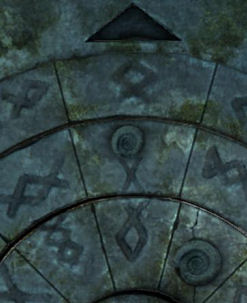
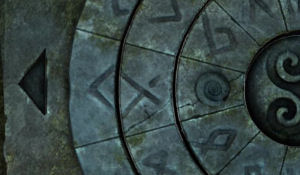
Etched rings: See a
circle made up of 3 rings and a center circle. Each ring is engraved.
Doors: See 3 doors with
engraving above them.
Open the doors: The
aim of the rings on the floor is to form the design above each door on
the arrow that points to that door.
Only one door can be opened at one time.
Place the 3 stone snakes on the empty circles
of the rings.
Middle door: Start
with the middle door. Study the design above the door.
Form that design under the arrow that points
to the top.
Turn each ring by click-hold-stop.
If correct; a sound is heard. Go to the now
opened door. The middle room is an ossuary. +5; 132
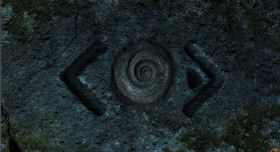
Right door: Open the
right door by copying the design on top of the door onto the rings on
the floor.
The design should be left of the arrow
pointing to the door. Note that there is a dot or line inside the
reversed V on outer ring.
The middle door closes. +5; 137
Enter the right room. See a snake. Ellen is
scared of snakes. Use the terra cotta pot on the snake. +3; 140
Pick up the antique flask with oil. Use the knife to take a piece of
cloth-tissue.
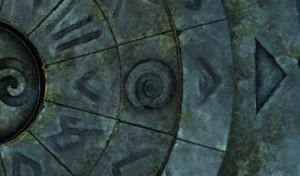
Left door:
Open the left door by copying the design on top of the door onto the
rings on the floor.
Note that there is a break in the line of the
fish tail on middle ring. +5; 145.
Find Vambery's safe:
Enter the left door. Use the flashlight on tunnel
but the battery dies.
In inventory combine the strip of tissue with the
bone to make unlit torch.
Combine the unlit torch with the antique flask
containing oil to make a torch. +4; 149
Light the torch with the lighter to get lit
torch. +2 151
Use the lit torch on the tunnel. Go forward once and then turn left.
Place the
torch on the holder right of the metal door. See a metal door.
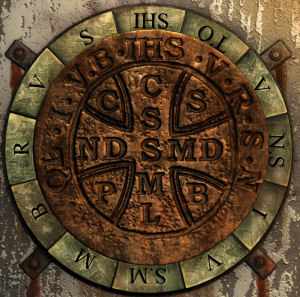
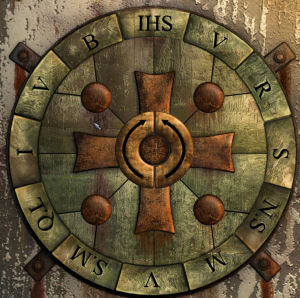
Open the vault:
Prayer: Turn around and
read the prayer for protection against Satan. It is the same message on the
medal of St. Benedict taken from the secret room.
Take note of the first letter of each Latin word: IHS V R S N S M V S M Q L I V B.
Turn back to the door.
Metal door: Place the
medal of St. Benedict at center of the circle.
Arrange the letters similar to the letters at
periphery of the medal.
The bottom letters can be taken from the prayer on
the wall.
There are 4 round buttons inside the circle. These
exchanges 2 letters on each quadrant.
The arrows at center turn the letters clockwise
or counterclockwise.
Place IHS at top and going clockwise arrange the
letters: V R S N S M V S M Q L I V B.
If correctly done, the door opens. +15; 166
Get the Vambery's Secrets trophy after opening the
secret office and the vault.
Get the Real adventurer trophy after solving 6
puzzles.
Search the vault:
Enter the vault and look around.
Take the strap off the cloth covered item
on the pedestal. Remove the cloth to see a bust of Vlad Tepes - Count
Dracula.
Someone is watching Ellen through the security
camera.
See a Romanian flag hidden at the corner behind
the bust. The flag
is made up of blue, yellow and red.
Open the chest:
Look close at the chest. Turn-click-hold each of the squares to show blue,
yellow and red colored plates (like the puzzle by crypt door and the flag).
The chest opens. +10; 176
An announcement states that the battery is low and
the door will close automatically.
Energy: Ellen panics and
her energy goes down. Take enough of the medicine to make her well. Add
vitamins to give her full health. Replenish vitamin inventory. Get In
Perfect Health trophy if Ellen is in full health.
If you mix whiskey and sleeping pills; obtain the
Reckless One award.
Check the door and see that it is locked.
Chest: Look inside
the chest. Check the title of the book: Dissertations upon the
Apparitions of Angels, Demons and Ghosts. That sounds familiar.
Take the short piece of string, broken
wax cylinder, silver bullets and leather box.
Find an exit to escape from the vault:
Find a possible exit: Look at
the bricks on top of right wall. Use the pick axe on the bricks. A small hole is
made. + 2; 178
Make a larger hole: In
inventory; combine knife with silver bullets to get powder.
Use powder with leather box.
Use short piece of string on leather box filled
with powder to make an explosive.
Obtain the kamikaze award for combining the
dynamite and lighter in inventory.
Use explosive on the small hole made on the brick
wall.
Use lighter on explosive. That made a larger hole but it is too small to fit Ellen. +6; 184
Break the wall: In
inventory combine rope and grapnel.
Use the rope and grapnel on the hole on the wall.
Use strap on bust of Vlad Tepes.
Click on end of strap to automatically tie it to
the rope of the grapnel.
Push the bust of Vlad Tepes to make a large hole.
+10; 194
Exit through the large hole on the brick wall and
be in Adam's bedroom.
Get the Great Escape trophy after getting out of
the vault.
Adam: Talk to Adam.
Report to the director of the museum:
Go downstairs. Use the phone to call the museum.
Talk to the director.
Learn that Kaneyek is a 16th Istanbul artist. The
name changed to present day Yanek.
Listen to the wax cylinder found in the vault:
In inventory, combine the glue with the broken wax
cylinder from the chest at the vault to get wax cylinder.
Go to the glass case close to the piano. Open the
glass lid.
Use the wax cylinder on the middle long rod.
Lower the horn over the wax cylinder and then turn
the crank.
November 1870 in Vladoviste; listen to Vambery's
grandfather talk about his exploits with Ioan Hartner. Hartner's wife
Luciana was taken and turned by Dracula. Learn what happened to Hartner and
Luciana. +7; 201
Get the Voice from the Past trophy after listening
to the wax cylinder.
Decipher the encoded message found in Friedlen's file:
Go back to Adam upstairs in the library. Talk to
Adam about Kaneyek and The Path of the Dragon.
Adam mentions that the strip of paper from
Friedlen might be decoded using the scytale in his room.
If you use the scytale before Adam tells Ellen
about it, get the Independent award.
Go to the Adam's bedroom. Use the strip of paper with encoded message on the
scytale that is on the desk.
Seek information on Kaneyek's descendants:
Get the address of Yanek in Istanbul: Yanek
Tevkkifhane sokak 7 34110 Fatih, Istanbul. +5; 206.
Tell Adam about Kaneyek.
Go downstairs and call the museum. The director
sends Ellen to Istanbul, Turkey.
Get more fruits from the kitchen.
Say goodbye to Adam at the library.
Istanbul
Hotel room:
If you start the chapter in perfect health, get
the Perfect Patient award.
A lighter and a knife are in
inventory.
Use the knife to open the box on the table.
Read the letter from Gerry. Take the camera and
the medicine.
Exit the room.
Visit Yanek:
Yanek: Enter the open
door. Ellen calls out for Yanek.
Look at the Lilith painting at right. It is one of
the missing painting in the Vambery collection.
Talk to Yanek. Learn that Yanek is a painter as well as a
puppeteer.
Avoid the question when asking
about Friedlen. Get the Diplomat trophy after avoiding angering Yanek.
Find a place from which to monitor Yanek's departure:
Turn around. Move the garbage bin. Enter the door
that is unblocked.
Look through window to see Yanek leave.
Look around. Pick up strip of metal on top
of metal drum. Pick up knotted rope, lock picking hook
and pliers.
Break into the studio:
Look close at Yanek's door and see that the lock
picking hook is already inserted.
In inventory combine the pliers with the strip of
metal to get a tension tool. +2; 208
Use the tension tool in the lock.
Lock picking:
The tension tool can be moved up-down by
click-hold-move. There are 6 positions that it can be moved to.
The inserted lock pick hook can be moved
in-out. The lock pick hook has 5 teeth.
The tension tool is at the upmost position.
Get an award - Experienced Burglar.+15; 223
 |
|
 |
|
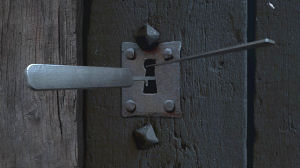 |
| original position
The upmost position of the tension tool is the
start. If you go back here; you have to start from the beginning.
|
|
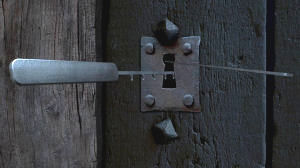
Move the lock pick hook to show 4 teeth in the
lock. Move the tension tool to the second from upmost position.
|
|
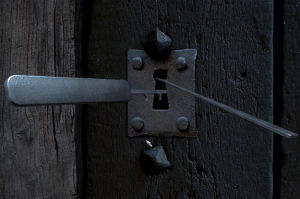
Move the lock pick hook to show 1 tooth in the
lock. Move the tension tool to the third from upmost position.
|
 |
|
 |
|
 |
|
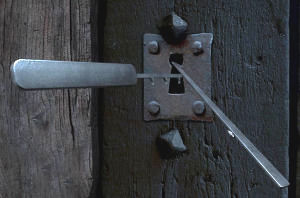
Move the lock pick hook to show 5 teeth in the
lock. Move the tension tool to the fourth from upmost position.
|
|
Move the lock pick hook to show 2 teeth in the
lock. Move the tension tool to the fifth from upmost position.
|
|
Move the lock pick hook to show 3 teeth in the
lock. Move the tension tool to the sixth from upmost position.
|
Repair the broken puppet:
Turn around and flip the light switch right of the
door.
Puppet: Look close at the
alcove desk that has painting items - Yanek must be making a puppet.
Look close at puppet show and click on rightmost
switch at the bottom. A puppet falls of and breaks. Ellen says she has to
restore the puppet.
Pick up the broken puppet.
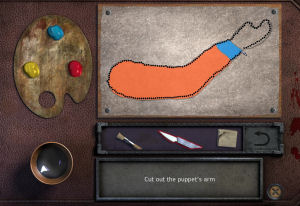
Paint an arm: Look close
at the painting desk at left. The arm needs to be
painted and cut.
Highlight the paint brush. Click-mix yellow and
red paint to make orange. Use the orange paint on the sleeve of the arm.
Wash the brush in the bowl of water. Use blue paint on the cuff of the sleeve.
Highlight the scalpel and cut the outline of the
arm. +10, 233
Get the Steady Hand trophy when the outline of the
arm is cut with no mistake.
In inventory, combine the movable arm and the
broken puppet. +2; 235
Examine the Lilith painting:
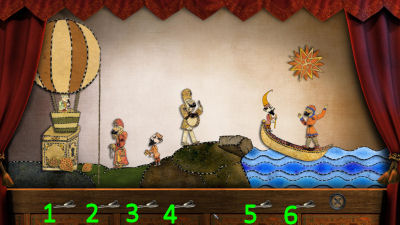
Puppet show: The aim of
the puzzle is to get the man with the key to enter it on the keyhole under
the balloon.
Numbering the switches from left to right - 1 to
6.
1. Click switch #5 left man in boat to raise the
right side of the boat.
2. Click switch #6 to get the right man on boat to jump and
change the sun to moon.
3. Cut the balloon rope by clicking on switch #2 -
the second man from left. He is carrying a knife.
4. Click the switch #4 - man at center to call
the dragon (increased in size because it is night). The dragon eats the man
with a knife and clears the way for little man with key.
5. Click switch #1 - the balloon loose and it will
float to change night to day. This will remove the ivy from the stand that
has the keyhole.
6. Click switch #3 to move the little man with key
to the left and insert the key on the keyhole.
The secret door at left opens. +15; 250
Puppeteer achievement received.
Lilith painting:
Enter the room beside the stairs. Take the rod in front of the covered
painting.
See the Lilith painting. Examine it and then take
a picture of the painting. +5; 255
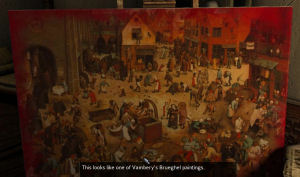
Photograph the paintings that look like they come from
the Vambery collection:
Go right and see a painting on an easel that is
covered with red paint.
Turn to the table and take the sponge and
paint
solvent.
In inventory combine the sponge and the paint
solvent. +2; 257
Use the sponge with solvent twice on Vambery's
Brueghel painting with red coat. +5; 262
Take a picture of the exposed painting. +3; 265.
Find the 16th painting on Vambery list:
Go back to the stairs and remove the room divider. Go upstairs to Yanek's bedroom.
Side Table: Examine the side
table.
See rings with ornate mosaic design. Turn the
rings to complete the design.
The outer ring moves itself and the middle
ring.
The middle ring moves itself and the inner
ring.
The inner ring moves itself.
Use the yellow, red and blue and green mosaic
tile at center design as a guide.
Turn the outer ring so that the 2 stars of the
same color is positioned across the same colored tile at center.
Move the middle ring to match the outer ring. Move the inner ring to match the rest. +10;
275
Take the hook from the opened side table.

Attic: Look up at ceiling
and see the attic trap door.
In inventory, combine the rod from the secret room
and the hook from the side table.
Use the rod with hook on the ceiling trap
door. +2; 277
The ladder is down. Climb to the attic.
Missing painting: Turn
left and take the rope from wall and screwdriver from stool.
Check the box at right side. It is the A III 07
16th painting from the list of the Vambery collection.
It has an ornate lock. Take the sealed case.
+5; 280
Body: Turn right and move
the curtain. See a dead man on the floor.
Examine the body and see that the pockets are
empty.
Look close at wrist and see that it has a dragon
tattoo.
Use the camera and take a picture of the dead man.
+3; 283.
Close the trap door to slow Yanek down:
Ellen hears sound from downstairs. Close the trap
door by clicking on the handle at right.
Flee through the window:
Look at the window. Use the screwdriver on the 2
screws holding the metal plate with the padlock.
In inventory combine the rope from the attic with
the knotted rope from the hiding place to get long rope.
Use the long rope on window. Escape. +2; 285
Contact the police and the museum:
Use the phone on the side table. Call the police
and get a recording.
Call the museum and talk to the director. He wants
Ellen out of the country before reporting the murder.
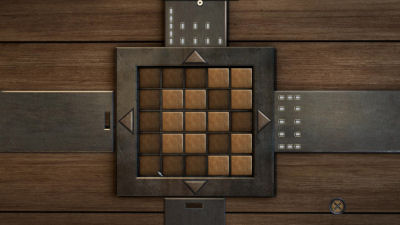
Open the chest that's sealed shut:
Look close at the sealed case and see a panel with
2 plates with holes at 2 sides.
The aim of the puzzle is to depress the squares in
the keypad to match the holes on the side plates. The number of holes should
match the depressed pads at center.
The top holed plate is for the columns and the
right side plate is for the rows.
When done correctly the holes on the 2 side plates
are all lit up. +15; 300
Get the Thank You trophy for watching the credits. Get The End trophy for finishing the game. Get the 300 trophy for getting 300 points.
Ellen opens the case and sees the painting of...
This document may not be
distributed without express written permission of the author and the content may
not be altered in any way.
For Questions or Comments
on this Walkthrough,
Please write to:
MaGtRo
Copyright © June/2013
MaGtRo
 GameBoomers
Walkthroughs and Solutions
GameBoomers
Walkthroughs and Solutions