Dracula 5: The Blood Legacy
By Anuman Interactive, Koalabs & TotM Studios
Walkthrough by MaGtRo December 2013
Gameplay: This is a point and click game.
Select a profile.
The main menu has new game, continue, prologue-tutorial, load a game, options and quit the game.
Options have audio settings, general options and credits. Audio settings have adjustments for sound effects, music, videos and voice volume.
General options have selections for: mode (casual or adventurer), subtitles and rotation of the view (normal or reversed).
Profile can be changed using Ellen's picture at top right of screen.
The game has no manual saving feature but autosaves at certain points and when one exits the game.
Only the autosaves are seen on the load page. Continue will start where one left off in the game before closing.
Inventory is seen at bottom right of the screen.
The inventory when opened has a frame for items-object (suitcase), medicine (cross), dosage of medicine and achievement (trophy).
Objects in inventory can be combined. The items that can be combined is shown by a gear at bottom right. Click-hold-drop one item over another item that can be combined.
Medicines and food items can be combined or can be taken separately or combined with other medication-food. Knowing items or combination will help Ellen increase her energy.
Bottom left of the inventory screen shows the main menu link and the score obtained during gameplay. Certain specific actions in the game give the gamer points. The center bar shows the description of the highlighted icon or item in inventory bar.
At right of the notebook are tabs for the journal (pencil), to do list (bull's-eye) and dialogue done in the game.
Ellen Cross recalls what happened at Dracula 4: The Shadow of the Dragon.
New York
Get report to the Museum Director:
Metropolitan Museum of Art:
Museum Director's office: Go through the scanner and enter the door at right.
Talk to the Director Phillips about Yanek, cadaver and security. Learn that the police didn't find a cadaver and stolen paintings at Yanek's place.
Get a new security magnetic card. A knife is also in inventory.
Reminder: Check Ellen's health in inventory every so often. Manage the medicine intake to gain full points at end of the game.
Go to the restoration workshop:
Exit the office and go to the door at right. Use the magnetic card on door.
Gerry Berowski: Learn that Adam Stoker is in New York. Talk to Gerry about Vambery, Package and Kaneyek.
Unpack the painting:
Turn left and go to the scanner and table at corner.
Take the compress, scalpel and small test tube from the table.
Look at the sealed case right of the table. Click on it several times to automatically remove the seal, open the case and get a wrapped painting.
Place the painting on the scanner at left. Use the scalpel on the wrapped painting.
See a black cross on the painting. Learn from Gerry about the meaning of the tarred-black cross.
Take a sample of the painted black cross:
Look close at painting. Use the scalpel on the tar on the painting to get sample of black substance.
Combine the scalpel with sample of black substance and the test tube.
Go to the dumbwaiter-cabinet at wall across Gerry's desk.
Press the green button to open the cabinet. Place tube with sample of black substance inside and press the down button.
Run an infrared analysis on the painting:
Go back to the monitor right of the scanner.
Turn the monitor's button at bottom left.
Press the machine left of the scanner. The painting is scanned. See a man, wolf and smoke.
Gerry: Talk to Gerry about the cross and infrared. He wants Ellen to read the book that has info about Vlad Tepes. The lab result is back.
Take the result from the cabinet. It is 98%tar. The solvent is oil and S237 mixture.
Remove the tar cross:
Take the empty container from the table left of the scanner.
Go to the shelves on left wall by exit door. Open the shelve door.
Take the yellow oil in flask from top shelf and the corked blue bottle-S237 solvent at bottom shelf.
In inventory combine the oil with empty container. Add the S237 on the oil container to get Tar solvent.
Go to the painting on the scanner.
In inventory combine the compress from work table with the tar solvent to get compress soaked with solution.
Apply the soaked compress on the painting four times. See a painting of Vlad Tepes. The painting gets darker.
Obtain the Nimble Finger Award for reviving the painting.
Gerry: Talk to Gerry. Ellen says Shadow of the Dragon to learn that Radu, Vlad's younger brother wrote a poem of the same title.
Put the painting up in the storage room:
Take the painting from the scanner.
Medicines: Go towards the door. Ellen does not feel food. Review dosage and see what combination or medcine is best to take.
Turn right to the 2 doors. The left is is the video cabinet. The right is the storage room.
Use the magnetic card on the scanner. Enter and place the painting on the easel.
Take the protective cloth from the statue at right. Use the protective cloth on the painting. Exit the room.
Phone: See that Gerry is gone. Answer the phone on the table left of the exit door. Talk to Adam.
Book: Go to Gerry's desk and take the book about Vlad Tepes. The notes are in Ellen's diary.
Vlad was released 14 years before Radu the handsome by Sultan Murad II. The Sultan kept the brothers hostage. Radu Basarab supposedly drove Vlad's wife to kill herself with a dagger he gave her.
The letter from Radu shows that he resented Vlad because of a gift that Vlad had thanks to Radu.
Adam: Ellen tells Adam about the painting.
Use the magnetic card on the storage room scanner. Enter to show Adam the painting.
Ellen faints.
Ellen's apartment: Ellen wakes up in her apartment. Ellen and Adam get together.
Ellen wakes up alone. Read the letter on the dining table.
Take some medicines to bring health up. Take the medicines from side table drawer. Exit.
Look at the video surveillance recording:
Enter the restoration room and then the storage room using the magnetic card. See that the painting is gone.
Exit the room. Open the door left of the storage room.
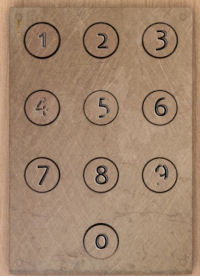
Open the video camera door: Using the faded number buttons deduce the code to open the door. Press 9 5 4 (1).
Obtain the Medium Award for opening the door lock on first try.
Play the video recorder: Press the top right red button to stop recording.
Press the double arrow pointing left to rewind the tape.
Press the single right arrow to play the tape. See Adam take the painting.
Take the recording: Press the white eject arrow at top right. Take the video cassette.
Message: Exit the room. Hear Marlene from library leave a message for Gerry. She sent Gerry a copy of the original parchment of the poem.
A suspicious government official inquired why she checked the poem.
Get hold of Marlene's mail:
Take the keys to Gerry's mailbox from Gerry's desk. Exit the restoration room.
Turn left and look close at the mail boxes on the wall.
Open G. Berowski's mail box. Take the envelope.
Poem: Learn about the Order of the Dragon. Read the poem.
Find out what place Radu's poem leads to:
Go back to the apartment by exiting the museum.
Ellen mentions a program Gerry wants to check for the museum. Go to the computer monitor.
Use the poem below to find the correct keywords to select on the program
In the prison of my childhood bed,
I built a castle where my vengeance is ripening,
Engulfed basilica, sanctuary of my return,
Safe from your eye, my son awaits his turn.
His path will be long throughout the dark waters,
As the mist of your sons we have called upon.
But by these words I dot the steps he will follow,
To the hiding place where your fate is sealed.
Select basilica for left, cistern in middle and Turkey at right. (Thanks, Mervyn!)
Read about Yerebatan Sarnici - the Basilica Cistern.
Obtain the Wonder Geek Award for using the computer in finding the next location.
Hear the phone ring.
Answer phone at bedroom. A woman says that Gerry was killed.
The woman says that Dracula wants to see his portrait when Ellen retrieves it. She left a package at Ellen's doorstep.
Contact Gerry:
Gerry: Use the phone and select Gerry. Pick up the receiver. Learn from the policeman that Gerry is dead.
Call library to find out about Marlene. She is supposedly on vacation.
Medicines: Take medicine Cikloprex to get Ellen's bar to green.
Envelope: Open the door and pick up the envelope. It has forged Lucy Murray passport and driver's license.
Automatically travel to Turkey.
Obtain the New York New York Award for finishing the chapter.
Istanbul, Turkey
Basilica Cistern:
Ticket office: Talk to the man at the ticket office. He allows Ellen to go through free of charge.
The peacock column and the gorgons are not available for viewing.
See a set of keys on the back wall.
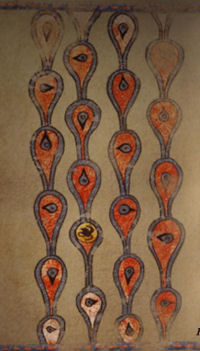
Find where the Gorgons and the peacock eye column are:
Map: Go right and then look at left wall to see the map of the site.
See the location of the gorgons (green) and the eye of the peacock.
Click on the gorgon and the peacock pictures. There should be 3 gorgons.
See the info booth, phone and snack bar at other side of the info booth.
The phone numbers of the reception, restaurant, and booking are at top left.
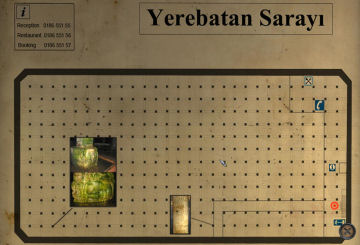
Peacock icon: Turn around from the map board and go forward the path.
See a locked gate and Ellen says the peacock icon is just behind the gate.
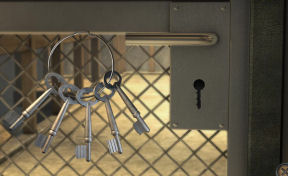
Send the guard off so you can take the keys:
Snack bar: Go left back to the map. Go left pass the info booth to the snack bar.
See a phone on the wall. Look close at the table at left and take the tip-coin from the plate.
Use the coin on the phone. Ellen calls the reception number and distracts the man with a story.
Info booth: Go back to the info booth. Take the bunch of keys from back wall.
Go right and forward. Turn right to the hallway.
Use the keys on the gate. Use the third key (middle) from right. Click on key to turn it.
Obtain the Key Master Award for unlocking the gate immediately.
Return the keys: Go back to info booth and return the keys on back wall.
Obtain the Unseen Unknown Award for finding the secret society.
Go back to the now opened peacock icon gate.
Look down on the left of the gate and pick up the long plank.
Find the object with the dragon symbol that Radu's poem depicts:
The peacock with different eyes will raise the head,
Of the third gorgon with the inverted face.
My child, follow the direction given to you fearlessly,
Enter and then turn right to the corner column. It's missing something.
Get to boat: Continue to the end of the walkway.
Pick up the short plank. See a boat ahead.
Use the long plank on the broken column base in the water.
Use the shorter plank on the boat.
Go to the boat. Untie the rope of the boat.
Wall: Look up on the wall (back of boat) and see a loose brick.
Use the knife to pull out the brick. Take the unwrapped small scepter inside.
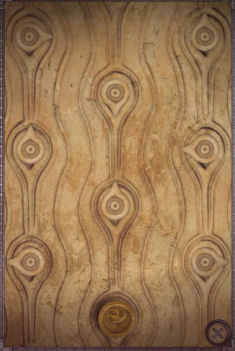
Put the scepter on the peacock column:
Peacock eye column: Use the small scepter on the hole of the peacock column.
Arrange the eyes to point similar to the drawing in Radu's poem. Check the diary for the drawing.
Automatically take the small scepter from the finished puzzle.
Obtain the Photographic Memory Award for solving the peacock puzzle in 30 seconds.
Find the third gorgon - Follow the direction indicated by the gorgon (or the peacock column):
Go to the boat and go forward.
Compass: See a compass on the column at right with a gorgon on its side. Take the compass.
Watch the compass red needle. Turn or move the boat to get the red compass needle to point at the stated direction.
Go - W W W N N E E N N N. (The third gorgon will be on your back right).
From facing north as above - follow the direction stated by the peacock column arrows or the direction of the gorgon heads on columns seen at each stop point.
Go - W N E N W W.
Obtain the Ariadne's String Award for getting through the Basilica Cistern maze.
Find the entrance to the Shadow of the Dragon's hiding place:
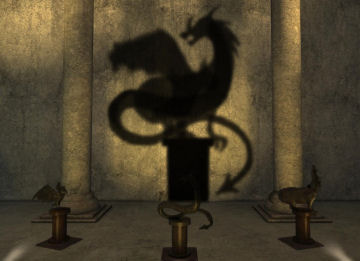
Go forward to the statues. See a bat, sea serpent and nightmare.
To the wall where my hiding place will open in the shadow.
Press the button on the floor at bottom of screen.
Turn the nightmare at right 3 times. The head of the nightmare's shadow should merge with the sea serpent's shadow.
Turn the bat at left 3 times to form a dragon's shadow. The door opens.
Foyer: Go forward once. Look at the Plexiglass display cases at right and left wall.
Read the plates below the right display: Killing a dragon and the golden dagger.
Read the plates below the left display case: Archives of experiments in passing vampirism and Father Arno's diary.
Crypt: Enter the Shadow of the Dragon's hiding place. Look around.
Check the glass dome at center of the floor.
See the tombs on the floor and the weapons display on the wall. Take the flail from the middle display at right wall.
Display cases: Go back to the foyer's display cases.
Use the flail on the left display case.
Take the amphora and the manuscripts about Killing a dragon. Check the diary to see the manuscripts about dragon and children of Lilith.
Check the weapon case and see that the dagger is gone recently.
Use the flail on the other display case.
Take the Operation D file and Father Arno's diary.
Altar: Go back inside the crypt.
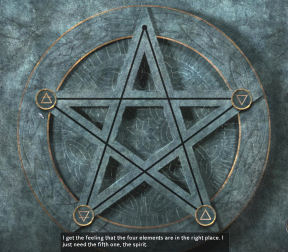
Check the altar and see a pentacle and the 4 elements.
Review the manuscript about the blood of Lilith. Take note of the positions of the 4 element symbols.
Place the elements similar to the manuscript except in mirror image.
Move all 4 elements around in the only possible open position twice. Ellen will say when it is in position.
Place the small scepter at the top hole-point.
Obtain the Fifth Element Award for not needing the clue to solve the pentagram puzzle.
Family Tree: See Radu's family tree. Click on the topmost name.
Ellen wants to know who runs the Shadow of the Dragon now.
Click at bottom and see that Adam Stoker is the descendant not only of Bram Stoker but of Radu.
Caught: The Cistern's receptionist confronts Ellen at the crypt. He opens a trap door under Ellen.
Ellen is at the hospital after being saved by 2 sewer workers. Flowers were sent by Adam.
At the hotel, Ellen thinks that her only lead left is the only one she knows in Istanbul - Yanek the forger.
Find Yanek:
Enter Yanek's place. Click the table with fruits right of stairs. The paintings are gone.
Medicine: Take medicines to get Ellen healthy.
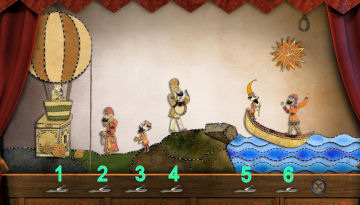
Puppet show: Look at the puppet show. Ellen says it looks different.
The aim of the puzzle is to get the right man on the boat to pull the noose above him.
Numbering the switches from left to right - 1 to 6.
1. Click switch #5 left man in boat to raise the right side of the boat.
2. Click switch #6 to get the right man on boat to jump and change the sun to moon.
3. Click switch #2 - the second man from left to get him to cut the balloon rope. He is carrying a knife.
4. Click switch #4 - man at center to call the dragon (increased in size because it is night). The dragon eats the man with a knife and clears the way for little man with key.
5. Click switch #1 - the balloon loose and it will float to change night to day. This will remove the ivy from the stand that has the keyhole.
6. Click switch #3 to move the little man with key to the left and insert the key on the keyhole. A bird flies out to land on left man on boat.
7. Click switch #6 to change sun to moon.
8. Click switch #5 to get left man and bird to sky.
9. Click switch #5 again to get man to boat.
10. Click switch #6 to get right man to noose.
The secret door at right opens.
Obtain the Litttle Sherlock Award for solving four puzzles.
Secret room: Go to right wall and then left to enter the open door of the secret room. Look around.
See the paints labeled by the name of the known painters that used them.
Check the 2 machines on left wall. The left one looks like something to concoct solutions.
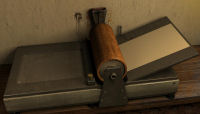
The machine at right is a rotary press. There's a legend on the wall.
Obtain the Passe-muraille Award for finding the secret door.
Question Yanek:
Yanek: Go through the curtain. Yanek comes behind Ellen and shows his fangs. Yanek says that Ellen was not killed because his master Dracula says not to. See an open coffin.
Talk to Yanek. Learn that it was Yanek that painted the portrait and that the portrait is how Dracula sees the world. So Dracula saw Ellen when Ellen looked at Dracula's portrait. Yanek says that Ellen is carrying Adam's child; the future heir of the Shadow of the Dragon. No vampire born of Dracula blood can vanquish him. Dracula drunk the blood of his wife and that transformed him. Dracula keeps a vial of her blood around his neck. Anyone that drinks that blood can vanquish him.
Ask Yanek about Dracula again. Yanek does not know where Dracula is at present but they can locate him by printing a map using ink that has his blood.
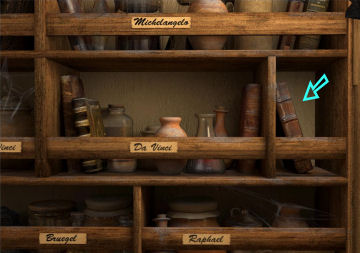
His paints are arranged by chronological order. Dracula's portrait was painted at 16th century paint. The base was the paint Yanek prepared for Da Vinci and the red paint for Bruegel's Hell. Learn how he collected the essence of paints. The paints have the blood of man, woman or even a vampire.
Find Dracula's blood:
Go to the paint room. Click on the bottom shelf right of the curtains.
See a closeup of the shelf. Take the book right of Da Vinci's paints.
Turn the page after Dracula's dedication. Take Dracula's blood.
Find the copper cylinder with the blood ink recipe and print the recipe:
Copper cylinder: Turn to the wall with the rotary press. Read the legend on the wall.
See the symbol for alchemy/sciences.
Turn to the right and see the shelving for books and cylinders.
Alchemy is second from bottom. Take the copper cylinder at middle (XVIII) pigeon hole. Get an engraved copper cylinder.
Print the recipe: Pick up 2 piece of papers below the books-cylinder shelving.
Pick up the ink left of the rotary press.
Look close at rotary press.
Pour ink at middle opening close to wall (see ink on wall).
Place the engraved copper cylinder at center or press.
Go outside and then turn around. Pick up the crank from the floor.
Place the crank on the rotary press. Turn the crank.
Read the recipe.
Make the blood ink:
Collect chemicals: Go to main room. Pick up the shellac from the table ahead.
Turn right and forward to the alcove at far wall. Take the bowl of lampblack.
Climb the stairs and enter the bedroom. Take the kohl from the octagonal table beside the bed. See that kohl has antimony.
Prepare blood ink: In inventory combine lampblack with kohl (antimony).
Combine the shellac with the antimony-lampblack mixture to get blood ink base.
Use the blood ink base on the machine left of the rotary press.
Use Dracula's blood on machine.
Click on machine and see a closeup of Ellen's finger. Use the knife on Ellen's finger to get blood into machine.
Mix the solutions:
Look close at machine. The aim is to get all the drops reach the center bottom.
Press the circles with arrows to either have it on or off; so that the passage of the drops will be similar with the pictures of drops in the path.
Check the passage of the drops by clicking on the arrow at bottom left.
Get blood ink.
Obtain the Alchemist Award for making the blood ink.
Print a map with the blood ink:
Cylinder: Go to the shelf left of the curtain.
On the cartography (compass icon) section; take the engraved silver cylinder at right pigeon hole.
Take the copper cylinder off the rotary press.
Map: Use the engraved silver cylinder on rotary press.
Place a new paper on the rotary press.
Use the blood ink on the ink container slot at middle back of the press.
Turn the crank. Chernobyl...
Chernobyl, Ukraine
Find Dracula's lair:
Truck: Look close at truck. Check behind the curtain.
Hear a voice calling Ellen to follow the path of despair.
Take the machete. Open the box and take the batteries, Geiger counter and Geiger counter tube.
Look right of the truck and see a first aid kit. Take the iodine pills inside the kit. Take some iodine pills.
Path of despair: Turn right and see a big rock behind a bush.
Use the machete on the bush and see the radiation symbol inside the dragon.
Click on the symbol and Ellen thinks it means radioactivity is the path of despair.
Combine all three: batteries, Geiger counter and Geiger counter tube to get a ready to use Geiger counter.
Turn on the Geiger counter by pressing the bottom left button. Point the knob to X1.
Move around to find the highest count. Go to that path.
Start by going left of the red car.
Turn left and Ellen says it's highest here. Use machete to clear the path.
Go forward the cleared path.
Obtain the U235 Award for finding the secret path.
Enter the tower:
See a broken tower.
Turn left and pick up the crowbar on the snow mound.
See the tank at right. We need a container.
Tower door: Go to the tower. Hear Dracula. The door is closed. Use the crowbar on the door.
Get down to the well:
Turn on the generator: Check the lever on the stand in front of the elevator.
Check the generator at right and see that it is out of fuel.
Pan left and pick up the empty jerry can.
Go outside and to the tank. Use the jerry can under the tap of the tank. Turn the tap to get full jerry can.
Go back to the generator in the tower. Use the full jerry can on the pipe at top right of generator.
Press the red button at left side of generator.
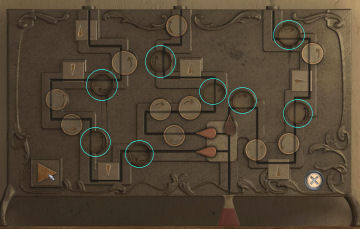
Fix the control panel of the elevator: Pull the lever on the stand in front of elevator.
Check the panel under the lever on the stand.
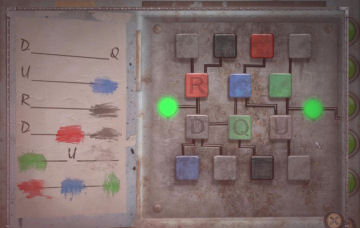
Get power to the panel: Open the smaller panel at left with the green bulb.
See a color code on the paper at left.
Arrange the tiles on the panel following the code.
D is attached to Q and red; and is one away from black.
Red is attached to black.
U is attached to blue and green.
Red is left of blue and green is at right.
Obtain the Little Miss Einstein Award for solving this puzzle.
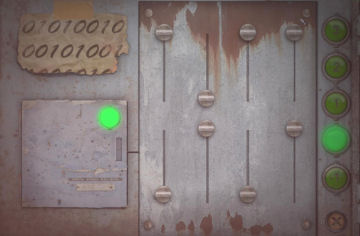
Turn on the diode that corresponds to the main floor (0): There are 5 floors-diodes as seen on the right: 3, 2, 1, 0 and -1. Ellen is on floor 0.
The first 2 lines of the code is seen on the paper at left. Deduce the missing 3 floors-lines from the first 2 lines of codes.
Third line (floor 1) is 10010100.
Fourth line (main floor) is 01001010.
Fifth line (basement -1) is 10100101.
Arrange the knobs to position 01001010 (fourth line).
Pull back and then pull the lever to call the elevator. Enter elevator. Ellen goes down.
Obtain the Riddle Resolver Award for solving seven puzzles without skipping.
Take the path that leads to the Dragon:
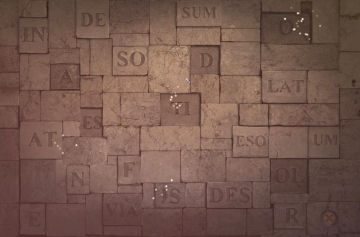
See gated entryways. Look around. Hear Dracula warns that only one path leads to him and the other 2 to death.
Click on the Latin words above the center entryway. Follow the path of desolation.
Look at the floor and see tiles with letters. Look close.
Select-press the letters that form the word desolation: D - ES - OL - A - TI - O or N.
The correct gate opens.
Obtain the Latin Lover Award for using the inscription clue to solve this puzzle.
Check the open gate: Look around and pick up cannonballs from floor. Get 3 cannonballs.
Use one cannonball on open right entryway. Go through the entryway.
Get across the cave:
See Dracula's castle across the water.
Go down the stairs and see the boatperson. Dracula says that Ellen has to pay to cross.
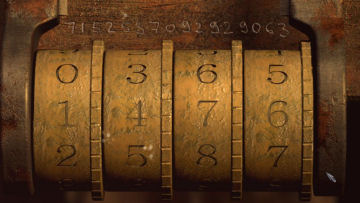
Blood payment: Turn left and see a stand with 3 syringes. Ellen says that she can't pay with her blood or else she won't have the strength left to continue.
Use Dracula's blood on the panel.
The aim of the puzzle is to get the lit arrows at left end of each syringe to turn off.
The top syringe can hold 4 cc of blood, the middle syringe 2.5 cc and the bottom 1.5 cc.
To turn off the arrows at left; the top syringe should only have 0.5 cc, the middle 2 cc and the bottom 1.5 cc.
Numbering the arrows at right as 1, 2 and 3; and U for up arrow and D for down arrow - click: 3D, 2U, 3D, 2U, 1U, 2U, 1D, 2D, 3U, 2D, 1D and 2D.
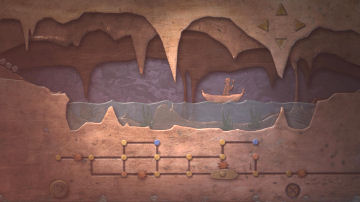
Move stone across water: See a boat in the water.
The circles at bottom of the puzzle is the available route of the boat. This is an overhead view of the puzzle.
Blue circles lowers the water level.
Orange circles move the obstacles (stars).
There are directional arrows at top of the puzzle. The reset arrow is at bottom left.
The aim of the puzzle is to move one stone from left bank to the right bank and out.
Click on the directional arrows:
L U L U (blue) L D D (orange) U L L - get stone.
R R D (orange) U D (orange) R R R R U (orange) D L L U R U R (blue) L D L D R R U (orange) D R and out.
Boat: Enter the boat. Go forward.
Turn to the left and see another cave exit. Ellen says that she might have ended there if she took another path.
Meet Dracula:
Obtain the On the steps of Orpheus Award for crossing the river to the castle.
The castle door opens. Look around.
Enter. Hear Dracula. Talk to Dracula.
You can accept, refuse or negotiate. Negotiate is the best choice.
Choose Adam or stay alive.
Find Adam and the portrait - Free Adam:
Go back outside. Enter the boat. Go to the cell-fire at right cave.
See Adam in a cell. Talk to Adam.
Lock: Look close at lock of the cell.
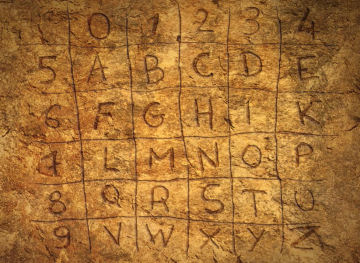
See numbers above the lock: 7152537092929063.
Pull back and look at the wall at right. See a graph of numbers and letters.
See that 71 is M; 52 is C, 53 is D, 70 is L, 92 is X, 92 is X, 90 is V and 63 is 1.
MCDLXXVI is 1476.
Enter 1476 on the cell lock.
Ellen collapses.
Obtain the Countdown Award for solving this lock puzzle.
Bring portrait to Dracula:
Adam talks to Dracula. Ellen is still unconscious. Adam tries to stab Dracula but was overtaken by Dracula.
If you run out of medicine; pay 50 points to get revived. You can take medicine now if you want.
Decision:
Talk to Dracula.
Dracula adds his wife's blood from the vial that was on his necklace to a cup and offers it to Ellen.
Refuse or accept.
Obtain the The End Award for finishing the game.
Obtain the 360 Award for getting the maximum points of the game.
This document may not be distributed without express written permission of the author and the content may not be altered in any way.
For Questions or Comments on this Walkthrough,
Please write to: MaGtRoCopyright © 12/2013 MaGtRo