DROWNED GOD
Observations & Walkthrough
by Soren Andersen
General Observations
This is a long and interesting game, and in many ways a difficult one, with some really fascinating aspects. It is a very linear game in which the protagonist (you) is teleported——there is a lot of that—–to four different Realms to search for and bring back legendary treasures of the past, thus the term Relic Hunter that you encounter in the game booklet. When assembled in one place, these treasures all together are alleged to have tremendous power.
It is very much a puzzle driven game. There are many of these, both easy and difficult, and of course they must be solved in order to proceed with the game, but you are given as many chances as you need to do this. The story line is a strange mishmash of Old Testament, Greek and Egyptian mythology, Atlantis legend, Tarot, astrology, ancient and recent alien visitors, and very secret government machinations, all of these modified, manipulated, exaggerated, and falsified to suit the author’s plot. When the game is finished, one wonders how the title was chosen, and even more so, how it relates to the story.
The game interface is well presented in the game booklet, and it is imperative that you read carefully the Relic Hunter Papers in pages II to XII of this booklet; it is suggested that you review each of the four Realms described therein as you play because of the diagrams and other information. The glossary should also be read and reviewed. The introductory Case Note 493 will help. The hints near the end of the booklet will be useful, particularly for the Knight Templar puzzle. It would be a good idea to make copious notes of the many items, facts, and references that develop as you move along, even if you resort to the walkthrough, because not everything is presented there in detail, though most of it is.
There are, however, limitations and drawbacks in this game that are severe enough to cause the player who does not have enormous patience to seriously consider abandoning it. The prudent adventure gamer saves his game many times as he progresses, but the makers of Drowned God have made provision for only six—–6!!—–to be saved at any one time, though you can save over one already saved and retain those that you deem most important. This is very bad design indeed. The game is on three CD’s, but to launch it you must return to the first one, which is also bad design. There are a great many instances of dialog, but the delivery of a lot of them is rendered so badly that they are incomprehensible, and when they approach understanding the background music interferes to an extent that you again do not know what is being said. This is inexcusable. Moreover, there are in fact instances where the rendering of the speech is very explicit, which quite naturally leads one to wonder why the rest is not. A great percentage of what is said is gibberish, but you don’t know what kernels of game importance are in the doubletalk if you can’t make it out. Furthermore, if as is frequently the case you are replaying parts of the game, there is no way to bypass these tediously overlong speech sections, which is something that you are able to do in most games; more bad design. All in all, some very seriously discouraging deterrents to the enjoyable playing of this game.
These observations and the walkthrough refer to game version 1.0. You will find on page 17 of the game booklet a reference to an Internet connection; this game is from the middle nineties, and Inscape has decided not to maintain this connection, so this bonus to the game is no longer available. However, should you do an Internet search on the game title you will find quite a few references.
[A couple of years after the foregoing observations were written, new computer software made it advisable that the accompanying page of Notes be supplied. Please read it at this time, as game patches are involved.]
WALKTHROUGH
There are a few places in this game where input must be made from the keyboard; in these cases the notation <ENTER> is used, a reference to the Enter key.
Bequest Globe I
After an introduction of mostly scenes to be encountered, the game begins and you are inside the Bequest Globe, about which you have carefully read (you have, haven't you?) in the Relic Hunter Papers that are in the game booklet. A pleasant voice is speaking to you, welcoming you to the Globe; you should be able to make out most of the words, but the content is ambiguous. In front of you is a large central pillar flanked on each side by smaller pillars. While the voice is speaking, you can walk around behind these pillars, but it serves no purpose except to admire the graphics and pass the time until the lecture is over. The central pillar has a large round door that you cannot yet open.
Affixed to the left pillar is what appears to be a computer because it has above it a monitor with a pulsing blue border. You have to wait for the irritatingly slow voice to stop speaking before you can access this monitor, then click on it to approach and click again to get an animation that ends with a vocal request for you to input your name. Do this, followed by <ENTER>; more animation and a personal “sacred” number and symbol are generated, presumably somehow based on the name, and both of these items should be noted as they will be used later (booklet page XXV). The symbol is astrological (ptui!) in origin and appears in one of the row of boxes. This is followed by a character assessment (click on it to skip), then four past incarnations (click on the pictures to skip), and finally a hexagon appears, flanked by D and P. The top and bottom junction nodes of the hexagon are highlighted. Once more you must wait for the voice to stop before you can move back from the computer (forward arrow at top of screen) and forward to the large central pillar.
The central pillar circular door will now be covered with the Cryptowheel disk on which there are many numbers and symbols, and also six small disks mimicking the corners of the hexagon that you have just seen, with numerals in the top and bottom disks. Click on either of these disks to open the door. Enter and as directed go down the stairs to the left to the Malchut (P) room. Advance to the cabinet on the table, click on it to see a rotating figure that may eventually be observed to be a mask, and hear a female voice spouting some semi-understandable claptrap, window dressing leading to the display of the numeral 8. Turn around and go back out the door and up the stairs past the entry to the Kether (D) room at the top. Here a monitor displaying rotating mask presents a recitation that makes just a little more sense. The numeral 3 appears. Later, as the game progresses, Kether and Malchut seem to be at odds with each other.
Return down the steps and out to the computer where the monitor screen border is again pulsing. Click on the monitor to get a display of the D and P symbols with blanks below each. <ENTER> the numbers 3 and 8 as appropriate, and the hexagon reappears. The numeral 2 emerges in the center of the hexagon, to be replaced by the word BINAH, which in turn is replaced with a chalice. The upper right corner of the hexagon central square is highlighted. The chalice is Binah’s symbol, 2 is its number, and the highlighted location on the hexagon is relative to other Realms. The significance of all this will appear later.
Back off from the computer and approach the central column to have the Cryptowheel reappear; there is now a 2 in the small circle corresponding to the previously highlighted hexagon corner. Click on the 2, and after much movement of clockworks, the door will again open and you will be transported to Binah.
The Realm of Binah (Air)
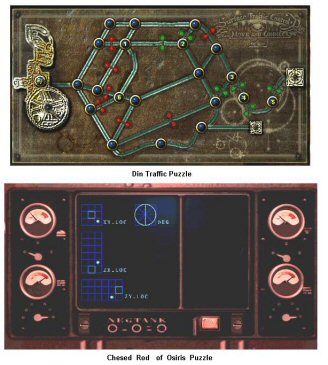
You are in the center of a collection of stone pillars and arches resembling those to be found at Stonehenge. See Fig. 1, the map of Binah. At right angles to each other are four exits from this center, one leads to a stone wall with a locked gate, one to a large and decrepit tree trunk called Merlin’s Oak, one to a great torso clad in armor, and one to an enormous horned helmet. Refer to Fig. A for the view that you need to see in order to go to these places from the center of the Stonehenge arches. When you start to any of them, the screen reduces briefly to an animated irregular circle, and with much whistling you pass through it to a large stone arch that has electricity crackling within it; click on the arch to advance through it to one of the above four scenes that await. The reverse is true when returning to the Stonehenge center.
When you solve a puzzle you may earn an item that you will need. Here in Binah three of these items will be Tarot cards; each card of course has a descriptive name, but in inventory it is identified by a Roman numeral. These cards are used as currency or keys at points in the game, and therefore help establish your progression and affect the linearity of the game. For instance, from the Stonehenge center you could go to any of the four locations (at this point there is no use going to the gate with the locked door), but you will soon need the Tower Tarot card, and you need to go to the armored torso to get it. Fig. A will indicate which arch will lead you there.
The armored torso has some sort of connection with King Arthur, and upon entering it you will find the Round Table surrounded by empty chairs. Go to the opposite side of the table from the entrance and on the back of the chair at that position you will find the Shield puzzle. Starting at the bottom, connect all of the blue nodes without crossing a connecting line. If you wish to cheat, Page 27 of the game booklet has a solution. When you successfully connect back to the bottom node, your connection unwinds and with much animation you will see a vision of the Holy Grail. When the vision fades go back out the entrance doors, and when you open them the screen is filled with clouds. Click on the central area of the clouds for a series of shadowy black and white videos enigmatically concerning King Arthur. When the clouds clear away, before you will be the Stonehenge arch to the torso (the latter is behind you). Click on the arch and the Tower (XVI) Tarot card appears; click on the card to put it in inventory. Continue through the arch and whistling circle to the Stonehenge center. Select the arch that leads to Merlin’s Oak.
Alternate Path
Here is an alternate path to Merlin’s oak, one that is longer and involves solving an extra puzzle. There is no apparent reason for choosing it unless you like to solve puzzles, and would like to see a little more of Binah, though you will go to most of these places before you leave this Realm.
Instead of proceeding through the arch to the Stonehenge central area, turn around and reenter the torso. The Round Table has been replaced by an alien craft--a flying saucer--to the left of which is a man apparently attending to it. This is your first encounter with the Man in Black. He notices you, rises, walks away, and disappears. Go over to see what he was doing, and you will find a console in the saucer. Click on it and details will emerge. A pair of lips will tell you to enter number, time, and location. At top right are four readouts that are obviously time, and the top one has a chalice, the Binah symbol, next to it. Click on the chalice to slide it to the right, and time is entered. Above the lips are three buttons, two red and one green; click on either of the red ones until the symbol corresponding to your number appears. In the hexagon click on the upper right corner of the central square, Binah’s location, to highlight it. Click on the green button to enter these and the lips will tell you that your access is accepted, then will continue with some doubletalk, about half of which can be understood.
The console closes and the saucer rises a short distance revealing a hole in the floor from which an elevator rises. Enter the elevator, which will take you down to Da Vinci’s laboratory, Fig. 2. (You can’t take the elevator back up.) There is nothing that you can do here at this time other than look around, but much to do later on. Go to the large round portal to the right of the elevator, click on the portal, and go forward until you have to turn. Go left and continue and you will exit through the horned helmet. Continue through the arch and cross the Stonehenge central area to the opposite arch, then through it and you will be at Merlin’s Oak. Curiously, this is your only contact in the game with the horned helmet.
When you get to Merlin's Oak by either path, move as close as you can to the tree trunk, then move the cursor up and down to find three hotspots where there are drawers. In one drawer is a casket, in another a goblet—–or it could be an hourglass–—and in the third some free-floating points-of-light white fuzzy spheres. Only the spheres matter, and you must click on the drawers until they are released. The first click has no apparent effect, but it sets up the sequence for opening a particular drawer. Try the bottom drawer. If the casket or goblet appear, close the drawer and the process is reinitiated. Just keep clicking on drawers until the spheres fly out and swirl away, followed by a single larger one that the game booklet calls the Wisp. Turn around and follow the Wisp, which leads you to the wall with the locked gate.
When you get to the gate, there is the Wisp waiting for you. It opens the gate and goes through. Follow it onto the pier on the other side, then click on the horned head of the figure half buried in the sand at the side of the pier. This will summon a boat. Board the boat and click on the pointy-eared figure on the prow and it will then transport you (and the Wisp) to the Isle of Avalon. Enter the tower where you will find a Knight Templar sprawled on a chair at a table. Click on him and you will find that he is very drunk. You have to play him in a difficult game.
Part of this game difficulty is understanding how to play it. Basically, you have a 5x5 matrix, on one square of which there is a cup and the rest of the squares having flames in them. Rows of flames are extinguished by controls at the board edges; also extinguished are all other rows on the opposite side from the cup. This leaves different matrix configurations of flames as the rows are extinguished. The player to extinguish the last flame wins and the loser must take the cup (and presumably drink from it). The loser then places the cup on a new 5x5 square and his opponent makes the first move to begin turning off the flames. You have to beat the knight two games out of three. In the initial game the knight goes first in placing the cup, and the way the game is configured, with insufferable commentary the knight always wins this first one (don’t ask); therefore after it is played, save and you won’t have to repeat it if you lose the second game, just reload it and try again from the point of the first game loss. You can save again after you win, and you will be ready to try for the second win. (You have to turn away from the game board to make the save.)
Pages 28 and 29 of the game booklet explain the strategy, but the explanation itself is not all that easy to understand. However, carefully examine the details because it works if you take it slow, read the strategy carefully, and study the diagrams. The best way to learn how to play is just keep playing restored games, noting what happens on the board as a result of what you do, and consulting the game booklet diagrams as the active matrix changes when the flames go out, and you will eventually figure it out. Or win by luck.
After you win two games, the knight passes out and a sarcophagus-shaped elevator descends. Enter it to find the Wisp is waiting in a bracket affixed to the back. Turn around and press the UP button. When the elevator stops, click on the door to open it and find the Wisp has somehow already arrived. Click on it to bring up the Star (XVII) Tarot card, then click on the card to put in your inventory. Move forward to see Morgan Le Fay, the gruesome winged figure with her hands confined in stocks; approach her (3 times) for some enigmatic muttering in which she identifies herself as Morganna, King Arthur’s sister, and gives you a cryptic and sometimes unintelligible message about the stars, then a final admonition to bring her the star and the Babel. Get back in the elevator (there is the Wisp again) and press the DOWN button. If you have heard all of Morganna’s statements, the elevator will take you down past the floor where the Knight is passed out, and further down to the basement of the tower.
Open the elevator doors and step out into a small hallway. To your left at the end of a corridor may be seen the door to the Newton-Einstein puzzle, to the right a large circular locked portal, and on a table in front of you is a red book about the Priory of Sion (see glossary). Place the Tower (XVI) Tarot card from inventory into the receptacle on the table next to the book. The book will fly open, but more important, the circular portal will be unlocked. Leaf through the book by clicking the dog-eared page icon at lower right of the book page. The book contains a hodgepodge of mixed-up declarations combining error-prone Old Testament and Egyptology statements that could just as well be skipped. Go to the Newton-Einstein puzzle.
This is a tedious puzzle that is solved by sheer persistence. The two heads that rotate on the pedestal, Isaac Newton and Albert Einstein, each have four statements that when speaking alternately can be semi-logically ordered to support a conversation. There are three hotspots, the two doors in the back wall and the dial on the pedestal labeled NOW, that will cause the statements to be made: clicking on either door will bring them randomly, clicking the dial will bring them in order. You must set the order so that it seems like a conversation.
· Click on either of the doors until you have eight different statements—write them down, including which of the two said them.
· Arrange these statements in an order that makes a conversation, sort of, alternating between the two speakers. You can get the first of the eight by clicking on the NOW dial.
· Click on either of the doors until you get what in your list is the second statement; at this point click on the dial to secure its place in the conversational order. The conversation will be repeated for as many statements as you have secured in place.
· Repeat this procedure for the rest of the eight statements until the conversation is complete.
· To check that the list is being assembled in the proper order, you may consult the blackboard and the picture of the apple next to the doors: if Newton's order is correct, the apple has progressively more bites taken from it, and if Einstein's order is correct the blackboard has more lines written on it.
When you have placed all eight lines, and if you have indeed done so in the proper order, when you click on the dial for the last time, Einstein has more remarks about time being an illusion and what effect the Grail has on time and space, and that to find the Grail you must set the hour back to the time of your entry. The dial flips over and you have a brass ball to put in inventory.
Should you wish to cheat, you can find the eight statements in the correct order on page 30 of the game booklet, but you still have to use the machine to correctly assemble them so that you get the brass ball.
Leave Isaac and Albert and proceed down the corridor through the circular portal into the Da Vinci lab, Fig 2. After your first step into the lab you might wish to glance to the right to see the robot. Go to the alcove on the left in which there are books, drawings, and other paraphernalia. Step into it and turn left, where you will find a drawing of a clock in which the hands are mysteriously turning. Get close to this phenomenon and turn left to a plaque of the robot with a hole in the center of his chest. Place the brass ball you have just earned in this hole, and it will somehow energize the robot, who will jerk upright and stagger over to the Babel machine which he will turn on with the stump of his left arm. The machine goes into action, engraving a small cylinder and dumping it into a column of rings. This cylinder is the Babel that Morganna told you to bring to her. Before you can pick it up, however, you must solve the Star puzzle.
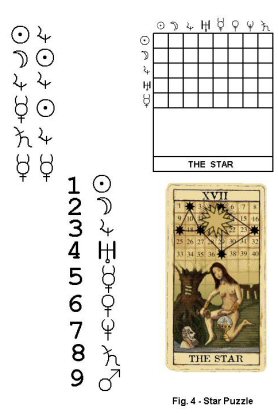
Opposite the clock in the vestibule is a table on which there are two books. The book on the right is open to a page showing the picture that is on the Star Tarot card, and on the book’s opposite page is a series of 6 symbol pairs. Above the Star picture is a 5x8 blank matrix in which the rows and columns are “numbered” by these same symbols, thus a particular square in the matrix will be identified by one of the 6 symbol pairs. These pages are redrawn in Fig. 4. (Page 6 of the Relic Hunter Papers also shows the equivalency between symbols and numerals.)
Leave the vestibule, turn left, advance once, and turn left again. On the wall is another 5x8 blank matrix, only here the rows and columns are identified by standard Arabic numerals. On a shelf below is a gray square and a red square. Click on the gray square to get close, then put the Star (XVII) Tarot card in the tray and the matrix fills with numbers as on the Tarot card. Click on the column number and the row number for the first symbol pair in the vestibule book, and the intersecting matrix number (17) burns away leaving an 8-pointed star. Do the same for the other five symbol pairs in order, with same result for each pair. After the sixth, the stars are joined by lines in a representation of the Sirius constellation. (Page 9 of the Relic Hunter Papers.)
The matrix board falls away and is replaced by a projector screen. Click on the red button to see a series of nineteen slides. You can click on each one for a closeup, but there is not much of an advantage to doing so. You are left with the impression that Leonardo has seen an alien spaceship with little gray beings of a type that is on the game box cover, and has somehow examined each of these in excruciating detail. There does not seem to be much of an obvious point to this puzzle, but as it happens, if you do not solve it, you will not be able to present Morganna with the Babel. After the last slide the screen burns and you can retrieve the Star Tarot card.
Pick up the Babel from the bottom of the column of rings and go to the elevator in the hallway. Press the UP button twice to return to Morganna. Place the Star card in the vertical tray in front of her, then put the Babel cylinder in the wall container when the container door opens. The scene shifts to the roof of the tower, and after some very peculiar antenna activity you are presented with the Moon (XVIII) Tarot card for your inventory. Return down the elevator to the Da Vinci lab, cross the lab and exit through the round portal next to the robot. Proceed forward through the tunnel until you have to turn, then go to the right and after going up and down some stairs you will come upon a shield and a lantern. Ahead is darkness. Use the Moon Tarot card near the base of the lantern, and a Wisp will emerge and travel down the tunnel to light it up. Follow it to the matching symbols puzzle.
This is a timed puzzle—–you will hear a clock ticking—–but there is ample time to complete it, and you can go back to the lantern to start again if time runs out. It is a 4-sided rotating box with 4 symbols on each side. Each symbol is repeated once, but never on the same side. Click on the wooden panel to slide it down, then click on a symbol to highlight it in blue. Click on either the left or right side of the box to rotate it in either direction until you find the pair of the symbol, click on it to change its color to yellow indicating a match. Immediately click on another symbol and repeat the process until all 8 symbols are matched. A voice tells you to search no more, you are the keeper of the Grail, and also to turn time back (as Einstein said). You are transported back to the Stonehenge center.
Each of the four access arches now has in front of it a shimmering cube. Click on each cube to find a scene of a place where you have been and where time can be reset, and each has in it a hotspot to do this. In Da Vinci’s vestibule the clock is made to rotate backward, in Morganna’s lair a burned down candle is restored, in Merlin’s oak an hourglass is turned over, the hour digits on the Newton-Einstein pedestal dial stop moving. Turn around and exit each cube after clicking the hotspot and the cube will disappear. Advance to the center of the circle of stone arches and turn to find the next cube.
Note: if you chose the alternate path to Merlin’s oak as described above, there will be an additional shimmering cube in which time must be set back. Go to the flying saucer console and move the Binah chalice symbol back from right to left.
After the last of the cubes the Holy Grail emerges from another shimmering cube—it contains a red sphere, for some reason—and then it disappears back into the cube. Click on the cube and a video carries you and the Grail back to the Bequest Globe.
Bequest Globe II
You are again looking at the Bequest Globe central pillar door, now with the Grail above it. The Grail and red sphere separate and disappear behind the pillar. When you left the globe previously, the Kether mask told you to return to it when you completed your task. Advance to the door to bring up the Cryptowheel, click either the 1 or 9 to open the door, then go up the steps to Kether. When you click on the monitor, the mask seems testy, but it provides the Magician (I) Tarot card in the tray in front of the monitor. Take it over to the map on the wall and place it in the holder at the bottom of the map, and you can learn a few things about Stonehenge, not necessarily true. Back to the monitor where you will be given the numeral 4.
Check out the Malchut room at the bottom the stairs to get some more doubletalk and the Temperance (XIV) Tarot card. Take this card to the brown panel that you can see on the wall behind the monitor. Place the Tarot card in the tray and you will be shown an animated painting of obscure significance. Back at the monitor you will again see the numeral 8. Go back to the main room to find the blue bordered monitor pulsing. Click on it and <ENTER> the numerals 4 and 8. You then get Chesed’s numeral (3), its symbol (a pyramid), and its position on the hexagon (upper left of the central box). Go to the Cryptowheel and click on the 3; when the door finally opens, you will go through to Chesed.
The Realm of Chesed (Water)
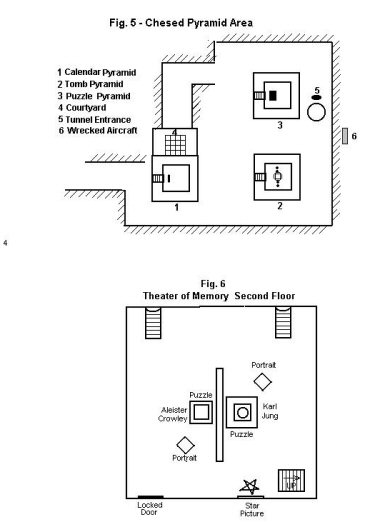
Despite the water characterization, Chesed appears to be desert country, and the pyramids that you discover indicate Mayan, though the Central American country inhabited by these people was hardly a desert. If you go left from where you have entered, at the end of a long tunnel you will find a structure built around a pool, but you can’t do anything but explore at this time. Interesting, though.
From your entrance location turn right and proceed along a deep trench to the foot of steps leading to the top of a Mayan style pyramid. This is the Calendar pyramid. See Fig. 5. Don’t climb the steps yet; rather turn right and go around to the back of this pyramid. On the way you will see another behind it, this one with a sphere suspended over it. It is the Tomb pyramid. Ascend the steps to the top, where below the sphere is an opening leading down to an immovable wall. Don’t bother to go down; instead click on the leftmost of the four rectangular plates lying on the pyramid top. Put the plate in inventory, then go down and back to the steps of the Calendar pyramid. Go up the steps to the calendar disk and put the plate in one of the brown openings in the calendar disk (it will only go in one of them). A Mayan god statue will emerge from the pyramid top and say something in that language, followed by a translation almost equally unintelligible. Return to the Tomb pyramid and get a second plate from it and insert it into the calendar, then do the same for the third and fourth plates. You will note that the sphere drops down a bit each time you get a plate, until finally it rests on the opening. And there are four deity statues.
Now you have to find four hotspots on the calendar disk near the inner ring at the feet of the figures carved on it. The figures on the disk are those of the statues above and are paired on the calendar. The hotspots show up one at a time, and you click on them as you find them. More shouting, and when you click the last hotspot the calendar face sticks out its tongue. Click on the tongue and the statues have an altercation that results in the sphere being raised off the opening on the Tomb pyramid. A small pentagon appears on the tongue of the calendar disk face for you to pick up. Go back to the top of Tomb pyramid and down the steps of the opening below the sphere. There is a reclining figure on the right with a 5-sided opening in its body. Put the pentagon in this opening, whereupon the wall in front of you rises and you can enter the tomb that gives this pyramid its name. On the floor is a pattern of squares connected by lines. Go up the steps to the left and out on the platform overlooking this pattern.
The floor pattern is the board for an ancient game, with the current name being Nine Men’s Morris. You play it against a mysterious and clever opponent who is never identified. Examine the pattern. At the beginning of a game each player has a chance to designate nine squares, one at a time taking turns, so that three will be in row connected by the joining lines; this is called a mil. Clicking on a square will turn it green, your opponent then turns his orange. Forming a mil will allow the player to take away one of his opponent’s pieces, but not any in a mil. Clearly, you will not only try to construct a mil, you will also try to prevent your opponent from doing so. Then, after both sets of nine squares have been chosen, you move them along the lines one space at a time, still attempting to form a mil and keeping your opponent from making one. Watch closely to see where he moves. No jumping is allowed.
If you form a mil, you may move away and then on your next turn reform it. So can your opponent. You may do this as many times as you can, removing one of your opponent’s pieces each time, but you are vulnerable each time you move out of the mil. When a player has only three pieces left he may move to any vacant square. The game is over when a player has only two squares left so that he can no longer form a mil, or is boxed in and cannot move. There is no real penalty for losing, you just have to play again until you win. You can restart to a new game at any time by turning away from the playing area and back again. When you finally do win you get half of a Tarot card, and the board no longer responds.
This is not an easy game. The best way to master it is to keep playing it. Your opponent is very good at it, and it is easy to miss one of his imminent mils. Remember, you only have to win once. Your first move...
After you have won a NMM game—and you will after you have played enough games—leave the Tomb pyramid and go to the one beside it, the one with a cube on the top. This is the Puzzle pyramid, so called because when you ascend the steps of this one you will find a puzzle on the face of the cube. It is really a simple puzzle, all you have to do is click on 9 of the holes to plug them all. Try clicking on a couple holes to see the pattern that results. Turn away and back to start the puzzle anew. When you have solved it a sphere comes tearing around from in back of it and hovers, waiting for you to put it in inventory. Another result of this solution is that a hole, unseen by you, will open in the trench behind the Puzzle pyramid; this hole is the entrance to a tunnel that you may enter later at the other end, so you probably will not use this entrance.
Turn away from the puzzle. From your vantage point at the top of the pyramid you can see on the right a trench leading away from the pyramid. Descend the Puzzle pyramid steps and turn right, move forward once, then turn left to face the trench. Go to the end of the trench, turn left, and move forward once to see a door to the interior of the Calendar pyramid. In front of the door is a 4x4 matrix tile courtyard; as you approach several of the tiles drop away, and you must click on these to bring them back to make the courtyard level so you can get to the door. Start at the left rear and in no time you will accomplish this simple task. One of the tiles remains slanted but you can ignore it.
To open the pyramid door click on the ring above it, then enter. On the back wall is a gray rectangle. Go to it and click on it three times and you will get the other part of the Tarot card that you won playing the NMM game, the Emperor (IV). Leave and go back to the foot of the Calendar pyramid steps. On your way back, if you go to edge of the area between the Puzzle and Tomb pyramids, you will find the rusted wreckage of an airplane from which you can hear the voices of the pilot and a ground controller, but there seems to be no connection of this to anything else. When you get to the Calendar pyramid steps, turn left and go back through the long trench to the place where you entered Chesed.
Continue forward through a long tunnel and when you go up the steps at the end of it, you will be in what seems to be—except for what looks like the glass globe of a very large old fashioned kerosene lantern—the ruins of an ancient Greek or Roman temple. Go up the steps of the pedestal immediately before you, where you will see a water filled pool between you and the lantern globe. Now look down. A cover slides away to reveal a figure impressed in the rock: a staff with six branches. This figure is the form of Rod of Osiris, and you will encounter it often in this Realm; in fact, the Rod itself is the relic of your search. Five of the six branches have spheres at their tips; put the inventory sphere in the depression at the tip of the sixth and the pool drains. Retrieve the sphere.
When you look up you will find that the water from the pool has gone into the lantern globe. Go down from the pedestal and to either edge of the temple, then along the side so that you can turn and go up the steps to the pedestal next to globe. Turn to the globe and look down at the pedestal. On it you will see L and W figures in front of a slot. Look up at the blue water filled globe that fills the screen and click on it. A very strange slug-like creature swims in and out of view giving a two minute speech from which you might be able to pick out a word or two here and there, at the conclusion of which he tells you choose alpha—life—or omega—death. The L and W slide apart so that you can make the choice. In fact, however, it makes little difference.
Click on L and the High Priest (V) Tarot card appears and a door opens in the wall of the drained pool immediately below. Put the card in inventory and turn to face the pool, where you can see steps leading down into it. Go around to either of the steps, go down into the pool and across to the open door. Pass through the door and you are in a serpentine tunnel that from appearances could be a sewer.
Click on W and it does make a difference after all, at least to the slug, because he is destroyed. The High Priest (V) Tarot card appears, but the door in the pool does not open. In this case, leave this pool area and return to the pyramids. Go around behind the Puzzle pyramid, where in front of a large stone sphere is the hole in ground that is the tunnel entrance mentioned earlier. Go down the hole and the appearance of the tunnel is identical to that had you gone through the pool door. It is the other end of that tunnel.
Proceed along the tunnel until the character of the passage changes and there is an upward exit toward a very bright light. Go through the light and you will find a quite strange bellows organ. Press the keys six times, in any order, or the same key. During this action you will get glimpses of a naked tattooed male figure in a glass coffin and another device that resembles, sort of, a human head and torso with stubby arms. After the sixth key pressing you will be lifted to a level where these two things are located.
Turn around and approach the coffin. Click on the monitor in the side of it so that by moving your mouse you can scroll along the man’s body and view his tattoos; clicking the mouse as you scroll will indicate the part of the body you are viewing. You are looking for four different instances of the Rod of Osiris, one near the head, one in the center, and two near the feet. Each time you find one, click the mouse and a small sphere will emerge at the upper right of the monitor screen. If you click on a previously discovered image, no sphere will appear. Put each one in inventory as it appears. Ignore the noise that builds up as you scroll. When you have the four spheres, turn around and go to the head and torso.
This too has a monitor, it is where the head would be. The torso chest is covered with a red bib (a tongue?). Put the spheres you just obtained one by one at the top of the bib, and the first three times you will get a display involving the DNA spiral helix and ending with a drawing of combination of animal and man. After the last sphere and display, a gray bump appears in the center of the bib; click on this bump and you will get the Lovers (VI) Tarot card. Then three trays rise from the bib. Put the three Tarot cards from inventory into these trays, turn aside, and with a flash you will somehow be transported to the USS Scorpio submarine, though there is no indication until later that this is where you have been placed.
Here is another maze. Probably a good idea to save the game at this point. Turn around to see a panel with two meters on each side and the word NEGTANK at the bottom. It is a puzzle to be solved later, but will serve as a location reference here. Turn around again, facing away from the panel. Move forward four times to a door whose handle cannot be turned. Turn right, go forward twice, turn left, go forward three times, turn left, go forward three times, turn right. Now when you move forward you will come to a door whose handle you can turn, but when the door opens, standing there is the Man in Black. He raises his hand to stop you, and the door closes. Don’t be discouraged, open the door again and he has disappeared! From here you just continue moving ahead up a couple of flights of stairs and opening doors, and you will arrive in the periscope room. Move forward twice, turn right, go forward and turn left. You will be looking at what is left of a very surprised sailor. Take the key hanging from his neck, then turn around and look through the periscope, where you can see a spacecraft moving away and disappearing. This vessel that you are on has suffered a disaster presumably from the spacecraft, and is resting on the sea bottom. You had a glimpse of it in the introductory video.
Turn right from the periscope and move forward. You could listen to a radio broadcast about a UFO by clicking on the striped box cover, though you won’t get much from the faint voices through background hash. You could also find a Morse code chart in this room but you won’t need it because this walkthrough will provide the required code. Turn left and exit through the doorway you came in. Go down the stairs, through the door, and ahead to the first cross passage (you will hear the door close). Turn left and you will see the captain’s quarters. Go there.
On the desk is a book and an intercom, and facing the desk is a locked door for a toilet, as indicated by the open/occupied mechanism next to the handle. Click on the book to open it; the word GENESIS in large letters is a clue. In Morse code this is
––· · –· · ··· ·· ···
Click on the intercom, then enter the code using the red button. Each letter entered correctly will turn on one of the small green lights. When you have entered the word, the green button below the red one lights up; click on this button and the toilet door will unlock! Click on the door and it will slide open. Enter.
Turns out this is not a toilet but a special secure office. When you enter the door slides shut. Turn left and lights come on. Click on the display unit on the right end of the shelf above the light. Click on the green button for a message. Next focus your attention on the folder on the desk. Read all the documents (use dogeared page icon to leaf through the papers) and pick up the key from the back cover. Lots of strange information in this office.
Now you have to return to the NEGTANK panel where you arrived on this ship. Click on the sliding door latch below the photo to unlatch the door, then click on the door to slide it back. Leave this room for the outer office and turn right to the doorway you came in. Move forward three times, turn left, then forward six times, going through two doors and down a flight of stairs in the process. Turn left, forward three times to a locked door, right, forward three times to another locked door, right, forward twice, left, and forward to the NEGTANK panel. Save your game.
The Rod of Osiris puzzle embodied in this panel is not easy, the difficulty is mostly in understanding the controls and how they respond to your input settings. After that it is not too difficult. The first thing that you must do is click on the two keys in inventory to highlight them, then click on one of the two vertical keyslots at the bottom corners of the center panel. The keys then appear at the panel top if you click the left keyslot or at the panel bottom if you click the right keyslot, and you must maneuver them to the keyslots using your mouse. Start slow, and you will soon catch on. Left click when the key tips are on the slots to turn them and energize the panel.
A worksheet has been prepared for this puzzle and is appended; it is suggested that you refer to it during the following presentation.
The three blue grids that appear in the energized panel are plane views of a 3x3x6 unit 3-dimensional rectangular tower, and the dots in the grids indicate the position of the Rod of Osiris within this tower. Turn around and you will get a view of the tower looking down into it (do this by using the reverse cursor to turn away from the panel) and showing the Rod located as indicated by the dots. Note the orientation of the Rod and compare it with the panel grid containing the circle and eight radial lines spaced at 45º. Also note that the spherical tip on one of the Rod’s arms is missing.
In each of the rectangular grids one of the squares is shaded; the object of the puzzle is to move the Rod so that the dots rest in these squares, which represents the center of the top of the tower. You must also rotate the Rod to its upright position. The Rod is upright when the staff is vertical and the arm tip with the missing sphere is on the upper right. To do all this you have to adjust the switches below the four meters, then press the rectangular red button to put your adjustments into effect. You have three opportunities to do this; on the fourth try, when you press the red button the puzzle recycles and you have to start over by getting the keys from inventory, and you will find the rod has been randomly repositioned.
When the panel is energized by the keys from inventory, the switches are in their rightmost position and the meter needles on red. The switches are adjusted by clicking on either side of the knobs. The first thing to do is put all the knobs at the leftmost, or zero, position; all the meter needles go to the left. This means that if you pressed the red button there would be no change in the Rod position in the tower (i.e., the dots would not move) or in its orientation. You would also use one of your three chances.
The two switches on the left are straightforward in their action. The top left one sets up the Rod (the dot) movement in the X direction: either 0, 1, or 2 squares in the horizontal position, left to right, in the upper two grids as indicated by the X arrow on the worksheet. The bottom left switch moves the Rod along the Z-axis from 0 to 5 squares, downward in the middle grid and left to right in the bottom grid. (In all cases, if movement carries the sphere beyond the grid it circles back to the other end.)
The switches on the right are more complicated in their actions in that two movements are simultaneously affected. The upper right switch moves the Rod downward in the upper and lower grids and at the same time to the right in the upper and middle grids. The lower right switch moves the Rod downward in the middle grid and to the right in the lower grid, and at the same time rotates the Rod so that you can place it upright.
The rod is supposed to rotate clockwise in multiples of 45º increments, depending on the bottom right switch setting. Would that this were so. The rotation is indeed clockwise, but the rotational increments do not follow a consistent pattern. From actual testing:
Switch position 0 Rotation increment: 0x45º=0º
This is okay. The Rod does not rotate when the red button is pressed.
Switch position 1 Expected Rotation increment: 1x45º=45º
When the rod is positioned at 45º or 225º (/), the Rod rotates 90º when the red button is pressed; from all other positions it rotates 45º as expected.
Switch position 2 Expected Rotation increment: 2x45º=90º
When the rod is positioned at 135º or 315º (\), the Rod rotates 90º as expected when the red button is pressed; from all other positions it rotates 135º.
Switch position 3 Expected Rotation increment: 3x45º=135º
From all positions of the rod it rotates 180º when the red button is pressed.
Switch position 4 Expected Rotation increment: 4x45º=180º
When the rod is positioned at 45º or 225º (/), it rotates 270º when the red button is pressed; from all other positions it rotates 225º.
Switch position 5 Expected Rotation increment: 5x45º=225º
When the rod is positioned at 135º or 315º (\), the Rod rotates 270º when the red button is pressed; from all other positions it rotates 315º.
The table in the worksheet summarizes the foregoing lower right switch rotation information.
Having set all switches at 0, the next thing to do is turn around and look at the Rod within the tower, and also look at the heavy line in the grid with the circle and radial lines. Note the Rod orientation and determine how much it must be rotated clockwise so that it will be upright (segmented circle on worksheet should help here). Then, taking into account the inconsistencies detailed above, set the lower right switch to position the rod upright and press the red button; do not at this point concern yourself with dot Z movement. Check by turning around to look, and also that the heavy line in the circular grid is vertical. Assuming you are successful with correct reorientation of the Rod to render it upright, return the lower right switch to 0 and do not move it again.
The upper right switch is the only one that can produce Y direction dot movement, so using the upper grid, determine whether 0, 1, or 2 steps are required to put the dot in the middle row; if it is already there, do not move the switch or press the button, and turn your attention to the other two switches. Set the switch, press the red button, then return the switch to 0.
Since the left hand switches are single function, you can set them both to move the dot the required steps in the X and Z directions in order to place it in the highlighted squares, and press the red button for the third time.
You have three tries until reset, and an unlimited number of the latter. If you do not succeed in manipulating the Rod to the required position, get the keys from inventory and try again. Be sure and return switch settings to zero as indicated.
When the dots that indicate Rod position are in the highlighted squares and the Rod is oriented upright, the three dots will pulsate. Turn around to see the Rod (large but not upright), and then place the sphere from inventory on the Rod tip where one is missing. A video will carry you and the Rod of Osiris back to the Bequest Globe.
Bequest Globe III
As soon as you are back in the Bequest Globe facing the round door in the central pillar, the smaller pillar on the right, with the Rod on it, sinks into the floor. Click on the door to bring up the Crypto-wheel, then on the 1 or 9 to open the door. Go down to Malchut for more doubletalk from the monitor, after which you will get the Empress (III) Tarot card for you to bring to the brown panel on the back wall. Place the card in the holder to get a dire animated picture of something. Return to the screen to get a number (9), then go up to Kether.
The Kether mask in the screen gives you another lecture and the High Priestess (II) Tarot card for you to place in the holder below the wall map. This time you get a rundown on Mayans and the Bermuda Triangle. The Kether monitor gives you the number 5, and it’s back out to the blue bordered monitor to <ENTER> these numbers to get the name DIN, its number 5, its pentagon symbol, and location on the hexagon, lower left on the internal square. Click on the numeral 5 on the Cryptowheel, and you are clockworked to Din.
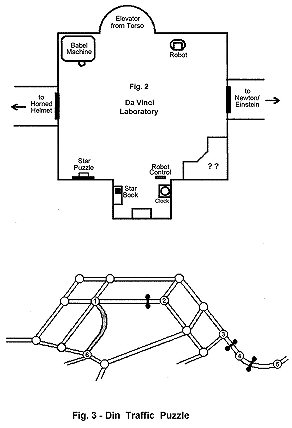
The Realm of Din (Earth)
When the brightness fades away you are in a room that to all appearances must be a library. There are a number of things to be seen, but the only thing to do at the moment is solve the Surface Traffic Control puzzle on the wall to your left. You must move the ball from the chariot on the left to the larger terminal square on the right. After you have left the chariot, click on the ball to rotate it and aim the arrow on it toward the path you wish to take; then click on the adjacent node to which you want the ball to go. If you fail to get to the terminal, the game is reset by reinitializing the traffic lights and returning the ball to the chariot for another try. As you move the ball you will discover rules of the game:
· You can only move the ball one node at a time.
· You cannot turn around and backtrack.
· The traffic lights:
1. The initial settings of the traffic lights are not random. Each time the game is reset the lights have the same red and green configuration.
2. Each time you move to another node they change color. After the first move from the chariot to the first node, there are 3 exceptions to that rule (refer to Fig. 3):
a. the light between nodes 1 & 2: the sequence as you move from node to node is RRGRRG...
b. the light between nodes 3 & 4 changes color every 4 node movements
c. the light between nodes 4 & 5 changes color every 2 node movements
· As you begin you will note that there is a section of broken track between nodes 1 and 6 (Fig. 3 again). After you move once from the chariot it is no longer broken. After your second move it is broken again. Thereafter every six moves it is unbroken.
· If you are at the entrance to the smaller destination square, you either can’t go in, or if you can and do, you lose and reset the game.
· The game resets after 20 moves.
Within the above restrictions, move the ball from the chariot to the larger terminal square. Give it a try. Here is a hint: the broken track that mends at regular intervals suggests that it is very likely to be part of the successful path. After that, a few more tries should do it.
If you still can’t make it, here is how to do so: from the node in front of the chariot, go down 2, then take the long straight track that goes right and a little upward. From there go up and to the left, down and back toward the chariot, then the short section to the bottom of the broken track (node 6), which should be unbroken when you get to it. Take the temporarily unbroken track upward to node 1, from which, because of the re traffic lights, you can only move one way. Then go to the right, down to the left to node 2, down to the right, up to the right, down to the right to node 3, and then just follow the path to the terminal square. For this you appropriately get the Chariot (VII) Tarot card.
Head for the door on the opposite side of the library. Before you get there, you will fall through a trapdoor hidden by the rug on the floor. You end up in room 7 of a peculiar maze of revolving doors. You can get out of this maze by leaving through the left door of odd numbered rooms and the right door of even numbered rooms. When you get to room 1 the doors are no longer revolving, but leave through the left door anyway, into a gray metal room, and continue through the next left door. You are on the correct track if you see part of a large, slowly revolving gear. When you get to the gear, an old man wearing a beaked mask dodders across your path, then dodders back again, all the while muttering the occasional discernable word. When you hear a metal door close, follow him around the corner to the right. Walk to the metal door and get a short mumbling lecture from the old man.
When he closes the hatch in the door, turn around, move forward twice, turn left, and go past the gear back to the metal room. The right door is spinning, so click on the left doorway and go through. Here is the old geezer again. Follow him out the door and go straight ahead along the passageway as he dodders back and forth across your path. (There are a lot of pauses while he is faltering and mumbling--move ahead as you get the forward cursor.) When you reach the door at the end of the passage turn right and go through the black door. Here he is again. Follow him. Watch the video as he divides in two like an amoeba, then one of him does away with the other, and they both dissolve, leaving behind on the floor a book and a glove for you to put into inventory.
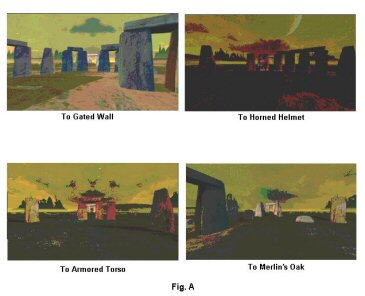
Go out the door on the right where the old man was heading as he dissolved. Keep going straight ahead, through the turnstile, and into the Theater of Memory, as identified above the entrance. Ahead on the far wall you will see two sets of steep stairs coming together in front of a locked door. Go to this point and go up the left steps to the second floor. Moving around in this location can be confusing, so a diagram, Fig. 6, is provided. When you reach the top of the stairs you automatically turn left, where on a display stand you can see a portrait of a man wearing glasses. Go to this portrait and click on a button at the bottom for a partial lecture on Karl Jung (see glossary). In the background to the left is the Karl Jung memory machine puzzle. When the lecture abruptly stops, approach this machine.
The puzzle contained in the Jung memory machine is an example of the MasterMind game in which you are to guess the sequence of a hidden set of symbols. In this case, if you run through the symbols by pressing buttons below any of the four symbol locations on the machine you will find that there are 8 different ones:
1 Gas mask
2 Alien
3 Skull
4 Surprised woman
5 Baby
6 Man with nose mask
7 Man with glasses on forehead
8 Bald man
The program randomly establishes the hidden sequence of 4 of these symbols. You set up your guess of this hidden sequence by pressing the up triangle or down triangular buttons on the machine for each of the four positions, then pull the handle at the right. The machine displays how many of your guesses are correct and in the correct position in the hidden sequence, and how many are correct but incorrectly located. Based on this information you make another guess and repeat the process, deducing which of your four are the correct ones and where in the group of four they must be. When you succeed in guessing a series that matches the hidden one you will have to watch a very long pointless video, after which you will get the Flying Saucer book.
With only 4 symbols to match, this particular MasterMind puzzle is not overly difficult. Your first guess can of course be any sequence of the 8 symbols, and you can proceed to try and make a match using the machine information. However, for a systematic solution, choose 4 of the same symbol, gas masks since they are already set up, then pull the handle to have the machine tell you if any of the hidden sequence symbols is a gas mask, and if so, is it in the correct location in the sequence. (In this case, if there is a gas mask in the hidden sequence, it would have to be in the correct place since your guess was all gas masks.) Should the machine announce that there are 0 correct choices you will then know that there are no gas masks in the series.
Change all 4 to aliens and repeat, then all skulls, continuing until you have determined which 4 of the 8 are in the hidden sequence. Now pick one that you know is present and put it in the first position, and in the other 3 put symbols that you know are not present, and when you pull the handle the machine will tell you if the known symbol is in the correct position; if not move it over one position and try again. The elimination procedure is quite evident and needs no further elaboration here. It gets progressively simpler as you establish a symbol in a position and leave fewer to investigate. Be on the lookout for a symbol being in the series more than once. Eventually you will get the Flying Saucer book.
There is an interesting alternative. Balmoral Software has produced a short program, mmsolve, that may be used to solve this puzzle in short order. Along with a Readme this program has been placed on a diskette that accompanies this game, or you can download it from Balmoral. Starting with your desktop, put the diskette in your A drive and launch the program MMSOLVE.EXE, then launch Drowned God. You can toggle between the two by using the Alt-Tab keystrokes. Bring up the DOS MMSOLVE and <ENTER> 8 for alphabet size and 4 for word length where indicated. The digits 1 — 8 represent the game symbols in MMSOLVE, which presents the first guess as four 1’s. Use the Alt-Tab keys to bring up Jung machine, where the four gas masks are the equivalent of the four 1's. Pull the handle. You have to convert the two numbers you get from the machine to one number for MMSOLVE. Multiply the correct guesses in the correct place by 10 and add the number of correct guesses in the wrong place, then <ENTER> this score in MMSOLVE. MMSOLVE will determine the best guess for a second set of four and return that. Set the Jung machine to correspond to this new set, then pull the lever again. Keep repeating this process and you should solve the puzzle in eleven or fewer tries and you will get the Flying Saucer book.
Now go to the star drawing near the entry stairs and press the button at the bottom of the picture for a short lecture on the Stone. Turn right and go past a locked door around to the photo portrait of Aleister Crowley (see glossary). Press the button on the bottom of the portrait for some information about him. Advance to the Crowley Machine puzzle. There is not much to this one. On the front in two rows are the nine possible Secret Symbols that you encountered at the beginning of Drowned God; when the voice stops, click on yours. (Actually, you don’t even have to remember it—just start at the beginning and you will come to it.) Then click on the button inside the triangle between the two speakers. You get a lot of senseless chatter from three or four talking heads, then a curtain draws back to show an outline of a hand. Put the glove from inventory on this outline. Then more gibberish and finally a drawer opens and you can pick up the Book of Lies.
You are through here for now. Go back down the stairs to the first floor, and move to the pair of mannequins on your right. From the mannequin on the left you can get the Justice (XI) Tarot card. On the inside of the right hand door in the chest of the mannequin on the right is a hard to read two page letter from Aleister. He mentions Baphomet (see glossary) and leaves an important 555 below his signature. A tour of the posters around this room may be of interest, though none figure in the game play. There is also a hole in the floor in which are stairs that leads to the basement, but they also lead to a dead end.
Leave the Theater and continue through the turnstile. Two moves past the latter, turn right, go up some steps, and turn left. This is the Skull subway station. Note the station icon. Instead of turning left, you could turn right, though you don’t have to do this, and go up the stairs to the station stop just to see what is there: a maze of colored pipes, railroad tracks, and a white rounded structure. The latter, though you have no way of knowing it, is the roof of the Theater of Memory that you just left.
Go back down to the subway, and a football shaped subway car pulls to a stop. Those of you that use public transportation will be truly amazed at how in this game a car arrives just when needed. Get on board and get a closeup of the subway map. You are at the skull station on the left. There are three other station stops plus a couple of dead ends. The button at the top has an icon that looks something like a fish with stumpy legs: click on that one. Off you go.
When the subway stops, turn around, leave the car, and go up the steps to a door. Upon opening the door and entering the area beyond you will find a maze of pipes as those outside the skull stop, some releasing white and blue vapor. Turn left and go between the lights into the hut with the round front. You are confronted with a bunch of controls and switches; study them closely. Behind them you can see a shadowy operator attending an array of meters, and you have to get his attention. Click three times on the 12-pointed dial at the left, waiting moments between each click for a response from him (a look, a wave), the last of which is that he comes slowly over to you, then disappears through the floor, presumably on an elevator. Click the dial once more and a process in the rear closes down with a hiss.
Leave this hut and return to the subway. On the way you get a look at a larger version of the station icon: it’s not a fish but a streamlined jet powered wheeled engine with a transparent cab. In the subway car press the button that has an icon that looks like a turreted Victorian house. When you get this station, go up the stairs to another area of pipes, though not as crowded. Turn left and go to the door in the brick wall. As you get closer it appears that this wall is part of a building that is sitting on railroad tracks. Go through the door to find yourself in the library where you first entered Din. One thing has changed: the stock ticker across the room has some ticker tape coming out of it. Cross over to look at it. It’s not your standard stock ticker tape. It has on it a bunch of symbols, many of which look like the controls and switches in the hut you just left, with numbers, X’s, and check marks next to them. Make a note. Better yet, go back to the hut and try those settings before you forget them. Leave the library and return to the subway.
Choose the engine stop again. When you get there go back to the hut with all the controls and switches, that you must now set according to the ticker tape:
1. Move the slider on the thermometer to 60º.
2. Turn the pointer of the star all the way to the right.
3. Click the 12-pointed star 3 times.
4. Move the slider at the bottom of the wind pentagon all the way to the right (NOT 4 dots as shown on the tape—somebody goofed). You will hear wind blowing and the gage at the top will fill.
5. Don’t move the cloud/rain pentagon slider.
6. Don’t move the skull switch.
7. Turn the TT switch all the way to the right.
8. Click on the plunger switch so that red shows.
9. Move the switch by the little gears all the way to the right.
With all the gizmos set properly, that shadowy man comes back up his elevator and pulls an overhead chain to envelop you in a pink fog wherein you see a video of stuff happening inside a giant eyeball, the conclusion of which shows aliens examining a human figure. More of this later. Video fades.
Well, that didn’t show much, except whatever you shut down before in the back is again up and running. Probably one of those things that must be done so that something else can be accomplished. Take the subway back the house station and return to the library. Put the three books that you have in inventory in the bookshelf, which then swings back to reveal a secret room. Go around the room and examine the posters Firebird, Gene Isis, Lost Angels, and Majestic that are in the room’s corners. These are code words that you may use later.
Note: in this game the Philosophers Stone is in the shape of a Star, and the two terms are used interchangeably.
At one end of the room is a door in which there is a holder that will accept the Chariot (VII) Tarot card that is in inventory. The door rises on what looks like a motorman’s cubicle. When you enter the two round windows slowly open. Move the handle forward and the whole structure moves ahead along the railroad tracks on which it was sitting. Just before it stops and the round window shutters close, you can see out the right window the white Theater of Memory roof. Leave the cubicle, go through the secret room to the library, and out the door. The white roof is on the left and you have moved to the Skull station.
Go down to the subway, enter the car, and this time press the button with the red dot. When you get to that destination the screen breaks up and you are teleported to a house trailer. Move forward twice, turn right, and click three times on the oval video screen to bring up the circuit board puzzle. This puzzle may look daunting at first glance, but it is pretty simple. First off, ignore the blinking colored dots. Then observe that there are four pairs of icons: pentagons, pyramids, chalices, and spoked wheels, placed symmetrically on the board. You are to join each of these pairs without crossing the joining lines. Here is one way: click on a pentagon; it turns green and white connectors start rotating around it. Click on the connector going toward the other pentagon. Do this three more times and they are connected. You see how it works. Now click on the upper pyramid, then click four connectors to the right, six connectors down, and four connectors to the left. Done. Click on the bottom chalice, three left, six up, and three right. Done. Finally click on the wheel on the right, start down and wind your way back and forth, up and down, between the established connectors to the wheel on the left. For this you get the Hermit (IX) Tarot card.
After you put the card in inventory the video screen shows five globes, a central one and four slightly smaller ones surrounding it. Click on it to bring it closer and you will see the central globe contains a rose inside a triangle and the other globes contain the characteristic symbols of this game‘s four Realms, one of which you have not yet visited.
At this point you must decide whether you wish to pursue an optional set of operations that show many papers and reports of the kind that you found in the secure room in the submarine captain’s quarters. These reports are identical in type to the captain’s, giving a lot of more or less connected information that may help understand what is going on. They are not necessary to move the game along, but it is a good idea to investigate them because they tie together a lot of what you have seen and experienced. And if you do start to read them——and there are a lot of them——you can at any time return to the game if you find that you are not interested.
Should you not want to investigate the reports, skip this paragraph and go to the next one...First of all, do not click on the central globe because this sends you to the Internet connection that is no longer supported. Click on any of the other four globes and the subject of one of the pictures you examined in the secret room off the library will appear, with provision for a code word below it. The code word is the word(s) that was on the picture:
Rod of Osiris: GENEISIS Star: MAJESTIC
Firebird: FIREBIRD Chalice: LOSTANGELS
<ENTER> the code words as appropriate and a list of reports will appear; click on the ones you wish to see. There are scroll buttons on the left to move the paper up and down, and to return to the video screen. Keep an eye on the various dates that are on these items, some should ring a bell. When you have finished, or have had enough, back off and continue the game.
To back off from the video display move the cursor to the left or right to show the down arrow, then to back off more, move the cursor to the top for the upward pointing arrow. Turn left and go into the bedroom, then turn right and click on the small globe to be teleported back to the subway, where you automatically go the House station. You know there is nothing there (you could check) because you drove it to the Skull station, so click on the engine button at the top. When you go up and enter the hut, a Tarot card holder rises on the right. Put the Hermit (IX) card in it. The shadowy, slow moving man rises in his elevator, goes to and throws a lever, and goes back down the elevator. In the back you can see that a white, round roofed building has risen: the Theater of Memory.
So it’s back to the subway, back to the Skull station, back to the library and into the secret room. As you enter the building you can see that there is more to the Theater than when you left. At the end of the secret room under a noose is a wooden pyramid. When you click on the latter, it opens and a strange metal head rises. Click on the base of it and you will get a closeup of a star shaped opening between two Tarot card holders, a row of digits, and a horizontal cylinder. Recall the 555 that was on Aleister’s letter in the mannequin—-click three times on the digit 5, tubes rise and fall beside the head and it says a few words (“make an old man happy”), then all is still. Click on the pump near the top of the head to bring up the tubes and start the head talking again, and repeat this each time the head falls silent. When it is done the pyramid closes; most of what the head says can be understood, but it is still the doubletalk that is characteristic of this game. He says that he is Baphomet, the Templar’s talking head, and that you must unite the Stone with him.
The door across from the bookcase entrance to this room is now accessible, and when you go through it you have entered the Theater of Memory via the formerly locked door between the set of stairways. Go up the stairs as before and go to the door just past the Star picture. Go through this now unlocked door and keep going forward, taking the right hand doorway when you come to it, until you reach a prisoner, the Man in the Iron Mask. Click on the speaker on the left of his cell for rundown on him, at the conclusion of which you can get a piece of the Star/Stone from the glowing red aura above his hands. It fills part of the star recess in your inventory. Turn around and move forward back to the Theater, down the stairs, and through the hole in the floor to a basement crypt where there is another prisoner, the Compte de St. Germain, whose name has come up before. Click on his speaker for his rundown, and get another piece of the Stone, which fills anther part of your star inventory.
Go back to Baphomet in the secret room. Click on the pyramid, and when he rises put the two pieces of the Star in the star cavity in front of him. He then tells you that you must choose between the two prisoners. Put your last Tarot card, Justice (XI), in one of the two places next to the star cavity. Apparently it makes no difference which one you choose. When you make the choice and place the card, the Star fills in, and the now familiar video takes you and the Star back to the Bequest Globe.
Bequest Globe IV
You are once more looking at the Bequest Globe central pillar door with the Star affixed to the left pillar. The pillar immediately rotates to hide the Star and bring back the familiar computer. Then the Cryptowheel appears, ticking off the numbers of the Tarot cards that you have used so far. Once more click on the 1 or 9 to open the door and go up to Kether. The mask in the monitor is not so irascible this time, rather it is more congratulatory. Sounds more like a snake oil salesman, in fact. “Trust us”, he says, then gives you the Devil (XV) Tarot card to put in the holder below the map. You get information on the Four Corners area of the southwest USA, and Egypt and the pyramids, though the latter does not come up in the game. You get the numeral 6 before going down to Malchut for the usual twaddle from that mask, and the Death (XIII) Tarot card to place below the panel at the rear, for which you get another enigmatic animated picture. Back to the monitor for the numeral 7, then out to the blue bordered monitor to <ENTER> the 6 and 7. Again the interminable ominous doubletalk during which you get the name CHOKMAH, its number: 4, its spoked wheel symbol, and location on the hexagon: lower right on the internal square. Click on the numeral 4 on the Cryptowheel, and you are clockworked to Chokmah.
The Realm of Chokmah (Fire)
When the scene comes up on Chokmah you are looking at a brilliant sunset through a locked chain link gate with a Restricted Area sign on it. Presumably this is the Four Corners area of the southwest US. Turn around to see a deserted diner with a trailer next to it. Go to the trailer and open its mirrored door. When you enter you will find that you are again in the trailer to which you were teleported in Din. Ahead of you is a device half concealed by a sliding door. Click on the door and it will move aside. Click on the device and you get successive closeups of a brain implant until you are looking at a 3-dimensional matrix of small violet and yellow spheres.
This is the brain implant puzzle. At the bottom one of the spheres is an eyeball. This is you. At the upper right is another eyeball. This is your opponent. You can move to any connected sphere. The idea is to get next to him so that if it is your move, you can capture him and you win. On the other hand, if it is his move, he can capture you and you lose. Therefore you have to force him to move next to you. You can’t do that as long as the moves alternate between violet and yellow. Over on the left there a location where two yellow spheres are adjacent; move through them and the color alternation is reversed and you can chase him and win. For this you earn the Hanged Man (XII) Tarot card.
Now look around the trailer. You may encounter an alien who looks at you with curiosity, then fades away. The globe in the bedroom is gone, the oval video screen is not responsive. To the left of it, however, is a tape recorder on which are segments of an aircraft transmission that is full of static. It sounds very much as the one from the rusted aircraft wreck in the Chesed pyramid area. On the bench across from the tape recorder is a telephone answering device with a blinking light; click on it to get a message from a female reporter about the aliens.
Leave the trailer and go to the diner. Go in, turn left, and walk toward the end of the room. There seem to be unfinished meals on the counter and in the booths. Answer the phone when it rings to hear a female voice tell you to contact Edgar on a safe line, then the phone goes dead. Go around to the radio on the counter and turn it on. You can tune to many stations, but you are looking for a broadcast from the Edgar just mentioned, Edgar Cayce. It will come in stronger than any of the others, and he will start by giving his name. To find this, set the radio to the top band and move five tics from the right end of the dial. After he starts talking, back off and turn around, the Pigman will materialize in a booth and start talking. After he fades out and back in again, put the XII Tarot card in his right hand when he holds it out, and take the Judgement (XX) card from his left, and he fades away. Turn aside, and the Man in Black takes you out. You return back in the Bequest Globe with an empty inventory.
Endgames
Save your game at this point, as there are three endings.
Click on the round door to bring up the Cryptowheel, then go to Kether for a very strange haranguing from the mask, telling you that you have failed to bring back the last artifact, the Ark of the Covenant, but you will be prepared to do it by going behind the other door in this room. He also warns you not to believe Malchut. The Sun (XIX) Tarot card appears in the tray in front of the monitor for you to use in opening the other door in this room. Go to that door and put the Sun card in the receptacle to the right of the door. When the door opens, enter and get the Strength (VIII) Tarot card from the panel on the right and put it in the receptacle on the closed door. Go into the room beyond and click on the monitor screen for a glimpse of the Man in Black, then you see the Fool Tarot card, after which you get the final mixed up fable, and the game fades away without getting the Ark despite Kether’s promise.
Launch the game again and go down to Malchut, who warns you against Kether, and you have a very similar experience to that which you just had with Kether, except you get the World (XXI) Tarot card to open the room’s other door, and then Wheel of Fortune (X) Tarot card to open the last door resulting in the same fable.
Launch the game yet again and go to Kether and Malchut, but when you pick up the Strength (VIII) and Wheel of Fortune (X) Tarot cards in the locked rooms, return to the Bequest Globe main room and put these cards in the Cryptowheel. A group of Aliens will appear, one of whom says something—as usual, completely unintelligible—and the same final fable concludes the game.
Commentary
Small matters:
· The non-use of the horned helmet seems strange.
· Why bring up Egypt and the pyramids in Kether’s map with no further reference? Red herrings? The same for the Bermuda triangle. The only connection might be the fragmentary aircraft transmissions that have no impact on the game.
· The slug in the water in Chesed says to choose alpha or omega, referring to the letters L and W on the pedestal; L is the Greek L, not alpha.
· Edgar Cayce, self-styled ESP authority, should be listed in the game booklet glossary.
· The wrecked submarine at the bottom of the sea (Bermuda Triangle?) for an unknown length of time has lots of lights and equipment in working order.
Large matters:
· Much, much dialog, a substantial amount unintelligible, and that which is understandable is mostly inanity.
· Dialog may not be skipped.
· Only six game storage locations.
Very large matter:
I very much hope that I have not missed something in playing this game, because the ending as I found it is a bitter, bitter disappointment, completely unsatisfactory. Is the failure to recover the last artifact a way out of having to describe the effects of the purported tremendous power of the assembly of all four? In addition, why have three endings if they are all offer the same dissatisfaction? After working one’s way through adventures and puzzles to end up with a nothing is another of the drawbacks cited at the beginning of this document. It’s almost as though the authors decided the game was long enough and they should simply bring it to a conclusion with a lame ending, or else they lost interest and cut it short. After stating that the relics assembled together have great power, then arbitrarily to fail to retrieve the last one and to have the others disappear leaves the story and the player hanging. Failure with no alternative or even an explanation is unacceptable, to say the least. I hope that some day I am presented with a reasonable explanation.
Soren Andersen, June 01
NOTES
Patches
A couple patches for Drowned God, dgpatch4.zip and dg-morg.exe are available from The Patches Scrolls and from GameSpot.
dgpatch4.zip — this patch is required (at least for Windows XP) and is also supplied on a diskette. It should be incorporated when the game is installed, and following are steps to do this.
Place disk 1 in a CD Rom unit and access that unit.
Open folder SETUP and double click on SETUP.EXE, then keep clicking Next on the windows that follow (there may be a long wait for the first window) for the default installation.
Extra Game Storage
There is a way to overcome the limitation of 6 inventory slots with a little finagling if you think it is worth it. Find the location of the stored games, which will be C:\DrownGod if you followed the default game installation. There the games are stored as a series of files dgsaveN.dat where N goes from 0 to 5 for the full 6 game capacity; in addition, a dgnames.dat file appears the first time that you store a game—it is assumed that this is a local directory for the 6 stored games. In a convenient location (Local Disk (C) is a handy one) open a new folder, say DGsavgam, then within this folder open several more: Set 1, Set 2, etc., for as many sets of 6 games as you think you will need. Inasmuch as the stored games in the Sets have no indication of where in the game they are referenced, it is a good idea to keep a separate listing of these locations.
When you have filled a set of 6, move (not copy) the set of 6 saved games plus the dgnames.dat file from C:\DrownGod to a Set folder. Using the Alt-Tab keys to toggle between Windows Explorer and the game is convenient for drag-and-drop moving of the saved games. When you go back to the game you will find 6 vacant storage locations for more saved games...To use any set of saved games, delete any saved games (and dgnames.dat) from C:\DrownGod, then copy (not move) the desired Set to this folder...Unless you want to keep the stored games for future gameplay, delete them when you uninstall the game.
Game Freezes
It has happened that in the midst of gameplay-—or the above extra storage operations—-the game action freezes except for the movement of the cursor. Should this occur, a possible solution is to use Ctrl-Alt-Del to bring up the Windows Task Manager; in this window highlight the game and double click on it, which might cause play to resume. Maybe not.