The DaVinci Code
by The Collective
Walkthrough by MaGtRo and Rice Burner
May 2006
This document has been updated: June 19, 2006
GamePlay: Please read the manual for this keyboard action adventure game. The save checkpoints are predetermined by the game and is flashed on top of the screen. You can then save at that point or not. If you don't, the loaded game will start at the beginning of each location. There are only 10 saved game slots. Use the Visual Database (tab key) frequently and select clues. This will review the clues taken and sometimes shows the solution before the puzzle is solved.
CHEAT CODES USED IN THIS GAME:
Vitruvian man – God mode
Sacred feminine – Double health
Phillips Exeter – One hit fist kill
Royal Holloway – One hit weapon kill
Apocrypha – All visual database unlocked
Et in arcadia ego – All bonuses unlocked
The Louvre
Robert Langdon arrives at The Louvre for a meeting with the curator, Jacques Sauniere. Robert is met by Bezu Fache, an inspector of the Judicial Police. Robert was informed and shown the naked body of Sauniere. Look at the active spots on the body. Take note of all the clues.
Sophie Neveu, a cryptographer of the Judicial Police arrives. She hands Robert a business card to call for important message. After the cutscene of calling the number and hearing the message, Robert goes to the bathroom.
Take the soap from the sink counter and combine it with the tracking device in inventory. Go to the window and follow the directions seen at bottom of screen. Throw the soap-device out the window.
Go forward to the far end of the hallway. Enter the grilled door. Learn how to sneak. Sneak pass the guard and stay close to the left side that is shadowed.
You can either pick up the bar from the floor and do a sneak attack or fight him directly. Examine the cart and take the UV light.
Sophie is joined by Robert facing the Mona Lisa painting. Examine the painting with the UV light. A cryptogram is seen. Highlight ALL the letters so that the puzzle will start. Replace the symbols with letters. Some symbols are similar to the alphabet they represent. Find the most common symbol and see if it would work for either a or e, s for the end of a word and see if frequent words like 'the' will fit in the decryption.
DA VINCI
PAINTED THOSE
THAT KNEW
BETWEEN BACCHUS
AND URIEL LIES
THE CLUE
Go to the statue at the center of the room. Note the highlighted symbol. Take the Saturn sphere. It will not be in inventory but information can be seen at the Visual Database (tab key). A highlighted symbol usually shows that a 'secret' is hidden close by. There are 'secrets' scattered throughout the game.
Exit through the door at other end. To the right of the door are active paintings of Bacchus on the left, John the Baptist at the center and Uriel on the right. The painting of John the Baptist is pointing up. Pan up and see something on top of the painting above John the Baptist. Lift Sophie up to take the Priory ring.
Hear a phone ring. Go to Sauniere's office opposite side of the hall and to the right. Listen to Fache give orders to capture Robert and Sophie. Listen to the answering machine and hear Sister Sandrine cry for help. There are 2 guards here. You can hide or do sneak attack or fight. Examine all active spots on the desk. Take the small bandage for minor injuries from top right drawer. Use it if your life bar is down. Examine the statue at top left of the desk. See that it is pointing to something. Use the UV light on map on wall left of door. Check the vent at top of the left wall from the map. It is activated by the statue examination. Lift Sophie up to enter through the vent.
At the Restoration Room, go to the nook at left corner and take the first aid kit. You can use this in extreme injuries. Go to top left corner and examine the table. Read how to clean or do restorations. Learn about the different chemicals (enzymes, counter enzymes, catalase...) and how they are mixed. Turn around from the table and examine the boxes. Take the Da Vinci's Arial Screw. At the center of room, take the towel from toolbox. Go to table right of door. Prepare cleaning solution - Use one dose of Chitinase, add one dose of Dismutase and 1 of Catalase to get cleaning solution. Examine the dirty painting. Combine the towel and the cleaning solution. Use it on dirty painting. It shows the painting of Nike.
Exit restoration room, go back to Mona Lisa Room on opposite side of the hall and to the right. Go behind the left side of the Mona Lisa wall. There will be a guard here. You can do a sneak attack or fight directly. Enter room, go right, forward and hide. There are more guards on the way to the Nike statue. They will eventually leave. Creep down the stairs and see a guard by the statue. You have to fight him. Stand in front of the Nike statue and examine it. Go left of the statue and examine the display by the railing. Use the priory ring on the indent. Take the Fleur-De-Lis disk. Sophie recognizes the disk.
Go down the main staircase. On the landing, turn right, see a highlighted symbol on the wall. Take the lead coin from the right railing.
See 2 guards patrolling the hall. Hide behind the statues or displays. Wait until they are apart and do a sneak attack. It is always best to fight one at a time. Use first aid or bandage if needed. Exit through the door.
Saint Sulpice
Sophie and Robert separate to follow different clues. Robert to help Sister Sandrine who was heard on the answering machine and Sophie to follow the Fleur-De-Lis disk clue at her grandfather's mansion. Robert enters the Church. See a cutscene of the murder of Sister Sandrine.
Fight the monk attacking a nun. Talk to the Sister Margarite and she will go hide in her room. Take the small bandage between the 2 beds.
Go across to the other room. Examine sister's body. Note that her right hand is pointing under the bed. Go to the desk and check the paper and note Matthew 7:14. Go to left side of the bed and pull the bed. See a safe under the bed. It has a letter slider puzzle. There are 4 symbols under the tiles. Draw these symbols for reference. We need more clues. Examine a cabinet right of the door. It is locked but has the symbol.
Exit room, turn right and open the door to the inside of the church balcony. Enter through the door at other end. Take the bolt cutters and can of oil from the supply shelf. Exit the room and back to the other side.
Go forward pass Sister's room and knock on door on the right. The nun will say that Sister was carrying 2 statues.
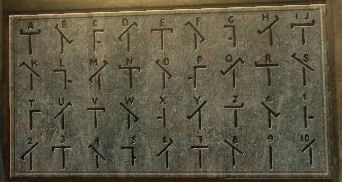
Enter through the door at end of the hall. See a monk. Fight or sneak attack the monk. Go forward to end of the balcony, look at the symbols on the wall. These are the Chappe Translation of the symbols to alphabets and numbers.
Go back to the safe under the sister's bed. With the translation panel, translate the symbols under the tiles. Place the appropriate alphabet tiles over the symbol to form S I O N. Take the bronze slide.
Exit the room and if you haven't talked to the other nun, do so for other possible clues - that Sister did the Way of the Cross in wrong order. Exit through the door to the outside balcony. Enter through the door on the left to enter the church.
There are several monks walking around. Try to take them all out one at a time using sneak attack or direct attack or push when the monk is by a wall and then drag-hide them. On the side aisle left of Way of the Cross station 1 and in front of a side altar, take the small bandage. Use it when needed. You can read the explanations at each Way of the Cross. Pan down and see a hole on a ledge. Go to the shell holy water container on the post across from Station #8. Take the key.
Go back to Sister's room and use the key on the cabinet right of door. Take the reclining Jesus statue. Go back to the chapel to the alcove between stations #9 and #10. Examine the window and take the tin coin. At an alcove between stations #3 and #4, see a book stand. Read the book and learn the dates of the 2 eclipses. One on April 11 and the other is on October 4th. Turn to the right and look down. See a stone slab that month and date can be entered. Enter the date closest to Jesus' death: Aprilis and XI. A small platform rises from the floor. Take the Jesus carrying the cross statue.
Go to the padlocked door right of Station #7. Use the bolt cutter to remove the padlock. Go up and see the church organ. Go to the right side and see a clock. The clock stops at 12. Turn (click-hold hand) the clock to the numbers seen on the paper at Sister's room - 7:14. The secret compartment on the floor of the organ opens. Take the copper slide. Pick up the large bandage at corner of the organ balcony.
Go to the aisle with Stations 7-14. On the floor at the middle of the aisle is a locked hatch. Based on the description of the statues on hand, description of the station and the paper found in Sister's room, place the appropriate statues on the hole below the correct Way of the Cross Station. Place Jesus carrying the cross statue on hole at Station 7 and reclining Jesus statue on the hole at Station 14. See the roll bar removed from the floor hatch. Go to the floor hatch and enter.
At the crypt, turn right upon entering and see a stack of boxes. Examine and take the Da Vinci ornithopter. Go forward to the altar with 3 lanterns. See that the middle lantern has a slide with letters on it already. Open all 3 lanterns. Examine the door of the lanterns on the 2 ends. Place the appropriate slide (copper slide on copper lantern...) with letters on the door. Examine the cavity at the center of the altar and use the can of oil. Light the wicks of all the lanterns. See letters projected on the wall. It reads JERUSALEM. Turn around and go to the tomb at right wall. Push the tomb to reveal symbols. See that the symbols are similar to the Translation panel on the wall of the outside balcony. From left to right, the symbols are translated S E. R I L A M E.. U Arrange the tiles to form: I E. R U S A L E.. M or push the tiles (numbered left to right) 4 2 3 9 1 6 5 8 7 to make 1-9.
A secret compartment on the floor opens up. Take the paper and Robert will read it. It shows the list of the Grand Masters of the Priory of Sion. The monks come. Try to wait when they are separated and do sneak attack. Somewhere is a metal rod that can be used to attack. Or you can try to creep towards the entrance (ladder) and run to the exit.
At the chapel, there will be monks around. Either creep to the exit door or fight them one at a time. Robert talks to the other nun to be sure that she will be okay.
Normandy Mansion
Watch Sophie climb the mansion wall. There are 2 dogs. They are named after Leonardo's parents. Go left and pass the open kennels. See a hanging rope on the walkway. Go forward to the building. The door is boarded up. Remove the board and enter. Open the freezer on the left side of the room and take meat.
Go to the open kennel and place the meat on the food bowl. Go outside the kennel and then left. Pull the hanging rope to call the doggies. The dogs eat well.
Go to the right and see that the door is closed. Go to the back and climb to the window. A monk climbs down from the window also. Fight him. After taking care of the monk, check the shelves. See a locked box with a chalk board with numbers on the left. Sophie will note that it is based on the Fibonacci Sequence. The sequence is based on the addition of 2 adjoining numbers to make the next number; then the new number + the previous number makes the next number... Example on the board is 112358. So 1+1=2, 1+2=3, 2+3=5, 3+5=8. The lock box numbers would be the continuation of the numbers on the board. 5+8=13, 8+13=21, 13+21=34.
Enter the number 132134. Take the key and exit the building.
Go forward to the center of the yard. There's a wheel to the right that turns the bridge. Turn the wheel so that you can cross. Cross the bridge and use the key taken from the shed on the mansion door.
Go left and see a locked door. Turn left and open the cabinet. Take the Aeneas statue from the bottom of the cabinet. Turn around from cabinet and go forward to the family room. Look at the fireplace and see that there is a disk missing out of 4. Place the Fleur-De-Lis disk taken from the Nike display at the Louvre on the hole. We need more info to find out how to turn the Fleur-De-Lis disks. Go to the far left window and pick up the Cupid statue from the side table.
Exit the family room on the opposite end and climb the backstairs. At the landing examine all 4 Goddesses. Take note of each description about them. Look above each stained glass panel and see the Fleur-De-Lis associated with each goddess. Now the directions of the Fleur-De-Lis are known but the sequence to use for the fireplace is still not known. From left to right: Nidaba (pointing up) , Tiamat (pointing down) , Belet ili (pointing right) and Isis (pointing left).
Continue up the stairs and use the priory ring on the lock, enter the bedroom. Examine the bed and take Da Vinci's tank from end of the bed. Examine the dresser right of the bed. Take large bandage from middle right drawer. While in examine view, use the priory ring on bottom left locked drawer. Take Vulcan statue. Read the poem on top center drawer. This gives the clue for the sequence of the Fleur-De-Lis of the fireplace puzzle.
Enter the door on the right to be in the upper library. Examine each book case to add to the Visual Database. Go across to the other side and see eyeholes on the wall. Look close on the table. Open the box and take the Jupiter statue. Read the note about Venus and her admirers facing her. See the next cryptogram. The same letters are used as in the Mona Lisa puzzle. Some symbols are similar to the alphabet they represent. Find the most common symbol and see if it would work for either a or e and see if frequent words can fit like 'the'.
JUPITER IS
ABOVE VULCAN
AENEAS IS BELOW
MARS MARS IS TO
VULCANS RIGHT
Go down the stairs to the lower library. Meet another killer monk. <sigh> Do the best you can to win. After disposing the monk, examine the table by the window. Move the box to the left and it will push off an item. Look under the table and take Mars statue. Open the door to the left to unlock the door for the other side. Do not exit. Exit through the door by the winding staircase to be in the family room.
Now that information is gathered from the stained glass Fleur-De-Lis and the poem, go to the fireplace. Turn the Fleur-De-Lis based on the poem taken from Sauniere's bedroom, identified goddesses and the direction of the Fleur-De-Lis from left to right:
From her the heaven and earth were born: Tiamat - point down.
From her the race of man was born: Belet ili - point right.
By her their names were writ in stone: Nidaba - point up.
By her a healing love show: Isis - point left.
The lion's mouth opens. Take Venus statue.
Go to the foyer and climb the main front stairs. Enter the room on the right. See the painting on the right wall with eyeholes. See the highlighted symbol on the wall. Examine the painting on the left and take the Jupiter sphere.
Climb to top of stairs and enter the room. Look around. Go to the platform by the window. Place the 6 statues collected on the side ledge of the round table. The aim is to place the statues based on the decrypted clue.
Place Jupiter on top, Vulcan at top left, Mars at top right, Cupid at bottom left and Aeneas at bottom right. Place Venus at the center.
Turn the male statues to face Venus at the center. Then turn Venus to face front or facing between Cupid and Aeneas.
See the windows open to view the garden maze. See the statues represented on the table to the bigger ones in the maze.
At the maze, see the police arrive. The best way is to sneak around them or do the sneak attack. Drag the unconscious guard to hide them from the others. The aim here is to find all the male statues and turn them to face Venus; just like the small statues puzzle. When you find one, turn it and the game will state when it is facing Venus. Stop then and look for the next one. To navigate the maze, go left and find a statue, turn it and then go left again until all the statues are turned. When the statues are turned, Venus will rise and an entrance to Grandpere's underground secret chamber will be seen. Go to Venus and enter the secret chamber.
See a chamber with 5 stands in a circle at center of room. On left of entrance is Hathor and on the right is a goddess. At the back are robes for a secret rite. The aim of the puzzle is to light up all the stands. Take the unlit torch held by Hathor left of entrance. Light the torch in one of the fires. Go around and light the stands. Some lit stand will turn off the fire from another stand.
I got this from a forum help because I got it by trial and error: By trial and error, unlit all but one stands. Move to the left, skip the next 2 stand and light up the next stand. Then go left, skip one stand and light up the next stand. This will light up all the stand. The goddess' hand opens to reveal a key. Take laser etched key. Examine the key in inventory.
Bank of Zurich
Sophie picks up Robert from St. Sulpice. At the Bank, talk to the guard at the reception desk and Sophie will show the key. Enter the door on the right and be in a multilevel area. Go left and enter the first active door. Go forward to the gate. Use the laser etched key on the gate. Go forward to open room at other end. Use the laser etched key on the center stand. See the box taken from the vault and brought down. Now it needs a password. The box has symbols and is translated to be 21 and 500. Using the Fibonacci Sequence will result in 521. You need 4 digits. 500 + 521 = 1021. Enter 1021 on the stand. The box opens. Take the cryptex. Examine box and see that there's a small hole on the top lining of the box. Go to the desk by the wall. Open the drawer and take the paperclip. Use the paperclip on the hole of the box lining. Read the note and deduce the needed word. Open inventory and use it to enter the word GRAIL. The Bank manager arrives to help you get out of the building. He gives a security card with level 1 clearance and a vehicle key. The Bank guards will be alerted by the arriving police to look out for them.
Exit the room, walk pass the guards, out the door and go left. Turn right and use the security card to enter the elevator. Meet a friendly guard. Enter the elevator and get a message from the manager. You need to update the card to level 2 clearance at the Administration Office. Open the elevator roof hatch, climb up, turn the wheel to manually open the door and exit.
There are 2 guards patrolling this second level. Creep to the right outside the elevator and see if the hallway is clear. You can also fight them or do sneak attack. Enter the first door on the left of the hallway. In the storage room, examine the left shelf. Take the large bandage and the Mars sphere.
Exit the room and turn left. You might meet a guard. Go forward and enter the last door, the Administration Office in this hallway. Again there are 2 guards here. Creep around or do sneak attack. Best to get them out of the way so that you can move about freely. Upon entering this office, turn left to end and right to middle of hallway. Enter the door on the left. Inside, enter the room on the left wall to get to the Bank Manager's Office. Go around his desk and he talks to you. Use the security card on the machine on his desk, enter the password 867530 and see that the password was changed. You need to go to the Office manager's office to find out the new password. Exit this office and the other office to go back to the main room. Turn left on the hallway, right pass the security office and enter the last cubicle on the right. Examine the shelf to get Da Vinci Ballista. Go back to the perimeter hallway. Turn right on the perimeter hallway and enter the room on the left. Look around the desk and take large bandage from bottom drawer. The middle drawer has a password - 728559. Go to the painting behind the desk and use the UV light on it. See that there are handprints at bottom of the painting. Lift the painting and see a safe. Use the password 728559. Take the file cabinet key. Exit the office. Turn right, left and right to the Security Office at the middle of the back hallway. Go to the back wall. Turn around and use the key on the top right drawer of the long file cabinet. Examine and get the new password - 260924. Go back to the Bank Manager's Office. Exit the security office, turn right, left and enter the office on the right. Enter the Manager's Office on the back wall. Insert the security card on the machine on the desk and enter the password 260924. Go to the perimeter hallway across the room and right of the Office manager's office. See a card machine. Before you use your card in the machine turn around and look at the two privacy rooms for a glowing symbol. Find the Iron coin. Use the upgraded to level 2 security card on the machine. Go through the newly opened door on the right and walk down. Exit through the door at the lowest level.
At the atrium, sneak pass the guards by going left on the shadowed area. Enter the door, go forward and enter the only door that can be opened - the last door on the left. Go forward, going through several doors until an area with privacy rooms.
In the area with privacy room, go to left corner of the area. See a vent above. Lift Sophie to enter through the vent. Sophie jumps down in an aisle between a line of servers. There are 2 guards in this area. The way I did this is creep to the right and hide behind the banks of server on far wall. Sneak attack the patrolling guard. There 's a door and an open office on the left wall. The other guard is in the open office. Sneak attack the guard when his back is turned. Use the security card on the machine on the right bench to upgrade to level 3 security clearance. Exit and enter the door on the right. Exit through the door at end of this L shaped hall. Join Robert in Privacy room area. Exit and go forward the way you came.
To pass the 2 guards at the atrium, sneak on the right shadowed side by wall until you get to the door on the other side.
Use the upgraded to level 3 security card on the machine to open the door to the loading dock. Creep to the left shadowed area and wait for the guard to walk close to you. Do a sneak attack. Creep to get behind the other guard standing by the end of the room and do the same. Take the small bandage from the closet behind this guard. Further down in the next area is another guard. Take care of him. Use the vehicle key on door and you're out of here.
Chateau Villette
Meet Sir Leigh Teabing. He will instruct Sophie about the Holy Grail. Before going any further find the stairs leading down to the basement off the foyer. Go down and find the room off to the left. Go to the left rear of the room and see the glowing symbol. Look for the Copper coin. Take it. You can examine a couple of things here but they are not important. Go back upstairs and Teabing will give you some history. Listen. Examine the 2 paintings. Examine and listen to the descriptions of all the shields by the window. Select and carry the extreme left shield with a red heart of Percival's to the Knight left of the set of shield. Then do Galahad's shield with a red cross to the knight right of the shields. The doors beside the knights open.
Enter the room right of the shields. See a Last Supper painting above the mantel. A line of chalices with the the different knight's coat of arms. See a keypad right of a locked door left of the bookcase with the note. Examine the note on the bookcase left of the doorway - Solomon's Song: Verse 14, line 4, word 3.
Go to the room across the shield room and look around. See an active stand that has an 'Arthur tag'. Check the bookcase and examine the open bible. Read (after examining the note at the reading room) the Solomon's song verse 14. Look at the 4th line and select the third word on that line - HEAR. Go back to the other room. Go to the keypad and enter HEAR.
Enter and see a piano. The other door goes out to the foyer of the Chateau. Secret - Open the other door. Examine the table and take the Venus sphere. Go back to the Reading room. Pick up Arthur's Red Dragon chalice. Go back to the library. Place the Red Dragon chalice on Arthur's stand on the right. The door on the right opens. Enter.
Do the slider puzzle of the picture seen at Sauniere's Normandy Mansion. This opens the door on the left. Enter and take the music sheet from the table. Go forward to the corner and examine the display case. Take Da Vinci's Warcart.
Go back to the Piano room beside the Reading room.Place the music sheet on piano and do the piano puzzle. See the keys and mouse buttons to follow. Wait until the notes below the keys or mouse buttons to be highlighted yellow and immediately follow the clue. If that button is clicked correctly it will turn green, if wrong red.
Listen and watch what Teabing says. Highlight different active spots on The Last Supper painting: The V left of Jesus, the Grail on the post left of the painting, John (Mary Magdalene) left of Jesus, M that connects John-Mary Magdalene to Jesus. You now have what you need to solve cryptex 2. The solve is ‘MAGDALENE’. A cut scene follows.
You have to gather parts for a weapon. Run up the stairs to the room with the piano and take the globe in the corner. Silas then bursts on the scene. You will have to fight him. After the fight the globe is sent to the basement. Go to Percival’s room. Turn to the right, the part you need is there but Silas comes in again. Fight him for the part and it gets sent to the basement also. Go to the room you just stuffed Silas into. Approach it through the other door from the main hall. Go to the far corner and Silas appears yet again. Fight him off again and the final piece will go to the basement. Enjoy the cut scene.
Biggin Airfield
Teabing’s plane lands at Biggin Airfield and he is questioned by the police. Robert and Sophie escape the hanger.
When you get control go to the waste bin and push it in front of the door. Turn to the electric panel and pull the switch down. Go across to the railcar and release the switch/lever. The railcar moves forward. Stay along side so you won’t get shot by police. When the railcar stops run to the door and enter.
Turn to the right and get Da Vinci’s bridge on top of the crate. Go right to the tool box and examine it, take the bolt cutters. Go to the other end of the hanger and use bolt cutters on chained door.
Open the door and go inside. Climb up the ladder at the end. Go forward and use the controls to move the bin to the other side of the building. Go back down the ladder and the police come in. Fight them and win. Go to the storage cage and examine the shelves. Take flare. Go to the trapdoor and open.
Climb down into the WW2 bunkers. Go straight ahead and down the stairs. Straight and turn corner. Hear the police talking through the vent. Go forward through the door and see trapdoor in the floor. Climb down and turn right. See the door. You can’t open it, no power. Turn around and go back down the hall. At the end turn right and then left. Find the stairs. Go up and find a padlocked door. Use the bolt cutters.
Open the door and go through the steam room. Open the door at the other end. At the other end of the room find Auxiliary Fuse Box. Take 3 - 50 amp fuses. Turn around and take the catwalk to the right. Turn right and right again to another fuse panel. Take 2 - 300 amp fuses. Turn around and go to the end to a ladder.
Climb up into a control room. Examine the shelves and take first aid kit. Go to the control tower elevator. Cutscene. There is another fuse panel. Take 3 - 300 amp fuses.
Go back to the elevator. Fight the police. Go back to the trapdoor and down to the bunkers. More police. Fight them.
After the fight go down the center catwalk, turn right and look for ladder on right side and climb down to generator room. Go to the main fuse box at the other end of the room. Take all the fuses in the box.
Now you should have 8 - 300 amp fuses and 4 - 50 amp fuses. We need to examine the schematic to the right of the power switch. Use the UV light on it. See the surface door on the lower left. IT needs 100 amps. Go back to the main fuse box on the left and use two 50 amp fuses in the two slots on the lower left. Go back to schematic and look at Left Generators on upper left. We need four 300 amp fuses in the four slots. Go back and use 4 - 300 amp fuses on the upper left grouping. Back to the schematic and look for the Right Generators. Again we need 4 - 300 amp fuses. Go back to the panel and insert 4 - 300 amp fuses in the upper right corner. Pull the main power switch. If you got it right the generators will start.
Go back to the other end and turn left before climbing the ladder. In an alcove there look for the symbol on the wall. Turn around and take the Mercury coin. Go back to the ladder and climb up. Go back down to the bunkers. When you get to the bottom of the stairs a guard will cross from left to right. Let him pass and go left and find the alcove. Look for the symbol on the wall. Examine and take the Mercury Sphere. Backtrack to the door you need to open to get out. More police. Fight them and go to the surface access switch on the wall. Hooray, the door opens.
Go straight ahead and turn left at the end. Go forward and see large shaft turning. Go right and climb the ladder. Forward and jog to another ladder. Fight more police. Go over to the jet fuel tank in the corner of the yard. Use the bolt cutters on the lock. Open the valve and pump fuel out the hose onto the ground. Go up the ladder to the roof. If police are there, fight them. Go to the break in the wall and use the flare. Save your game.
Temple Church
Cutscene while the group goes to the Temple Church. Use coded message in your inventory. Solve the cryptogram:
OUTDOORS THE
GRACEFUL WATER
YOU WILL SEE
THROUGH
DEDICATION YOU
MUST FIND THE
KEY
Teabing and Robert go inside the church. Sophie must look around outside. Turn around and go to the railing. Go left or right and find the stairs going down. Go down and look for a trash bag by a window. Examine and take the Silver coin. Go to the gate at the far left side of the church entrance. Its locked. We need a key. Go to the bulletin board on the right side of the entrance door. Open the case and look at the bulletins. Look on the right side by the lower hinge. Take the key. Go back to the gate in the fence. Use the golden key.
Cutscene….Remy brings more thugs to the church. You can sneak up on the first one by the tree. Take the weapon on the ground and use it on the thug. Go all the way down to the end of the arches and go in. Examine the boxes and take the Moon Sphere. Go back out and down to the other end of the arches. Turn right into the last arch and turn right again. Go all the way to the end and go up the stairs.
At the top wait until the thugs quit their conversation and separate. You can now sneak up on one and get him with a stealth attack. Sneak up on the other one and do the same to him. Go along the walkway in front of the building until you see a wheelbarrow. Take the shears. Go back to the flower planter by the fountain. Use the shears to cut the flowers. Read the plaque and use the ring on the copper engraving. Take the metal shard.
The scene changes to Robert who has been captured and put in a cell under the church. Go to the rear of the cell and examine the table with boxes. Take a piece of cardboard. Examine the palette. Take the metal rod. Turn around to the table. Move to the chair and examine the hot spot. Move down and see a small gear. Take it. Go to the door and look at the keyhole. Look at the gap under the door. Use the piece of cardboard. Next use the metal rod on the keyhole. Robert gets the key. Use the key on the door lock. Sneak across to the room on the other side. Robert is discovered by the thug. Fight him and take him out. Turn to the cabinet and take Da Vinci’s paddleboat. Go to the main room, turn left, then right and see the Gearbox puzzle. We will have to find some gears to make this work. Go back through the room and open the door with the flashing yellow stripes.
Robert is now in the church proper. We have to be sneaky here, there are more thugs. After taking out the thugs, go to the cabinet in the corner. Take the small gear. Go to another cabinet near the altar and get another gear and a large bandage. Go into the crypt where you fought off the two thugs. Turn left and find a large desk in an alcove. Take the large gear.
Lets go back down to the basement and solve the gearbox puzzle. First take all gears off the puzzle board. You should have two large and four small gears in inventory. Examine the gearbox and put one large gear on the left center spindle. Put a small gear on the spindle directly to the right of it, and another small gear on top of the small gear. To the right of that one put another small gear. Then go right and up and put a large gear on the large spindle. Now put the remaining small gear between the two large ones on the right. Now move over to the power switch and pull it down.
The scene goes back to Sophie outside. The two thugs saw the door open. Go back down the stairs and take out the two thugs. Go to the basement door that Robert opened.
Meet up with Robert. Open the barred door and go in. More thugs. Take out the first one, then follow the walkways until you find the second one. Take him out. Keep going and hear two more. Take them out also. In the crypt near them is a Templar Seal, take it. Move along until you meet another thug. Take him out, then move back until you see a crypt with a box in it. Move the box and take another Templar seal. Go all the way to the end of the tunnel and see an electrical box on the wall. Examine it, there are four buttons which light up green when pushed. This is the code to open the gate. The idea is to light up all four switches at the same time. Use:
2 4
3 1
When completed correctly the power will turn on to the switch next to you. Open the door and enter the room. Take the third Templar seal and the small bandage. Go back down the tunnels and confront two more thugs. After you take them out look for a switch on the wall near them. Pull the switch and enter the room.
Now it is time for another puzzle. The Pillar Monument. Use the Templar seals on the three empty holes. The seals now have to be turned in the right direction. From left to right turn the seals to:
10 o’clock, 4 o’clock, 12 o’clock, 2 o’clock
I found these to be temperamental to move. Click and drag seems to work best. Go back up to the church and open the barred door to the outside. Go straight ahead and move around the right side of the stone pillar there. Take the sharp metal shard. Go back to the church and go into the crypt in the rear. There is a shield against the wall. Use both shards on the shield. Look at the crypts and find the one that says “Dark Effigy”. Examine it and it will read “W. Marshall”. You will get a chart and the shield which you need to decode. Look at the symbols on the shield and find the corresponding letters on the left. The first one will be: RICHARD
Time to solve the third cryptex: RICHARD
Remy and Silas show up and Remy takes the cryptex from Robert. Sophie and Robert run to the tunnels with Silas chasing them. Sophie gets away but Silas closes the door on Robert. Robert has to run from Silas. Run until you get to a door that you need to break down. Then you will come to another door with one of those switches and electrical boxes. Solve the code, (remember the one that goes……….
2 4
3 1
Pull the switch and run again. The next door you will have to break down again. After that one you come to another coded door. Do the code again and pull the switch. You will have to manually hustle it up all the way. Run again. The next door will need lifting up and then run some more until you come to a door that is part way open. Open it all the way and keep on running. The last door will be another coded door. Use the code and pull the switch. Go through the last door. Now a cut scene.
Westminster Abbey
Look at the directory to see the layout of the abbey. Turn around and go left. Look for the statue with the glowing symbol. Examine and take the Gold Coin. Go back and right at the first opportunity. Go through the grilled door at the end.
This is Newton’s tomb. Another guard. Push the light cart into the puddle when the guard is standing there. Then take out the other two. Go to the end of the room and examine the sculpture, get the Sun Sphere. Go over to Newton’s tomb. Examine the symbols near the bottom of the tomb. Use the ring on the Fleur-De-Lis and take the sun orb. You now have a scroll with five poems.
The father of the English poems of yore,
Whose Canterbury tales held moral core,
Clockwise around a shield stops the name,
Of he who can absolve your sin and shame.
Though many tried his words defined the rose,
In iambs writ’ this man of loves and woes,
A word you’ll find that lies within the prose,
Which here denoted grants a ring repose.
The first child King of England made this place,
Where now he rests inside confessor’s grace,
The bard’s denoted word will help you find,
A way to help release a King of kind.
The cousin of the Queen Elizabeth,
In Somerset the Baron lost his breath,
His mother with a Soldier ran away,
But not before the Knight had made her day.
Think back on all that you have now observed,
And find the knight with whom you first conferred,
He seeks the orb that ought be on his tomb,
But only if the seed lies in its womb.
Start with the first one. Go back to the main hall and find Chaucer’s tomb. Examine the circular plates near the top. Move down and look at the shield. Solve the puzzle. Use the sun orb on the center tile. Now the letters can be moved around. Spell PARDONER starting at the top left and working clockwise. When you get it right a large ring appears in the center. Take it.
We need to find Shakespeare’s tomb next. According to a sign in the main hall Shakespeare’s monument is undergoing restoration. Let’s find the restoration room. Go back to the short hall where you found the door to Newton’s tomb. Instead of going through the grilled gate, go through the wooden door into the Cloister. Go forward to the door to the Art Restoration Hall. Oh oh, two more guards. Take them out. Go all the way past them and turn right at the end of the hall. Forward and left to Shakespeare’s monument. Its too dark to see. Go back to the storage room off the hallway and take large bandage. Go behind the door and turn on the light switch. Go back to the monument and examine it. The scroll is covered in mildew. You will have to find something to clean it with. Go back to the main hall after attacking a couple more guards. Go to the area that is covered in blue tarps. Look behind to see a cabinet. Let’s examine it. Click on the jacket and it will move aside. Look in the jacket pocket. Take a cleaning brush. Take the small bandage from the bottom drawer. Go back to the restoration area. Forward to the end of the hall and turn right. Examine the pallet and find bolt cutters in the rear box. Take them. Go to the two boxes with blue tarps to the right. Walk around the side of them and take Da Vinci’s Codex Arundel. Now go all the way back to the door to the main hall. Turn left and go down the other hallway in the Cloisters. All the way at the end is a padlocked door. Use the bolt cutters. The room is too dark so move a box near the door and find the light switch. Turn it on. Go to the workbench in the rear of the room. Look on the floor under the bench and find the Marble Surface Cleaner. Take it. Let’s go back to Shakespeare and see if we can clean the scroll. Combine the cleaner with the brush and clean the scroll. After Robert reads the scroll examine Shakespeare’s finger. Use the large ring on his finger. Take the hand crank that appears in the drawer below.
Go back to the main hall and go to King Henry III tomb. Examine the ‘hole’ in the center of the shapes. Use the hand crank on it. Spell out the word ‘temples’. Take the King tile.
Go to the scaffolding behind you and unlock two brake wheels. Push the scaffolding away from the grilled gate. Use the bolt cutters on the padlock. Enter St. John’s Chapel. Examine Baron Hunsdon’s Tomb. Put the tile you just collected into the center position. Solve the puzzle. Push the tiles in this order:
Queen
Baron
Knight
Soldier
Take the unusual cylinder.
Go back to Newton’s tomb. Combine the unusual cylinder with the sun orb and insert in hole. A drawer will open on the bottom. Use the torn scroll from your inventory to complete the scroll. A slider puzzle will materialize. You are on your own with this one. You will notice there are edges on some of the pieces. That will tell you where to position the ones on the outside, like a frame. Then move the pieces to complete the picture.
Remy shows up and ‘escorts’ Sophie and Robert back to Teabing who is the baddie in this adventure. As Teabing talks you are given the opportunity to solve the last cryptex. The solution is ‘Payens’. You have to be fast or else you will fail. Sophie tries to agitate Teabing with comments to give Robert time to solve the cryptex. The correct answers are:
1. “I thought you told us only the worthy can find the grail.”
2. “You are the one responsible for my grandfather’s murder.”
3. “You are no better then the church.”
4. “and now you have taken over where the church left off.”
If you fail to solve it in time you will have the opportunity to do it again. If you solve it in time a long cutscene ensues.
Rosslyn Chapel
Turn around and go to the foyer of the church. Examine the baptismal and take the stone lid. Turn around and examine the wooden chest. Look at the scuff marks on the floor. Back out of the closeup and pull the chest away from the wall. Go behind it and look at the floor. Move the loose stone. Take the Daisy Disc.
Go back into the church and go to the red curtain on the right. Pull the cord. Examine the empty space. Use the stone lid on the empty space. Take the Lily Disc.
Now go to the rear of the church and examine the four angels on the wall. Take the matches on the mantel under the ‘faith’ angel. Go to the other side of the church and look behind the other red curtain. You need more light. Use the matches to light the candle on the left. Robert will translate the Latin inscription. Go to the chest of drawers nearest the center of the church in the rear. Find the journal, it reads:
Five-course vaulted ceiling
Daisies represent innocence.
Lilies represent purity.
Sunflowers represent adoration.
Roses represent love.
This is the most complex. It showcases stars in the sky, a crescent moon, one small star, a dove, a sun, and an open hand underneath.
Return to the rear of the church and examine the ‘truth’ angel. Robert will lift Sophie up to find the Rose Disc. You can now look around the church some more or go to the red gate. Use the journal writings to determine the placement of the discs.
Innocence - Daisy
Purity - Lily
Love - Rose
The gate is unlocked. Go downstairs. Examine the Stone Memorial and Robert will translate the Latin inscription. Go to the other end and examine the globe. Spin the globe and discover the missing piece. Go to the front and turn right to a side room. Examine the Bleeding Angel and Robert will explain it. Take the missing piece and return to the globe. Insert the missing piece and the globe opens revealing the Star Disc. Take it.
Go into the storage room. Find a wicker box and push it. This will reveal a stone slab in the floor. Examine it. Look at the star symbol. Use the star disc. The floor moves aside revealing another slider puzzle. This one is easier then the other. The completion of this puzzle will release the locks on the trapdoor. Open it and enter the secret library. Go to the far corner of the room, look for a stack of chairs. Look for and take Da Vinci’s Codex Atlanticus. Go to a rear corner and examine a photo album. Read the clippings in the album. Watch the long cutscene.
END OF GAME
Louvre revisited
This part is awarded to you for finishing the game. Look at the paintings, you have nine more puzzles to solve. The solutions for the paintings are as follows:
Louvre Museum Painting -
YOU SHOULD NOT
HAVE RUN
MONSIEUR
SAUNIERE NOW
TELL ME WHERE
IT IS
St. Sulpice painting -
THE SISTER MUST
HAVE BEEN
CALLING PRIORY
MEMBERS WHEN
SHE WAS
ATTACKED
Normandy Mansion painting -
IT’S THE
PRINCESS SOPHIE
KEY MY
GRANDFATHER
PROMISED ME
Bank of Zurich painting
IT IS THE
CRYPTEX THIS IS
BASED OFF OF A
DESIGN BY DA
VINCI
Chateau Villette painting -
THE LEGEND OF
THE HOLY GRAIL
IS A LEGEND
ABOUT ROYAL
BLOOD
Biggin Hill Airfield painting -
SAUNIERE
BROUGHT US
TOGETHER TO
FOLLOW THESE
CLUES FOR A
REASON
Temple Church painting -
SILAS TAKE THE
KEYSTONE FROM
MR LANGDON
TEABING IS OUR
HOSTAGE NOW
Westminster Abbey painting -
TEABING FELT
THE TRUTH
CRASHING DOWN
ON HIM THE
GRAIL WAS LOST
TO HIM
Rosslyn Chapel painting -
THE QUEST FOR
THE GRAIL IS
THE QUEST FOR
THE DIVINE IN
EACH OF US
To leave this location you will have to exit to the menu, then click on ‘Mission select.’
If you completed the game the next level will be:
Rosslyn Chapel Revisited
If you found all the secrets you will be allowed to see all the bonuses at this location. Look at the display of the solar system. Examine the planet buttons and play the sound tracks. Go down to the secret library and examine the paintings. Go upstairs and find the altar in the center and examine the altar note and the nine buttons below it. Then examine all eight pedestals and solve the anagrams. If you need help I will tell you they are all people. If you need more help this is the list:
BEZU FACHE
JACQUES SAUNIERE SAINT CLAIR
REMY LEGALUDEC
ROBERT LANGDON
LEIGH TEABING
SISTER SANDRINE BIEIL
SOPHIE NEVEU SAINT CLAIR
SILAS
END
This document may not be distributed without express written permission of the author and the content may not be altered in any way.